Tenant registration
After you created a CodeTwo Admin Panel account, it's time to register your Microsoft 365 tenant to CodeTwo and specify how signatures should be added to this tenant. See the step-by-step instructions below or check out our video tutorial:
To begin, sign in to CodeTwo Admin Panel (if you are not already signed in). On the Tenants page, click ADD TENANT (Fig. 1.) to launch a wizard that will guide you all the way through the registration process.
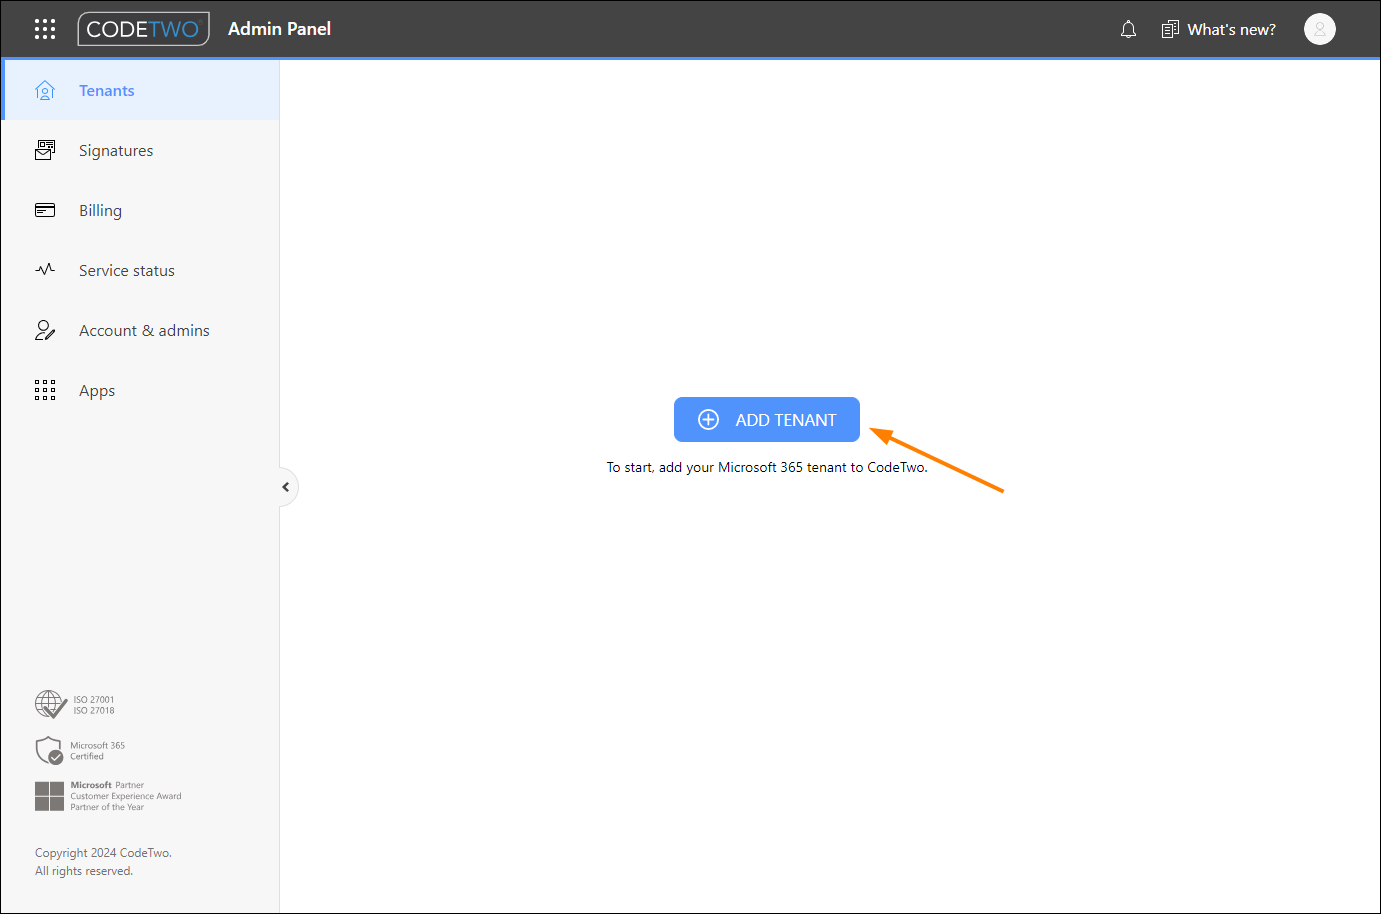
Fig. 1. Registering a new Microsoft 365 tenant to CodeTwo Admin Panel.
License agreement
In the first step of the wizard, read and accept CodeTwo's EULA and linked terms and conditions, then click Next to proceed to the next step.
Sign in
In the second step, click the Sign in as tenant’s Microsoft 365 global admin button (Fig. 2.) and follow the steps shown on the Microsoft sign-in page. Accept the permissions required for CodeTwo Email Signatures 365 to include user data in email signatures. Note that the global admin account is the only account type in Microsoft 365 that can grant the necessary permissions.
The program uses Entra OAuth 2.0 authentication. Your credentials are safe, because they are passed directly and only to Microsoft servers; they are never stored on any CodeTwo or third-party servers. Our service will never ask you to grant more permissions than necessary to perform its current task. Learn more about security
If you don't have global admin permissions, you can invite a Microsoft 365 global admin of your tenant directly from the wizard to give them access to CodeTwo (as an Admin Panel admin). This user will then be able to complete the tenant registration for you.
Once you've signed in, you'll automatically jump back to the wizard. Click Next to continue.
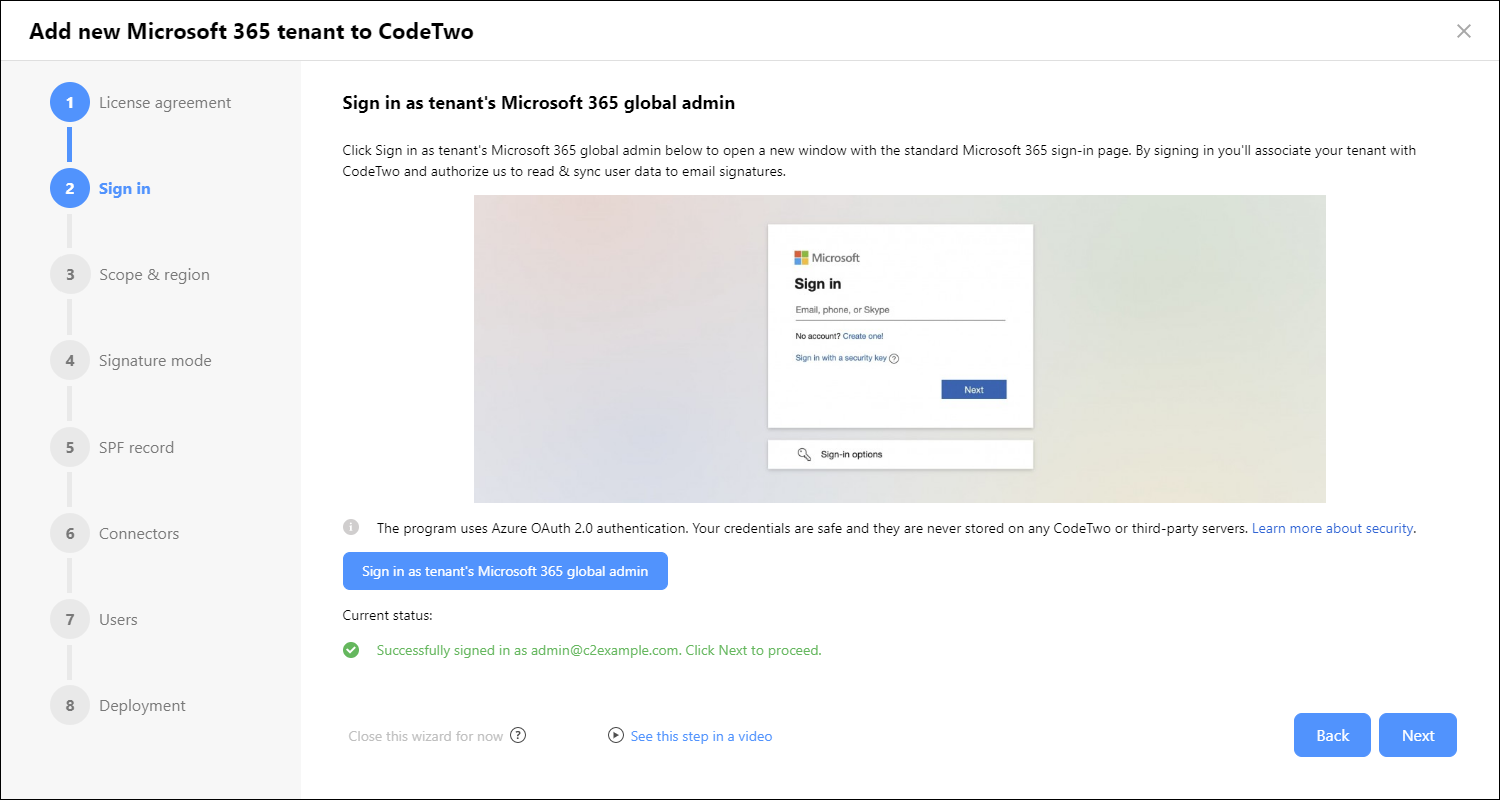
Fig. 2. Sign in as Microsoft 365 global admin to associate your tenant with CodeTwo.
Scope & region
First, you need to choose an Azure region of the CodeTwo service. This is where your signatures will be added (if you select the cloud signature mode in the next step) and where your settings and some of your data will be stored. You can select a region by clicking its name on the map (Fig. 3.) or by using the Region drop-down menu. It is recommended to choose the same region in which your Microsoft 365 tenant resides (or the nearest one).
Important
Be sure to choose the right region as it is not possible to change this later without deregistering your tenant (which will also cancel your subscription). If you need to modify your region, contact our Customer Success Team.
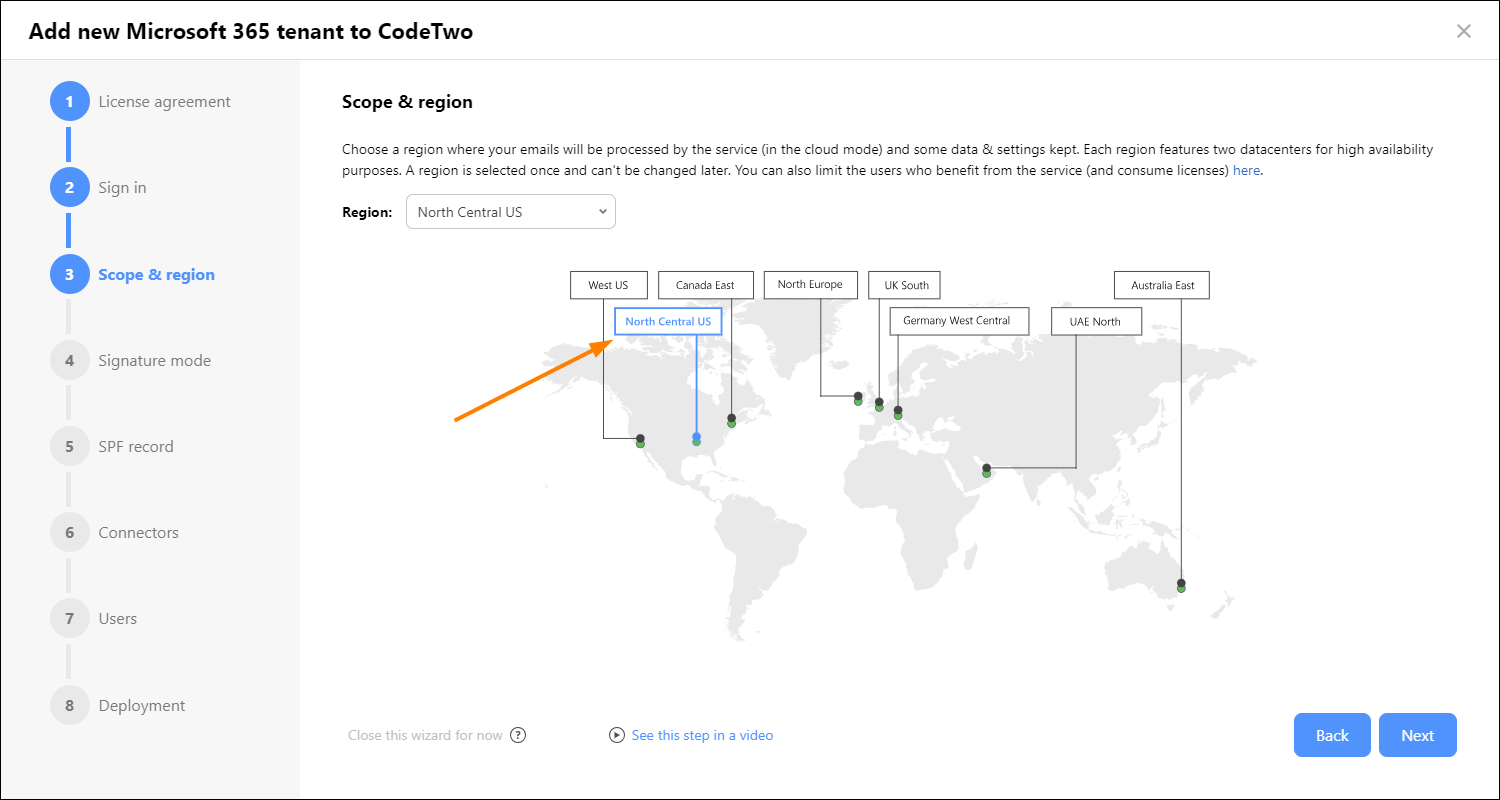
Fig. 3. Selecting a location of the CodeTwo service.
By default, all users in your Microsoft 365 tenant are synchronized to CodeTwo (to keep their contact information up to date) and can consume licenses to benefit from the service (get email signatures, automatic replies, etc.). To limit this scope to a Microsoft 365 (Entra ID) group, click the link shown in Fig. 4. (1), and then click Change (2).
You will be able to change the scope of licensed users at any time later, as described in this article.
Note that users included in this scope do not automatically consume CodeTwo licenses. See this article to learn how licenses are counted and assigned.

Fig. 4. Changing the scope of licensed users.
In the pane that opens, click Only users belonging to this group and select a group of users (Microsoft 365 group, distribution list or security group) from your tenant (Fig. 5.). Click OK to confirm, and then go to the next step of the wizard.
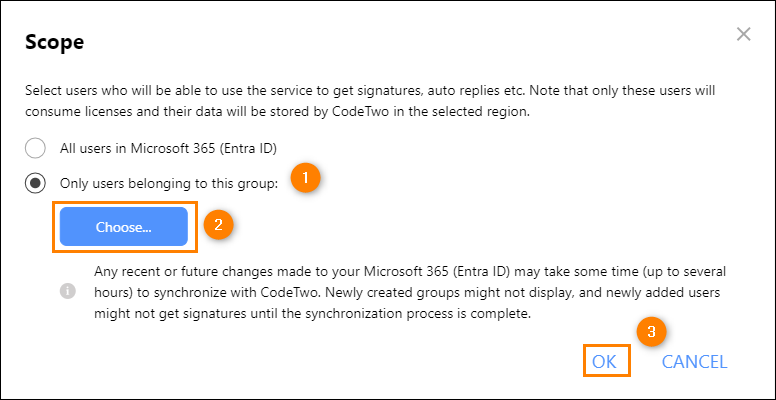
Fig. 5. Limiting the scope of licensed users to a specific group of users.
See this article to learn how different scopes you configure in CodeTwo determine who gets signatures and automatic replies.
Signature mode
This is where you decide how CodeTwo signatures should be added to emails in your organization. You can choose from three signature modes:
- Cloud (server-side) mode – this is the default mode that works with all email clients. Signatures are added in the cloud, after an email is sent (end users can still preview their signatures in Outlook desktop and OWA by using a dedicated CodeTwo Web Add-in). This mode requires setting up Exchange Online connectors to reroute emails from your Microsoft 365 tenant through CodeTwo cloud service, located in the Azure region of your choice.
- Outlook (client-side) mode – works with Outlook only (Outlook desktop, mobile and Outlook on the web / OWA). This mode uses the modern Outlook Web Add-in that adds a signature directly to the email body as end users compose their email (the add-in deployment is fully automated – no end-user installation required). In Outlook mode, emails are not rerouted through CodeTwo cloud service, so no connectors configuration is needed.
- Combo mode – works with all email clients. It's a combination of the cloud and Outlook signature modes. A signature is added as end users type an email in Outlook. If they use other email clients, the signature is added in the cloud, after an email is sent.
To learn more about each signature mode in CodeTwo Email Signatures 365, see this article.
Once you select a signature mode (as shown in Fig. 6.), click Next and go the proper step:
- If you selected cloud or combo mode, continue with the SPF record step.
- If you selected Outlook mode, go directly to the last step – Deployment.
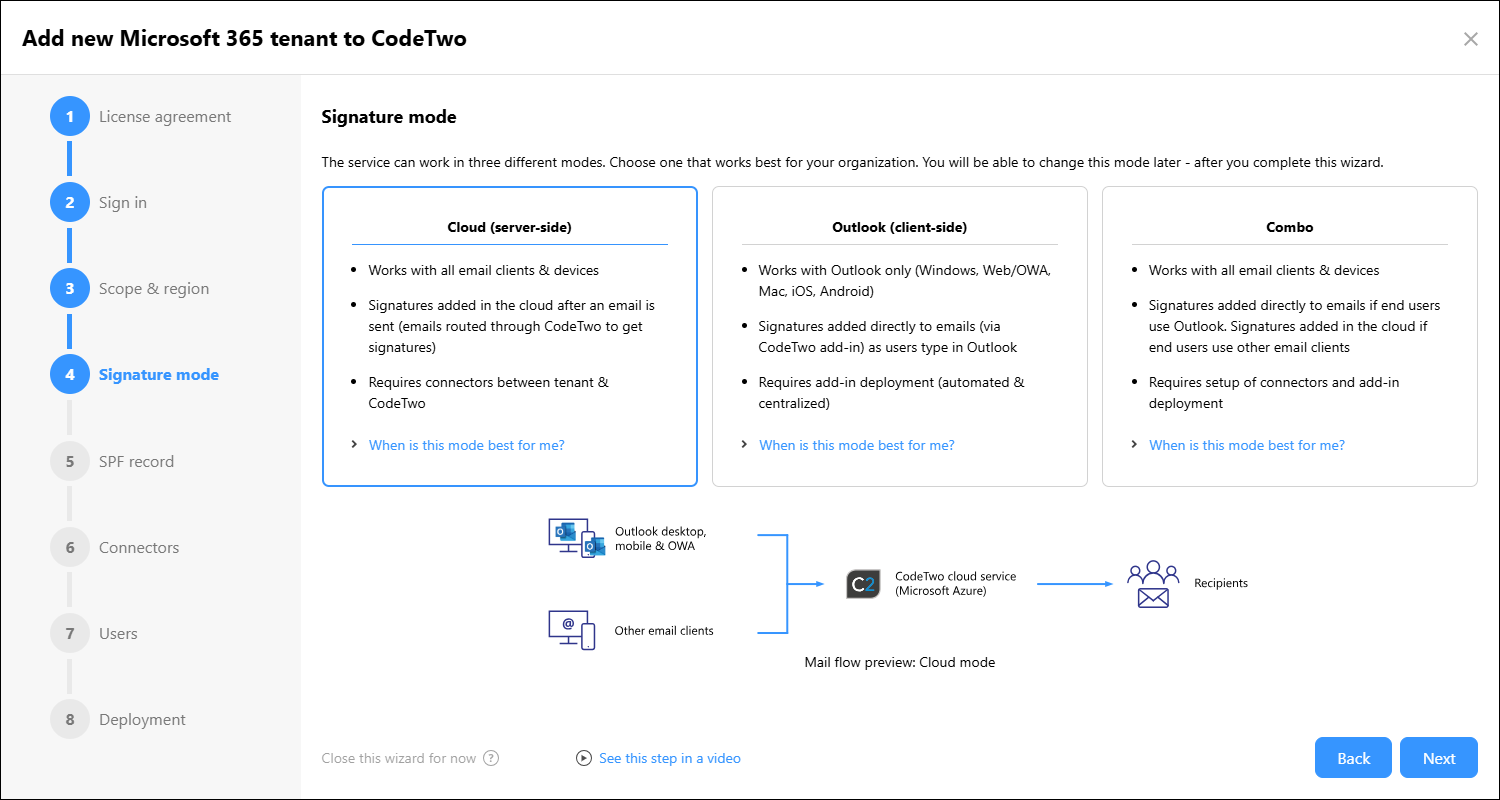
Fig. 6. Signature mode selection.
Important
After you complete the tenant registration process, you can change the signature mode at any time in CodeTwo Admin Panel. See how to do that
SPF record
In this step, you will find an entry (see Fig. 7.) that should be added to the SPF record of your Microsoft 365 tenant. This is to make sure emails with CodeTwo signatures are not marked by Exchange Online Protection (EOP) as junk and don't land in the recipients' spam folders. This entry corresponds to the Azure region you selected earlier.
For instructions on how to configure the SPF record of a domain, see this step-by-step guide.
Once you have updated your SPF record, click Check my SPF record to validate that everything works correctly. If the status shows SPF record OK (Fig. 7.), click Next to go to the next step of the wizard. If not, refer to this section.
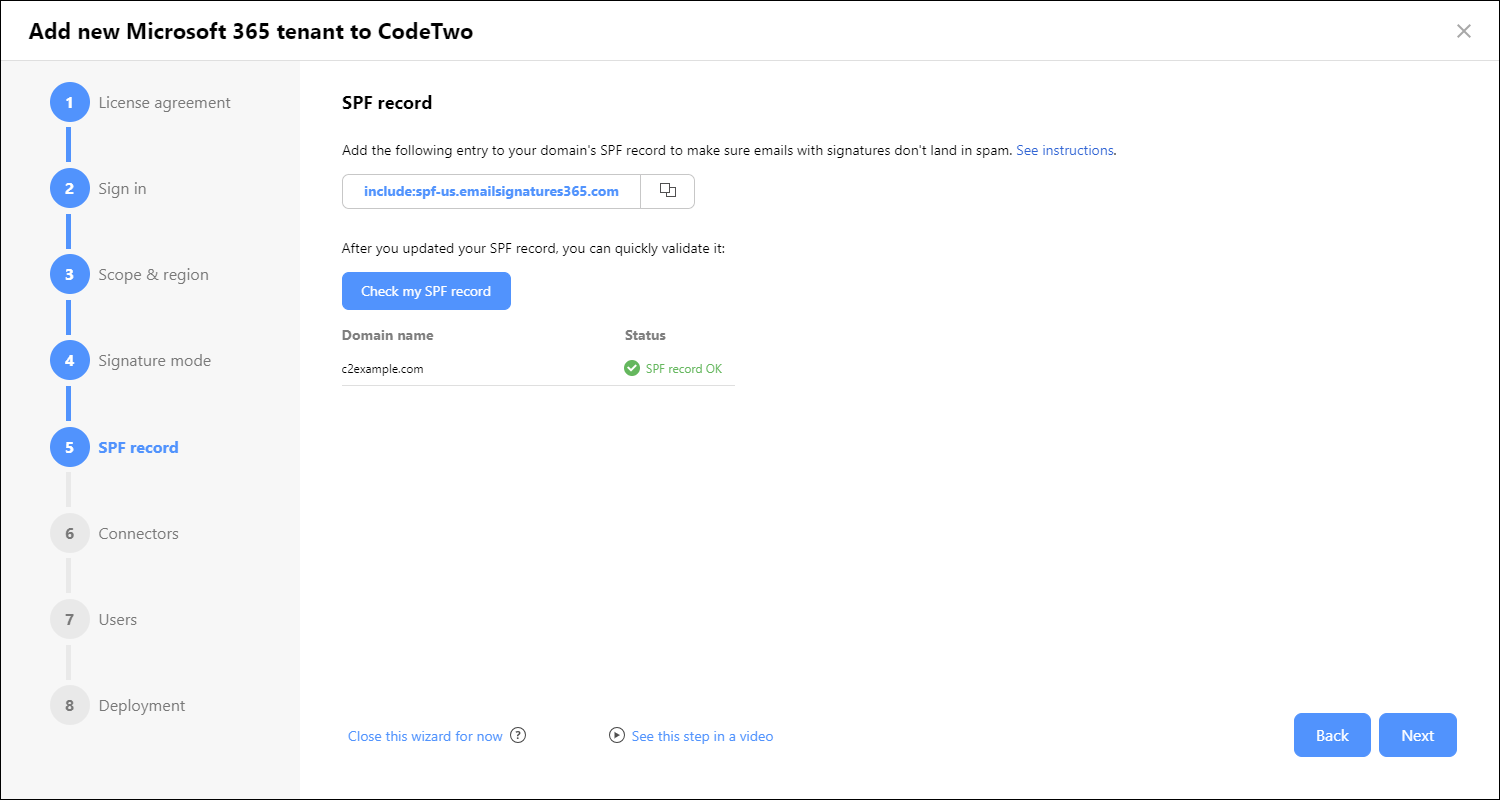
Fig. 7. Validating the SPF record configuration.
Note that you should use CodeTwo Email Signatures 365 with your own (vanity) domains. If your tenant is only using the default onmicrosoft.com domain, the validation will not occur. The onmicrosoft.com domain is managed by Microsoft and its SPF record can't be changed at your request. You can continue with the wizard for now but remember to update your SPF record as soon as you add your own domain to your Microsoft 365 tenant. Learn more
Skipping the SPF validation
It is also possible to continue configuring the wizard without making the necessary changes to your SPF record: simply click Next without validating your SPF record, and then click YES, GO TO THE NEXT STEP when prompted. You can also go to the next step if the validation status shows SPF record invalid. However, we don't recommend doing so, as this may cause your organization's email to land in spam. After you finish the wizard and your tenant is added to CodeTwo Admin Panel, you can find the entry that needs to be added to your SPF record in your tenant's settings (in CodeTwo Admin Panel, go to Tenants > <your tenant name> > SPF record) or in this article.
Tip
At this point in the wizard, you can use the Close this wizard for now link (shown at the bottom of Fig. 7.) and return to setting up your tenant with CodeTwo later. This can be useful if, for example, you can't configure the SPF record on your own and you require assistance from the person who manages hosting in your organization or from your hosting service provider. If you use this option, you will be able to return to the wizard by clicking the Continue setup link on the Tenants page (Fig. 8.).
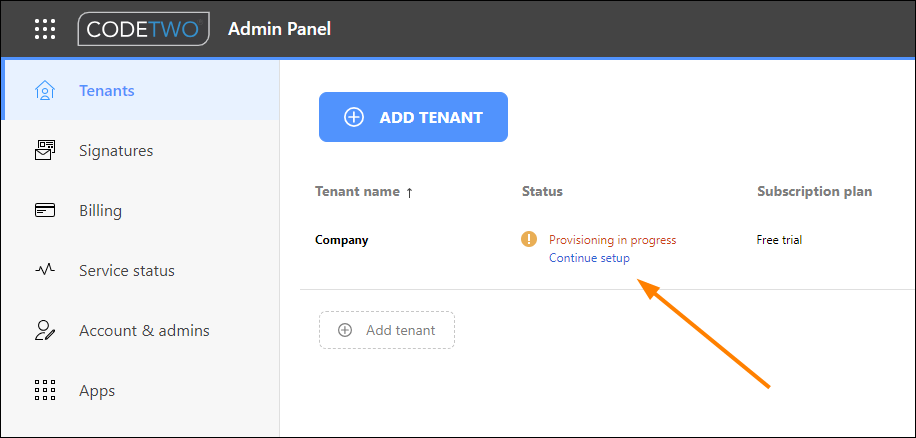
Fig. 8. Click this link to get back to the tenant registration wizard.
Connectors
To get CodeTwo cloud signatures (added after an email is sent), you need to create Exchange Online connectors and an Exchange transport rule that will reroute your organization’s email through CodeTwo. The configuration wizard can create these connectors automatically for you, which is the recommended method (the Automatically set up my connectors option is selected by default). To find out more about the connectors and transport rule and what they do, see this article.
To proceed with the default automatic setup, click Authorize and sign-in to your Microsoft 365 tenant by providing global admin credentials. Accept the permissions that are needed to authorize us to create the connectors and transport rule for you. Once you have successfully signed in, the Microsoft sign-in page will close automatically.
To ensure maximum security, we will only use self-expiring security tokens from Microsoft that will expire after 90 minutes or sooner.
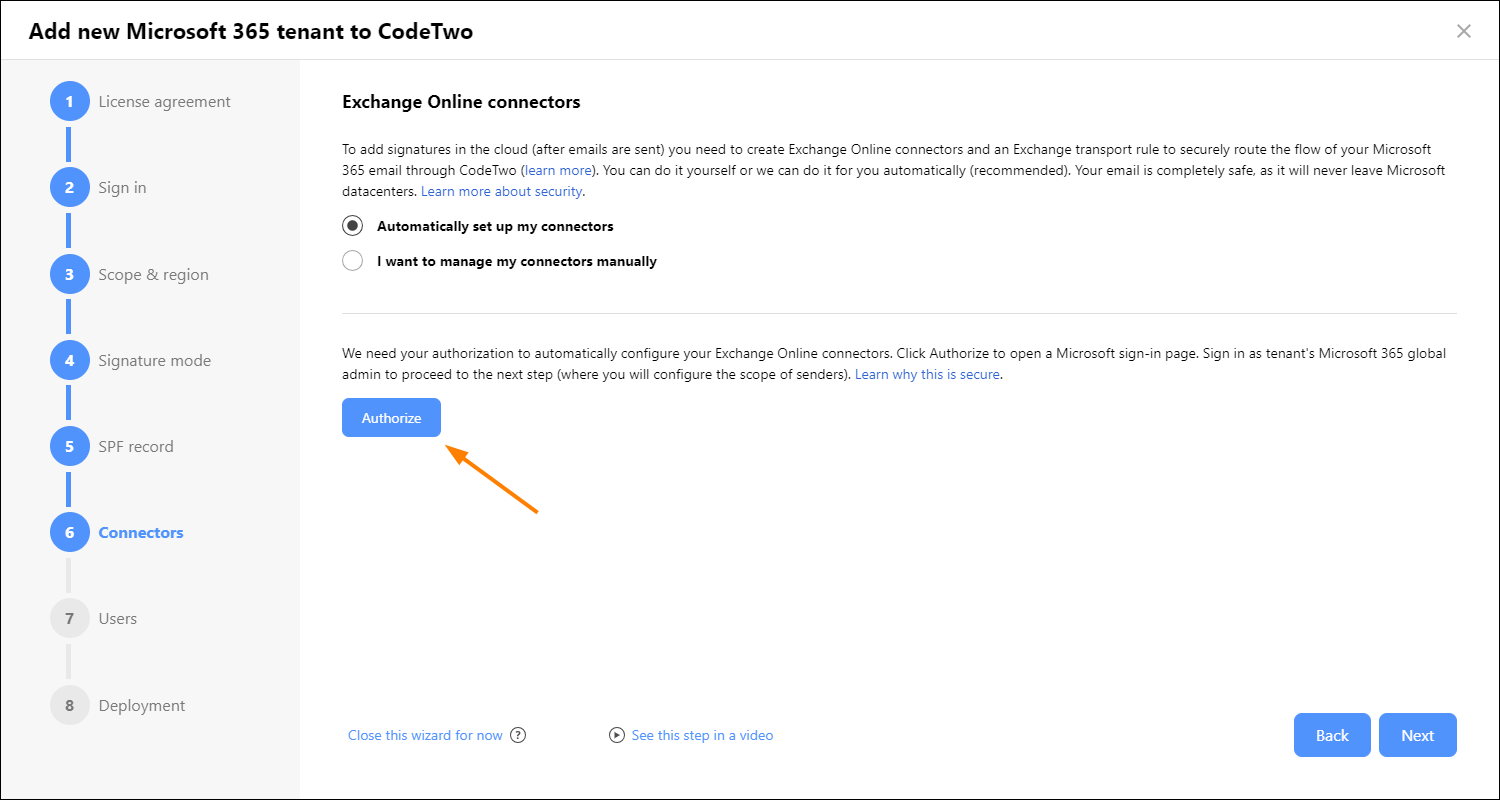
Fig. 9. Proceeding with the automatic configuration of Exchange Online connectors and an Exchange transport rule.
Back in the configuration wizard, proceed to the next step (the wizard will configure the connectors in the last step of the wizard).
Manual configuration of Exchange Online connectors
If you select the I want to manage my connectors manually option instead, you also need to click Authorize (as shown in Fig. 9.) and sign-in to Microsoft 365 with a global admin account. We need your authorization to issue a certificate and create a unique CodeTwo subdomain that is required for the connectors to work. Once done, click Next to proceed directly to the Deployment step. There, you will find a link to the personalized guide that will help you with the configuration process.
Users
(This step does not appear if you selected the manual connector setup in the previous step.)
In the Users step, you need to specify users whose emails will be rerouted through CodeTwo to get cloud signatures (scope of senders). Every user whose emails go through our cloud service uses one license from your license pool, no matter if this user is defined in any signature rule. Find out more on how the license counting works
You can select all users in your Microsoft 365 tenant (Microsoft Entra ID / Azure Active Directory) or limit the scope of senders to members of a particular group in your tenant (it can be a distribution list or any mail-enabled group), as shown in Fig. 10.
If you previously limited the scope of licensed users to a specific group in the Scope & region step, the same group will be selected here by default (unless you selected a group that is not supported, e.g., a non-mailbox-enabled security group).
See this article to learn how the CodeTwo service behaves if the scope of senders (handled by connectors) is different from the scope of licensed users.

Fig. 10. Configuring the scope of senders whose emails should go through CodeTwo to get cloud signatures.
Here are some additional considerations when configuring the scope of senders:
- If you want to select more than one group, you need to edit the transport rule and add another group manually, as described in this article.
- If you select a group that has other groups nested inside, emails sent by members of the nested groups will also go through the CodeTwo cloud service.
- If you need to further customize the scope of users who will get signatures, you can do that by creating signature rules.
- Any changes you make in your Microsoft Entra ID (Azure Active Directory) might take some time (up to several hours) to propagate and synchronize with CodeTwo. This means that:
- If you have just created a new group, it may not be available in the group picker (which opens when you click Choose) right away.
- Changes made to the group selected in the wizard also need time to propagate. For example, if you add new users to this group, they might not get signatures right away. Learn more
- You will also be able to reconfigure the scope of senders later, if you need. Learn more
Click Next to start the deployment.
Deployment
The deployment process is fully automated. The configuration wizard will now add your Microsoft 365 tenant to CodeTwo Admin Panel.
If you choose to use CodeTwo Email Signatures 365 in the Outlook (client-side) mode, go to this section to learn what your next steps are.
If you selected cloud (server-side) or combo mode, the wizard will now perform tenant provisioning, which might take up to a few minutes. It's a process of assigning a unique certificate that's necessary for the correct operation of Exchange Online connectors. If you authorized CodeTwo to configure the connectors automatically, the wizard will do this now as well (Fig. 11.). It usually takes just a few minutes for all these changes to propagate across your Microsoft 365 tenant.
Once the provisioning of our services is finished, a new accepted domain will be added to your Microsoft 365 tenant:
[your unique ID].smtp.codetwo.online
You can find the domain by following these steps.
Do not remove this new domain. It's the new requirement from Microsoft to make your email even more secure. If you remove it, the program will not work correctly. If you accidentally deleted the new CodeTwo domain from your Microsoft 365, follow the steps described in this article.
Please do not verify this domain in your Exchange admin center. If Microsoft 365 sends you notifications or warnings (e.g., to update the domain's DNS settings), you can ignore these warnings – your mail flow is not affected. Learn more

Fig. 11. Automatic deployment in progress (cloud/combo mode).
Once the deployment is complete, click Finish to close the wizard. You’ll see a screen with the next steps, which are also listed below in this article. Your 14-day trial of CodeTwo Email Signatures 365 starts now.
Manual configuration of Exchange Online connectors (cloud and combo mode only)
If you choose to configure Exchange Online connectors manually in the Connectors step, you will now be provided with a link to a personalized guide (Fig. 12.) designed to help you configure the connectors in your Microsoft 365 tenant. Be sure to follow all the steps in this guide, otherwise CodeTwo Email Signatures 365 might not work correctly with your tenant. Use the checkbox to confirm that you have configured the connectors manually and click Finish to close the wizard.
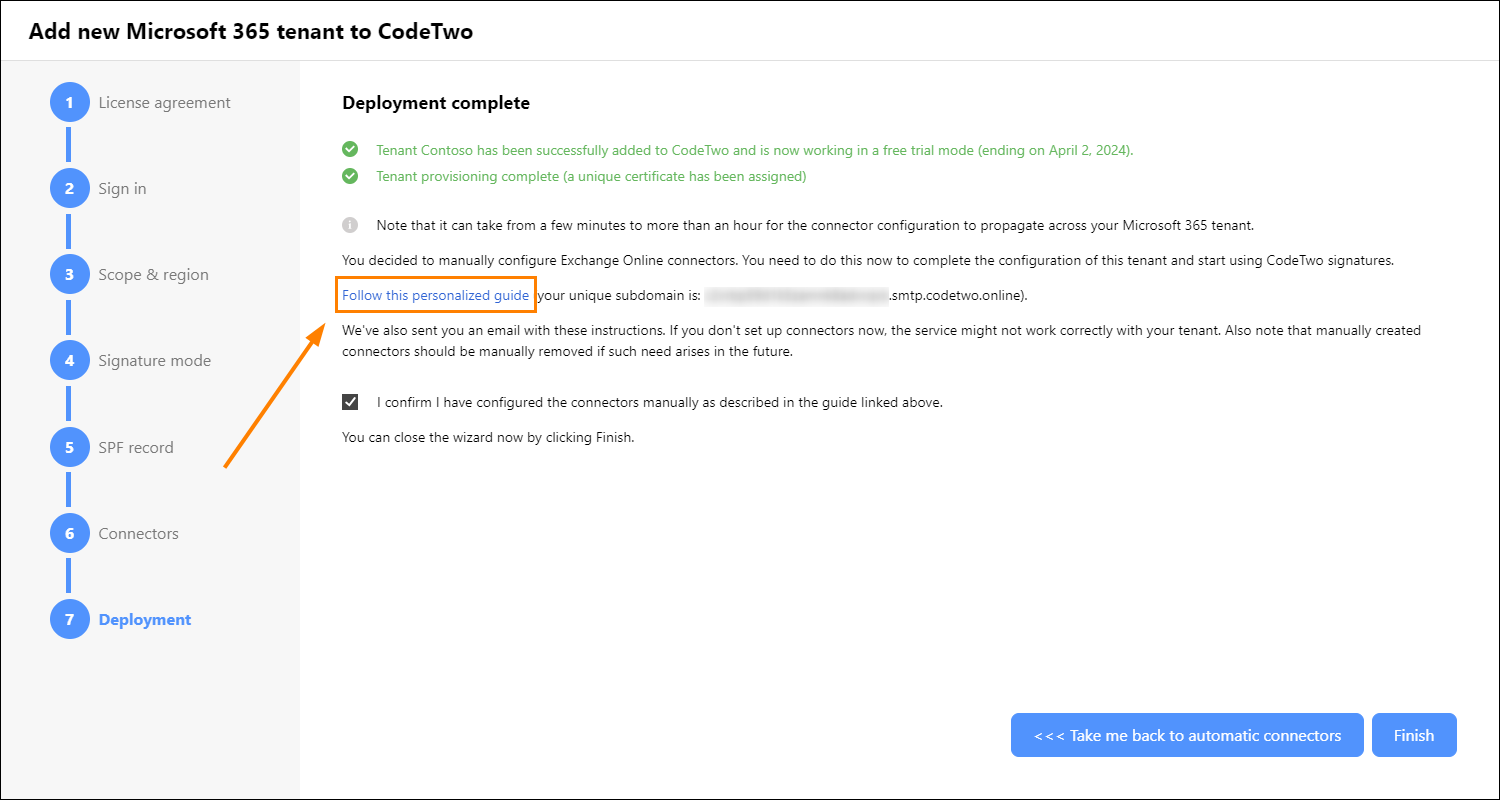
Fig. 12. A link to a personalized guide that describes how to configure Exchange Online connectors in your tenant.
To learn more about how to configure the Exchange Online connectors manually, see this article.
Next steps
Depending on the signature mode selected in the configuration wizard, follow these steps to start using CodeTwo Email Signatures 365:
Next steps: cloud (server-side) mode
- Set up email signatures and assign end users who will get them (for instructions, see our video tutorial or this article).
- (Optional) Deploy our Outlook Web Add-in to these end users to allow them to preview their signatures in Outlook (learn more about this feature or see deployment instructions).
- (Optional) If you use smart host (mail relay) services in your organization, additional configuration might be required. See this article for details.
Next steps: Outlook (client-side) mode
- Deploy our Outlook Web Add-in to these end users (see deployment instructions).
- Set up email signatures and assign end users who will get them (for instructions, see our video tutorial or this article).
- Wait for the Web Add-in to propagate. It might take from 6 up to 72 hours. Your users will begin receiving CodeTwo signatures once the add-in appears and starts functioning in their Outlook apps.
Next steps: combo mode
- Set up email signatures (both cloud and Outlook signatures) and assign end users. See our video tutorial or the following articles:
- Deploy our Outlook Web Add-in to end users who will get CodeTwo Outlook signatures (see deployment instructions).
- (Optional) If you use smart host (mail relay) services in your organization, additional configuration might be required. See this article for details.
- Wait for the Web Add-in to propagate. It might take from 6 up to 72 hours. Your users will begin receiving CodeTwo Outlook (client-side) signatures once the add-in appears and starts functioning in their Outlook apps. Until then, your users will receive CodeTwo cloud (server-side) signatures.