Attributes manager & My user info
The Attributes manager app gives you complete control of your users' details stored in CodeTwo Azure AD cache and added to email signatures and auto replies. You can bulk edit all user attributes, add custom attributes (not available in Entra ID / Azure AD), and decide which attributes can be edited by end users themselves (by using the My user info app).
The changes you or end users make do not affect your original Entra ID data – attributes are updated in the CodeTwo cache only (and consequently, only in users' email signatures and automatic replies). These attributes will no longer be overwritten by changes in Entra ID (or in your local AD, if synced via Microsoft Entra Connect in a hybrid environment), but you can easily restore the default attribute values from Entra ID, as explained later in the article.
Read on or use the links to learn more.
- Examples of use
- How to start
- Attributes manager: manage attribute visibility for end users
- Add custom attributes
- Bulk manage attributes
- Restore default Entra ID (Azure AD) attribute values
- My user info: how end users can manage their personal information
- Frequently asked questions
Examples of use
Attribute management gives admins and end users a wide range of possibilities. See our list of Examples of use articles.
How to start?
If you have an active subscription of CodeTwo Email Signatures 365, you can use the Attributes manager and My user info apps for free.
- Admins can manage user attributes in Attributes manager by signing in at attributes.codetwo.com with Microsoft 365 global admin credentials and granting the required permissions.
- End users can edit their personal information by using the My user info app at user.codetwo.com (they also need to sign in with their Microsoft 365 account).
Important
The My user info app will not work until you enable at least one attribute for viewing or editing in Attributes manager.
You can access both apps quickly from CodeTwo Admin Panel by using the Apps menu (![]() ), as shown in Fig. 1.
), as shown in Fig. 1.
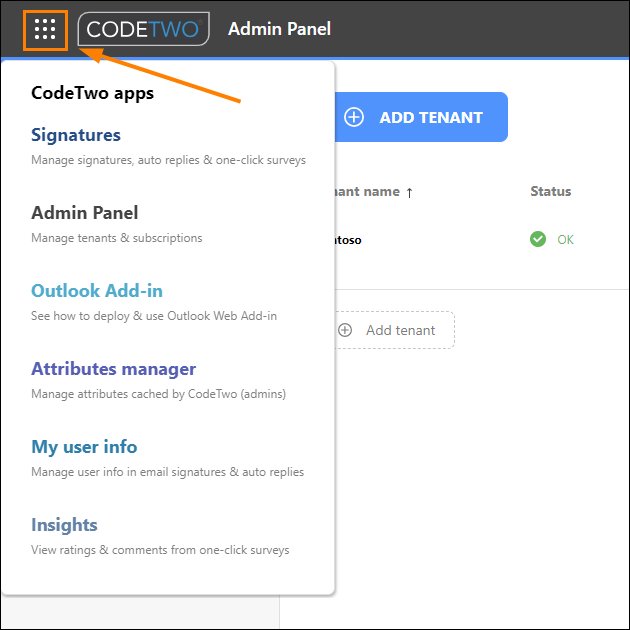
Fig. 1. App launcher in CodeTwo Admin Panel.
Watch this short video to see how admins and end users can edit their attributes:
Attributes manager: manage attribute visibility (admins)
The Attribute visibility tab (at attributes.codetwo.com) is where you can select attributes whose values your end users can edit (at user.codetwo.com).
Important
Exchange Online (Microsoft 365) additional attributes such as Initials, HomePhone, Notes, Pager, PostOfficeBox and WebPage (learn more) are not listed in the Attributes manager and for now can only be only managed through the Exchange admin center.
To let your end users edit the value of a particular attribute, select the Editable checkbox next to it. Selecting Visible only will make an attribute visible but non-editable (grayed out) for your users. When you're done, click Save for the changes to take effect (Fig. 2.).
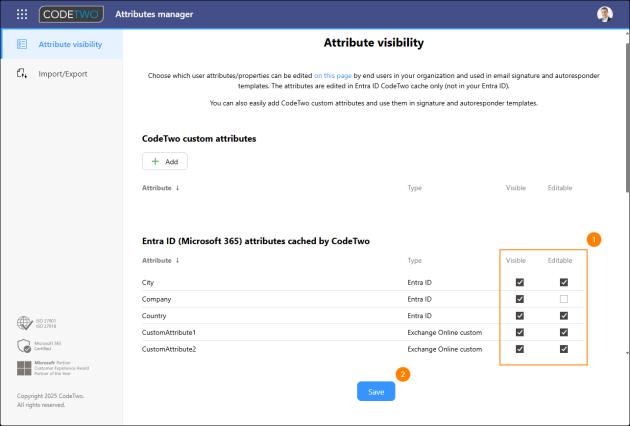
Fig. 2. Choosing attributes whose values can be edited or viewed by your end users.
Add custom attributes
CodeTwo Attributes manager lets you create your own custom attributes to be used in email signature and autoreplies. To create a new custom attribute, open attributes.codetwo.com and go to the Attribute visibility tab.
To create a new custom attribute, first click the Add button in the CodeTwo custom attributes section. In the window that opens, type the name of your attribute and click ADD. To apply the change, click Save (Fig. 3.).
Important
Don't use special characters, such as brackets or parentheses, in placeholder names.
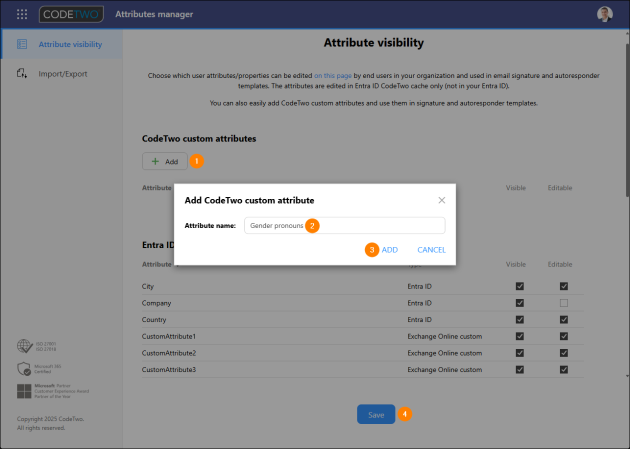
Fig. 3. Adding a new custom attribute.
By default, the newly created attribute becomes available:
- for end users to edit at user.codetwo.com;
- in the signature management app, where you can use it to build rule conditions based on the Azure AD filter option;
- in the signature/autoresponder editor, where it can be added to signature and auto-reply templates as a placeholder (under Placeholder > Sender > Additional attributes); and
- in the Conditional placeholders manager, where you can use it to build conditions for conditional placeholders.
To delete a custom attribute, click the Delete (trashcan) icon next to it, as shown in Fig. 4. Confirm the action and click Save to apply your change.
Warning
Make sure the custom attribute is no longer used in any signature/auto-reply template, as deleting it may negatively impact the layout of your template.
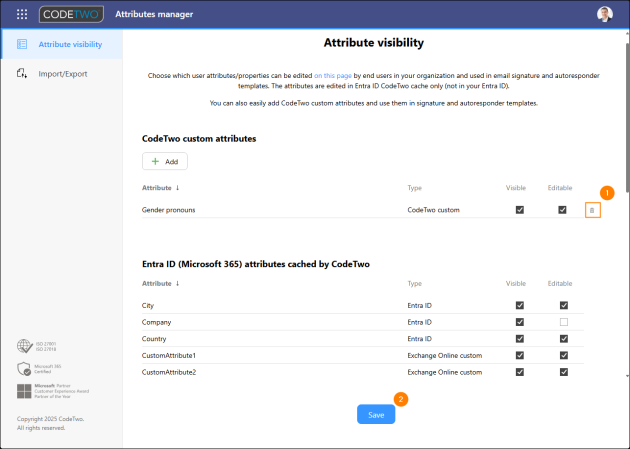
Fig. 4. Deleting a custom attribute.
Import/Export attributes (bulk management)
On the Import/Export tab, you can bulk manage & change attribute values for multiple users (including shared mailboxes). See the guidelines below or watch our short video to learn how to do so.
To bulk edit Entra ID (Azure AD) attributes stored in CodeTwo Azure AD cache, first click the Export to CSV button, download the CSV file and open it.
You can open & edit the file using a text editor (such as Notepad or Pages) or import to apps such as Microsoft Excel. If Microsoft Excel displays your file incorrectly (not as shown in Fig. 5. below), see this FAQ section for troubleshooting.
The CSV file includes a list of end users and the attributes they changed. Empty cells mean the values have not been changed and are the same as in your Microsoft Entra ID (Fig. 5.).

Fig. 5. CSV file with a list of users and modified attributes.
If no attributes were changed, you’ll only see a list of attribute names with no users.
If you want to change the attributes for users listed in the file, just edit any value and type anything you want.
- Clear values (cells) and leave them blank to restore the original values for these users from your tenant’s Microsoft Entra ID.
- Type #empty# as the cell value if you want this field to have no value (and stay empty).
If you want to change attributes for other users, just add them in new rows. Make sure you use the correct UPN address of each user.
For a sample updated CSV file, see Fig. 6.
When you're done, save the file, click the Import from CSV button and choose an option that suits you (Fig. 7.):
- Selective import updates the attributes of users who are found in the CSV file and leaves the attributes of other users unchanged.
- Import & overwrite updates the attributes of users who are found in the CSV file and restores all original Entra ID attribute values for users who are not found in the CSV.
Even if you use the Import & overwrite option, custom attributes will not be deleted for the users who are not found in the CSV.
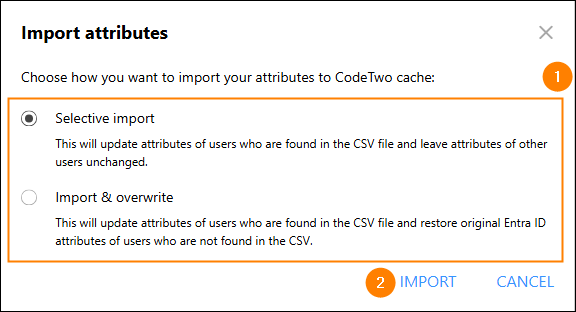
Fig. 7. Choosing how to import bulk edited attributes into CodeTwo Azure AD cache.
Click IMPORT to finish. Usually, users' details will be updated in a few minutes. In very rare cases, the process may take up to several hours.
How to restore the original Microsoft Entra ID (Azure Active Directory) attribute values for all users?
If you want to restore all original values (i.e. values from your organization's Microsoft Entra ID) to CodeTwo Azure AD cache, clear all the values (cells) in the CSV file except the first row with attribute names. Then import the file to the CodeTwo cache by clicking Import from CSV and selecting the Import & overwrite option. From now on, your organization's email signatures will include the same attributes that are present in your tenant's Microsoft Entra ID.
To restore an original value from your Entra ID, simply clear an appropriate cell in the CSV file.
My user info: how end users can manage their personal information
End users can sign in to the My user info app (user.codetwo.com), shown in Fig. 8., where they can view and/or modify attributes used in their email signatures and automatic replies. Attributes that are grayed out cannot be modified.
Users can restore the default values (those set in your tenant's Entra ID / Azure AD) for any editable attribute by clicking the Restore (![]() ) button next to it. Changes typically take effect immediately (new values appear in email signatures), but in rare cases it may take from a few minutes to several hours for updates to fully propagate.
) button next to it. Changes typically take effect immediately (new values appear in email signatures), but in rare cases it may take from a few minutes to several hours for updates to fully propagate.
Which attributes end users see or can edit depends on the settings configured by an admin in Attributes manager (attributes.codetwo.com), as explained in this section.
Important
End users will not be able to access the My user info app until you enable at least one attribute for viewing or editing.
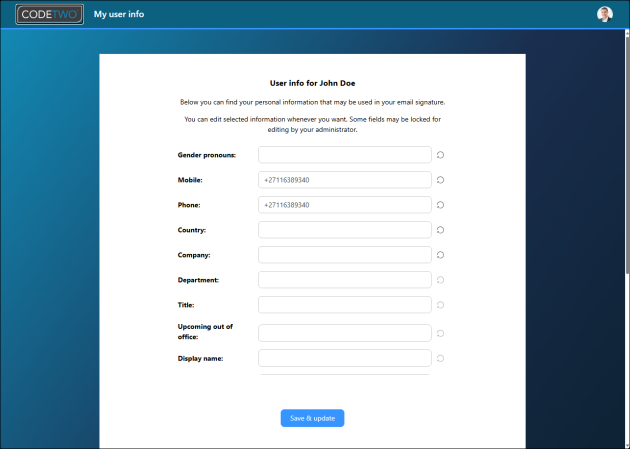
Fig. 8. The My user info app lets end users manage their personal information shown in email signatures.
End users can also use the My user info app to remove some of their details from signatures or add additional information, such as their upcoming out of office dates. See more examples of use.
German version of My user info app
This app is also available in German. To use the German interface, the preferred language in your web browser needs to be set to German.
FAQ
- Microsoft Excel incorrectly displays my data exported into the CSV file (e.g. all data is in one column). How can I fix it?
- Data import from the CSV file fails. Why?
- What happens if I add/remove columns in the CSV file and then attempt to import it?
- How to restore the original Microsoft Entra ID (Azure Active Directory) attribute values for selected users only?
- What happens if I make any changes in my Entra ID (Azure AD) data? Will this update the attributes in the CodeTwo cache?
- Does the Attributes manager work with shared mailboxes?
1. Microsoft Excel incorrectly displays my data exported into the CSV file (e.g. all data is in one column). How can I fix it?
This problem is most likely related to an incorrect character used to separate values in a CSV file which is set according to your locale settings. Instead of changing the locale settings (not recommended), you can try to open and fix the exported CSV file using the following method:
- Open the exported CSV file with the incorrectly displayed data in Microsoft Excel.
- Select the first column in which all the data is stacked, go to the Data tab on the ribbon, and click Text to Columns (Fig. 9.).
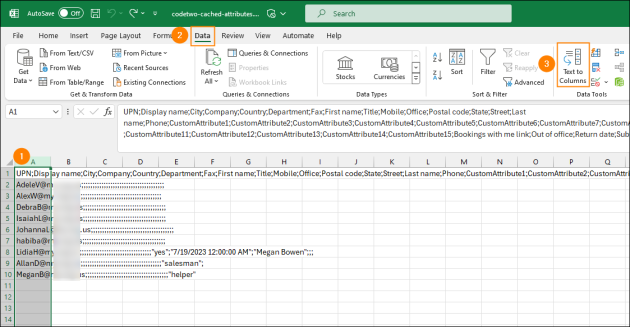
Fig. 9. Using the Text to Columns feature to fix the incorrectly displayed data.
- In the wizard that opens, select Delimited and click Next (Fig. 10.).
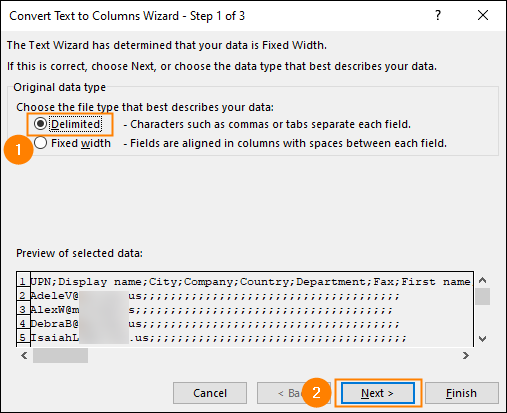
Fig. 10. Choosing how your data should be organized in your CSV file.
- In the second step, select the checkbox next to Semicolon and click Next to proceed (Fig. 11.).
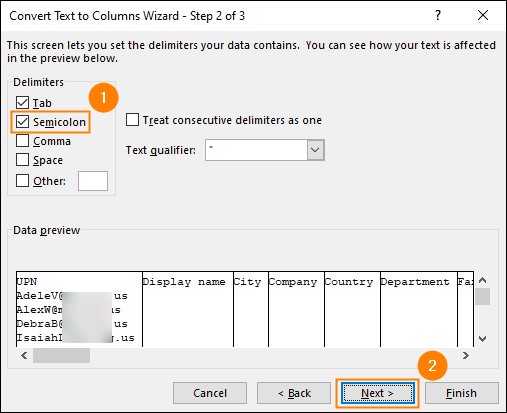
Fig. 11. Setting semicolon as the correct delimiter character for the CSV file.
- In the last step, click Finish.
Now the data exported from Attributes manager should display just fine.
If you look for alternative methods to deal with the problem, have a look at this article.
2. Data import from the CSV file fails. Why?
To successfully import attributes from CSV, the file must include the UPN column. If the column doesn't exist, the import will fail.
The import will be also unsuccessful if you make the file unreadable for our software by heavily tampering with its contents.
3. What happens if I add/remove columns in the CSV file and then attempt to import it?
If you remove a column (e.g. City) from the CSV file, the remaining attributes will be imported as usual and the values from the deleted column will be restored to the defaults from your tenant's Microsoft Entra ID (Azure Active Directory).
If you add a column (e.g. Alternative city) to the CSV file, it will not affect the import process in any way (no data will be imported from the new column nor there'll be import errors).
4. How to restore the original Microsoft Entra ID (Azure Active Directory) attribute values for selected users only?
To restore the original values from your tenant's Entra ID for specific users, leave only their UPNs in the UPN column of the CSV file and clear the remaining values in the rows that correspond to these users. Then import the file to CodeTwo by clicking Import from CSV and choosing the Selective import option.
5. What happens if I make any changes in my Entra ID (Azure AD) data? Will this update the attributes in the CodeTwo cache?
Once the value of an attribute is modified at attributes.codetwo.com or user.codetwo.com, it will not be changed (updated) by any subsequent changes in your tenant's Entra ID (or local AD for hybrid environments syncing via Microsoft Entra Connect). If you want to restore the original attribute values from your Entra ID, see instructions in this section.
6. Does the Attributes manager work with shared mailboxes?
Yes. Follow the steps described in this section to learn how to import a CSV file that is used to bulk edit attribute values. Be sure to provide an email address of your shared mailbox(es) in the UPN column of the CSV file.
Moreover, by using the Attributes manager, you can set values to attributes such as First name or Last name for shared mailboxes. This feature is especially helpful if you use the same signature templates across your organization and don’t want the signatures added to emails sent from shared mailboxes to be missing any information.
In this article
