How to add different signatures to emails sent from alias addresses
CodeTwo Email Signatures 365 can recognize when you send messages from alternative email addresses (email aliases) and automatically add a dedicated email signatures for those addresses.
In this article, we'll show you how to send emails with different email signatures depending on the email address you select as the sender (in the From field) of your message. For example, you can configure different signatures for emails sent from:
- alias addresses within the same domain,
- a secondary email address with a different domain associated with your Microsoft 365 tenant (Fig. 1.).
Since licenses for CodeTwo Email Signatures 365 are consumed per user, using signatures in emails sent from aliases won’t consume any additional licenses.

Fig. 1. An email sent by the same user from a primary domain (A) and a secondary domain or alias (B).
See our step-by-step configuration guides:
- Set up cloud (server-side) signatures for email aliases
- Set up Outlook (client-side) signatures for email aliases
- Can't send from email aliases?
Set up cloud (server-side) signatures for email aliases
If you want users to automatically get different signatures for emails sent from their alias addresses (secondary email addresses), you need to configure a dedicated cloud (server-side) signature rule for those email addresses.
Why do I need a dedicated rule?
If you set up a signature rule for users' primary email addresses only, this rule will also apply when these users send emails from their alias addresses. In other words, they will get the same signature no matter if they use their primary email address or an alias.
- To create a dedicated rule for email aliases, sign in to the Signatures app, click CREATE RULE and select Server-side signature. In the rule wizard, name the rule accordingly (e.g. Signature for aliases) and click Next to proceed.
- In the Senders step, click Add below the conditions section (the top list) and select Email addresses (Fig. 2.).
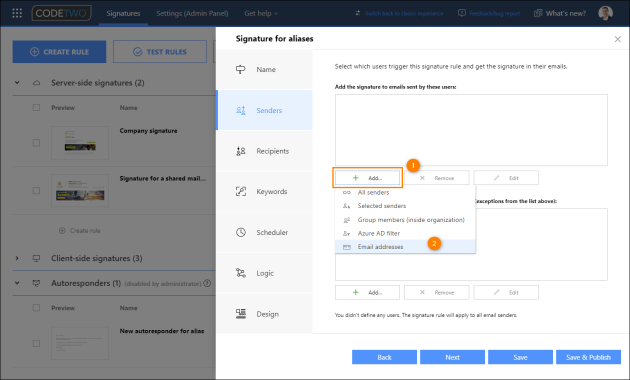
Fig. 2. Adding an Email addresses condition to a signature rule.
- In the Email addresses pane, enter the email aliases to which this rule should apply. You can specify individual addresses separated by semicolons (;) or use an email address in the format: *otherdomain.com to apply the rule to all addresses in that domain (Fig. 3.). Click OK to add the condition to the rule.
See this article to learn how to easily obtain a list of email aliases from your tenant by using PowerShell.
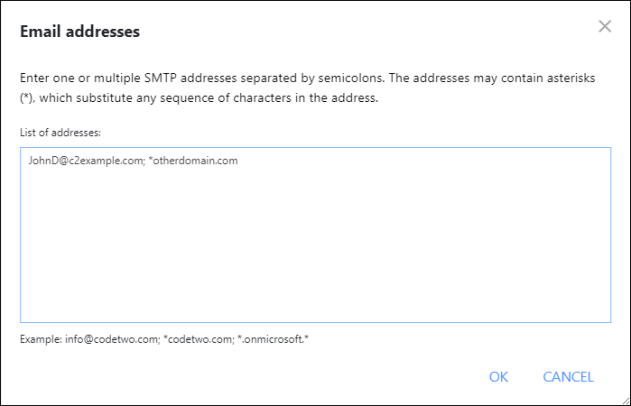
Fig. 3. Specifying alias addresses to which the rule should apply.
- Configure conditions (and exceptions) in the Recipients and Keywords steps and the Scheduler as desired. For more info, see this article.
- In the Logic step, leave the default settings:
- If this rule is applied > Do not process any more rules
- If this rule is not applied > Process the next rule on the list
- Proceed to the Design step and click Edit signature to design the signature for alias addresses. Watch this video or read this article for step-by-step instructions.
- CodeTwo Email Signatures 365 lets you use placeholders (e.g. {First Name}, {Last Name}, {Title}, {Email}, etc.) when designing an email signature. When a user sends an email with a CodeTwo signature, these placeholders are automatically replaced with information (relevant to that user) fetched from Entra ID (Azure AD) or CodeTwo cache.
Note that the {Email} placeholder is always replaced with user’s primary email address, even if the email is sent from an alias address. To include the email alias in your signature, use the {From e-mail} placeholder instead. This placeholder will be replaced with the email address selected in the From field of the email app.
Proceed as follows:- Remove the {Email} from your signature template if it’s there.
- Add the {From e-mail} placeholder in the same place by clicking Placeholder on the ribbon and selecting Message properties > Email (e-mail’s From field) or E-mail as link (e-mail’s From field), as shown in Fig. 4.
- If necessary, adjust the font style and color of the placeholder/link as shown in this article.
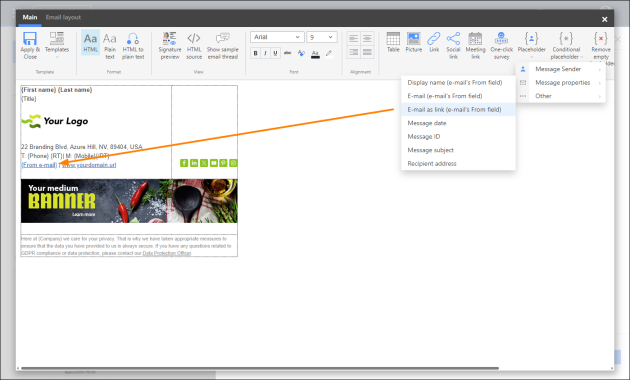
Fig. 4. The {From e-mail} placeholder will be replaced with the alias address in the signature.
- Click Apply & Close to exit the editor, then click Save & Publish in the rule creation wizard to apply this rule across your organization.
- Finally, drag and drop the new rule (or use Move up) to place it at the top of your cloud (server-side) signatures list (Fig. 5.). This is very important because cloud rules are applied in the order in which they are listed, from top to bottom. If you have more general rules in place (likely configured for the primary email addresses), these rules will also apply to emails sent from alias addresses, potentially resulting in the wrong signature being added.
Alternatively, if you prefer not to change the order of your cloud rules, you can add alias addresses as exceptions to the rules configured for your primary email addresses.
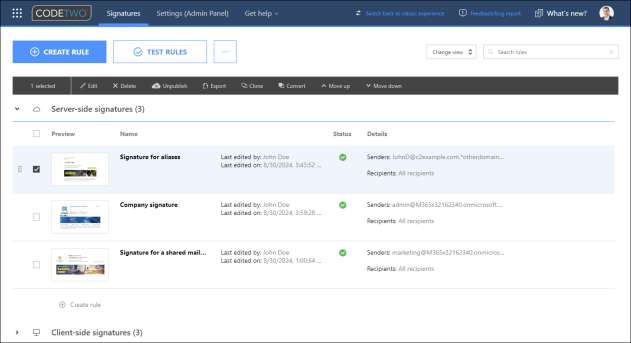
Fig. 5. Make sure the rule for alias addresses is placed at the top of the cloud (server-side) signatures list.
That’s it. Now, when your users send an email from an alias address (or from an address in a different domain), they will get the dedicated signature for this address (the signature will be added in the cloud after the message is sent).
Tip
You can deploy CodeTwo Outlook add-in in your organization to let users preview their cloud signatures while composing emails. Learn more about this feature
Set up Outlook (client-side) signatures for email aliases
Follow the steps below to configure a dedicated Outlook (client-side) signature for email aliases.
- Before you start, make sure that support for aliases is turned on in the Web Add-in settings: sign in to CodeTwo Admin Panel, select your tenant and go to Outlook add-in. Next, click Show advanced settings and make sure the Change CodeTwo Outlook (client-side) signatures to match the email address in the From field (instead of the default address) setting is enabled, as shown in Fig. 6. Learn more about this setting
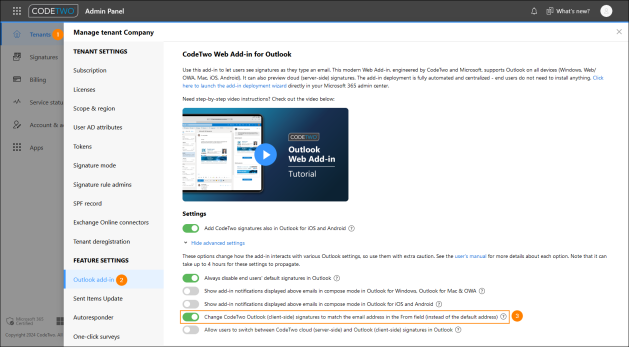
Fig. 6. Enabling support for aliases in Web Add-in’s settings in CodeTwo Admin Panel.
- Sign in to the Signatures app, click CREATE RULE and select Client-side signature. In the rule wizard, name the rule accordingly (e.g. Signature for aliases) and click Next to proceed.
- In the Senders step, click Add below the conditions section (the top list) and select Email addresses (Fig. 7.).

Fig. 7. Adding the Email addresses condition to a signature rule.
- In the Email addresses pane, enter the email aliases to which this rule should apply. You can specify individual addresses separated by semicolons (;) or use an email address in the format: *otherdomain.com to apply the rule to all addresses in that domain (Fig. 8.). Click OK to add the condition to the rule.
See this article to learn how to easily obtain a list of email aliases from your tenant by using PowerShell.

Fig. 8. Specifying alias addresses to which the rule should apply.
- (Optional) Click Add > Email addresses below the exceptions section (the bottom top) and enter the primary email address. This way, the signature you are configuring for the alias will not be available in Outlook when sending an email from the primary address.
- Configure the Scheduler as desired. For more info, see this article.
- In the Logic step, make sure the following options are turned on:
- Set this signature as default for new messages
- Set this signature as default for replies and forwards
Alternative approach
If you didn't add the primary email address to the rule's exceptions (see step 5), you can turn off these two options. This way, you will be able to select the alias signature manually from the add-in pane.
- Proceed to the Design step and click Edit signature to design the signature for alias addresses. Watch this video or read this article for step-by-step instructions.
- CodeTwo Email Signatures 365 lets you use placeholders (e.g. {First Name}, {Last Name}, {Title}, {Email}, etc.) when designing an email signature. When a user sends an email with a CodeTwo signature, these placeholders are automatically replaced with information (relevant to that user) fetched from Entra ID (Azure AD) or CodeTwo cache.
Note that the {Email} placeholder is always replaced with user’s primary email address, even if the email is sent from an alias address. To include the email alias in your signature, use the {From e-mail} placeholder instead. This placeholder will be replaced with the email address selected in the From field of the email app.
Proceed as follows:- Remove the {Email} from your signature template if it’s there.
- Add the {From e-mail} placeholder in the same place by clicking Placeholder on the ribbon and selecting Message properties > Email (e-mail’s From field) or E-mail as link (e-mail’s From field), as shown in Fig. 9.
- If necessary, adjust the font style and color of the placeholder/link as shown in this article.

Fig. 9. The {From e-mail} placeholder will be replaced with the alias address in the signature.
- Click Apply & Close to exit the editor, then click Save & Publish in the rule creation wizard to apply this rule across your organization.
That's it. Now, when you change the email address in the From field in Outlook to an alias address, the add-in will automatically insert the signature configured for that alias (Fig. 10.). The signatures shown in the add-in pane will update as well – you can manually add a different signature by clicking Use this signature below it.
Alias addresses are not yet supported by the CodeTwo add-in on mobile Outlook apps. This means that changing the sender in the From field to an alias address will still insert the signature configured for the primary email address. This is a limitation of Outlook, not CodeTwo.
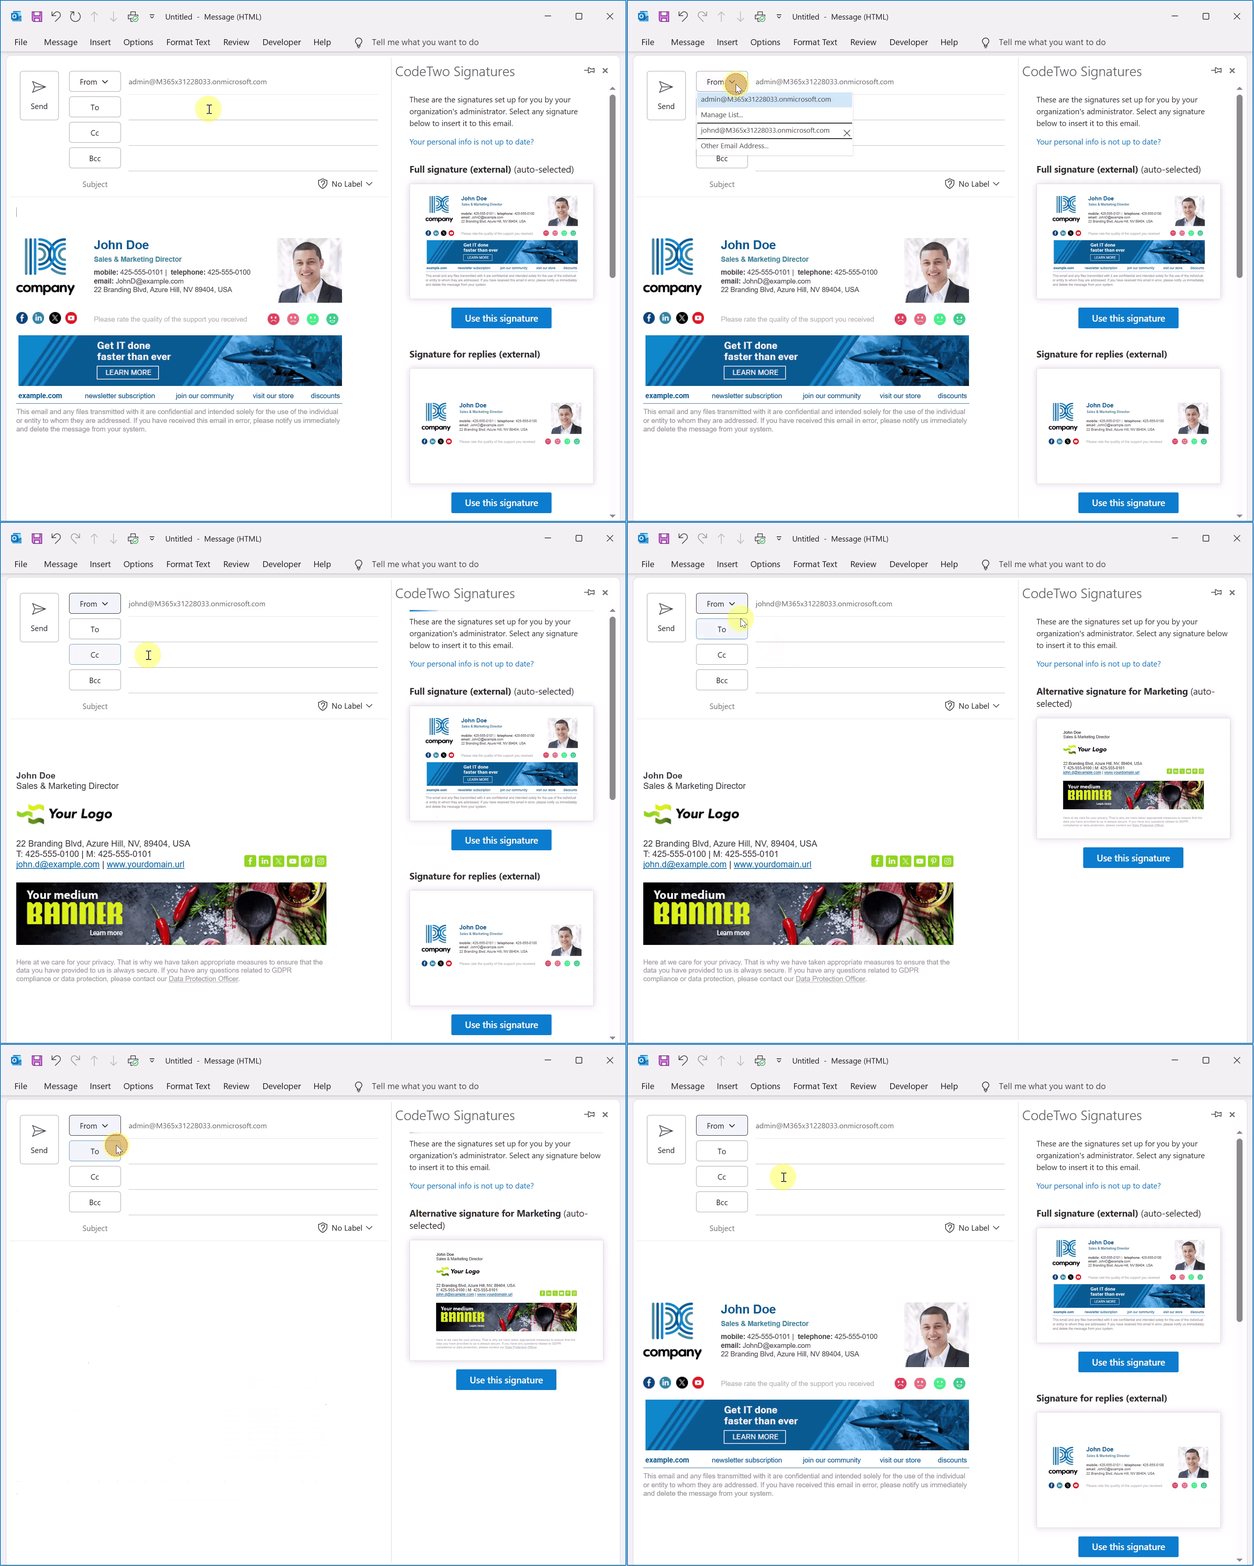
Fig. 10. The signature auto-updates when you change the email address to an alias.
Can't send from email aliases? Microsoft 365 / Exchange Online prerequisites
If you're not able to send emails using aliases in your organization, you might need to reconfigure your Microsoft 365. Here's how to enable sending emails from non-primary email addresses or domains in Microsoft 365.
Important
Sending from aliases has certain implications/limitations, e.g. journaling rules might not apply to emails sent from aliases, forwarding/redirecting Inbox rules will use the primary SMTP address anyway, etc. For a complete list, see this Microsoft article (in particular, check the Known Issues section).
Enable sending from aliases in Exchange Online (Microsoft 365)
- Sign in to the Exchange admin center using a Microsoft 365 global admin or Exchange admin account.
- Go to Settings > Mail flow and make sure the Turn on sending from aliases setting is enabled (Fig. 11.). If not, select the checkbox and click Save.
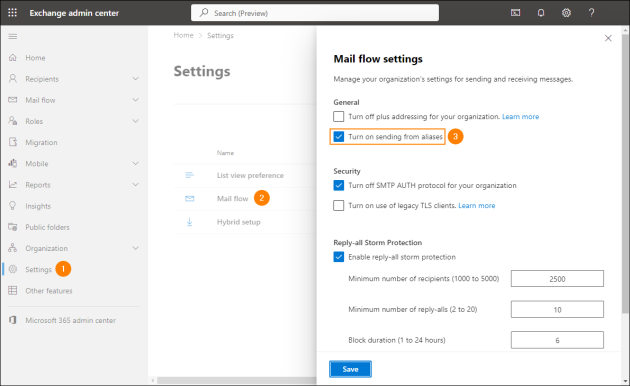
Fig. 11. Enabling sending emails from aliases in the Exchange admin center.
- Wait for up to 60 minutes for the changes to propagate.
Tip
You can also enable sending from aliases for your entire Microsoft 365 tenant via PowerShell by using the following cmdlet:
Set-OrganizationConfig –SendFromAliasEnabled $True
Enable changing the email address in the From field in Outlook on the web (OWA)
By default, users cannot select an alias address in the From field when sending an email in OWA. Follow these steps to change this:
- Sign in to Outlook on the web and access settings by clicking the gear icon at the top of the page.
- Go to Mail > Compose and reply.
- In the Addresses to send from section, select all the addresses (primary and aliases) you want to be able to send emails from (Fig. 12.).
This section will only appear if you enable sending from aliases in Exchange Online, as described here.
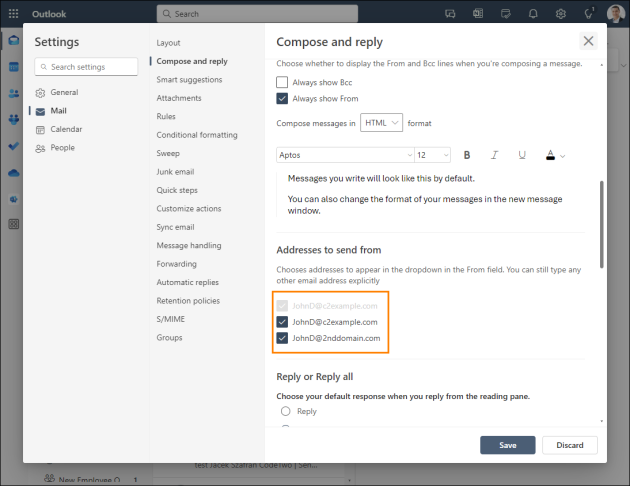
Fig. 12. Choosing which addresses can be used in the From field in OWA.
- Click Save at the bottom of the settings pane to apply the change.
From now on, all the selected addresses will be available to use in the From field in OWA.
Add an alias email address to a user in Microsoft 365
- Sign in to the Microsoft 365 admin center.
- Go to Users > Active users.
- Select a user on the list and click Manage username and email in the Aliases section (Fig. 13.).
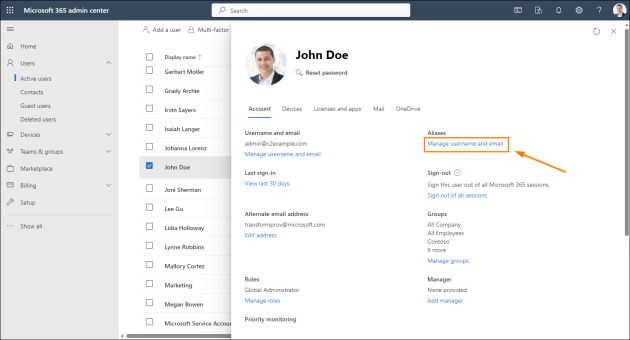
Fig. 13. Accessing username and email management options in the Microsoft 365 admin center.
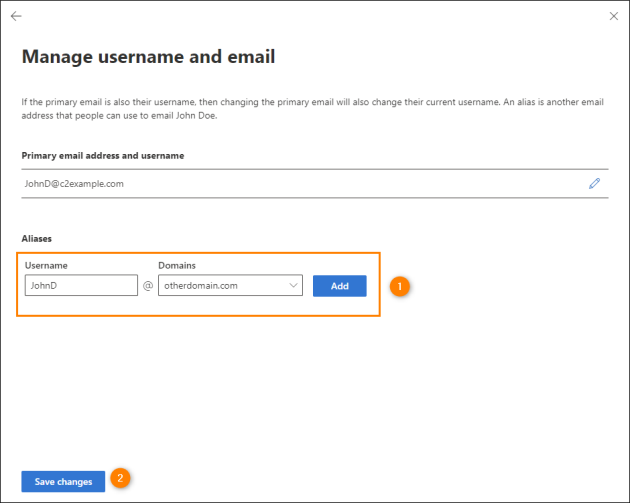
- Enter a unique username, select a domain (if you have multiple domains added to your tenant), and then click Add to create an alias address. Finally, click Save changes (Fig. 14.).
In this article
