How to create email signatures with rotating banners
Learn how to configure CodeTwo Email Signatures 365 to rotate through a number of different promotional banners or different signatures over a selected period of time.
Setting up CodeTwo Email Signatures 365 in a way that allows emails sent on different days to contain different promotional banners is an interesting way to attract more attention to your business. If your email signatures change from time to time, they are more likely to be noticed, as opposed to email recipients ignoring the same banner they see over and over again.
New to CodeTwo?
Learn more about signature modes our solution can work in. See how to set up your first signature rule and design an email signature template.
Use the following links to learn how to set up:
- Rotating banners in cloud (server-side) mode
- Rotating signatures in Outlook (client-side) mode
- Alternative approach: changing the banner with a CodeTwo custom attribute (all signature modes)
How to set up rotating banners in cloud (server-side) mode
CodeTwo Email Signatures 365 working in cloud mode lets you create separate signature rules for adding a different part of a signature. In this example, we will use this functionality to create an email signature comprising the signature’s main body (fixed), rotating promotional banners (4 different ones), and a disclaimer (also fixed), each added by a separate rule. Each banner will be rotated on a 4-day basis.
Start by opening app.codetwo.com. Create a new cloud (server-side) signature and name it accordingly, e.g. Sales campaign signature body. Go to the Senders step and select Add > All senders or configure the conditions so that the rule adds signatures only to the messages sent by selected users, as discussed in this article. In the Recipients step, select Add > All recipients. If you would like to limit the scope of people who receive emails in this campaign to specific customers or to those originating from specific markets (countries), you can set up the conditions as discussed here.
In the Logic step, select the following options:
If this rule is applied > Process the next rule on the list
If this rule is not applied > Process the next rule on the list
as shown in Fig. 1.
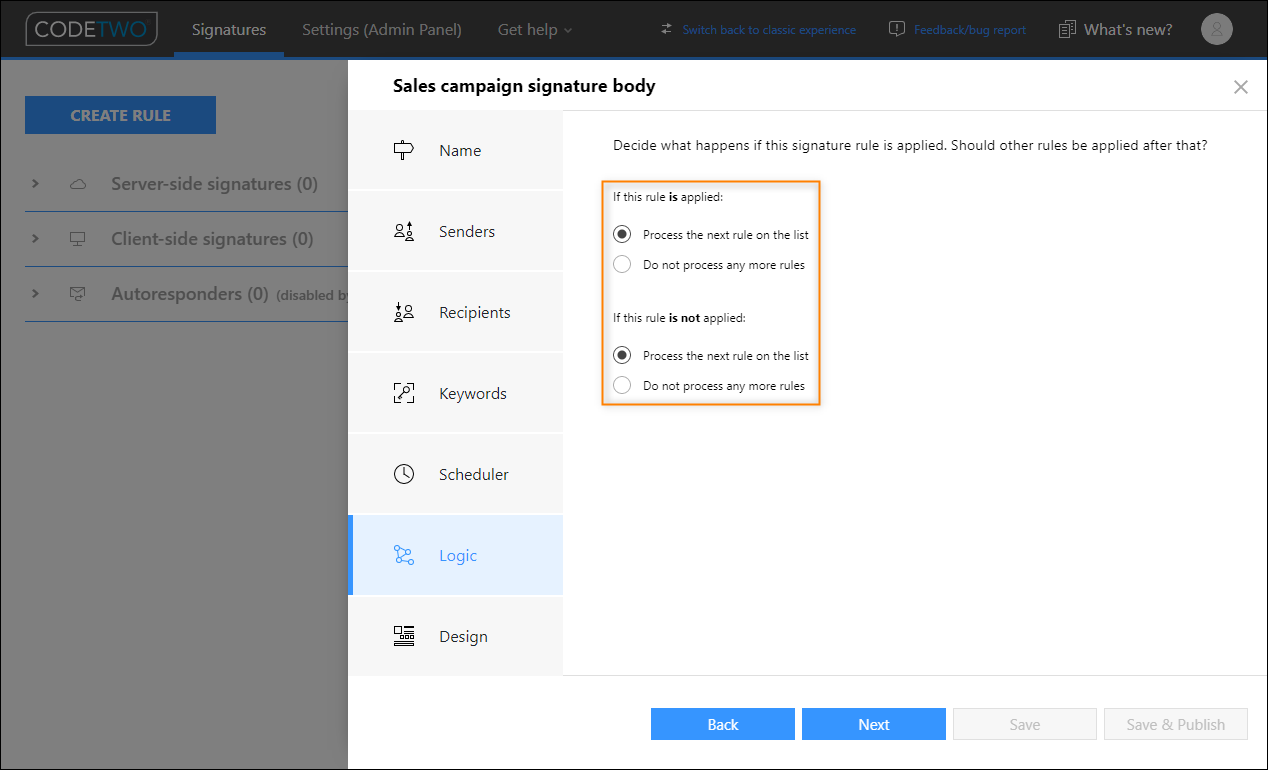
Fig. 1. When this rule is applied, the program will go to the next rule and process it.
Next, go to the Design step and click Edit signature to open the signature template editor. Create the main body of your signature that will always remain the same. For this scenario, we need to create the body of the signature without any banners and without a legal disclaimer (Fig. 2.), as these elements will be added later by separate rules. Read this article to learn more about creating signature templates.
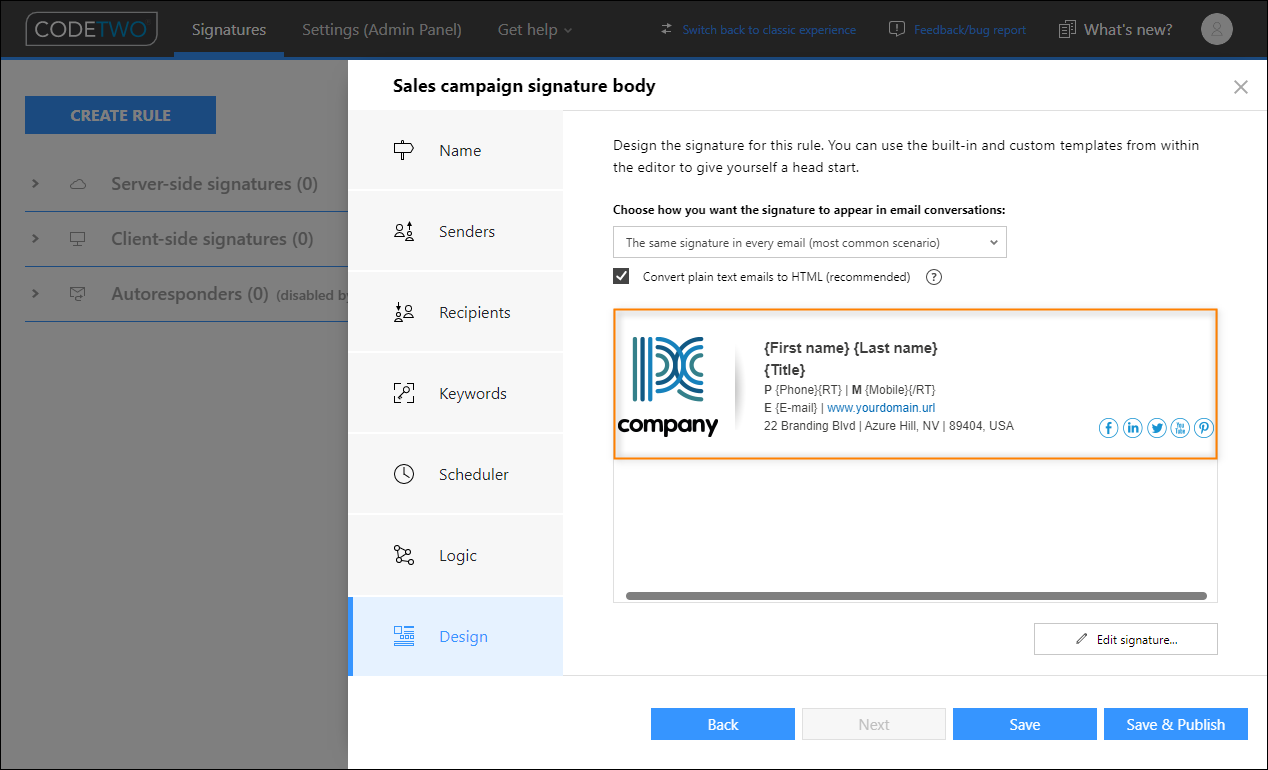
Fig. 2. A signature template containing the main body of a signature.
Once done, submit your changes by clicking Save.
The next step is to create separate rules that will add the rotating promotional banners. To do so, click the Clone button in the signature management app's main window to clone the first signature rule so that its conditions, exceptions and settings are recreated in the new rule. This rule will be used to add the first variant of your rotating banner, so be sure to name it accordingly, e.g. February campaign – blue banner.
Next, go to the Scheduler step and activate the feature (Fig. 3., item 1). This will enable additional configuration options (Fig. 3., item 2).
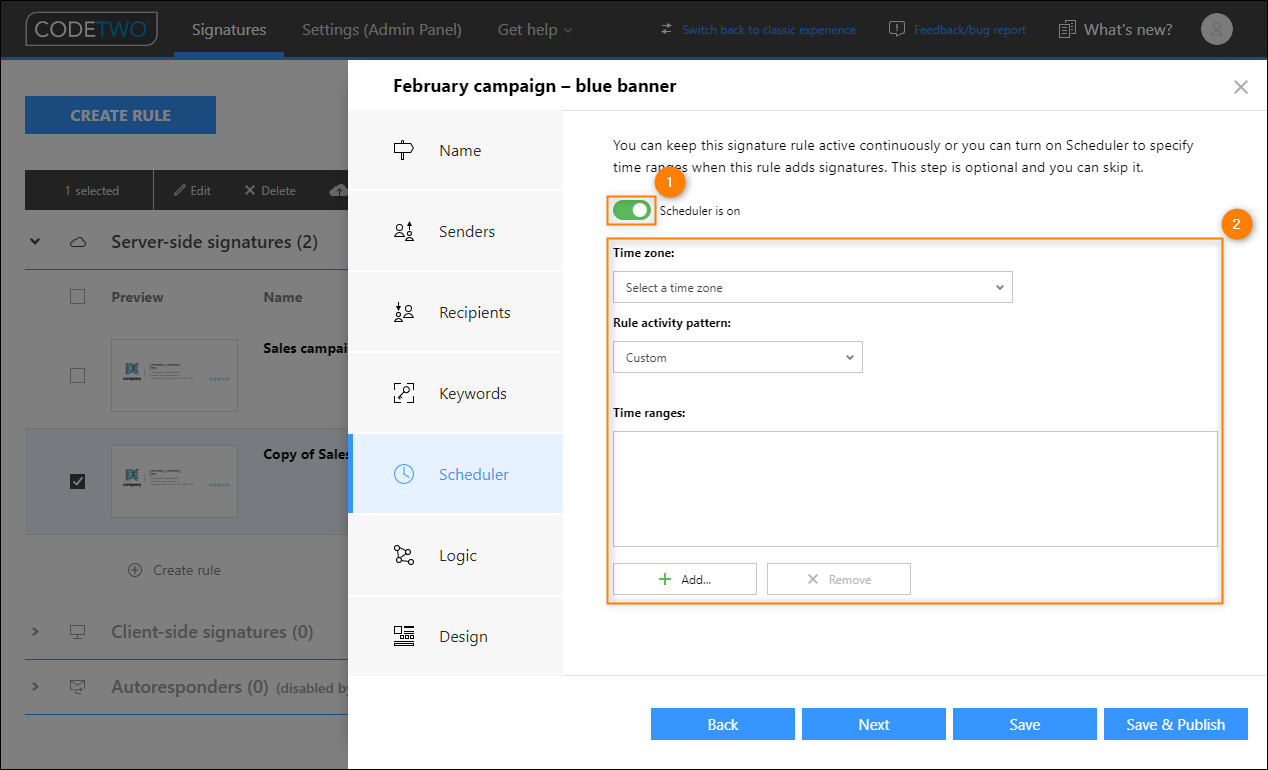
Fig. 3. Activating the Scheduler (1) and enabling the feature's configuration options (2).
Choose the appropriate time zone. Select the Daily activity pattern. In the Rule activity time section, check the All day option and select every 4 day(s), because in this example we will be using 4 different signature templates. In the Date range section, set the start and end date. In this example, we use the 1st and last day of the month (Fig. 4.).
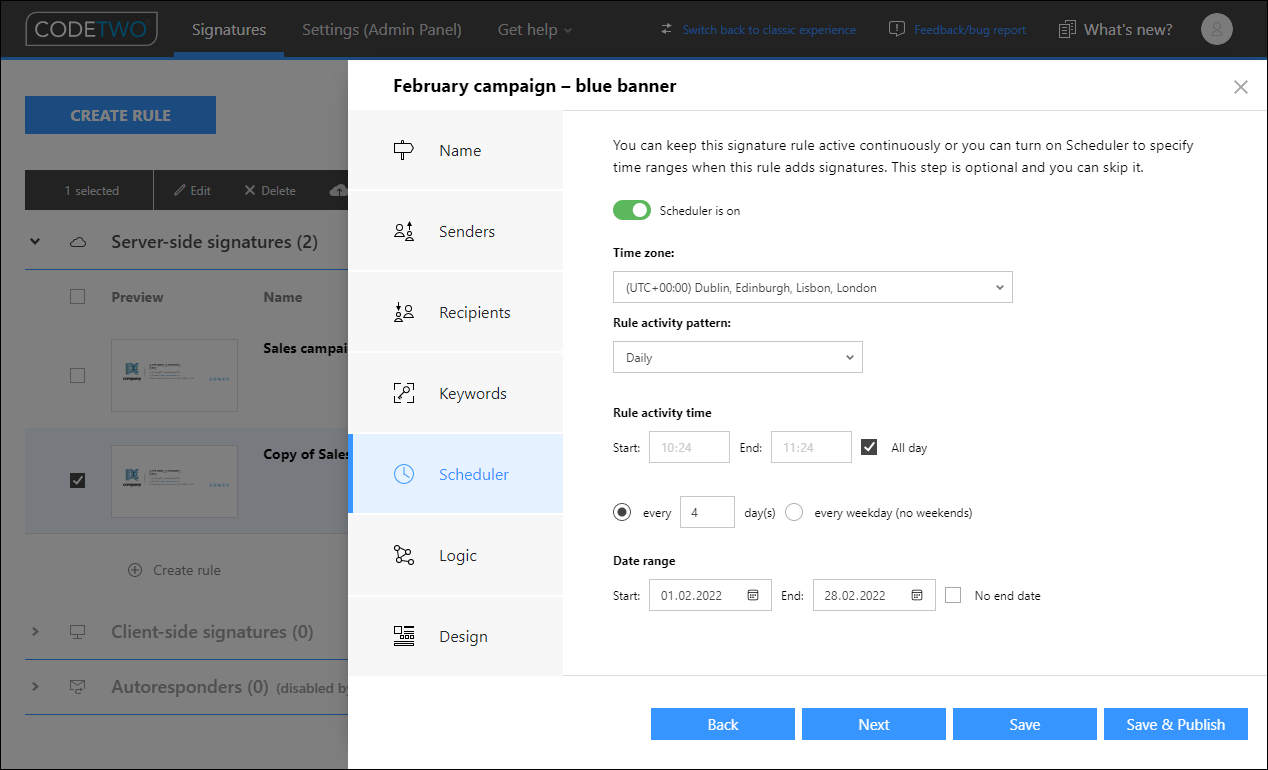
Fig. 4. Scheduler configuration for the first of four rotating banners.
Finally, go to the Design step, open the signature template editor and create a signature rule containing only the promotional banner (Fig. 5.).
Important
Some email clients may not display a signature that contains an image only. If you don't want to create a separate rule that adds text content to your signature, be sure to apply this workaround.
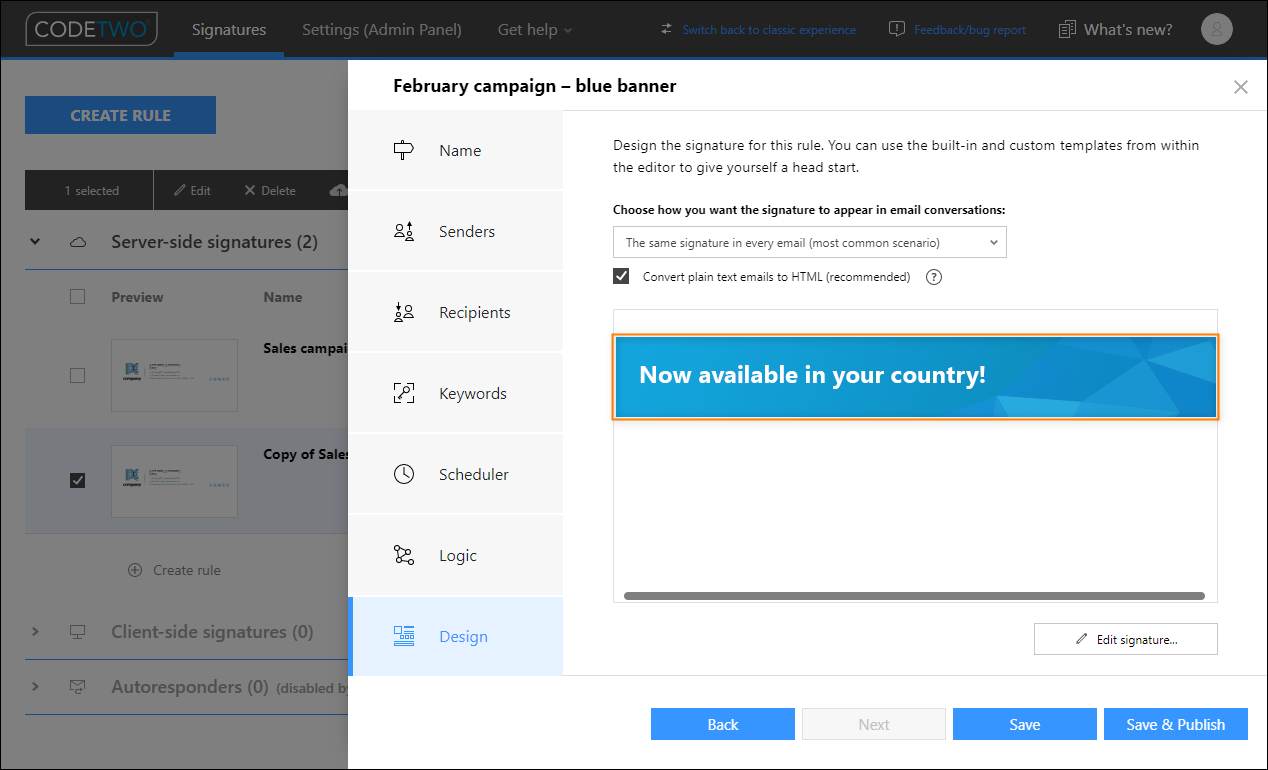
Fig. 5. A signature template containing only the promotional banner.
When the signature rule for the first banner is ready, submit it by clicking Save.
Clone the signature rule using the Clone button in the app's main window. Rename the new rule to e.g. February campaign – red banner. Since the configuration of this rule is identical to the previous one, you only need to:
- go the Scheduler step and make the following change: in the Date range section change the start date to the 2nd day of the month (Fig. 6., item 2).
- create a new signature template in the Design step. This template will also contain the banner only.
Repeat this process as many times as necessary. In our example, we will clone the existing rule to create two more rules. i.e. February campaign – green banner and February campaign – yellow banner. In the case of the 3rd rule, we set the start date to the 3rd day of the month (Fig. 6., item 3) and in the case of the 4th rule – to the 4th day of the month (Fig. 6., item 4).
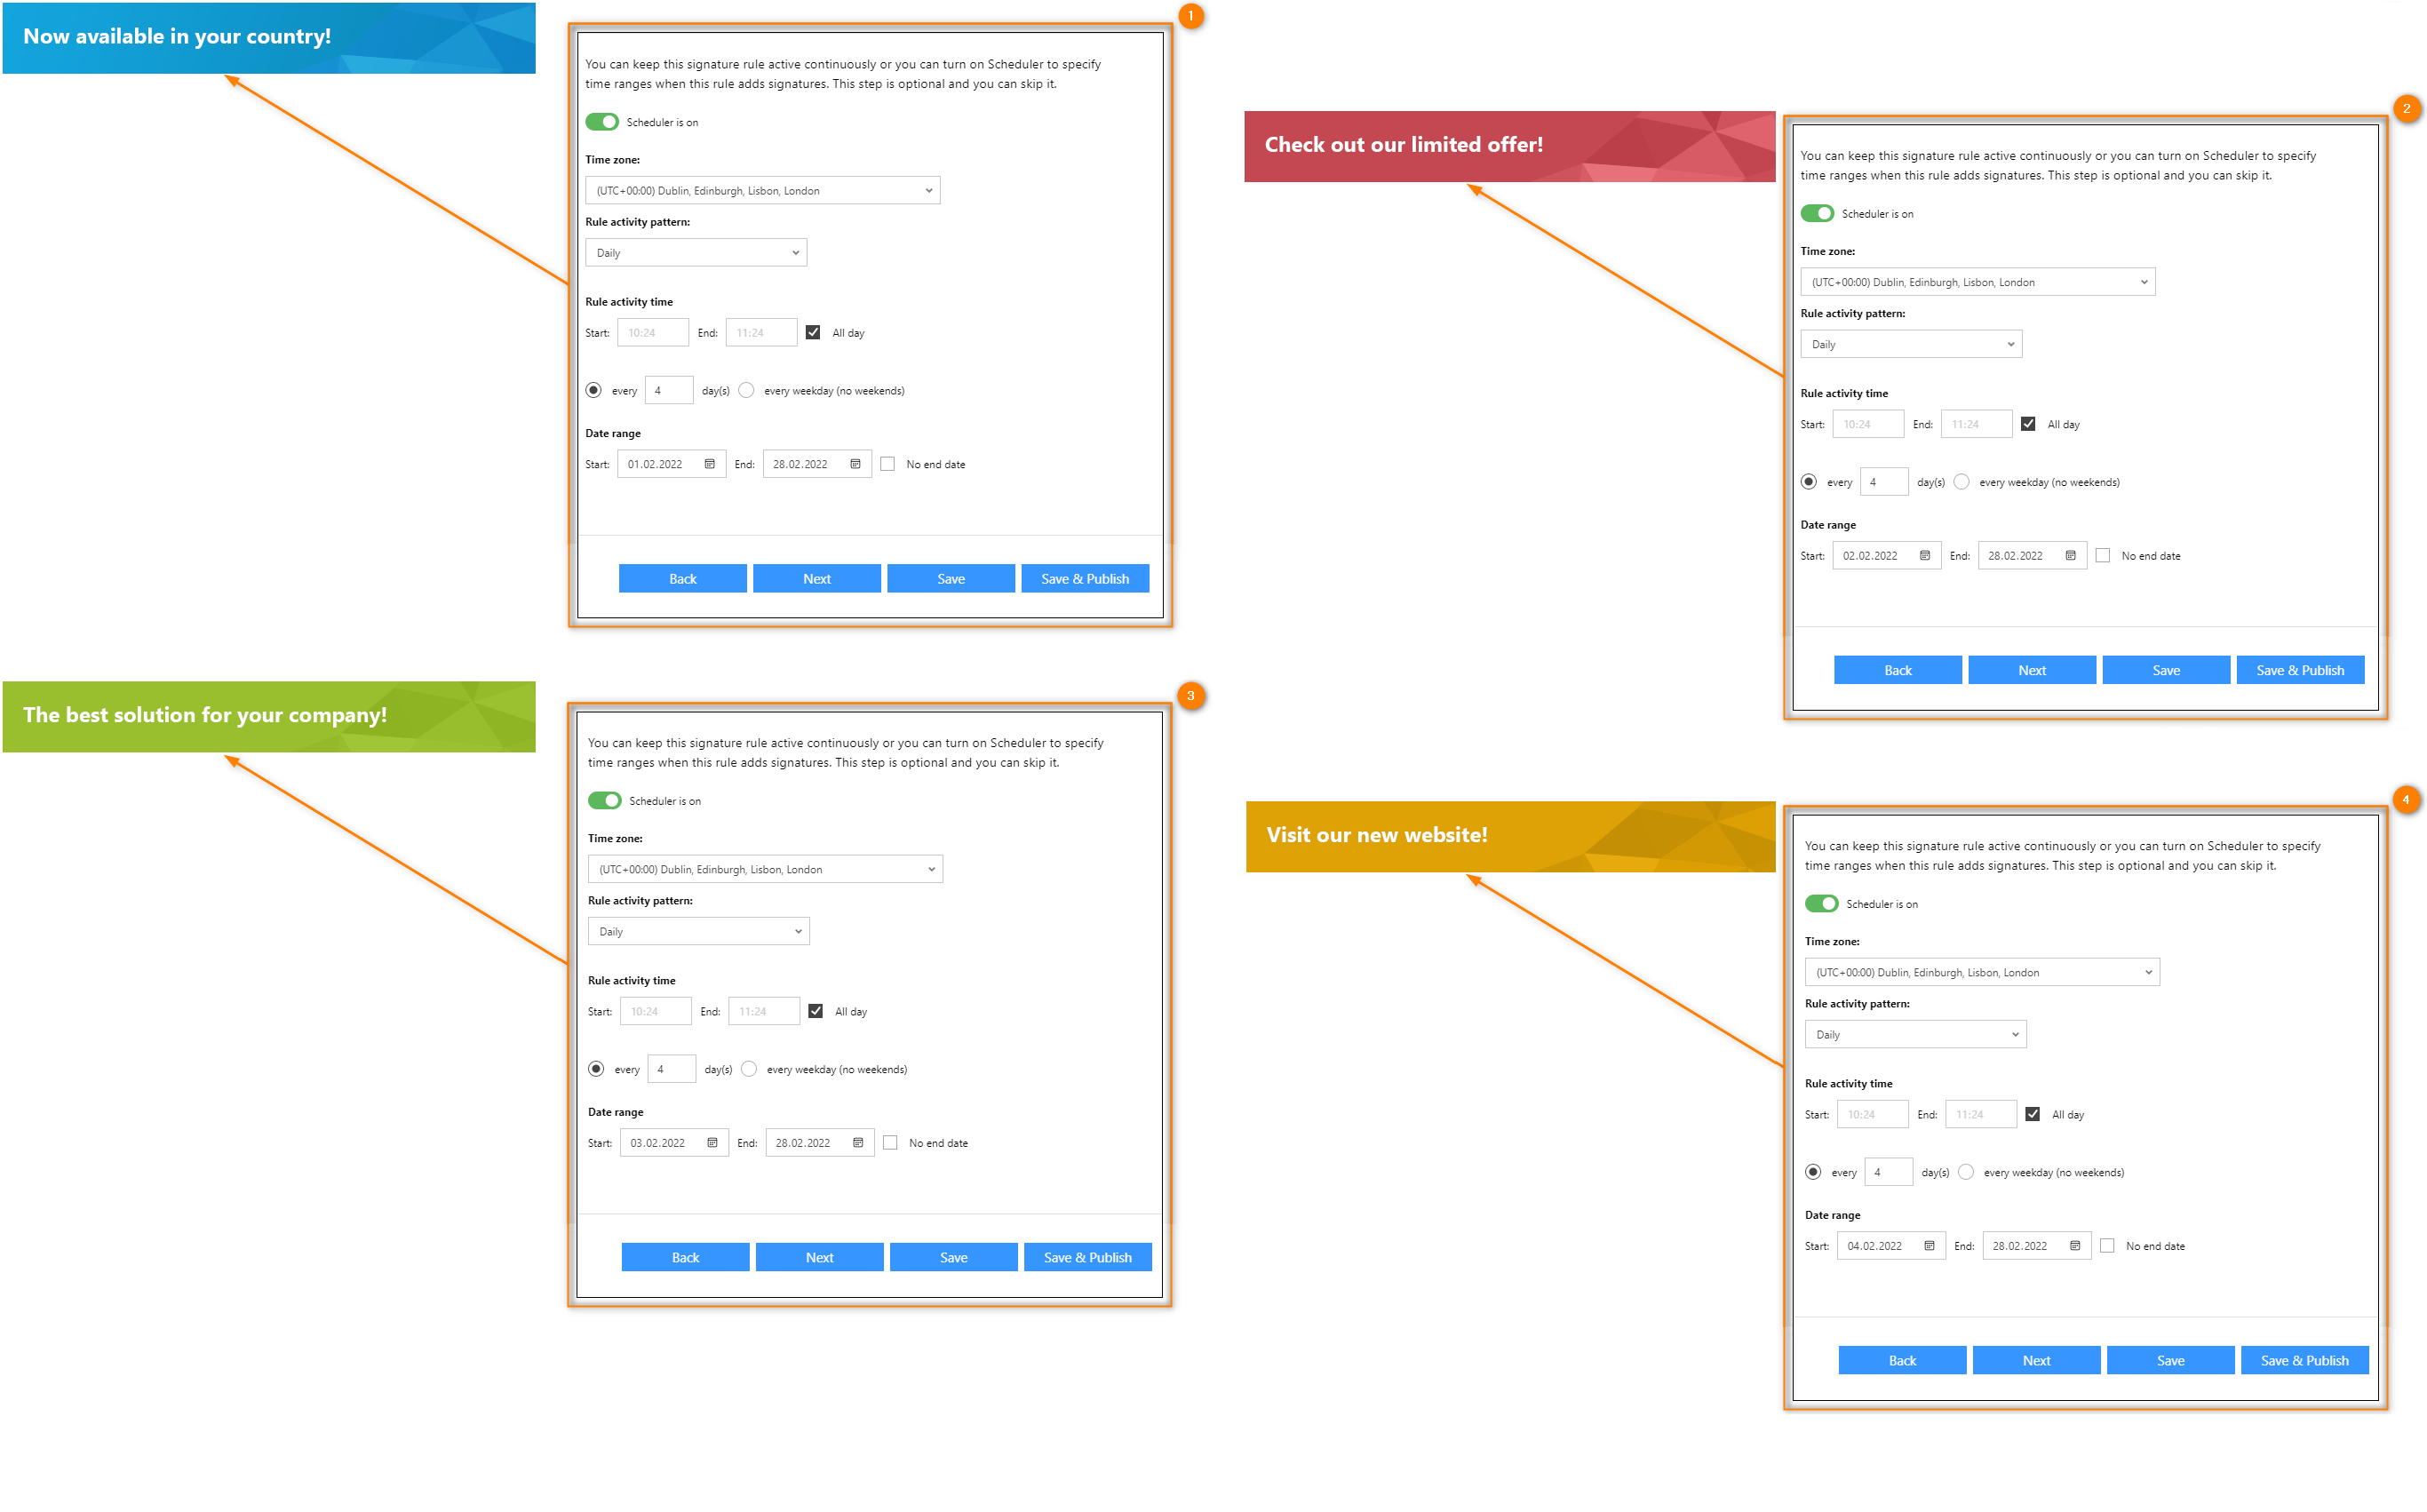
Fig. 6. Scheduler configuration for banners used in the marketing campaign.
Add a rule that uses the same conditions and exceptions as the previous rules. This one will add a legal disclaimer. Name it accordingly, e.g. Disclaimer for emails. As before, you need to clone a previous rule and change the signature template. When configuring this rule, it is important that:
- the Scheduler should be turned off so that the disclaimer is added at all times, even when the campaign is over,
-
the following options in the Logic step are selected (unless you want any other signature rules to be used):If this rule is applied > Do not process any more rules
If this rule is not applied > Process the next rule on the list -
the rule contains only the legal disclaimer text.
When all the rules are ready, use the Move up and Move down buttons in the app's main window to put them in the correct order in the Cloud (server-side) signatures list (Fig. 7.).
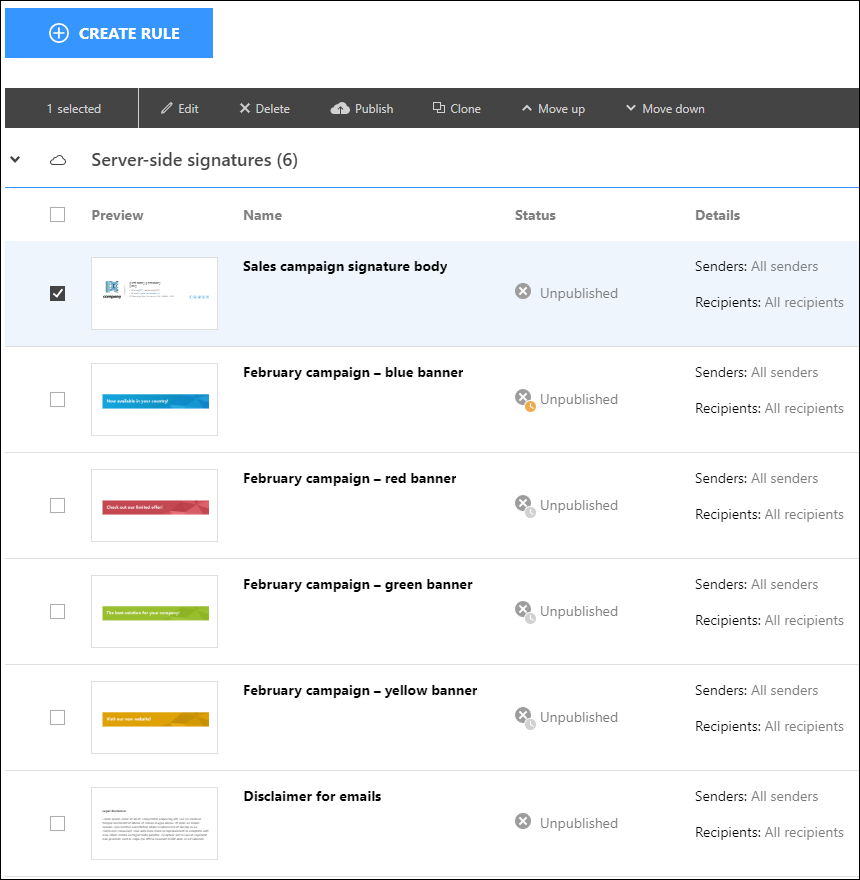
Fig. 7. The order of rules for adding the signature body, a rotating banner and a legal disclaimer.
Once done, select all signature templates and click Publish selected. This will make them active in your organization (see Fig. 8.).
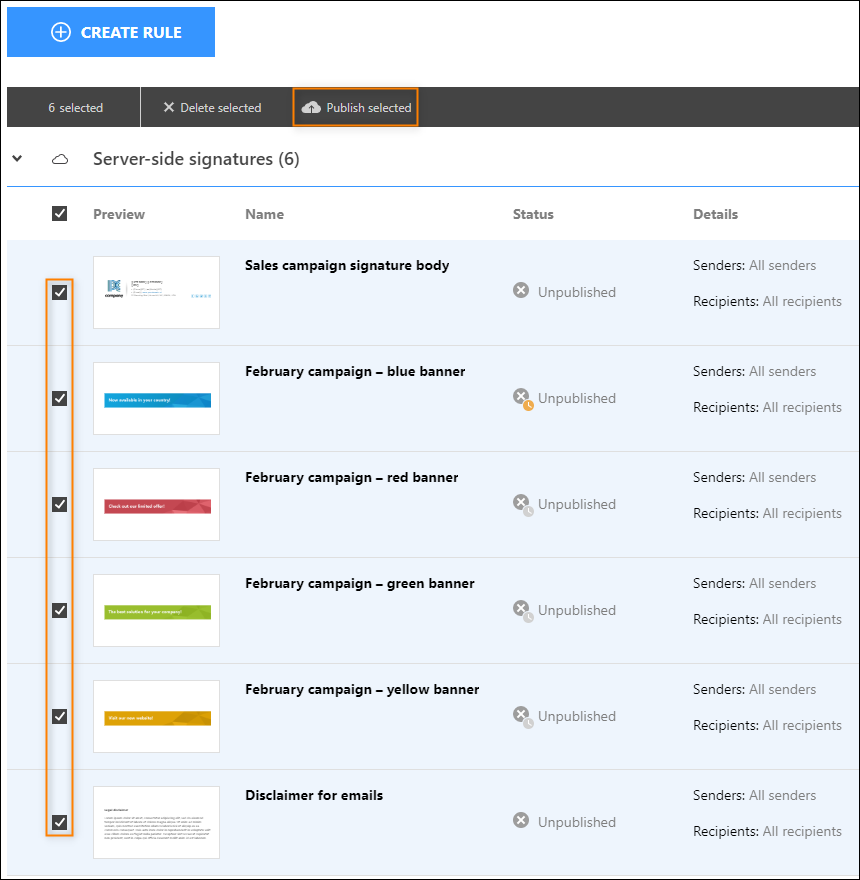
Fig. 8. Publishing the prepared cloud (server-side) signatures.
When configured as above, the banners will change in the order presented in the following diagram (Fig. 9.).
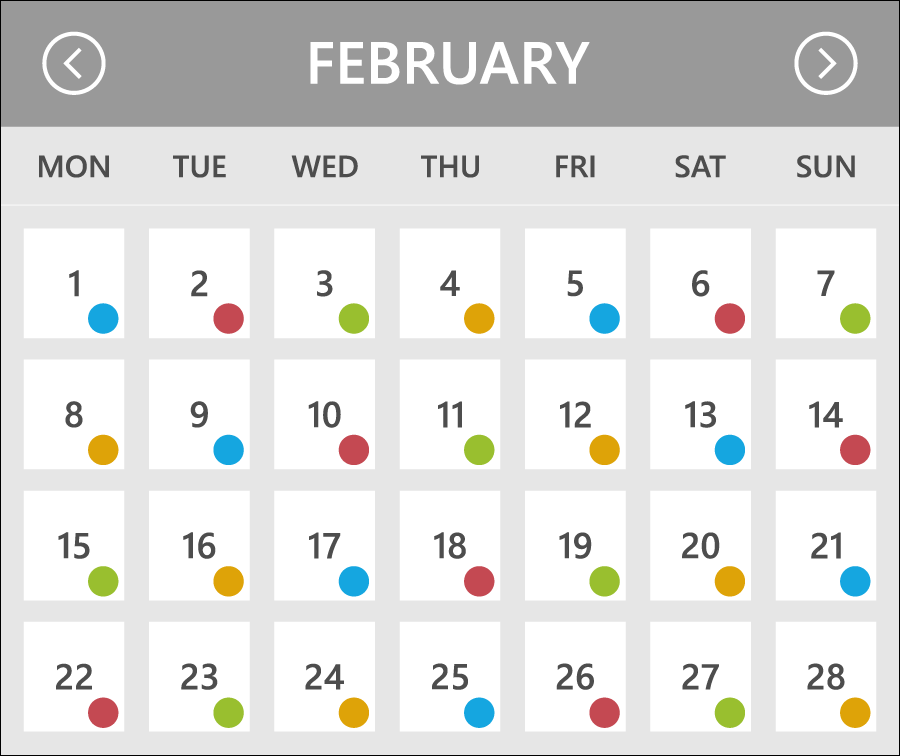
Fig. 9. The order of rotating banners during the campaign period.
How to set up rotating signatures in Outlook (client-side) mode
When using CodeTwo Email Signatures 365 in Outlook mode, you can create as many signature templates as you need and make them available for your users in Outlook desktop and Outlook on the web (OWA). In this example, we will create four signature templates, each comprising the same signature’s main body, a different promotional banner, and the same disclaimer. Then, we will set up the program to rotate through several signatures over a promotional campaign period.
To begin, open the signature management app and create a new Outlook (client-side) signature rule. It will be used for adding the first variant of your rotating email signature, so name it accordingly e.g. February campaign – blue banner.
Go to the Senders step and select Add > All senders or set different conditions and exceptions, as discussed in this article.
In the Scheduler step, activate the feature (Fig. 10., item 1). This will enable additional configuration options (Fig. 10., item 2).
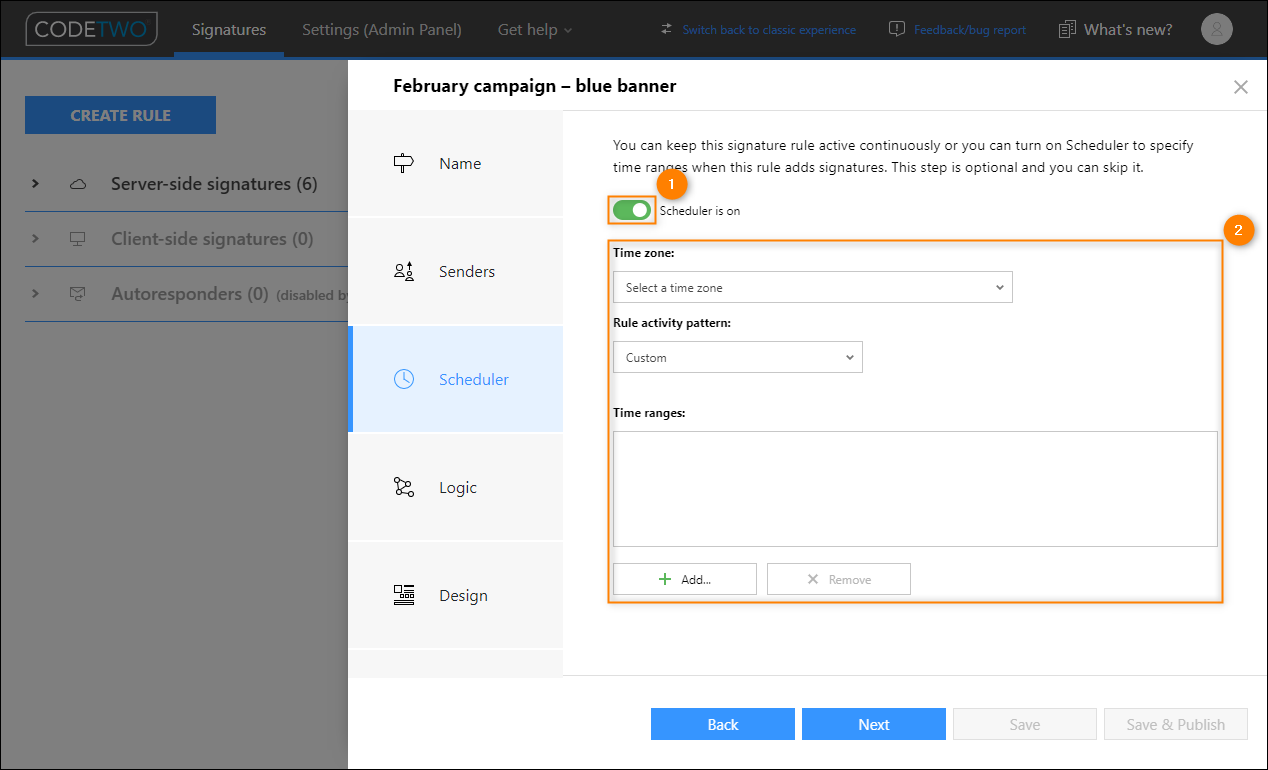
Fig. 10. Activating the Scheduler feature (1) and enabling its configuration options (2).
Choose the appropriate time zone. Select the Daily activity pattern. In the Rule activity time section, check the All day option and select every 4 day(s), because in this example we will be using 4 different signature templates. In the Date range section, set the start and end date. In this example, we will use the 1st and last day of the month (Fig. 11.).
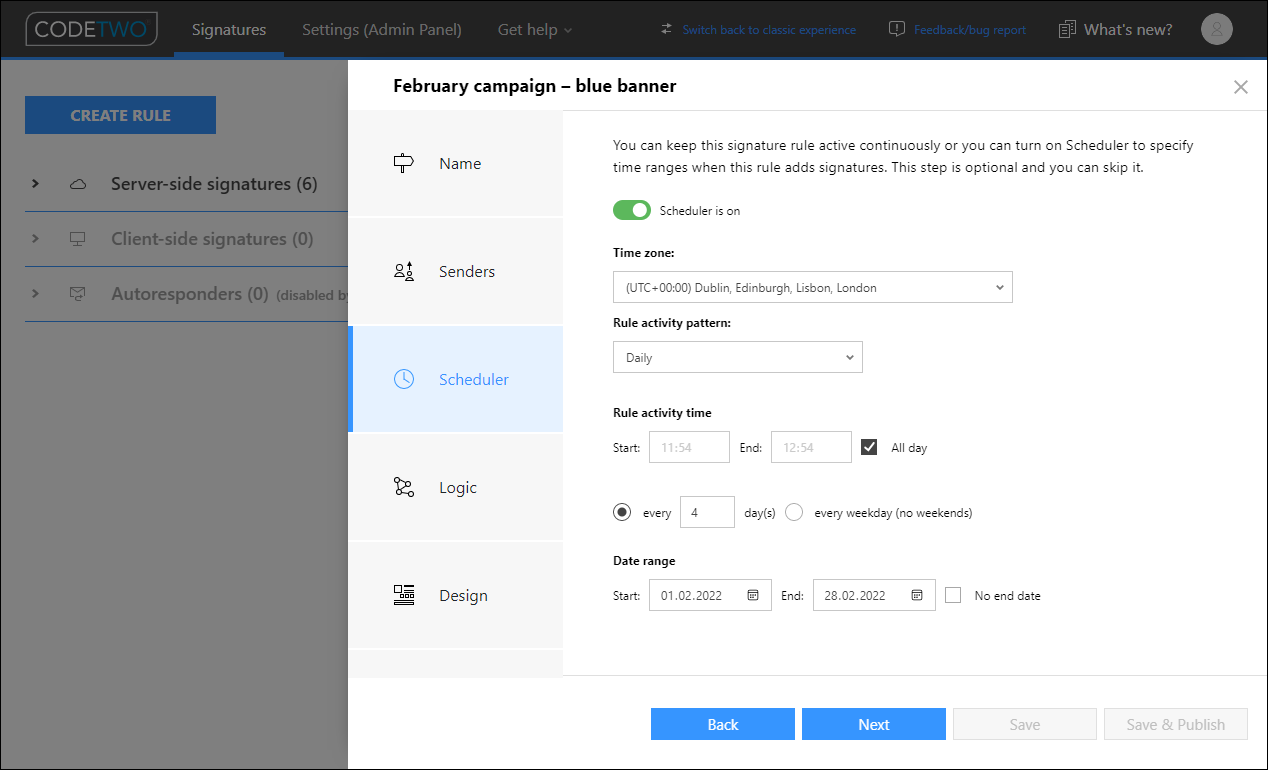
Fig. 11. Scheduler configuration for the first of four rotating signatures.
Once the Scheduler is set up, go to the Logic step and select the Set this signature as default for new messages and Set this signature as default for replies and forwards options, as shown in Fig. 12. That way, the program will add the signature configured for this rule to new messages, replies and forwards by default.
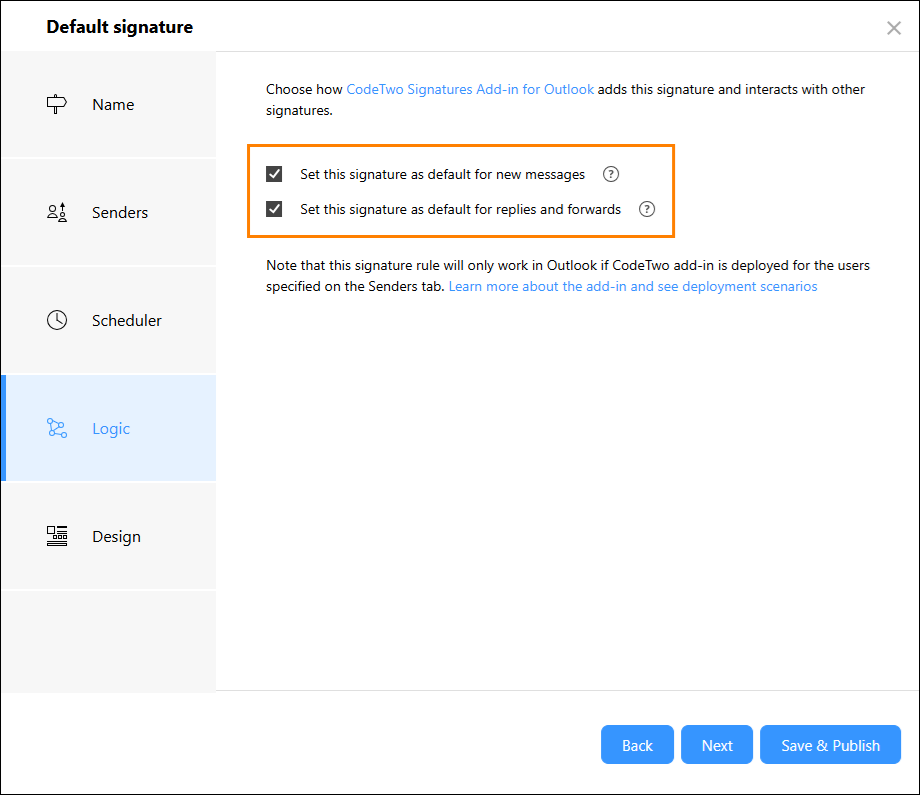
Fig. 12. By selecting these options, the CodeTwo signatures add-in will add the selected signature to all Outlook and OWA emails by default.
Important
Setting up the Outlook signature adding options and the Scheduler is optional and lets you automate the signature adding process. If you want your users to have access to all signature templates at all times and let them select a signature with a different banner manually, you can skip these steps.
Finally, go to the Design step and click Edit signature to open the signature template editor and prepare the first email signature template for this campaign (Fig. 13.). Read this article to learn more about creating signature templates.
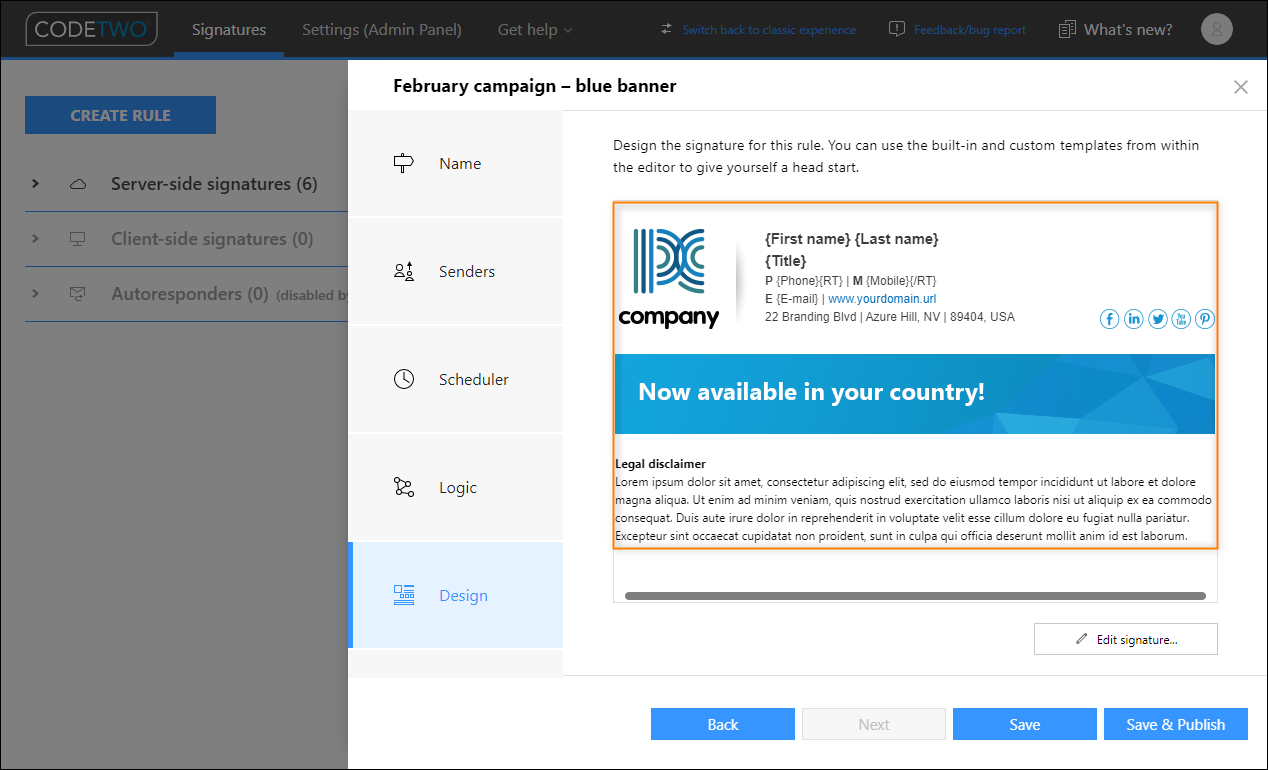
Fig. 13. A signature template with a main body, a banner and a legal disclaimer.
When the first signature for this campaign is ready, submit it by clicking Save.
Clone the signature rule using the Clone button in the app's main window. Rename the new rule to e.g. February campaign – red banner. The configuration of this rule should be identical to the previous one, except for the following:
- in the Scheduler step, make the following change: in the Date range section, change the start date to the 2nd day of the month (Fig. 14., item 2),
- modify the signature template in the Design step by adding a different banner.
Repeat this process as many times as you need. In our example, we have created two more rules, February campaign – green banner and February campaign – yellow banner, the same way as described above. In the case of the 3rd rule, we set the Start date to the 3rd day of the month (Fig. 14., item 3) and in the case of the 4th rule – to the 4th day of the month (Fig. 14., item 4).
Fig. 14. Scheduler configuration for the first of four rotating signatures.
When all the rules are ready, make sure they are placed on top of your Outlook (client-side signatures list (Fig. 15.). To achieve this, use the Move up and Move down buttons in the app's main window. That way, you make sure that correct signatures, with rotating banners, are the ones added by default to emails in Outlook and OWA.
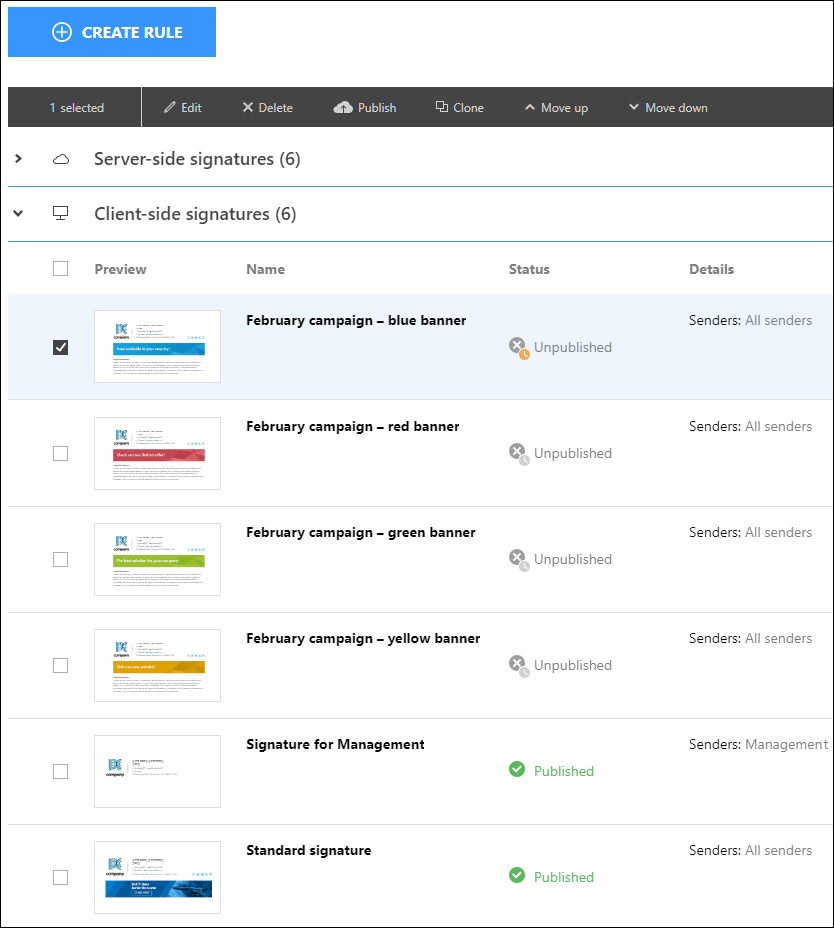
Fig. 15. The order of rules for adding the signatures with rotating banners.
Once done, select all signature templates and click Publish selected. This will make them available to your Outlook and OWA users (see Fig. 16.).
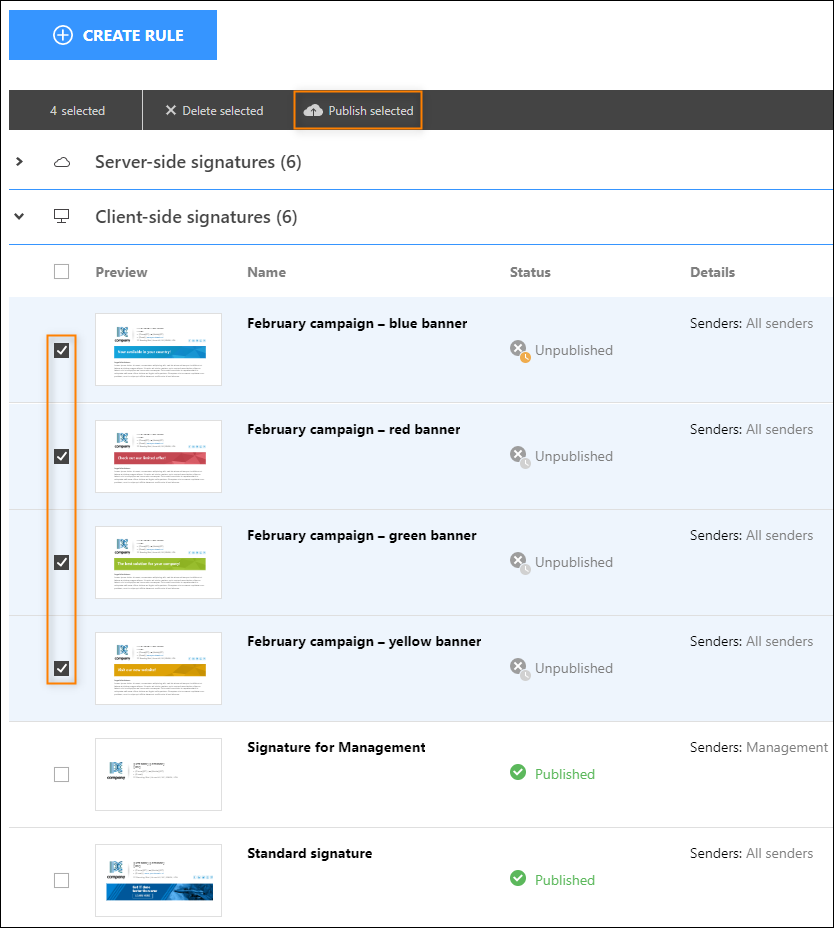
Fig. 16. Publishing the prepared Outlook (client-side) signatures.
When configured as above, the signatures will change in the order presented in the following diagram (Fig. 17.).
Fig. 17. The order of rotating signatures during the campaign period.
Result
When set up correctly, the banners (or signatures) will change each day over the period of one month. In cloud (server-side) mode, signatures are changed automatically, and no user interaction is required (Fig. 18.).
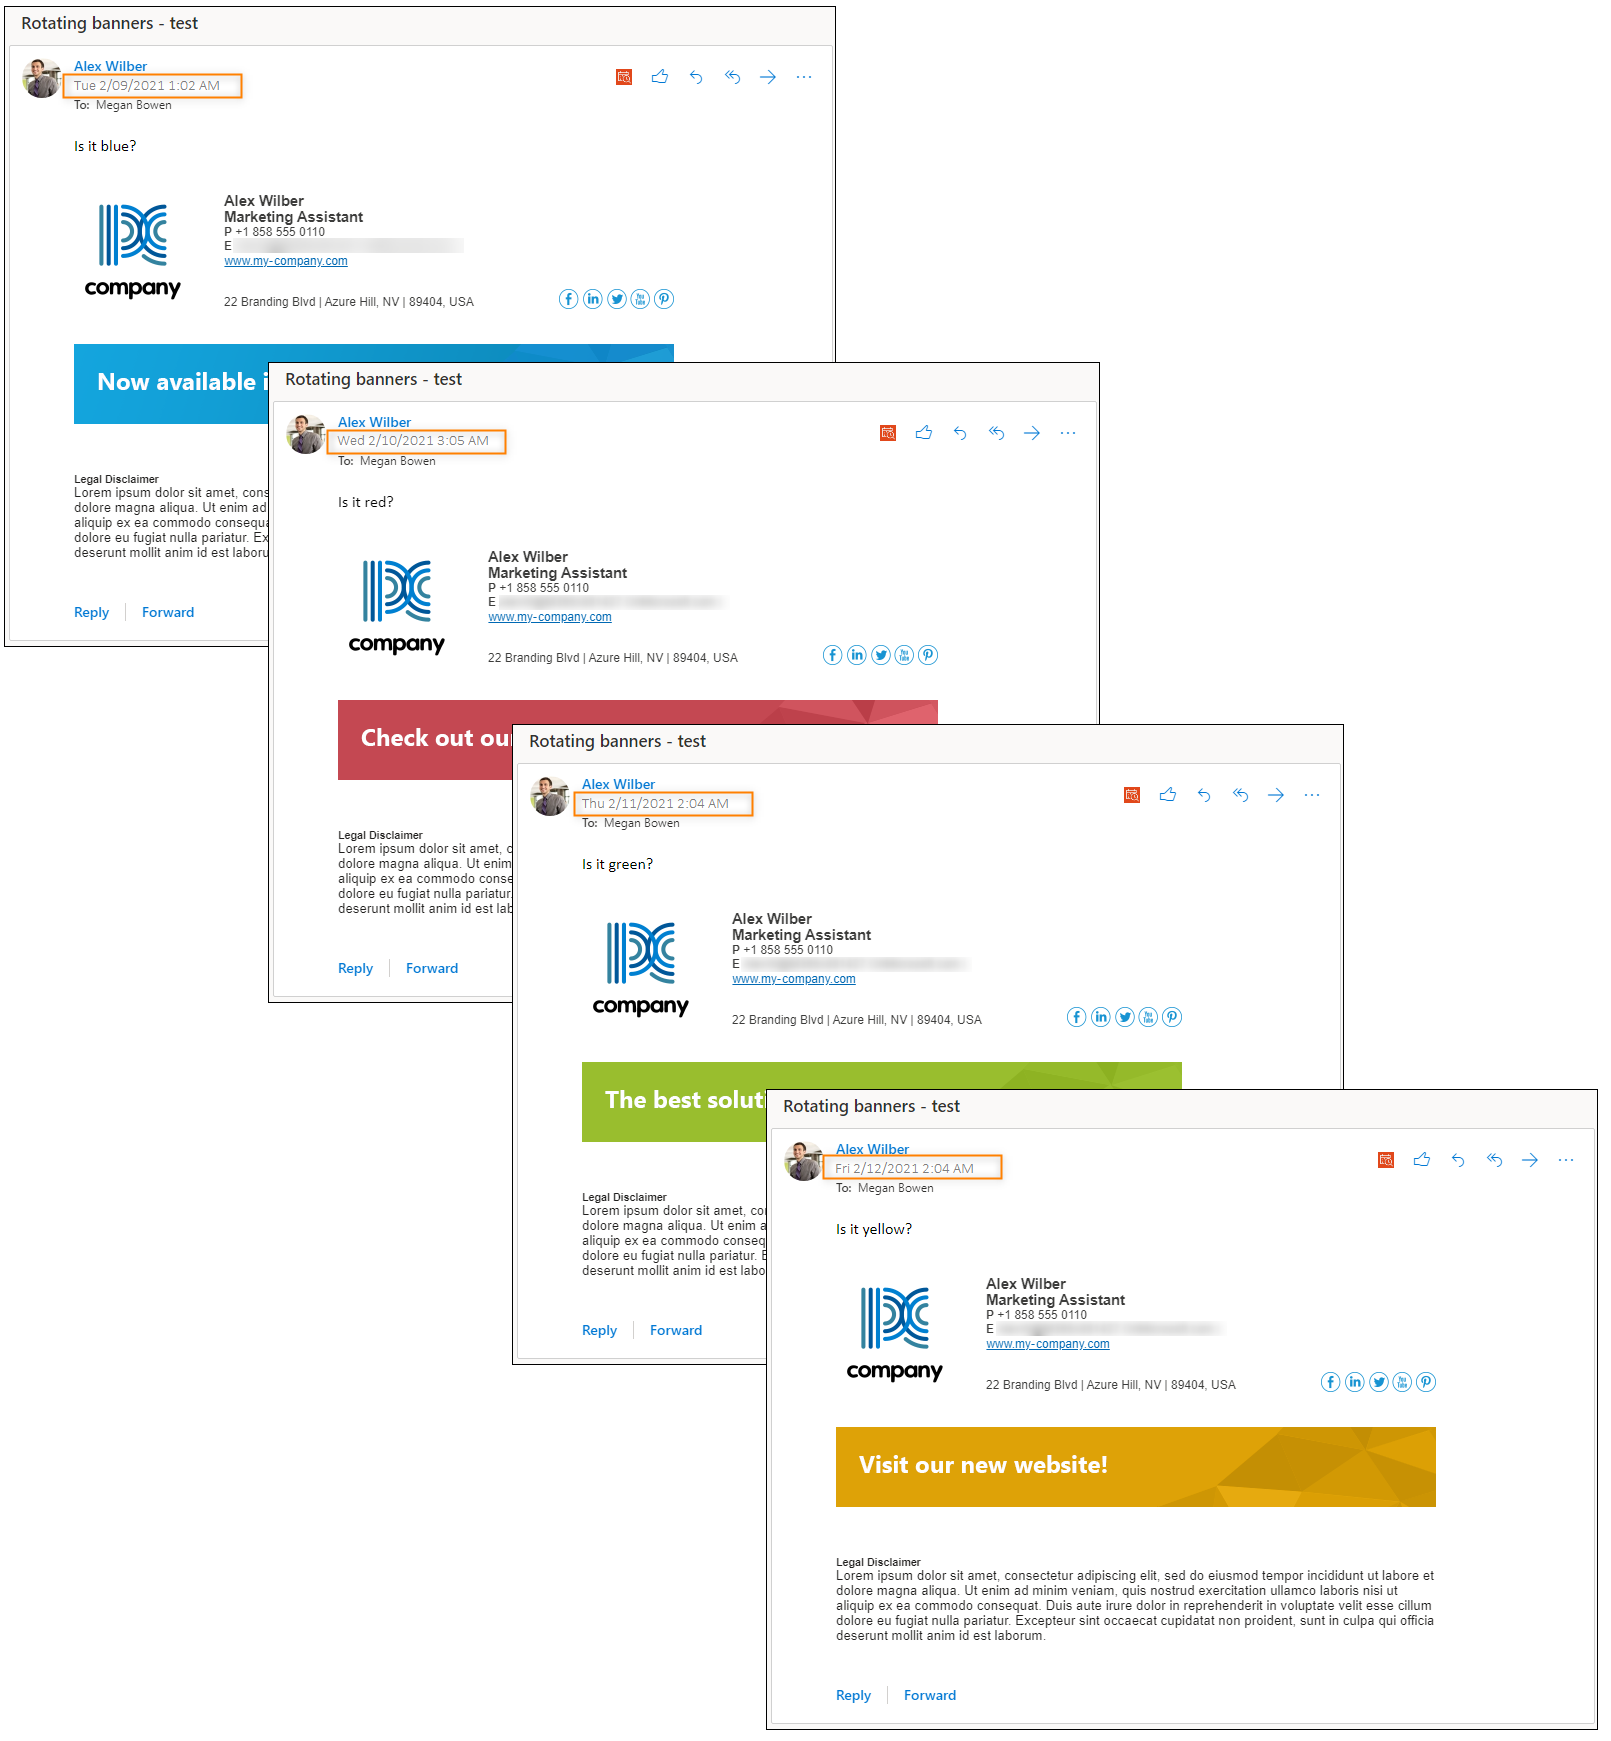
Fig. 18. Signatures added to emails on different days.
When using Outlook (client-side) mode, the signature set as the default one is automatically added to emails composed in Outlook (desktop, mobile & OWA). This signature is also shown in the CodeTwo add-in pane (Fig. 19.). If there are other Outlook (client-side) signatures configured in CodeTwo Email Signatures 365 for your users, these signatures will also appear in the pane and users will be able to manually insert them into their email with a single click.
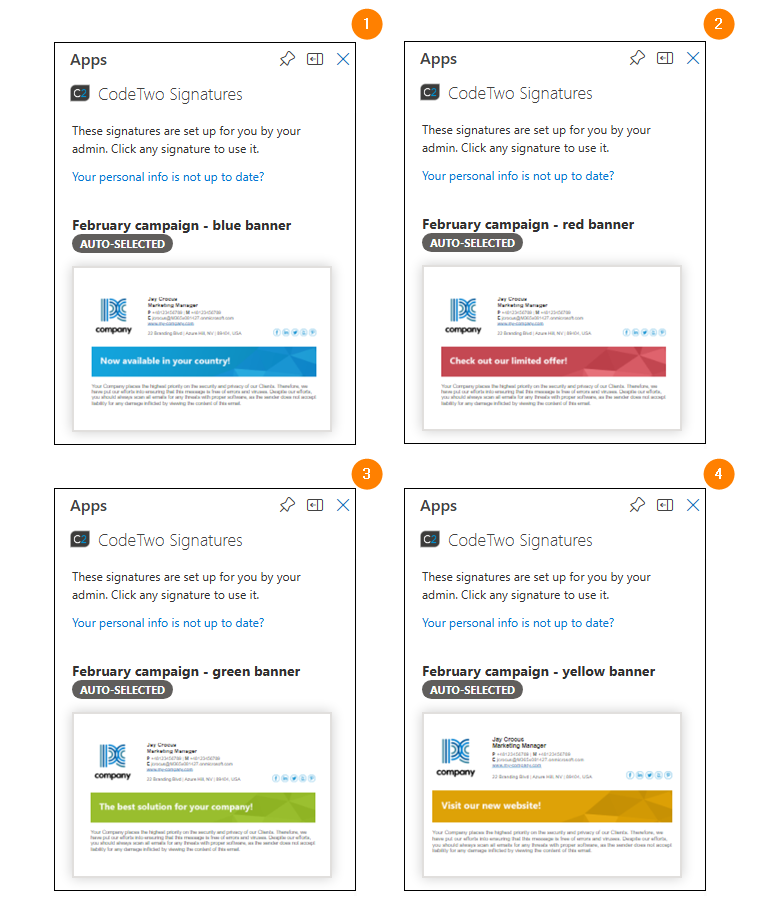
Fig. 19. Rotating signatures preview in the CodeTwo add-in pane.
Changing the banner with a CodeTwo custom attribute: an alternative approach
When you manage CodeTwo Email Signatures 365 for your organization, you can access our free Attributes manager available at attributes.codetwo.com. The tool lets you, among other things, create custom attributes that prove useful in many scenarios.
For example, your Marketing staff can create a custom attribute to let users periodically change the banner in their external email signature. All of that without:
- creating a number of signature rules (with the CodeTwo custom attribute, you need just one rule);
- having to periodically edit the rules; and (consequently)
- assigning access rights to the Signatures app for Marketing team members.
This approach is useful especially when you need more flexibility (in terms of the banner’s change interval) and, at the same time, want to give your Marketing people more control over the currently used banner(s).
For detailed instructions on how to configure the program for this scenario, see this article.
In this article