How to let your users choose their preferred signature
While you might be using CodeTwo Email Signatures 365 to take advantage of centralized signature management, you can still allow your users to choose their preferred signature. In fact, this idea is not at odds with having control over users’ signatures because it’s still you who designs and deploys the signatures.
Giving your users the option to choose their preferred signature is especially useful if:
- your organization’s structure is complex and management via Microsoft 365 groups is difficult,
- your users manage several different brands and need separate signature templates for each brand (see this article to learn about different methods of adding signatures in various languages),
- some users send most of their emails from mobile devices and want a signature design specifically tailored to mobile email apps,
- some users want to add simplified signatures (for instance, without a marketing banner or social icons) rather than full-size versions,
- certain departments (such as Sales or Marketing) change their email signature periodically, e.g., use another signature to promote current offers or seasonal promotions.
With CodeTwo Email Signatures 365, users can choose their preferred signature template in two ways:
- In the CodeTwo add-in pane in Outlook – this will work for Outlook (client-side) signatures. See the setup instructions for this scenario
- In the My user info app – this will work for both cloud (server-side) and Outlook (client-side) signatures. See the setup instructions for this scenario
New to CodeTwo?
Learn more about signature modes our solution can work in. See how to set up your first signature rule and design an email signature template.
My user info and Attributes manager are extra apps included for free in your CodeTwo Email Signatures 365 subscription. Learn more
Preferred signature selected in the CodeTwo add-in pane
This solution works for Outlook (client-side) signatures.
In this example, we’ll set up two signatures. Users will be able to choose either one as their preferred signature in the CodeTwo add-in pane, and it will then be automatically added to all new emails, replies, and forwards (Fig. 1.):
- Full signature – a standard company signature.
- Signature for Marketing – an alternative signature to promote an ongoing marketing campaign. It will use a different layout, color palette, and visual elements.
Tip
The following instructions also apply to the other use cases mentioned at the beginning of the article.
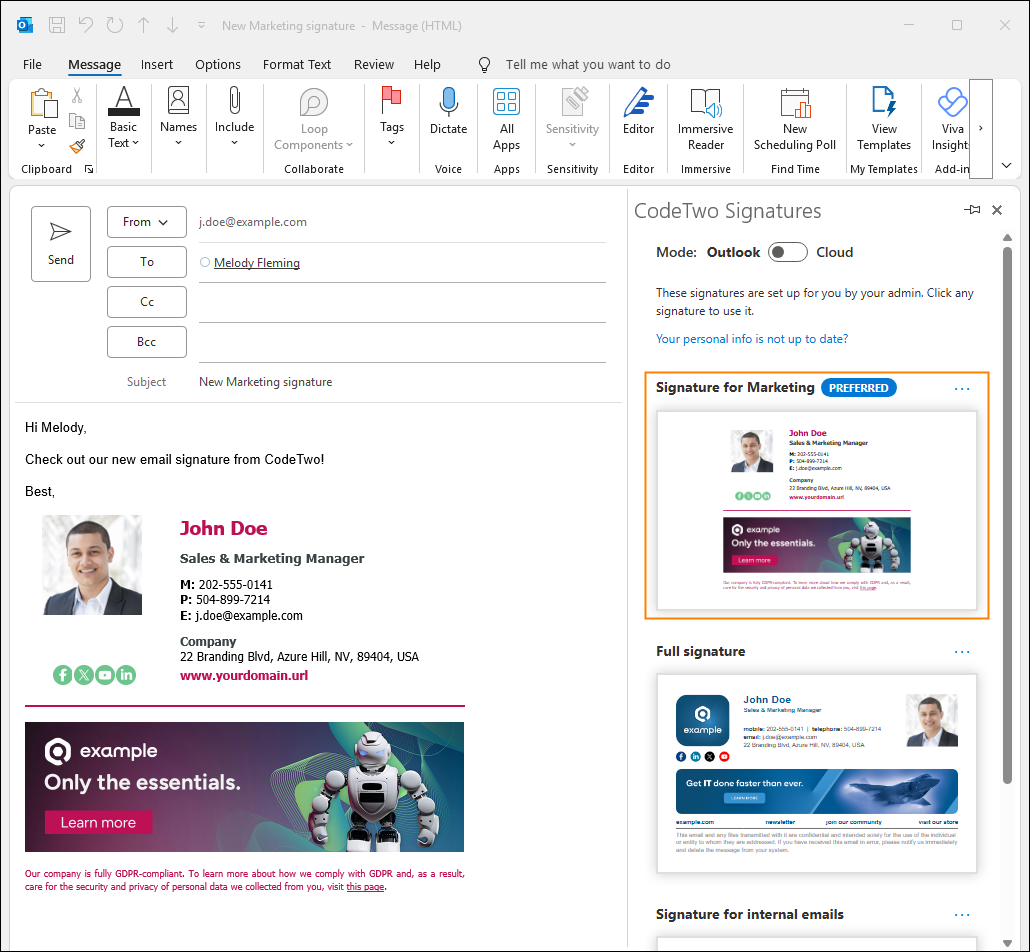
Fig. 1. An Outlook (client-side) signature marked as preferred in the CodeTwo add-in pane.
To start, sign in to the Signatures app, click CREATE RULE, and select Outlook (client-side signature). See this article for detailed instructions on how to create Outlook (client-side) signature rules, or read on for a quick overview of the steps.
In the Name step, enter the rule’s name and (optionally) a description. In the Senders and Recipients steps, configure conditions (and exceptions) as desired. Right now, we’ll configure a general signature rule to add signatures to emails sent by all senders to all recipients.
Go to the Logic step and make sure the Set this signature as default for new messages and Set this signature as default for replies and forwards options are enabled. Learn more about these options
Go to the Design step and create an appropriate signature template.
Once done, submit your rule by clicking Save & Publish.
Now, let’s create another rule to add a dedicated signature for Marketing. To create the rule, repeat the steps above, with one exception – in the Senders step, click Add > Group members (inside organization) in the top section, and select only the Marketing team.
Tip
You can also add more signature rules, e.g., for internal signatures. However, note that a signature marked as preferred is only added to an email when a matching signature rule applies. For example, if a user sets an internal signature as their preferred signature, it will not be added to external emails.
Each user can have only one preferred signature at a time.
Once your signature rules are ready, sign in to CodeTwo Admin Panel, select your tenant on the Tenants page, and go to the Outlook add-in tab. Next, click Show advanced settings and enable the Allow users to set their preferred CodeTwo Outlook (client-side) signatures in Outlook setting (Fig. 2.).
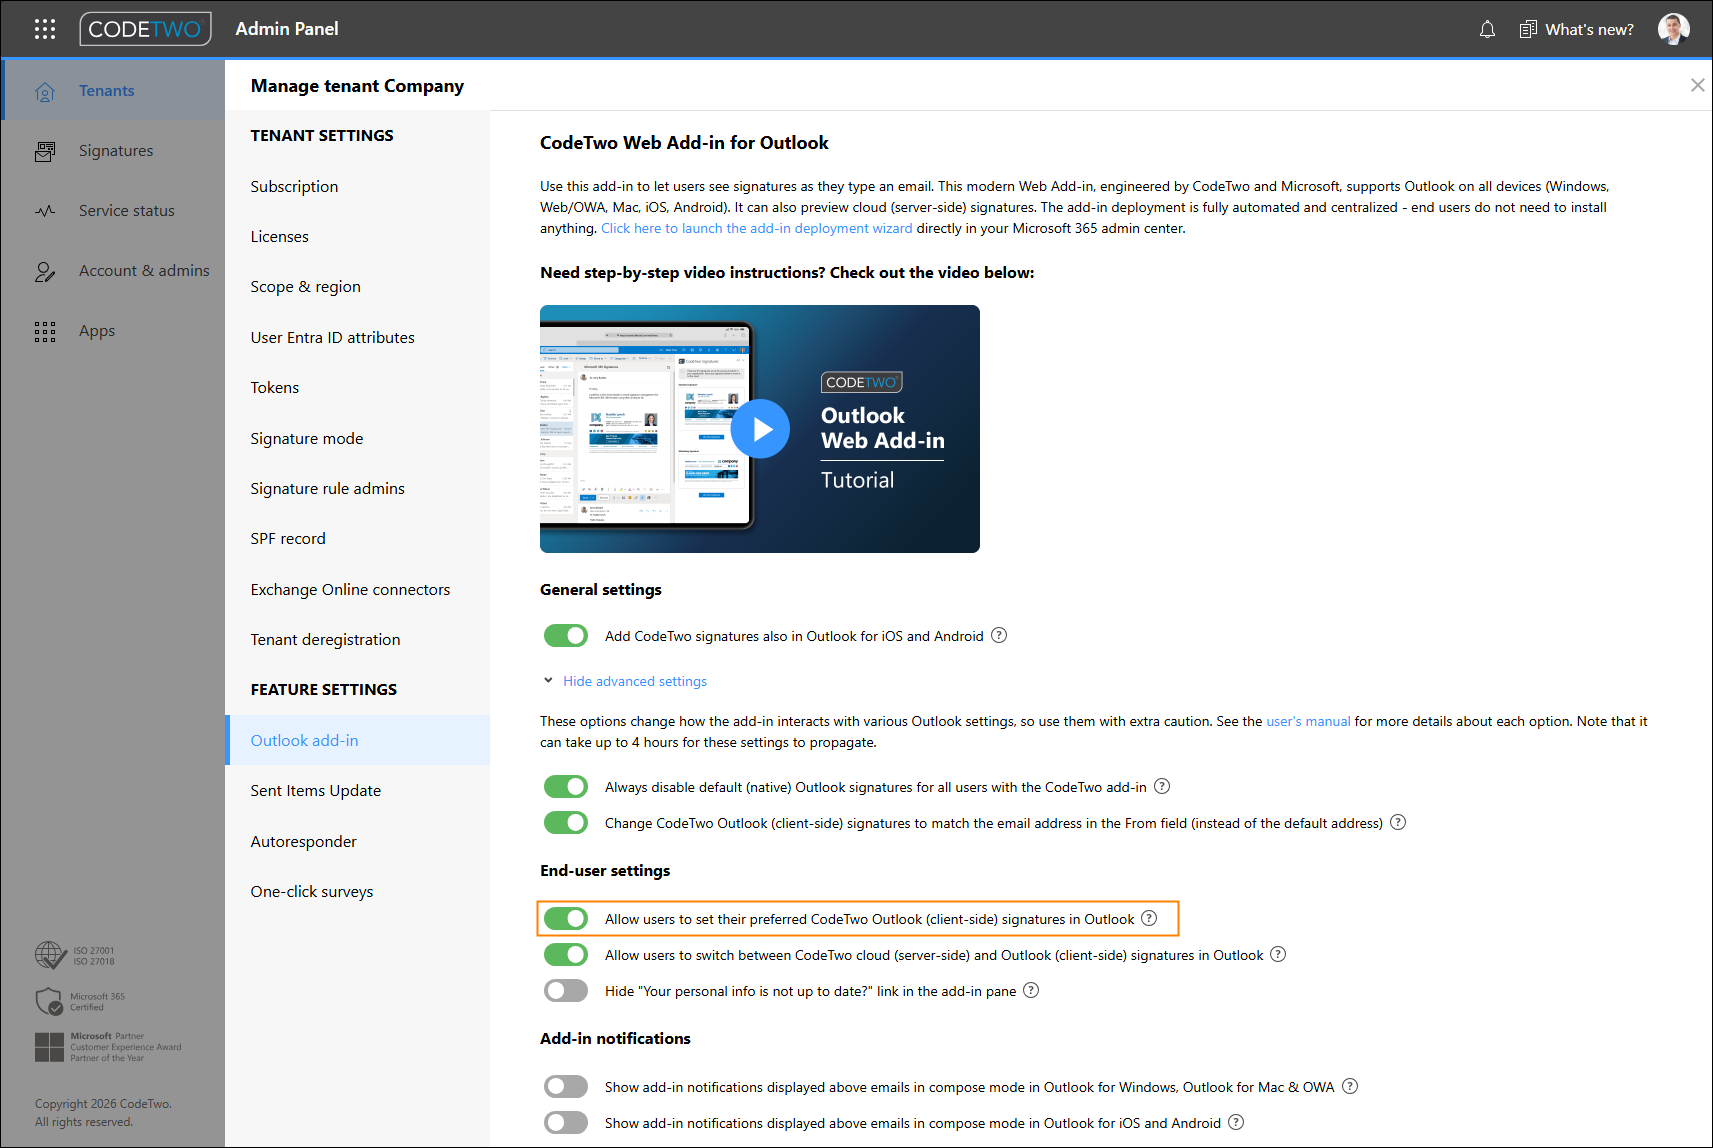
Fig. 2. Enable this setting to let users choose their preferred signature in the CodeTwo add-in pane.
That’s it – once the changes in the add-in settings propagate (it may take up to 4 hours), your users will be able to choose their preferred signature in Outlook. To do this, they only need to open the CodeTwo add-in pane, click … next to a relevant signature, and select Set as my preferred signature (Fig. 3.). Learn more about this option
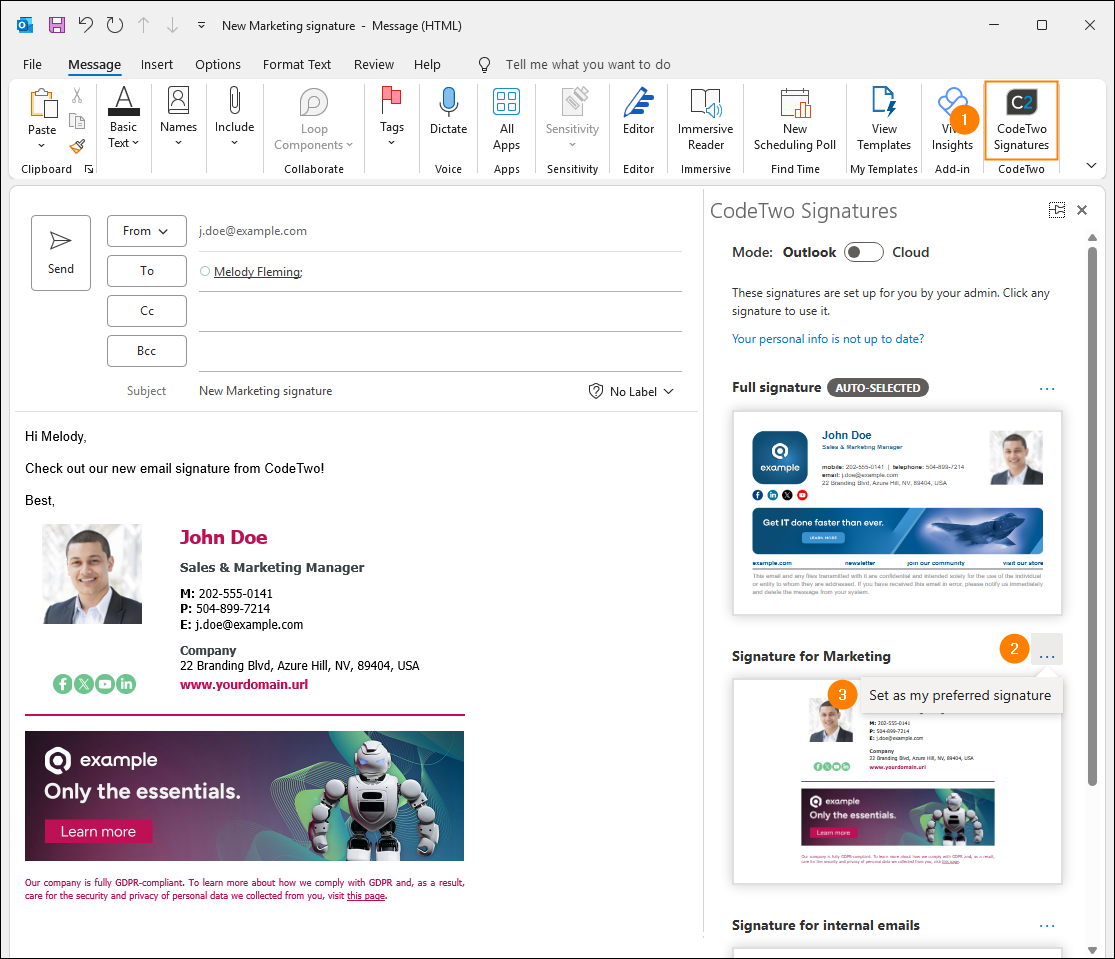
Fig. 3. Setting a preferred signature in the CodeTwo add-in pane.
Preferred signature selected in My user info
In this example, we’ll set up two signatures: a horizontal signature for regular company correspondence (it will also be used as the default company-wide signature) and a vertical version with matching visual elements, better suited for mobile devices (Fig. 4.). The preferred signature version selected by users in the My user info app will be automatically inserted into their emails.
Tip
The following instructions also apply to the other use cases mentioned at the beginning of the article.
If you use Outlook signatures, you can also let users select their preferred signature in the CodeTwo add-in pane. See the previous section to learn more.
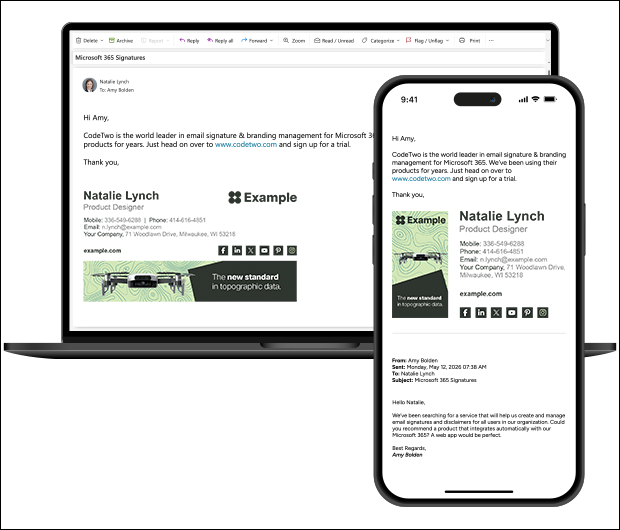
Fig. 4. In this example, users will be able to select either a horizontal or vertical signature template.
Create a custom attribute in the Attributes manager app
To start, sign in to the Attributes manager.
Important
By default, only Microsoft 365 global admins can sign in to the Attributes manager, but they can also grant access to other users. See this article to learn more.
If you use the manager for the first time, you need to consent to permissions requested by our web app on behalf of your organization.
In the CodeTwo custom attributes section, click the Add button (Fig. 5.).
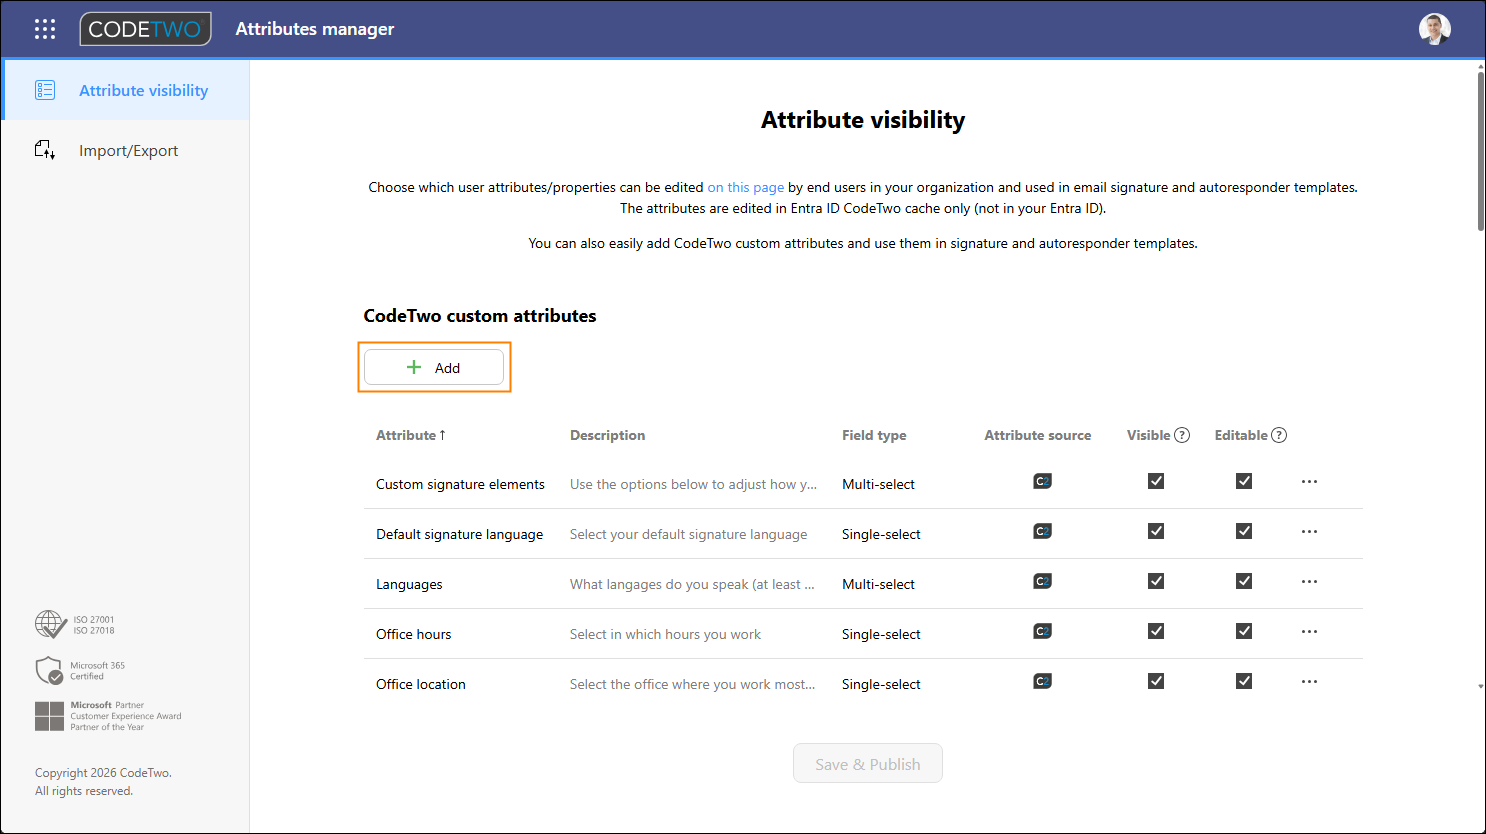
Fig. 5. Adding a custom attribute in the Attributes manager app.
In the window that opens, type the attribute’s name and (optionally) a description, and choose Single-select as the field type – this will allow users to select a single signature as their preferred one.
Next, enter signature template names in the Option fields, as shown in Fig. 6. These names will be used later to configure signature rules and will be displayed to users as available signature options in the My user info app.
You can include as many template names as needed using the Add option button.
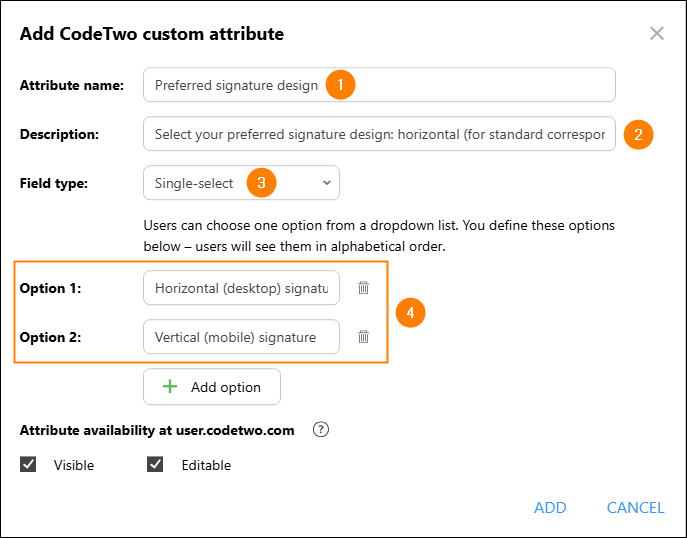
Fig. 6. Configuring the custom attribute for selecting the preferred signature.
After you enter all necessary options, leave the Visible and Editable checkboxes selected and click ADD.
Back in the Attributes manager’s main window, click the Save & Publish button to confirm your changes and make the new custom attribute available in other CodeTwo apps (Fig. 7.).
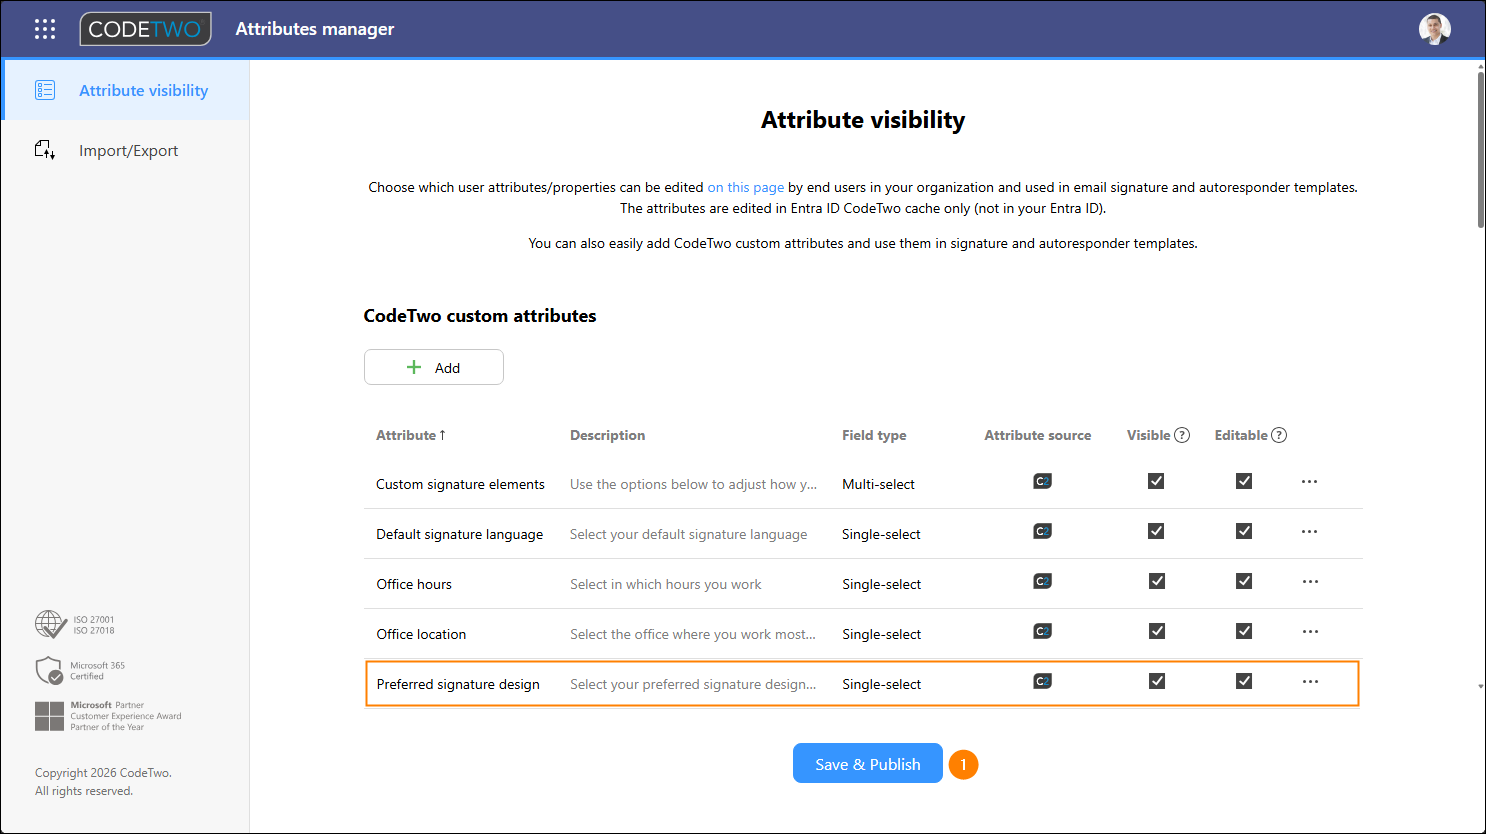
Fig. 7. Saving and publishing the new custom attribute in the Attributes manager app.
When the CodeTwo custom attribute is configured, you can move on to creating two (or more) email signatures your users will be able to choose from.
Create email signature templates in the Signatures app
Sign in to the Signatures app and create signature rules for the templates that your users will be able to choose. In this example, we’ll create:
- a rule for the horizontal, full-size signature that will also be used as the default company signature (see instructions), and
- a rule for the vertical, mobile-friendly signature (see instructions).
If you already have a relevant rule, you can simply edit its settings according to the instructions below. Also, if an existing rule adds your default company signature (for example, a full-size signature), you can leave it unchanged.
Use the links below for detailed instructions on how to create:
Create a signature template for the default company signature
This signature template will be used in the following cases:
- when a user selects this template as their preferred signature in the My user info app, or
- when a user doesn’t select any preferred signature at all.
In the Signatures app, click CREATE RULE and select Cloud (server-side) or Outlook (client-side). The rule editing pane will open.
In the Name step, enter the rule’s name and (optionally) a description. To make things easier, you can use a rule name that matches the corresponding option name configured earlier for the CodeTwo custom attribute value in the Attributes manager.
In the Senders step, click Add in the upper section and select All senders (as shown in Fig. 8.) or another option, depending on your organization’s needs for the default company-wide signature. Learn more about configuring senders
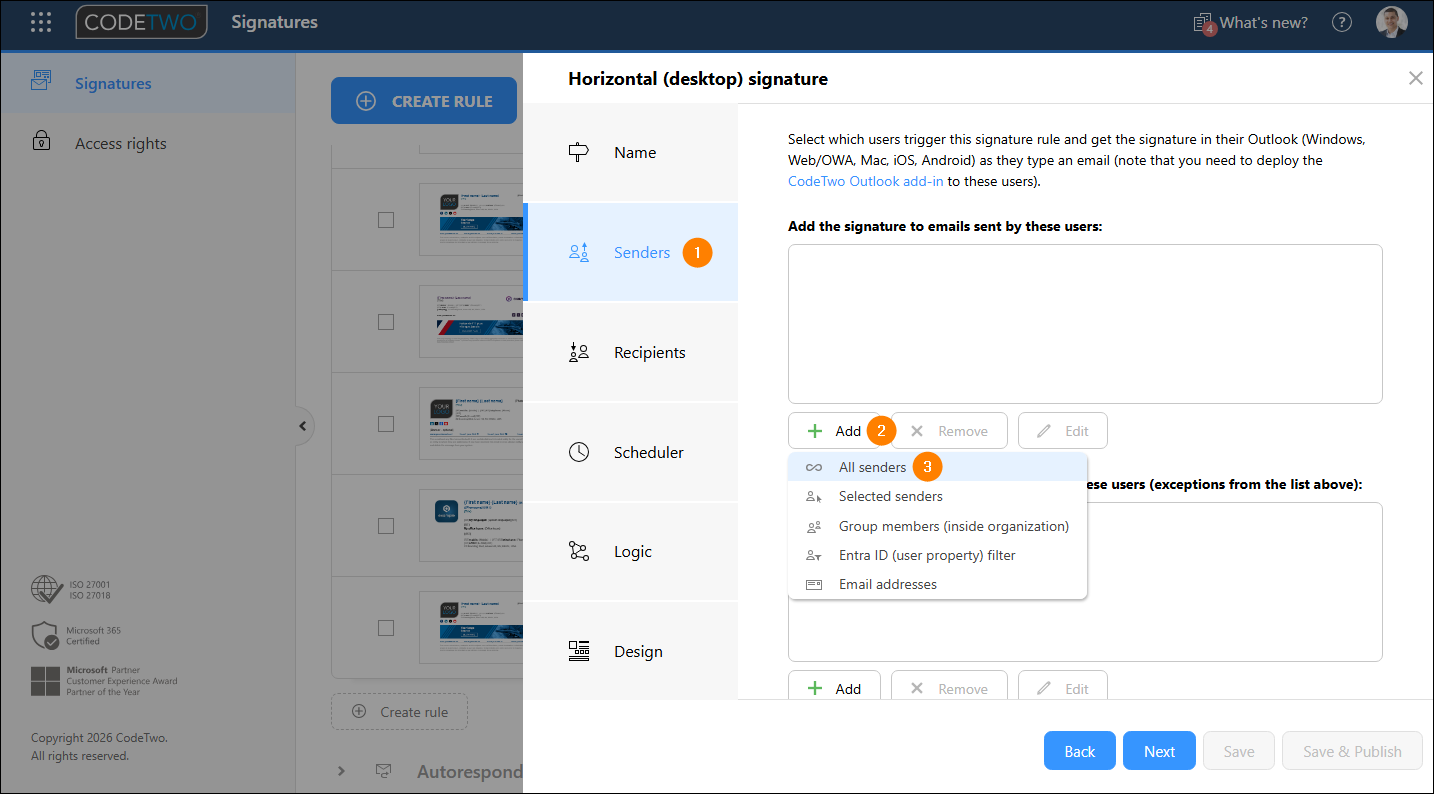
Fig. 8. Using the All senders option for the default company signature in the rule editing pane.
Configure conditions (and exceptions) for other steps as desired. For more details, see this article.
If you’re configuring an Outlook (client-side) signature, go to the Logic step and make sure the Set this signature as default for new messages and Set this signature as default for replies and forwards options are enabled. Learn more about these options
Go to the Design step and create an appropriate signature template (in this example – a horizontal template suitable for desktop apps).
Once done, submit your rule by clicking Save & Publish.
Create a signature template for the optional signature
This signature template will be used when a user selects it as their preferred signature in the My user info app.
In the Signatures app, click CREATE RULE and select Cloud (server-side) or Outlook (client-side). The rule editing pane will open.
In the Name step, enter the rule’s name and (optionally) a description. To make things easier, you can use a rule name that matches the corresponding option name configured earlier for the CodeTwo custom attribute value in the Attributes manager.
In the Senders step, click Add in the upper section and select the Entra ID (user property) filter option (Fig. 9.).
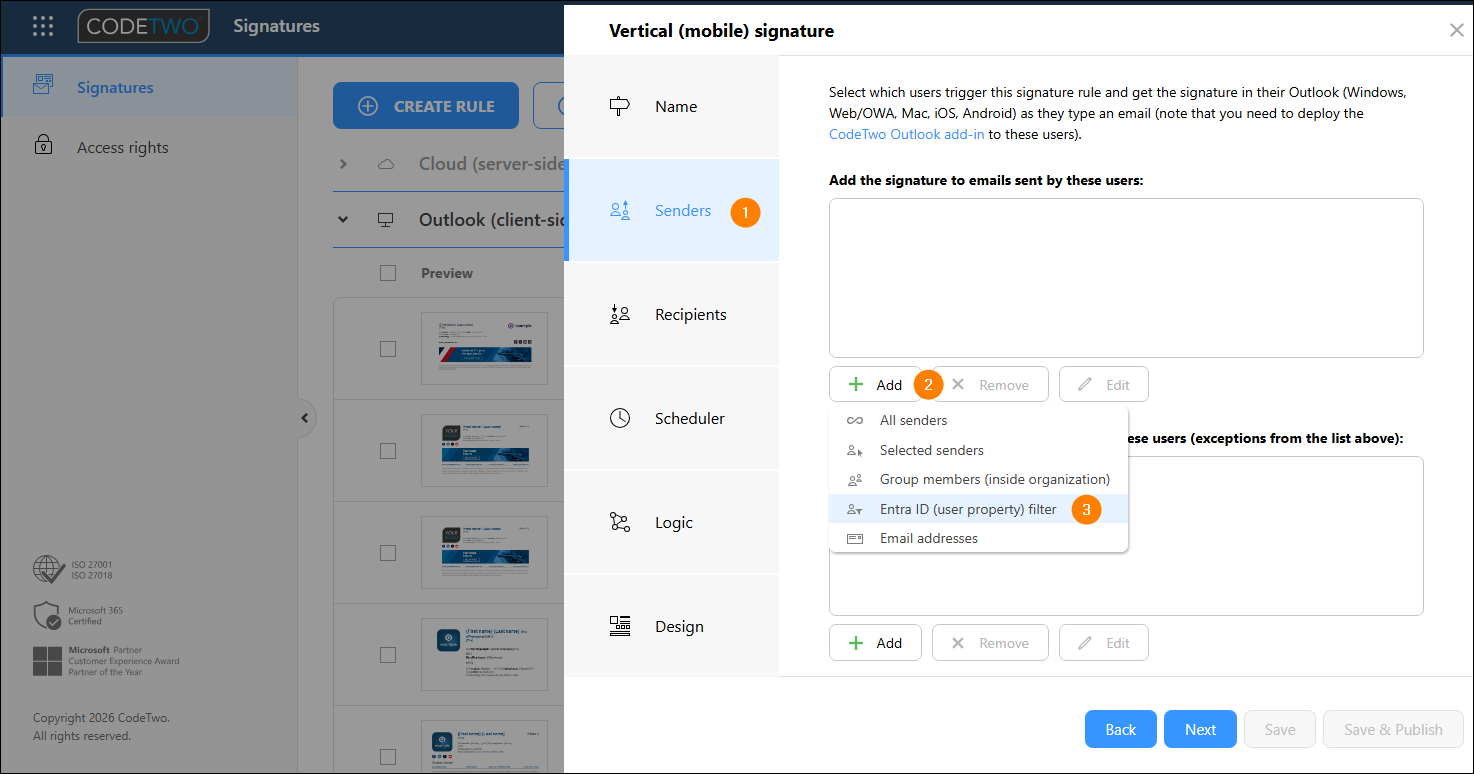
Fig. 9. Using the Entra ID (user property) filter option for the optional signature in the signature rule editing pane.
In the window that opens, select your new custom attribute in the User Entra ID attribute field, set the operator as Equals, and type an attribute value for the optional signature (previously entered in the attribute’s Option fields, as shown in Fig. 6.) in the Value field. Next, click Add to list and then OK (Fig. 10.).
Important
If the new custom attribute is not visible in the User Entra ID attribute field, you may need to refresh the Signatures app.
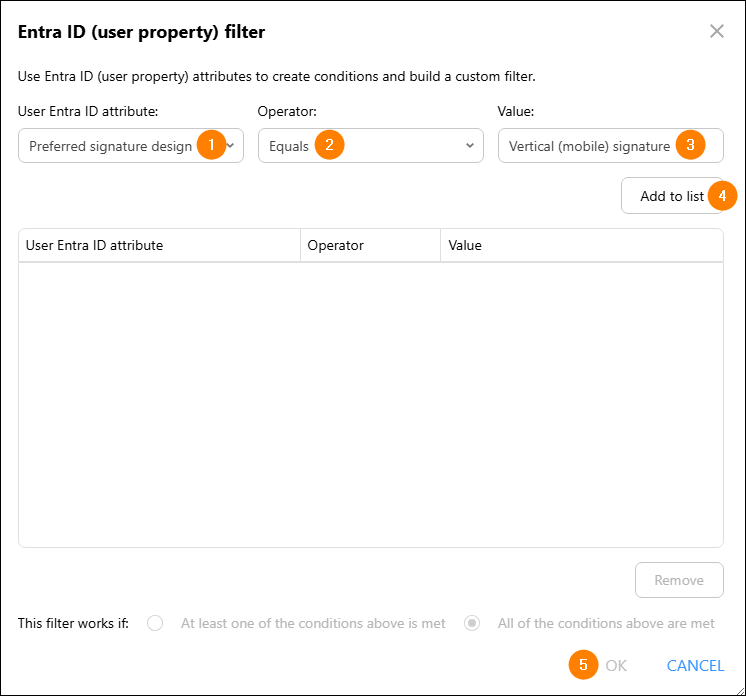
Fig. 10. Adding the condition to activate a signature rule based on a CodeTwo custom attribute value.
Configure conditions (and exceptions) for other steps as desired. For more details, see this article.
If you’re configuring an Outlook (client-side) signature, go to the Logic step and make sure the Set this signature as default for new messages and Set this signature as default for replies and forwards options are enabled. Learn more about these options
Go to the Design step and create an appropriate signature template (in this example – a vertical template suitable for mobile devices).
Once done, submit your rule by clicking Save & Publish.
If needed, repeat the steps to create more signatures that users will be able to choose.
When all the rules are ready, move them up the list of rules using the Move up button (Fig. 11.). Make sure the rules for optional signatures (such as the vertical version of a full-size horizontal signature) are placed before the default company signature. Learn more about rule processing logic
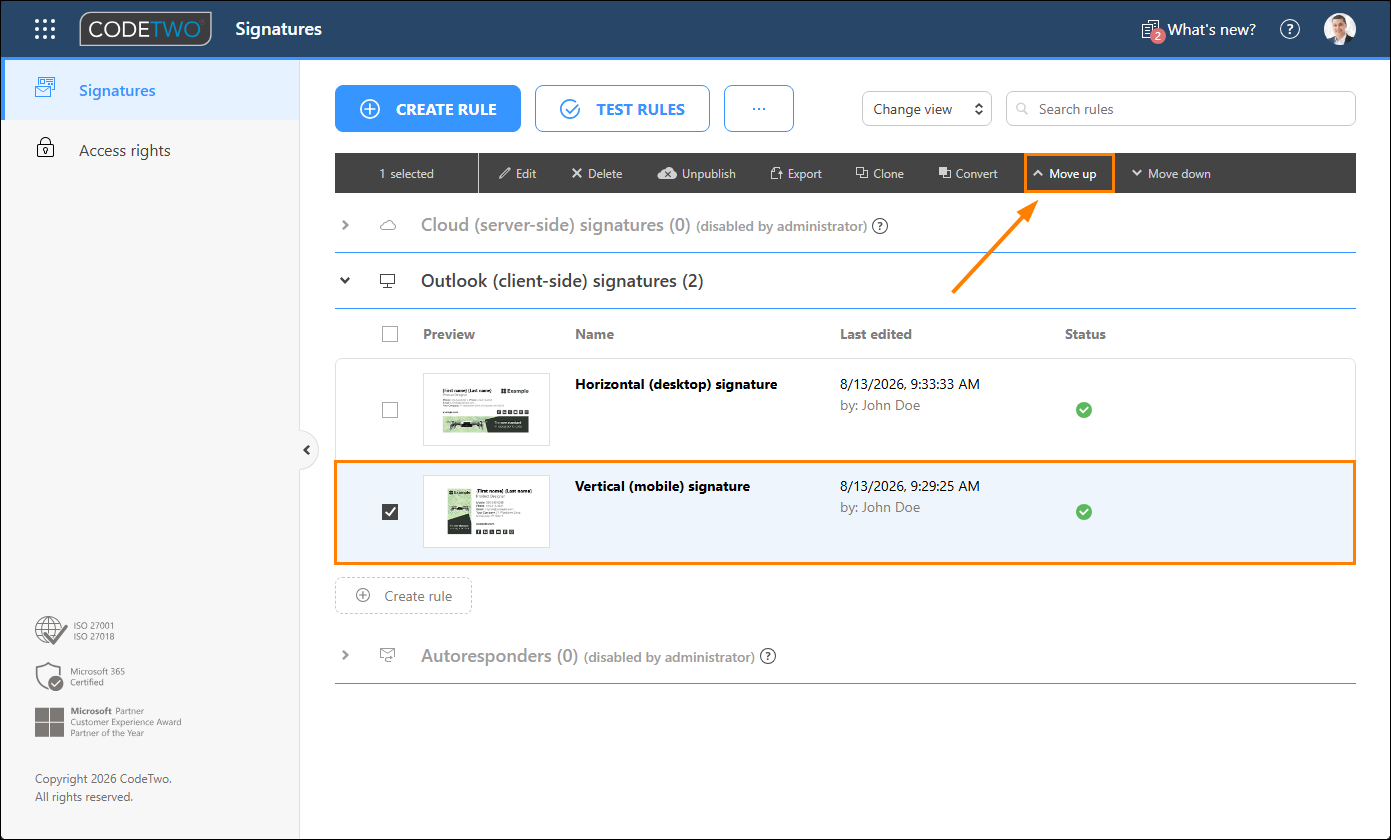
Fig. 11. Moving a signature rule up the list of rules.
How to change the preferred signature
Once you complete the steps described in the previous sections, users can sign in to the My user info app with their Microsoft 365 credentials and change their preferred signature template by selecting a relevant value of your new custom attribute (Fig. 12.).
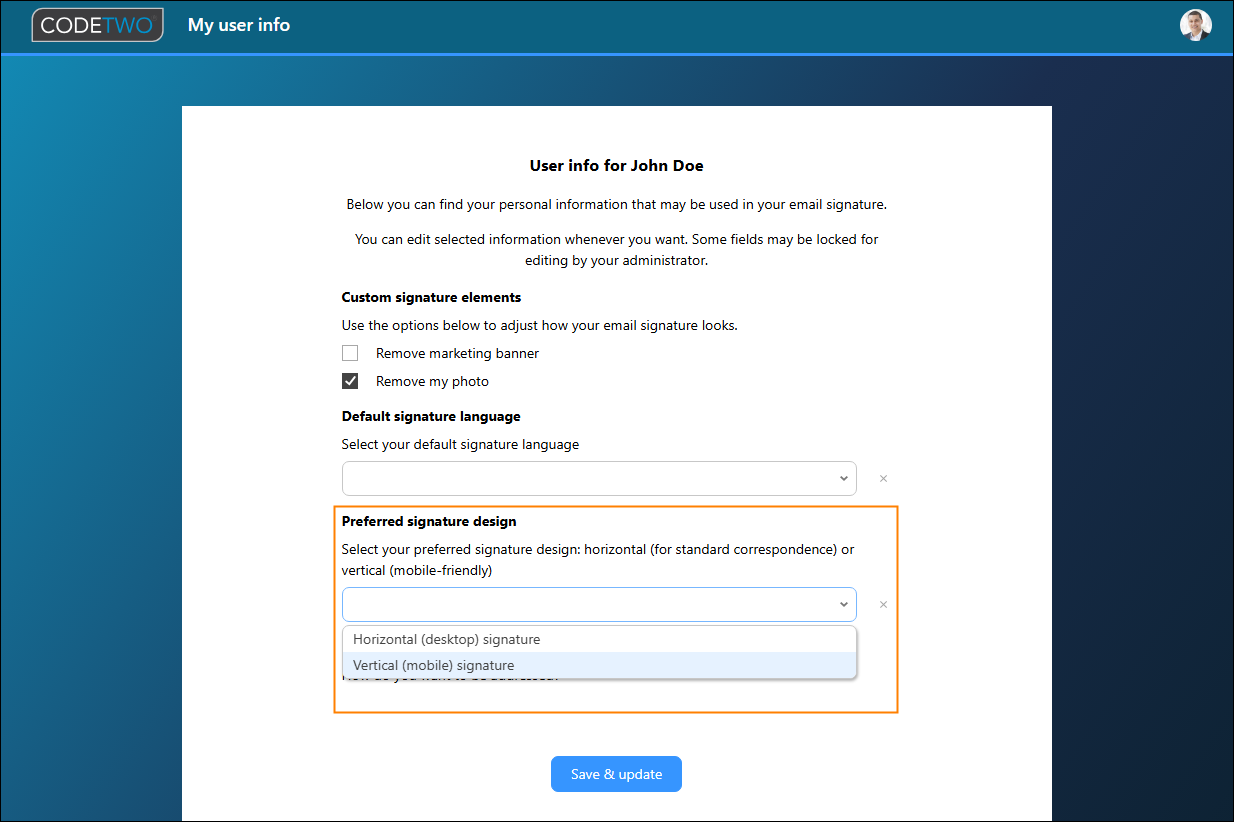
Fig. 12. Selecting a preferred signature template in My user info.
After users save changes in the app, their signatures will start to be added according to the selected value (Fig. 13.). If a user doesn’t choose any signature template version, the default company signature will be applied.
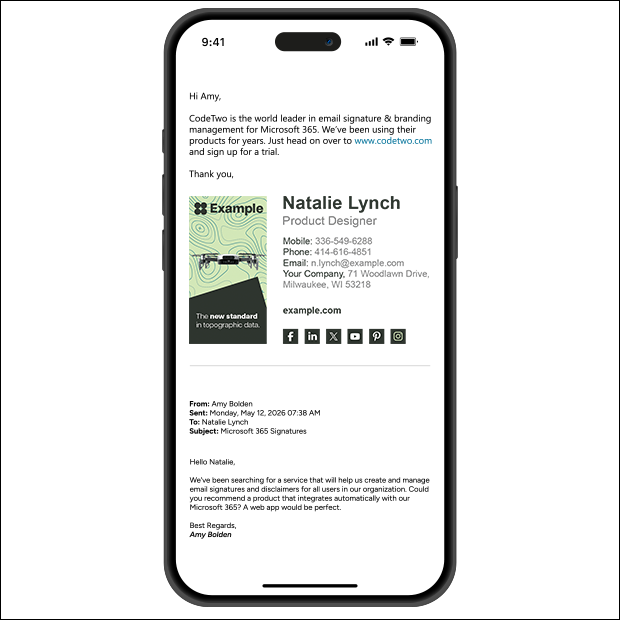
Fig. 13. A vertical signature design selected as the preferred template by a user.
See also
- How to add signatures in different languages - find out how to manage multiple-language email signatures and automate the process of adding them.
- How to add different signatures to messages sent by different users - learn how to configure our software to add different signatures for different senders, including senders belonging to a group.
- How to let users enable/disable autoresponders - see how you can combine the Autoresponder feature and CodeTwo custom attributes to give your users control over their automatic replies, including OOFs.
- How to use keywords to let users add or remove email signatures – learn how to allow users to manually change or remove their cloud (server-side) signatures by adding specified keywords to the email body or subject.
In this article