How to add different signatures to messages sent by different users
In this article you will learn how to configure CodeTwo Email Signatures 365 to add different signatures to messages sent by different senders or senders belonging to a specific group.
In a large organization with numerous departments as well as many different users, all with different needs, it is very useful to set up different email signatures for them. For example:
- The Sales and Marketing department, whose employees communicate directly with clients, can use an email signature with logos, a large promotional banner, social media icons and a legal disclaimer.
- Managers, who are usually not involved in promotional activities, will not need marketing banners, but a legal disclaimer and a confidentiality notice can be useful to them.
- C-level executives also have different needs regarding their email signatures. They usually communicate with officials or high-ranking officers in other companies and will want a very formal signature, free of anything that isn't strictly necessary.
New to CodeTwo?
Learn more about signature modes our solution can work in. See how to set up your first signature rule and design an email signature template.
How to configure the program for this scenario
Use the links below to learn how to assign different signatures for different groups of users (e.g. departments) or to individual users:
Cloud signatures
In this example, we will configure the program to automatically add different signatures to messages sent by:
- An individual user (CEO).
- A group of users (the Marketing team).
- Other users (default company signature).
For the signatures to be added flawlessly, you need to set up three signature rules and set the correct order in which they are executed.
Setting up a signature for an individual user
Start by adding a new cloud (server-side) signature rule (Fig. 1.) and naming it, e.g. Signature for CEO. You will be creating a number of signature rules, so using a good naming convention will help you manage them.
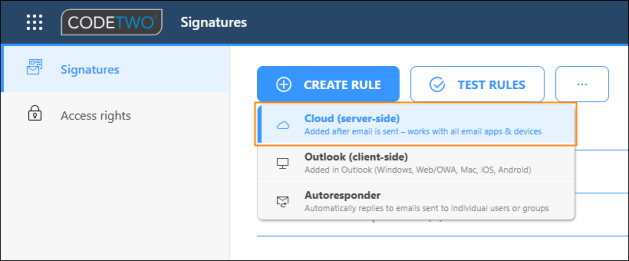
Fig. 1. Creating a new cloud (server-side) signature rule.
Go to the Senders step and click Add > Selected senders to open the Select users window. Use the search box or scroll through the users list to find the user you are looking for. Select the user (or users) and confirm by clicking OK (Fig. 2.). Define other conditions and exceptions as necessary (learn more).
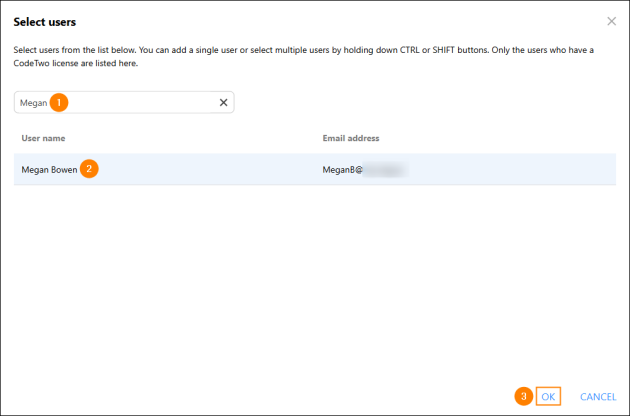
Fig. 2. Selecting a user to whom this signature rule should apply.
Next, go to the Logic step and make sure the options shown in Fig. 3. are set to defaults:
If this rule is applied > Do not process any more rules
If this rule is not applied > Process the next rule on the list
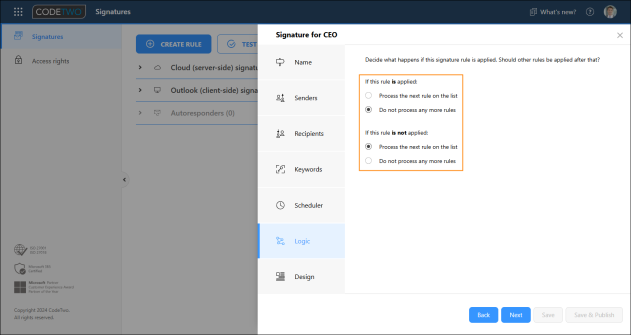
Fig. 3. Setting up the program to process further rules if the current rule is not applied.
In the Design step, click Edit signature and open an existing signature template or create a new one. Find out more about using the signature template editor
When your signature template is ready, click Apply & Close in the editor. Submit your rule by clicking Save.
Setting up a signature for a group of users
Create the next cloud (server-side) signature rule, as shown in Fig. 1., and name it accordingly, e.g. Signature for marketing.
In the Senders step, click Add > Group members (inside organization). Scroll through the list or use the search box to find the group you want (Fig. 4.). Keep in mind that you are not creating an email signature for the group itself, but for all the members of that group. See this article to learn how to add cloud (server-side) signatures to shared mailboxes.
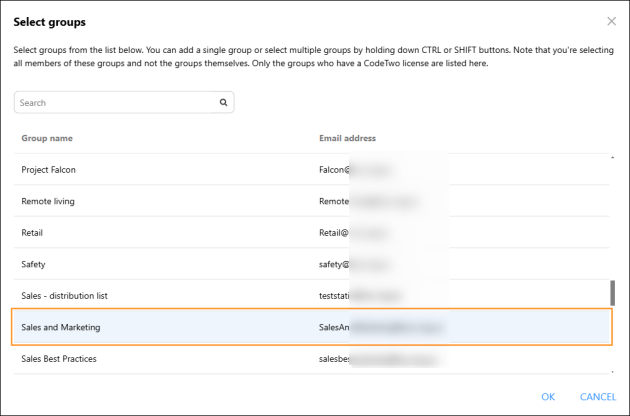
Fig. 4. Selecting a group whose members will receive the email signature defined in this signature rule.
If there is no Microsoft 365 group in your organization that lists all users who you want to include in a signature rule, you can either create such a group or use the Azure AD filter option instead. Learn more about this feature
Configure Recipients and Keywords as desired.
In the Logic step, leave the default options, as shown in Fig. 3.
Go to the Design step to prepare your signature template. In this example, the template will be used by the Marketing team, so it needs a promotional banner, links to company’s social media profiles, etc.
Once done, submit your changes by clicking Save.
Tip
If you want to create a signature rule that adds different signatures to users located in different domains, see this article for additional information.
Setting up a signature for other users (default company signature)
Create another cloud (server-side) signature rule (see Fig. 1.) and give it a name, e.g. Signature for all users. This signature rule will add an email signature to messages sent by all other users who will not receive a signature based on the conditions set in the rules created earlier.
Next, go to the Senders step and click Add > All senders (Fig. 5.). Define Recipients and Keywords as needed.
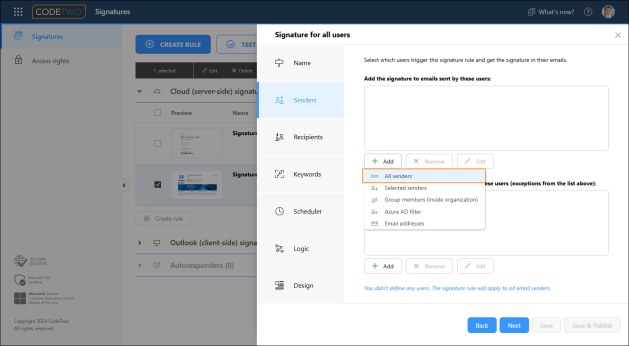
Fig. 5. Use this condition to add a signature to emails sent by every user in your organization.
In the Logic step, you can leave the default settings (as shown in Fig. 3.).
Next, in the Design step, click Edit signature and create a default signature template that will be used by your organization.
Finally, click Save to submit your rule.
Cloud (server-side) signature rule order
Signature rules are executed in accordance with the signatures list in the Signatures app's main window, from top to bottom (learn more). As a general rule, put the more restrictive rules first (at the top) and the least restrictive rules last (at the bottom).
Considering the example above, use the Move up and Move down buttons to put the rules in the following order: Signature for CEO > Signature for marketing > Signature for all users, as shown in Fig. 6.
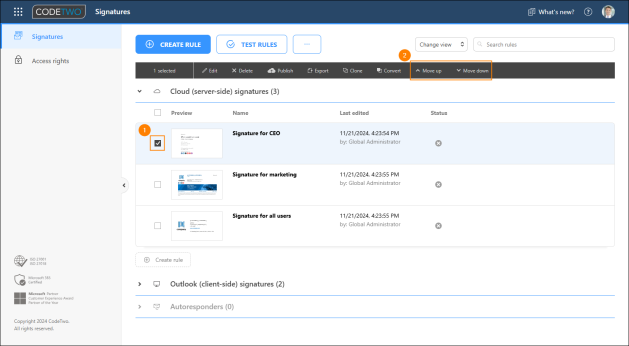
Fig. 6. Changing the order in which cloud (server-side) signature rules are executed.
When your signature rules are ready, select all of them and click Publish selected. This will make the signatures available for your users (Fig. 7.).
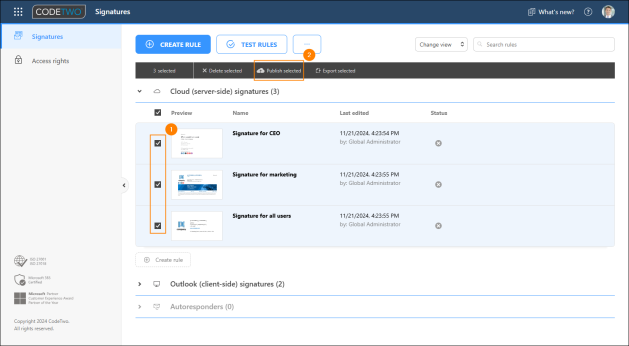
Fig. 7. Publishing the prepared signatures.
Outlook signatures
Important
This section explains how to create multiple CodeTwo Outlook signatures that users can manually select when composing emails in Outlook. If you want to set up dynamic signatures that update automatically based on selected email sender, see this article.
In this example, we will configure the program to automatically add different signatures to messages created in Outlook desktop and Outlook on the web (OWA) by:
- An individual user (CEO).
- A group of users (the Marketing team).
- Other users (default company signature).
For the signatures to be added flawlessly, you need to set up three signature rules and set the correct order in which they are executed.
Setting up an Outlook (client-side) signature for an individual user
Start by adding a new Outlook (client-side) signature rule (Fig. 8.) and naming it, e.g. Signature for CEO. Since you will be creating a number of signature rules, using a good naming convention will help you manage them easily. It will also allow your users to quickly identify their signatures in Outlook.
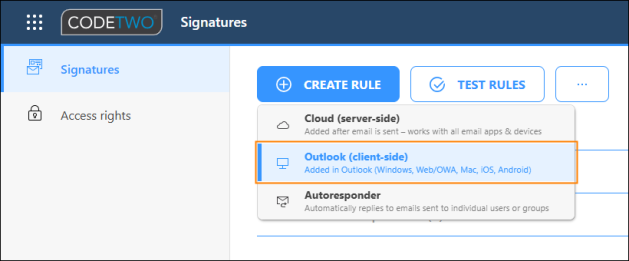
Fig. 8. Creating a new Outlook (client-side) signature rule.
Go to the Senders step. Click Add > Selected senders to open the Select users window. Use the search box or scroll through the users list to find the user you are looking for. Select the user and confirm by clicking OK (Fig. 9.).

Fig. 9. Selecting a user to whom this signature rule should apply.
Next, go to the Logic step. Select both the Set this signature as default for new messages and Set this signature as default for replies and forwards checkboxes (Fig. 10.). Learn more about the Outlook signature adding options
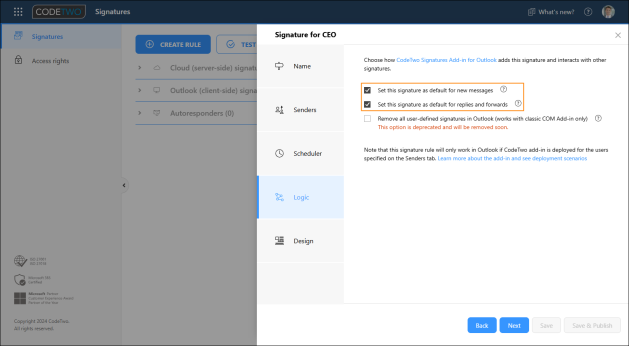
Fig. 10. Setting up the program to add the signature to all emails composed by the users who meet the conditions defined in this signature rule.
Go to the Design step, click Edit signature and open an existing signature template or create a new one. Learn how to use the signature template editor to design your email signature
When your signature template is ready, click Apply & Close in the editor. Submit your rule by clicking Save.
Setting up an Outlook (client-side) signature for a group of users
Create the second Outlook (client-side) signature rule (see Fig. 8.) and name it accordingly, e.g. Signature for marketing.
In the Senders step, click Add > Group members (inside organization). In the window that opens, either scroll through the list or use the search box to find the group you want (Fig. 11.). Keep in mind that you are not creating an email signature for the group itself, but for all the members of that group. See this article to learn how to add Outlook (client-side) signatures to shared or group mailboxes.

Fig. 11. Selecting a group for whose members will receive the email signatures defined in the rule being edited.
If there is no Microsoft 365 group in your organization that lists all users who you want to include in a signature rule, you can either create such a group or use the Azure AD filter option instead. Learn more about this feature
In the Logic step, use the same configuration as shown in Fig. 10. above.
Go to the Design step and create a signature template that will be used by the Marketing department (e.g. a signature with promotional banners, social media buttons, etc.).
Click Save to submit your changes.
Tip
If you want to create a signature rule that adds different signatures to users located in different domains, see this article for additional information.
Setting up an Outlook (client-side) signature for other users (default company signature)
To have an email signature for every other member of our organization, make sure to add another Outlook (client-side) signature rule. This signature rule will be used for those users who are not included in the signature rules created earlier.
Create an Outlook (client-side) signature rule (see Fig. 8.) and give it a name, e.g. Signature for all users.
Go to the Senders step and click Add > All senders (Fig. 12.).
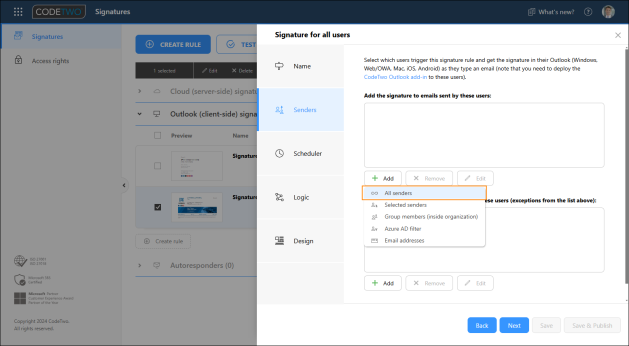
Fig. 12. Applying a signature rule to all employees.
In the Logic step, use the same settings as shown in Fig. 10.
Go to the Design step and create your default company signature.
Once done, click Save to submit your rule.
Outlook (client-side) signature rule order
Signature rules are listed in the Signatures app's main window and executed from top to bottom. The order in which they are listed is important, because if more than one rule applies to a given user, only one signature template will be automatically inserted as the default one in Outlook and OWA – the one that is executed the first (learn more). As a general rule, we recommend putting the more restrictive rules first (at the top) and the least restrictive rules last (at the bottom).
Considering the example above, use the Move up and Move down buttons to arrange the Outlook (client-side) signature rules in the following order: Signature for CEO > Signature for marketing > Signature for all users, as shown in Fig. 13.
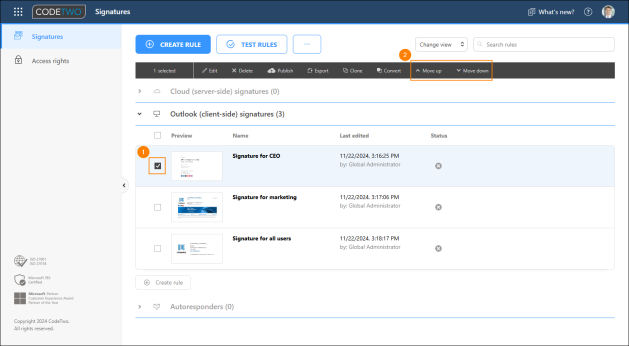
Fig. 13. Changing the order in which Outlook (client-side) signature rules are executed.
When you finish configuring your signature rules, select all of them and click Publish selected. This will make the signatures the signature templates available for your users (Fig. 14.).
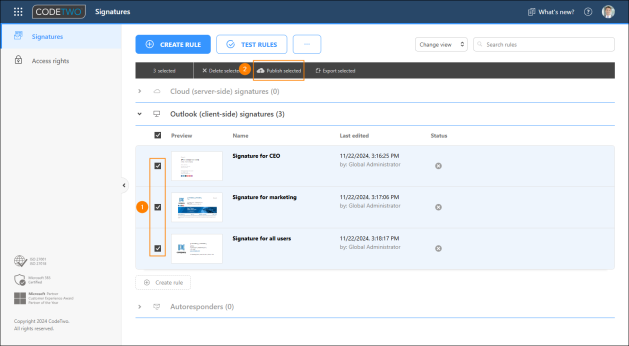
Fig. 14. Publishing the configured signatures.
Result
In case of cloud (server-side) signatures, CodeTwo Email Signatures 365 will automatically add the correct email signature based on who the sender is: the CEO, someone from the Marketing department (Fig. 15.) or any other employee. No further user interaction is required.
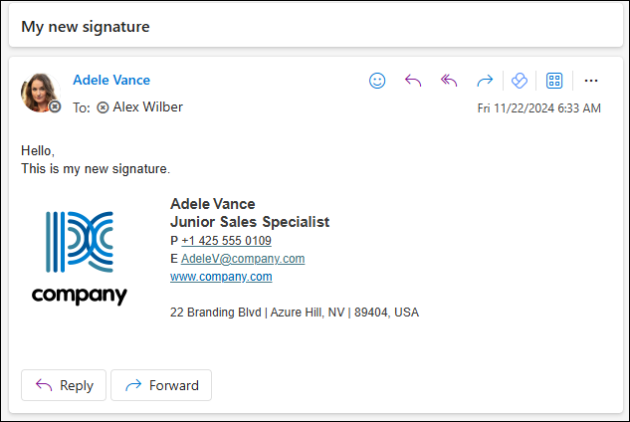
Fig. 15. An email sent by a junior sales specialist with a cloud signature added.
In case of Outlook (client-side) signatures, the users will have access to all signatures that are made available to them based on conditions and exceptions defined in Outlook (client-side) signature rules. The default signature is automatically added to emails as users start composing them in Outlook or OWA. Signature templates can be also viewed in the CodeTwo Signatures pane and inserted by using the Use this signature button, as shown in Fig. 16.
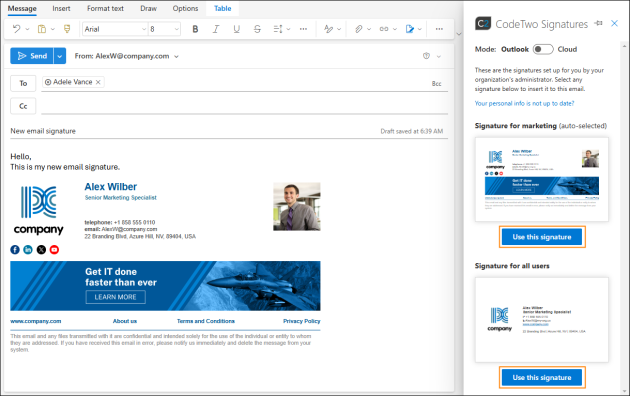
Fig. 16. Outlook (client-side) signatures can be viewed in and inserted from the CodeTwo Signatures pane.
In this article