How to add an email signature for a specific time only
Learn how to set up email signature marketing campaigns with limited running times to promote special offers or events.
CodeTwo Email Signatures 365 comes with the Scheduler feature that allows you to select a period of time during which a given signature template will be used. Then, after this time has passed, the program can automatically revert to the default signature or start using another signature that has been added for the following period. This feature is great for:
- running limited-time email marketing campaigns,
- using holiday-themed email signatures,
- informing recipients about upcoming events or sharing important news for a limited period of time,
- and more.
New to CodeTwo?
Learn more about signature modes our solution can work in. See how to set up your first signature rule, design an email signature template.
For more information about the Scheduler, see this article.
How to configure the program for this scenario
The Scheduler is available with identical configuration options in CodeTwo Email Signatures 365 working in both cloud (server-side) mode and Outlook (client-side) mode. While it is fully possible to obtain almost identical results in both modes, note the features characteristic for each of them, as indicated in the examples below:
- Cloud (server-side) mode – this example shows how you can temporarily replace a standard banner used in a corporate signature with a holiday-themed banner.
- Outlook (client-side) mode – learn how to change the default email signatures in Outlook desktop and Outlook on the web (OWA) for specific days to remind customers about recurring offers, e.g., weekend sales.
Cloud mode (using a holiday-themed email signature for a limited time)
Follow the steps below to learn how to set up the Scheduler in CodeTwo Email Signatures 365 to temporarily replace the standard banner used in a cloud (server-side) signature with a more festive version.
Start by opening app.codetwo.com and selecting an existing cloud (server-side) signature rule. This can be, for example, a rule that adds your standard (default) company signature to emails sent by all employees. To keep the same configuration in the holiday-themed rule, you can clone the existing rule by using the Clone button in the top menu.
Name the newly created signature rule accordingly, e.g., Winter holiday signature.
Next, go to the Scheduler step and activate the feature (Fig. 1., item 1). This will enable additional configuration options (Fig. 1., item 2).
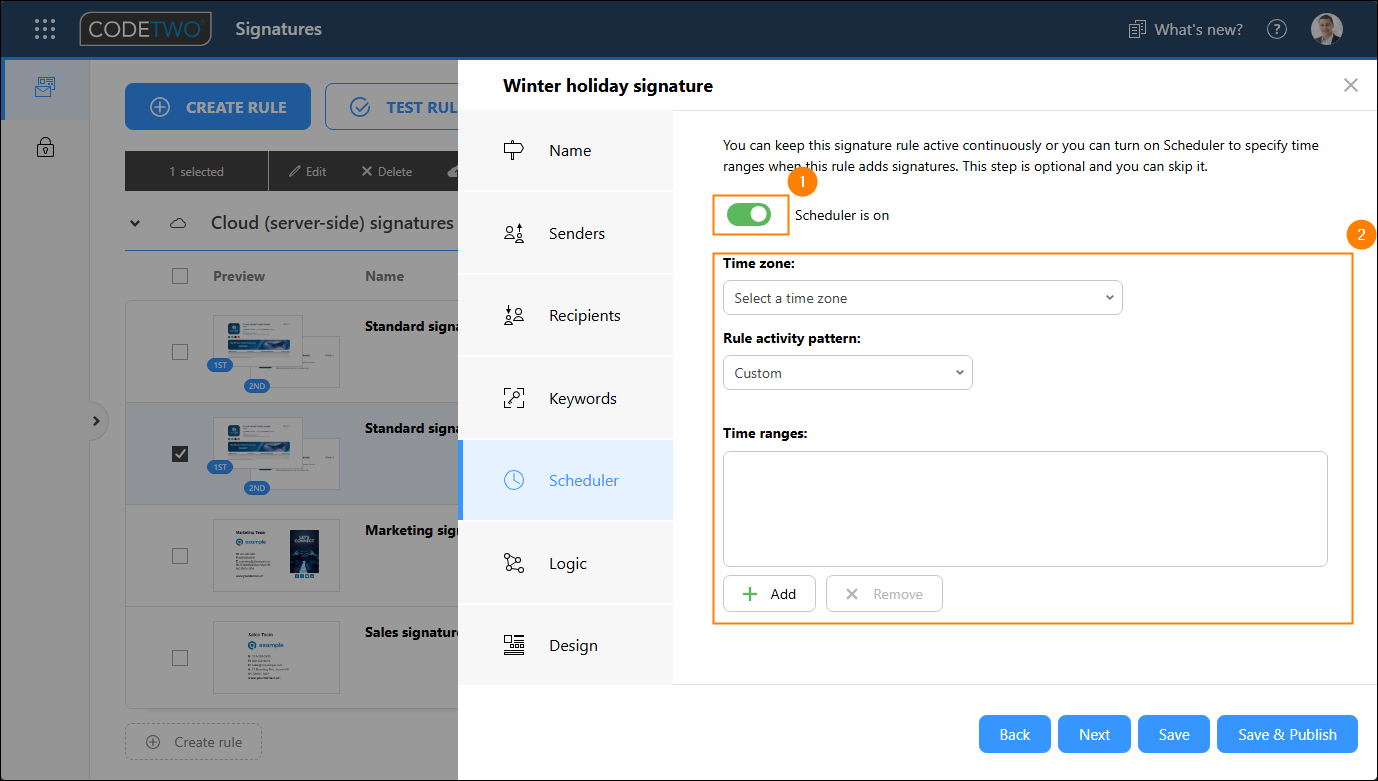
Fig. 1. Activating the Scheduler (1) and enabling the feature's configuration options (2).
Choose the appropriate time zone. Select the Custom activity pattern and click Add to configure the time settings. In the Rule date range window, set the Start time and End time, and leave the All day event checkbox selected (Fig. 2.). Confirm by clicking OK.
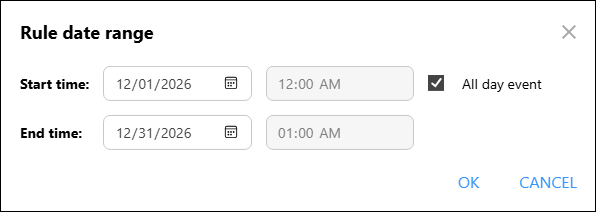
Fig. 2. Setting the date range for the temporary signature rule.
In the Logic step, leave the default rule processing options.
Finally, go to the Design step and click Edit signature to open the signature template editor. You can either add a holiday-themed banner to your standard signature template or create a new template from scratch. You can also use one of many free seasonal templates available here. To learn more about using the signature template editor, check this quick guide.
When you are done, save your signature rule and apply it in your organization by clicking Save & Publish.
Once you publish the rule, a Scheduler icon appears next to its name on the list of rules (Fig. 3.) to remind you that this rule has the Scheduler set up. This icon will also change to indicate if the rule is currently active ( ) or inactive (
 ), based on the Scheduler settings.
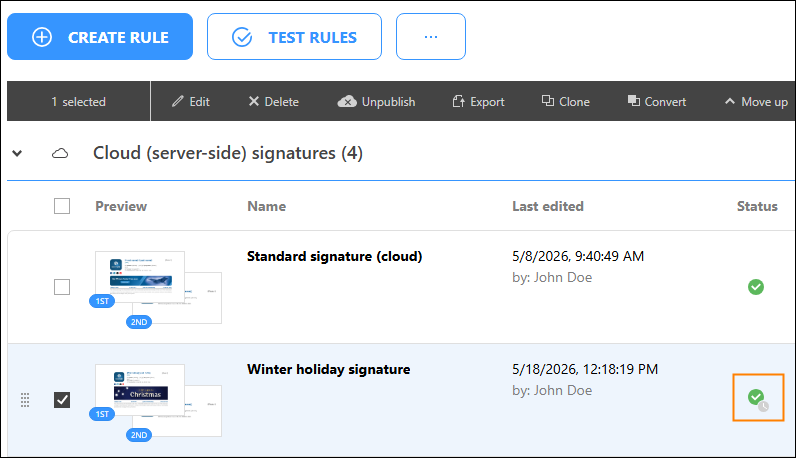
Fig. 3. This icon indicates that the rule is scheduled and is currently inactive.
Use the Move up button to position the new rule at the top of your cloud (server-side) signatures list, as shown in Fig. 4. By doing so, you can make sure that once this rule is activated, it will be executed before any other rule.
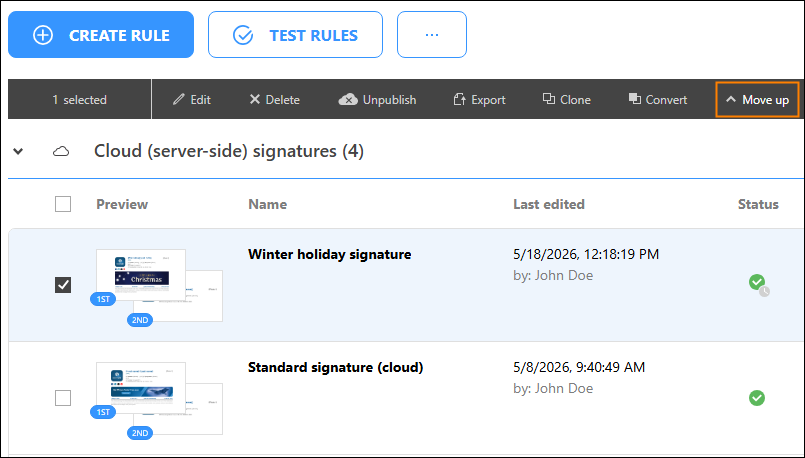
Fig. 4. Using the Move up button to place a rule on top of the cloud (server-side) signatures list.
Now, your holiday-themed signature will be added to emails within the specified time period, as shown in the Result section.
Read on to explore another example of using the Scheduler, as it presents a different use scenario. Although discussed from the perspective of Outlook (client-side) signature mode, you can use this method for cloud (server-side) signatures as well.
Outlook mode (changing the default email signatures in Outlook and OWA for specific days only)
Follow the steps below to learn how to set up the Scheduler in CodeTwo Email Signatures 365 so that email signatures with a special banner (e.g., informing about special sales that occur on weekends) are added by default to messages composed in Outlook (desktop, mobile & OWA) on Thursdays and Fridays.
Open app.codetwo.com and select the Outlook (client-side) signature rule that adds your default signature. To keep the same configuration, you can clone the existing rule by using the Clone button in the top menu.
Name the newly created rule accordingly, e.g., Special offer signature.
Then, in the Scheduler step, activate the feature (Fig. 5., item 1). This will enable additional configuration options (Fig. 5., item 2).
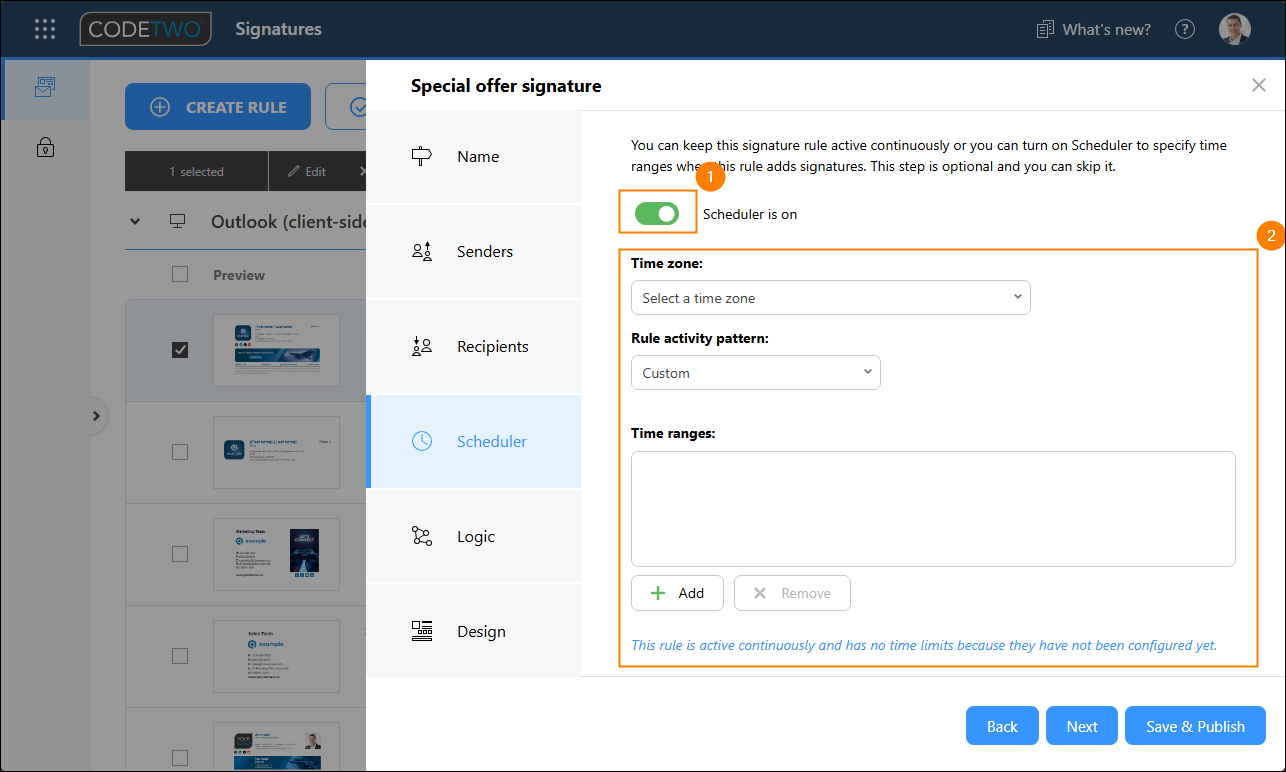
Fig. 5. Activating the Scheduler feature (1) and enabling its configuration options (2).
Choose the appropriate time zone. Select the Weekly activity pattern. Leave the Rule activity time as All day and select the rule to be applied every 1 week on Thursdays and Fridays by using the correct checkboxes. Finally, set the Date range to best suit your needs. For example, if the sale will last for a month only, set the start date as the first day of the month and the end date as the last day, as shown in Fig. 6.
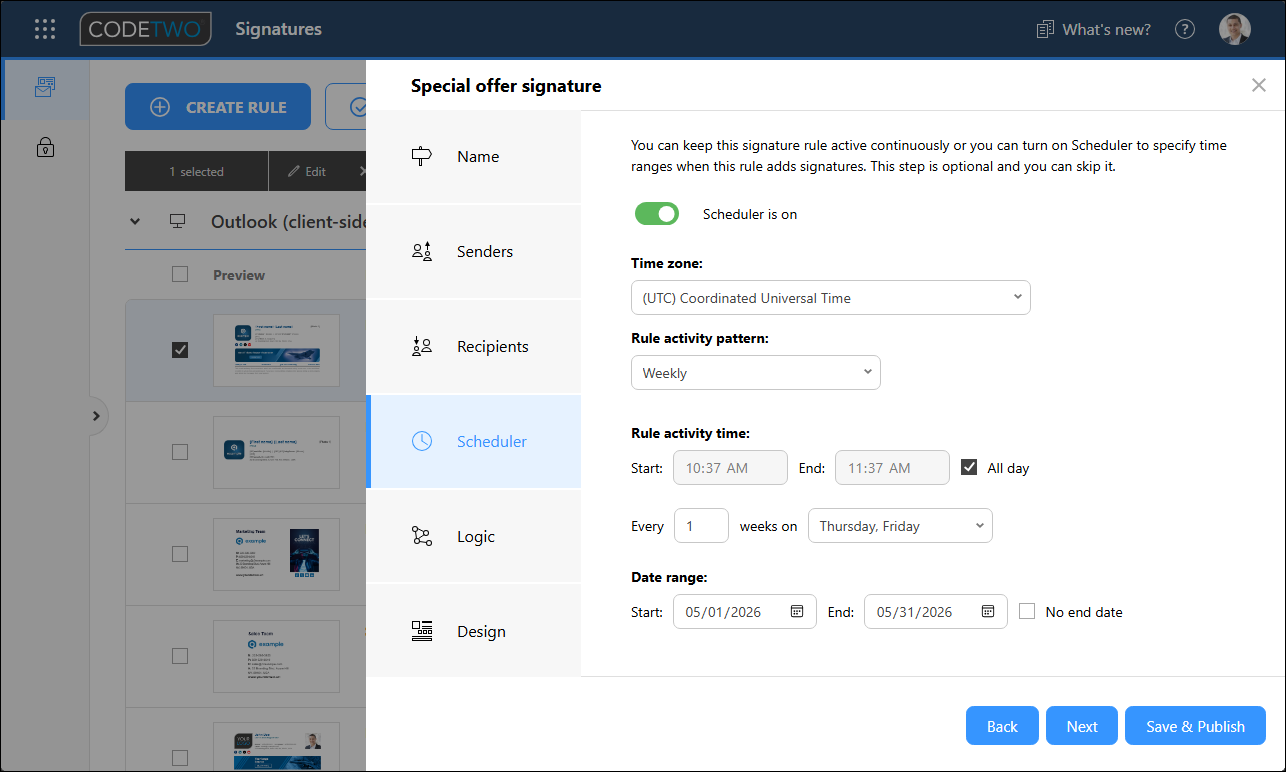
Fig. 6. The Scheduler configured to make the selected rule active on Thursdays and Fridays throughout May.
Next, go to the Logic step. Select the Set this signature as default for new messages and Set this signature as default for replies and forwards options.
Finally, go to the Design step and click Edit signature to open the signature template editor. Edit your existing template, e.g., by adding a different banner, so that it informs your recipients about the sale. To learn more about using the signature template editor, check this quick guide.
When you are done, save your signature rule and make it available to your users by clicking Save & Publish.
Once you publish the rule, a Scheduler icon appears next to its name on the list of rules (Fig. 3.) to remind you that this rule has the Scheduler set up. This icon will also change to indicate if the rule is currently active () or inactive (), based on the Scheduler settings.
Use the Move up button to position this rule at the top of your Outlook (client-side) signatures list, as shown in Fig. 7. This way, you make sure that this rule automatically inserts the defined signature template to all emails being composed in Outlook and OWA on specific days, even if more rules are configured to add the default signature.
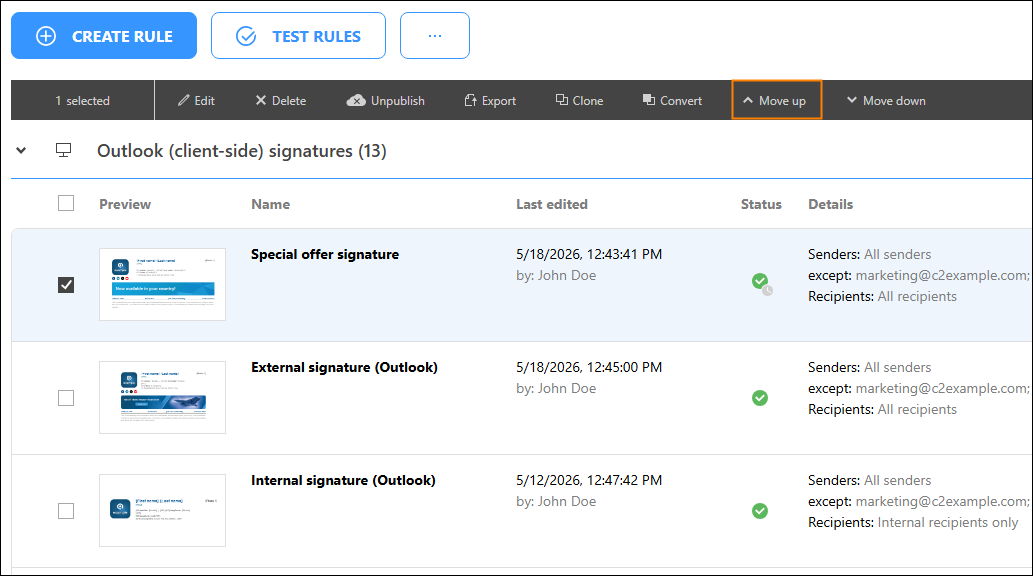
Fig. 7. Using the Move up button to place a rule on top of the Outlook (client-side) signatures list.
Now, your special offer signature will be added to emails on Thursdays and Fridays during the specified month, as shown in the Result section.
Explore the previous example of using the Scheduler, too, as it presents a different use scenario. Although discussed from the perspective of cloud (server-side) signature mode, you can use this method for Outlook (client-side) signatures as well.
Result
In the first scenario, the cloud (server-side) rule automatically adds the signature with a holiday-themed banner to emails within the time period specified in the Scheduler (Fig. 8.). When this period ends, the rule’s conditions (time restriction) will no longer be met, and this signature will not be added to emails.
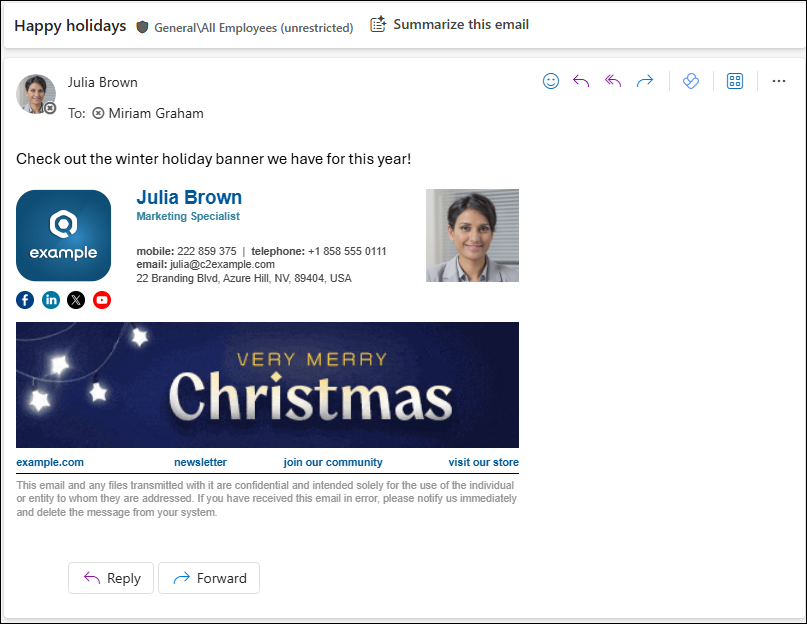
Fig. 8. A holiday-themed signature added to an email over the selected time period.
In the second scenario, the Outlook (client-side) rule changes the default email signature used in Outlook on Thursdays and Fridays, within the selected time period. In other words, when users compose their messages on Thursdays and Fridays, the signature with a promotional banner is automatically inserted into the email body. Additionally, users can always select another available signature by clicking it in the CodeTwo add-in pane (Fig. 9.).
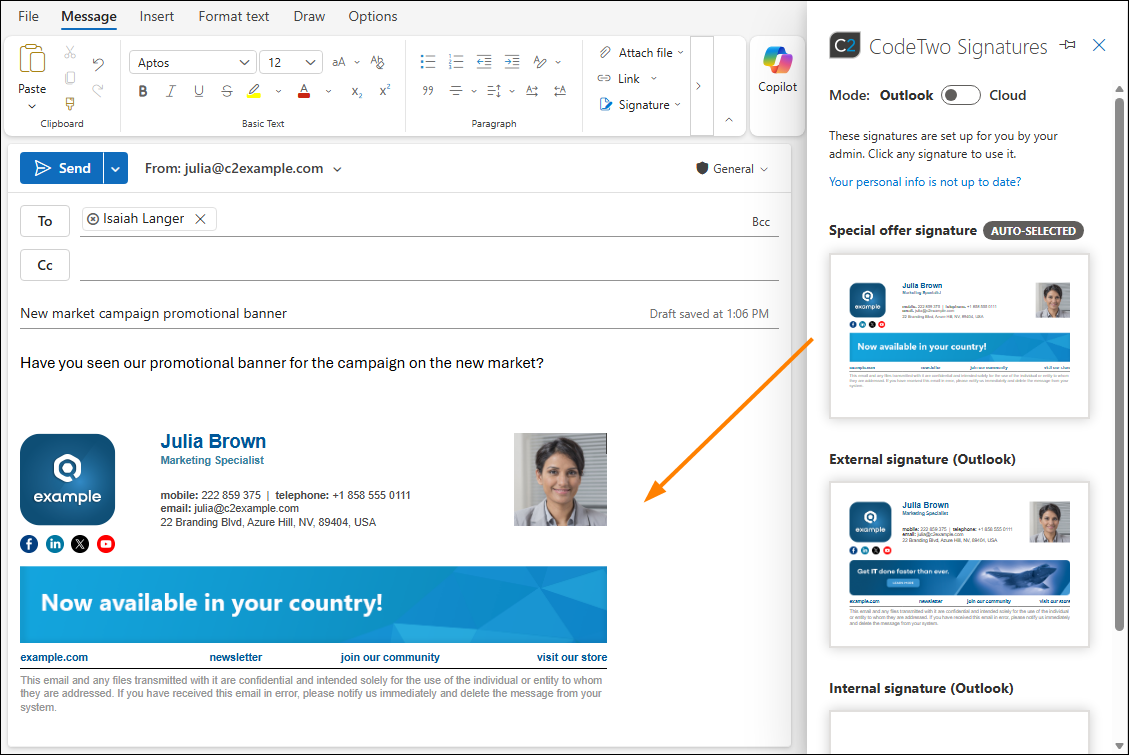
Fig. 9. A signature with a promotional banner is added automatically on specified days, with other signatures available in the CodeTwo add-in pane.
In this article