How to add different signatures to emails sent to different recipients
In this article, you learn how to use CodeTwo Email Signatures 365 to add different signatures depending on the recipients of your messages.
You might consider setting up a different signature template for emails sent to an individual person or a group of people to, for example:
- include different contact details while sending emails to specific recipients,
- run targeted email campaigns and add e.g. personalized or region/industry-specific promotional banners, directed at selected recipients,
- use signatures in different languages,
- include different legal disclaimers when sending messages to recipients from different countries or states, to comply with their local laws,
- include any other additional information that you think may be necessary only for some of your recipients/customers.
If you would like to know how to set up the program to add different signatures to internal and external users, refer to this article instead.
New to CodeTwo?
Learn more about signature modes our solution can work in. See how to set up your first signature rule and design an email signature template.
How to configure the program for this scenario
Use the links below, depending on your signatures type:
Cloud (server-side) signatures
The program can be configured to automatically add signatures to emails based on who the recipient is. In this example, we will set up three cloud (server-side) signature rules, with scopes of recipients ranging from the narrowest to the broadest:
- A rule for adding a signature to emails sent to a specific group of users only.
- A rule for adding a signature to emails sent to specific domain(s).
- A rule for adding a default signature to emails sent to recipients that are not covered by any other signature rule.
For the signatures to be added flawlessly, you need to set the correct order in which the rules are executed.
Creating the first signature rule for adding a signature to emails sent to a specific group of users
First, create a new cloud (server-side) signature rule (Fig. 1.). Let's name it e.g. Signature for Sales Team.
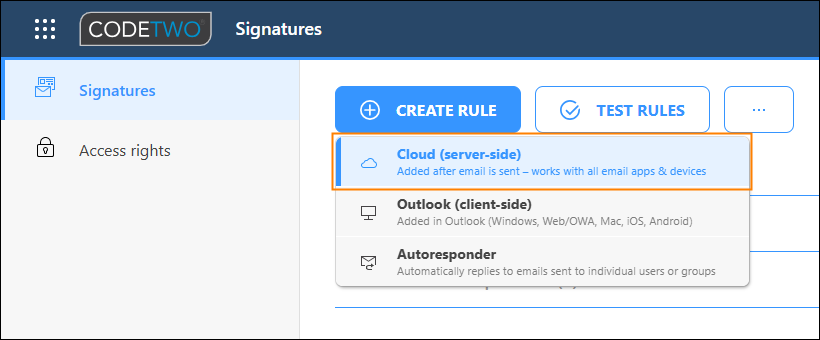
Fig. 1. Creating a new cloud (server-side) rule.
In the Recipients step, specify a group of recipients this signature rule will apply to.
- For internal recipients (users within your company), click Add > Group members (inside organization) and select an existing group, distribution list, etc. from your Microsoft 365 tenant, e.g. Sales Team (Fig. 2.). Click OK to apply.
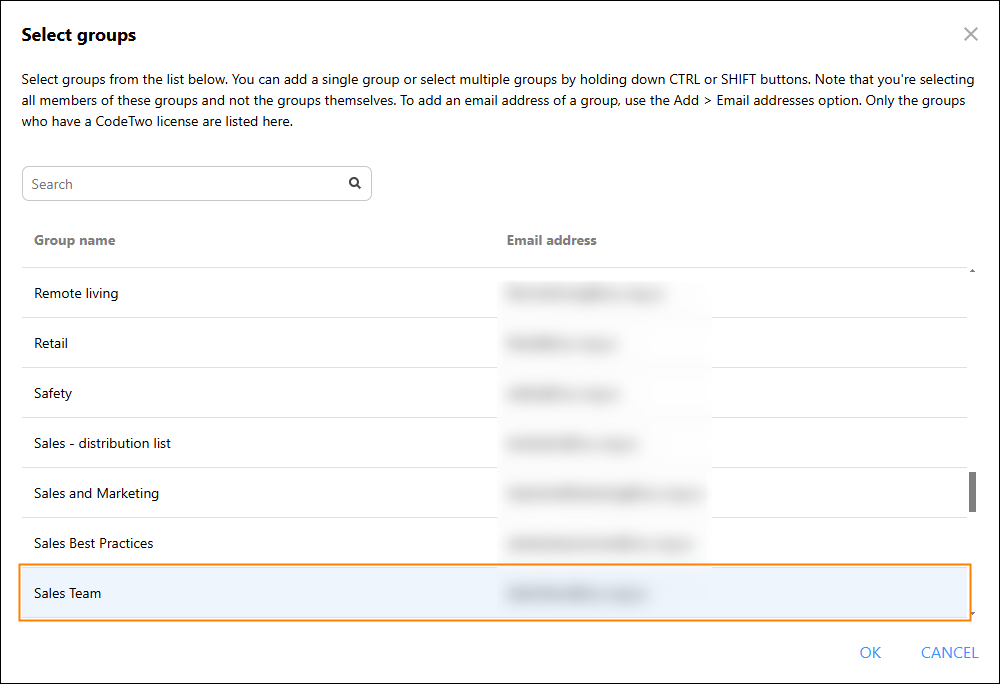
Fig. 2. Use this option to apply a signature to emails sent to a group of users from your organization.
- For external recipients, click Add > Email addresses and provide a specific email address. If you want this rule to apply to all contacts within a specific company's domain, enter an email address in the following format: *example.com (Fig. 3.). Click OK to apply.
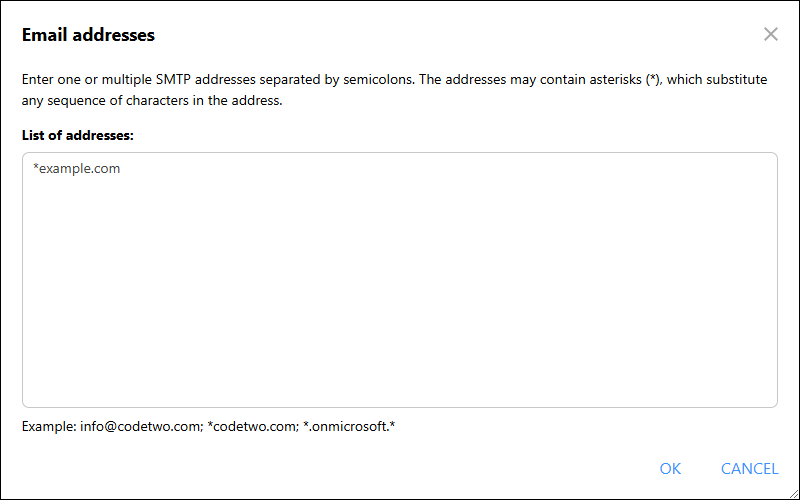
Fig. 3. Use this option to apply a signature to emails sent to contacts outside your organization.
In the Logic step, leave the default options, as shown in Fig. 4.
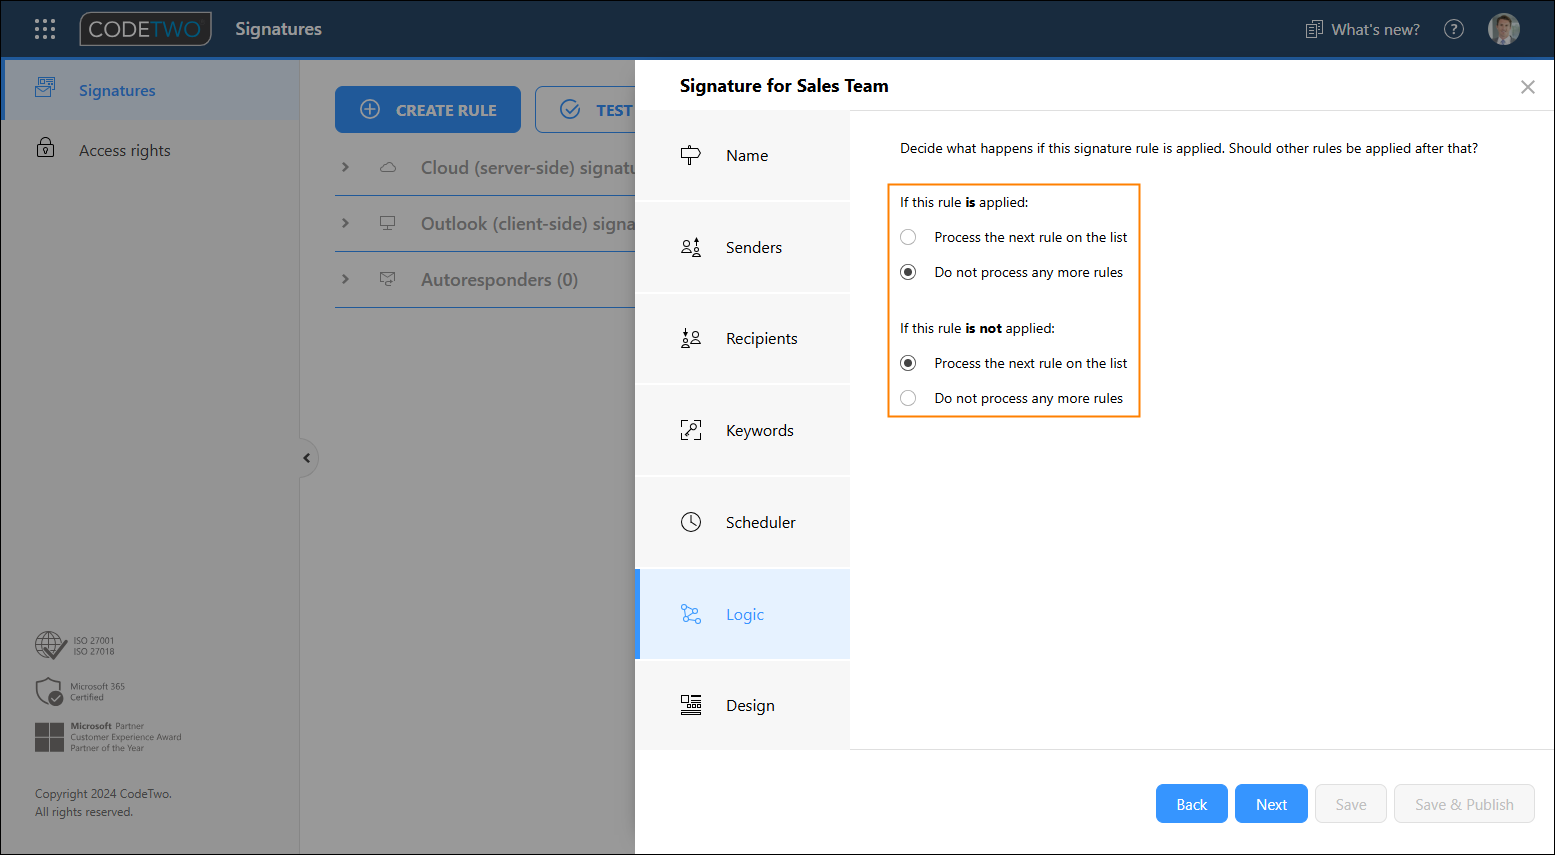
Fig. 4. Default signature processing options.
In the Design step, click Edit signature to open the signature template editor. Design a signature template for these recipients or select one of the predefined ones. Learn more about how to create a signature template
Once done, submit your changes by clicking Save.
Creating the second signature rule for adding a signature to emails sent to specific domain(s)
The second rule will apply to a broader scope of recipients. In this example, we want this rule to add signatures to all emails sent to German speaking countries (recipients).
Create another cloud (server-side) rule, as shown in Fig. 1. Let's name it e.g. Signature in German.
Tip
If you want to make only slight changes to the signature template used in the first rule, you can also use the Clone button (visible after selecting a rule) in the Signatures app's main window (Fig. 5.) to create the exact copy of the first rule.
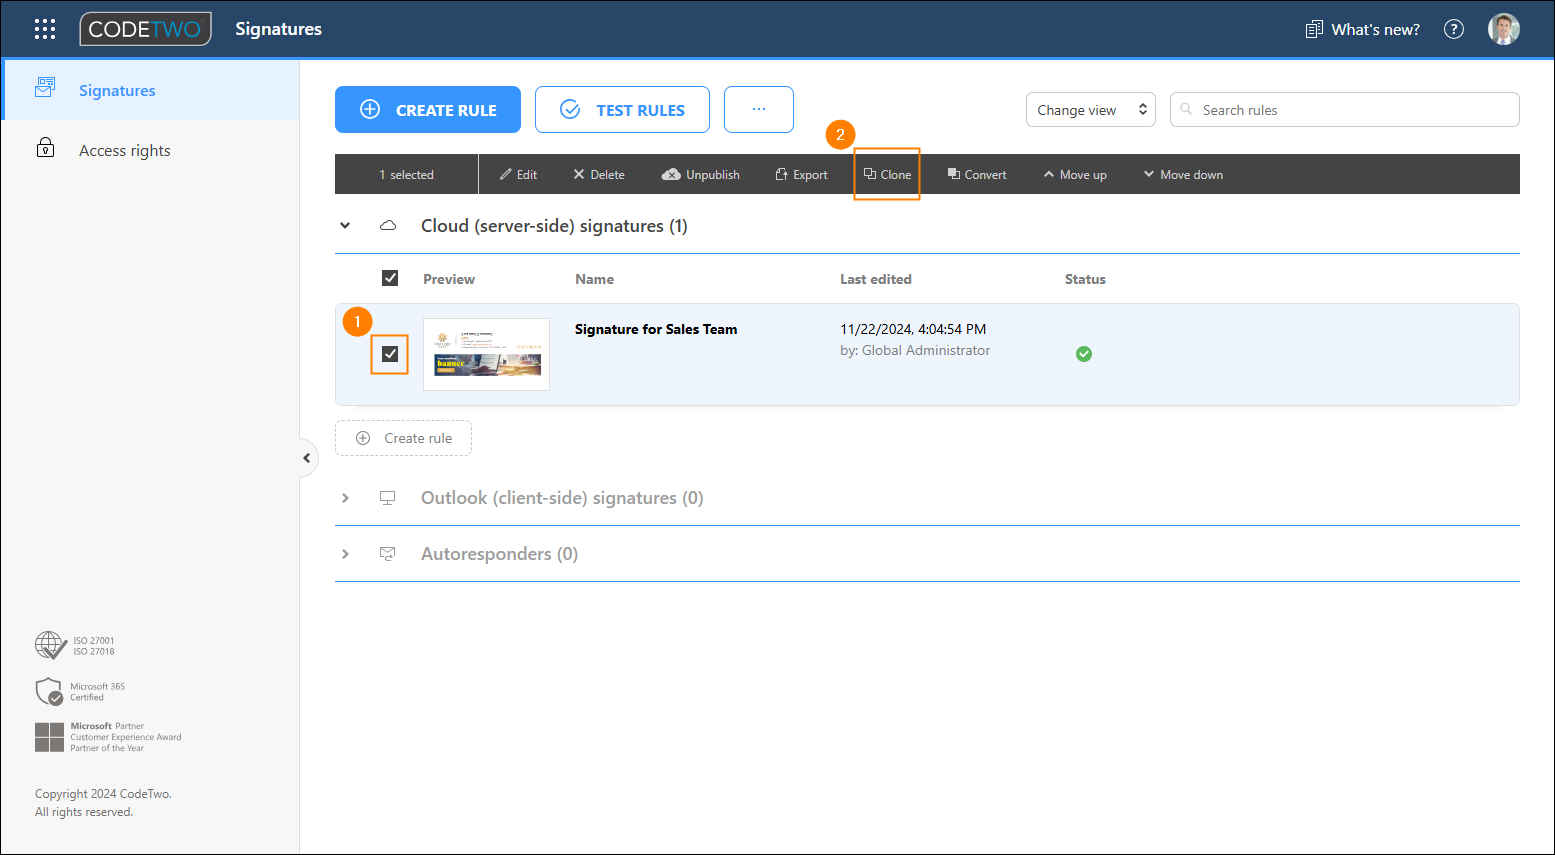
Fig. 5. Cloning a signature rule.
In the Recipients step, select Add > Email addresses and in the window that opens enter *.de. You can also include other country coded top-level domains for other German speaking countries, such as *.at for Austria or *.li for Liechtenstein, separated by semicolons, as shown in Fig. 6. Click OK to apply.

Fig. 6. This signature rule will be triggered for all messages sent to email addresses in the specified domains.
In the Logic step, leave the default options, as shown in Fig. 4.
Go to the Design step to create or edit a signature template (e.g. either in German language or dedicated to companies from the specified German speaking countries).
Submit your rule by clicking Save.
Creating the third signature rule for adding the default email signature
This rule will add a default email signature, i.e. a signature that will be applied to messages sent to other recipients than those specified in the previously configured signature rules.
Add a new cloud (server-side) signature rule (as shown in Fig. 1.) or use the Clone button in the signature management app's main window (see Fig. 5.) to create a copy of one of your other rules.
Important
If you ever create a new signature rule for narrower scope of recipients, be sure to use the Move up and Move down buttons in the app's main window (see Fig. 8.) to place that rule above the one used to add the default email signature.
In the Recipients step, click Add > All recipients (Fig. 7.).
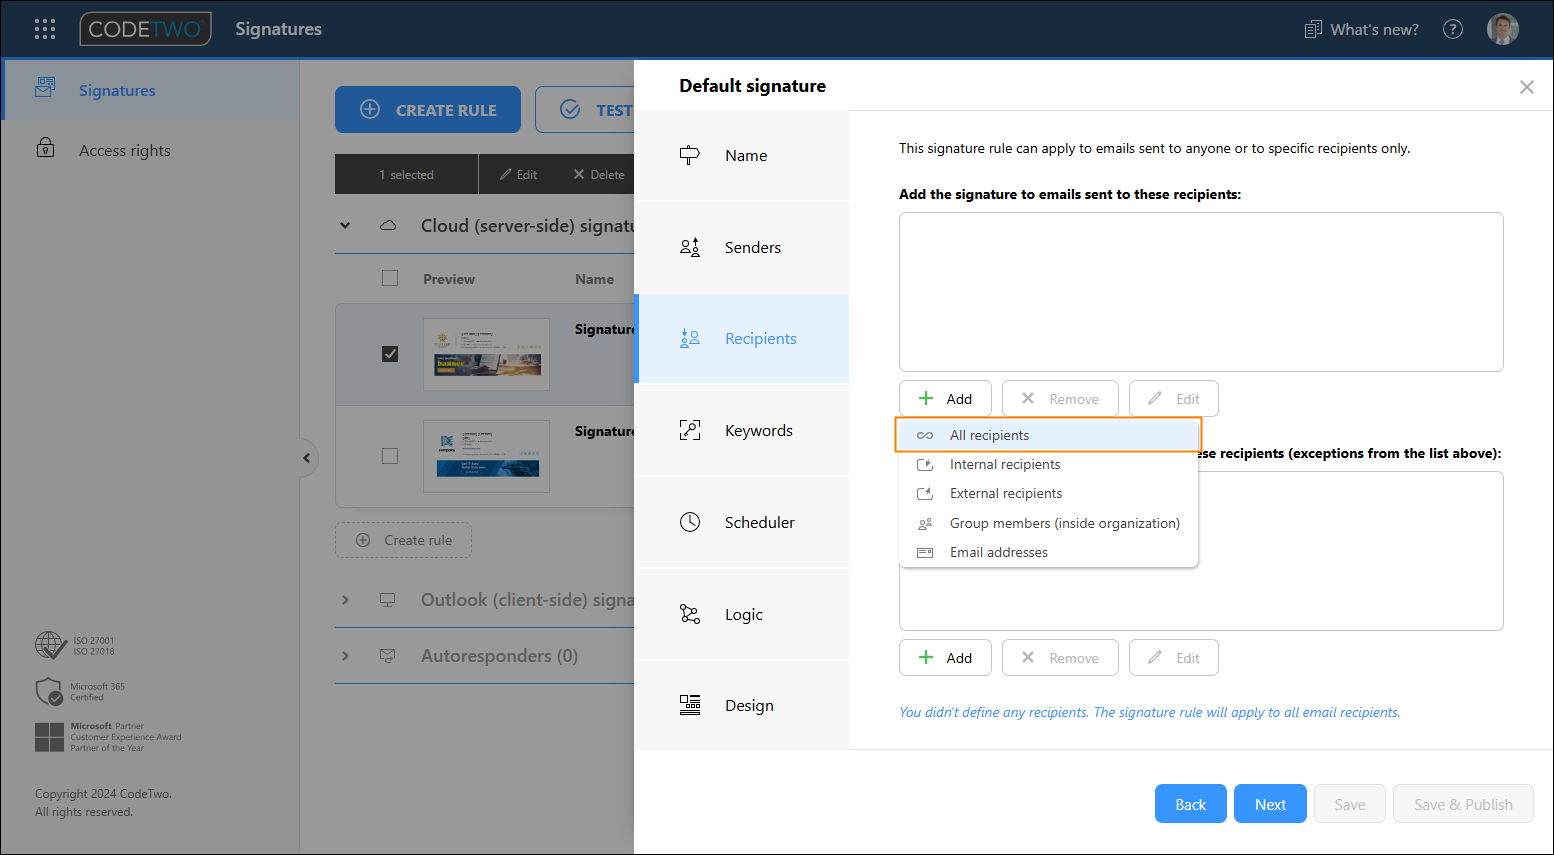
Fig. 7. Select this option to apply the signature defined in this rule to emails sent to all recipients.
There's no need to change anything in the Logic step for this rule as well – leave the defaults unchanged (Fig. 4.).
In the Design step, click Edit signature to create your default company signature or make changes to the existing template.
Finally, click Save to submit your rule.
Cloud (server-side) signature rule order
Signature rules are executed in accordance with the signatures list in the Signatures app's main window, from top to bottom (learn more). As a general rule, place the rules with the narrowest scope of recipients first (at the top) and rules with the broadest scope last (at the bottom).
Considering the example above, use the Move up and Move down buttons to put the rules in the following order: Signature for Sales Team > Signature in German > Default signature, as shown in Fig. 8.
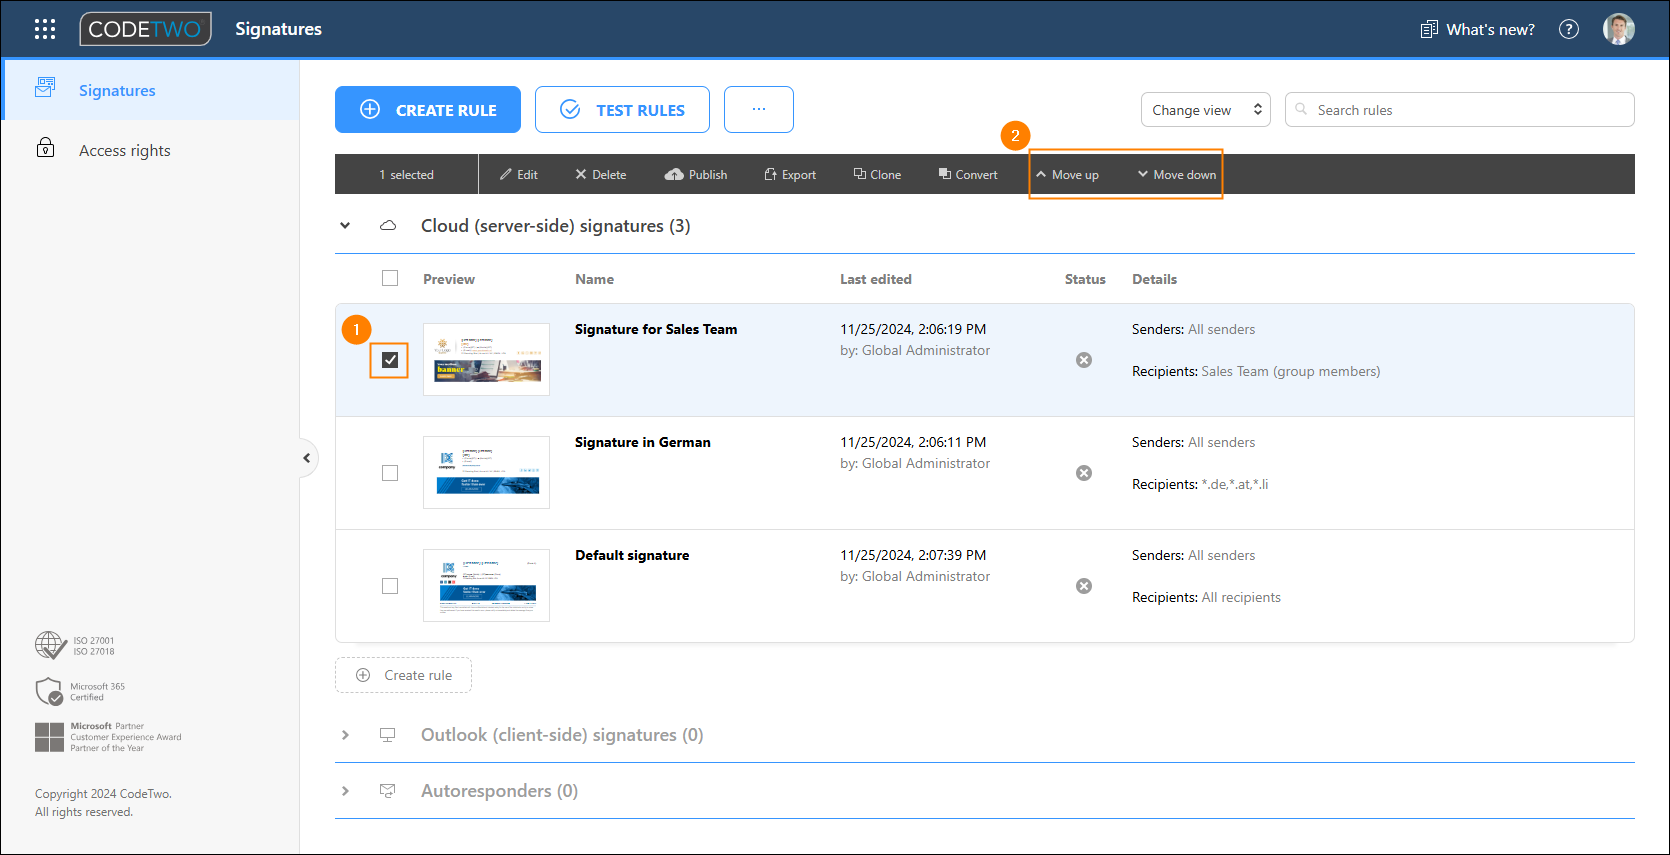
Fig. 8. Changing the order in which cloud (server-side) signature rules are executed.
When your signature rules are ready, select all of them and click Publish selected, as shown in Fig. 9. This will make the signatures active in your organization.
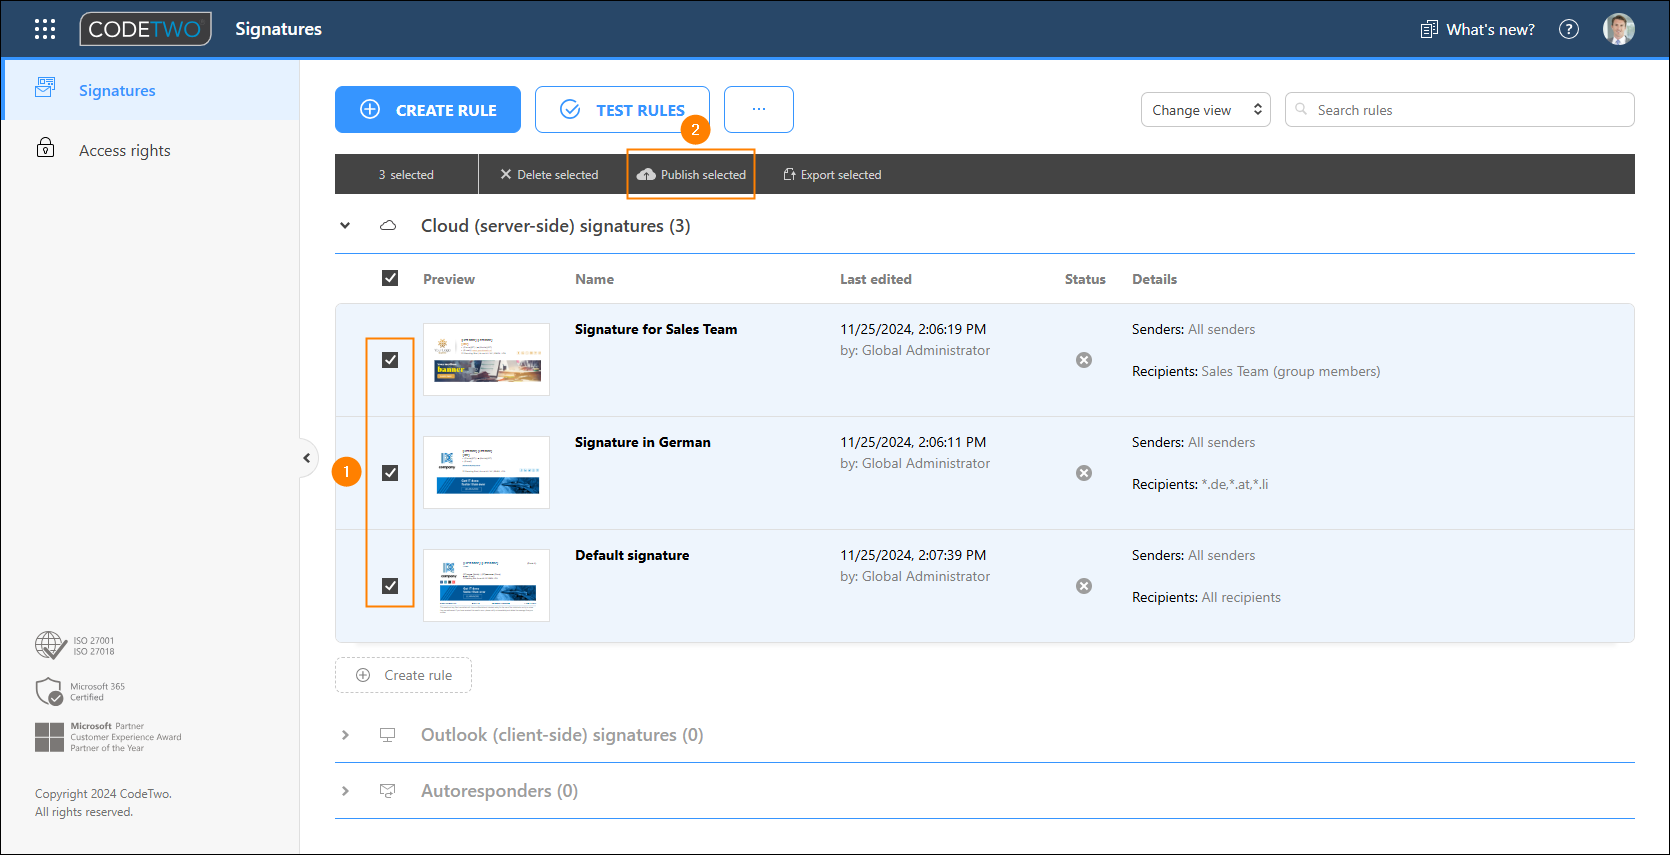
Fig. 9. Publishing the prepared signatures.
Tip
If you want to limit the scope of senders (users who will get a specific email signature), make additional changes in the Senders step. Learn more
Outlook (client-side) signatures
Important
This section explains how to create multiple CodeTwo Outlook signatures that users can manually select when composing emails in Outlook. If you want to set up dynamic signatures that update automatically based on selected recipients, see this article.
In case of Outlook (client-side) signatures, simply create as many signature rules as many signature templates you need. Your users will choose the appropriate signature when typing an email in Outlook, depending on who their intended recipient is.
Refer to this article to find out how to create an Outlook signature rule. Bear in mind the following important points:
- Provide a descriptive name for each Outlook (client-side) rule you create (Fig. 10.). This way your users will be able to easily identify each signature template in Outlook.
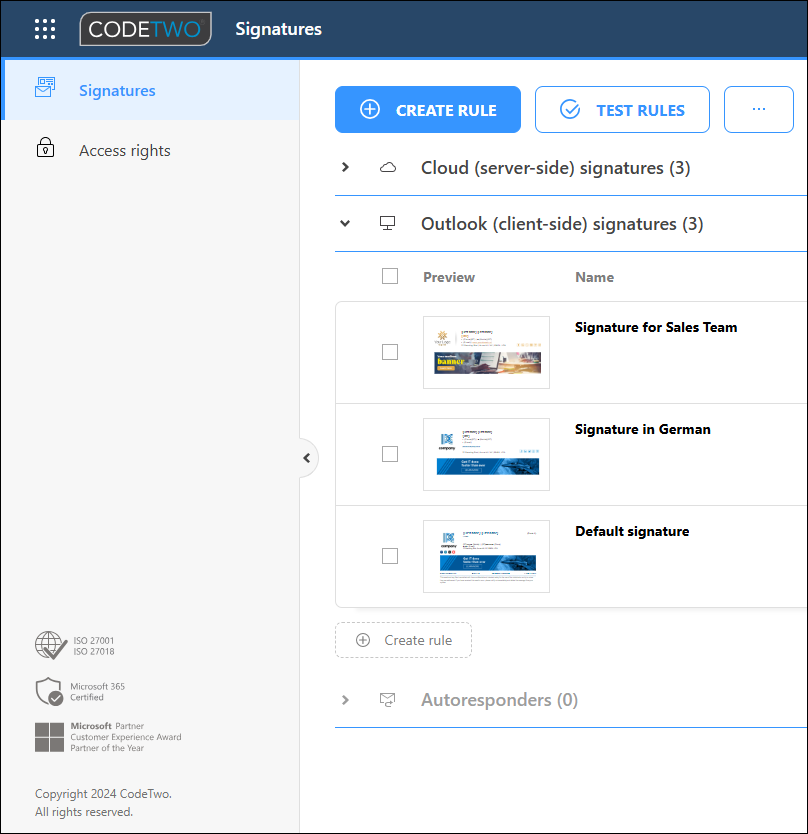
Fig. 10. Be sure the names of your Outlook (client-side) signature rules are simple and descriptive.
- Create a rule for adding a default email signature. Go to the Logic step and use the following settings for this rule (Fig. 11.).
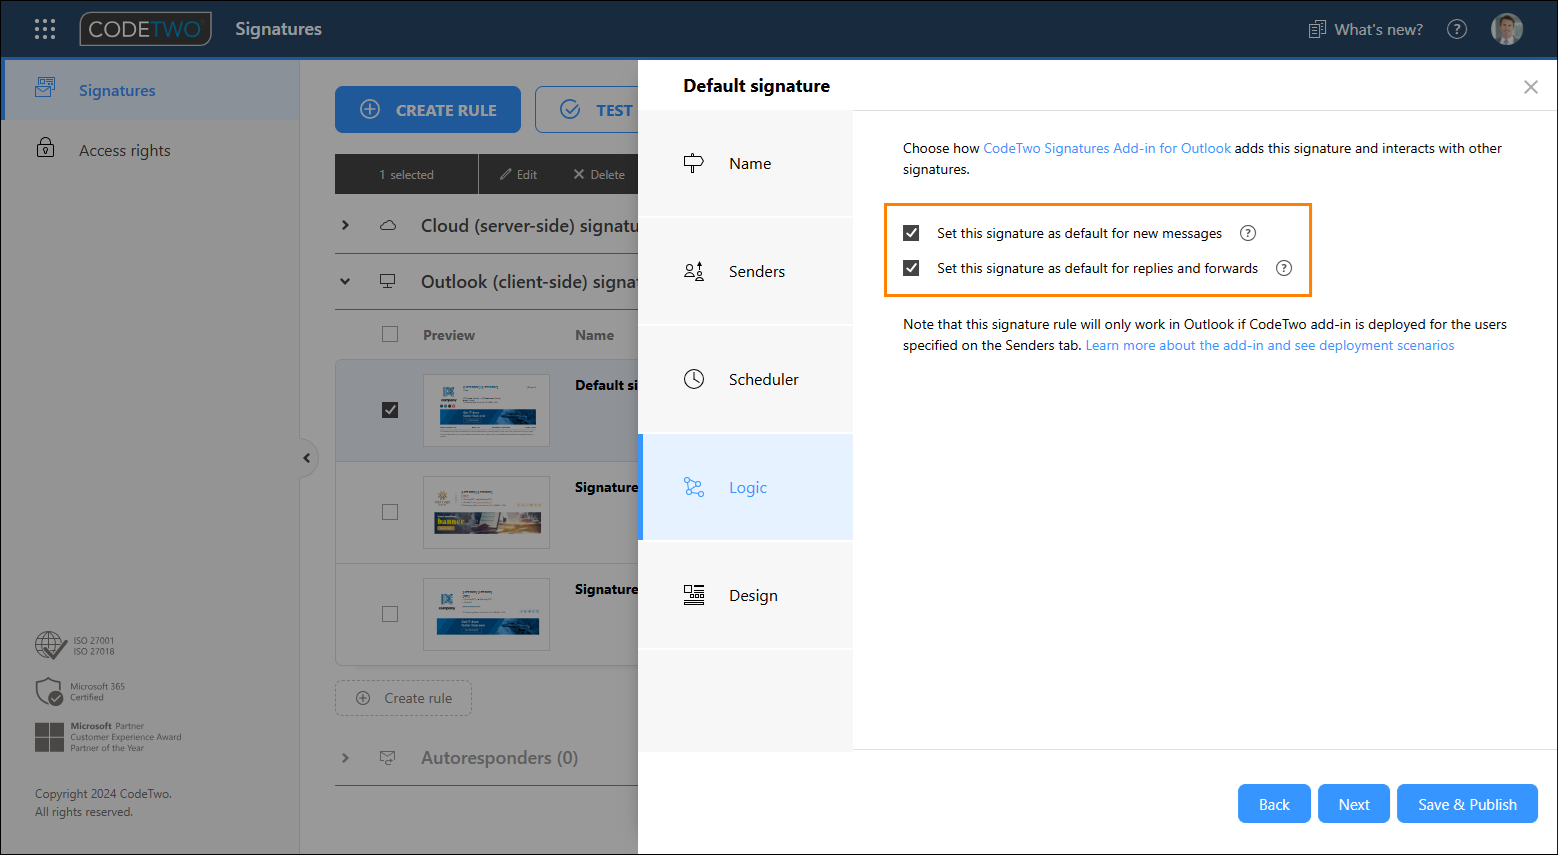
Fig. 11. Select these options if you want the default signature template to be automatically added in Outlook and OWA to all new messages.
- Additionally, use the Move up and Move down buttons to move this rule on top of the signature rules list (Fig. 12.). This way, the default signature will be automatically added to new messages while typing them in Outlook or Outlook on the web (OWA). Learn more
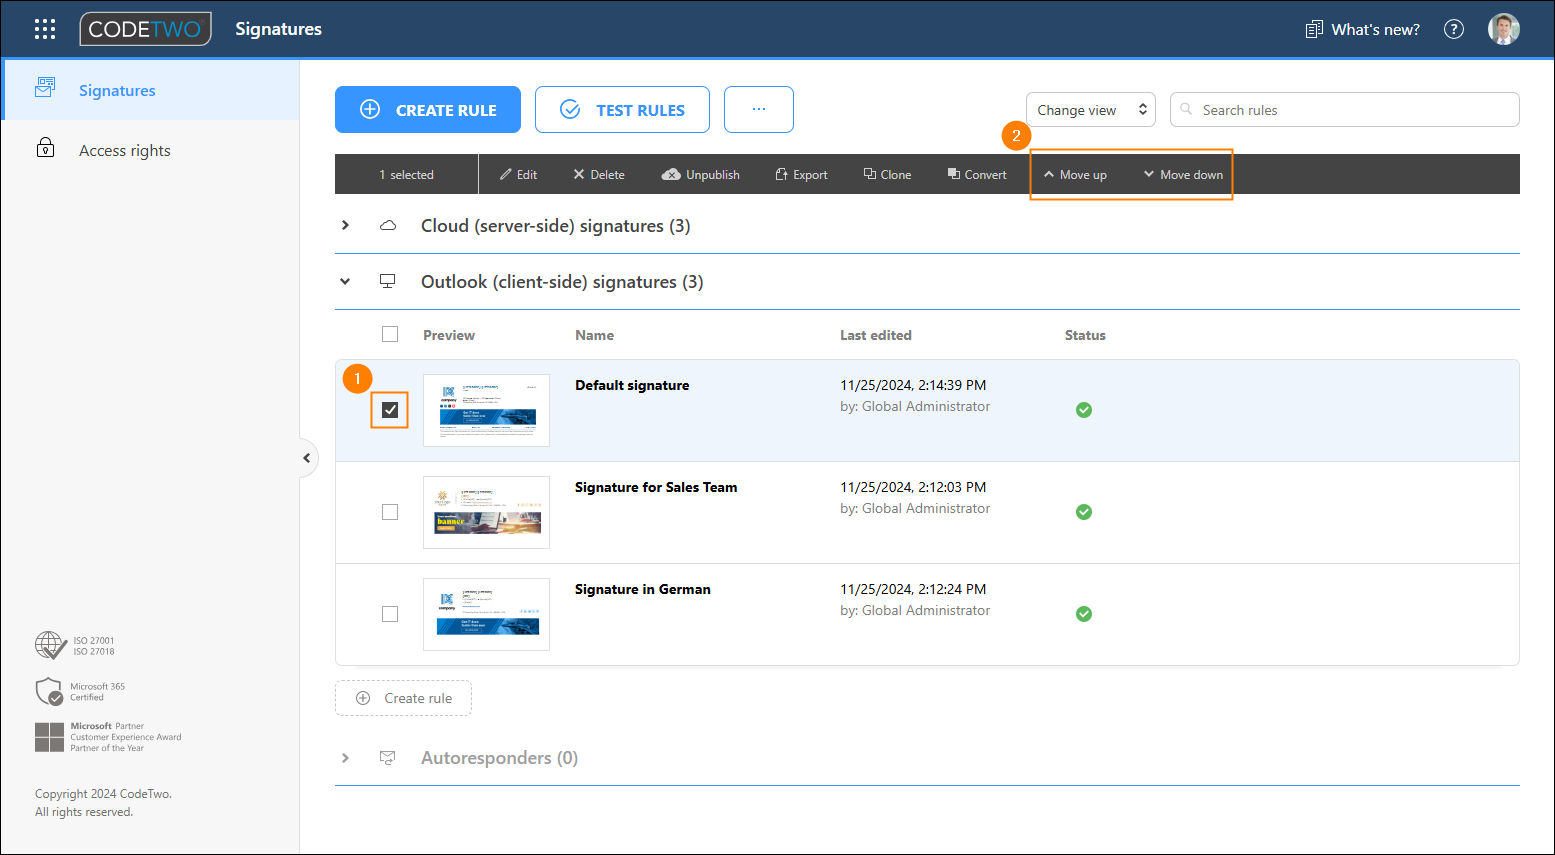
Fig. 12. Moving the default Outlook email signature to the top of the signature rules list.
- You can also restrict access to some templates to selected users only. Learn more on how to change the sender's scope
Result
In the case of cloud (server-side) signatures, CodeTwo Email Signatures 365 will automatically apply the correct email signature to each outgoing email, depending on who the recipient is (a member of the group defined in the first rule, a recipient whose email address ends with one of top-level domain names defined in the second rule, or any other recipient, according to the third rule). If you send a message to an email address that ends with .de and is also included in the first rule, the recipient will only see the signature added by the first rule.
As you type an email, you can use the CodeTwo Signatures Web Add-in for Outlook to check which signature will be added by our service (Fig. 13.).
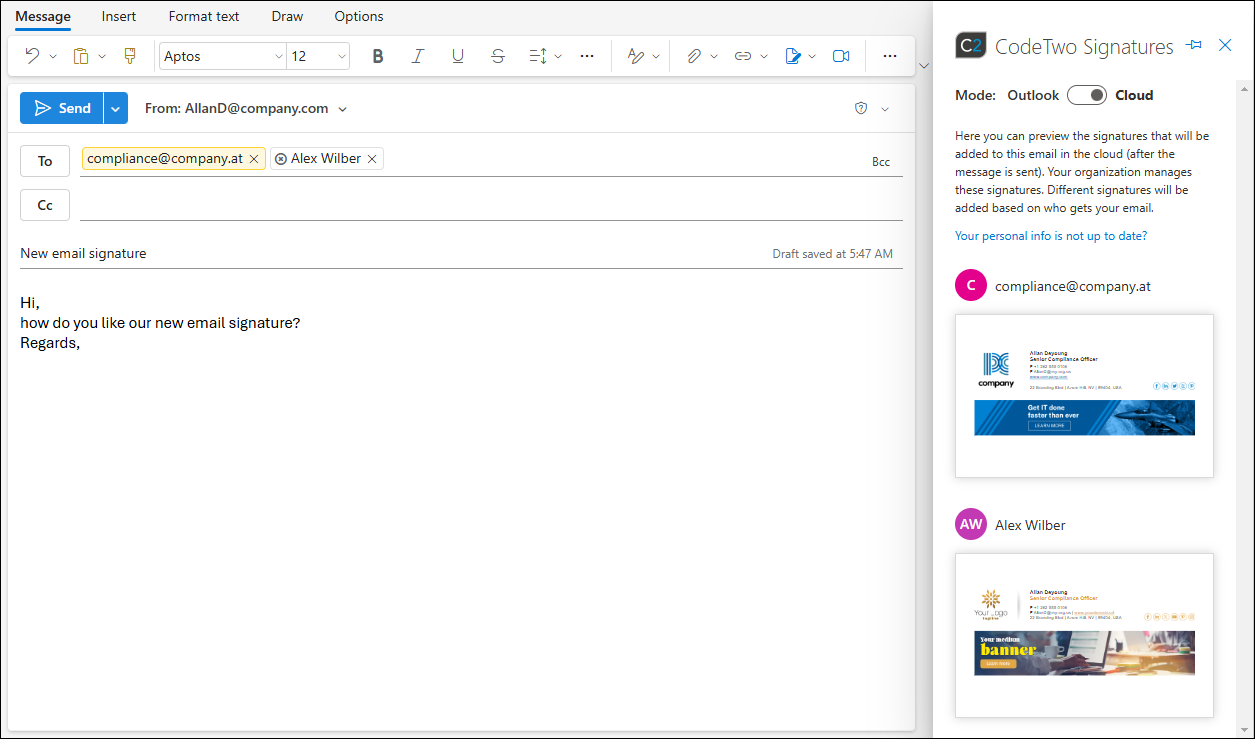
Fig. 13. Previewing a signature while typing an email in OWA.
Sending emails to multiple recipients
If you send a single message to 2 (or more) recipients, each recipient will get a signature that is intended for them. Learn more about the message splitting feature
In the case of Outlook (client-side) signatures, each user is provided with as many signature templates as you created (and made available for them). The default signature is inserted into every new message being created in Outlook (desktop, mobile, and OWA).
To use a different signature (e.g., when sending an email to a member of the Sales Team), simply click that signature in the CodeTwo add-in pane, available in Outlook desktop and OWA (Fig. 14.). Learn more
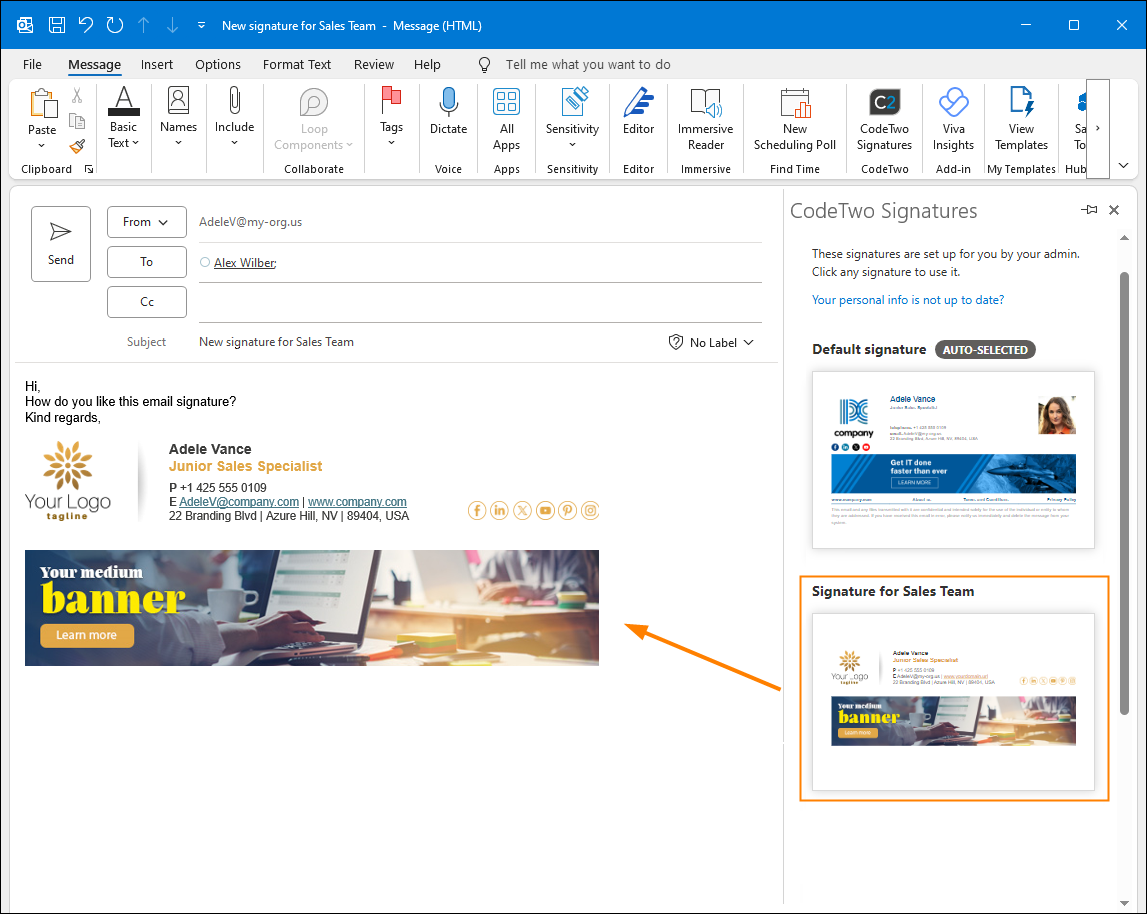
Fig. 14. Changing an Outlook (client-side) signature in Outlook.
In this article