Customer satisfaction measurement: One-click surveys & Insights
CodeTwo One-click surveys automate customer feedback measurement. They come with integrated real-time analytics (aka CodeTwo Insights) to help you analyze how employees, co-workers and services perform, track trends, measure customer loyalty, and more. It’s an optional free feature in CodeTwo Email Signatures 365 for licensed users.
- How it works
- Examples of use
- How to unlock One-click surveys in CodeTwo Email Signatures 365
- Create a one-click survey
- Manage one-click surveys
- Customer satisfaction analytics – CodeTwo Insights
- Set up email notifications for a survey
- Invite users to access CodeTwo Insights
- One-click surveys & Insights FAQ
How it works
One-click surveys are different from traditional online surveys because they mainly include buttons (icons) like emojis, thumbs up, likes or stars that people click instinctively to give their ratings. When a customer clicks a rating icon, they see a dedicated Thank you page, where they can also leave a comment (optional).
If your organization uses CodeTwo Email Signatures 365, you can add one-click surveys to your existing signature templates in the template editor, just as you add any other signature elements. Or you can create separate email signature rules that include surveys only. Having separate rules for email signatures and one-click surveys can give you more flexibility and control.
When the surveys are live in your emails and customers click them to give their feedback, you can check & analyze these ratings in real time using CodeTwo Insights, at insights.codetwo.com.
Examples of use
One-click surveys can be used by Customer Support, Sales, Product Development and HR teams and managers to:
- Analyze how customers rate your co-workers/employees, services & products and find ways to improve.
- Monitor and react to customer feedback, e.g. reach out to customers who were dissatisfied with the product/service.
- Create product surveys to plan product updates.
- Measure employee satisfaction within your company, and more.
There are multiple ways to integrate one-click surveys with your emails and email signatures, depending on your needs.
Example 1: Adding a one-click survey to every outgoing email
This scenario is best for emails send by your Customer Support team. Your customers (email recipients) can rate a specific support technician each time they receive an answer/reply from them. Read on to learn how to configure CodeTwo Email Signatures 365 for this scenario.
Example 2: Adding a one-click survey only to specific emails
You can use this scenario to, for example, gather customer feedback only after you closed a support ticket with them or after your customer has used your product/service for some time.
If you’re using cloud (server-side) signatures, you can add a survey to:
- emails that include a specific keyword in their subject or body, e.g. #addsurvey (learn more about using keywords),
- emails sent to specific recipients (see this example of use),
- any subsequent emails in a conversation (see this example of use).
As for Outlook (client-side) signatures, you can, for example, create two types of email signatures: with and without a survey. Those without a survey can be added by default (automatically) to all emails you compose in Outlook. If you want to use an email signature with a survey instead, you can select it manually form our Outlook Web Add-in (as shown here) before you send your email.
How to unlock One-click surveys
One-click surveys are disabled by default. To unlock them in your organization, you need to:
- Sign in to CodeTwo Admin Panel.
- On the Tenants page, select the Microsoft 365 tenant for which you want to enable One-click surveys.
- Go to One-click surveys in the left menu and use the toggle shown in Fig. 1. to turn them on.
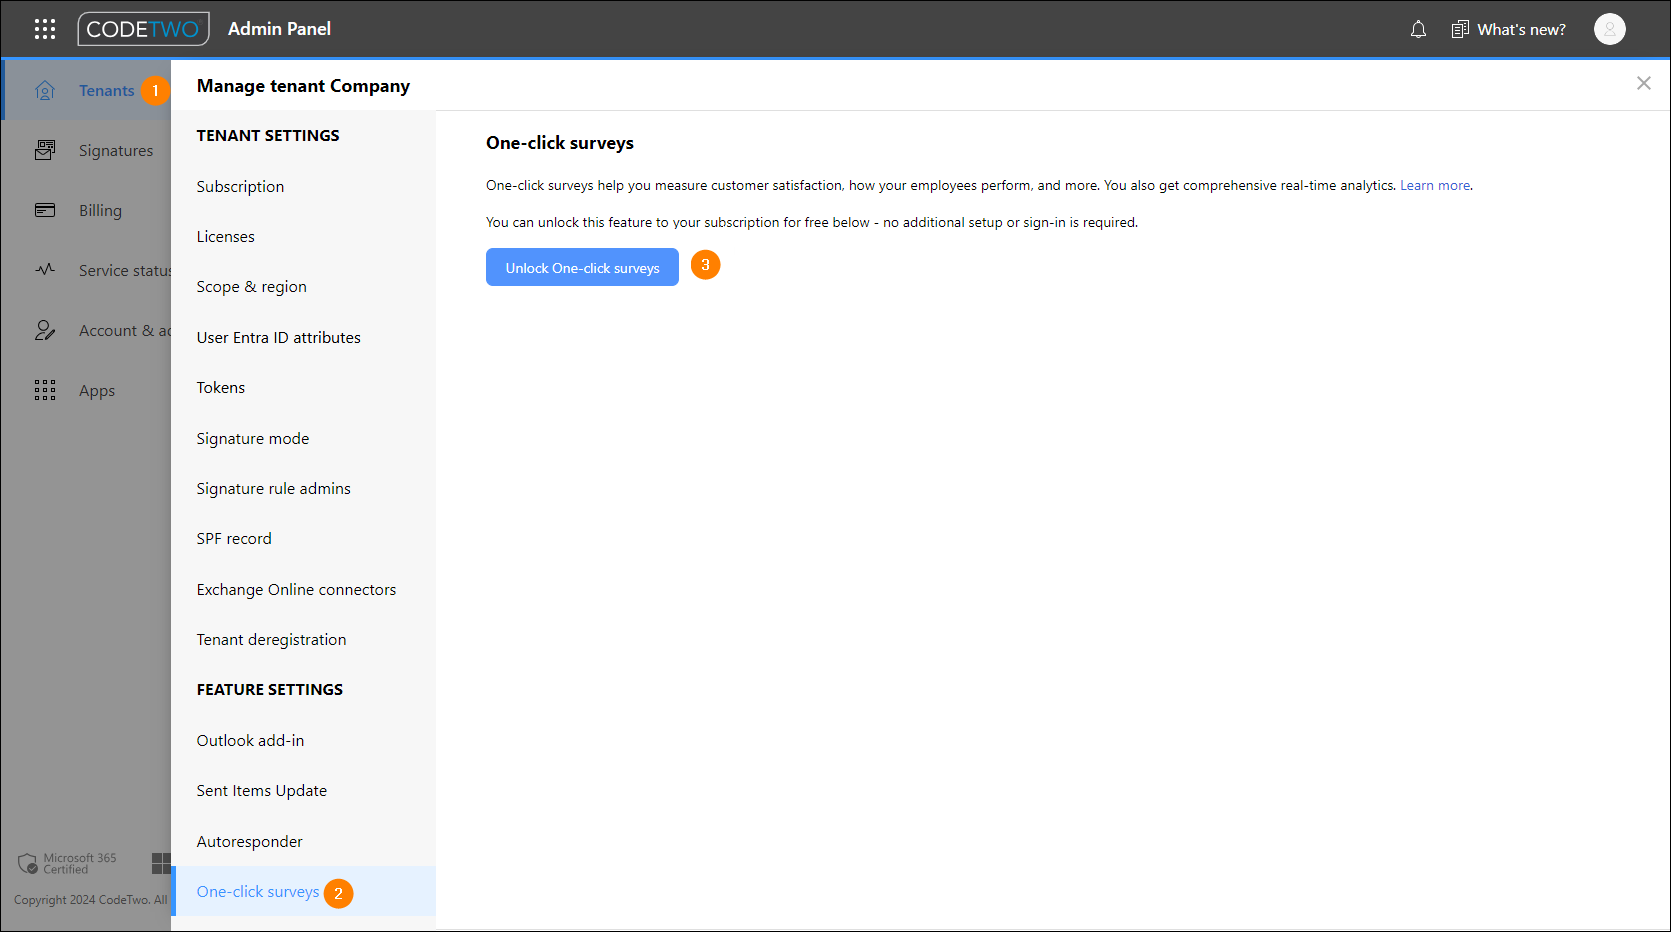
Fig. 1. Enabling One-click surveys in CodeTwo Admin Panel.
- One-click surveys are now turned on. See below how to use them.
Create a one-click survey
One-click surveys can be added to your existing email signatures (in the signature template editor), or you can create dedicated email signature rules with one-click surveys instead of signatures. The second approach can be more flexible because separate rules control when signatures and surveys are added.
- Add a one-click survey to an existing signature template
- Create a one-click survey in a new signature rule
Add a one-click survey to an existing signature template
To add a one-click customer satisfaction survey to an email signature, first sign in to app.codetwo.com. Next, open your existing email signature template for editing, as shown in Fig. 2.
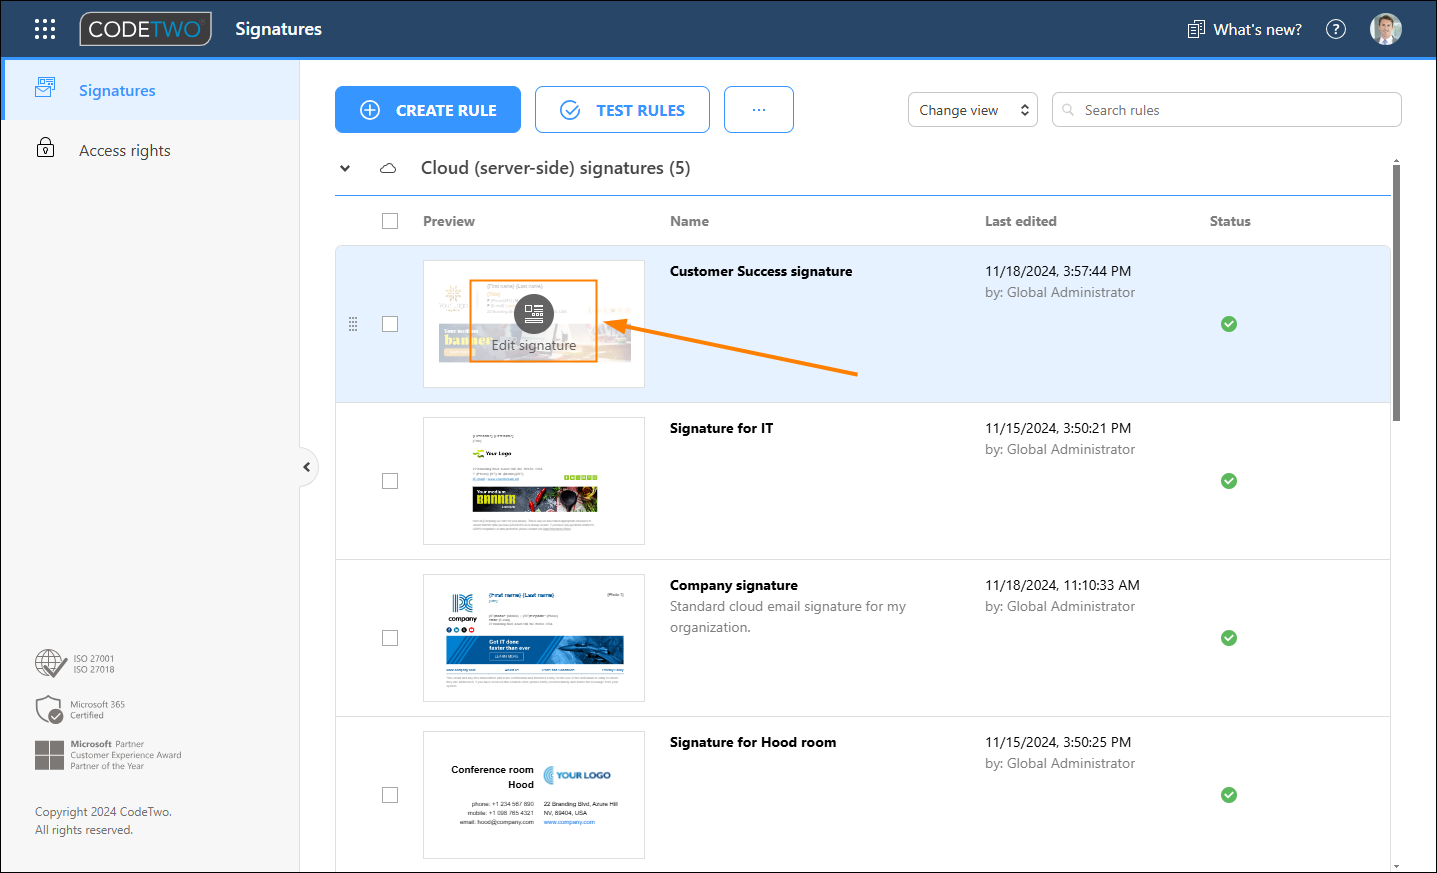
Fig. 2. Opening an existing email signature template for editing.
It’s time to add a survey to it. Proceed as shown in this short step-by-step tutorial or check the instructions below.
In the signature template editor, select a place where you want to insert the survey and click One-click survey on the ribbon (Fig. 3.).
If you see the One-click surveys need to be unlocked message, perform these steps first to enable this feature for your organization.
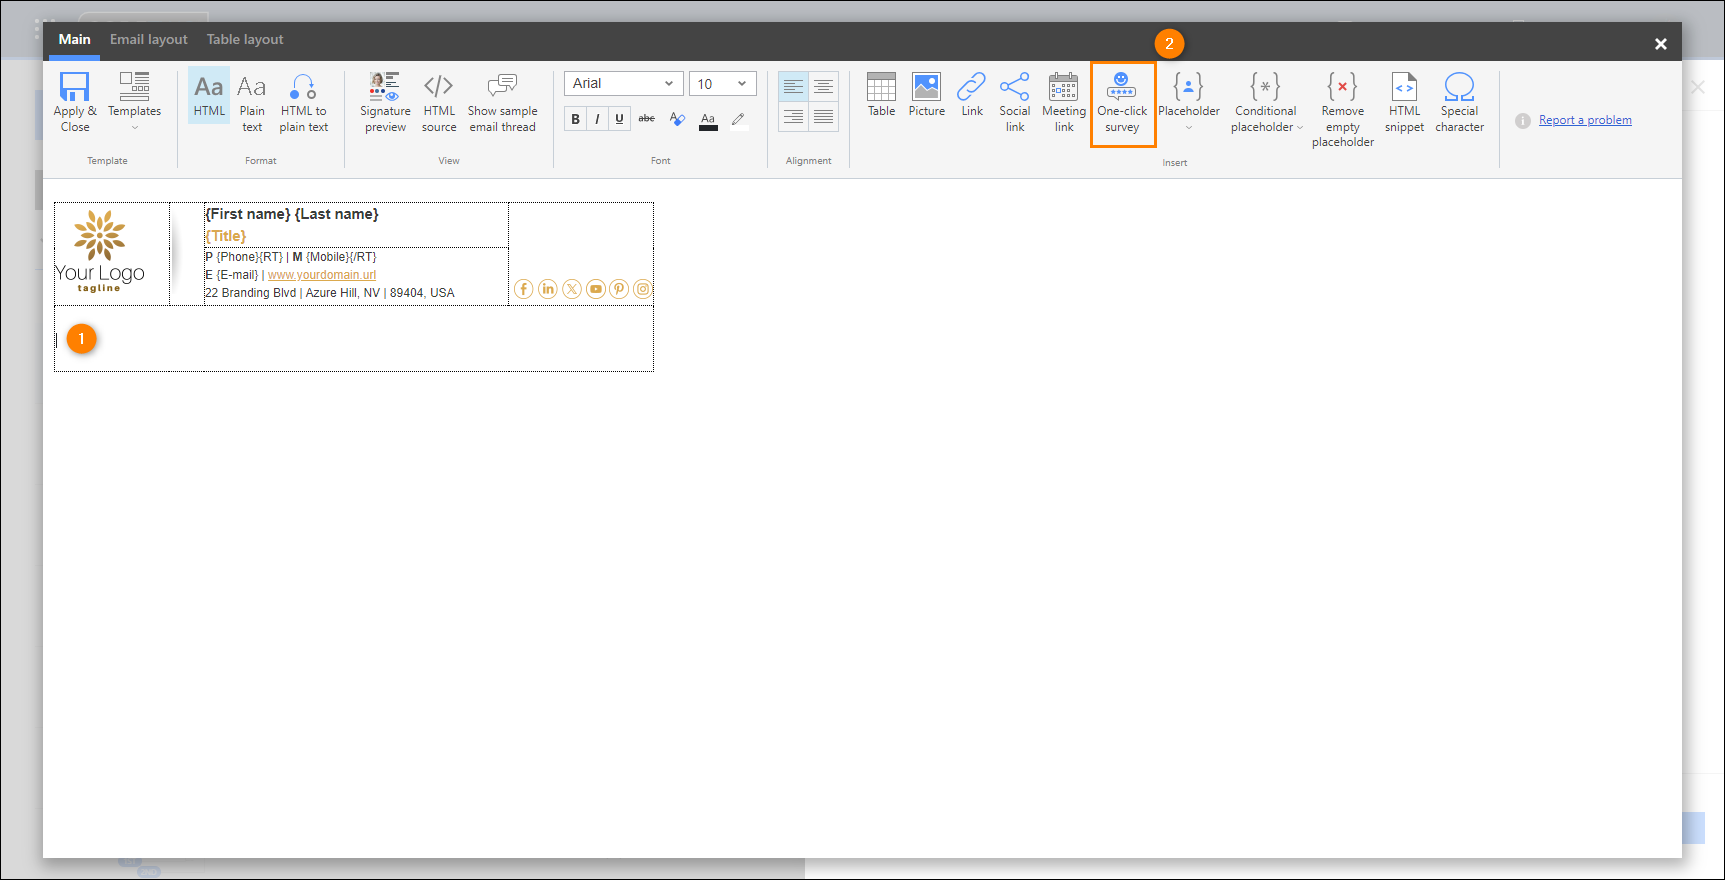
Fig. 3. Adding a survey to an email signature.
You don’t have any surveys yet. Design one now by clicking Create new survey (Fig. 4.).
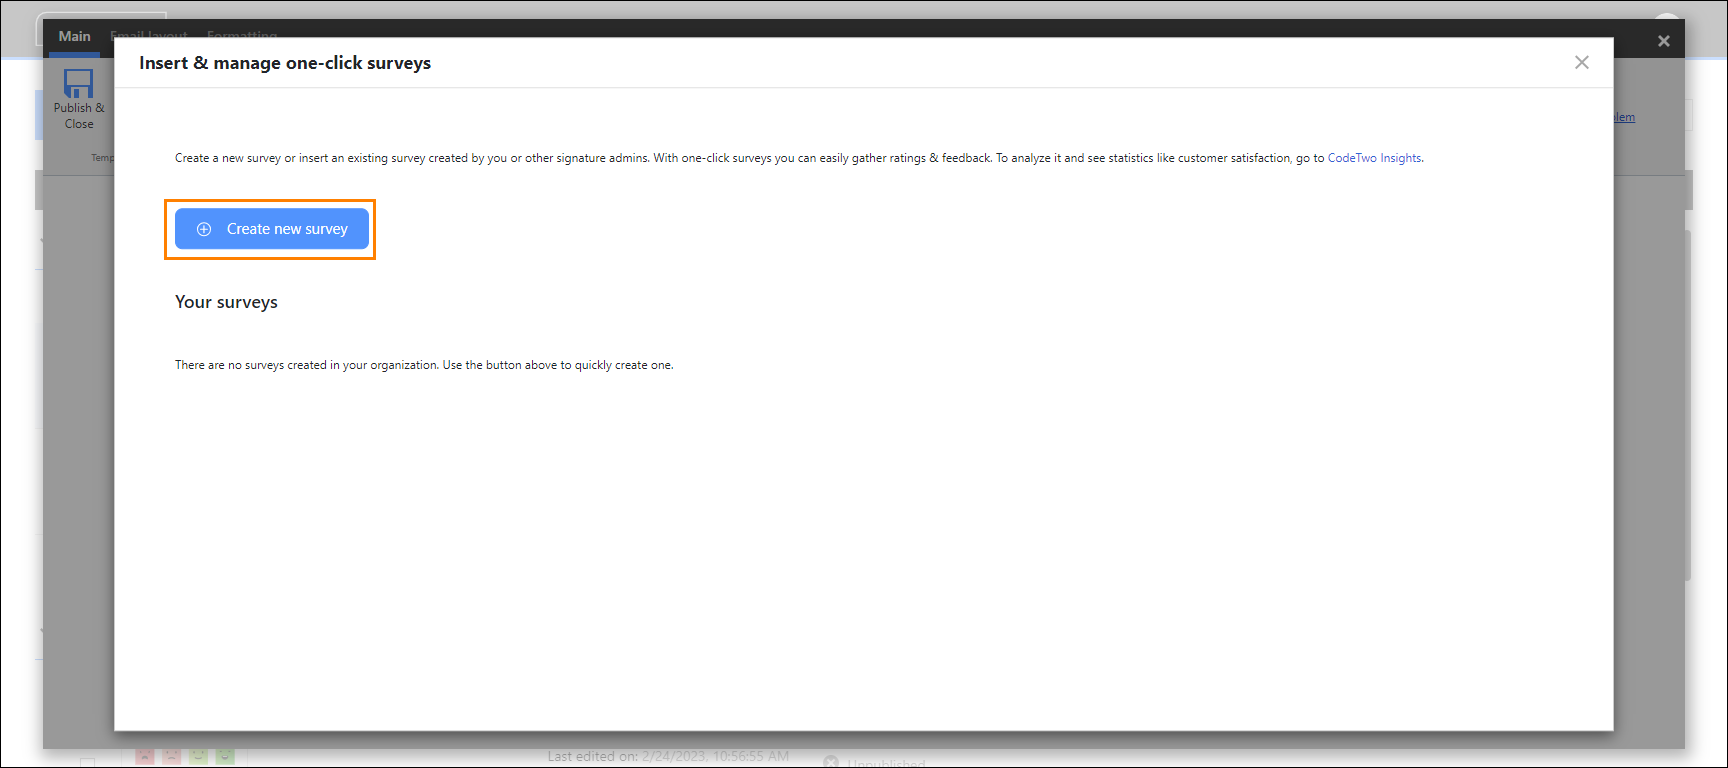
Fig. 4. Creating a new survey.
First, name the survey and choose the rating scale (Fig. 5.). Note that you won’t be able to change the scale after you complete this wizard and save your survey (until then, you can go back and forth and modify settings as you like). Click Next to start designing.
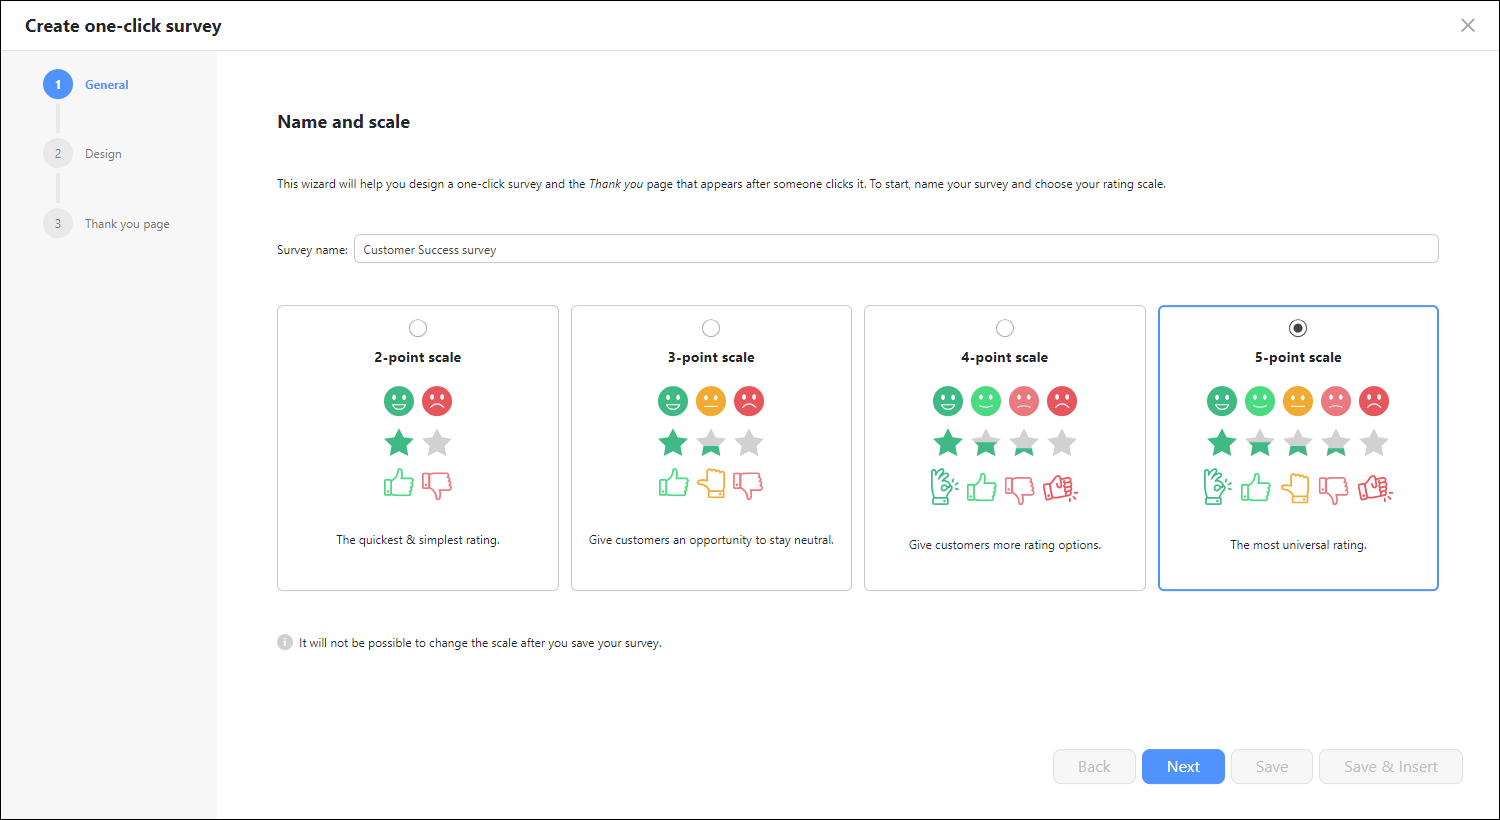
Fig. 5. Entering the name and selecting the scale for your survey.
Click Change icons to open the library with dozens of smileys, stars, thumbs up icons, etc. Use the slider to change the size of the icons. The Labels options allow you to add & customize labels if you want (Fig. 6.). When you’re done, click Next.
Tip
If you select to use labels but don’t define font type, the same font type as defined in the signature template will be used.
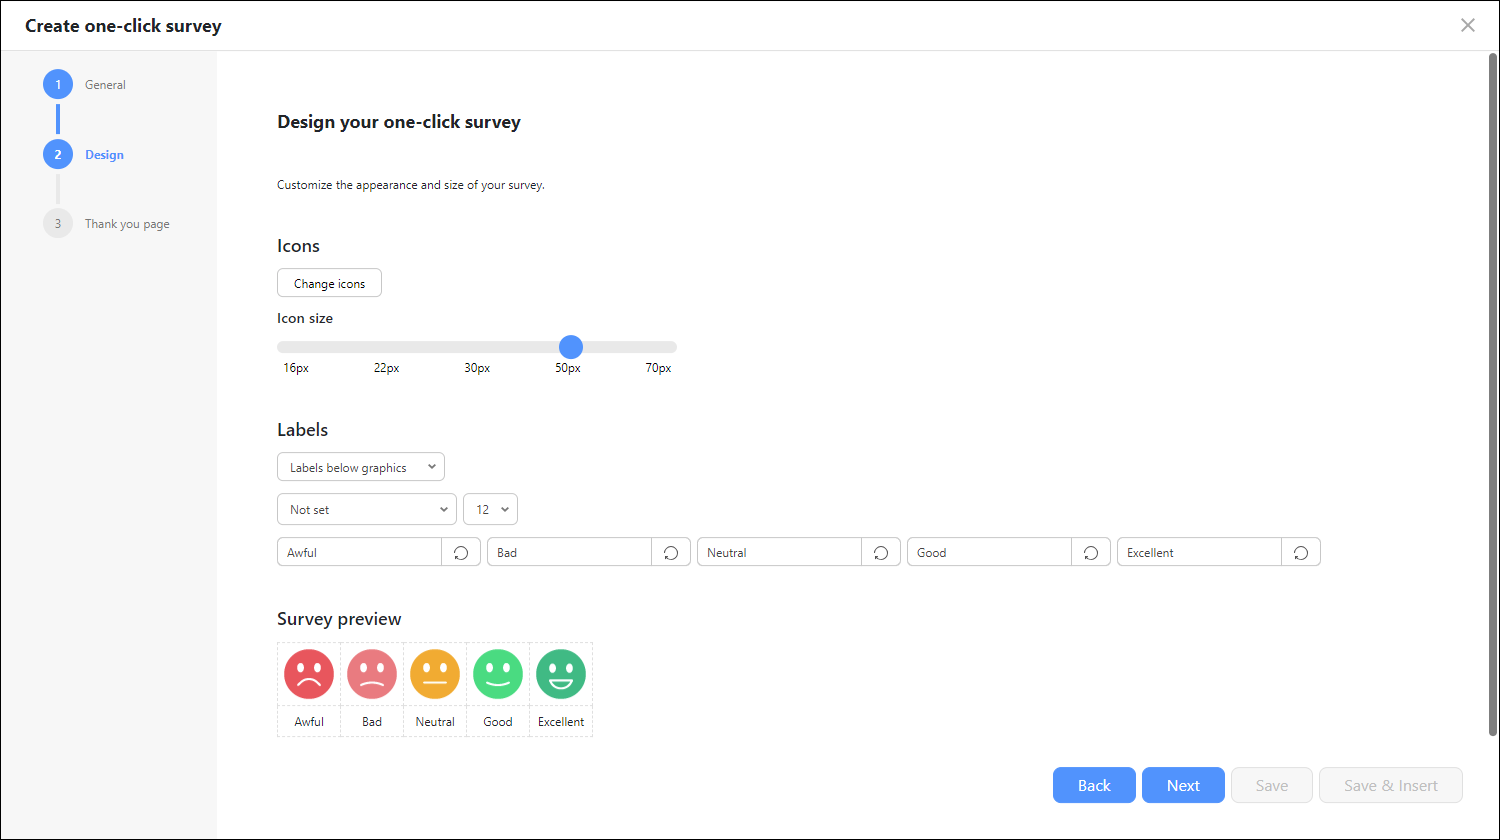
Fig. 6. Customizing the look of your survey.
In the last step, you can design a Thank you page that opens after your customer clicks a rating icon in your email survey. It’s a good idea to add your logo, type a thanks message, and add a comment field (Fig. 7.). Note that you can also preview the page by using the Page preview link at the bottom.
The maximum file size is limited to 500 KB for the logo.
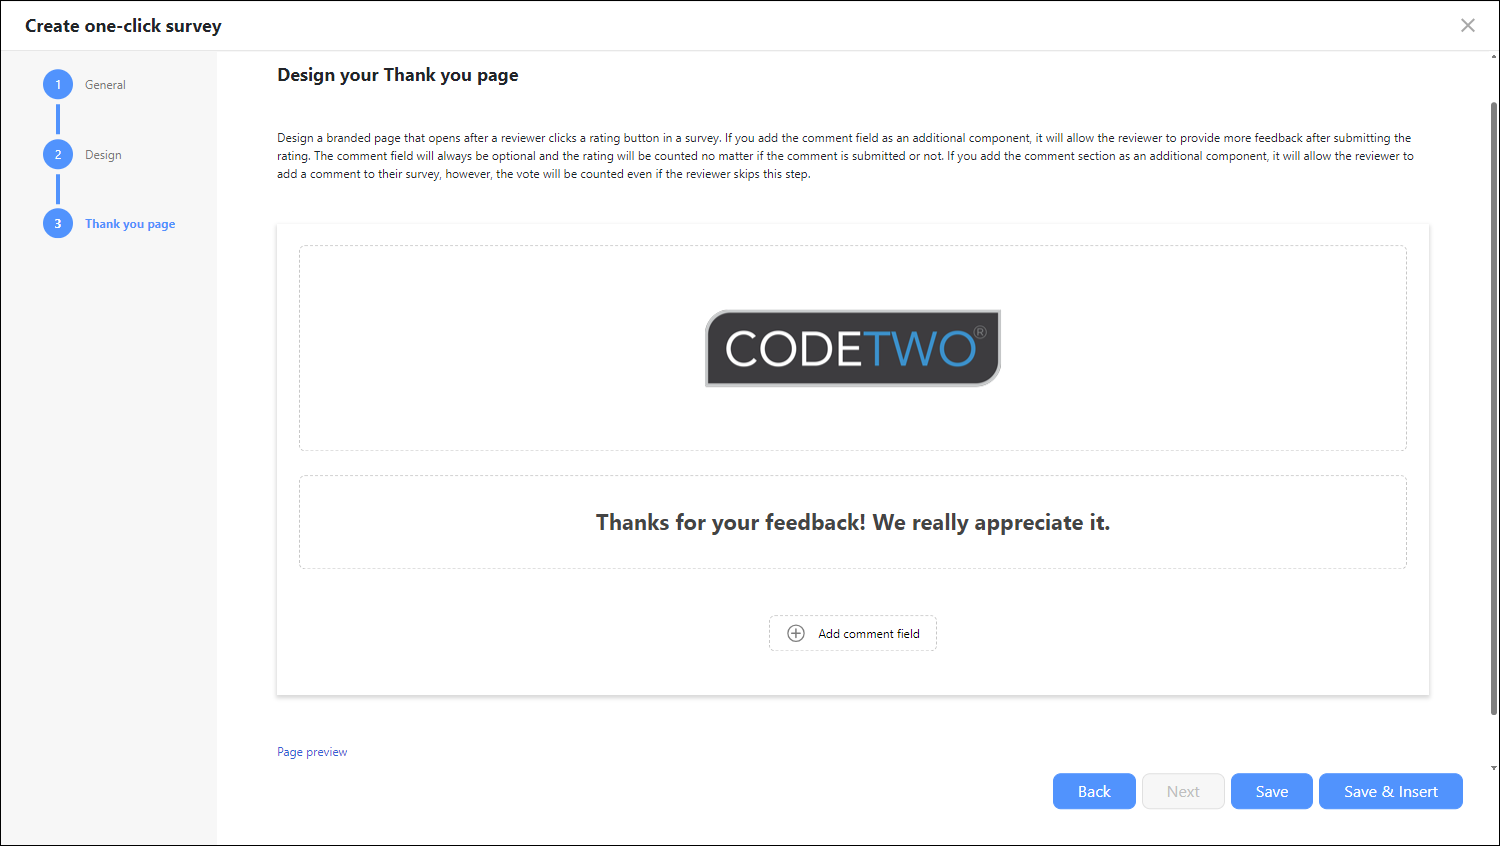
Fig. 7. Designing a Thank you page for your survey.
You can now save the survey to add it to the list of created surveys or you can save and insert it now to your template. Let’s choose the second option by clicking Save & Insert.
You’re now back in the signature template editor with your survey inserted. Click Signature preview on the ribbon to preview how the survey will look like in a sample email conversation (Fig. 8.).
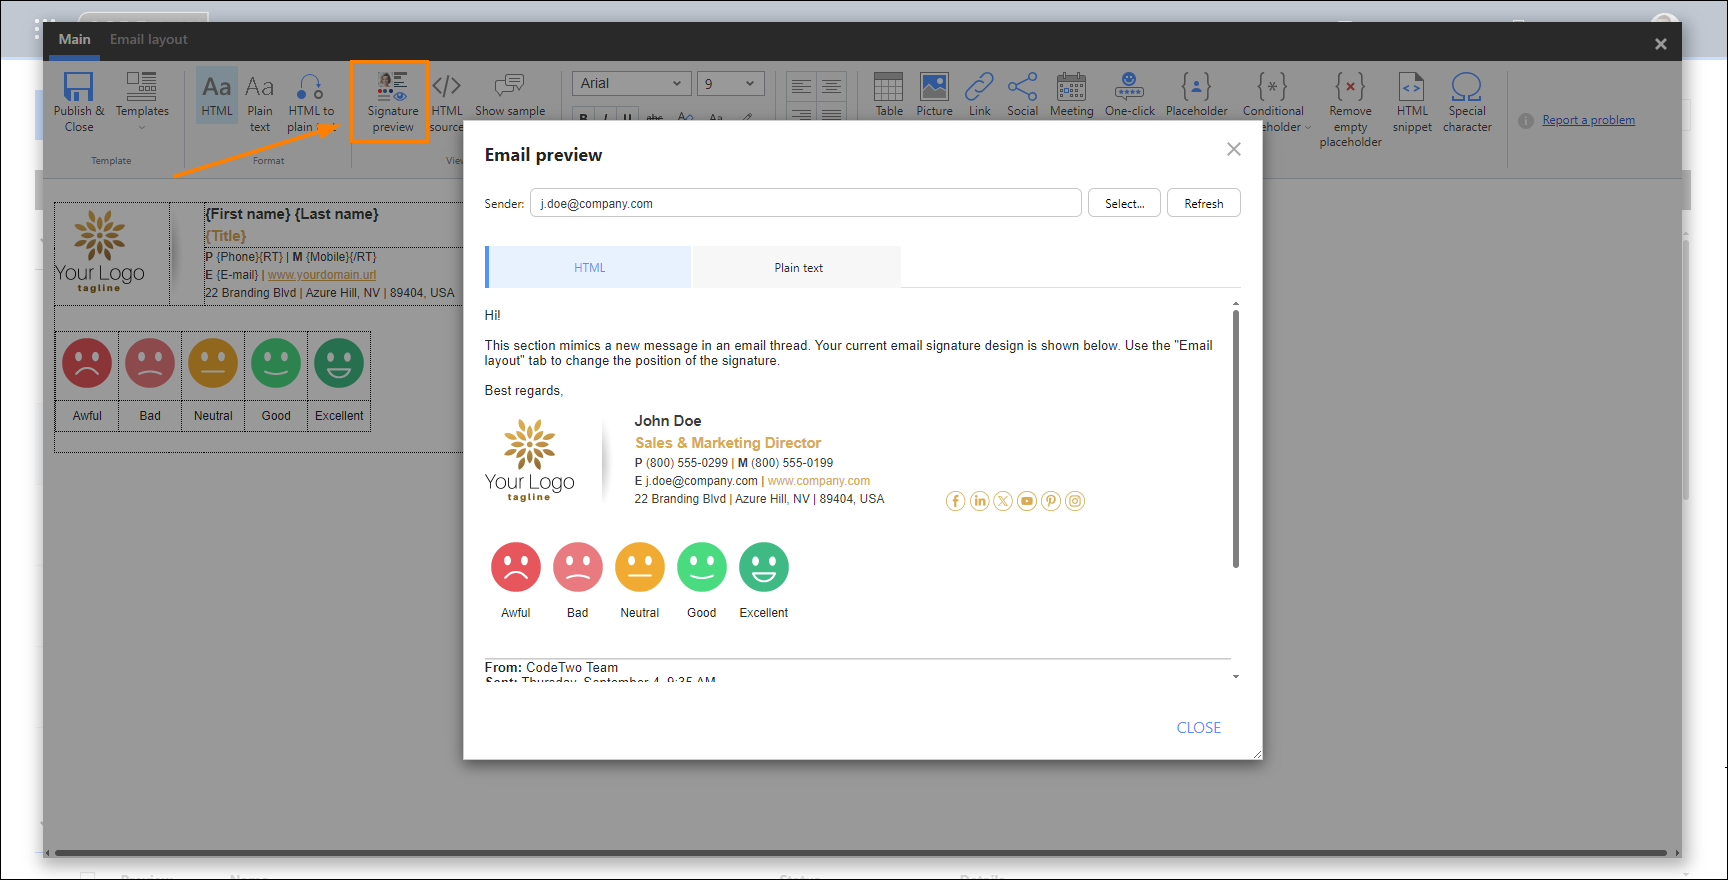
Fig. 8. Previewing a survey in the signature template editor.
If you want to customize the survey some more, use the options on the ribbon. For example:
- To add a fixed message (survey question) to encourage customers to give their feedback, click at the front of the survey and press Enter to add a text line above your survey. Type the text and modify the text size and formatting, if you need. Preview the survey again to check the effects (Fig. 9.).
Fig. 9. Adding a survey question above the survey.
- To add sender’s contact details above or below the survey, select a place where you want to put them and use the Placeholder menu on the ribbon to insert fields like first name and last name (Fig. 10.). They will be automatically filled with sender’s details when an email is sent (learn more about using placeholders in this article). Note that it might be better to create a separate rule that adds an email signature with contact details. See our guide
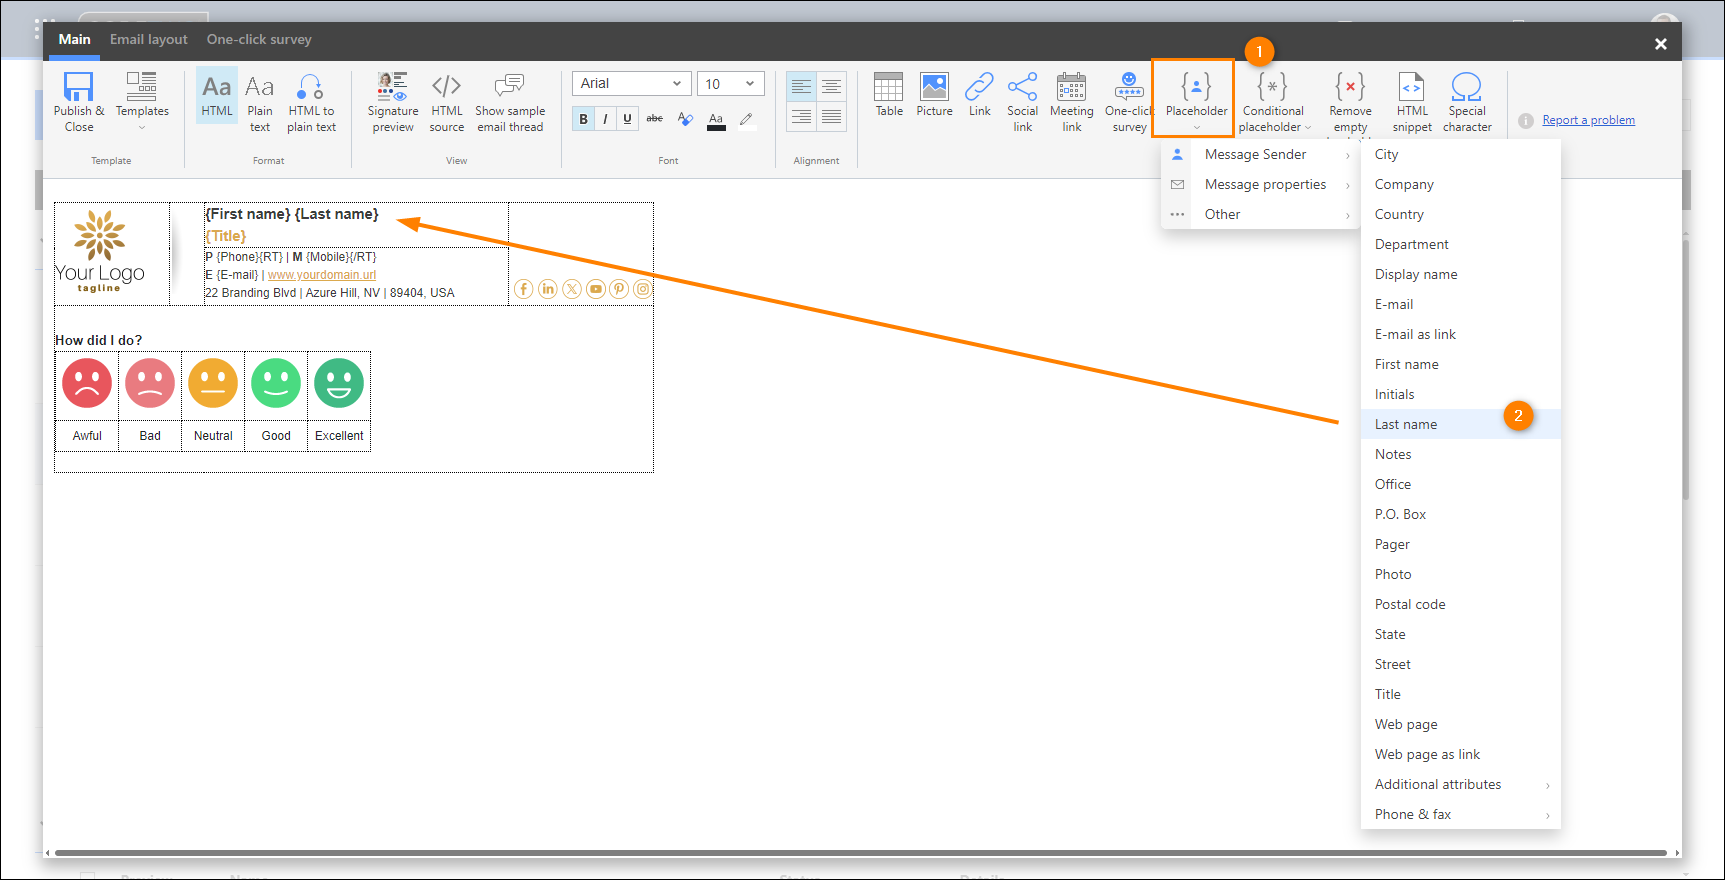
Fig. 10. Adding sender’s details to the template.
Finally, click Publish & Close (or Apply & Close) to exit the editor.
From now on, your customers can click the survey added to your emails. You can check & analyze customer ratings using CodeTwo Insights (at insights.codetwo.com). See how to use CodeTwo Insights
Create a one-click survey in a new signature rule
This section assumes that you’re already using CodeTwo Email Signatures 365, and your Microsoft 365 tenant is registered to CodeTwo.
Watch this short step-by-step tutorial to learn how to create a new signature rule that will add a one-click survey to your emails. You can also read the instructions below.
To start, sign in to app.codetwo.com. Next, create a new signature rule. Select:
- Cloud (server-side) signature rule if you want your survey to be added in the cloud after emails are sent (so all email apps and devices will get your survey automatically).
- Outlook (client-side) signature rule if you want to have surveys added directly in Outlook (desktop, mobile and OWA) as users type.
In this example, we will go with the cloud signature. For more information about creating signature rules, go to this article.
Once the rule editing pane opens, name your rule and add an optional description. Click Next to proceed.
Proceed to the Senders step to select who will get the signature with your survey. You can select specific users, group members or even create advanced filters for job titles and so on (learn more about these options in this article). Let’s add the survey to emails sent by the Customer Success team members (as shown in Fig. 11.) by clicking Add below the upper section, choosing Group members (inside organization) and then selecting your team from the picker. Add exceptions in the lower section, if necessary.
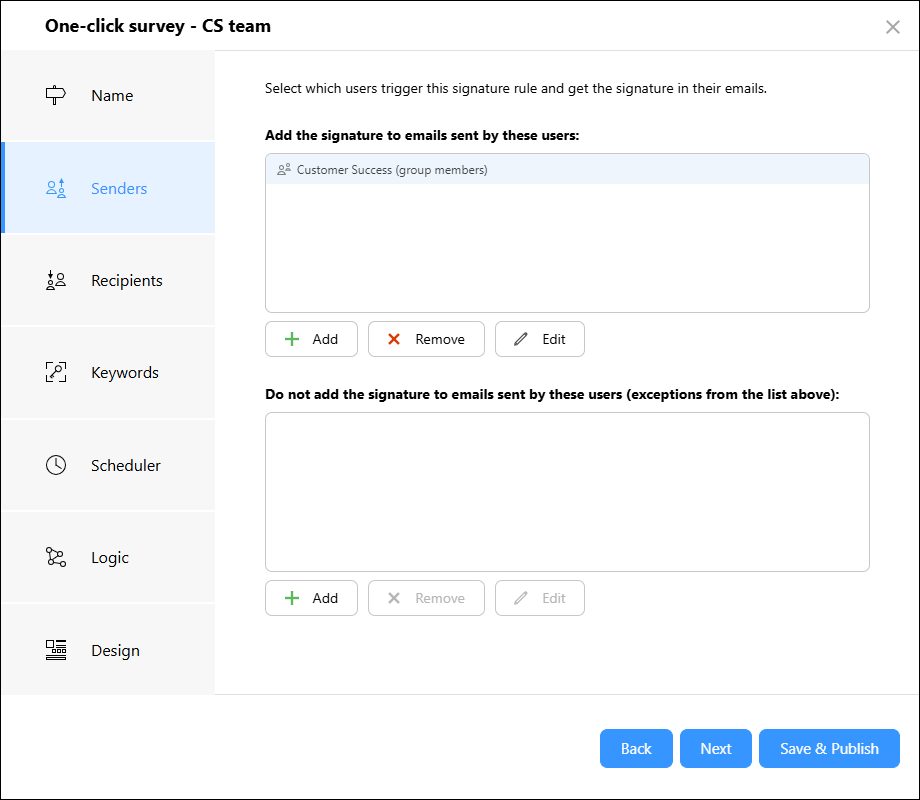
Fig. 11. Defining users who will get the email signature with your survey.
Configure the next three steps according to your needs:
- Recipients – here you can specify if the survey should be added to emails sent to everyone (All recipients) or to specific people (email addresses) only.
- Keywords – if you want to add the survey only to emails that include specific keywords (or phrases) in the email body or subject, you can define such keywords here. This step is optional and you can skip it if you don’t want to trigger surveys using keywords.
- Scheduler – if you want to add the survey only when emails are sent at specific time and date, configure the time ranges here. Let’s leave the Scheduler off (the default setting) so that the surveys can be added every time.
To learn more about each of the above settings, see this article.
When you have more signature rules, the Logic step allows you to decide how they interact (learn more). In this case, we’re creating a dedicated rule for the one-click survey, but if you have other rules that add email signatures (or marketing campaigns) and want to have these signatures added below your survey, it’s safer to choose the option to process the next rule on the list, as shown in Fig. 12.
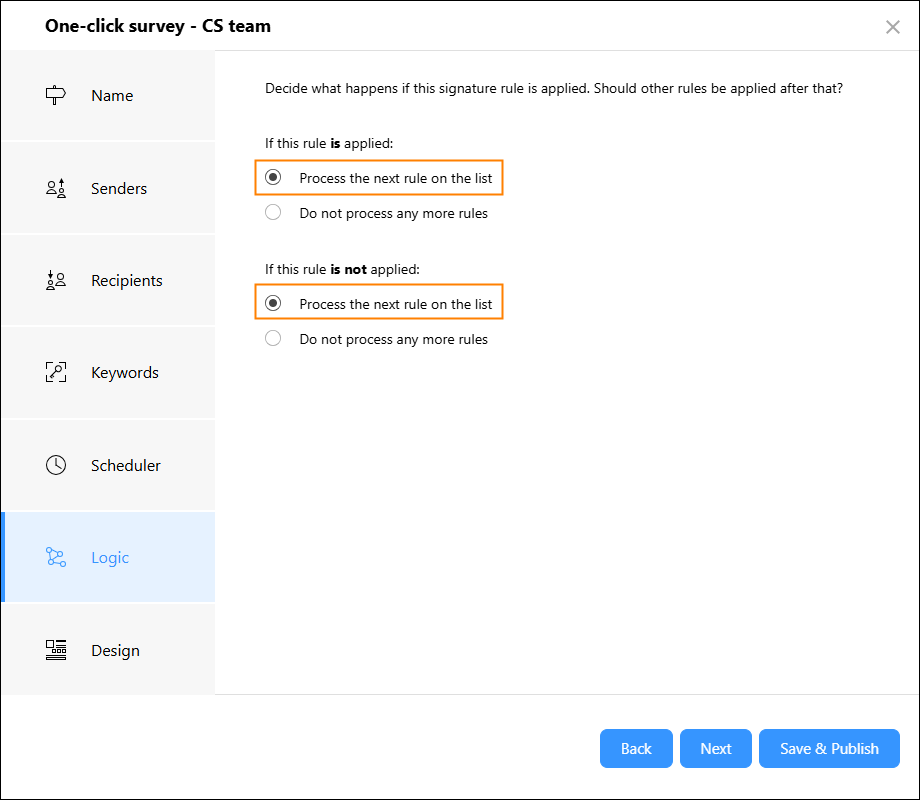
Fig. 12. The Logic step allows you to decide whether or not to add other contents to your emails besides the survey.
Finally, proceed to the Design step to create your survey template. In this example, let’s create a signature that includes a one-click survey and nothing else. Leave all the options as default and click Edit signature to start.
To learn how to create fully-branded email signatures (you can put surveys inside them) and how to use all the options in the Design step, see:
Choose the blank template from the template library (Fig. 13.) and click it to open the editor.

Fig. 13. Opening a blank template in the editor.
Now, proceed as described in the above section to design your survey and add it to your email signature. Once your survey is ready, click Apply & Close to exit the editor. If you want to go live with your survey now, click Save & Publish in the rule editing pane (Fig. 14.). Your survey is now automatically added to your emails based on the conditions you specified a moment ago.
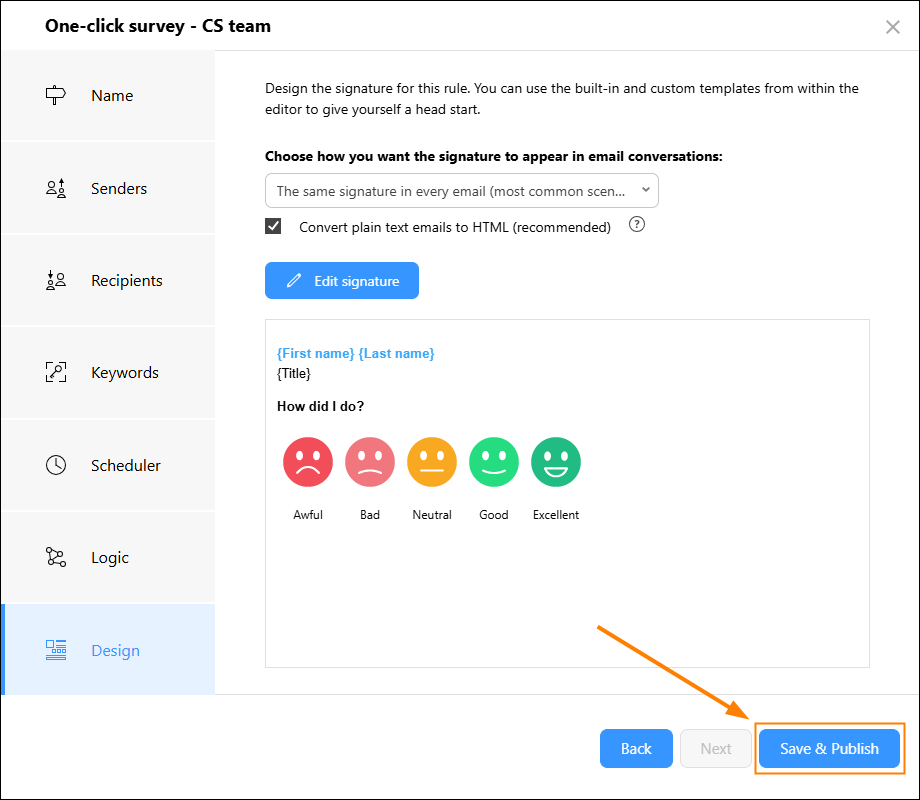
Fig. 14. Publishing a rule and going live with the survey.
From now on, your customers can click the survey added to your emails. You can check & analyze customer ratings using CodeTwo Insights (at insights.codetwo.com). See how to use CodeTwo Insights
Manage one-click surveys
To access and modify settings of your survey(s), sign in to app.codetwo.com, open the signature template editor (see Fig. 2.) and click One-click survey on the ribbon (see Fig. 3.).
In the Insert & manage one-click surveys pane, click the ellipsis button next to a survey (Fig. 15.) to access its settings:
- Insert survey inserts the survey into the signature template. Note that the same will happen when you click on the survey preview in this pane.
- Edit survey lets you change the survey’s name, icons, labels and the Thank you page. You won’t be able to change the scale of the survey at this point. See this section below to learn more about editing your surveys.
- Delete survey will delete the survey and all data gathered by the survey. The survey will no longer appear in CodeTwo Insights.
- Clone survey lets you create the exact copy of the survey.
- See Insights opens the statistics data gathered by the survey in CodeTwo Insights (insights.codetwo.com).
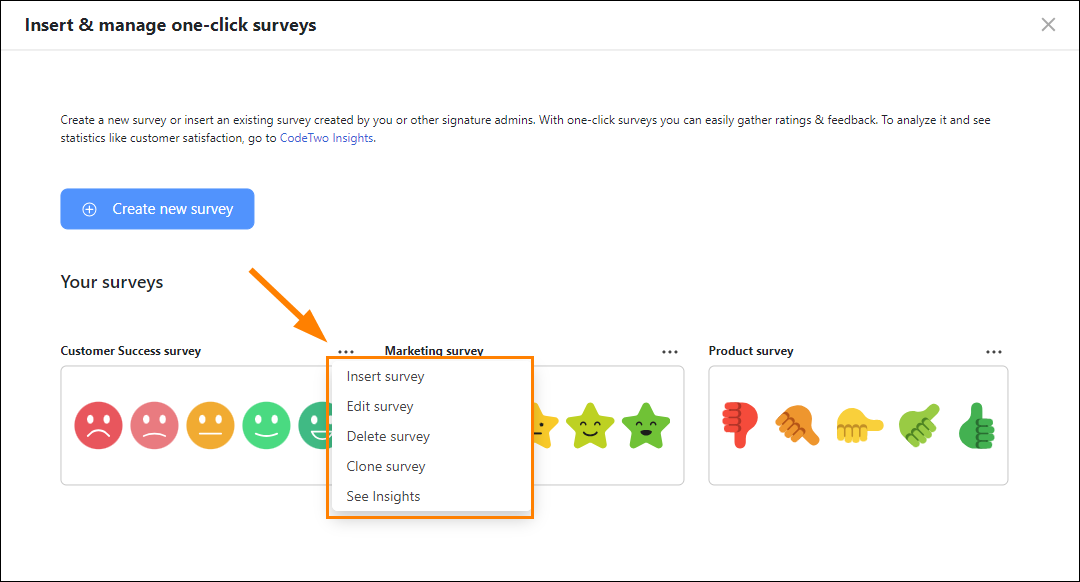
Fig. 15. Managing surveys in the signature template editor.
Editing & updating one-click surveys and the Thank you page
Editing the design (icons, labels, etc.) of a survey as shown in Fig. 15. will not update the surveys that are already inserted into your templates. If you want your changes to be applied to these templates, you need to open each of them in the editor and re-insert the updated survey.
You can also edit the already-inserted survey directly from the editing pane (Fig. 16.). To do so, either:
- click on the survey, go to the One-click survey tab and click Edit; or
- right-click the survey and select Edit one-click survey.
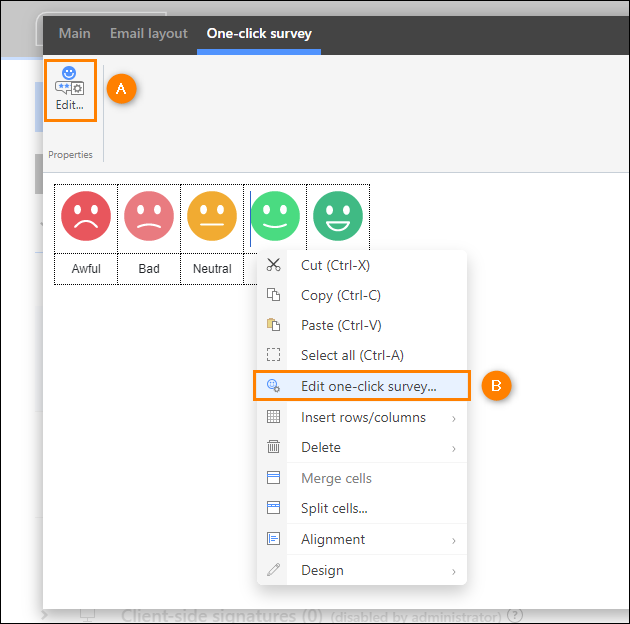
Fig. 16. Two ways of editing the survey directly from the editing pane.
Once you save your changes, the survey will be updated automatically. If you open the Insert & manage one-click surveys pane (see Fig. 15.), you will notice that the survey is updated there as well. You still need to re-insert the updated survey in your other templates, if necessary.
Note that when you update the Thank you page for a survey, your change goes live automatically and applies to all instances of the survey, even those already sent to your recipients.
Customer satisfaction analytics – CodeTwo Insights
CodeTwo Insights is a powerful statistics app that gathers ratings from your one-click surveys. With real-time analytics, it helps you analyze how your employees and services perform, track trends, measure customer loyalty, and more. Watch the video below for a quick overview of CodeTwo Insights, or keep reading for more details.
To access CodeTwo Insights, go to insights.codetwo.com and sign in with your Microsoft 365 account. You can also access Insights quickly from CodeTwo Admin Panel by using the Apps menu (![]() ), as shown in Fig. 17.
), as shown in Fig. 17.
By default, only tenant’s Microsoft 365 global admins have access to the app, but they can invite other admins, as explained further in the article.
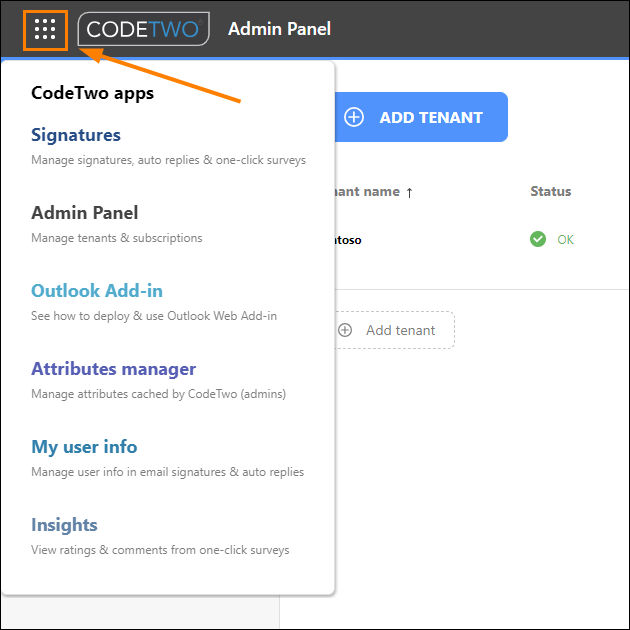
Fig. 17. App launcher in CodeTwo Admin Panel.
To see customer feedback data, select the survey you created for your team from the list or by using the menu on the left (Fig. 18.).
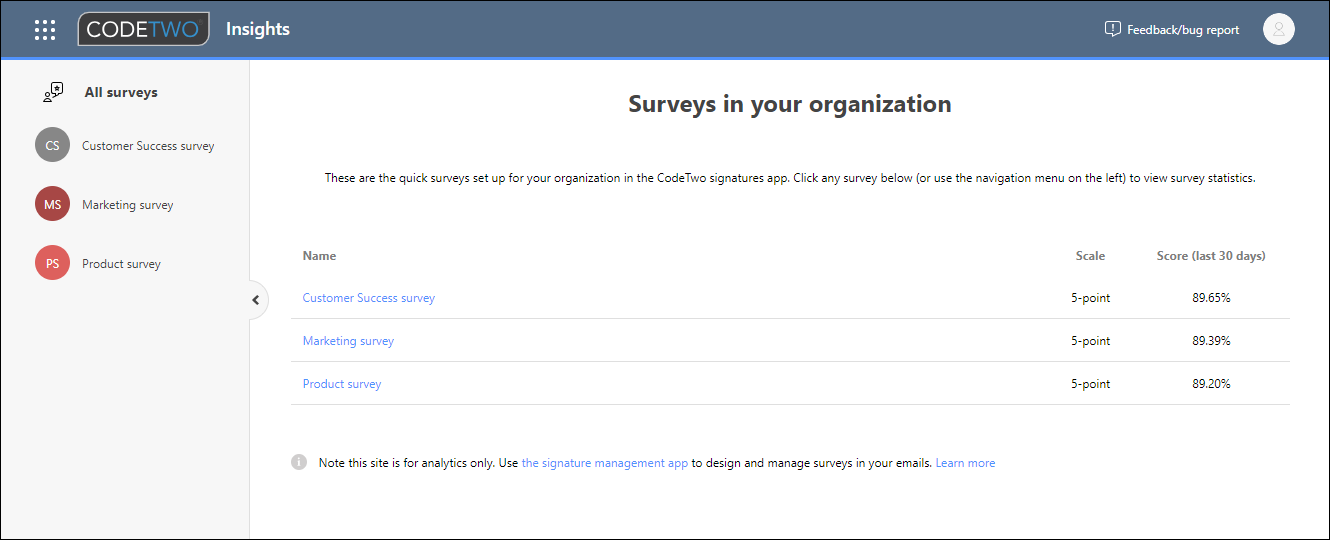
Fig. 18. CodeTwo Insights – list of surveys set up for your organization.
Here’s what you can do in CodeTwo Insights:
- Check survey stats
- Export survey data to CSV
- Set up email notifications for a survey
- Invite users to access CodeTwo Insights
Check survey stats
The Dashboard tab gives you an overview of the data gathered by the survey (Fig. 19.).
Satisfaction score is the total number of positive ratings divided by the total number of all ratings, shown as percentage. Positive ratings are displayed in green in CodeTwo Insights and depend on the rating scale used for your survey (e.g. on the 3-point scale, only the highest rating is considered positive; on the 4-point and 5-point scales, the two highest ratings are positive). Satisfaction score is calculated per selected period, e.g. a week, month, year or custom date range. You can select the period you’re interested in by using the drop-down menu at the top of each tab, as shown in Fig. 19.
Example
In the last 30 days, an employee received 58 ratings in total. On a 5-point scale, they got 56 positive ratings: 45 (forty-five) 5-point ratings and 11 (eleven) 4-point ratings. Their satisfaction score for this month is 96.55% (56/58 x 100).
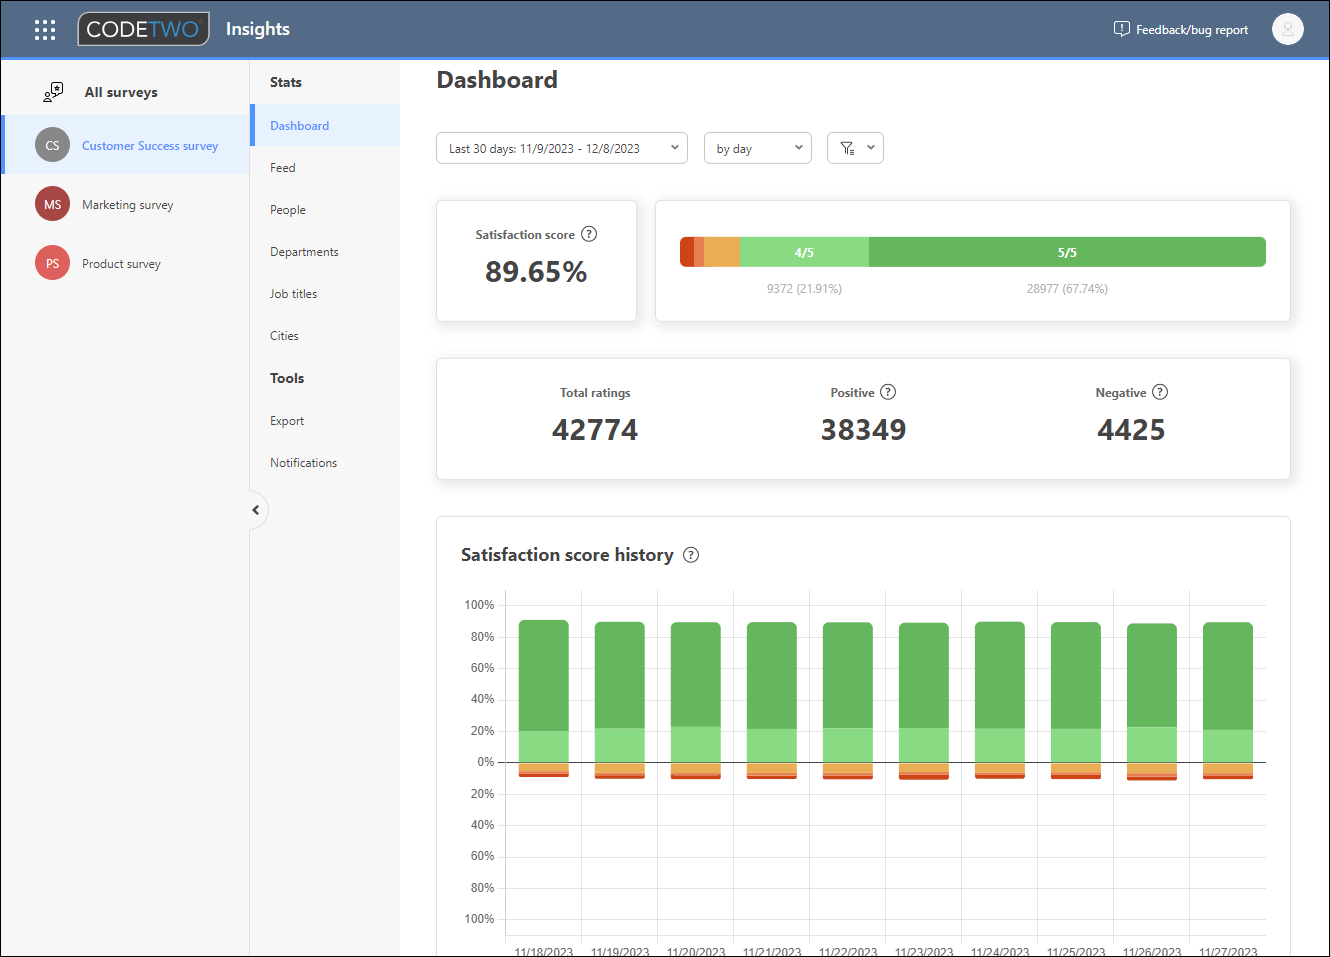
Fig. 19. CodeTwo Insights – Dashboard.
Go to the Feed tab (Fig. 20.) to check all the customer ratings and comments. You can narrow the results in many ways by using the available options and clicking Apply filters.
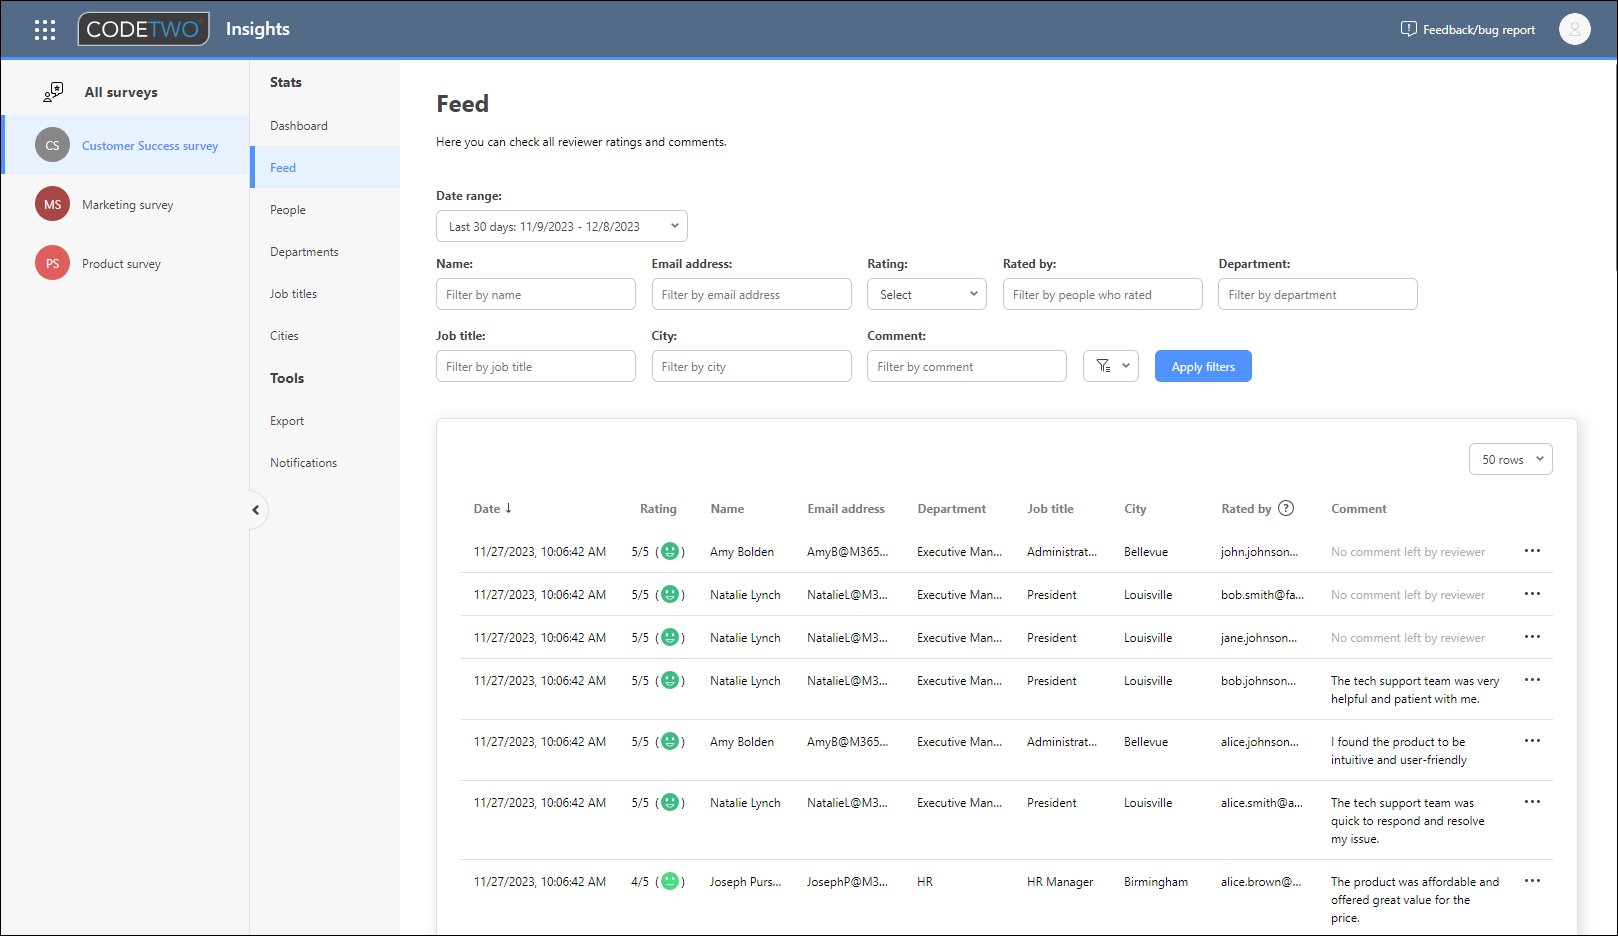
Fig. 20. The Feed tab lets you review all ratings and comments.
To exclude a rating you consider false or irrelevant from the stats, click the ellipsis button next to it and select Mark rating as false positive/negative (Fig. 21.). Optionally, you can also provide a reason for your decision.
Warning
You can’t undo this action. This means once a rating is marked as false positive/negative, it cannot be changed back.
To see who marked a rating as false positive/negative, when they did it, and their reason (if it was provided), use the ellipsis button shown in Fig. 21.
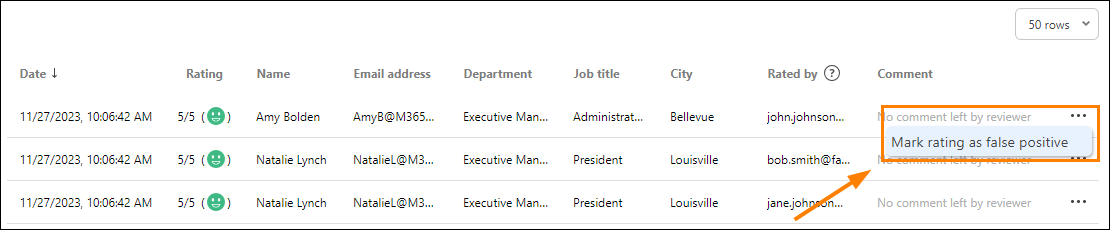
Fig. 21. Marking a rating as false positive or negative.
The People, Departments, Job titles and Cities tabs work in a similar way, and allow you to check the ratings and statistics broken down into different categories. For example, on the People tab (Fig. 22.) you can see satisfaction score for individual people in your organization, and below it a table with score breakdown.
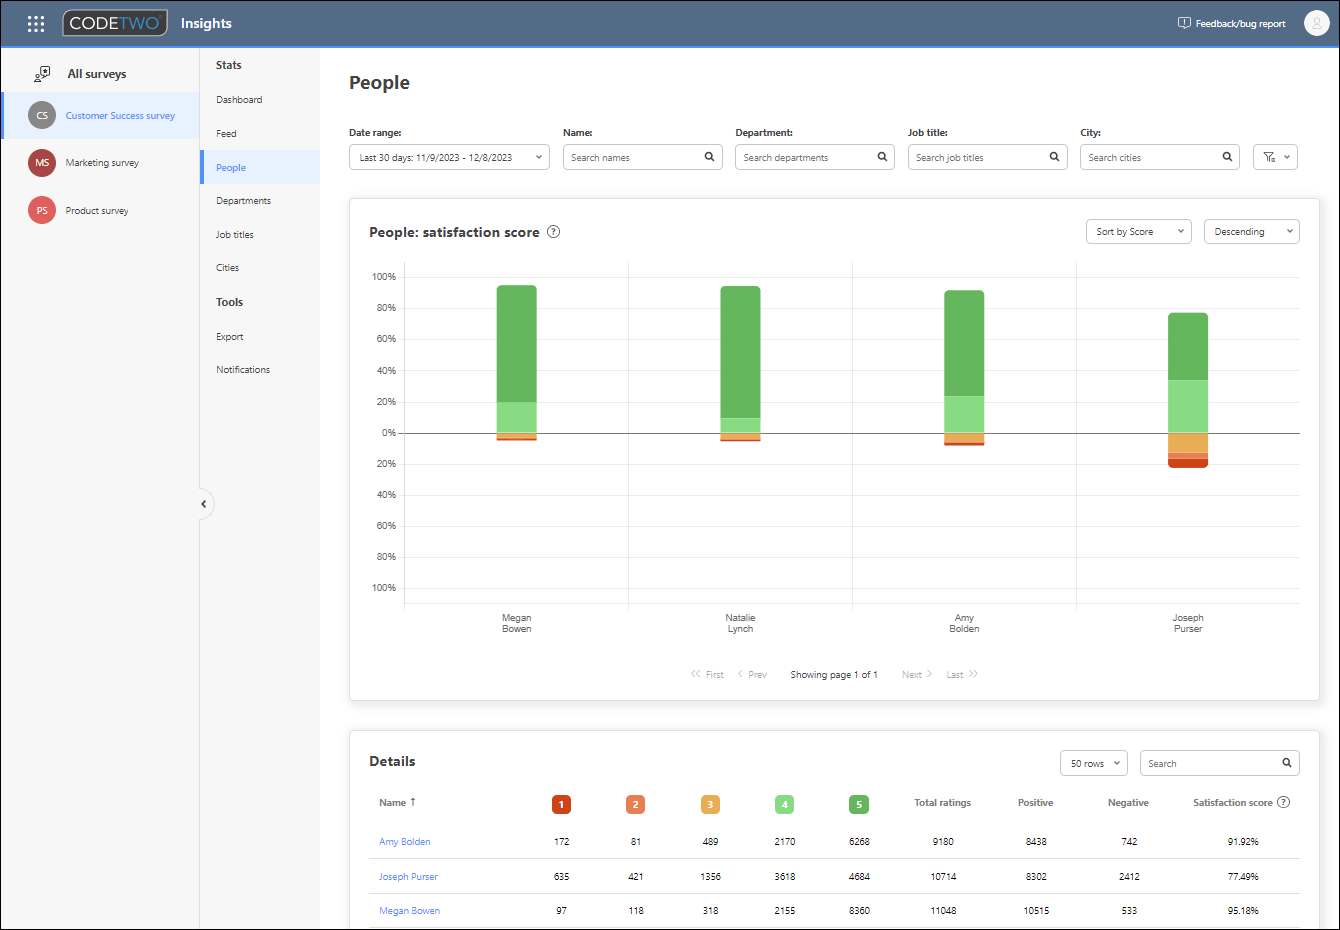
Fig. 22. Satisfaction score for individual people.
To see user satisfaction score details and history (Fig. 23.), click a rating bar for this person in the satisfaction score chart or click their name in the Details table below the chart.
Fig. 23. Accessing satisfaction score details and ratings history for selected people.
You can view statistics for the Departments, Job titles and Cities tabs in the same way – by clicking the bars in the chart or names in the table. This will give you a collective view. But you can also view a breakdown for people inside a department, city or with a specific job title by using the ellipsis button in the Details table and clicking People details. Fig. 24. shows how to access these stats from the Departments tab, and Fig. 25. shows the statistics you get.
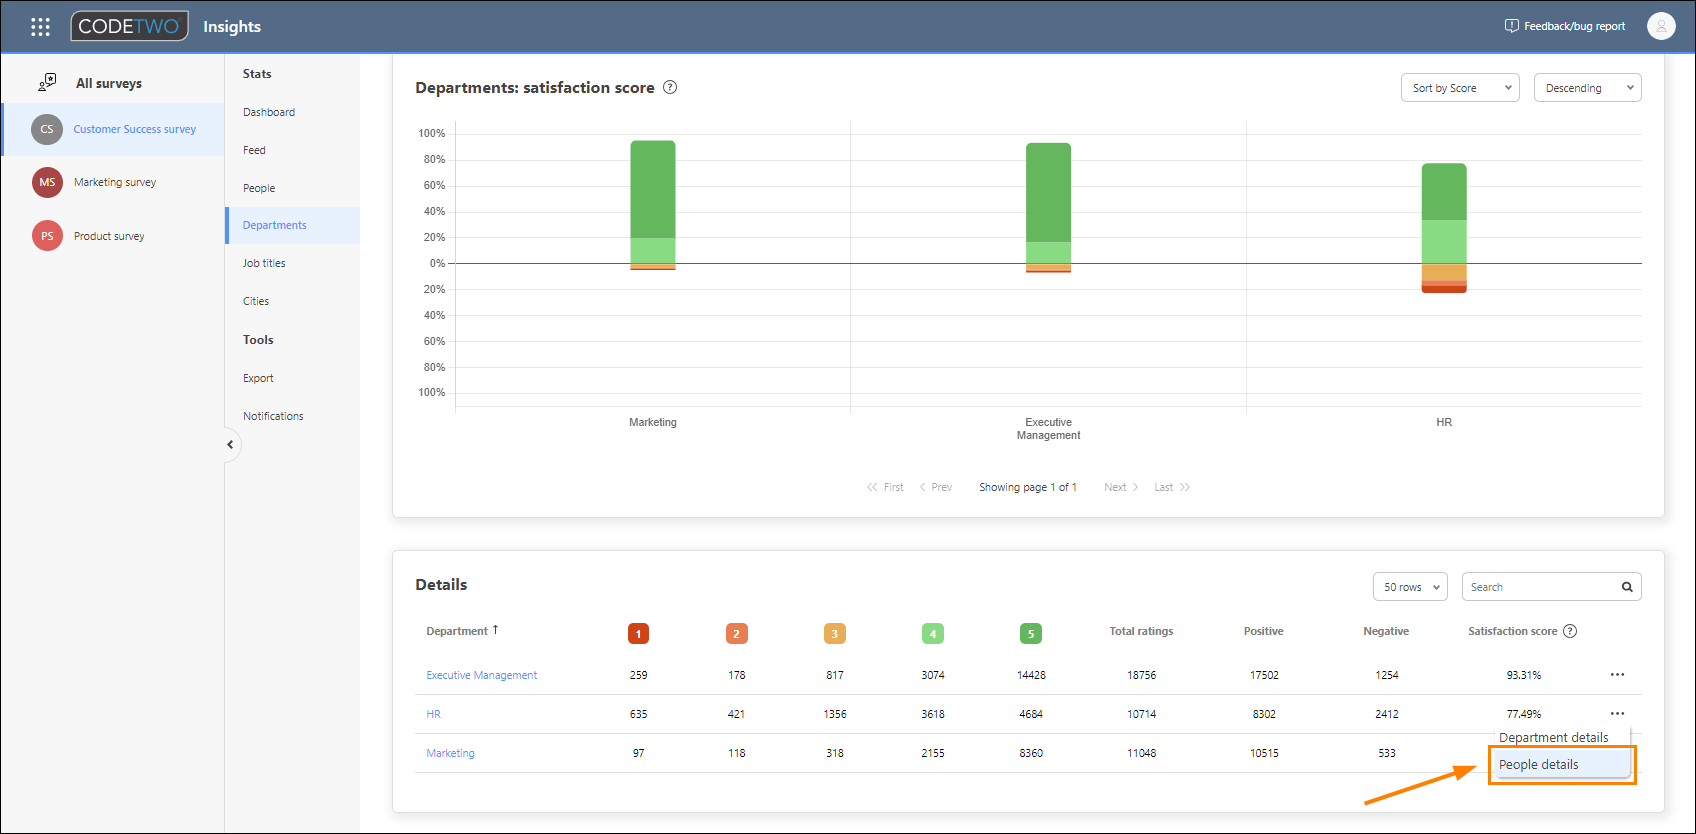
Fig. 24. Accessing stats for people from a specific department.
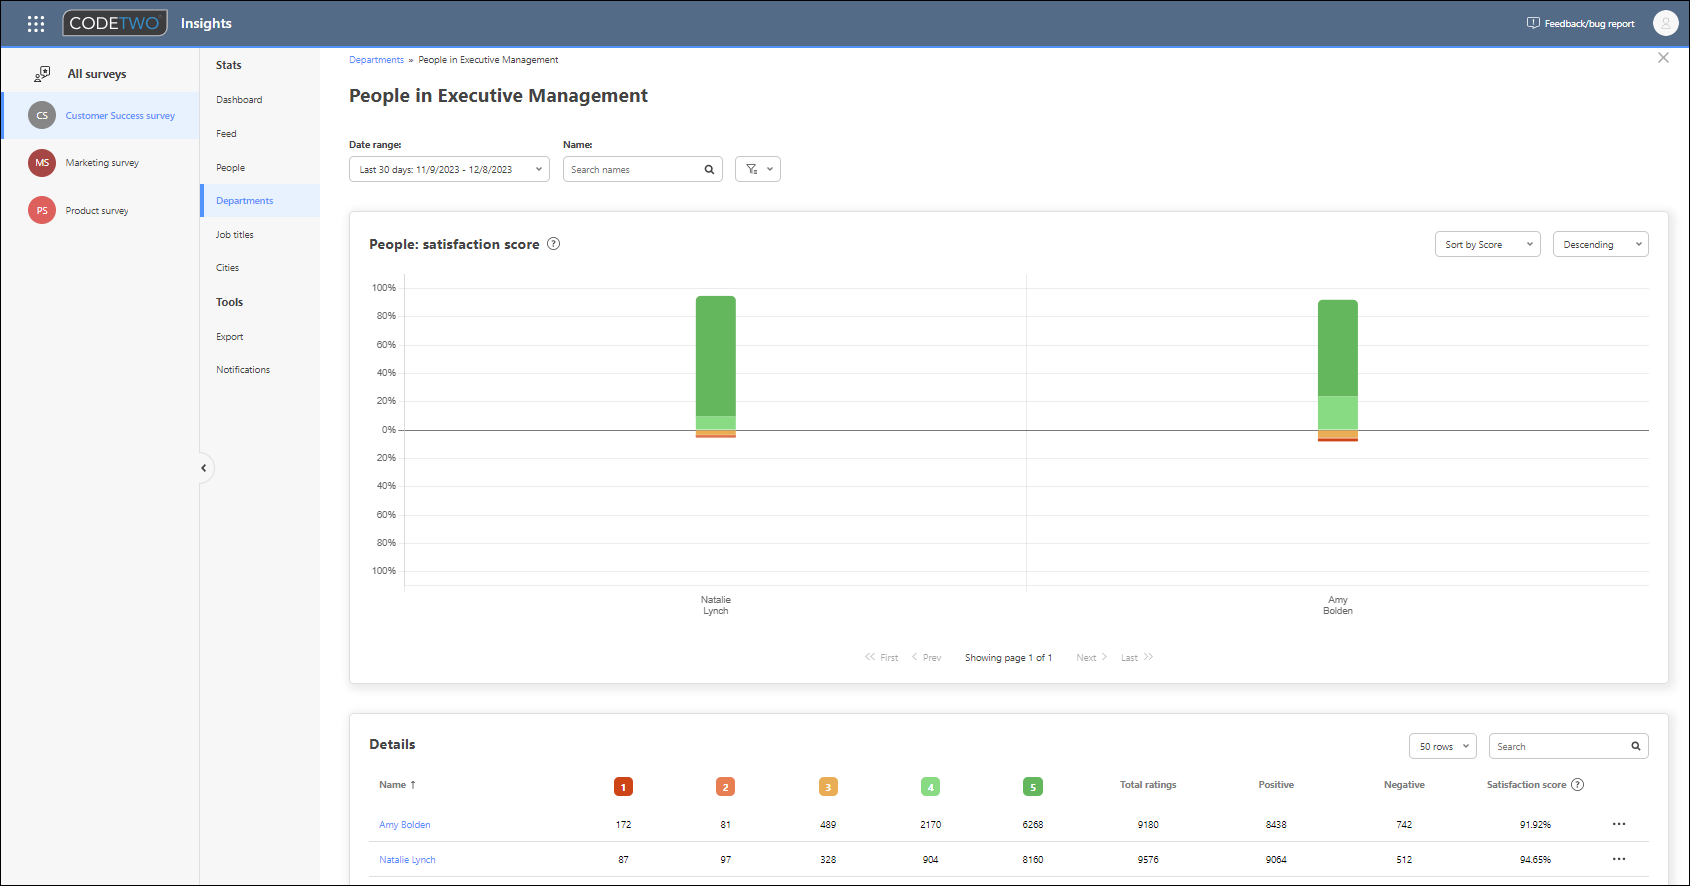
Fig. 25. Viewing stats for people from a specific department.
You can hide ratings marked as false by using the filters available on the People, Departments, Job titles and Cities tabs (Fig. 26.). Hidden ratings are not counted towards satisfaction score. See this section to learn which ratings are considered as positive and which as negative.
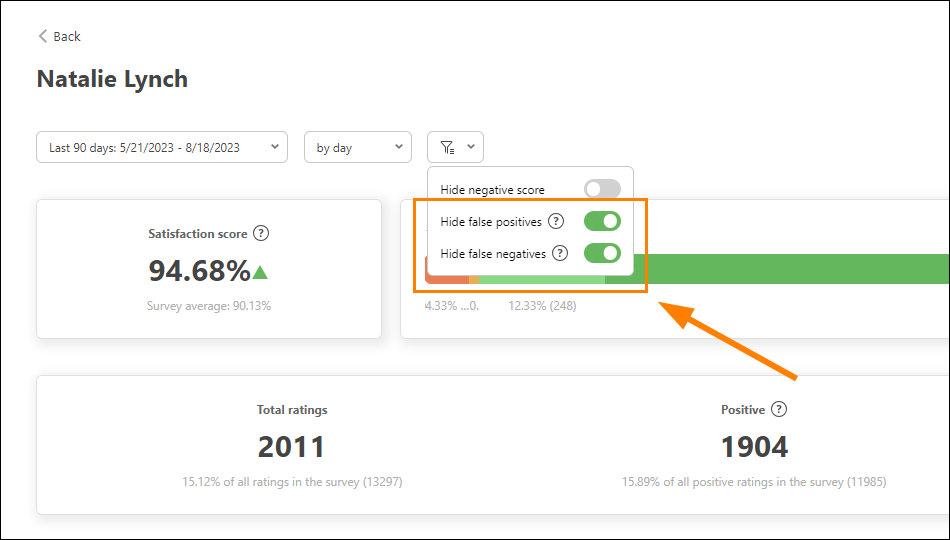
Fig. 26. Hiding ratings marked as false positive/negative.
Export survey data to CSV
You can export the survey data (feed) to a CSV file by using the Export tab in CodeTwo Insights (Fig. 27.). Select a date range, enter a password (required) that meets the complexity requirements, and click Export. You can run only one export operation per survey at a time.
A link to download the exported file will be sent to your email address (the same one you use to sign in to CodeTwo Insights). Use the password to extract the CSV file.
Important
Once generated, the download link remains active for 48 hours. If you want to download the CSV file after this time, or if you lose or forget the password, you need to export the data again.
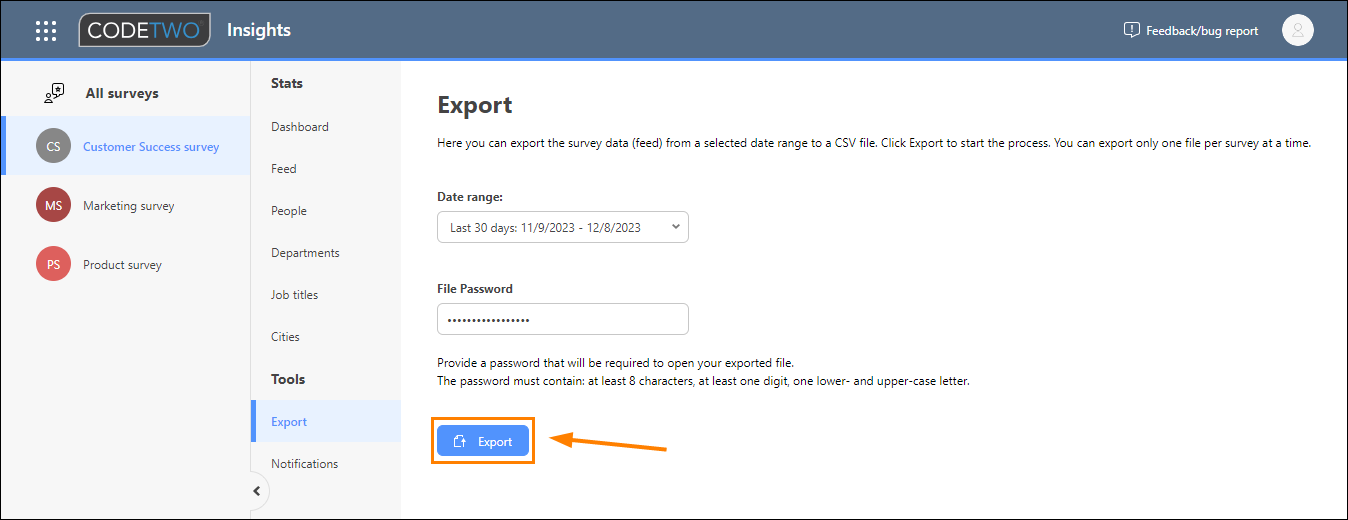
Fig. 27. Exporting survey data to a CSV file.
Set up email notifications for a survey
On the Notifications tab in CodeTwo Insights, you can enable email notifications for a survey (as shown in Fig. 28.) and specify who will get them. We will then send you customer rating insights for the survey according to these settings:
- Frequency – email notifications can be sent every hour or once a day/week/month.
- Emails – you can add up to 5 email addresses that will receive survey notifications.
- Options – here you can enable notifications only for specific ratings.
Example
Based on the configuration shown in Fig. 28., email notifications will be sent once a week, at 12:00 PM on Friday. You’ll get notified only, if there are new negative or neutral ratings, or new positive ratings with comments. Each email notification will include the number of new ratings that meet your criteria.
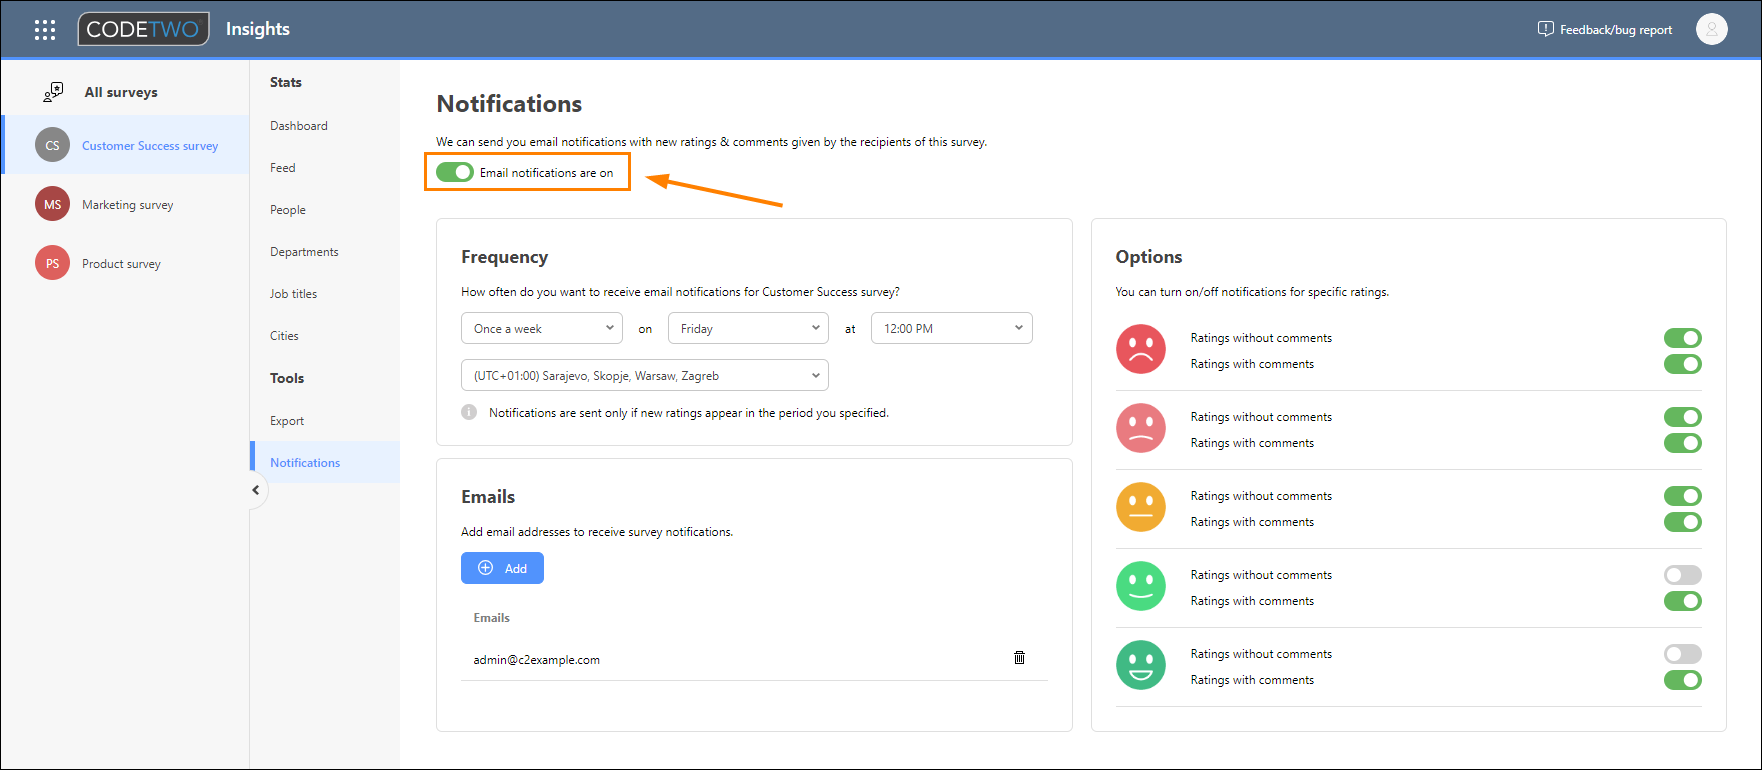
Fig. 28. Enabling and setting up email notifications for a survey in CodeTwo Insights.
Important
When cloning a survey, as described in this section, you can also select to include its notification settings (Fig. 29.). However, if you change the rating scale for the survey (e.g. from a 5-point scale to a 4-point scale), the notification settings will not be cloned.
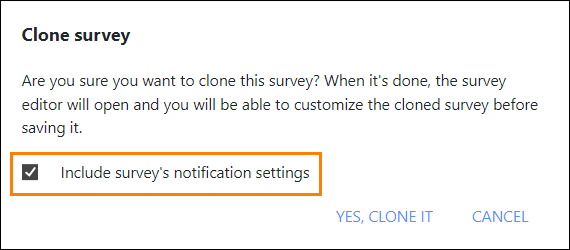
Fig. 29. Use this option to keep the notification settings of the cloned survey.
Invite users to access CodeTwo Insights
To invite other users to CodeTwo Insights and allow them to access and view statistics of all surveys set up for your organization, click the user icon in the upper-right corner of CodeTwo Insights and click Manage Insights users (Fig. 30.).
You need to be your tenant’s Microsoft 365 global admin to be able to invite other users to CodeTwo Insights. By default, all tenant’s Microsoft 365 global admins can access CodeTwo Insights.
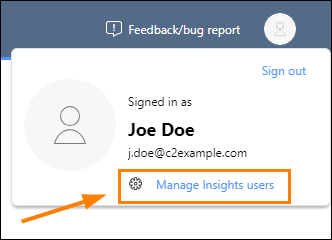
Fig. 30. Opening the users management page in CodeTwo Insights.
You can invite users or groups from your Microsoft 365 tenant by clicking ADD > User or ADD > Group respectively, as shown in Fig. 31. Click YES, SEND INVITATIONS when prompted to confirm your choice.
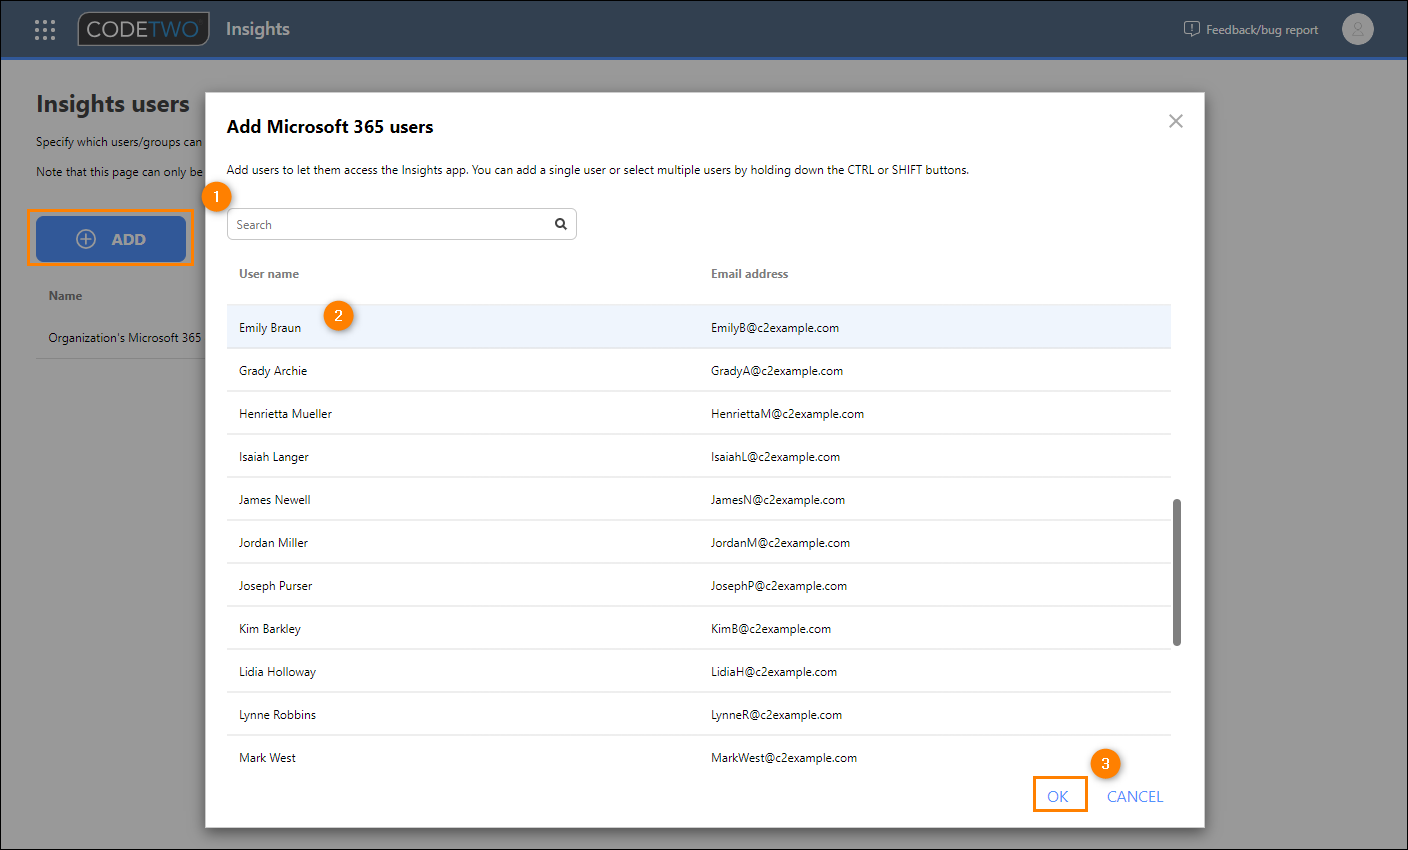
Fig. 31. Adding a new CodeTwo Insights user.
The invited users will now be able to sign in to CodeTwo Insights at insights.codetwo.com by using their Microsoft account. They will also receive an invitation email for informational purposes.
Important
Invited users who are not global admins in their Microsoft 365 tenant cannot invite other users to CodeTwo Insights.
One-click surveys & Insights FAQ
- What happens if a survey recipient tries to use the same survey more than once?
- Why is sometimes the reviewer shown as unknown in CodeTwo Insights?
- What happens when an email with a survey is sent to multiple recipients, and they all click a rating button?
- For how long is a survey active in an email?
- Can I use one-click surveys with both cloud (server-side) and Outlook (client-side) signatures?
- Where is my survey data stored?
- I cannot unlock One-click surveys. I get the "We do not recognize you" message when trying to sign in to CodeTwo. What to do?
- I cannot sign in to CodeTwo Insights, getting the "Something went wrong" error message. How to fix it?
- Do I need to add a one-click survey to every email in a conversation?
1. What happens if a survey recipient tries to use the same survey more than once?
Once the reviewer clicks a rating button on a one-click survey, they cannot use the same survey to, for example, change their rating. They need to receive a different survey from you (e.g. in another email) to be able to rate you again.
2. Why is sometimes the reviewer shown as unknown in CodeTwo Insights?
If you are using Outlook (client-side) signatures, surveys (and email signatures in general) are added to emails by our signatures Web Add-in. The Web Add-in currently cannot retrieve the survey recipient information from an email (this feature will be added in the near future), which is why you see Unknown reviewer in the Rated by column on the Feed tab in CodeTwo Insights.
3. What happens when an email with a survey is sent to multiple recipients, and they all click a rating button?
One-click surveys are rather intended to be sent to individual people. At the moment, if a survey is added to an email sent to multiple recipients and one of them uses the survey to rate their satisfaction (note that the survey can be used only once, as described in FAQ 1), we will not be able distinguish which of the recipients gave the rating. In other words, in such a scenario, the reviewer’s name shown on the Feed tab (in the Rated by column) in CodeTwo Insights might be that of any of the email recipients.
You might consider the following, depending on the type of signature you use:
- cloud (server-side) signatures: use keywords to remove a one-click survey from an email that you intend to send to multiple users. Learn how to add or suppress signatures with keywords
- Outlook (client-side) signatures: create a separate email signature template without a one-click survey. While typing an email that you intend to send to multiple users, manually select the signature without the survey, as shown in this article.
4. For how long is a survey active in an email?
The survey remains active and can be used to leave feedback for 3 months from the date it was sent in an email.
5. Can I use one-click surveys with both cloud (server-side) and Outlook (client-side) signatures?
Yes. However, to make surveys work with Outlook signatures, you need to use the modern CodeTwo Signatures Web Add-in for Outlook & OWA.
See also FAQ 2, as there are some additional limitations regarding Outlook signatures.
6. Where is my survey data stored?
In the same Azure region that you selected when registering your Microsoft 365 tenant to CodeTwo. Learn more
You can rest assured your data is safe with us. CodeTwo is ISO 27001 (information security) and ISO 27018 (personal data protection in the cloud) certified, and our One-click surveys are the only Microsoft 365-certified CSAT solution on the market.
7. I cannot unlock One-click surveys. I get the "We do not recognize you" message when trying to sign in to CodeTwo. What to do?
You get this message because you don’t have a CodeTwo Admin Panel account yet.
If you are a Microsoft 365 global admin, you can automatically gain access to your organization’s CodeTwo Admin Panel account by following these steps.
If you are not a Microsoft 365 global admin, you need to be invited by Admin Panel Owner to join your organization’s CodeTwo Admin Panel account, as described here. You can also ask the person who gave you access to the signature management app (app.codetwo.com) to unlock One-click surveys for you, as described in this section.
8. I cannot sign in to CodeTwo Insights, getting the "Something went wrong" error message. How to fix it?
This problem might occur if the cookies your browser uses to automatically sign you in to CodeTwo Insights have expired.
To fix it, simply sign out of CodeTwo Insights and sign in again. If that doesn’t help, clear the browser’s cache and try signing in again.
9. Do I need to add a one-click survey to every email in a conversation?
No. See these examples of use to learn what options there are for adding surveys to specific emails only, depending on the signature mode you use.