How to create a modular email signature with dynamic elements
You can use conditional placeholders to create a modular CodeTwo email signature with dynamically changing elements. This will help you:
- Prepare an email signature template that consists of a fixed part and replaceable department-specific parts that change depending on the sender’s department.
- Reduce the administrative burden of maintaining multiple email signatures for different organizational units.
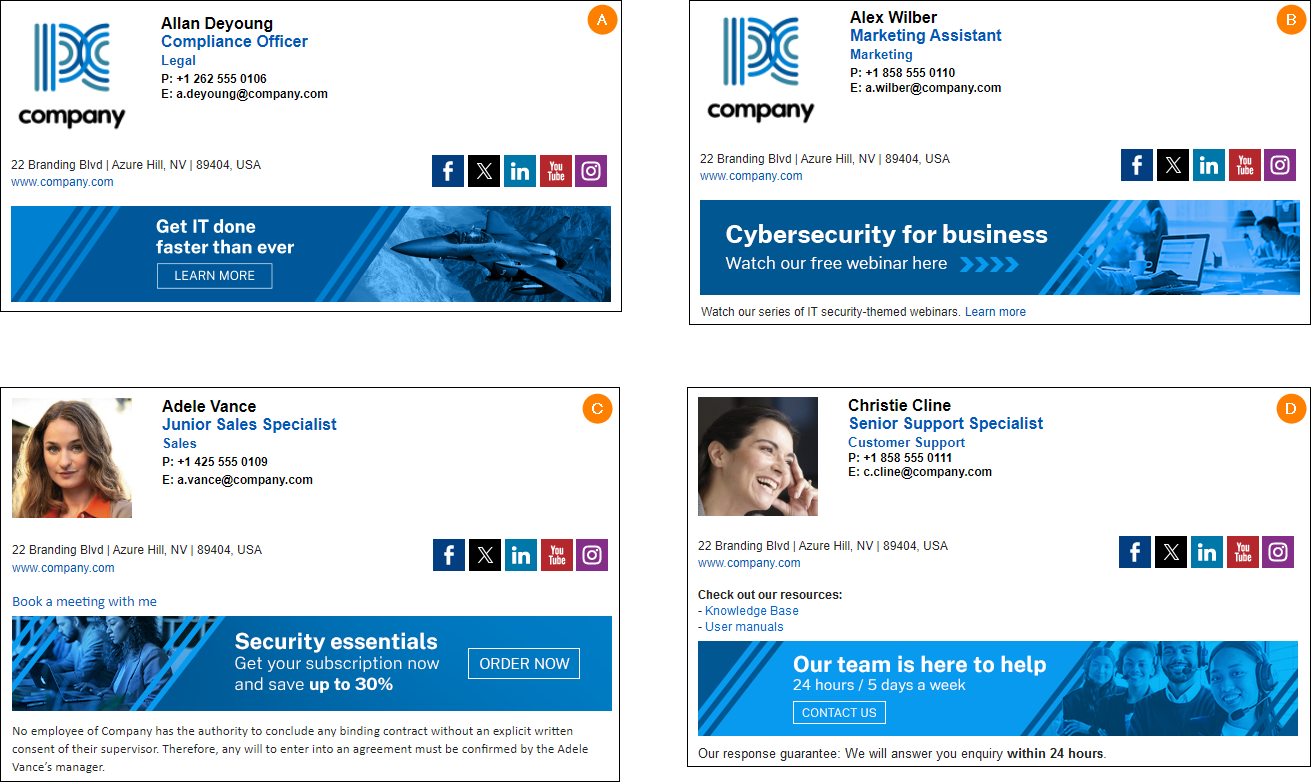
Fig. 1. An example of a modular email signature with common elements and department-specific parts (photo/logo, the bottom section).
New to CodeTwo?
Learn more about signature modes our solution can work in. See how to set up your first signature rule and design an email signature template.
Configuration
We’re going to prepare a modular email signature in a few stages:
- create a common, fixed part of the signature for all departments that contains basic user information, company’s social media icons, etc.;
- configure a user photo to display for senders from the Customer Service & Sales departments, while displaying the company logo for other departments;
- configure a department-specific bottom part of the signature that changes depending on a sender’s department (Customer Service, Sales, Marketing, or any other department).
The steps below can be completed regardless of which signature type (cloud or Outlook) you’re using in CodeTwo Email Signatures 365.
Important
For these steps to work, all your users need to have the Department attribute filled out correctly in Entra ID (Azure AD). If you need to supply missing information, you can do it in the Microsoft 365 admin center or (more conveniently) by using our Attributes manager. Learn more
Configure the common part
- Sign in to the Signatures app as a Microsoft 365 global administrator or a signature rule admin. Learn more
- Create and configure a new email signature rule (learn more). For the sake of this example, we’ll create an Outlook (client-side) signature.
- In the Senders step, add All users to the upper list. This way, all your users (from all the departments) will be able to use this signature in their emails.
- Leave the defaults in the Scheduler and Logic steps.
- In the Design step, click Edit signature to start designing your signature visually.
- It’s a good idea to start by using one of the predefined layouts. When the Template library window opens, click the Categories drop-down menu, deselect all categories except for layout only and choose the layout that suits you best by clicking it (Fig. 2.).
Tip
You can also base your email signature on one of the ready-made templates. Watch this video to learn how to edit and adapt a signature template to your needs.
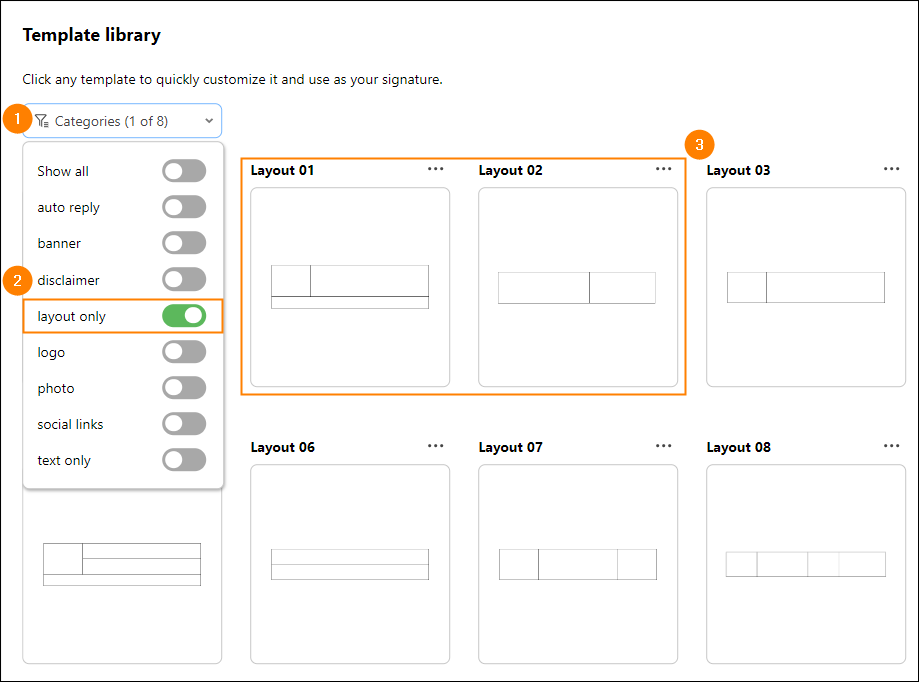
Fig. 2. Sample layout templates to choose from.
- Add the content that will be common to all your users (regardless of the department) to your signature template, such as the sender’s first and last name, job title, contact information, and social media icons. For detailed instructions on how to do this, have a look at the guide on designing an email signature from scratch. The ready common part of your email signature (Fig. 3.) might look something like this:
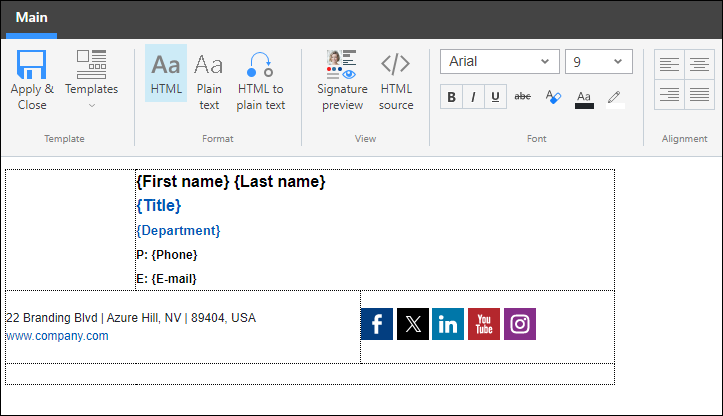
Fig. 3. A sample email signature template prepared with CodeTwo Email Signatures 365.
- Before proceeding to the next stage, it’s a good idea to save your signature template without going live with it just yet. To do so, save your template in the editor, then click Save in the Design step of the rule configuration wizard.
Configure the variable parts
To configure the variable parts of the signature, we’ll use the Conditional placeholders feature in the template editor of CodeTwo Email Signatures 365.
A placeholder is an element in an email signature template that is replaced with a specific value or content in real time when a user sends an email with that signature. Unlike regular placeholders, such as {First name} or {Title} that are replaced with the sender’s data pulled from Entra ID (Azure AD), conditional placeholders can be replaced with one of multiple conditional values (e.g. a text, picture or even an entire HTML section), depending on which condition is met.
In short, we’re going to use conditions based on sender’s department to update a conditional placeholder (and hence email signature) with content that’s suitable for that sender’s department – all of that without the need to design separate signatures for different departments.
Proceed to learn how to create sample variable parts of your signature.
Idea #1: User photo vs. company logo
For departments that contact your customers directly, like Customer Support or Sales, it might be a good idea to include a personal photo of an employee in the email signature to add a personal touch and build trust and engagement. For employees from other departments, you might want to include your company’s logo instead. Here’s how to achieve it:
- To begin, re-open the editor by clicking Edit signature (in the Design step of your email signature rule configuration).
- Click inside the area of the signature where you want a user photo or the company logo to appear. Go to the Table layout tab on the editor’s ribbon and note down the Column width value, as you’ll need it later (Fig. 4.).
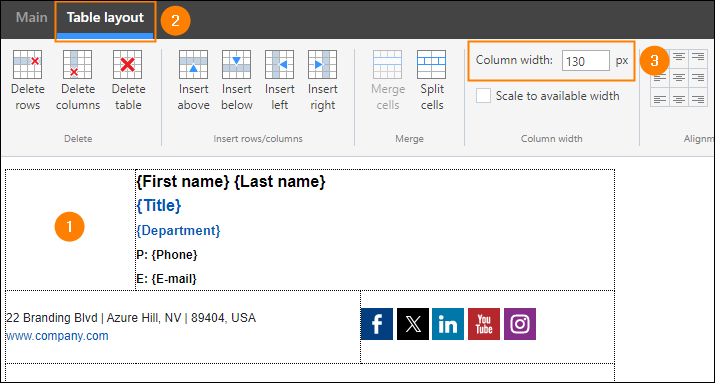
Fig. 4. Checking the column width in the template editor.
- Click Conditional placeholder on the editor’s ribbon and select Manage (Fig. 5.) – this will open the Conditional placeholders manager.
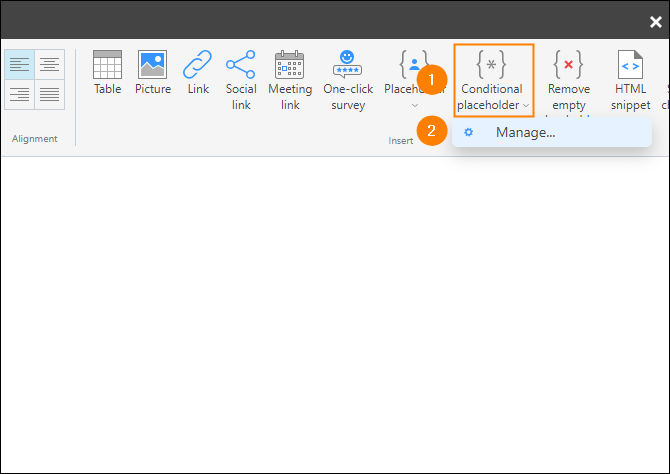
Fig. 5. Opening the Conditional placeholders manager.
- Click CREATE (Fig. 6.) to add a new conditional placeholder. Name it according to your needs (don’t use special characters like brackets or parentheses) and click OK – the placeholder will appear on the list.
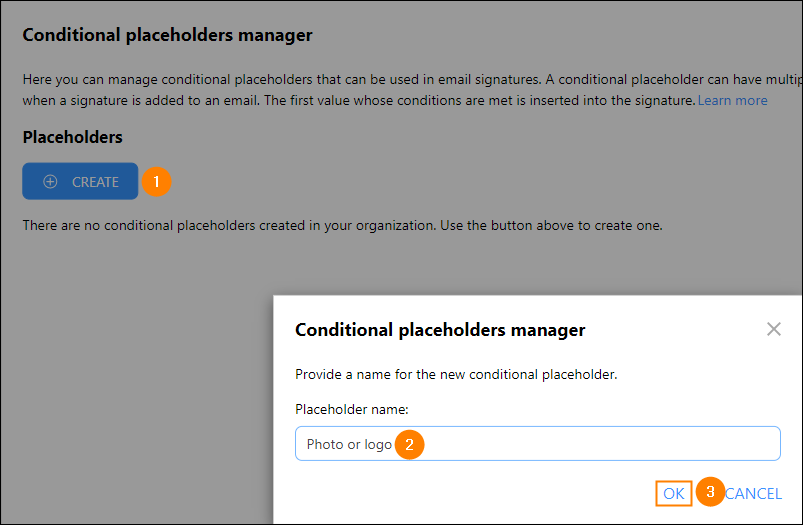
Fig. 6. Creating a new conditional placeholder.
- To add a new conditional value, click Add.
- Specify a condition that will trigger the related value:
- Click the edit (
 ) button to open the conditions builder.
 - Since you want your signature to include a photo for employees in the Customer Support and Sales departments, configure your conditions as follows:
- For Sender property, choose Department.
- In the Operator column, choose equals.
- Type the first department name (e.g. Customer Support) in the Value column. Ensure the department name matches exactly the value stored in your Entra ID (Azure AD).
- Click + to add another condition and choose Or in the And/or column.
- Repeat steps i.–ii.
- Put the name of the second department (e.g. Sales) in the Value column.
- Your conditions should now look similar to the ones shown in Fig. 7.
- Click OK in the bottom right corner to close the conditions builder.
- Click the edit (
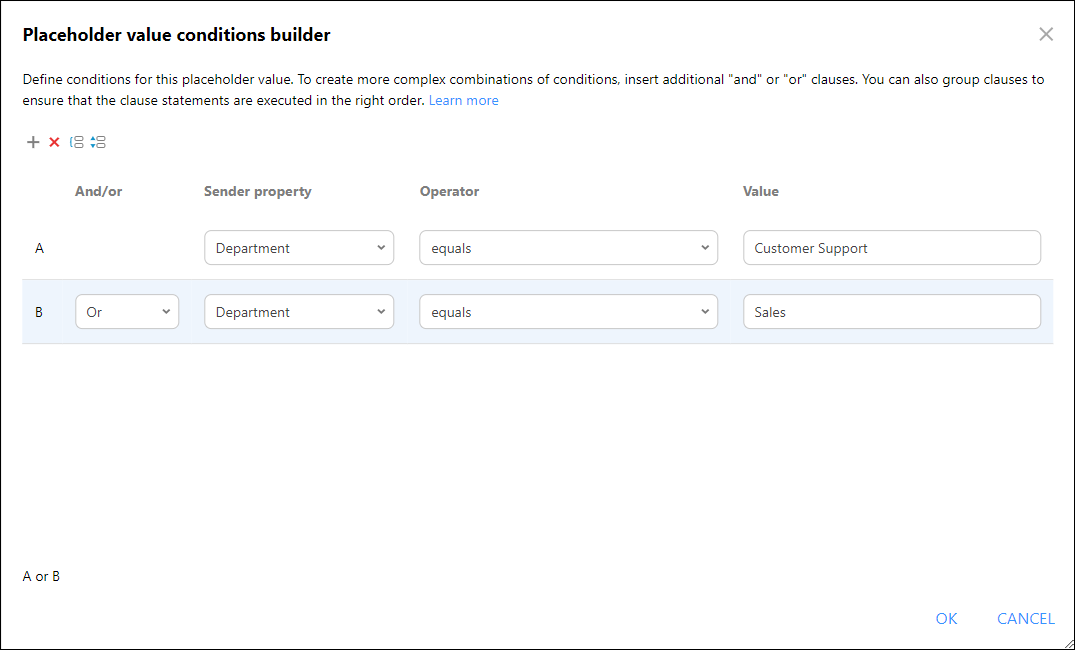
Fig. 7. Making sure the rule will apply only to users from the Customer Support and Sales departments.
- Next, decide what content/value your placeholder should be replaced with if one of the conditions is met for the sender. Since you want to display a photo for each employee in the Customer Support and Sales departments, click the
 button in the Placeholder value column, and go to Message Sender > Photo (Fig. 8.).
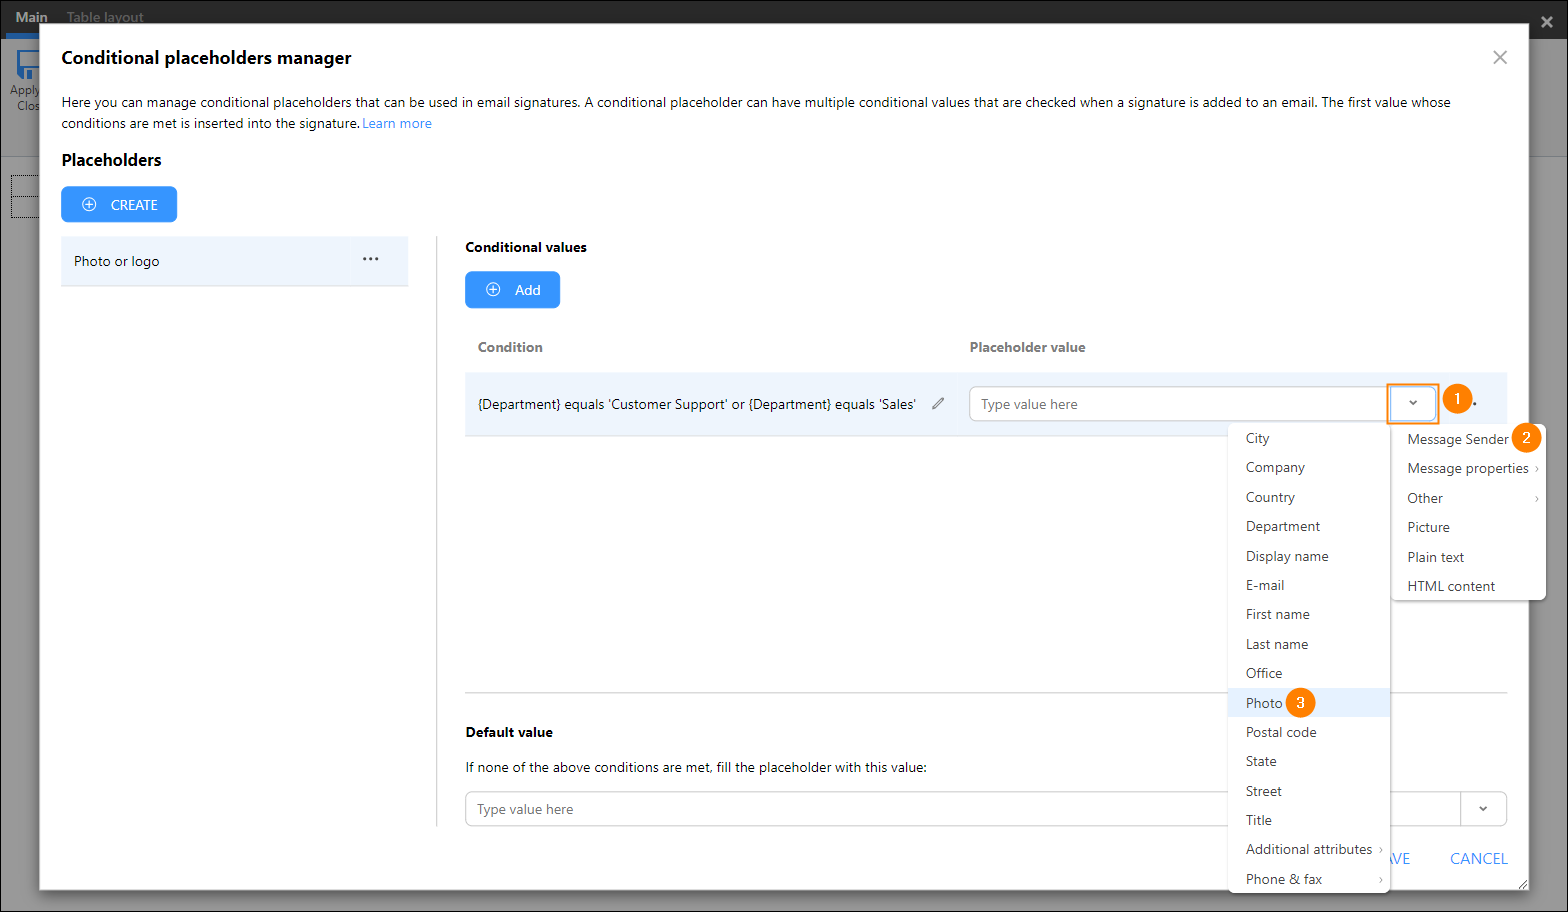
Fig. 8. Setting the Microsoft 365 user profile photo as the value of the conditional placeholder.
- In the Photo placeholder properties popup window, select Adjust dimensions and specify the width of a user’s photo displayed in your signature. Use a slightly smaller value than the one you noted down in step 2 to ensure there’s a margin and the photo doesn’t blend with adjacent signature elements. Leave 0 for Height and click OK (Fig. 9.).
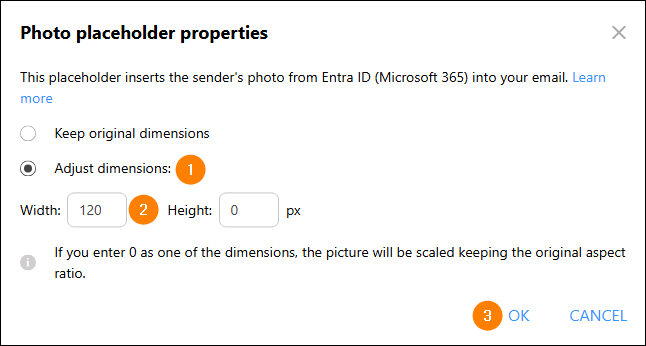
Fig. 9. Setting up the dimensions of a user’s photo in the email signature.
- Your conditional value is now complete. Next, you need to take care of the users from other departments, whose signatures will display your organization’s logo instead. Click the button in the Default value section and choose Picture (Fig. 10.).
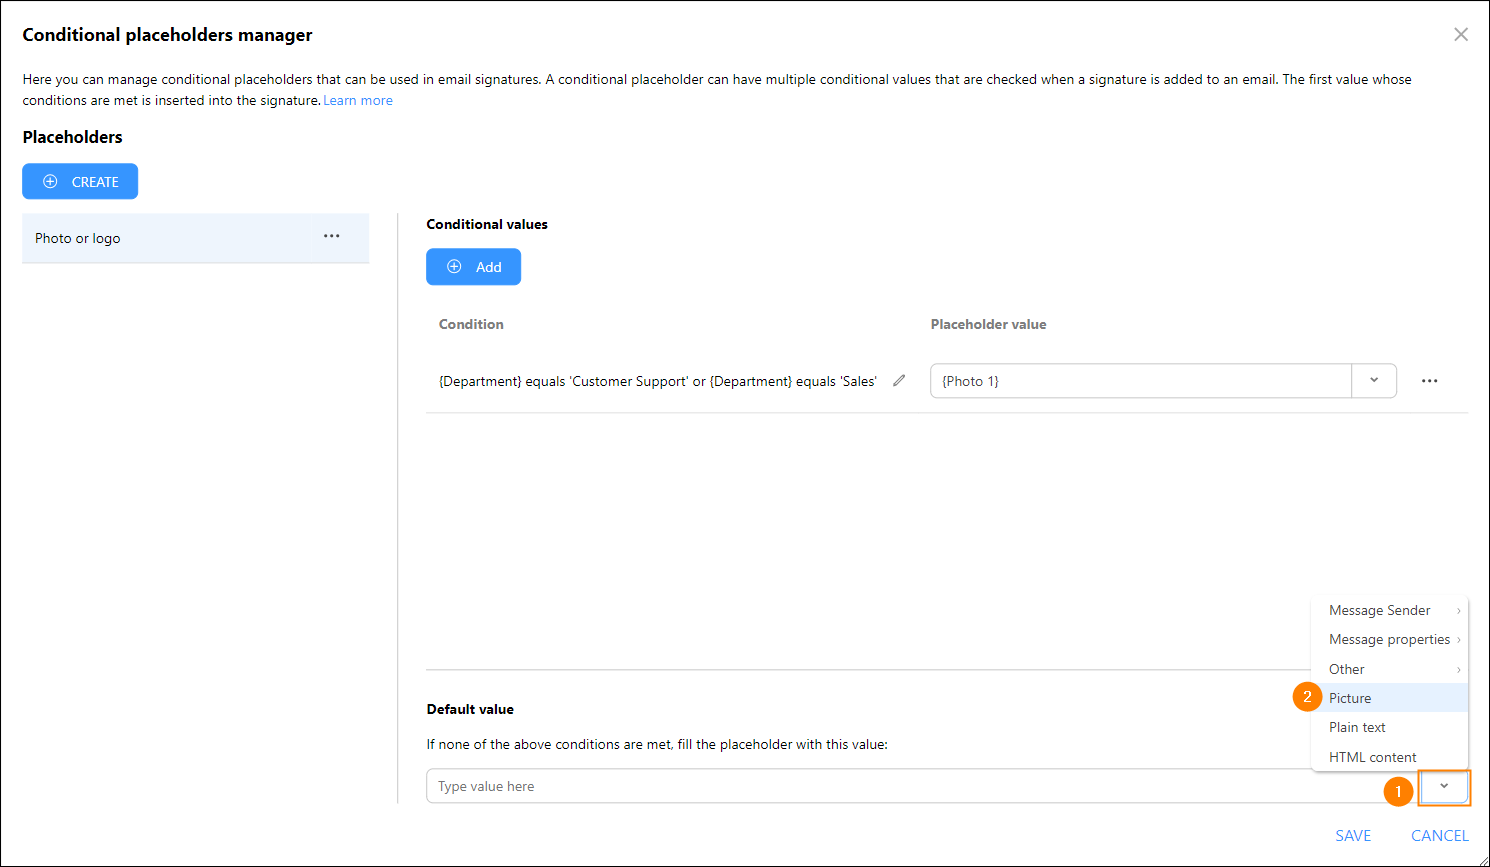
Fig. 10. Setting the conditional placeholder’s value to company logo for the remaining users.
- In the Insert picture popup window, add an embedded or an online picture of your company’s logo. Similar to the user’s photo, set the Width to a slightly smaller value than the column width you noted down in step 2. Finally, make sure the Keep aspect ratio option is selected, add the alternative text, and click OK (Fig. 11.).
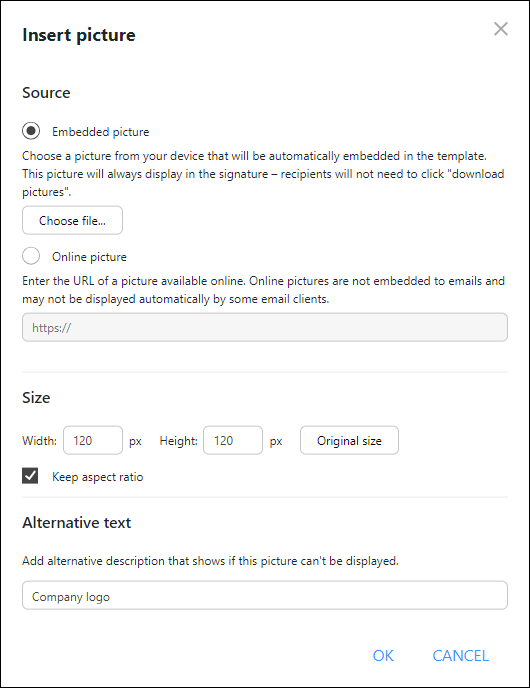
Fig. 11. Specifying the company logo image properties.
- Your conditional placeholder is now ready. Click SAVE at the bottom to save it in CodeTwo Email Signatures 365.
- Now, you just need to insert your conditional placeholder into your signature template. To do so, click the place where you want a photo or the logo to appear in your email signature, click Conditional placeholder, and choose your newly created placeholder from the list (Fig. 12.).
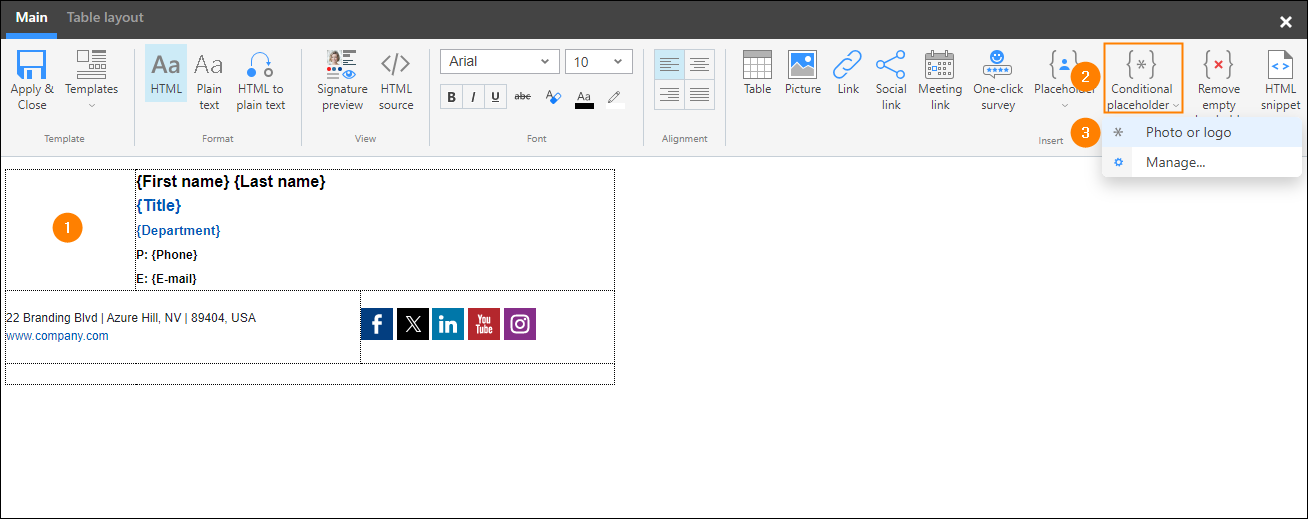
Fig. 12. Adding your conditional placeholder to the email signature template.
- After inserting the conditional placeholder, save the changes to your template in the editor, then click Save in the Design step of the rule configuration wizard.
Now, proceed to create another conditional placeholder that, upon sending an email, will turn into department-specific content of the signature, displayed at its very bottom.
Idea #2: Department-specific content at the bottom of the signature
While the top part of an email signature is usually uniform across all users, containing the most basic information, the bottom part gives you more freedom in terms of design. In this section, we’ll show you a few examples of how you can personalize the bottom part of your modular signature for each department.
- To begin, re-open the editor by clicking Edit signature (in the Design step of your email signature rule).
- Next, ensure that your email signature template contains an empty table cell at the bottom to accommodate the variable part of the signature (Fig. 13.).
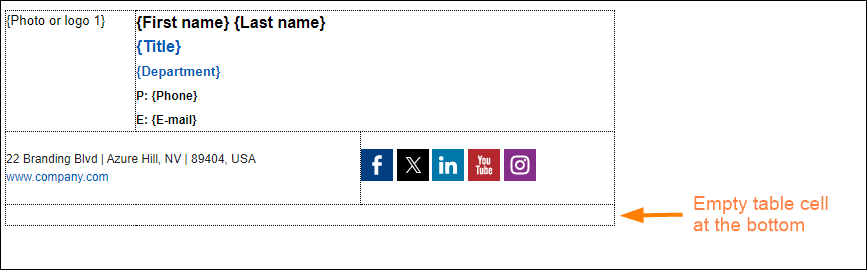
Fig. 13. An empty table cell where variable content will be inserted based on conditional placeholder conditions.
- If not, add a table cell by using the controls on the Table layout tab of the editor’s ribbon. For more detailed explanations, see this article.
- Once the empty cell is there, click inside it and go to the Table layout tab to check its width (Fig. 14.), as you will need it later.
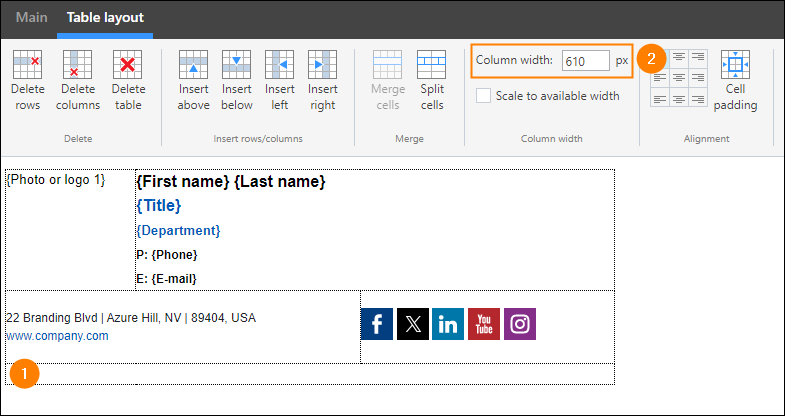
Fig. 14. Checking the total width of the bottom table cell.
- Next, click Conditional placeholder on the editor’s ribbon, and select Manage to access the Conditional placeholders manager once again.
- Create a new conditional placeholder by clicking CREATE and name it, for example, Department specific.
- This time, before proceeding to define any department-specific conditional values, let’s first decide on the default placeholder value that will be displayed for all users that do not belong to departments for which you’re going to define the values. In this example, we’ll use a standard company banner. Of course, you can decide on something completely different, e.g. a simple (plain) text or an HTML element. To add the banner, click the button (in the Default value area) and select Picture (see Fig. 10.).
- In the Insert picture popup window, add an embedded or an online picture of your standard company banner. Set the Width to match the column width you checked in step 4. Finally, make sure the Keep aspect ratio option is selected, add an alternative text, and click OK (Fig. 15.).
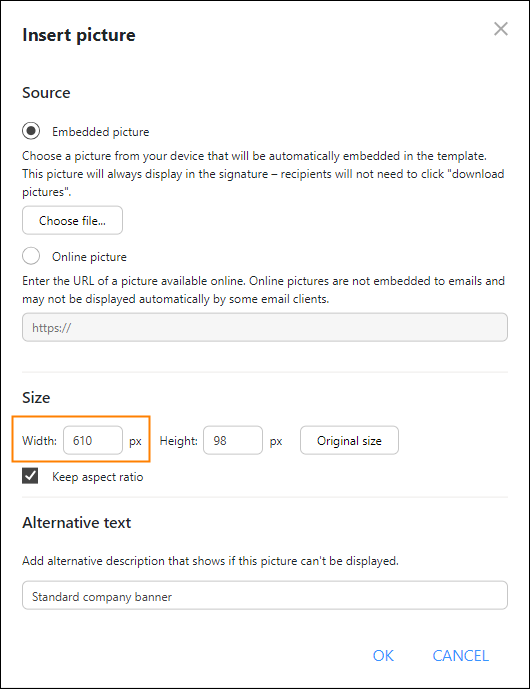
Fig. 15. Adding a standard company banner – the banner width matches the previously checked table cell width.
- Now, let’s move on to configuring conditional values, where each one includes a department-based condition and department-specific content (value) that will be inserted if the condition is met. Start by clicking Add.
- Click the edit () button to open the conditions builder (Fig. 16.).
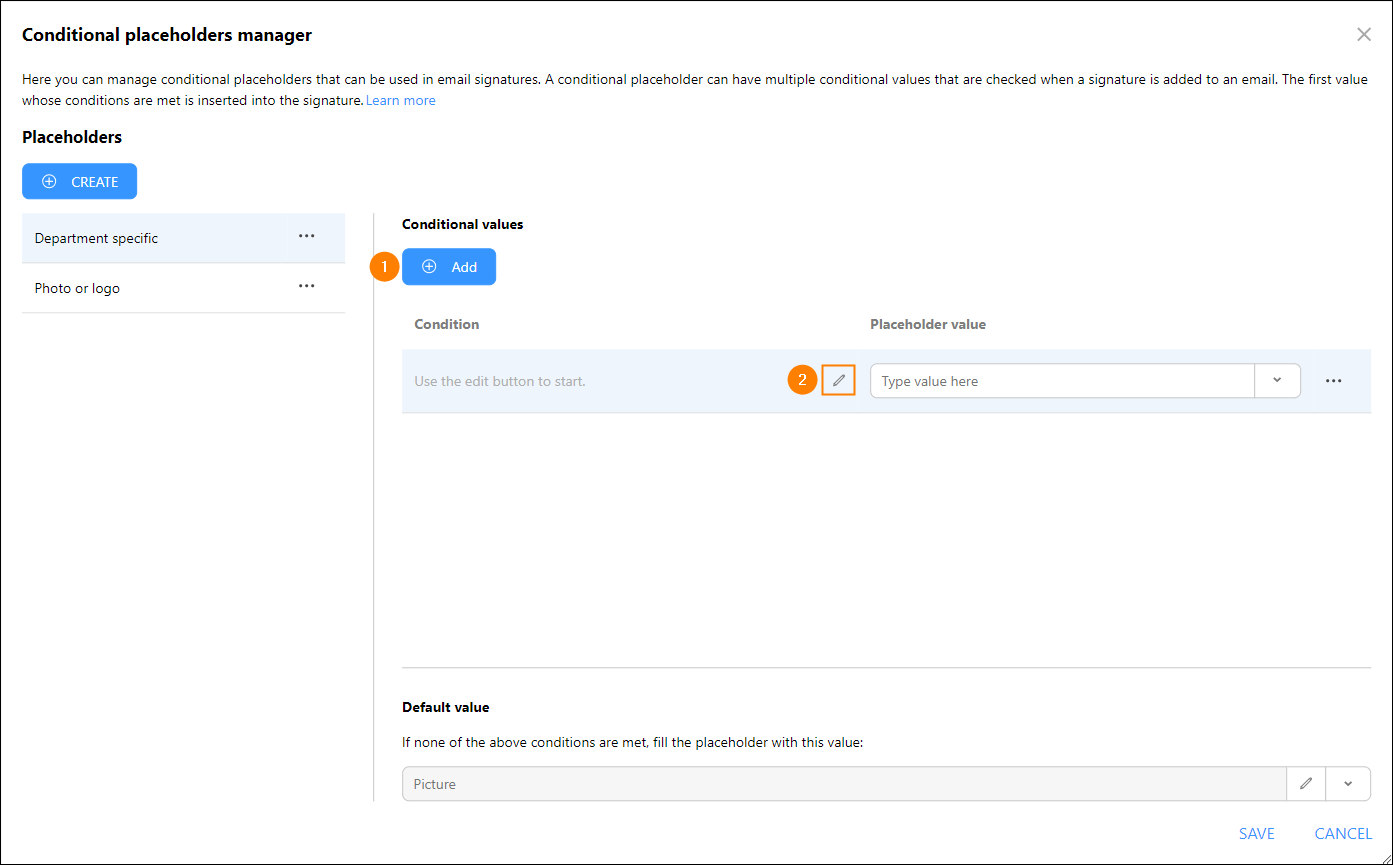
Fig. 16. Adding a new conditional value and accessing the conditions builder.
- Configure the condition as follows (Fig. 17.):
- Choose Department for Sender property.
- In the Operator column, choose equals.
- In Value, type or paste the name of the chosen department (Customer Support, in our example).
- Click OK to save the condition and close the condition builder.
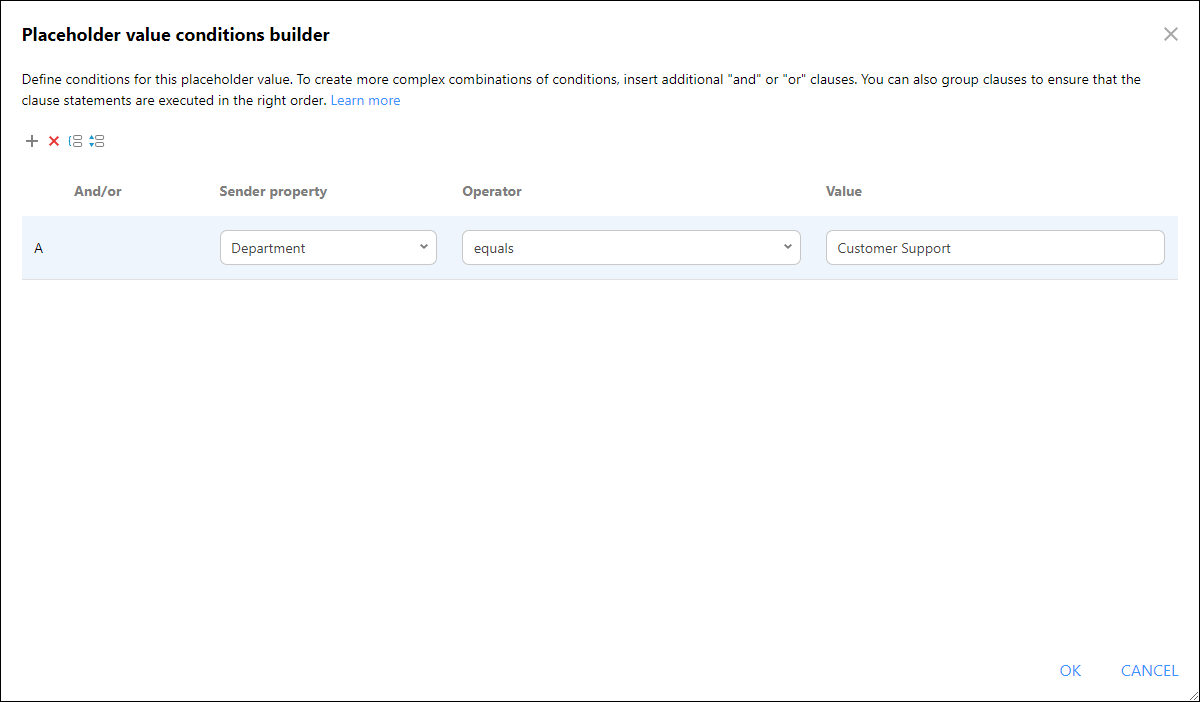
Fig. 17. Defining a condition for the Customer Support department.
- Next, click the button in the Placeholder value column and choose the type of content you would like to insert into the signature when a member of the Customer Support team sends an email. You can use a property/attribute, picture, plain text, or an HTML element. We’ll choose the last option (HTML content), as it gives you the most flexibility (Fig. 18.).
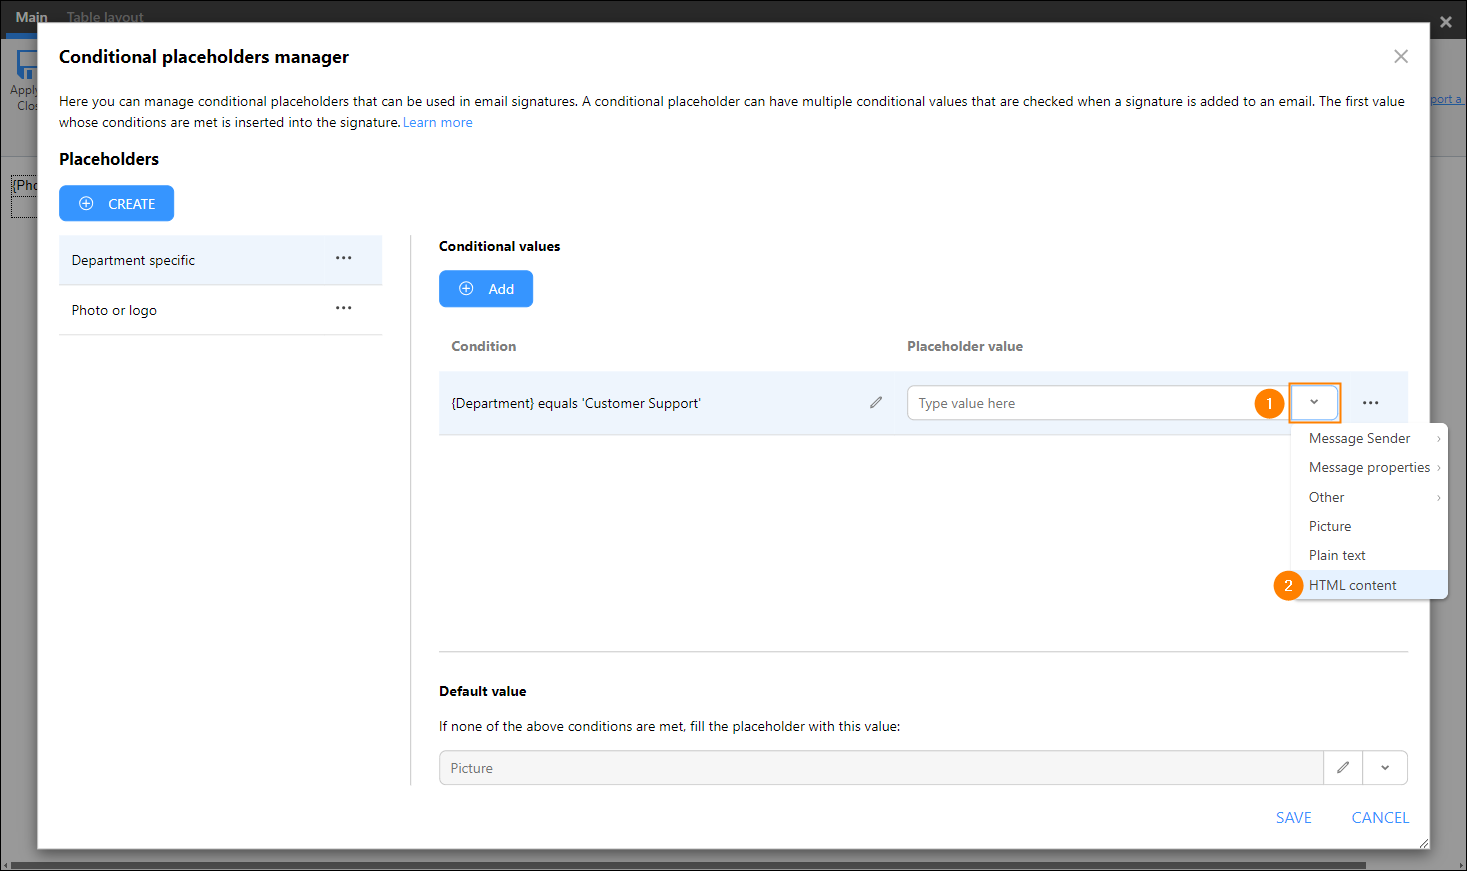
Fig. 18. Choosing the type of value/content that will replace the conditional placeholder on sending an email.
- An HTML snippet editor will open, letting you freely design the content that will replace the conditional placeholder. You can use the icons in the Insert group to add different elements. In our example, we’re going to insert a table for an even alignment of the content and then add links to useful documentation, a special banner, and information about the guaranteed response time (Fig. 19.).
Tip
To ensure your email signature looks good, go to the Table layout tab of the HTML snippet editor and make sure the column width is the same as the one you checked in step 4 above.
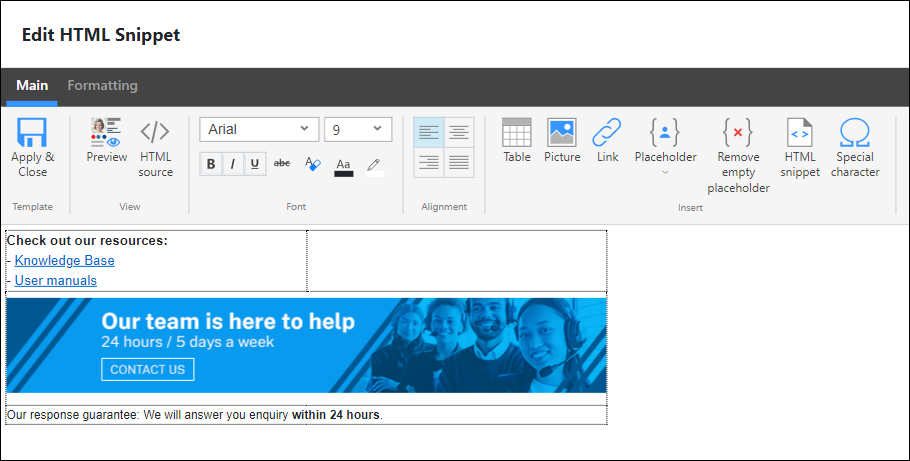
Fig. 19. An example of content designed for the Customer Support department.
- When you’re done, save your changes to close the HTML snippet editor.
Tip
It might also be a good idea to save the changes in the Conditional placeholders manager every time you finish configuring a conditional value (condition + value) by clicking SAVE (see the bottom of Fig. 16.). This lets you avoid losing your progress, e.g. in case your browser crashes.
To return to creating another conditional value (for the next department), simply reopen the Conditional placeholders manager by clicking Conditional placeholder on the editor’s ribbon and selecting Manage.
- Next, repeat steps 9–14 to prepare a separate condition and the content for each other department. Take a look at Fig. 20. and Fig. 21. below for some ideas:
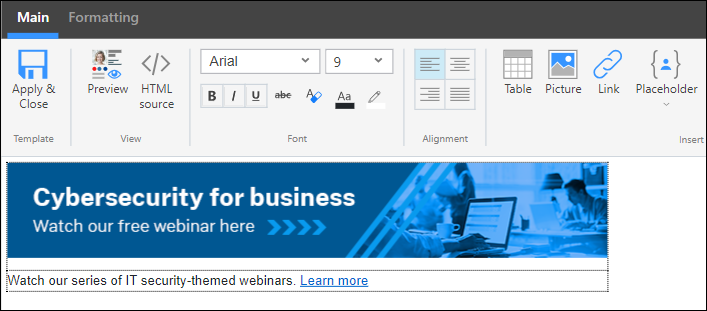
Fig. 20. An example of content designed for the Marketing department.
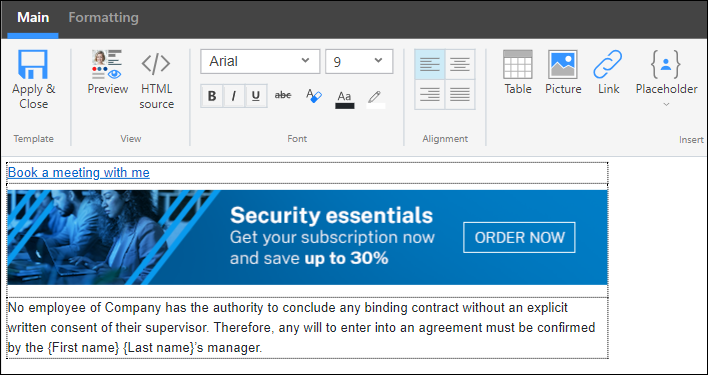
Fig. 21. An example of content designed for the Sales department.
- Once you’ve prepared conditions and content for all the desired departments, click SAVE in the Conditional placeholders manager main window (Fig. 22.) to save your conditional placeholder, which by now should look something like this:
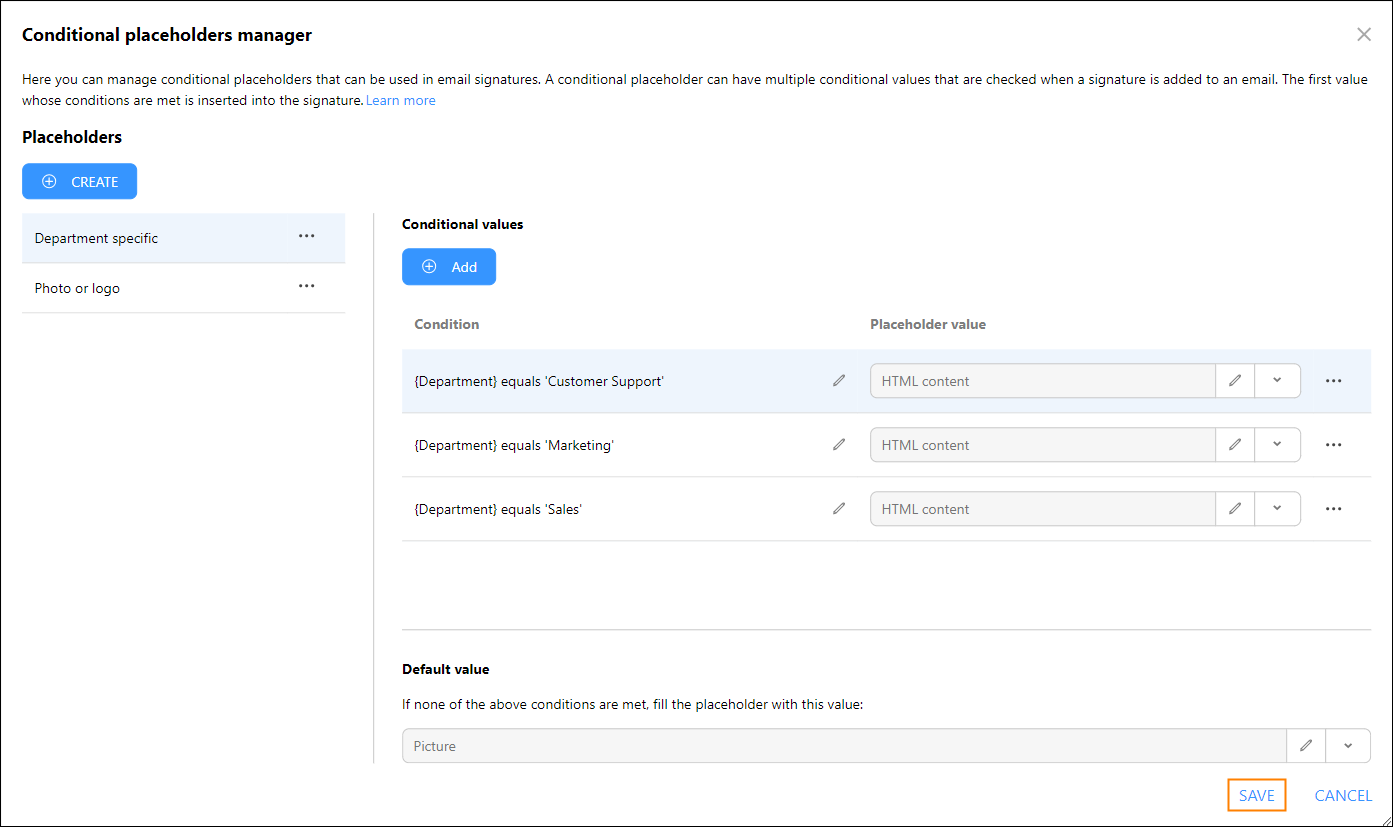
Fig. 22. Saving a complete conditional placeholder with conditions and values defined.
- Now, all that’s left is to add the conditional placeholder to your email signature template. To do so, click inside the empty cell at the bottom of the template and select Conditional placeholder > <your_conditional_placeholder_name> (in our example, it’s Department specific), as shown in Fig. 23.
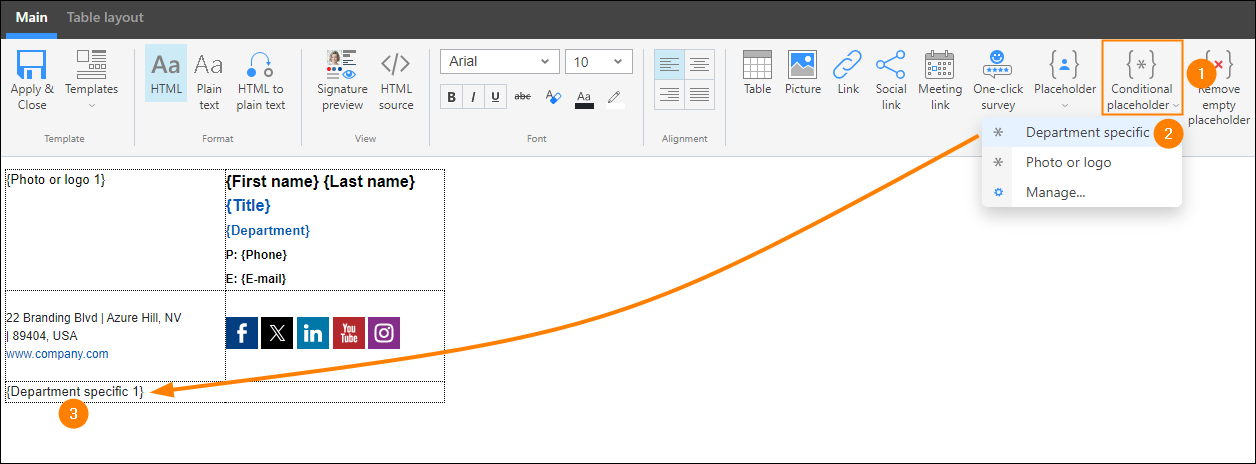
Fig. 23. Inserting the conditional placeholder into your email signature template.
- Finally, save the changes to your template in the editor, and then click Save & Publish in the rule configuration wizard.
From now on, when your users send emails, their signature will vary based on the sender’s department, while retaining the common, informative part unchanged, as shown in Fig. 1. at the beginning.
Regardless of the signature type you’ve configured (cloud or Outlook), your users will be able to preview it before sending an email if you deploy the CodeTwo Signatures Web Add-in for Outlook to them.
See also
Using different signatures for different recipients – see how to differentiate your email signatures depending on who your recipient is.
Adding signatures in different languages – learn how to automate managing signatures in multiple languages.