How to create an auto-reply message for Customer Service
Learn how to configure an auto-reply message for any team in your organization using the Autoresponder feature in CodeTwo Email Signatures 365.
In the scenario below, we will create an automatic reply specifically for a Customer Support/Success team. Still, you can follow the same guidelines when setting up an Autoresponder rule for e.g. internal IT or legal team.
Customer Service is the first line of contact with customers who experience problem(s) with your services/products or want to simply ask questions about them. Knowing that people who contact the team are usually stressed out and nervous, you would like to provide them with the best experience possible. One of the ways to do it is to let them quickly know there is someone ‘on the other side’ who will take care of them. That’s why, it’s a good idea (and actually a common practice) to send an auto-reply message that confirms receiving a support case.
With CodeTwo Email Signatures 365 offering much richer personalization capabilities than native solutions, your auto-replies will not only prove your team’s professionalism but also appear attractive to your customers.
Basics
This article shows how to configure CodeTwo Email Signatures 365 for a specific usage scenario. If you need more basic information, use the links below:
- Learn more about Autoresponder
- Quick guide to creating an autoresponder rule
- Design a template that you can use for auto-reply messages
When your organization is licensed to use CodeTwo Email Signatures 365, you can use the Autoresponder feature to create auto-reply messages for your users and teams at no extra cost.
Automatic replies are added in the cloud and require the software to work in either cloud (server-side) mode or combo mode. If you use Outlook (client-side) mode and want to use Autoresponder, simply switch to combo mode. Learn more about signature modes
The Autoresponder feature is not enabled by default. If you haven’t turned it on in CodeTwo Admin Panel yet, follow these steps.
How to configure the program for this scenario
In this example, we’ll prepare a professional auto-reply message informing a customer that you received their initial email and will follow up on them soon.
To start, sign in at app.codetwo.com. Click the CREATE RULE button and select Autoresponder (Fig. 1.). In the Name step, provide name for the rule, e.g. Customer Support, and optional description.
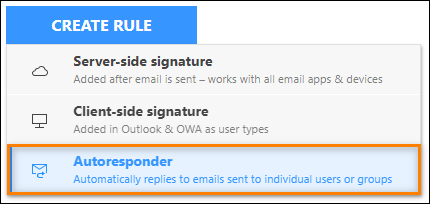
Fig. 1. Creating a new autoresponder rule.
Go to the Reply from step. In the upper section (top list), add the email address of a shared mailbox that is used by your team to receive requests from customers, e.g. support@company.com (Fig. 2.).
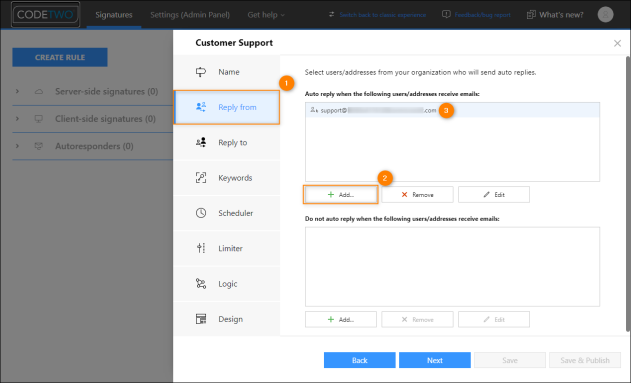
Fig. 2. Adding the support team’s shared mailbox to the autoresponder rule.
Next, in the Reply to step, you need to decide on who will receive auto-reply messages from your Customer Support team. You’ll most likely choose External users, as your customers are people outside of your organization (Fig. 3.).
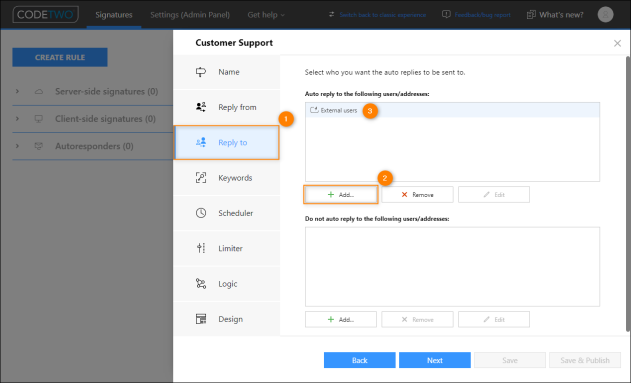
Fig. 3. Deciding on who will get the auto-reply from your Support team.
For the basic use scenario, you don’t have to configure anything in the Keywords step. However, settings in this step might be helpful to redirect messages that contain keywords like e.g. invoice or license to a different team, for example Accounting or Sales. Learn more about using keywords
The next thing to configure is the limit of auto replies sent to each sender every time an email from them reaches your support team's shared mailbox. To achieve this, go to the Limiter step (Fig. 4., item 1). With this feature, you can limit the number of autoreplies sent to the original sender in a given timeframe.
If autoresponder is used to send standard out of office (OOO) messages, it’s usually a good idea to set the limit to 1 auto-reply per day. Your colleagues/clients who email you a lot will know we’re away as soon as they receive the first (and only) auto-reply.
In the case of support mailbox, the situation is different. The same customer might want to send your team two issue reports, or an issue report and a query about a product. That’s why, you would rather set Limiter to somewhat higher value or even turn it off (Fig. 4., item 2).
Important
The auto-reply template should be sent from the shared mailbox address only in response to the first (initial) email from a customer. To prevent using the template in the subsequent conversation with the customer, subsequent emails should be sent from an individual mailbox of a Customer Support team member assigned to the customer.
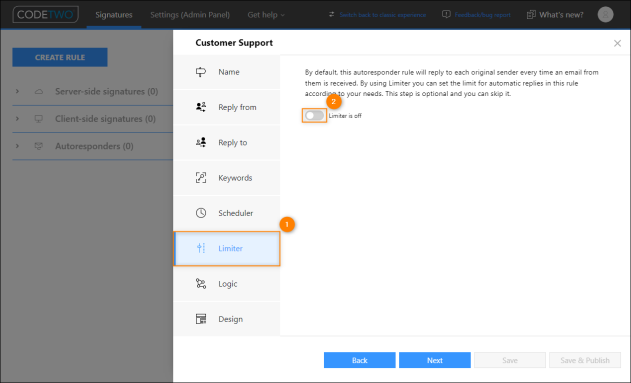
Fig. 4. Turning the limiter off.
The Design step (Fig. 5.) allows you to configure different aspects of your auto-reply message. Usually, the default settings for the From, To, Subject, and Behavior options should be OK for most of the scenarios. Still, you might want to:
- replace {Original recipient} (support@company.com in our example) in the From field with another email address that you specifically want your customers to see when they receive the auto-reply;
Tip
A good idea might be to use a no-reply type address like no-reply@company.com. That way, you can persuade your customers not to reply to your support mailbox to unnecessarily get another automatic reply. For even a better effect, you can also include a short message like Please do not reply to this message – we’ll contact you shortly. in the message body. Learn more about using no-reply addresses with autoresponder
- put your support team’s Microsoft 365 group mailbox in the To or Cc field (note: click the Cc button to add the field) to forward the thread to all team members;
Tip
Microsoft 365 groups are more modern ‘version’ of shared mailboxes, offering your team members enhanced collaboration possibilities. For the group mailbox to properly receive automatic replies, remember to complete the instructions from this article.
- use the Bcc button to add the Bcc field and include support team’s supervisor in every conversation to e.g. let them assign support cases to particular team members;
- modify the subject of a customer’s email by e.g. adding We received your message: in front of the original subject; or
- change the autoresponder’s behavior to include original message not in the thread but as an attachment.
To learn about the settings described above in detail, consult this article.
Next, click the Edit reply message button (Fig. 5.) to launch the template editor and start designing your auto-reply visually.
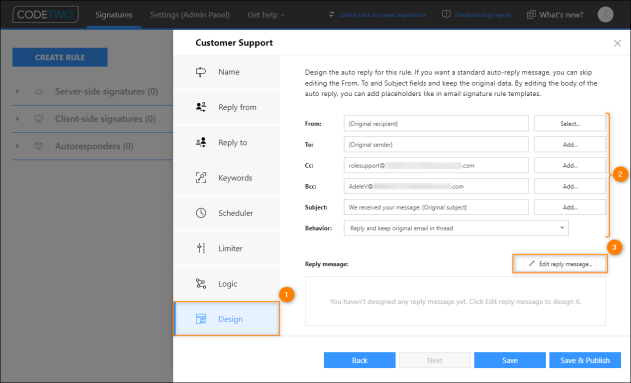
Fig. 5. Specifying different aspects of your auto-reply message.
Since you want to create an automatic reply for the entire Customer Support team, the auto-reply template shouldn’t include placeholders with user-specific information, e.g. {First name} or {Title}. If you opt to use one of the professionally designed templates available in our software, it’s a good idea to customize its contents before opening it in the editor (Fig. 6.).
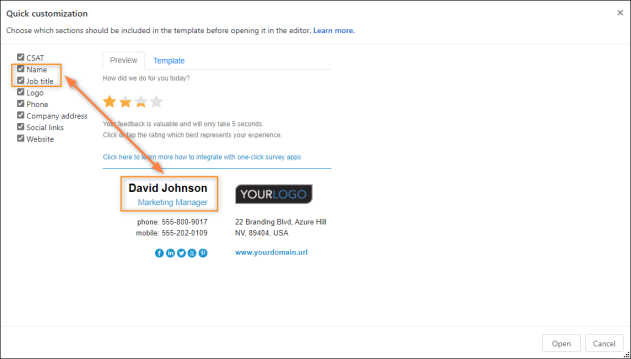
Fig. 6. Customizing sections of the auto-reply - once deselected, they will not be included in the template.
After you’ve opened the template in the editor, type the message from the team to a customer (Fig. 7., item 1) and provide your team’s name, e.g. in the place where user details were originally included. You can add your company’s name as well (Fig. 7., item 2).
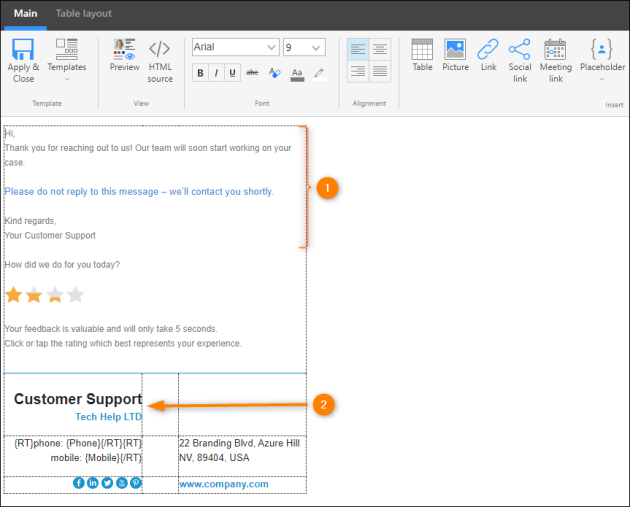
Fig. 7. Customizing the auto-reply message content.
Once you’re OK with the design, click Apply & Close to save auto-reply’s template and close the editor.
At the end, remember to click Save & Publish for all the changes to take effect.
Result
Now, when a customer contacts your Customer Support/Success team, they will receive an auto-reply message assuring them that their case is being taken care of (Fig. 8.). Thanks to that, your team and entire company will appear as responsive, well-organized, and professional.
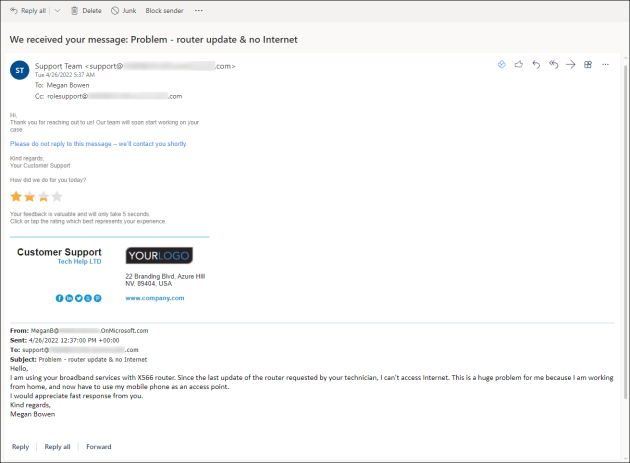
Fig. 8. The auto-reply from your team with the predefined message and the modified subject.
See also
How to set up an auto-reply for disabled or deleted users - learn how to use the Autoresponder feature in CodeTwo Email Signatures 365 to set up an auto-reply for all your disabled (unlicensed) or deleted users.
In this article