How to add signatures in different languages
With CodeTwo Email Signatures 365, you can easily manage multiple language versions of your company’s email signatures. Whether you want your users to have the same signature template with only the text adapted for their international recipients (as shown in Fig. 1.) or create distinct templates for different regions, CodeTwo will help you set up and automatically add email signatures that “speak the language” of your customers.
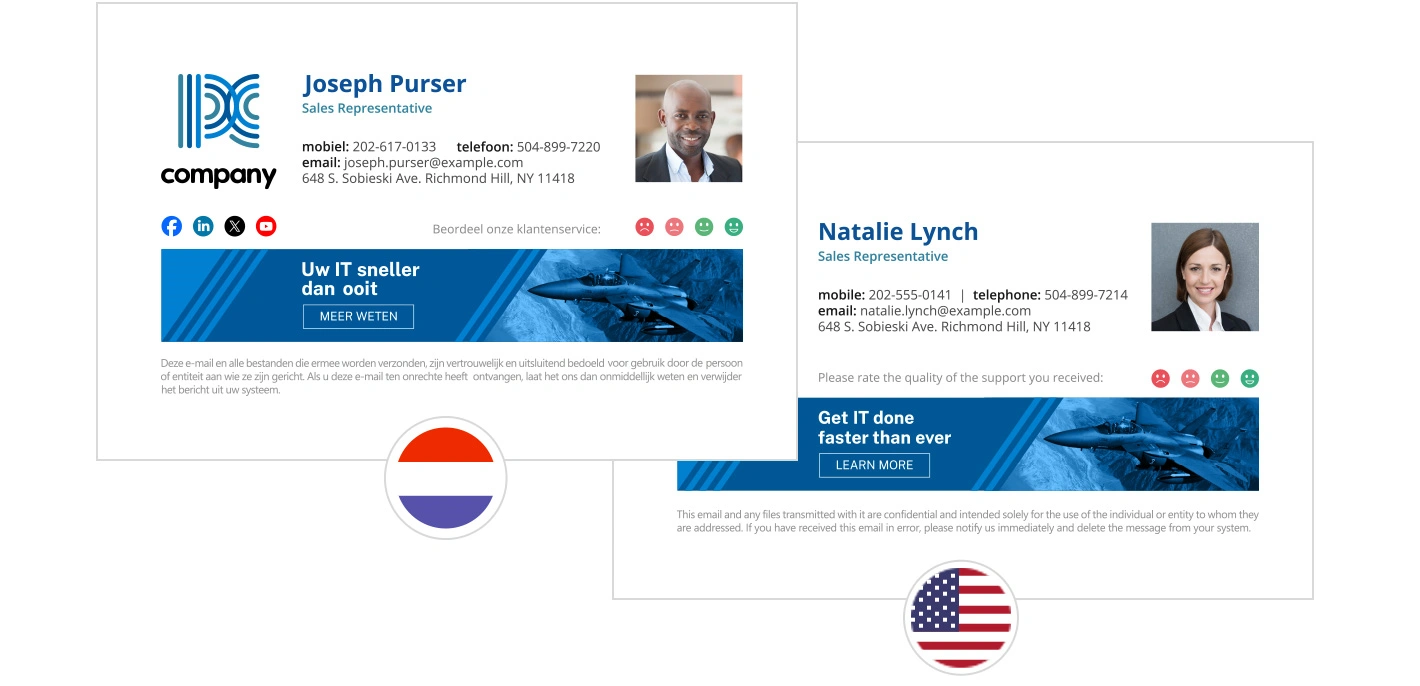
Fig. 1. Different language versions of the same email signature template created in CodeTwo Email Signatures 365.
CodeTwo Email Signatures 365 offers multiple solutions that can be used to ensure a correct signature, in the right language, is always inserted into all outgoing emails. Use the links below to find the solution that best serves your needs, depending on the signature mode you use in CodeTwo Email Signatures 365 and the level of control you want your users to have over their signatures.
All signature modes:
- Let your users choose their signature language with a custom attribute
- Automatically add signatures in different languages based on email recipients
- Automatically add signatures in different languages based on email senders
Outlook (client-side) mode only:
Click here to see a comparison of all the solutions.
New to CodeTwo?
Learn more about signature modes our solution can work in. See how to set up your first signature rule and design an email signature template.
Let your users choose their signature language with a custom attribute
With CodeTwo Email Signatures 365, you can let users choose the language of their default signature in the My user info app. To do this, you need to create a list of available signature languages using a custom attribute in the Attributes manager app and then set up separate signature rules triggered by specific attribute values.
Info
My user info and the Attributes manager are extra apps included for free in your CodeTwo Email Signatures 365 subscription. Learn more
If you want to let your users choose the language version of their Outlook (client-side) signatures without setting it as their default signature, see this section.
Start by signing in to the Attributes manager app.
Important
By default, only Microsoft 365 global admins can sign in to the Attributes manager, but they can also grant access to other users. See this article to learn more.
If you use the manager for the first time, you need to consent to permissions requested by our web app on behalf of your organization.
In the CodeTwo custom attributes section, click Add to create a new custom attribute containing the list of available signature languages. In the window that opens, type the attribute’s name and (optionally) a description, and choose Single-select as the field type. Next, enter the available languages in the Option fields, as shown in Fig. 2. You can include as many languages as needed using the Add option button.
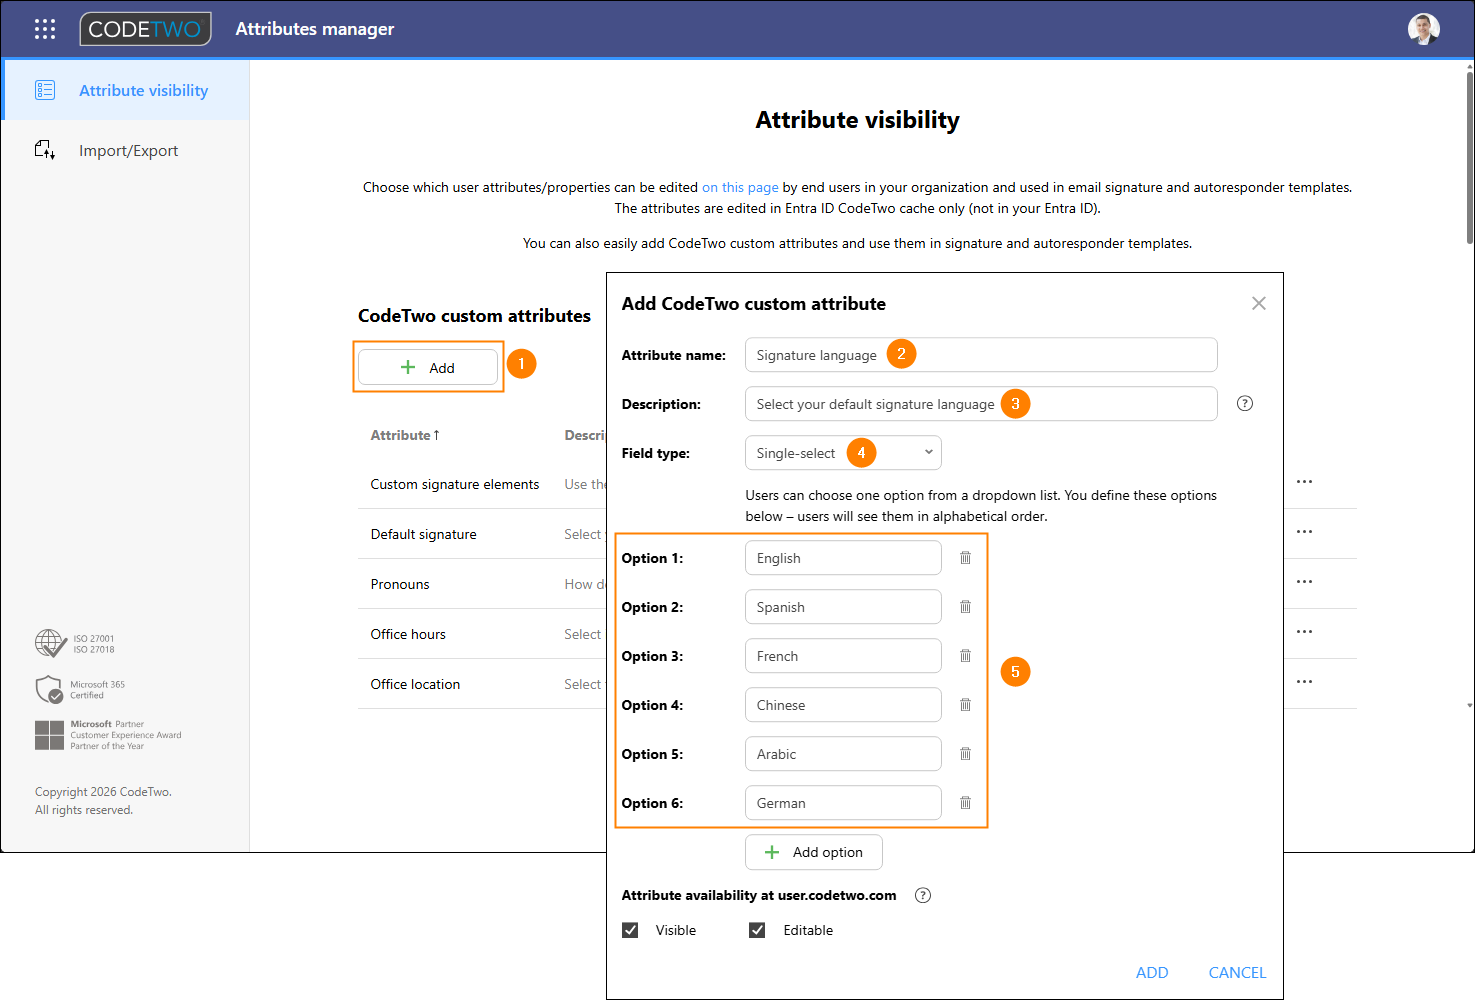
Fig. 2. Adding a custom attribute with the list of available signature languages in the Attributes manager app.
After you enter all necessary languages, leave the Visible and Editable checkboxes selected and click ADD.
Back in Attributes manager’s main window, click the Save & Publish button to confirm your changes and make the new custom attribute available in other CodeTwo apps.
Now, sign in to the Signatures app and create a new signature rule for a specific language version of your signature. If you already have signature rules published for a language that is most frequently used in your organization (for example, English), you don’t need a new rule for that language.
In the rule editing pane, go to the Senders step. Click Add in the upper section and select the Entra ID (user property) filter option. In the window that opens, select your new custom attribute in the User Entra ID attribute field, set the operator as Equals, and enter a language from your list in the Value field (Fig. 3.).
Important
If the new custom attribute is not visible in the User Entra ID attribute field, you may need to refresh the Signatures app.
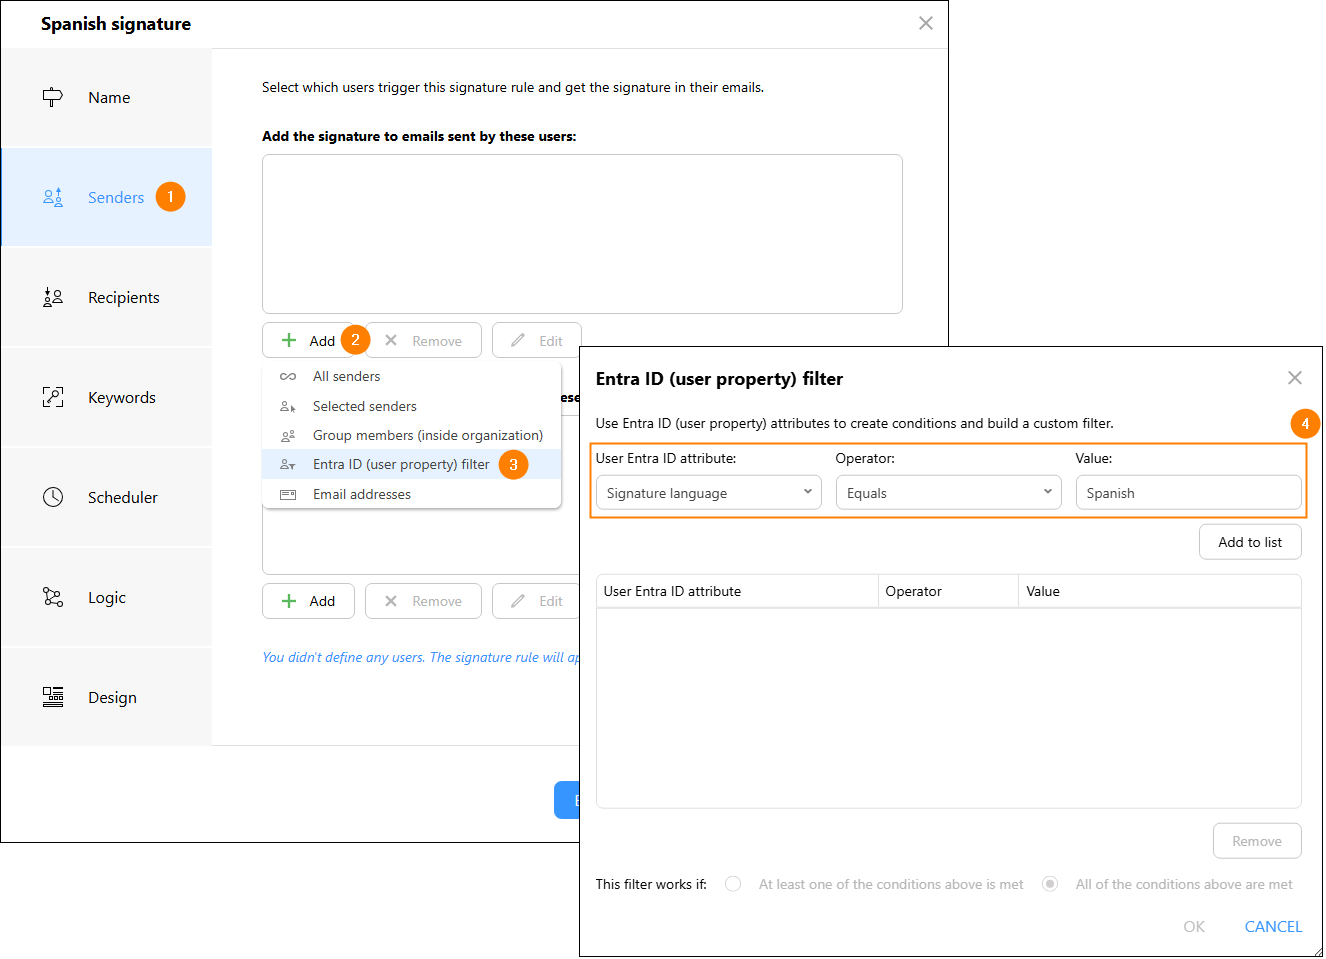
Fig. 3. Adding an Entra ID (user property) filter based on the signature language attribute in the Senders step.
Click Add to list and then OK to return to the rule editing pane.
Configure conditions (and exceptions) for other steps as desired. For more details, see this article.
If you’re adding an Outlook (client-side) signature, go to the Logic step and make sure the Set this signature as default for new messages and Set this signature as default for replies and forwards options are enabled. Learn more about these options
Next, go to the Design step to create a signature in the right language. See this article for step-by-step instructions.
Once done, submit your rule by clicking Save & Publish.
Repeat the steps in the Signatures app to create more rules that will be used to add signatures in different languages. If you want to use the same signature template in another rule, create a new rule by using the Clone button (visible after selecting a rule). Next, you only need to change the name and conditions/exceptions of the new rule, and translate the contents of the template into a different language.
When all the rules are ready, move them up the list of rules using the Move up button (Fig. 4.). Make sure the rules for foreign languages are placed before the rules to be applied when a user doesn’t select a default signature language or when they select your organization’s standard language covered by other rules. Learn more about rule processing logic
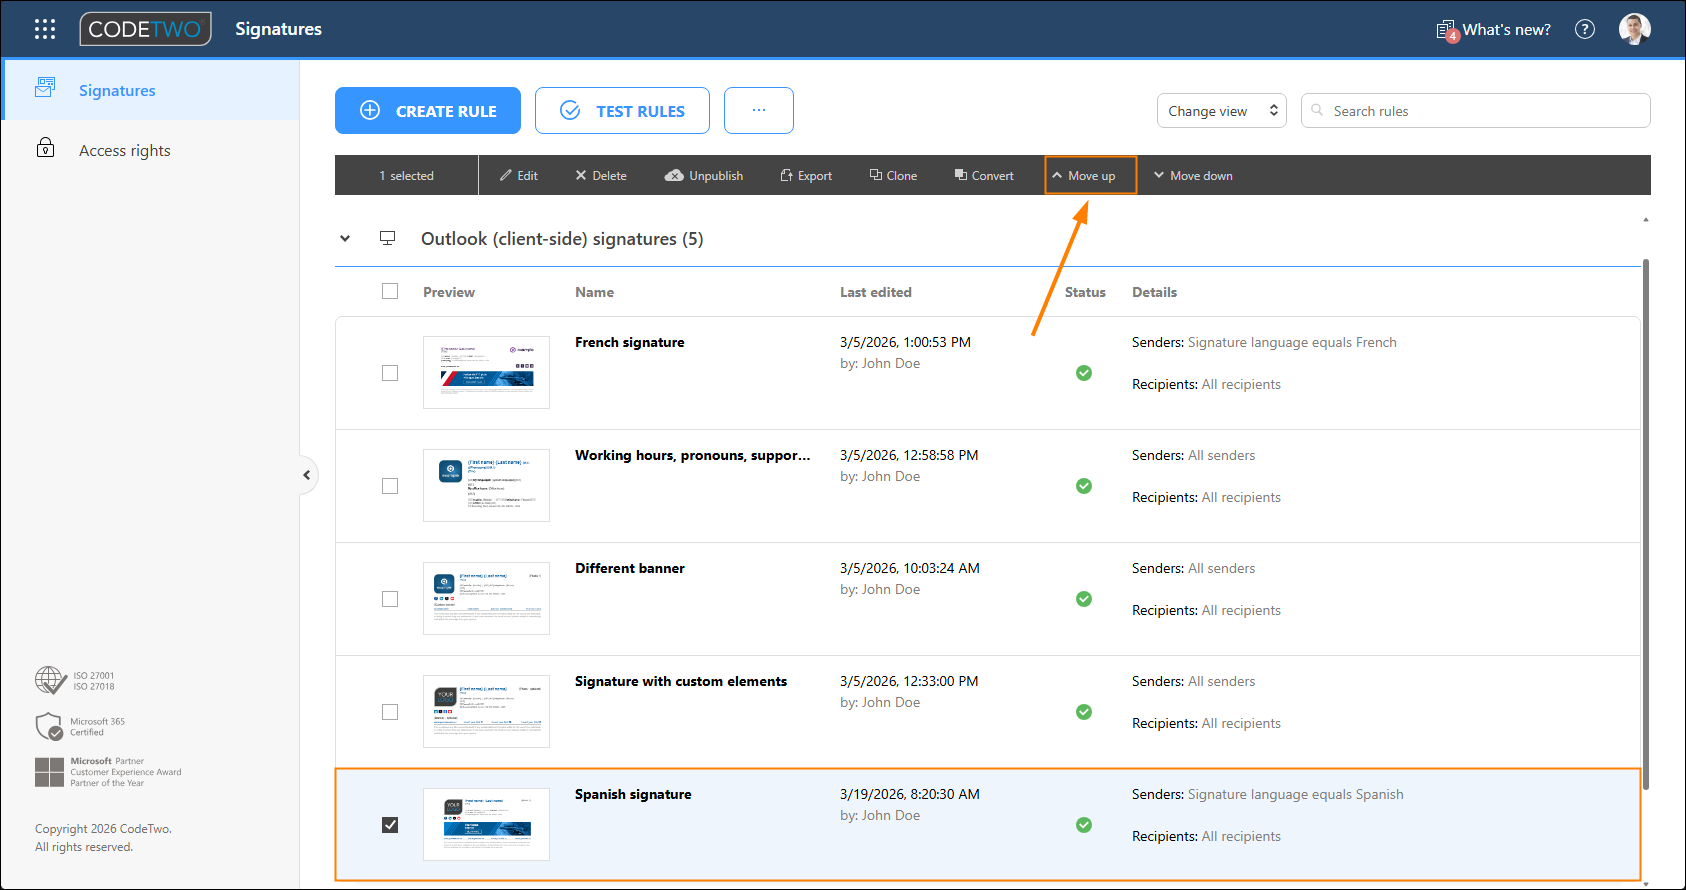
Fig. 4. Moving a signature rule up the list of rules.
Finally, ask your users to sign in to the My user info app with their Microsoft 365 credentials and choose their preferred signature language by selecting a relevant value of your new custom attribute (Fig. 5.). After they save changes in the app, their signatures will start to be added according to this selection. If a user doesn’t choose any language, the first applicable signature rule from the list of all rules will be applied for that user.
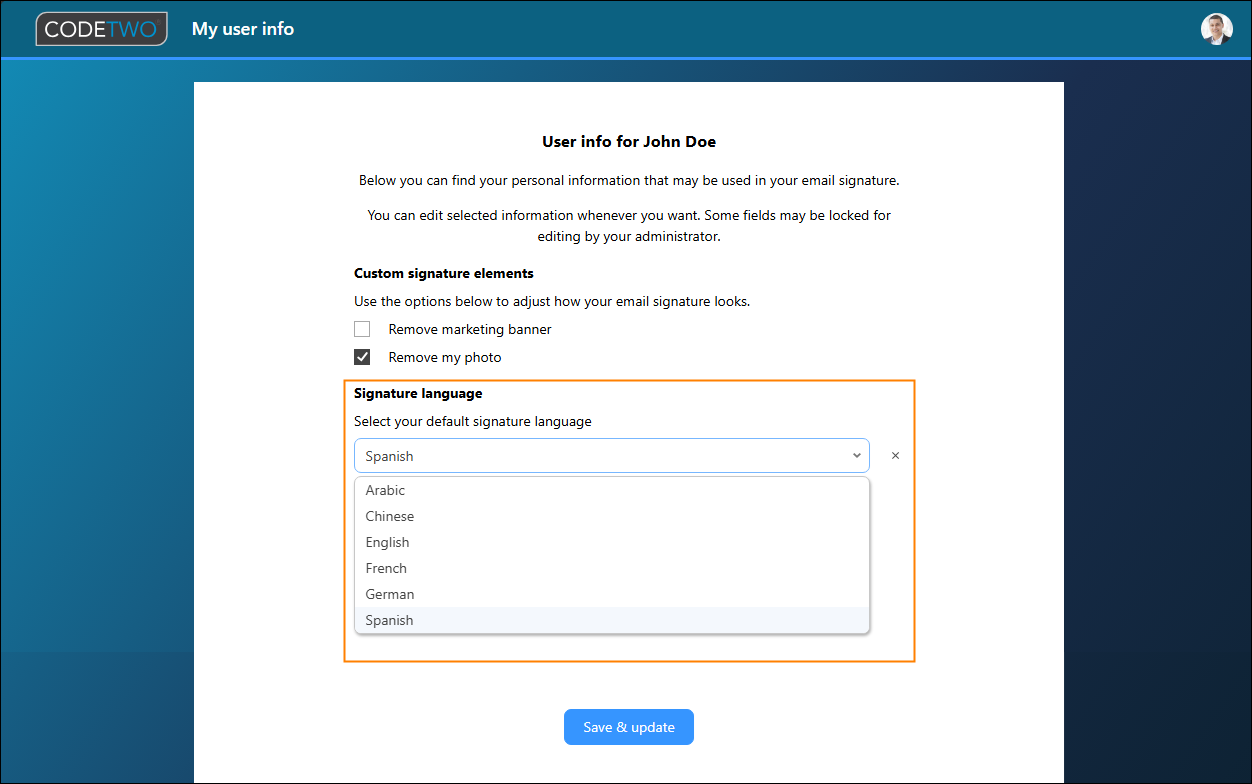
Fig. 5. Selecting a default signature language in My user info.
Automatically add signatures in different languages based on email recipients
CodeTwo Email Signatures 365 lets you create signature rules based on email recipients. In other words, you can configure the program to add email signatures in a specific language based on the recipient’s email address or domain.
To do this, sign in to the Signatures app and create a new signature rule.
Go to the Recipients step. There are different ways of configuring recipient-based conditions. For example, if you want the program to add a signature:
- in French to all recipients whose email addresses end in .fr (France) or .be (Belgium), etc., click Add > Email addresses and, in the window that opens, enter these top-level domain names. Be sure to add an asterisk (*) before them, as shown in Fig. 6. Click OK to apply.
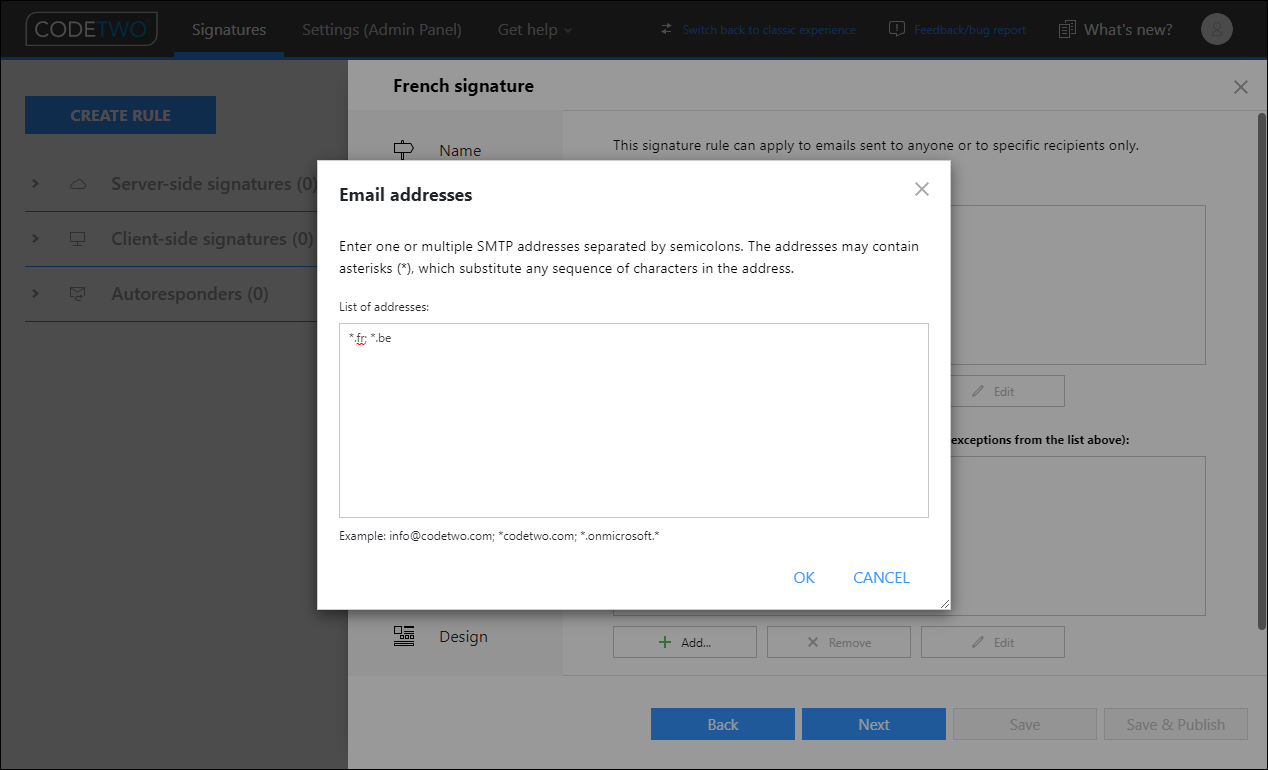
Fig. 6. Defining top-level domain names of email addresses as recipients of your emails.
- in German to all messages sent to your clients from German-speaking countries, click Add > Email addresses and, in the window that opens, either specify their individual email addresses (e.g., [email protected]) or enter a domain name associated with email addresses used by a specific company (e.g., example.at). Be sure to add an asterisk (*) before the domain name, as shown in Fig. 7. Click OK to apply.
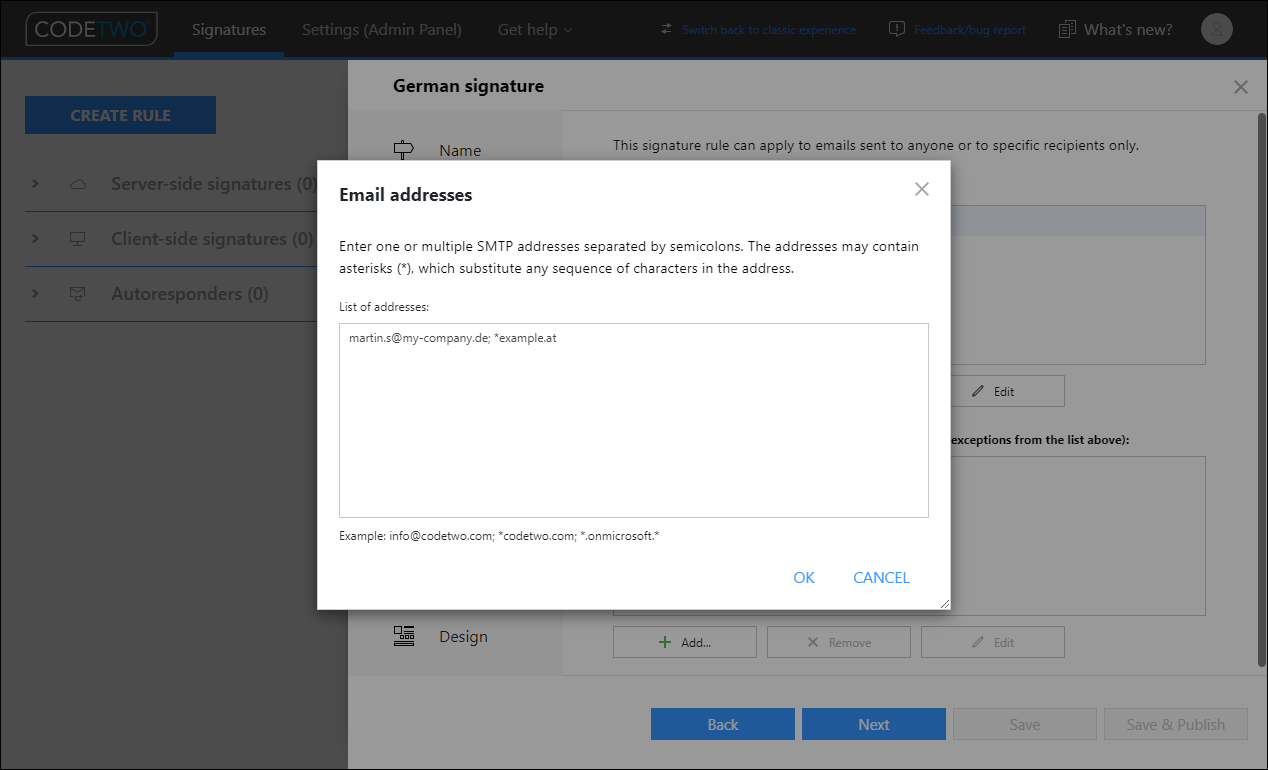
Fig. 7. Defining specific email addresses or domains as recipients of your emails.
- in your native language only to internal recipients, select Add > Internal recipients, as shown in Fig. 8.
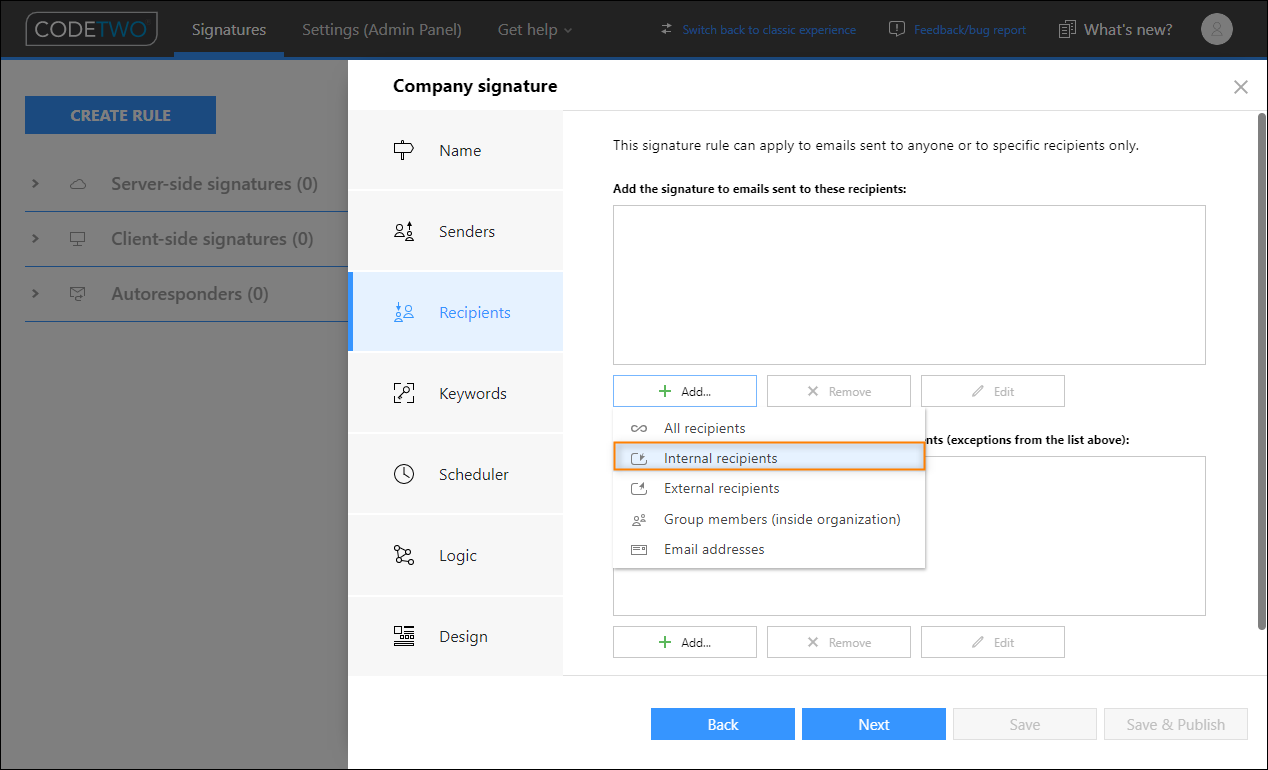
Fig. 8. By selecting this condition, the rule will add a signature only to messages sent inside your organization.
Configure conditions (and exceptions) for other steps as desired. For more details, see this article.
Next, go to the Design step to create a signature in the right language. See this article for step-by-step instructions.
Once done, save your template and submit the rule by clicking Save & Publish.
Repeat these steps to create separate rules that will be used to add different signature templates (in different languages). If you want to use the same signature template in another rule, create a new rule by using the Clone button (visible after selecting a rule). Next, you only need to change the name and conditions/exceptions of the new rule, and translate the contents of the template into a different language.
When all the rules are ready, move them up the list of rules using the Move up button (as shown in Fig. 4.). Make sure the rules for foreign languages are placed before the rules that add signatures in your organization’s default language (Fig. 9.). This will allow the program to apply the correct language version as soon as its conditions are met. Learn more about rule processing logic
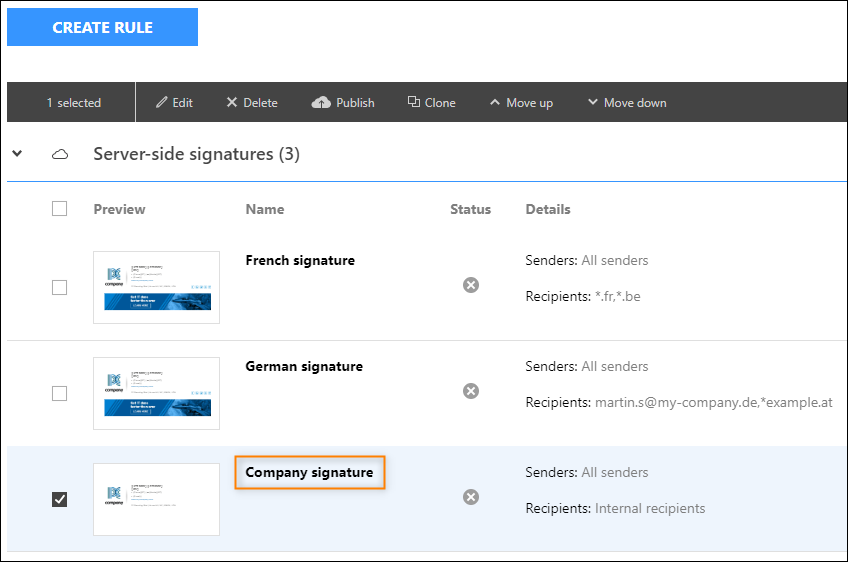
Fig. 9. Always place the rule that applies to the broadest number of users at the bottom of the rule list.
Once you have created the required rules, select all of them and click Publish selected. This will make the signatures active in your organization (Fig. 10.).
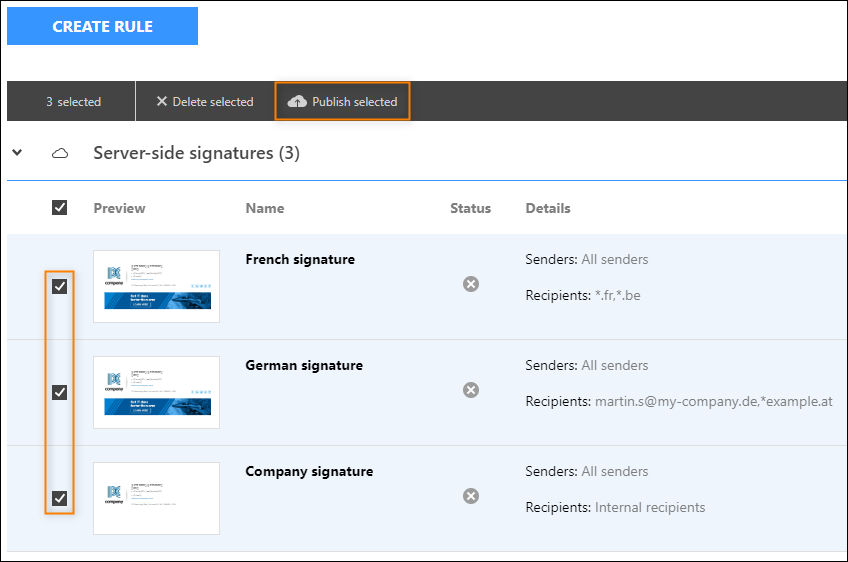
Fig. 10. Publishing the prepared signatures.
Read this article for more examples of how to create signature rules based on recipients
Automatically add signatures in different languages to emails sent by specific users (senders)
If you know that specific users or groups of users communicate only in a selected language or with customers from a specific country, you can define signature rules to automatically add email signatures in that language to all emails sent by these users/groups.
Start by creating a new signature rule in the Signatures app.
Next, in the Senders step select:
- Add > Selected senders to apply this signature rule to individual users only,
- Add > Group members to apply this signature rule to a group or groups of users (e.g., a distribution group; read this Microsoft article to learn how to create such a group in your Microsoft 365 tenant),
- Add > Entra ID (user property) filter to apply this signature rule to all users that fulfill certain conditions. For example, the program can add a German signature to all messages sent by users whose Country Entra ID (Azure AD) attribute is Germany (Fig. 11.).
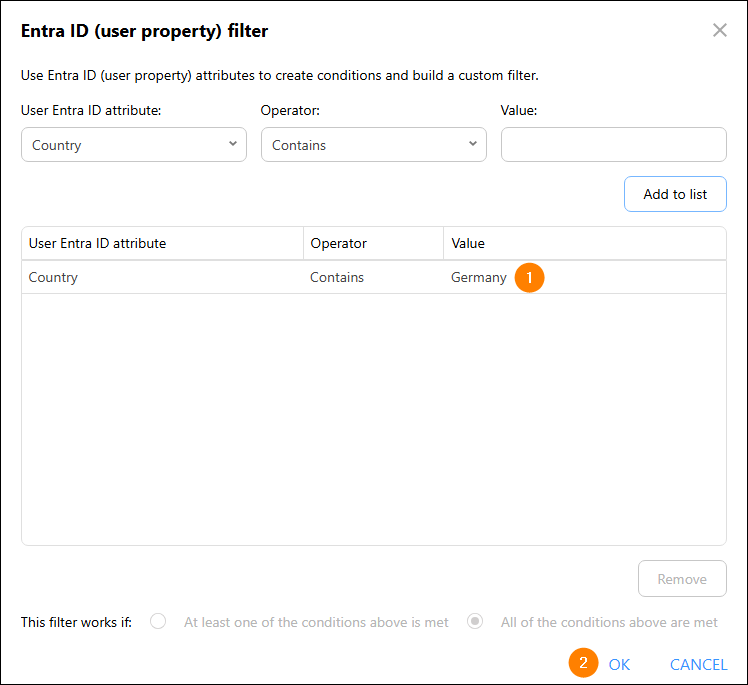
Fig. 11. The Entra ID (user property) filter options let you add a signature to all users who meet certain criteria.
Configure conditions (and exceptions) for other steps as desired. For more details, see this article.
Next, go to the Design step to create a signature in the right language. See this article for step-by-step instructions.
Once done, save your template and submit the rule by clicking Save & Publish.
Repeat these steps to create separate rules that will be used to add different signature templates (in different languages). If you want to use the same signature template in another rule, create a new rule by using the Clone button (visible after selecting a rule). Next, you only need to change the name and conditions/exceptions of the new rule, and translate the contents of the template into a different language.
When all the rules are ready, move them up the list of rules using the Move up button (as shown in Fig. 4.). Make sure the rules for foreign languages are placed before the rules that add signatures in your organization’s default language (as shown in Fig. 9.). This will allow the program to apply the correct language version as soon as its conditions are met. Learn more about rule processing logic
Once you have created the required rules, select all of them and click Publish selected. This will make the signatures available to your users (Fig. 12.).
Fig. 12. Publishing the prepared signatures.
Read this article for more examples of how to create signature rules based on senders
Let your users select a signature in a specific language when typing an email in Outlook
If you are using CodeTwo Email Signatures 365 in Outlook (client-side) mode, your users get their signature automatically in Outlook (desktop, mobile & OWA) when typing an email.
Your users can also select a different signature manually from the add-in pane in Outlook desktop apps and OWA. If you want them to have access to signatures in different languages and be able to choose the correct one depending on who the recipient is, configure the program by following the instructions below.
Create as many Outlook (client-side) signature rules in the Signatures app as many language versions of signatures you need. If you want to use the same signature template in another rule, create a new rule by using the Clone button (visible after selecting a rule). Next, you only need to change the name and conditions/exceptions of the new rule, and translate the contents of the template into a different language.
Use descriptive names for your signatures, e.g., German signature, Spanish signature, English signature, etc. That way, your users can easily identify each of them in Outlook.
If you want to limit access to specific signature templates to selected users only, go to the Senders step and configure rule conditions accordingly. Refer to this section to learn about some of the possible options.
In the Logic step, configure Outlook signature adding options accordingly. For example, if you don't want the signatures in other languages to be added automatically to emails, be sure to clear (unselect) the options shown in Fig. 13.
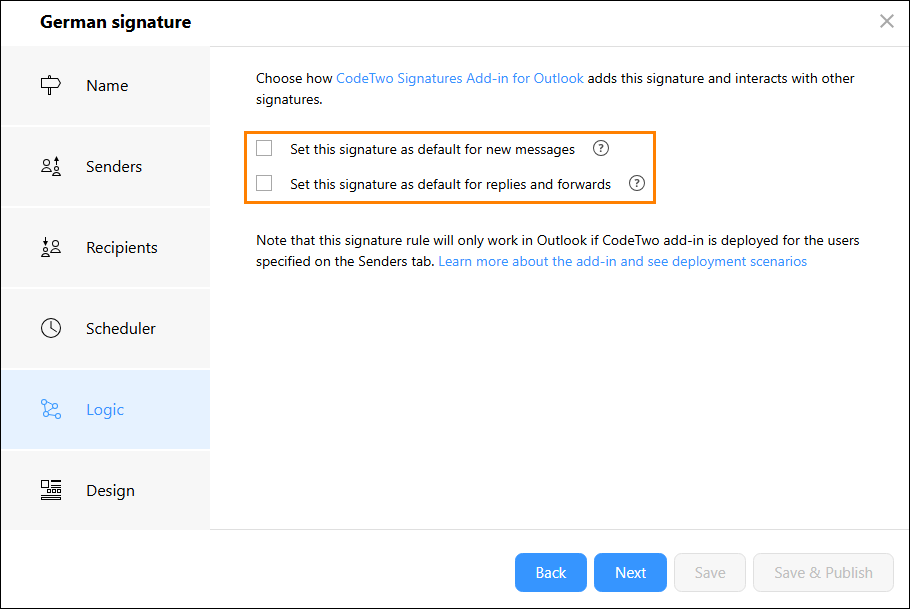
Fig. 13. Leave these options unselected if you want users to select this signature manually.
When all the rules are ready, move them up the list of rules using the Move up button (as shown in Fig. 4.). Make sure the rules for foreign languages are placed before the rules that add signatures in your organization’s default language (as shown in Fig. 9.). This will allow the program to apply the correct language version as soon as its conditions are met. Learn more about rule processing logic
Once you have created all the required rules, select all of them and click Publish selected. This will make the signatures active in your organization (see Fig. 14.).
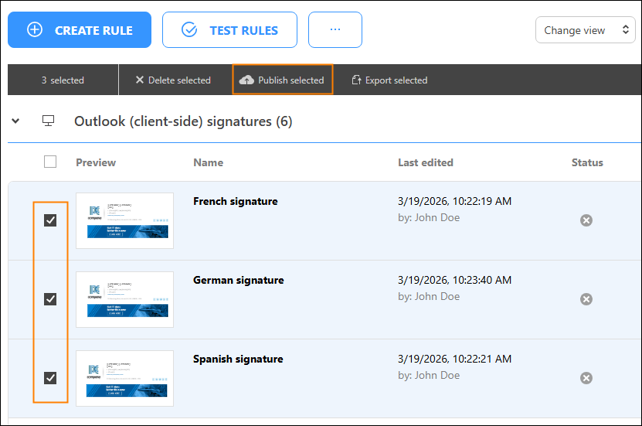
Fig. 14. Publishing the prepared signatures.
Now, your users can select their preferred signature language version from the CodeTwo add-in pane in Outlook desktop or OWA (Fig. 15.).
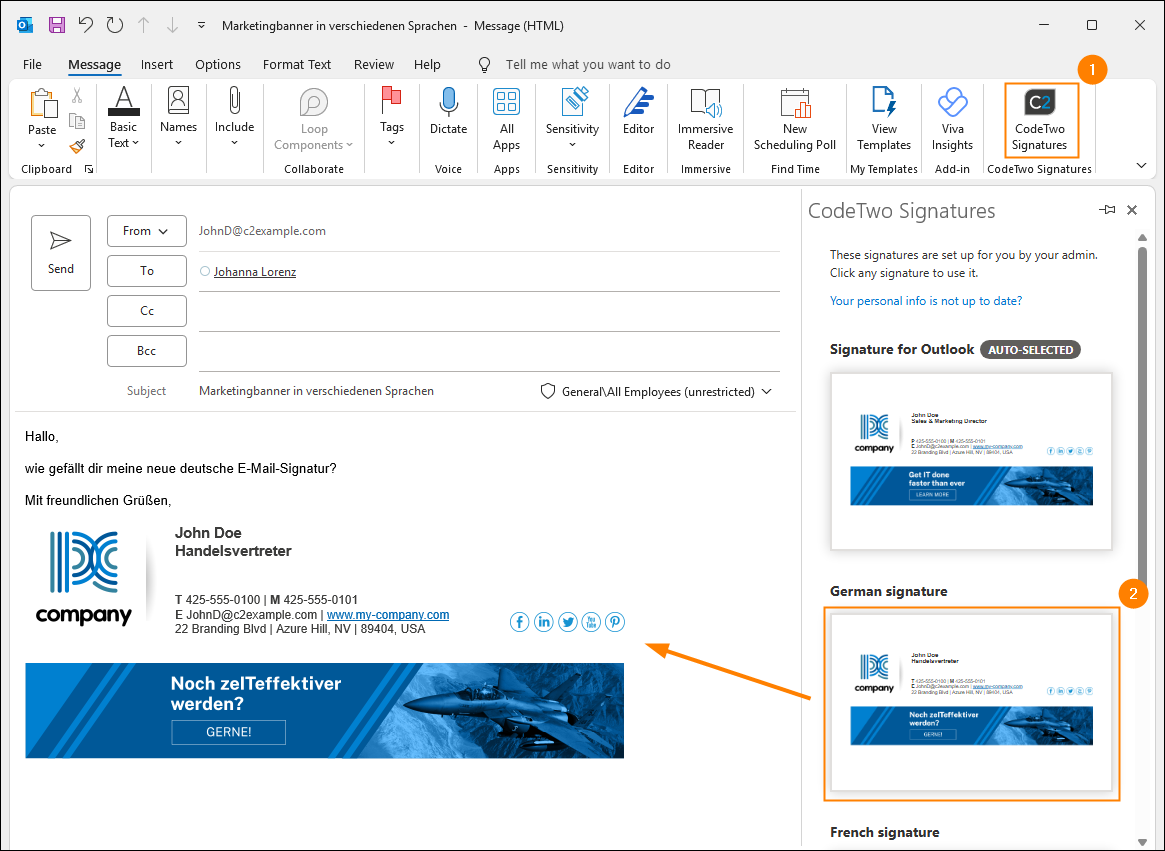
Fig. 15. Users can access their Outlook (client-side) signatures in different languages directly in the CodeTwo add-in pane.
Compare the solutions
Depending on the solution you choose, the signature in a given language will either be automatically added to the sent email or will be made available for your users after they click the Use this signature button in the CodeTwo add-in pane.
The table below shows the comparison of all the solutions described in this article.
| Email signature | Signature mode* | Is signature adding automated? | Can users select another signature? |
|---|---|---|---|
| Based on custom attributes | All | Yes |
Cloud signatures: Yes Outlook signatures: Yes |
| Based on recipients | All | Yes | Cloud signatures: No Outlook signatures: Yes |
| Based on senders | All | Yes | Cloud signatures: No Outlook signatures: Yes |
| Selected manually in Outlook | Outlook (client-side) |
No (signatures are selected by users in Outlook) |
Yes (in Outlook desktop & OWA) |
* Combo mode is a combination of cloud and Outlook modes, so it supports all scenarios described in this article. By default, the scenario applicable to Outlook (client-side) mode will only work for messages sent from Outlook for Windows, Outlook for Mac, and Outlook on the web (OWA). Find out more about using the CodeTwo Signatures Web Add-in for Outlook and OWA in combo mode
See also
How to set proper text direction for right-to-left languages – learn how to use your signatures with right-to-left languages, such as Arabic or Hebrew.