Conditions and exceptions
Signature rules define when a signature is added to emails and which users should get it. The signature-adding algorithm is based on conditions and exceptions, defined individually for each signature rule.
To configure a signature rule, sign in to app.codetwo.com and open an existing rule or create a new one, as shown in this article. There are two types of signature rules: cloud (server-side) and Outlook (client-side). Learn more about them here.
Conditions and exceptions are defined in the Senders, Recipients and Keywords* steps. The Scheduler step lets you define when this rule is active, while the Logic step contains additional settings for the selected rule type.
* The Keywords step is available only for cloud (server-side) signature rules.
Senders
The Senders step lets you specify users to whom your signature rule will be applied (Fig. 1.). If you are configuring a cloud (server-side) signature rule, the top list (Add the signature to emails...) allows you to define conditions by choosing senders whose emails will be stamped with your signature. The bottom list (Do not add the signature to emails...) allows you to add exceptions – users who will not get the signature. As for Outlook (client-side) signature rules, the Senders step is where you decide which users will have access to the signature in Outlook.

Fig. 1. The Senders step with 1 condition and 1 exception configured.
You can define the Senders conditions and exceptions in many ways. If you add multiple senders to the conditions list (the top list in Fig. 1.), they are all connected by the OR logical operator; exceptions in the bottom list work in the same way. For example, you can apply your signature rule to a group of users and exclude one or more users at the same time in the following ways:
- add a signature to the entire IT department except for the manager, whose signature is governed by a different rule (this is the example shown in Fig. 1.);
- add a legal disclaimer to all company emails except for the emails sent by employees from a foreign site, due to different legal requirements;
- add signatures with marketing banners to emails from the Customer Support department but not to emails sent by people from other departments, etc.
Click Add below the conditions or exceptions list and select senders by using the following options:
- All senders – the rule will apply to all users and shared mailboxes within your Microsoft 365 tenant.
- Selected senders – this opens a user picker that lists users and shared mailboxes in your tenant (Fig. 2.). You can select a single user or multiple users by using the Ctrl or Shift keys.
- Group members (inside organization) – this opens a group picker that lists groups (Microsoft 365 groups, distribution lists, security groups and mail-enabled security groups) in your tenant. Note that the rule will apply to members of the selected groups, not the groups themselves. If the group you select has other group(s) nested inside, emails sent by members of nested groups will also meet your condition/exception.
- Entra ID (user property) filter – this lets you set up custom filters based on Entra ID (Azure AD) attributes (see Fig. 3.) to apply the rule to emails sent by members of specific departments, offices, or people living in specific cities, etc. Read on to learn more about this filter.
- Email addresses – here you can enter one or more email addresses (that exist in your organization), separated by semicolons. This option is useful for setting up email signatures for alias addresses, as the user/group pickers (see Fig. 2.) only show primary email addresses. See this article to find out how to add different signatures when sending emails from aliases / other domains associated with your tenant.
Important
Remember to add at least one user in the conditions field (the top list). If you leave it empty, signatures will be added to all licensed CodeTwo users. The program will notify you about that and automatically add All senders to the top list when you submit your changes via the Save & Publish button.
If you would like to create a rule but don’t want to apply it to any users yet, you can click the Save button instead.
You can only select users or groups specified in the scope of licensed users to set up conditions/exceptions of your rules. For example, if you select the All senders condition, it will apply to the group of users selected in the scope of licensed users. See how other conditions/exceptions change when you limit the scope to a specific group
If you have multiple domains added to your Microsoft 365 tenant (e.g. @my-company1.com, @my-company2.com, etc.), the user and group pickers used in the program (Fig. 2.) will list users/groups with email addresses in all these domains.
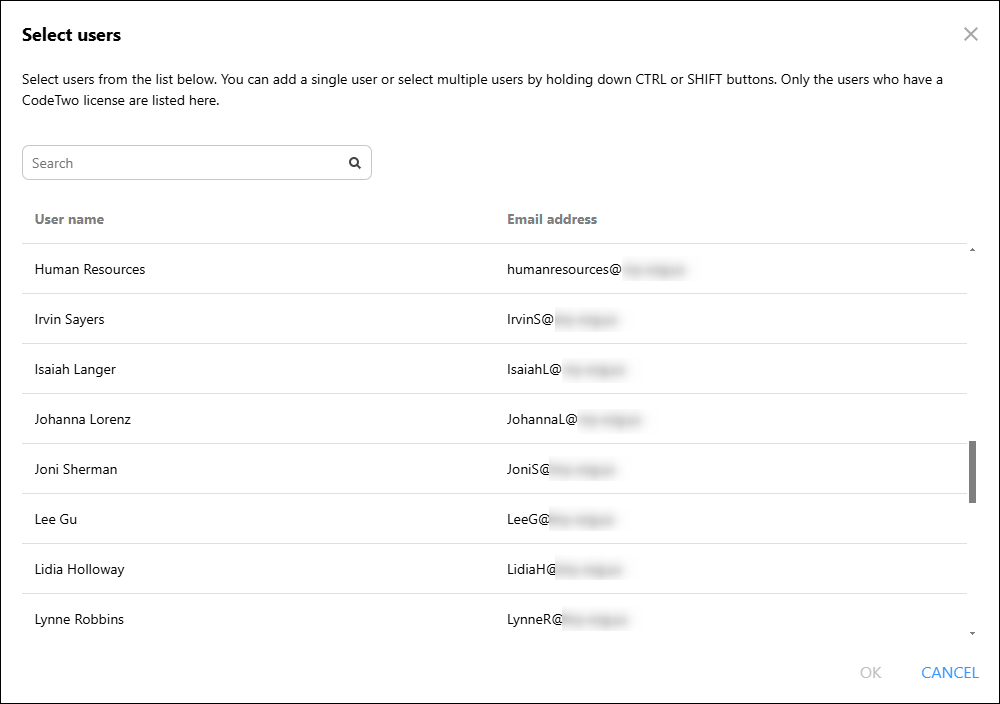
Fig. 2. The user picker shows the primary email addresses (mailboxes) for all domains added to your tenant.
Using the Entra ID (user property) filter
In the example shown in Fig. 3., we configured the rule to add signatures to emails sent by our IT team, excluding the managers.
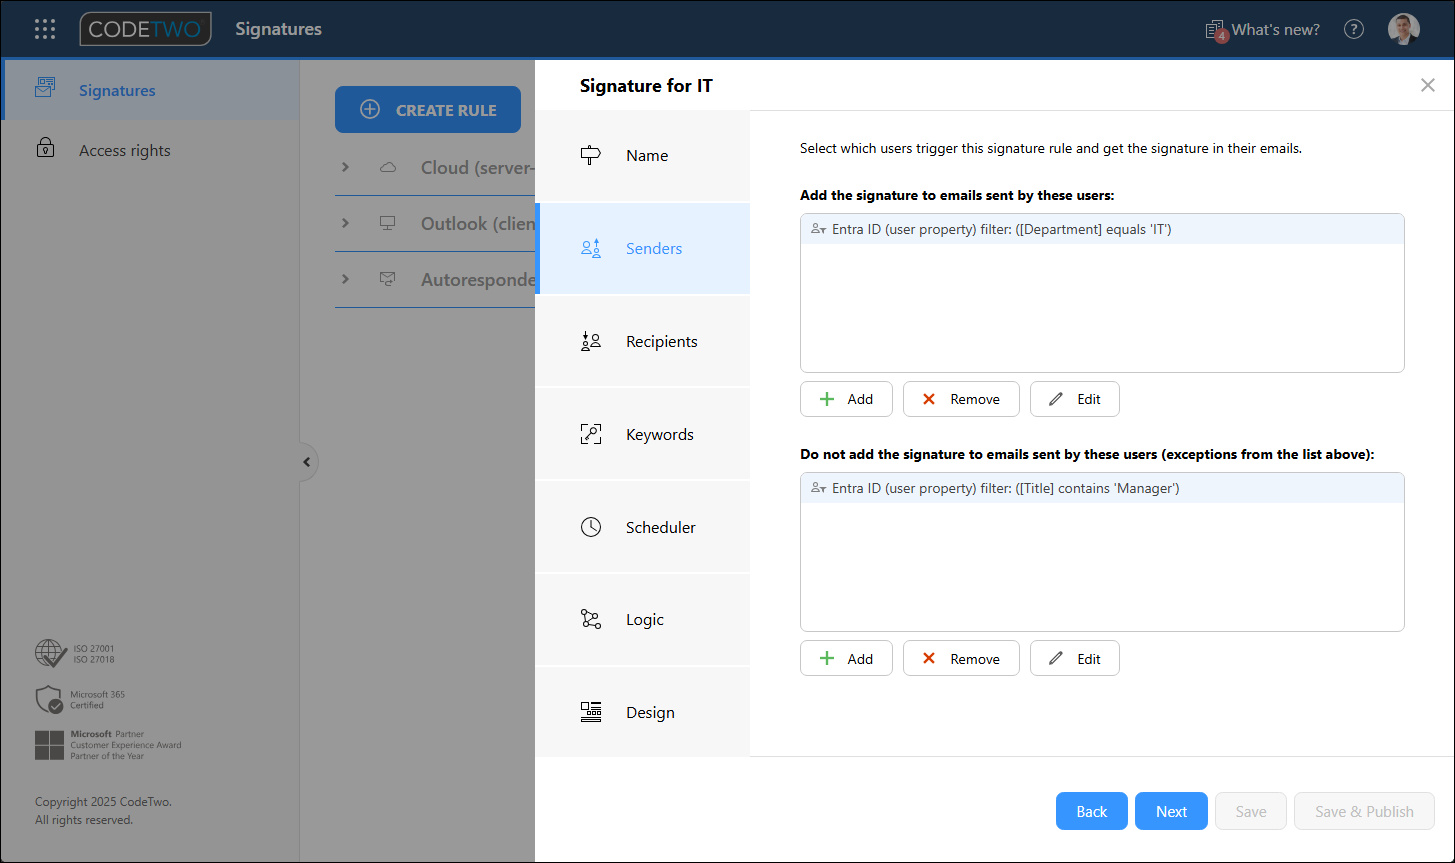
Fig. 3. Using the Entra ID (user property) filter to define both conditions and exceptions in the Senders step.
The software knows when to add signatures because we added an Entra ID (user property) filter condition, which checks if the sender's Department field in Entra ID (Azure AD) is equal to IT – see Fig. 4. for detailed configuration. In a similar way, an exception to the rule was defined: if the sender's Title in Entra ID contains the value Manager, the rule will not be triggered.
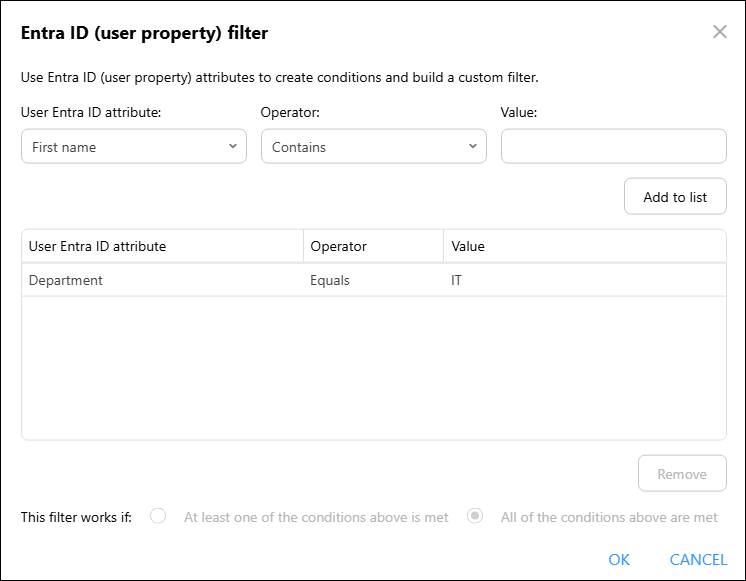
Fig. 4. The Entra ID (user property) filter options.
The User Entra ID attribute drop-down list (see Fig. 4.) contains common Entra ID attributes such as First/Last Name, Company, Department, E-mail or Phone, Exchange Online custom attributes, attributes synced from on-prem Exchange Server, as well as CodeTwo custom attributes.
See this article to learn more on how to add different signatures to messages sent by different senders.
Recipients
In the Recipients step (Fig. 5.), choose if you want to add your signature to emails sent to anyone or to specific people only. This selection is made on the top list of the Recipients step. You can also add exceptions - if an email is sent to recipients specified on the bottom list, the rule will not be applied, and the signature will not be added.

Fig. 5. The Recipients step. Here, the cloud rule applies to emails sent to anyone.
Some recipient-based conditions differ slightly between cloud (server-side) and Outlook (client-side) signature rules, as shown in the table:
| Condition/exception | Cloud signature rules | Outlook signature rules |
|---|---|---|
| All recipients | The rule will be triggered by emails sent to any email address | |
| Internal recipients | The rule will be triggered by emails sent to internal recipients | N/A |
| Internal recipients only | N/A | The rule will be triggered if all email recipients are internal |
| External recipients | The rule will be triggered by emails sent to external recipients | N/A |
| External recipient(s) | N/A | The rule will be triggered if at least one recipient is external |
| Group members (inside organization) |
The rule will apply to members of selected groups (Microsoft 365 groups, distribution lists, security groups and mail-enabled security groups), not the groups themselves. If the group you select contains nested groups, emails sent by members of those nested groups will also meet your condition or exception. |
|
| Email addresses |
The rule will apply to specific people (email addresses) or domains you specify. When using the email address filter, you can use asterisks (*) as wildcards that substitute any number of characters. This allows you to create, for example, conditions/exceptions that apply only when emails are sent to specific domains. For instance, if you type *example.com*, the rule will apply only to emails sent to email addresses that include example.com ([email protected], [email protected], and so on). |
|
If you send an email to multiple recipients to whom different signature rules apply, CodeTwo will behave differently depending on what type of signatures are added to this email:
- cloud (server-side) signatures – your message is split into several copies so each recipient gets the correct signature. Learn more about message splitting
- Outlook (client-side) signatures – the CodeTwo add-in checks all email recipients against your Outlook rules and inserts a signature based on the first rule whose conditions are met. All recipients get the same signature. See this article for more details and examples
For tenants with multiple domains, emails exchanged among those domains are treated as internal.
Remember to define at least one condition on the top list. If you leave this section empty, the rule will apply to emails sent to any recipient. The app will notify you about that (and automatically add the All recipients condition to the top list) when you submit your changes via the Save & Publish button.
See this article to learn more on how to add different signatures to messages sent to different users or groups of users.
Keywords
The Keywords step (Fig. 6.) is only available for cloud (server-side) signature rules. Here, you can define specific phrases that will trigger or suppress your rules. This option is very useful e.g. when you want to apply an additional signature only to selected recipients or if you want to quickly remove the default signature of your company from a private message. The latter is shown in Fig. 6. – if the program finds the #nosignature phrase in the email subject or body, the signature will not be added and the phrase itself will be removed from the message. The asterisks surrounding the keyword phrase are optional, but here they ensure the rule will be triggered even if any characters (letters or signs) directly precede or follow the phrase, so phrases such as (#nosignature) or -#nosignatures will all work.
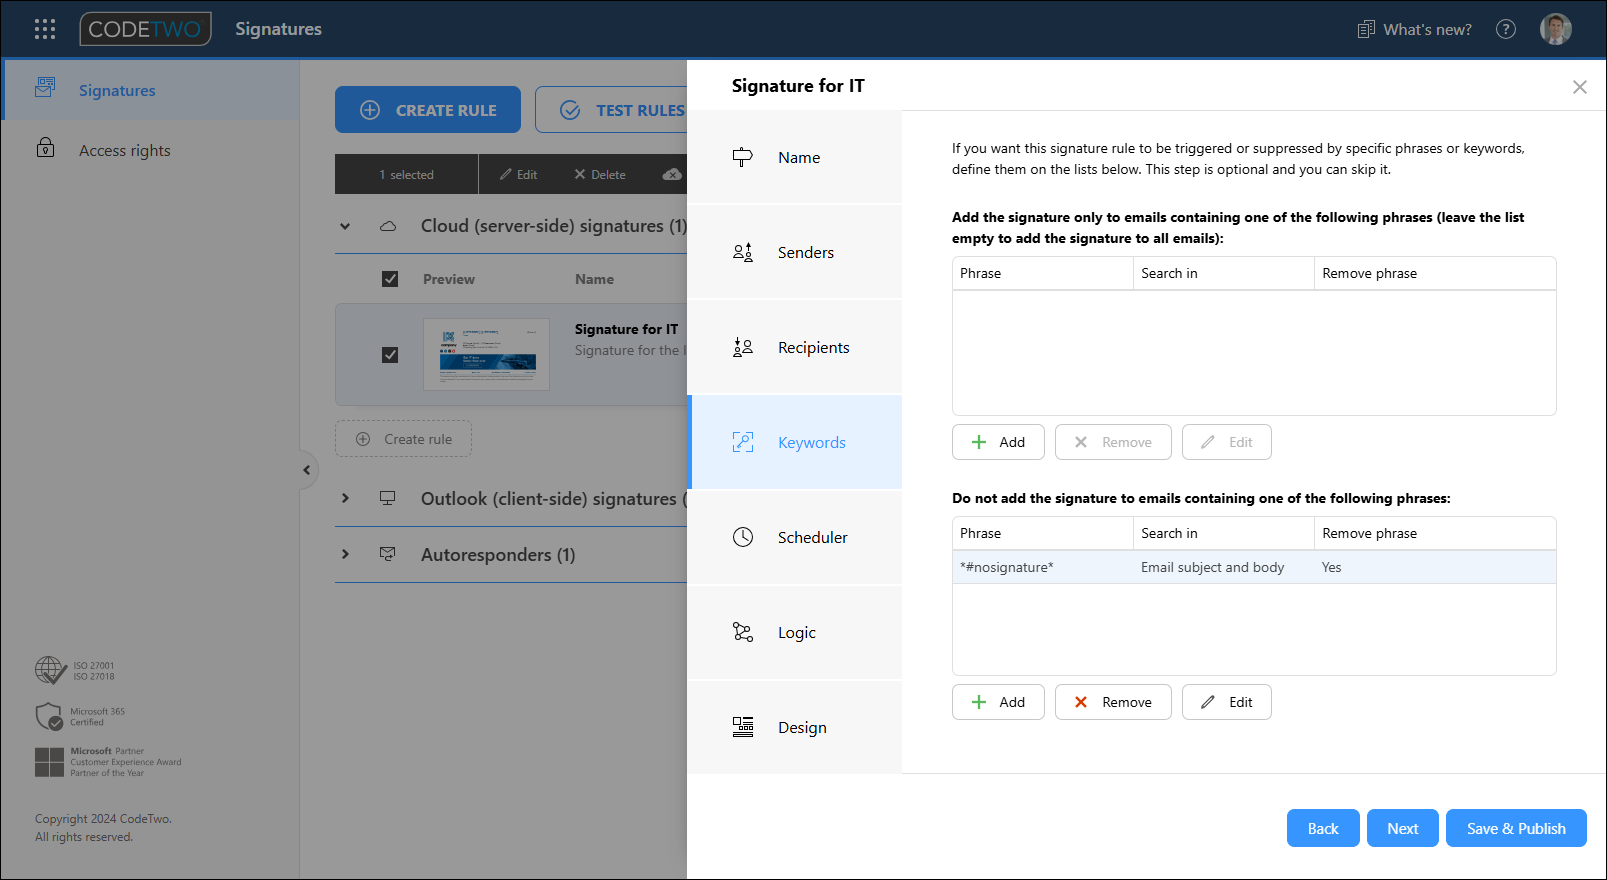
Fig. 6. The Keywords step available for cloud (server-side) signature rules.
You can add one or more keywords. By default, they are connected via the OR logical operator.
When adding or editing a keyword (Fig. 7.), you can define where to search for the phrase and decide if the program should remove it from the message.
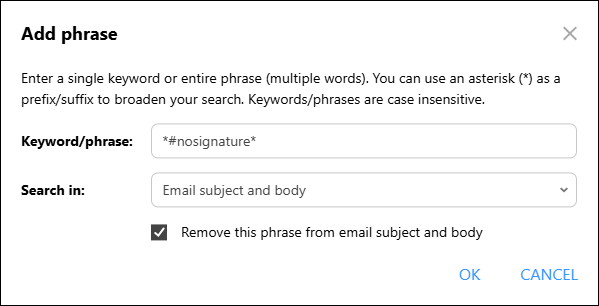
Fig. 7. Keyword configuration options.
Info
You can insert your keyword anywhere inside the message title or body. An asterisk (*) may be used as a wildcard character. Add it before and/or after the phrase to make sure that your keyword is always found (see Fig. 7.).
For more information about how to use keywords to force or suppress signature rules, check these examples of use.
Scheduler
In the Scheduler step (Fig. 8.), you can specify when your rule will be active. The Scheduler is configured separately for each rule. It allows you to manage the activity of a rule by selecting time ranges and recurrence patterns. You can create daily, weekly, monthly or custom patterns.
Important
If the Scheduler is off or is not yet configured for a signature rule, this rule will be active continuously (without any time limits).
The Scheduler's activity is based on the selected time zone. You can choose the time zone yourself by using the drop-down menu at the top (see Fig. 8.). If it’s possible to obtain sufficient information from your web browser and operating system, your time zone will be detected (and selected) automatically.
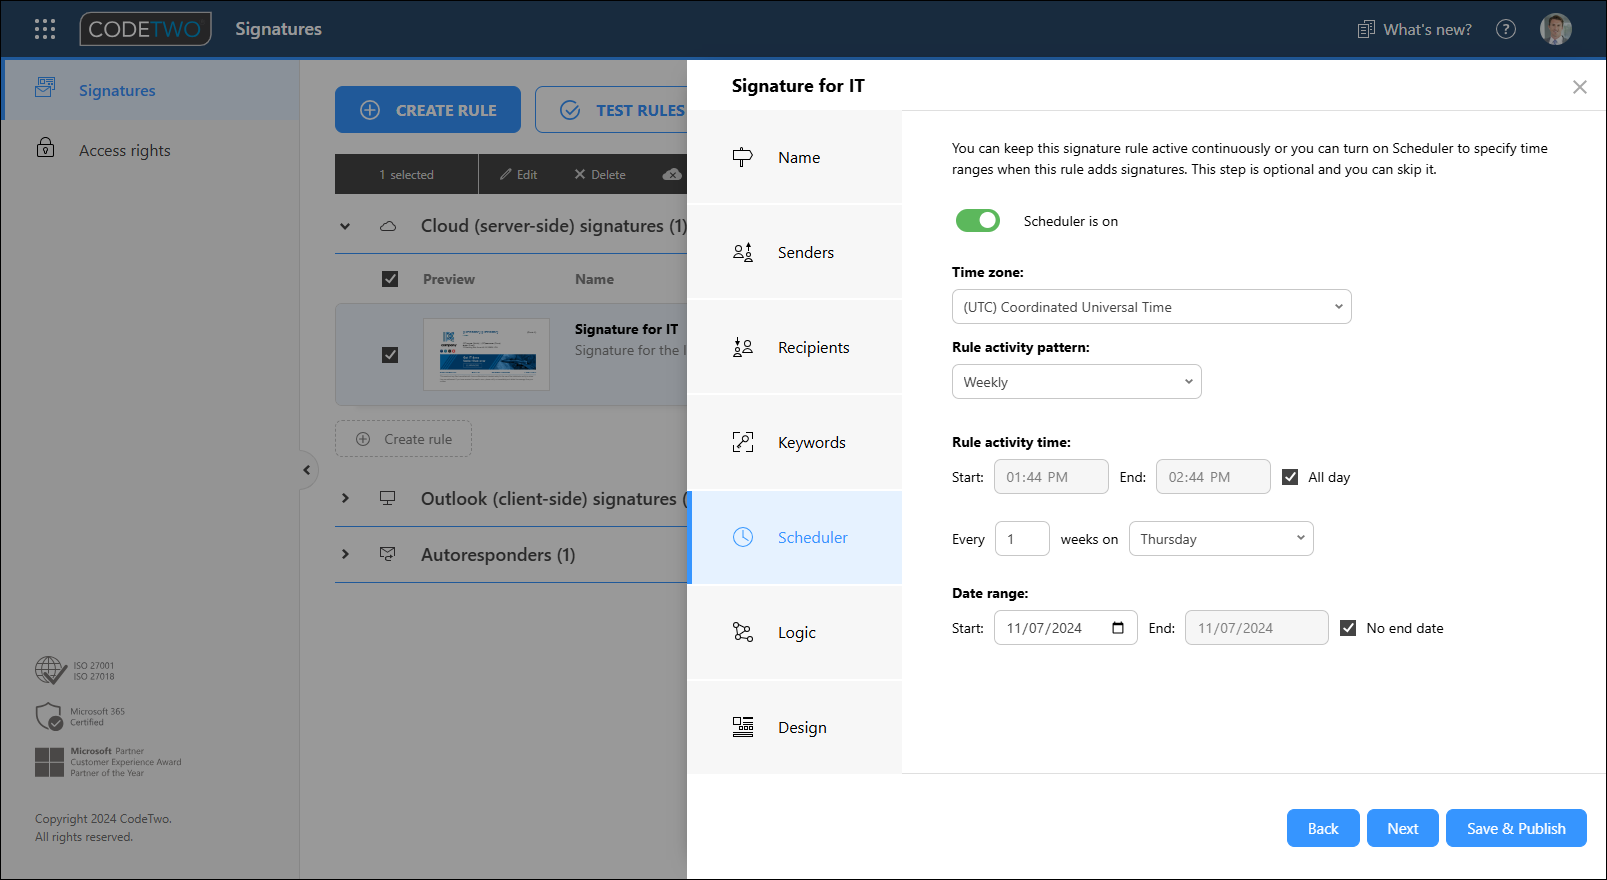
Fig. 8. Configuration of the Scheduler.
If you turn the Scheduler on for your rule, a small icon appears next to the rule's name (see Fig. 10.). This icon shows if the rule is currently active ( ) or not (
 ).
).
Logic
In the Logic step, you can:
- define how the program should process subsequent rules if you have more than one – settings available for cloud (server-side) signature rules only,
- configure Outlook signature adding options – settings available for Outlook (client-side) signature rules only.
Rule processing settings for cloud (server-side) signature rules
If you use many signature rules in your Microsoft 365 organization, it is important to manage how they are executed. You can do this in the Logic step (Fig. 9.):
- If you select the option If this rule is applied > Process the next rule on the list, our software will check if the conditions of the signature rule are met, and if they are, it will add a signature defined by the rule and move to the next rule (the one directly below it on the list). If you select If this rule is applied > Do not process any more rules, our software will check if the conditions of the signature rule are met, and if they are, it will not process any more rules.
- When it comes to the If this rule is not applied option, the case is similar. Our software checks if the conditions of the signature rule are met, and if they are not, it moves to the next rule or stops processing any other rules depending on the choice you made.
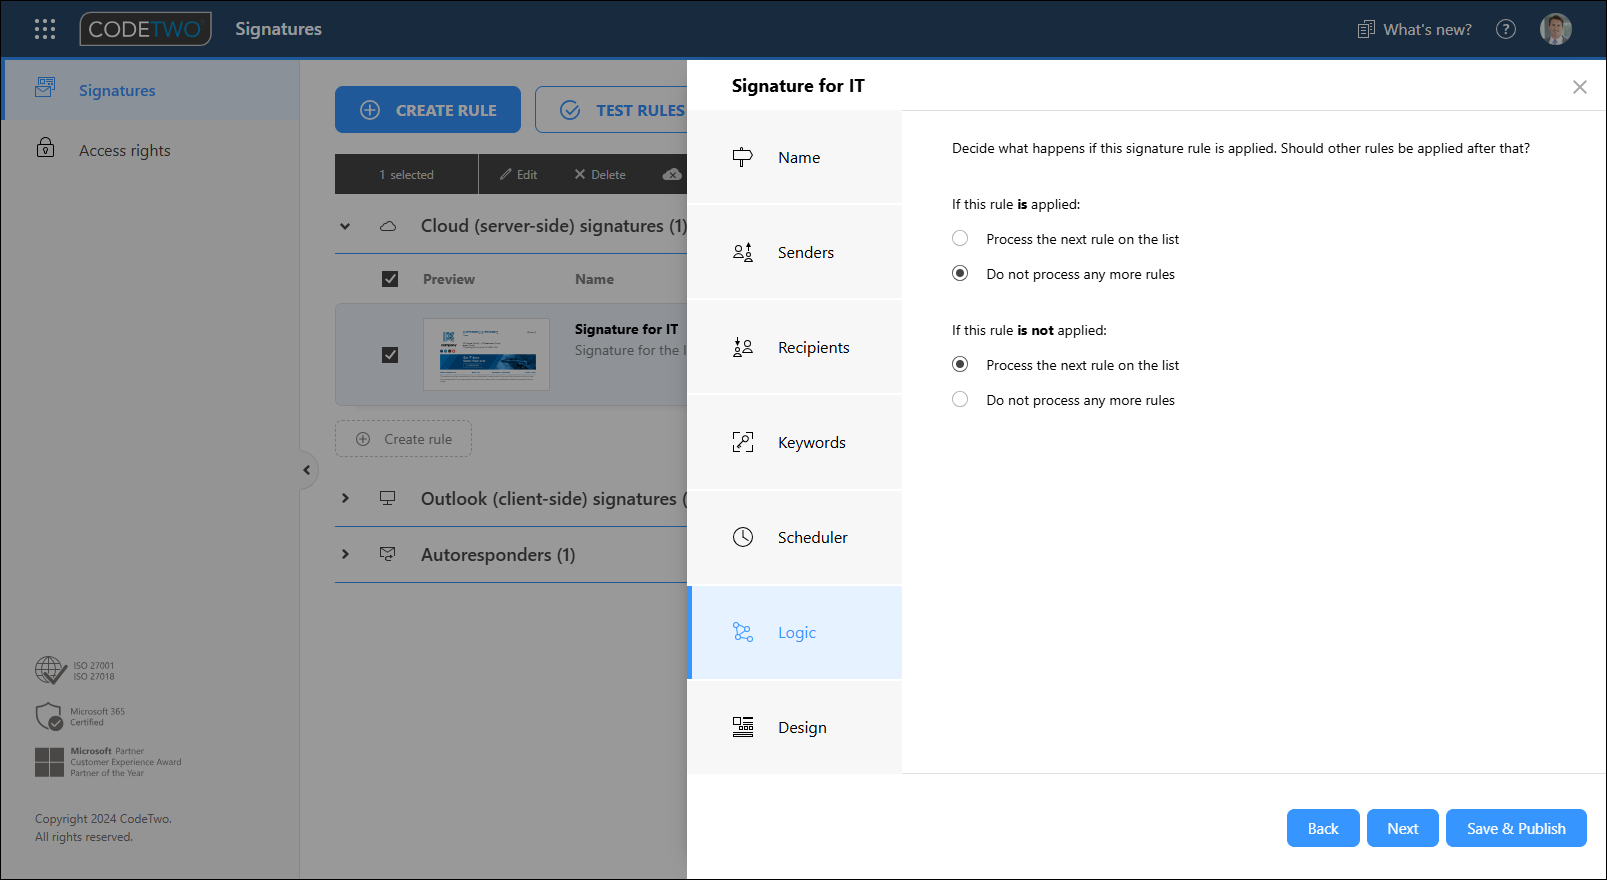
Fig. 9. The Logic step available for cloud (server-side) signature rules.
When setting up the processing of multiple rules, remember:
- The settings are configured for each rule separately.
- The rules are applied in the order they are placed on the Cloud (server-side) signatures list visible in the Signatures app's main window (see Fig. 10.), from top to bottom.
- If several signatures are to be added by different rules, they will be added top to bottom in the same order as the rules that govern them.
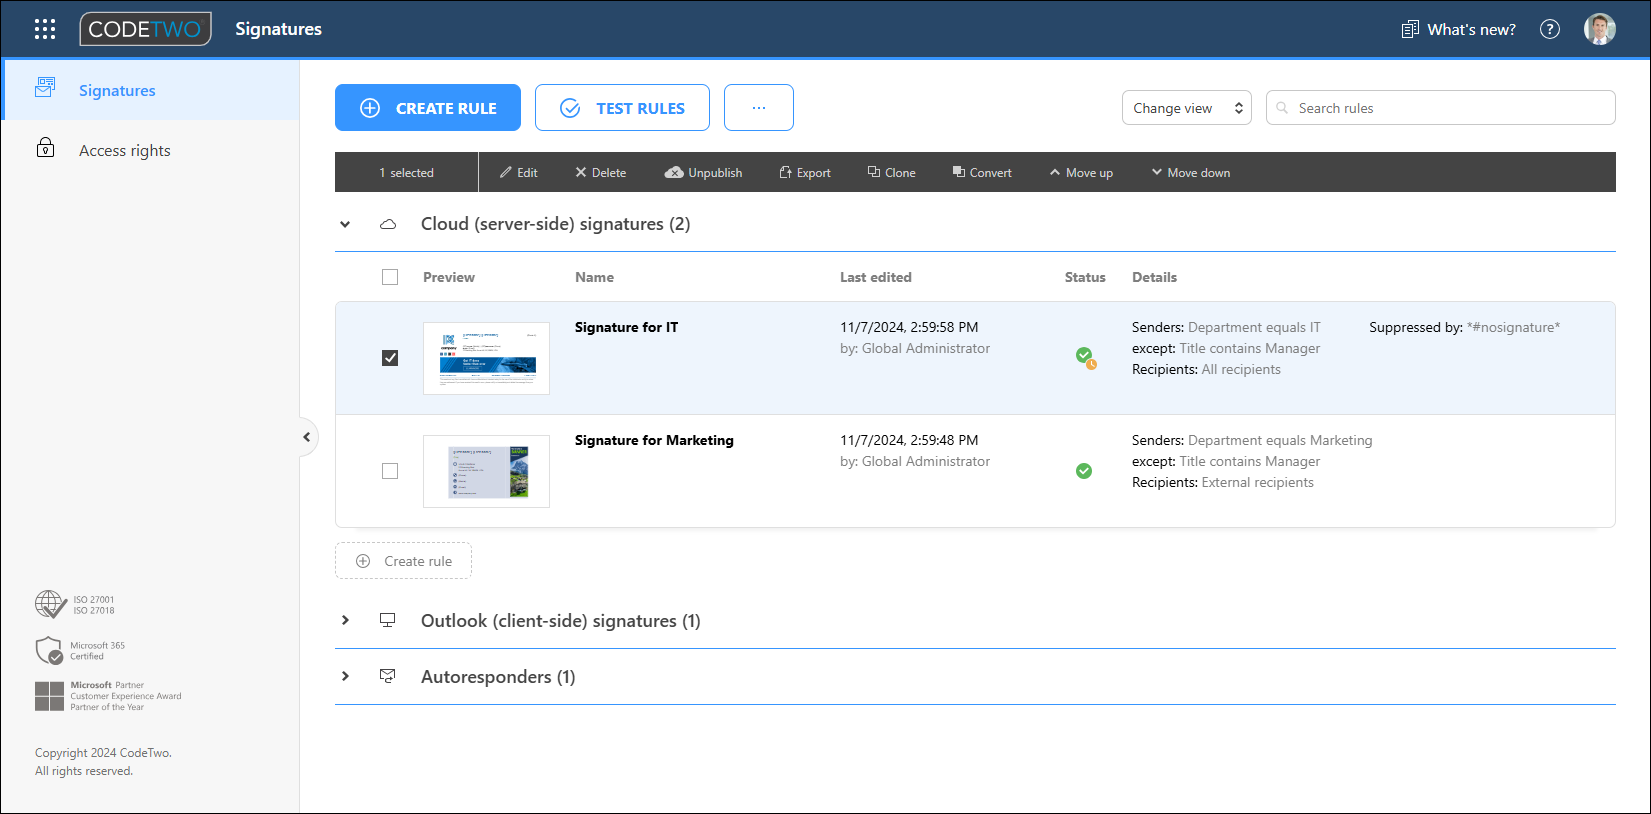
Fig. 10. List of cloud (server-side) signatures. The rules are applied in the order they are placed on the list.
This is important if you want to add several signatures in a specific order. The order of rules can be changed using the Move up and Move down buttons (as shown in Fig. 10.). For each rule, you also need to decide what happens if it is applied or not.
For each signature, the process of checking if the conditions of the signature rule are met continues until the program reaches the final signature rule (at the bottom of the list) or until the condition to stop processing next rules is met.
Signature adding options for Outlook (client-side) signature rules
The options available in the Logic step (see Fig. 11.) for Outlook signature rules let you configure default (automatic) signatures added by the CodeTwo add-in in Outlook:
- Set this signature as default for new messages
When this option is enabled (the default setting), the signature defined in this rule is automatically added to the body of each new email created in Outlook. If you have multiple CodeTwo Outlook signature rules that are set as default, the add-in will automatically insert the signature from the first rule whose conditions are met (the rules are processed from top to bottom in CodeTwo's Signatures app).
Keep in mind that users can still select a different signature set up in your organization while composing a message in Outlook.
- Set this signature as default for replies and forwards
This option works similarly to the previous one, except that the signature is automatically added to replies and forwarded messages.
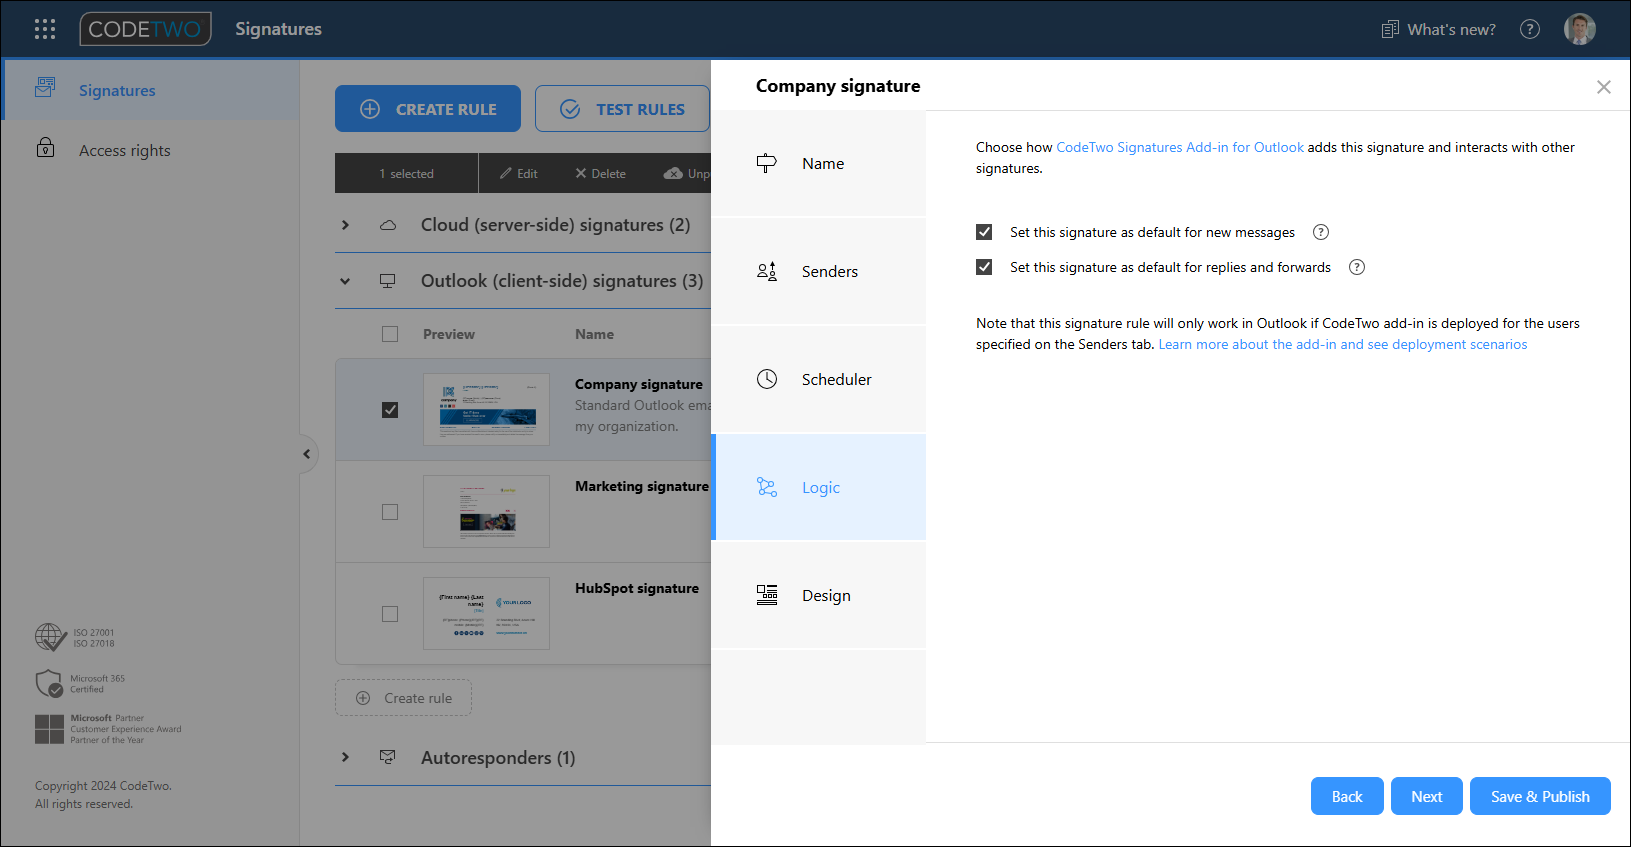
Fig. 11. The Logic step available for Outlook (client-side) signature rules.
Note that local signatures in Outlook (for example, in the Signatures and Stationery settings) are disabled for those end users who have their Outlook signatures added automatically by CodeTwo. Learn more
For more information on how to add different signatures to the first and subsequent messages regardless of your signature mode, see this article.
Understanding conditions and exceptions
As described above, the Senders, Recipients and Keywords steps let you set conditions (or exceptions) that need to be fulfilled by a message to trigger (or suppress) a rule and add (or exclude) an email signature. Apart from conditions and exceptions, you can specify when a signature rule should be active by using the options available in the Scheduler step.
To manage email signatures efficiently, it's important to understand how conditions and exceptions are related.
Conditions
Conditions can be defined on the top lists of the Senders, Recipients and Keywords steps.
Important
The relation between the Senders, Recipients and Keywords conditions is logical conjunction (the AND logical operator). This means that all these conditions must be fulfilled to trigger a rule and add a corresponding signature.
Example
To better understand that, imagine the following scenario for a cloud (server-side) signature rule: a company has a new product named XYZ and would like to add a dedicated signature to selected emails sent by the marketing team outside the organization. Let us assume that we already created a new signature rule and designed the signature template for this rule, and we only need to define the conditions for when this template is added.
First, we select this rule on the rules list and go to the Senders step. We add the Marketing group as the condition (top list), with no other conditions or exceptions (Fig. 12.). This means that our signature will be added only to emails sent by the employees working in Marketing.
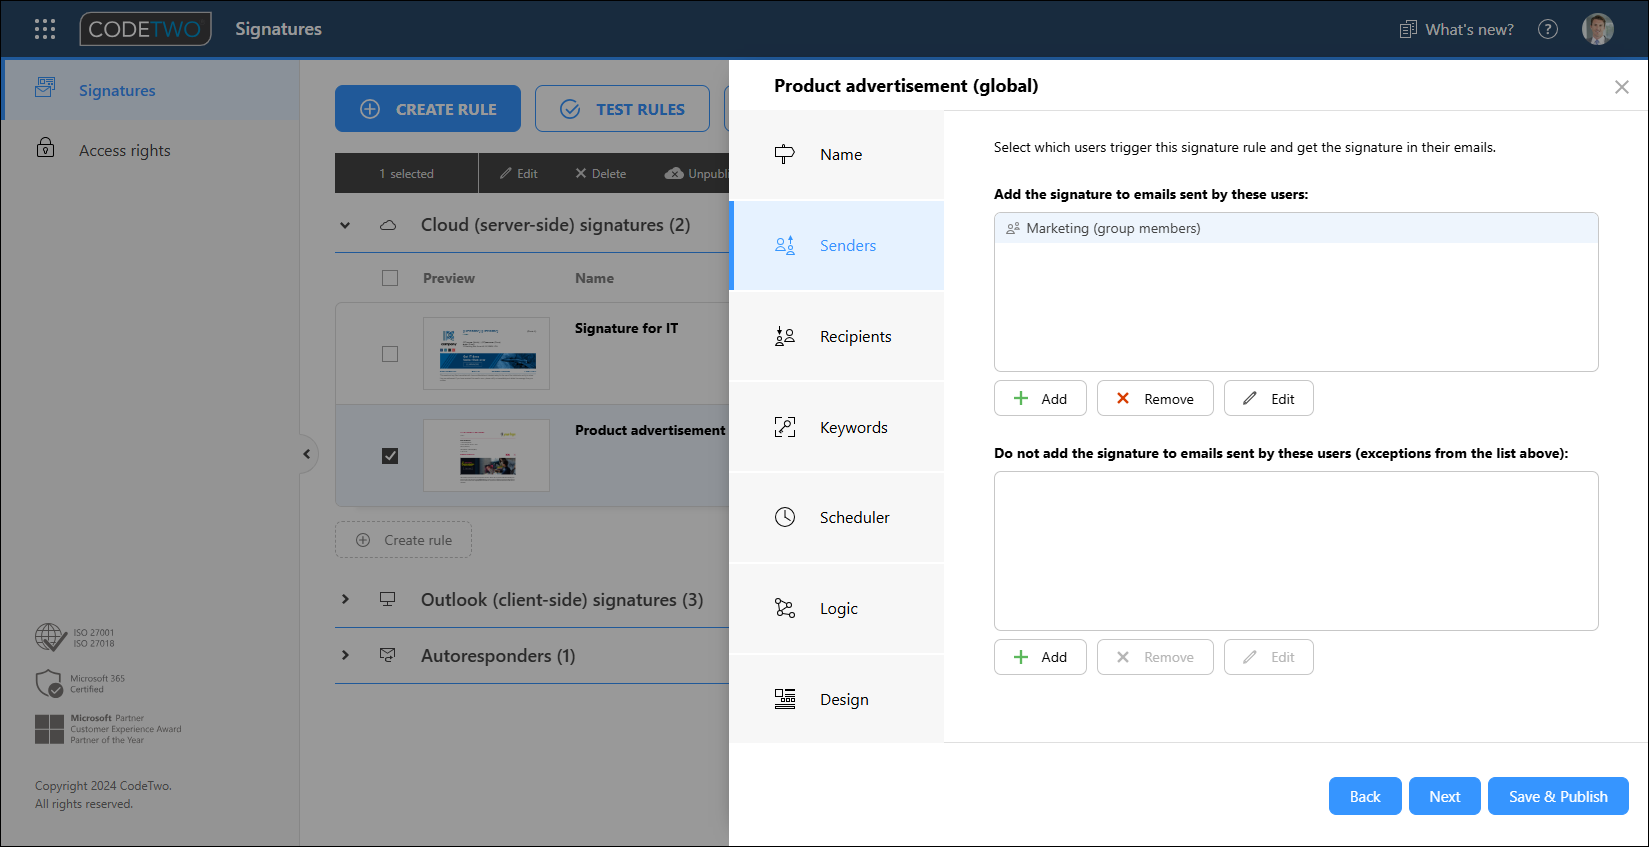
Fig. 12. The Senders step with one condition.
After that, we need to specify the email recipients to whom this rule will apply. We want our signature advertisement to be added to emails sent outside the organization. To do that, we switch to the Recipients step and add External recipients to the top list (Fig. 13.).

Fig. 13. Configuration of the Recipients condition: here, the rule applies to external emails only.
Finally, we define a Keyword condition (upper list in the Keywords step) for email subjects and bodies by adding the XYZ phrase (the name of our product), as shown in Fig. 14. We set the keyword phrase not to be removed because we assume that our advertising emails always contain (and should contain) the name of the product advertised.
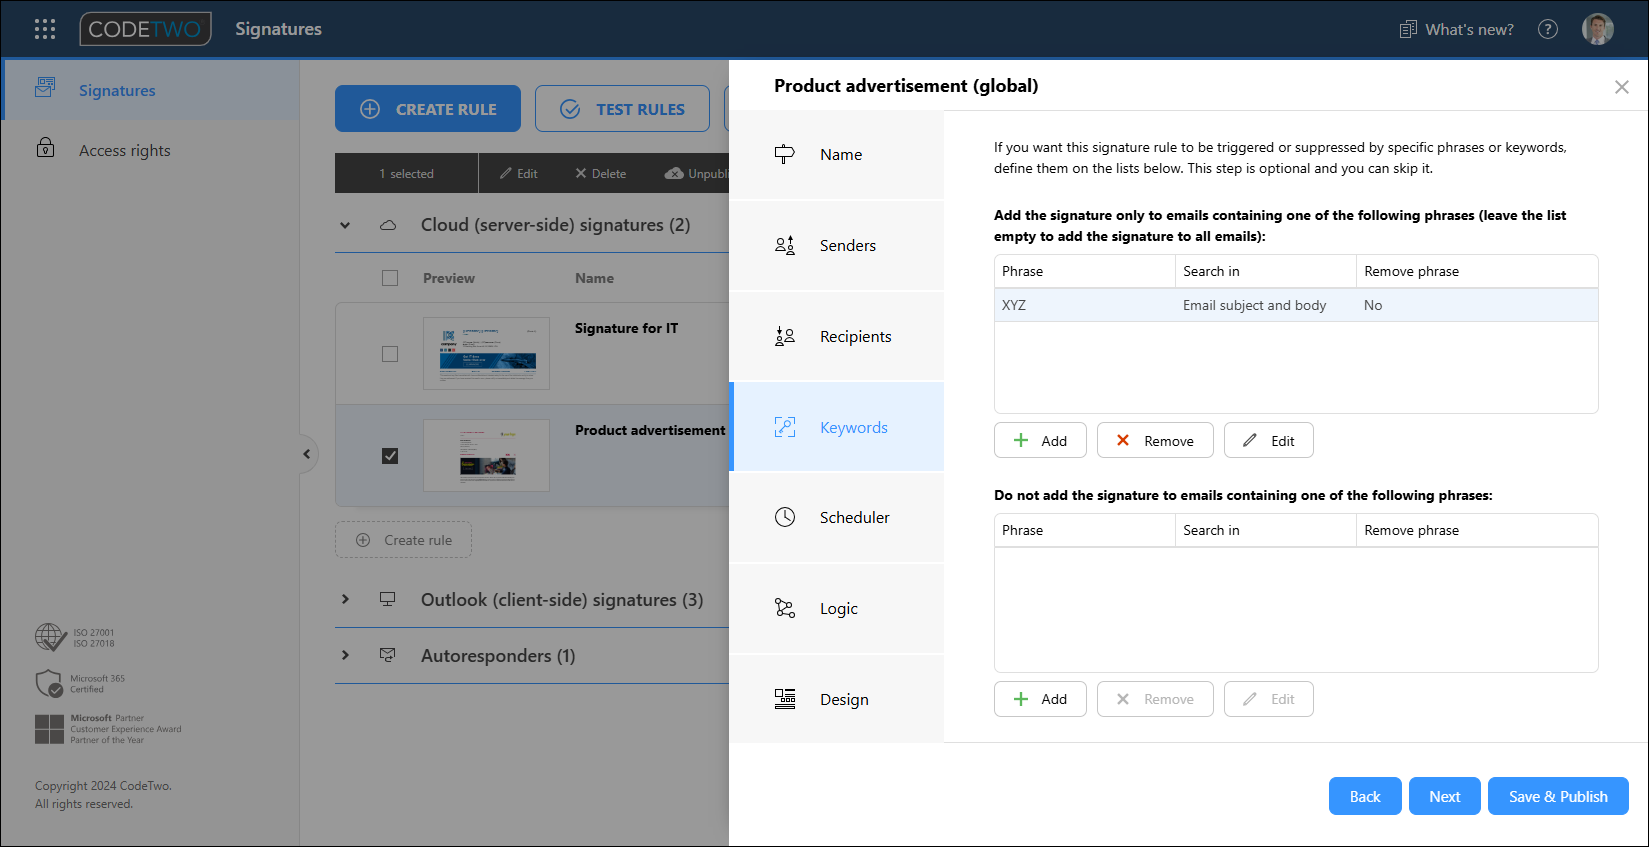
Fig. 14. The Keywords step with one Keyword condition.
With this configuration, our signature will be added only to emails which simultaneously fulfill all three conditions:
- are sent by the Marketing team
- and are sent to users outside the organization
- and contain XYZ (product name) in the message subject or body.
Exceptions
Exceptions (the bottom lists in the Senders, Recipients and Keywords steps) are connected via the OR logical operator (logical disjunction). In other words, if you define multiple exceptions, a signature rule is suppressed for each exception individually. The following example will help you understand how exceptions are processed by the program.
Example
Let us modify the cloud (server-side) signature rule described in the previous example. In the Senders step, we add an exception (the bottom list) by creating an Entra ID (user property) filter, as shown in Fig. 15. This will exclude users whose job title contains the word Manager (our search algorithm is case-insensitive) from having their emails stamped with the associated signature.

Fig. 15. Adding an exception to email senders.
Now, let's assume that we have a separate email marketing campaign for Canada, so we need to make sure our current rule does not apply to emails sent to the .ca domain. To do that, we go to the Recipients step, choose the Email addresses option on the bottom list (exceptions) and type *.ca as the email address (Fig. 16.). The wildcard (*) character ensures that all email addresses ending with .ca will trigger our signature rule.
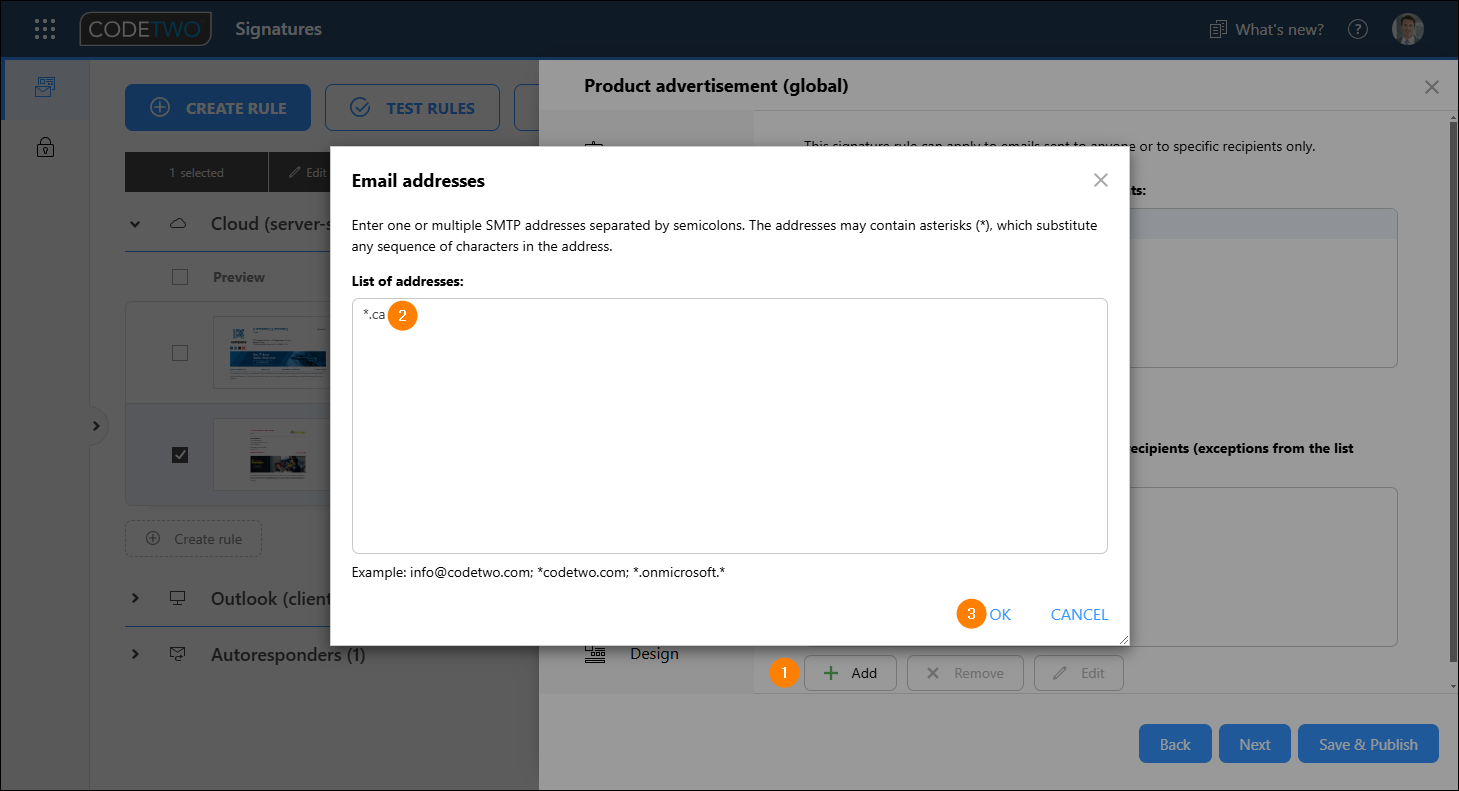
Fig. 16. Defining a new Recipients exception.
We can also create an exception that stops the rule from being applied when a specific phrase is typed in an email. We can do so in the Keywords step, as shown in Fig. 17. With this configuration, every email which contains the nosignature phrase in its body or subject will not receive the signature, and the phrase itself will be removed from the message.
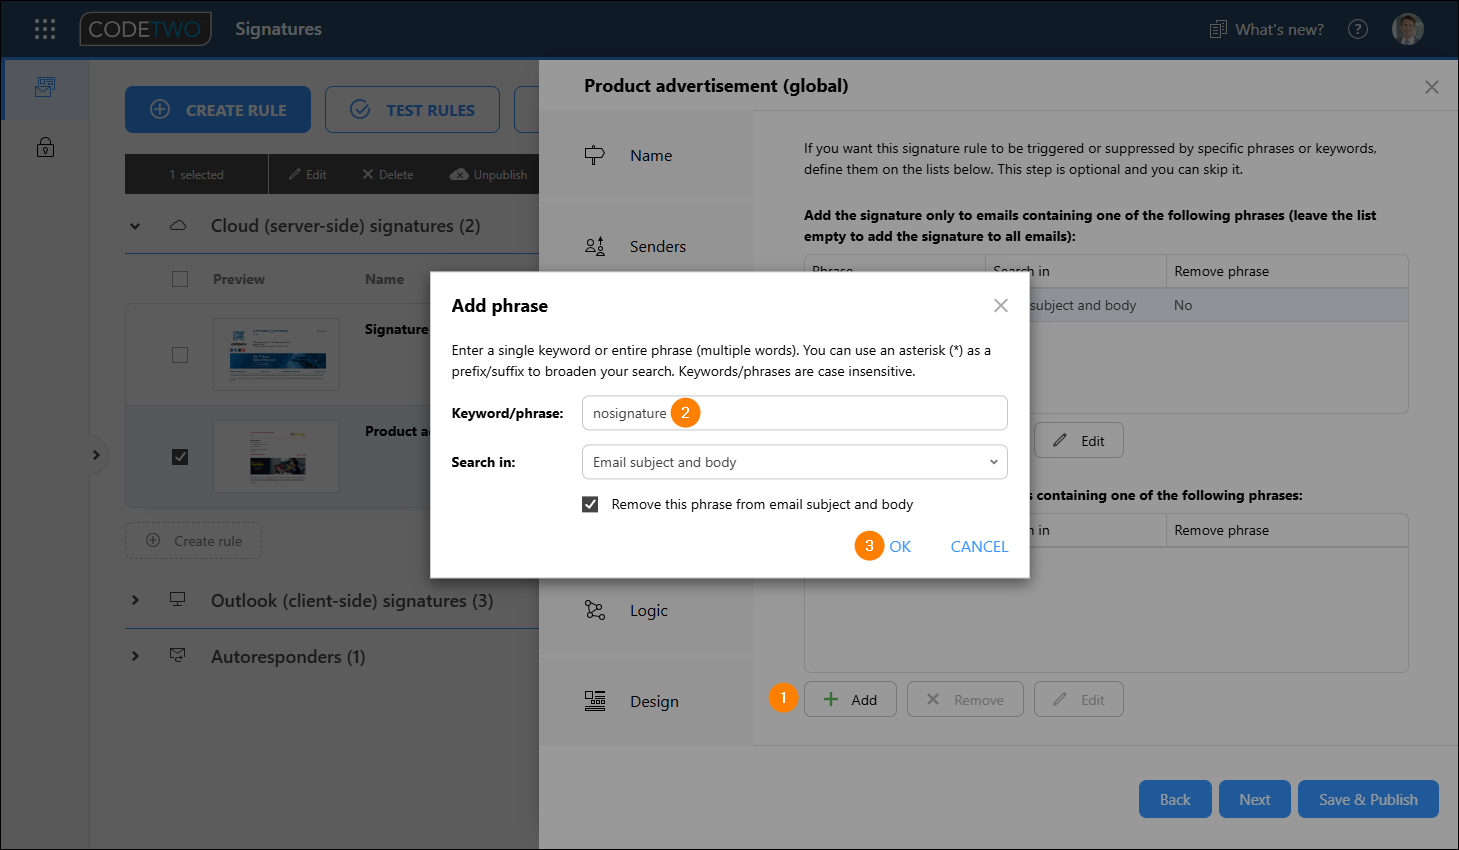
Fig. 17. Defining a keyword exception.
With these 3 exceptions and the previous 3 conditions combined, our rule will:
- add the signature only to emails that are sent by Marketing to external addresses and contain the XYZ phrase in the message subject or body,
- not add the signature in 3 cases:
- if an email is sent by a user whose job title contains the word manager (case-insensitive)
or - if an email is sent to an email address in the Canadian (.ca) domain
or - if the nosignature phrase is found in the message subject or body.
- if an email is sent by a user whose job title contains the word manager (case-insensitive)
Frequently asked questions
- How are signatures added to emails sent by delegates (Send As / Send on Behalf permissions)?
- How are signatures added to emails sent from aliases?
- What if an email is sent to multiple recipients to whom different cloud (server-side) rules apply? (Message splitting)
- Can I convert cloud (server-side) email signature rules to Outlook (client-side) signature rules and vice versa?
- Can I transfer my on-premises signature rules to CodeTwo Email Signatures 365?
- What happens when multiple users save changes to rules at the same time?
How are signatures added to emails sent by delegates (Send As / Send on Behalf permissions)?
Sometimes a user or a group of users have permission to send messages as other users or on their behalf. These users are referred to as delegates (see this Microsoft article for more information on delegate permissions). To find out how CodeTwo handles emails sent as / sent on behalf of another user, read this dedicated article.
How are signatures added to emails sent from aliases?
If you set up rules for primary email addresses only, your users will get the same signature no matter if they use their primary address or an alias to send emails (this is because aliases are associated with the primary email address in Microsoft 365). To add different signatures to alias addresses, you need to set up a dedicated rule for them.
Here's how it works if you set up separate rules for alias addresses:
- Cloud (server-side) signatures – to ensure users get the correct signature when sending an email from an alias, you need to:
- place the rules configured for alias addresses at the top of your cloud (server-side) signatures list, above the rules configured for primary addresses,
OR - add alias addresses as exceptions to the rules configured for your primary email addresses.
- place the rules configured for alias addresses at the top of your cloud (server-side) signatures list, above the rules configured for primary addresses,
- Outlook (client-side) rules – when a user selects an alias address in the From field in Outlook, the user's signature is automatically updated with the one configured for that alias (it will also become available in the add-in pane). To enable this, ensure this add-in setting is turned on for your tenant.
Learn more about adding different signatures to emails sent from alias addresses
What if an email is sent to multiple recipients to whom different rules apply?
To find out how CodeTwo Email Signatures 365 behaves when you send an email to multiple recipients to whom different signature rules apply, see this dedicated article.
Can I convert cloud (server-side) email signature rules to Outlook (client-side) signature rules and vice versa?
Yes. See this article to learn how to do it automatically.
Can I transfer my on-premises signature rules to CodeTwo Email Signatures 365?
Yes, we have a dedicated tool that allows you to easily move all email signature and disclaimer adding rules and rules with the Auto respond action defined in the CodeTwo Exchange Rules family of products, together with signature and auto-reply message templates configured in these rules. The entire process is completely automatic, and your rules will become available in CodeTwo Email Signatures 365 as cloud (server-side) signature rules or autoresponder rules.
Learn more about the CodeTwo Exchange Rules Converter
What happens when multiple users edit rules at the same time?
If a rule is being edited by one user, it is automatically locked for other users. Learn more
See next
Signature template editor - after you specify all the conditions and exceptions for your signature rule, it's time to design an email signature. Read this quick guide to learn how to create a signature template step by step.