Create an autoresponder rule
This article will help you create your first autoresponder rule in CodeTwo Email Signatures 365. An autoresponder rule contains the template of your auto-reply message and conditions that need to be met to send the message.
To be able to create a new autoresponder rule, you first need to turn on Autoresponder for your organization in CodeTwo Admin Panel, as described in this article.
You can configure conditions/exceptions for the rules based on users/groups included in the scope of licensed users only.
Only global administrators and authorized users can manage autoresponder and email signature rules. Learn more
To create a new autoresponder rule, sign in to app.codetwo.com, click the CREATE RULE button and select Autoresponder (Fig. 1.).
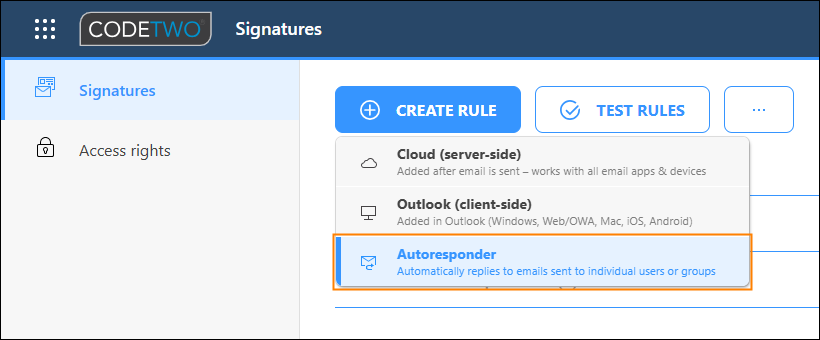
Fig. 1. Adding a new autoresponder rule.
In the first step (Name), enter the name of the rule and (optionally) its description (Fig. 2.).
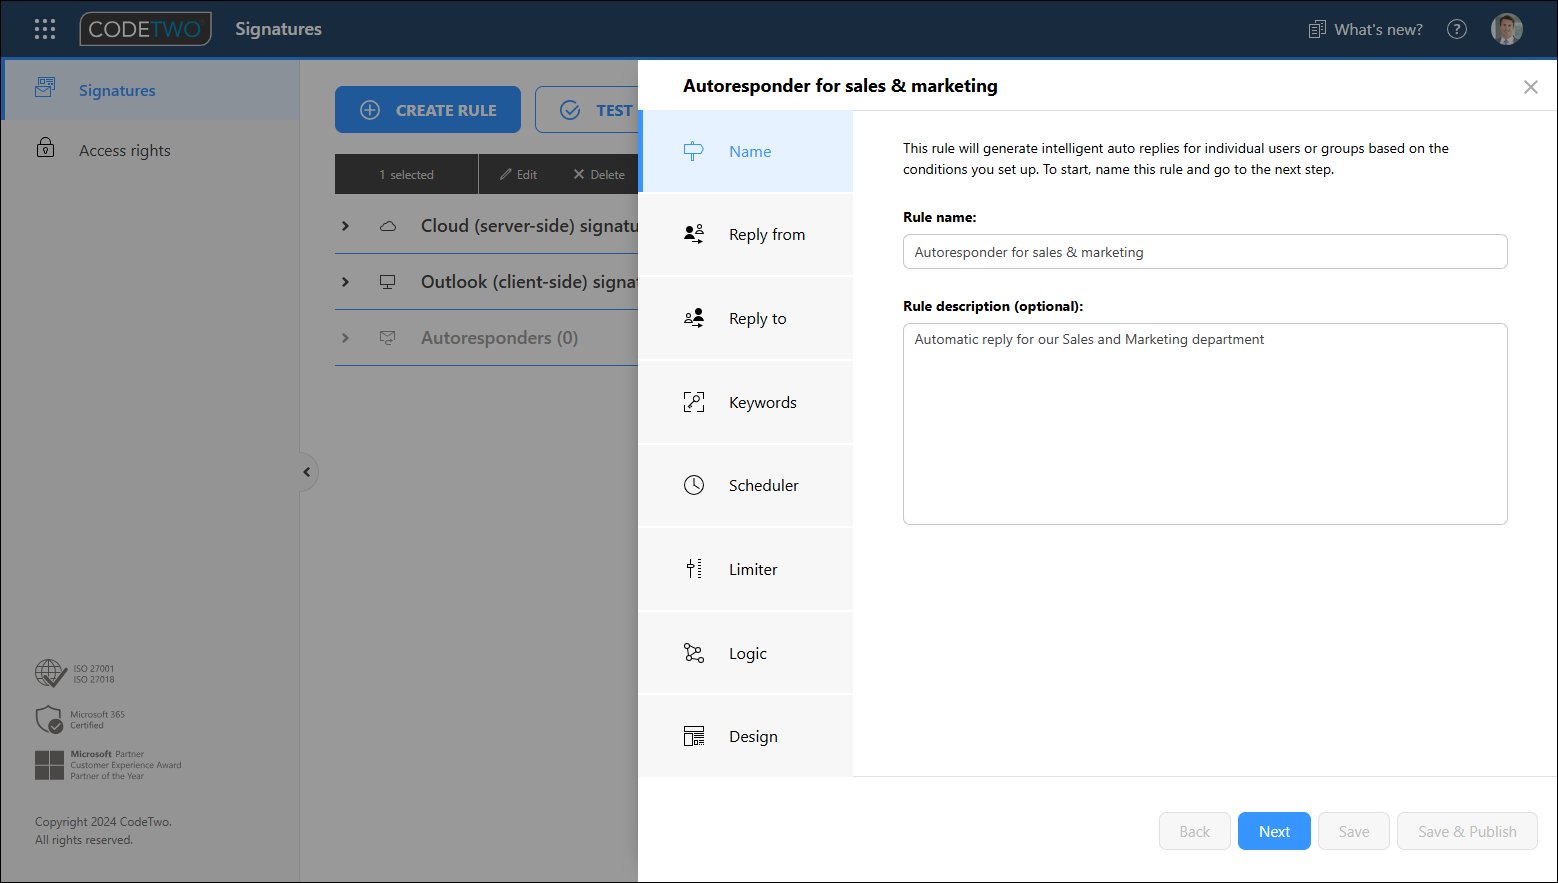
Fig. 2. Entering a name and description for the autoresponder rule.
The three steps that follow (Reply from, Reply to and Keywords) allow you to configure conditions (and optional exceptions) that need to be fulfilled to send the auto-reply message.
In the Reply from step, define users / email addresses from your organization for whom you want to set up auto replies. The autoresponder rule will be triggered if an email is received by users/mailboxes added in the upper section (top list). The lower section (bottom list) allows you to add exceptions. In the example shown in Fig. 3., the auto reply will be sent if any member of the Sales and Marketing group receives an email, except for Allan Deyoung.
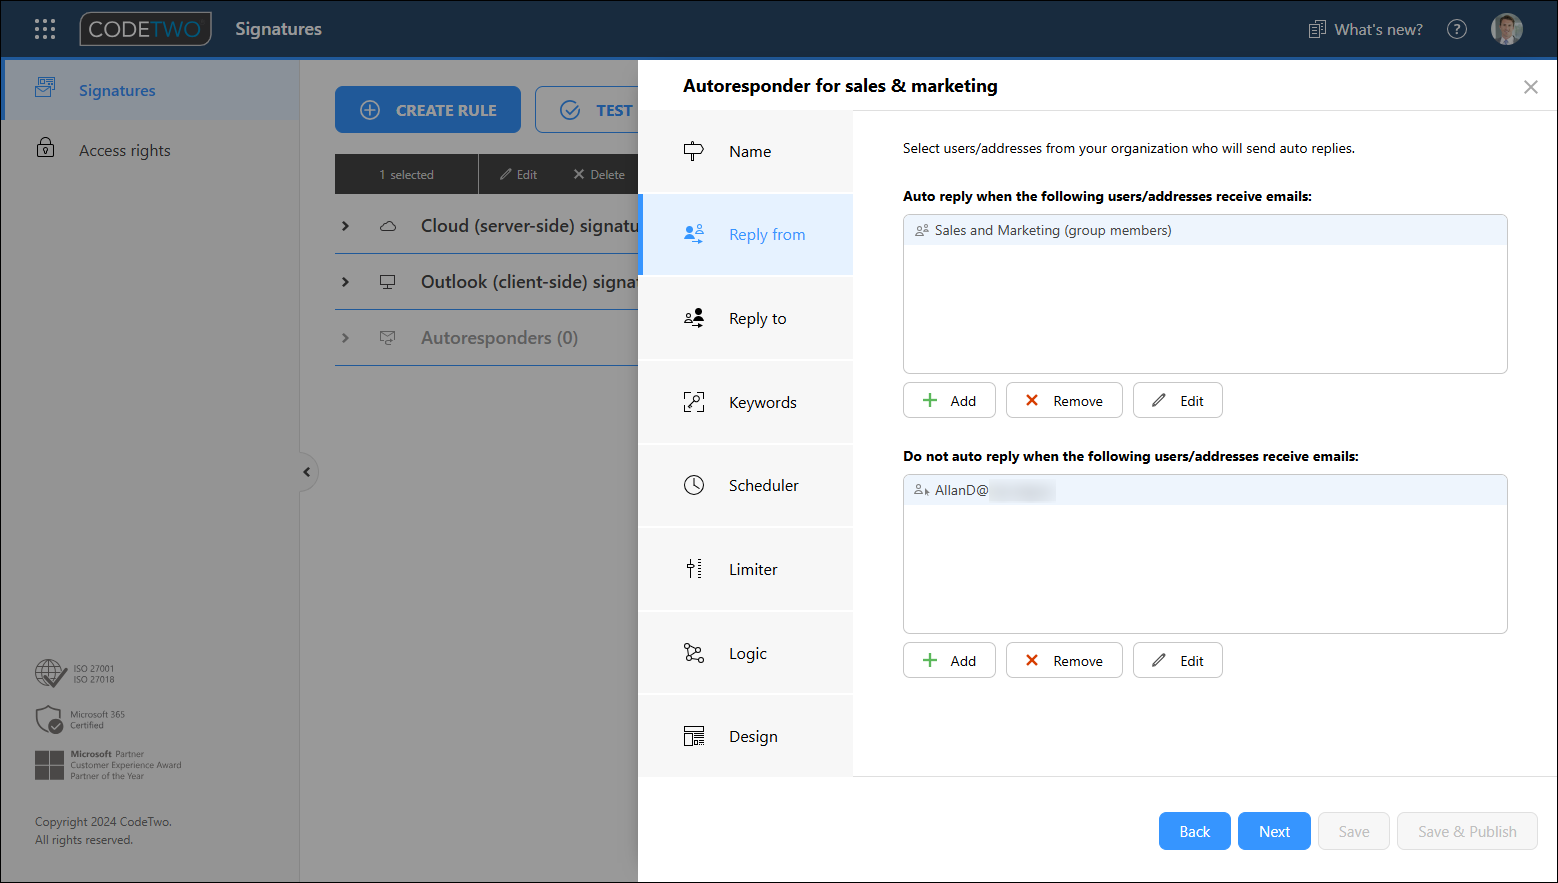
Fig. 3. The Reply from step. The autoresponder rule is triggered if users/addressed defined here receive an email.
Important
As soon as you save the rule, autoresponder licenses will be consumed for the exact number of mailboxes as defined in the Reply from step. Keep in mind that autoresponder licenses are assigned separately and do not affect your license pool for email signatures. Both types of licenses can be reset and reassigned at any time. Learn more
Adding Group members (inside organization) as a condition for this rule and selecting any group will NOT trigger the autoresponder rule if an email is received by the group’s mailbox. The rule will be triggered if an email is received directly by any of the members of that group.
In the Reply to step, you can decide who triggers the autoresponder rule: emails sent from anyone, from internal/external users, from users belonging to a particular group in your organization, or from specific recipients only (e.g. particular email addresses or domains). Use the top list to define users / email addresses that you want to trigger auto replies to be sent from your organization. If you don’t want to send auto replies when you receive messages from specific users/addresses, you can add them to the bottom list (exceptions). In this example, auto replies will be sent only if people in your organization (defined earlier in the Reply from step) receive messages from External users, that is users outside your organization (Fig. 4.).
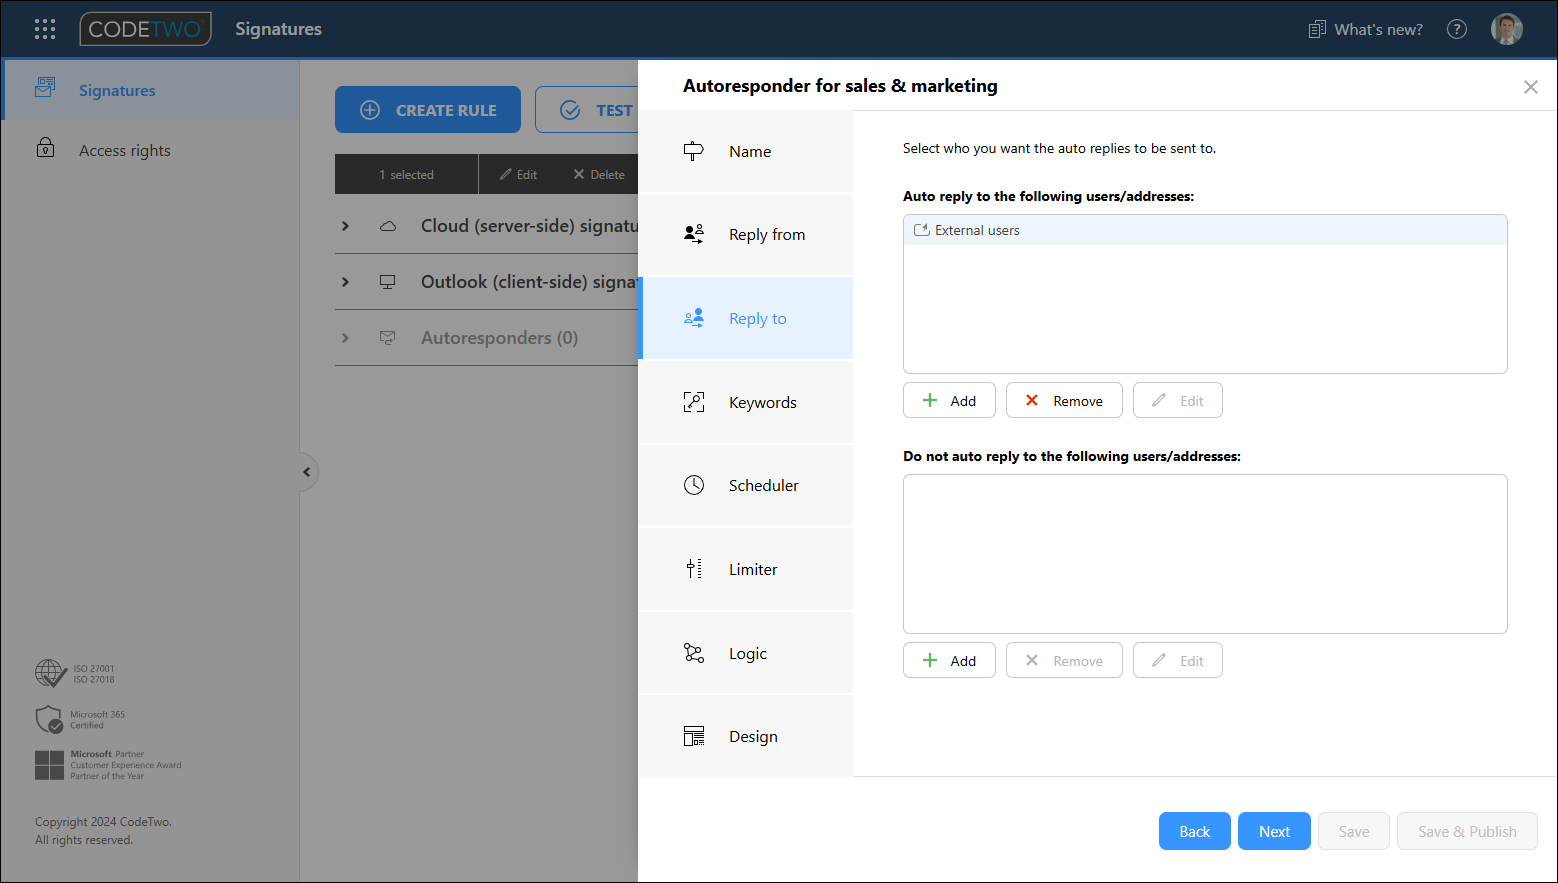
Fig. 4. The Reply to step. The autoresponder rule is triggered if users/addressed defined here send an email to your organization.
If you have several domains in your Microsoft 365 tenant, the Internal users condition applies to all of them.
If you don’t define any users/addresses in this step and decide to save your autoresponder rule anyway, All users will be automatically added to the upper list (meaning that this rule will apply to all incoming emails sent to users you defined in the Reply from step).
The next step – Keywords – is optional. Here you can define specific phrases that, when found in incoming messages, will trigger or suppress your autoresponder rule. When adding keyword phrases, you can use asterisks (*) as wildcards (as a substitute for other characters). The keyword settings might be very useful e.g. if you don’t want to send auto replies whenever you receive a certain type of email. In this example (Fig. 5.), if an incoming email contains the word invoice (or invoices – hence the asterisk) in the email subject or body, the rule will not be applied, and auto reply will not be sent.

Fig. 5. The Keywords step.
The Scheduler step (Fig. 6.) allows you to specify an activity period during which the rule is active and automatic replies are sent. Note that Scheduler works based on a chosen time zone. If the Scheduler feature is turned off (default setting) for a given rule, this rule will be active all the time. Learn more about this feature
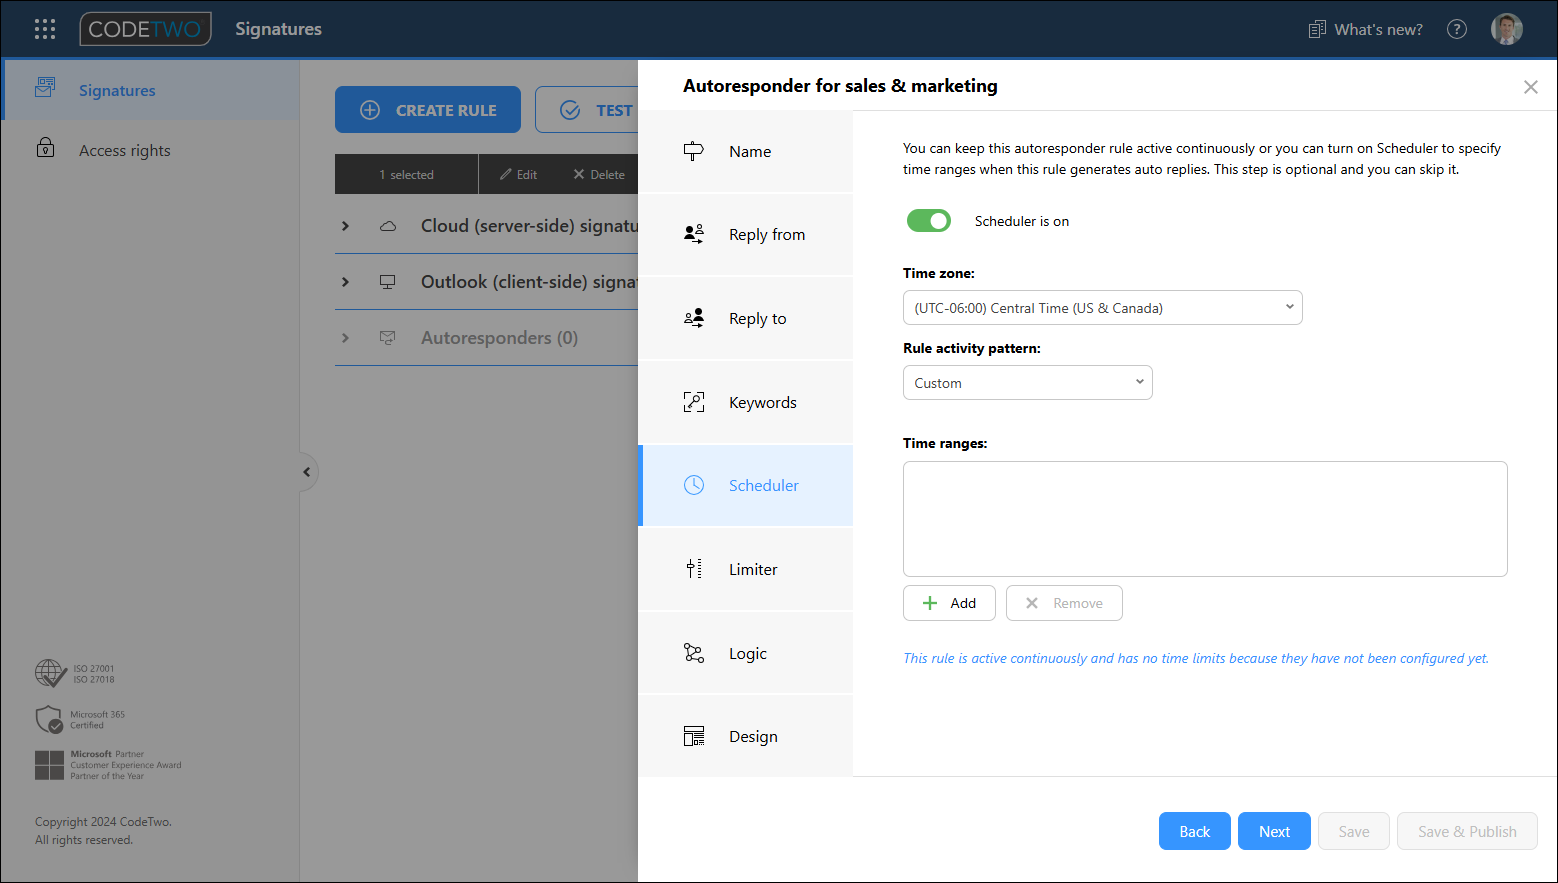
Fig. 6. The Scheduler step. Additional options appear once the feature is enabled.
In the Limiter step, you can define the number of auto replies sent to the original sender per a specified time period. By default, the Limiter feature is enabled and set to limit replies to 1 message per day (Fig. 7.).
Autoresponder has a built-in internal security mechanism that identifies and prevents most common email loop scenarios. Still, we don't recommend turning Limiter off to avoid generating unwanted emails in your end users' mailboxes (e.g. in a scenario, where your automatic replies trigger other auto-replies, such as NDRs, on the other side).

Fig. 7. The Limiter step with its default settings.
The Logic step (Fig. 8.) allows you to decide what the software should do if a particular rule is (or is not) applied. These settings are useful when you configure many rules and want to create a conditional rule flow, or when you send multiple auto replies. Learn more
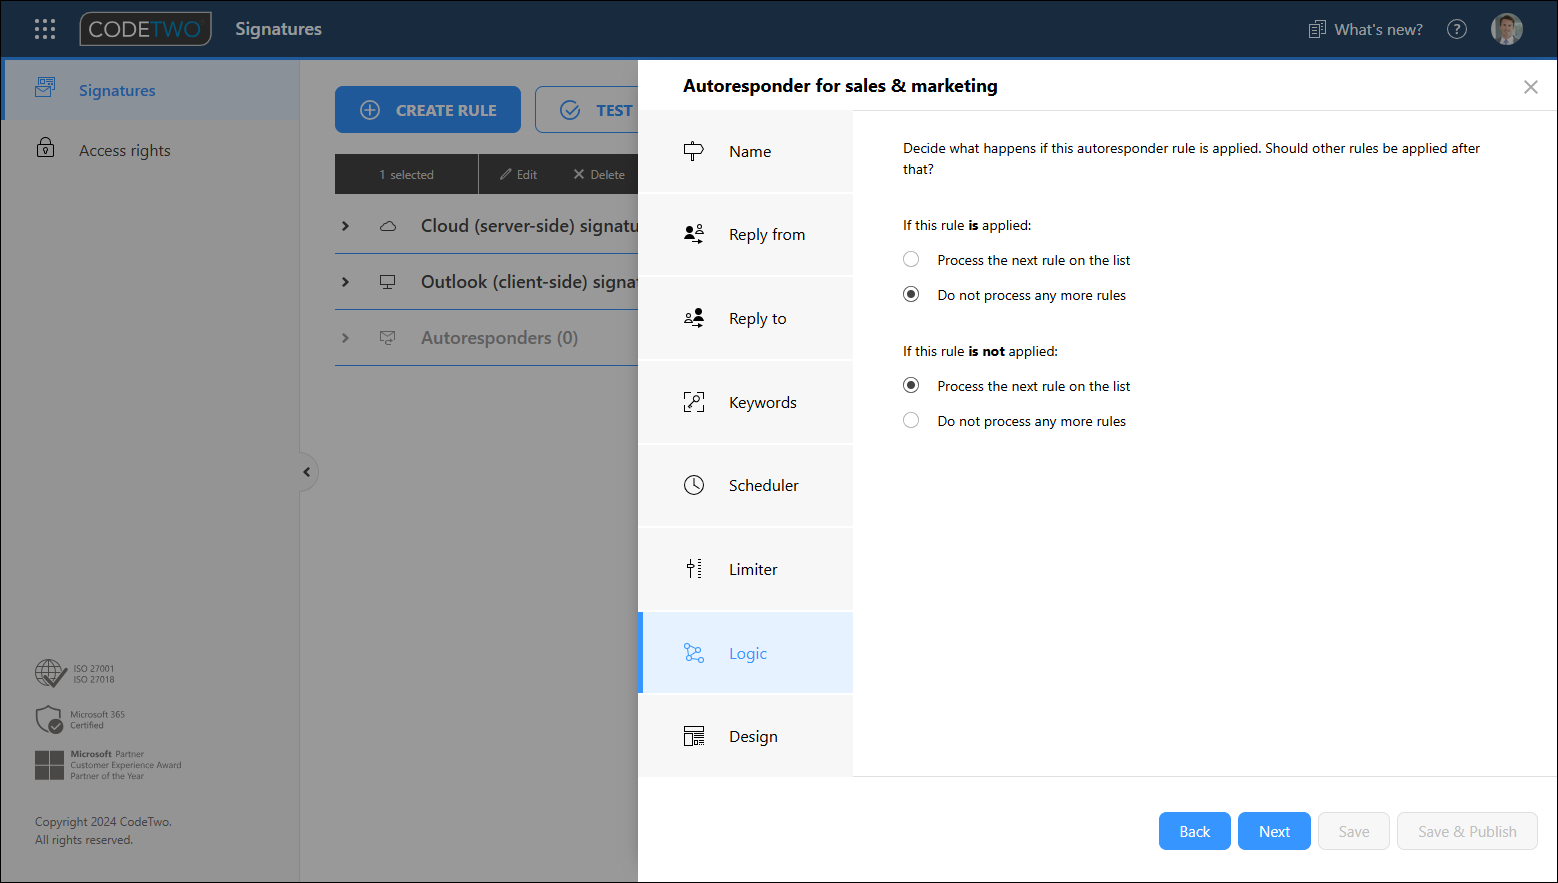
Fig. 8. The Logic step.
Proceed to the Design step to compose the template for your auto-reply message. By default, auto replies are sent from original recipients to original senders and keep the original email subject. You can change this behavior here as well.
The From field (Fig. 9.) defines who appears as the sender of your auto-reply message. In other words, if user X receives an email and it triggers the autoresponder rule, the auto reply can be sent with that original recipient (user X) or any other email address in the From field (see the Important info below for additional info). You can type an email address directly in this field or click Select and choose:
- Original recipient (default setting),
- Email address and type any email address,
- User (inside organization) and select a specific mail-enabled user from your Microsoft 365 tenant,
- Group (inside organization) and select a mail-enabled group from your Microsoft 365 tenant.
Although you can provide any email address in the From field, it is highly recommended to specify the email address of an existing mailbox in your organization. Otherwise, auto replies sent from a non-existent mailbox, e.g. [email protected], can be either rejected or considered as spam by mail servers.
If your auto-reply message template contains placeholders, they will be replaced with data taken from Entra ID (Azure AD) attributes of the mailbox specified in the From field, NOT the data of the original recipient. Group mailboxes are missing certain types of attributes, like First/Last name, so take that into consideration when designing a template for your reply message. Learn more about placeholders
Note also that an automatic reply is always sent from the primary email address. So, if you set up an autoresponder rule for alias addresses (see how to do that) and want the alias to show in the From field of the auto reply, you just need to enter the alias address in the From field in the Design step of your autoresponder rule (see Fig. 9.).
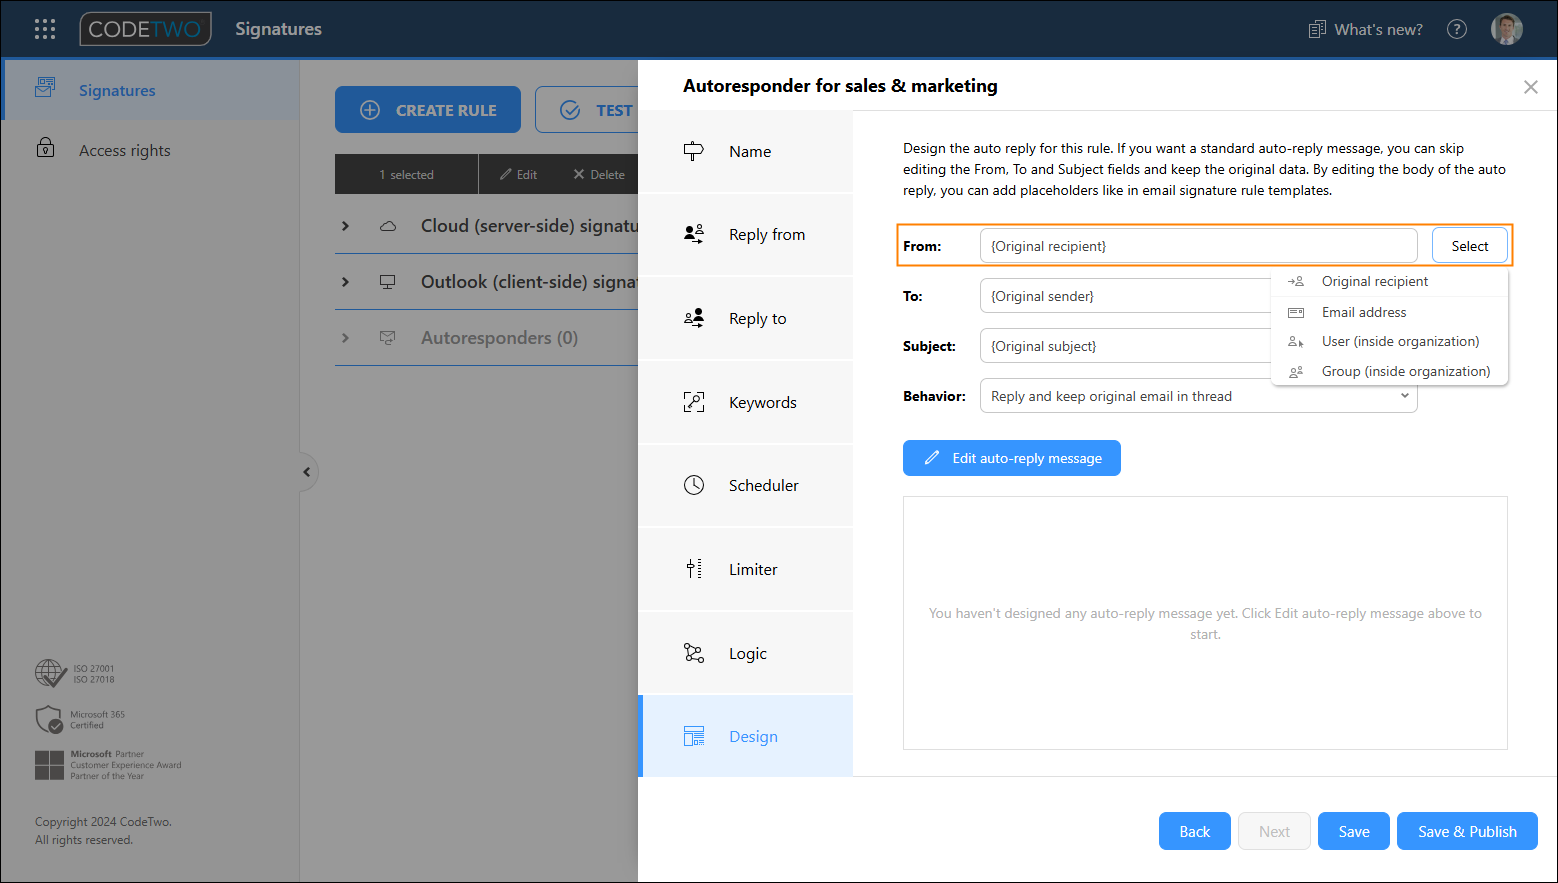
Fig. 9. The From field is where you specify the sender of your auto-reply message.
The To field (Fig. 10.) defines the recipient(s) of your auto-reply message. You can add multiple recipients. You can use the Cc and Bcc buttons (Fig. 10. A) to define the recipients of your auto-reply message that will be added in the CC and BCC fields of the reply message. Type email addresses directly in these fields or click Add and choose:
- Original sender (default setting),
- Email addresses and type any email address,
- Users (inside organization) and select specific mail-enabled users from your Microsoft 365 tenant,
- Groups (inside organization) and select mail-enabled groups from your Microsoft 365 tenant. Note: the auto reply will be sent only to the email address of the group, not to its members. See this article to learn how to change that and how to configure groups in Microsoft 365 to receive emails sent by Autoresponder.
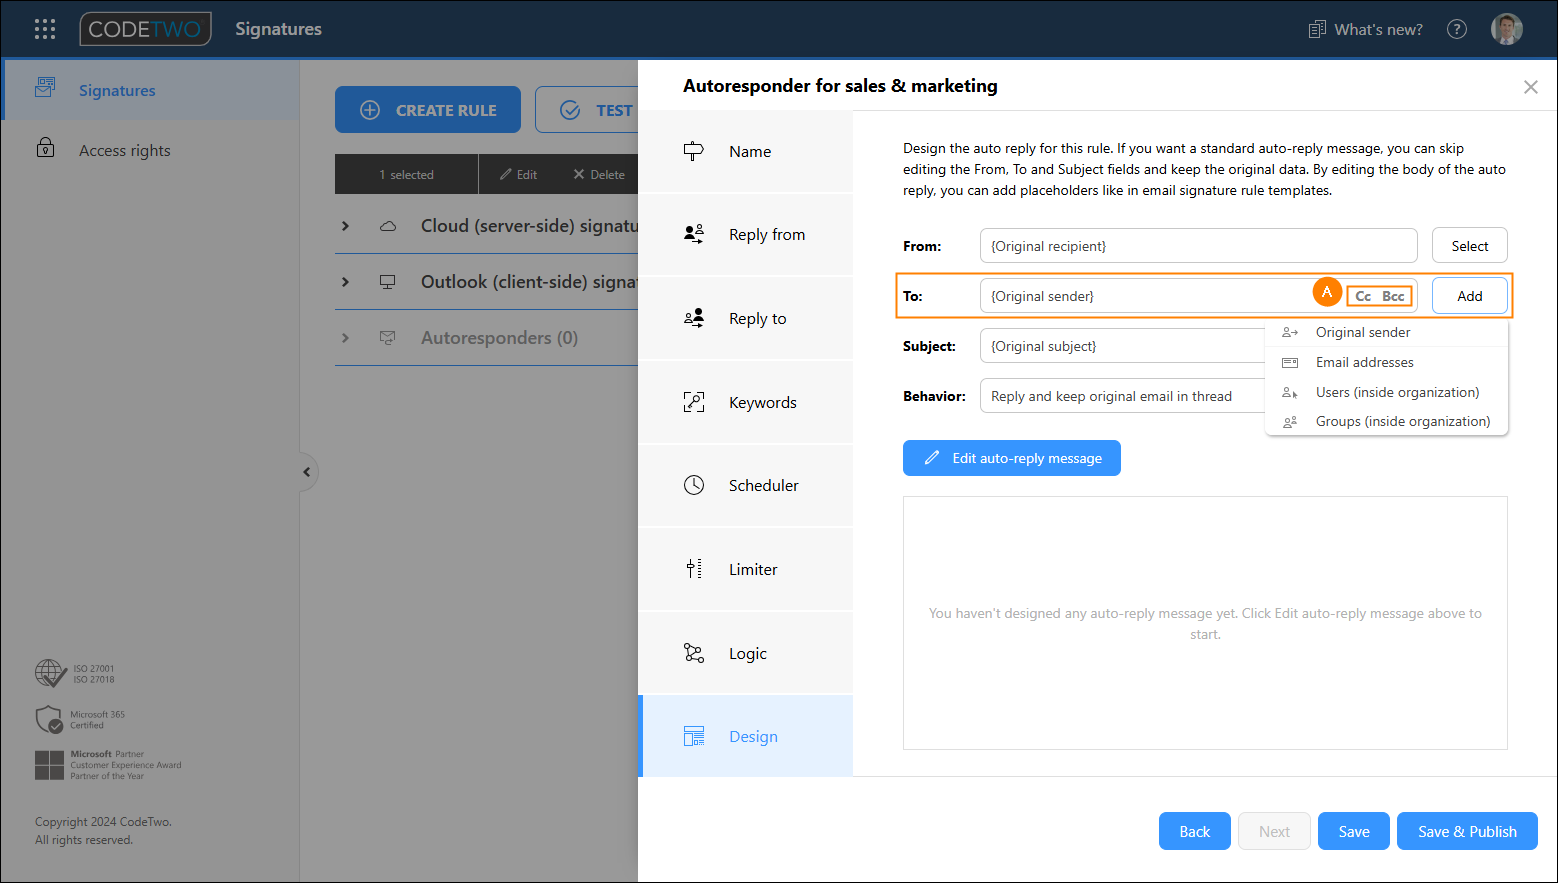
Fig. 10. The To, Cc and Bcc fields are where you specify the recipients of your auto-reply message.
The Subject field (Fig. 11.) lets you modify the subject of your auto-reply message. You can click Add to use different Message Sender and Message properties placeholders.
Important
The Message Sender type placeholders are replaced with data taken from Entra ID (Azure AD) attributes of the mailbox specified in the From field.
Subject example 1
If the original email subject is Get started with CodeTwo, and you customize the Subject field in the Design step in the following way: {Original subject} Autoresponder, the auto-reply’s subject will look as follows: Get started with CodeTwo Autoresponder.
Subject example 2
If you modify the Subject field in the Design step in the following way: {Display name} sent you a message, the {Display name} placeholder will be replaced with the display name attribute defined for the mailbox specified in the From field in the Design step.
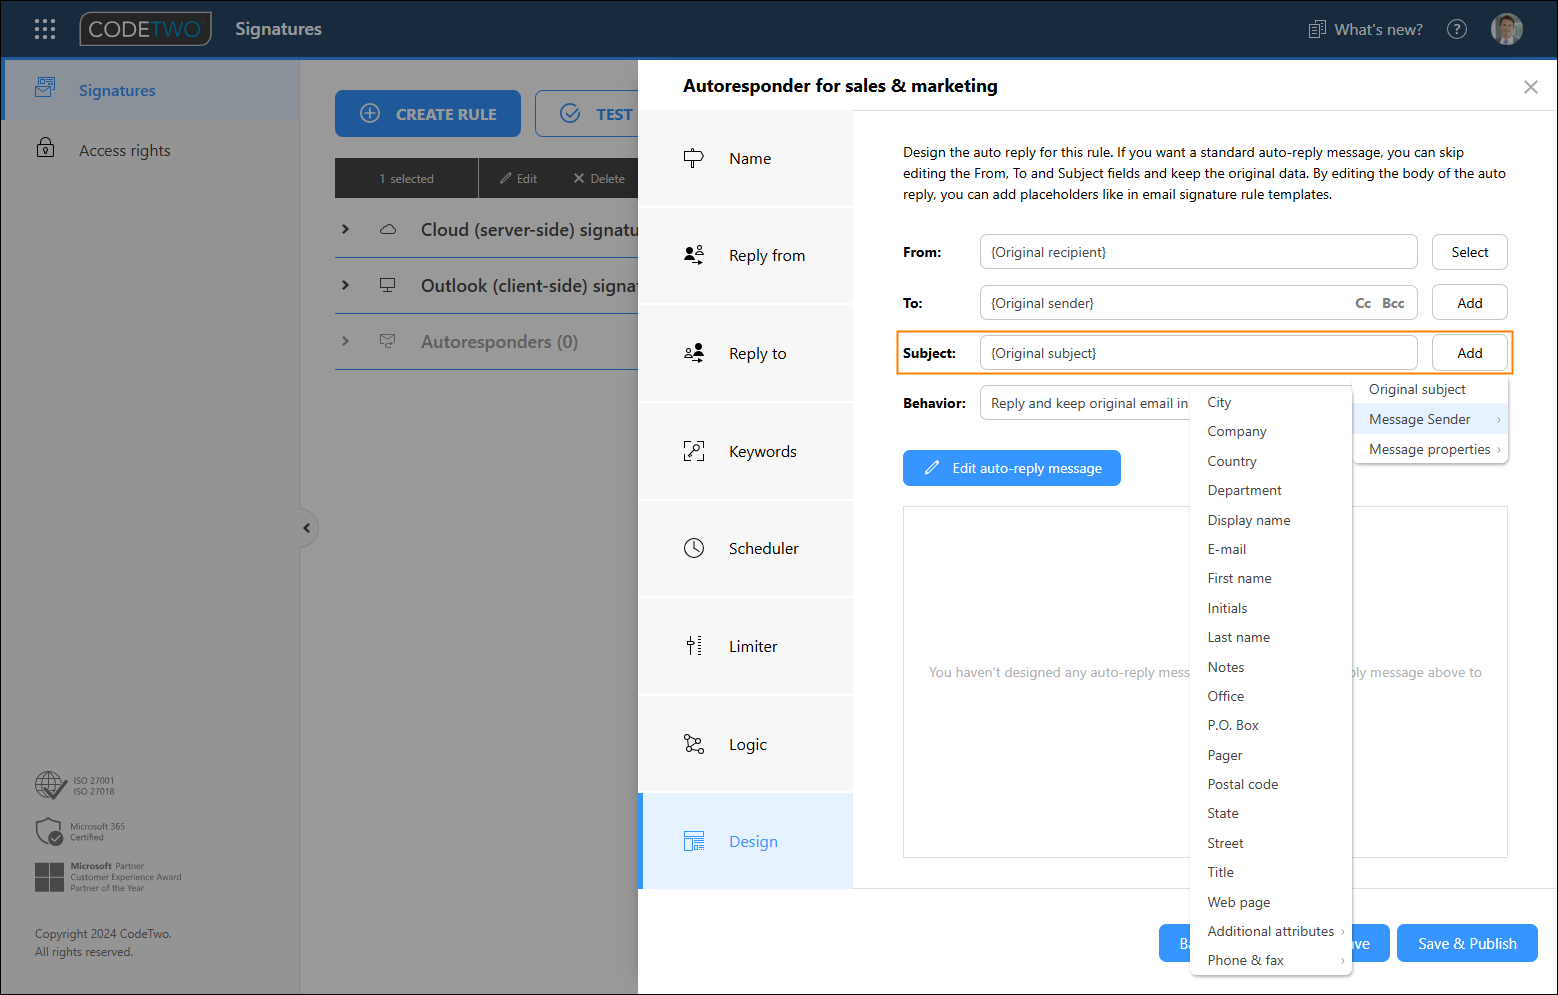
Fig. 11. The Subject field is where you specify the subject of your auto-reply message.
Use the Behavior option (Fig. 12.) to specify what to do with the original email (that triggered the auto reply) when the auto-reply message is sent:
- keep it in the email conversation (thread), below the auto reply,
- remove it from the conversation,
- remove the original email from the conversation but add it to the auto-reply message as attachment.
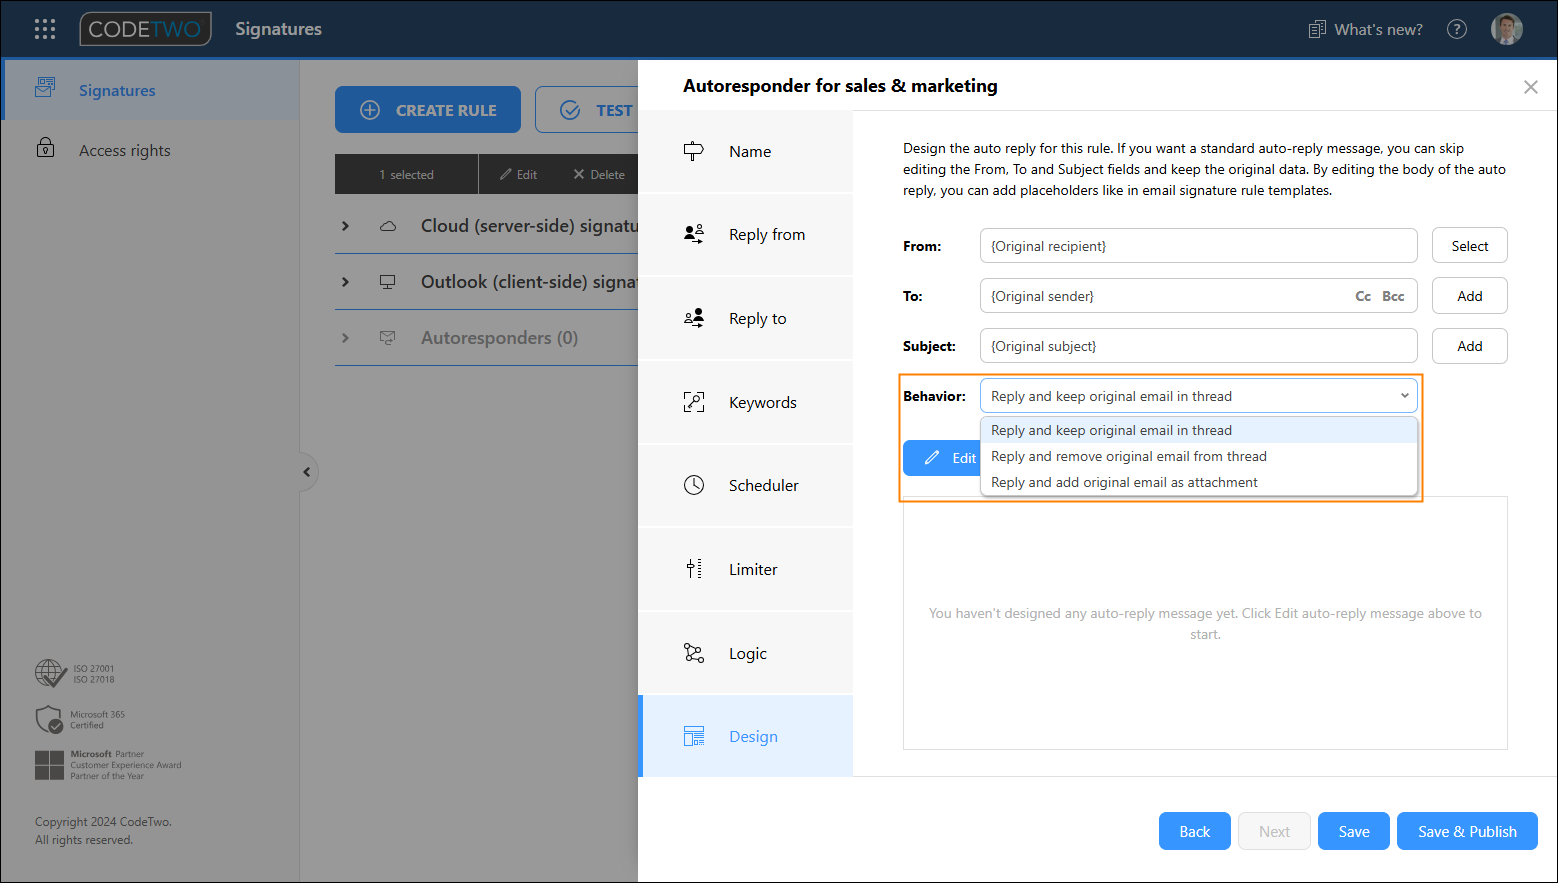
Fig. 12. These options let you choose what happens to the original message when your auto reply is sent.
To create or modify the auto-reply message template for your autoresponder rule, click Edit auto-reply message. This will open a built-in template editor. In the example shown in Fig. 13., we created a reply message based on one of the built-in templates available in the editor. Designing auto-reply templates is very similar to designing signature templates. Read this quick guide to learn how to create an email signature template step by step
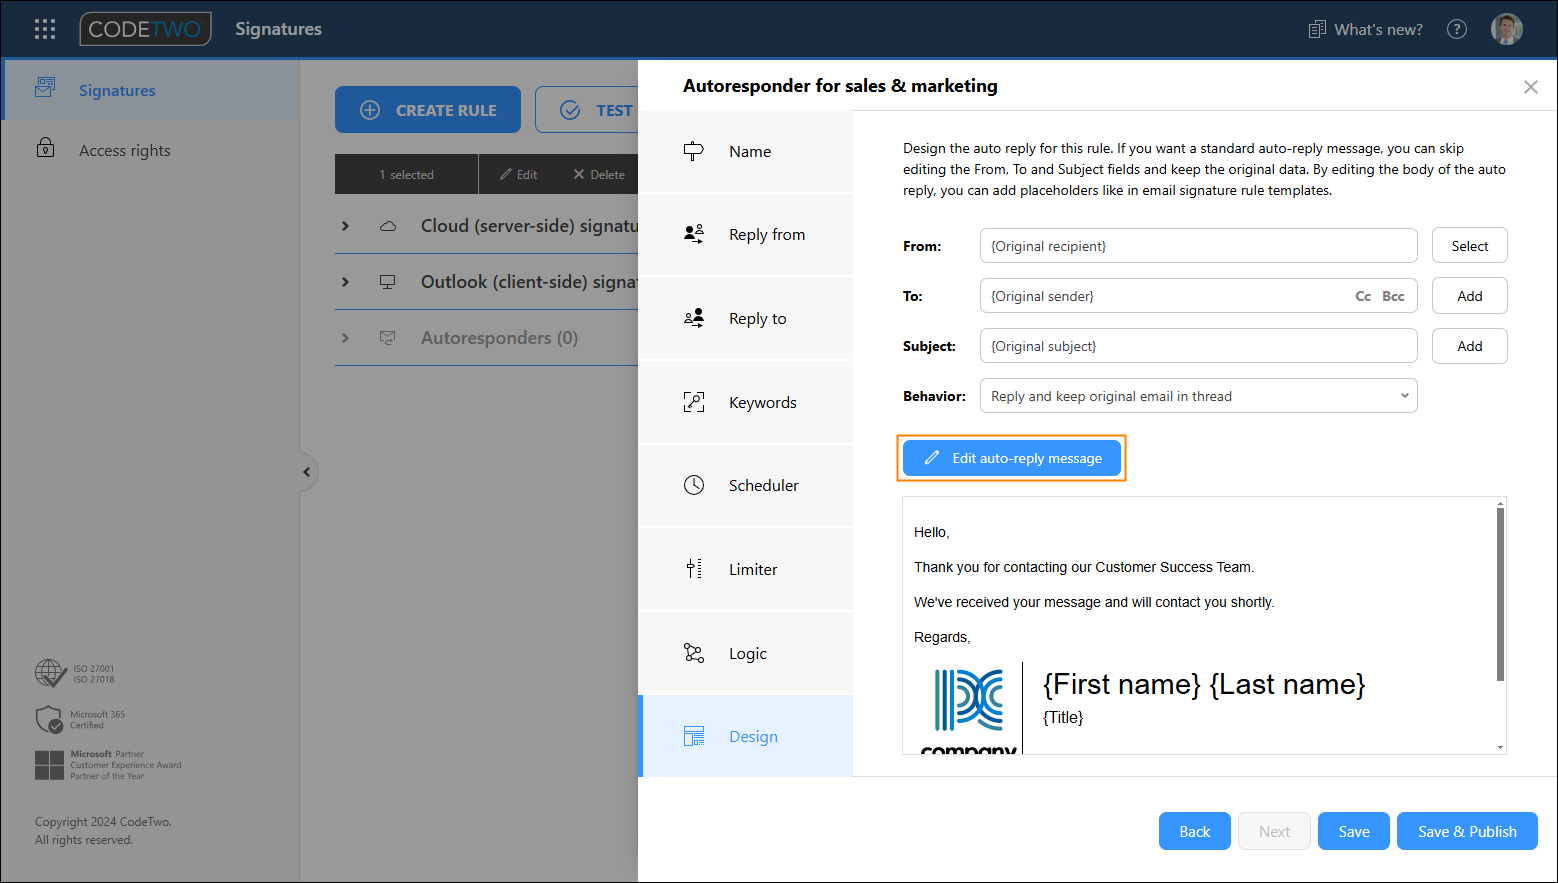
Fig. 13. The Edit reply message button lets you edit the template of your auto-reply message.
Finally, save your autoresponder rule by using the Save & Publish button. Once the rule is published, CodeTwo service will send auto-reply messages from your organization according to your settings.
See next
Examples of using automatic replies
In this article