Conditional placeholders
Placeholders are used in templates to customize email signatures or automatic replies based on the sender's information. In CodeTwo Email Signatures 365, there are two types of placeholders: regular and conditional.
Regular placeholders automatically fill in with the email sender's details (like job title and department) pulled from Entra ID / Azure AD. For example, the {First name} placeholder will display the sender's first name. If the data is not available in Entra ID, the placeholder will be empty, but you can avoid empty lines in your template by using RT tags. Regular placeholders can also include message details, a QR code, and more. See all available placeholders
Conditional placeholders change their content based on the conditions you set. This allows you to control what appears in a signature or automatic reply in place of the placeholder (this can be text, images, HTML code) depending on the email sender’s contact details, group membership, and more. Regular placeholders can be used within conditional placeholders as well.
You can use conditional placeholders to:
- Create a modular signature with dynamic (variable) content that changes based on the sender's information. See instructions
- Use an alternative phone number in a signature if the sender's phone number is not listed in Entra ID. See instructions
- Include marketing banners in different languages based on the sender’s Country attribute (as provided in Entra ID).
- Manage branding elements used in multiple signatures, like a company logo or banner, from a single place.
- Display a different office address based on the sender’s City attribute.
- Add additional/custom information to the signature for certain users.
- Insert generic contact details when specific attributes are missing in Entra ID, instead of leaving placeholders empty (or using RT tags). And more!
Each conditional placeholder can have multiple conditional values, each consisting of a condition based on the sender's Entra ID attributes and a placeholder value that will replace the placeholder (Fig. 1.). The email signature will include the first conditional value whose conditions are met. If no conditions are satisfied, the default value is used.
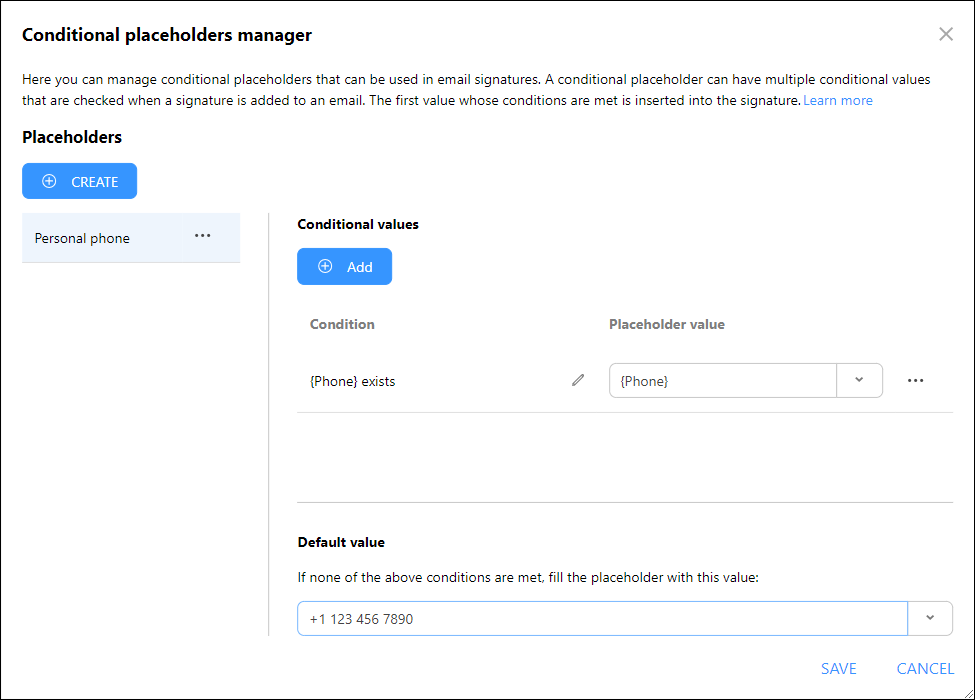
Fig. 1. This conditional placeholder inserts a generic phone number if the sender's phone number is not listed in Entra ID.
Follow the links below to learn how to:
- Create a new conditional placeholder
- Create a conditional value for a placeholder
- Insert a conditional placeholder
- Edit a conditional placeholder
Create a new conditional placeholder
Conditional placeholders are created and managed in the Conditional placeholders manager. To open the manager, go to the template editor, click Conditional placeholder on the ribbon and select Manage (Fig. 2.).
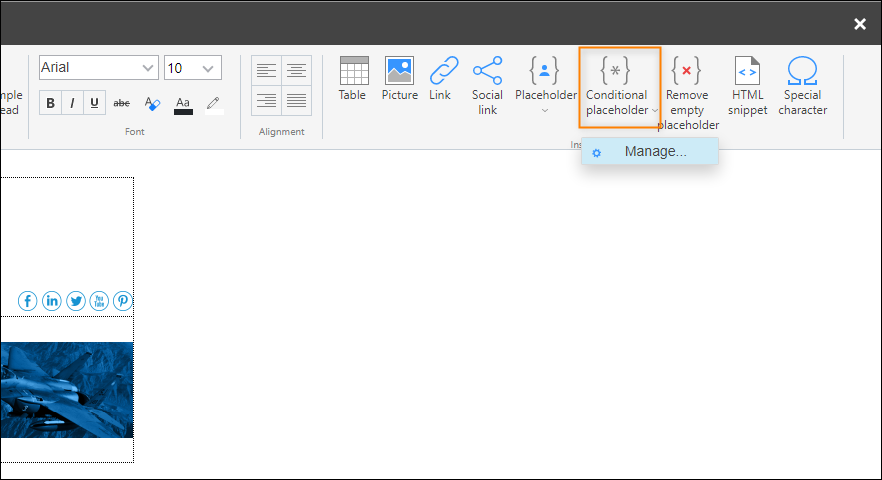
Fig. 2. Opening the Conditional placeholders manager.
Click CREATE (Fig. 3.) to create a new conditional placeholder. Provide a unique name for the placeholder and click OK. The program will notify you if you enter a name that is already used by another placeholder (either regular or conditional).
Conditional placeholders can be used across multiple templates. Because of their unique name, once you update a conditional placeholder in one template, the change will apply to all templates that include this placeholder (this does not apply to legacy conditional placeholders). That's why it's not possible to change the name of your conditional placeholders. However, you can use the Clone option (see Fig. 4.) to create a copy of any existing placeholder and name it differently.
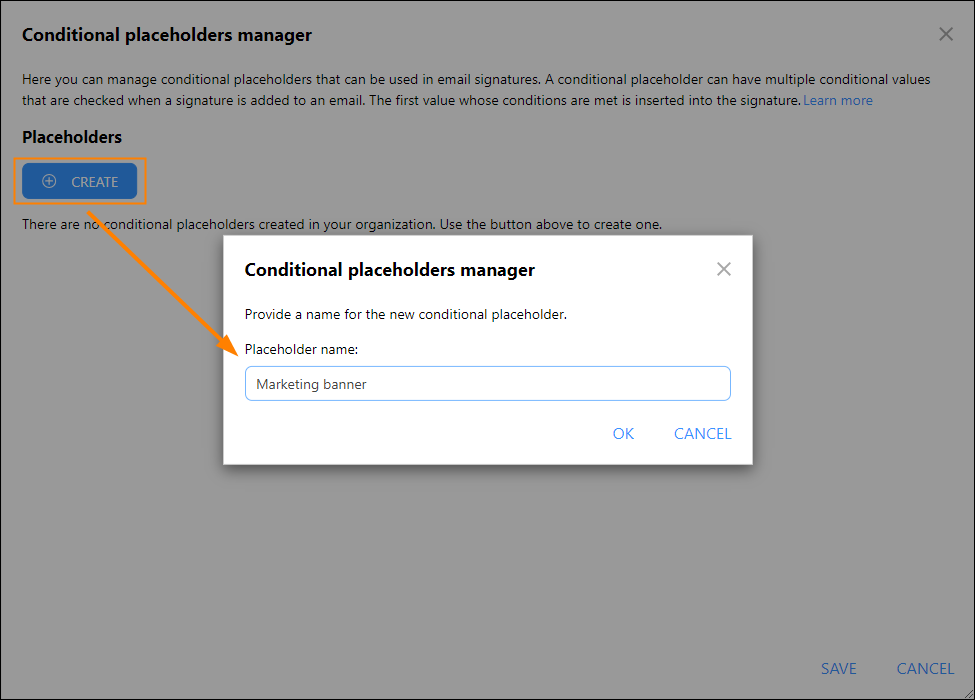
Fig. 3. Creating a new conditional placeholder.
To delete a conditional placeholder, click the ellipsis (...) button next to its name, select Delete (Fig. 4.) and then click YES, REMOVE THIS PLACEHOLDER to confirm. Note that if this placeholder is used in other templates, it will stop working and will be replaced with a blank space in emails / automatic replies.
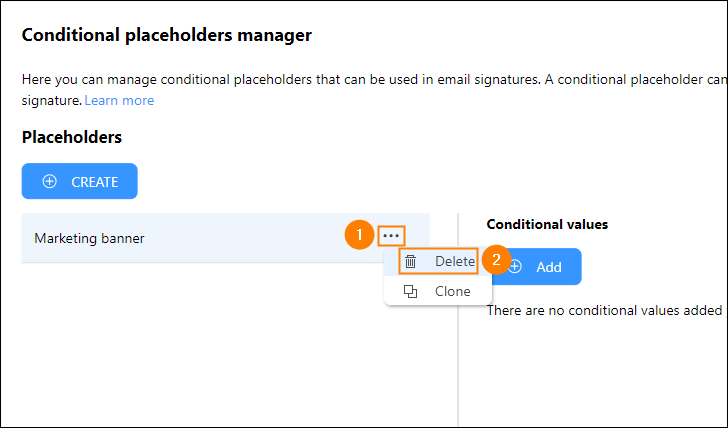
Fig. 4. Deleting a conditional placeholder.
Create a conditional value for a placeholder
A conditional placeholder contains one or more conditional values that replace the placeholder when an email or automatic reply is sent. To create a new conditional value, click Add (Fig. 5.).
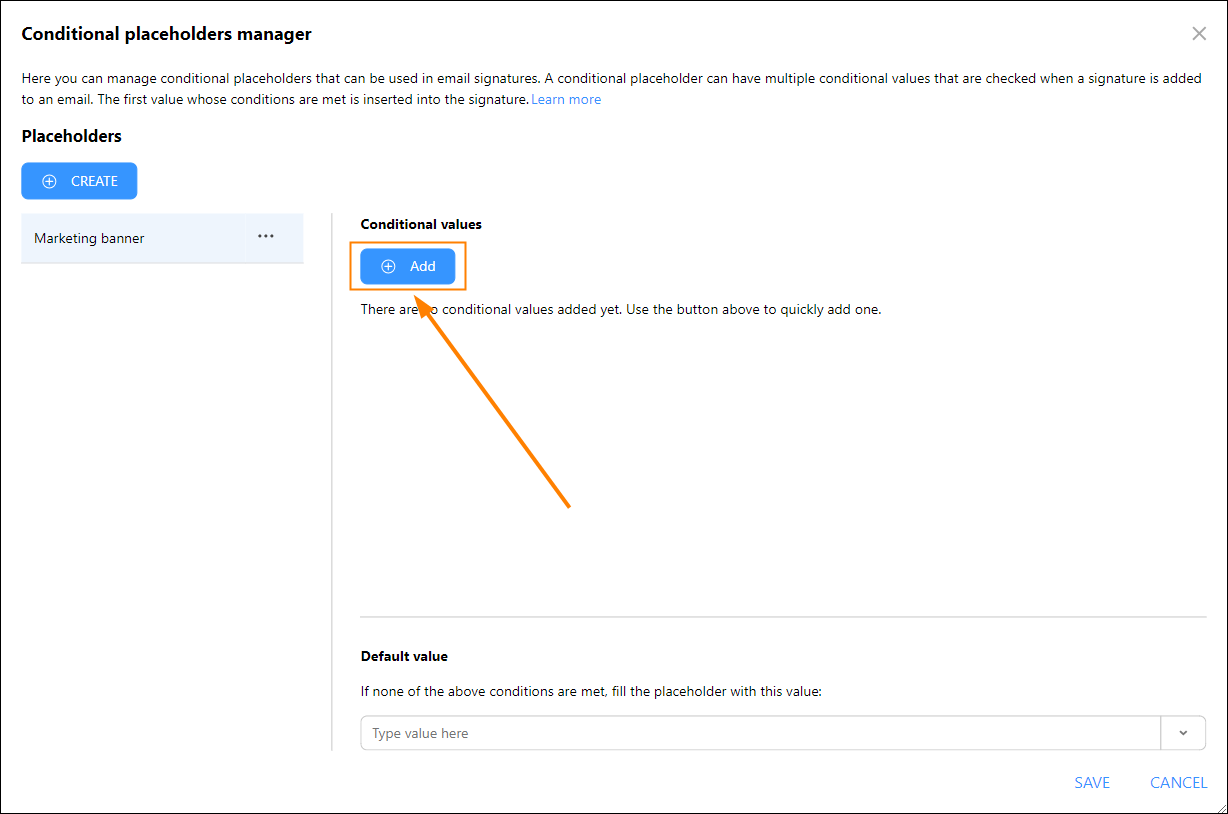
Fig. 5. Creating a new conditional value.
The order of conditional values is important. The program checks them from top to bottom in the Conditional values list and replaces the placeholder with the first value whose conditions are met. To change the position of a conditional value, click the ellipsis (...) button next to it and select Move up or Move down (Fig. 6.).
You can use this feature to your advantage. Check this example of use for more details.
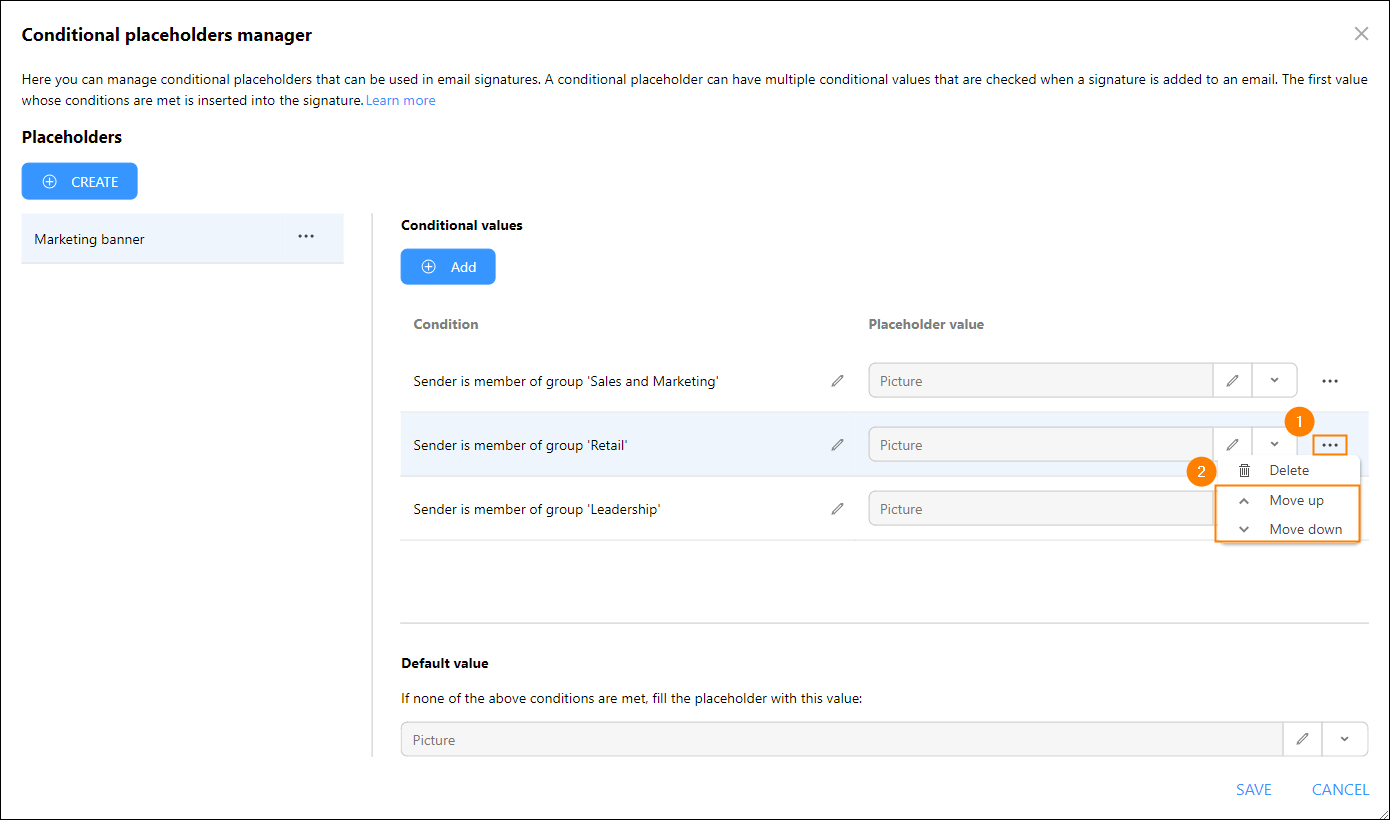
Fig. 6. Changing the order of conditional values.
To delete a conditional value, click the ellipsis (...) button next to it and select Delete (as shown in Fig. 6.).
Now you need to define conditions and values for your conditional value.
Define conditions
To define a condition for a conditional value, click the edit (![]() ) button to open the Placeholder value conditions builder (Fig. 7.).
) button to open the Placeholder value conditions builder (Fig. 7.).
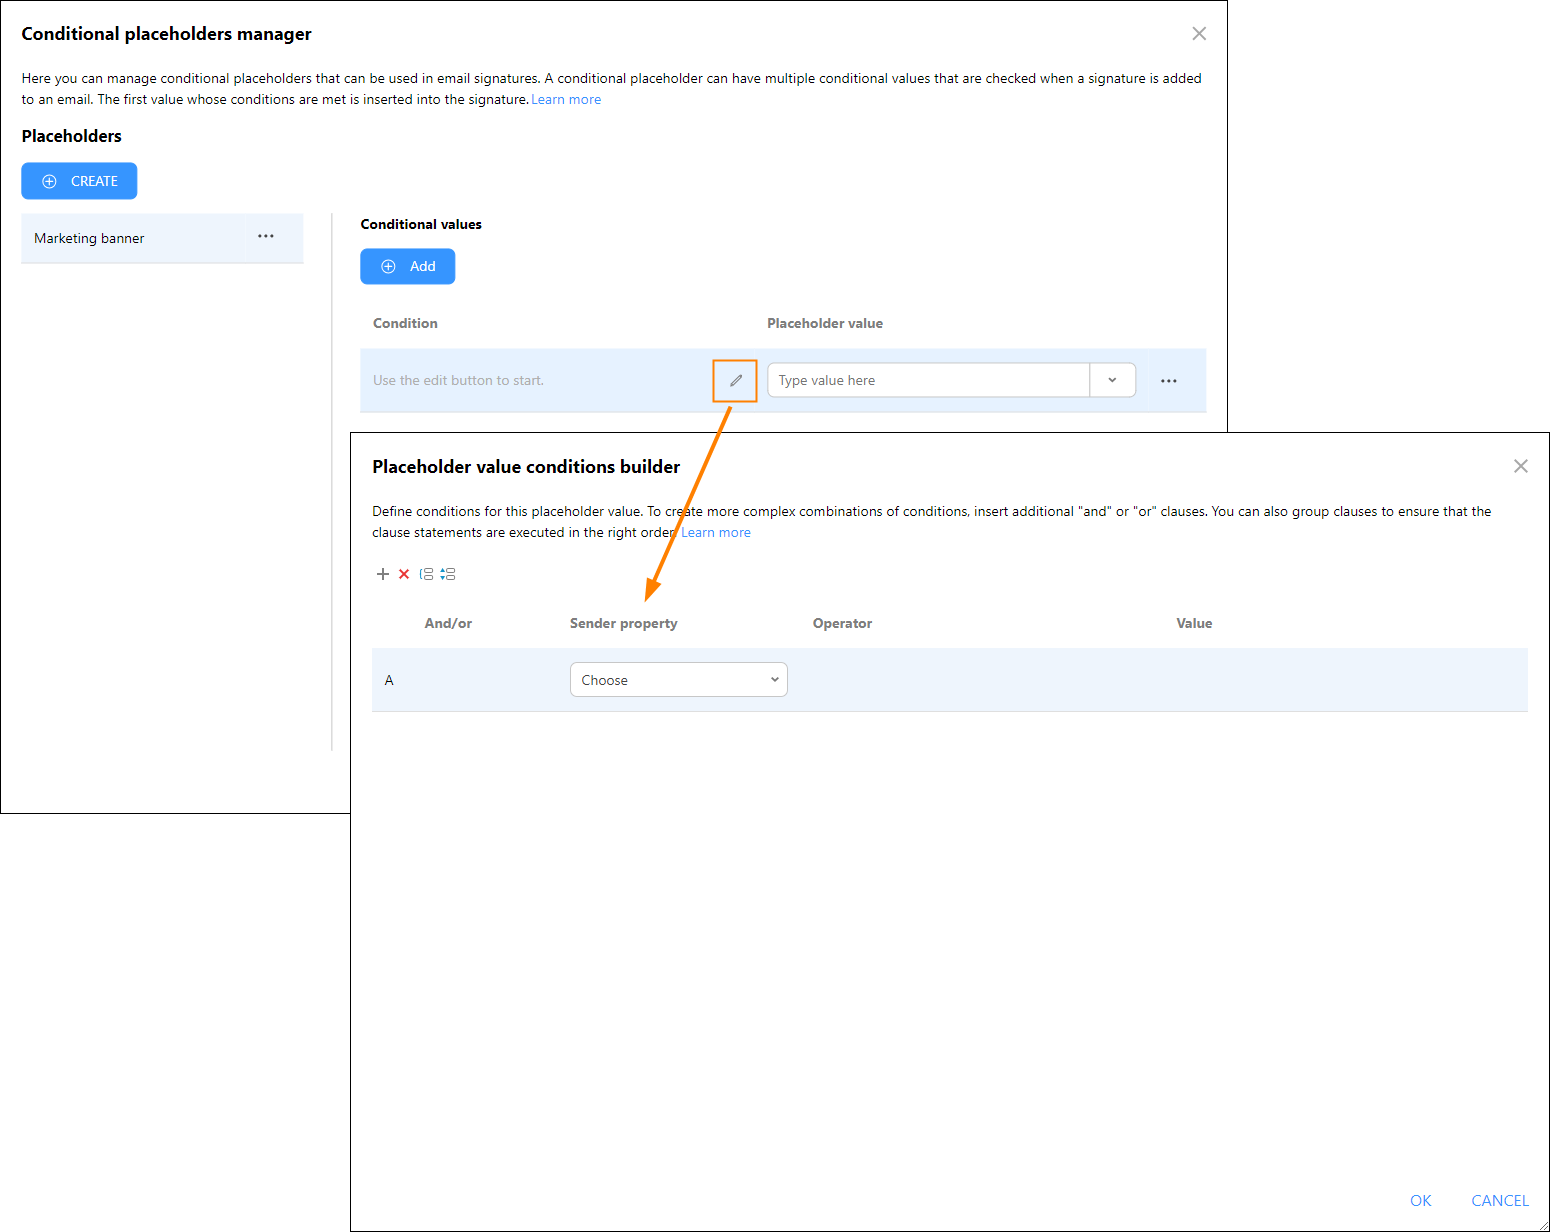
Fig. 7. Opening the Placeholder value conditions builder.
You can build value conditions based on:
- the sender’s properties (email address, group membership, etc.),
- Entra ID (Azure AD) attributes (City, Company, Phone number, etc.),
- Exchange Online custom attributes (including CustomAttribute1-15),
- attributes synced from on-prem Exchange Server,
- CodeTwo custom attributes.
You can create complex conditions by inserting additional AND or OR clauses or by grouping clauses with the GROUP button (select multiple clauses while holding the Shift key). For hints on how to use the Placeholder value conditions builder, see the examples below.
You can configure conditions based on users included in the scope of licensed users only.
Example 1: building a simple value condition
This simple condition will be met (and the conditional value will be used) if the email sender belongs to the Sales and Marketing group (Fig. 8.).

Fig. 8. An example of a condition – the conditional value will apply to all senders that belong to the Sales and Marketing group.
Example 2: joining conditions with OR
To apply a specific conditional value only when the sender holds higher or top managerial positions (e.g. manager or director), you can build the following conditions (Fig. 9.):
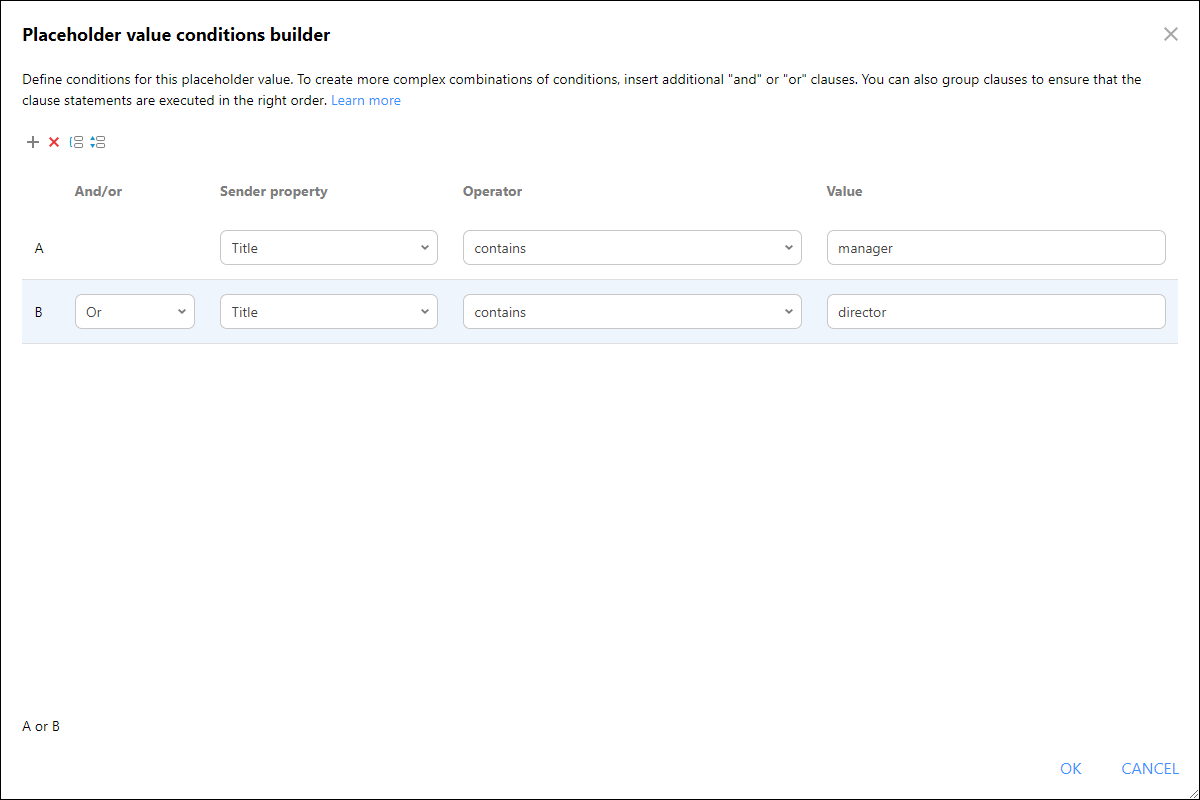
Fig. 9. An example of two independent conditions – the conditional value will apply to all senders whose job title includes the word manager or director.
Example 3: building complex conditions
The combination of conditions shown in Fig. 10. will apply the conditional value to the senders that occupy a senior job position and are members of the Sales and Marketing group as well as to the user whose email address is [email protected] (this user doesn't need to hold a senior position or belong to the Sales and Marketing group).
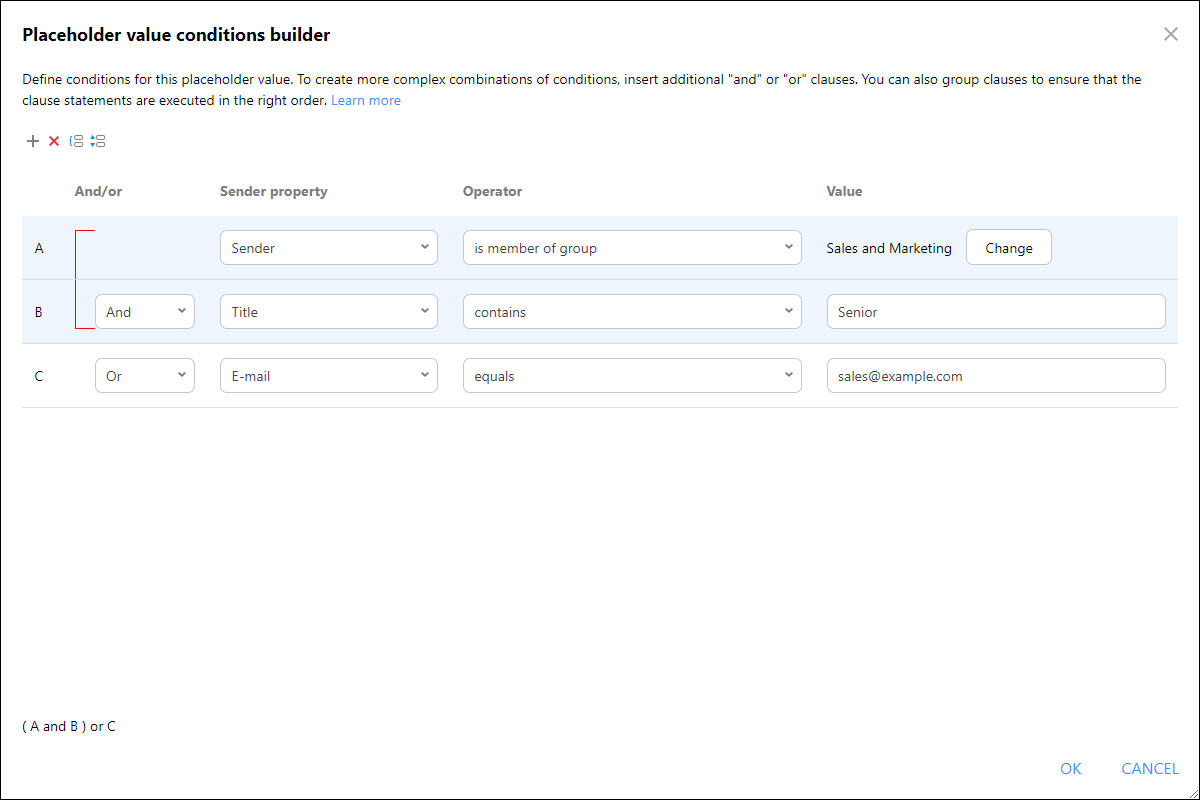
Fig. 10. An example of three conditions – the conditional value applies to all senders whose job title includes the word senior and who belong to the Sales and Marketing group as well as those whose email address is [email protected].
Define placeholder values
A placeholder value is what replaces the placeholder in an email signature / automatic reply, provided that the related conditions are met. If none of the conditions set up for a placeholder are met, the default value will apply.
Click the ![]() button in the Placeholder value column (or under Default value). This opens a drop-down menu (Fig. 11.) with all the available contents you can use.
button in the Placeholder value column (or under Default value). This opens a drop-down menu (Fig. 11.) with all the available contents you can use.
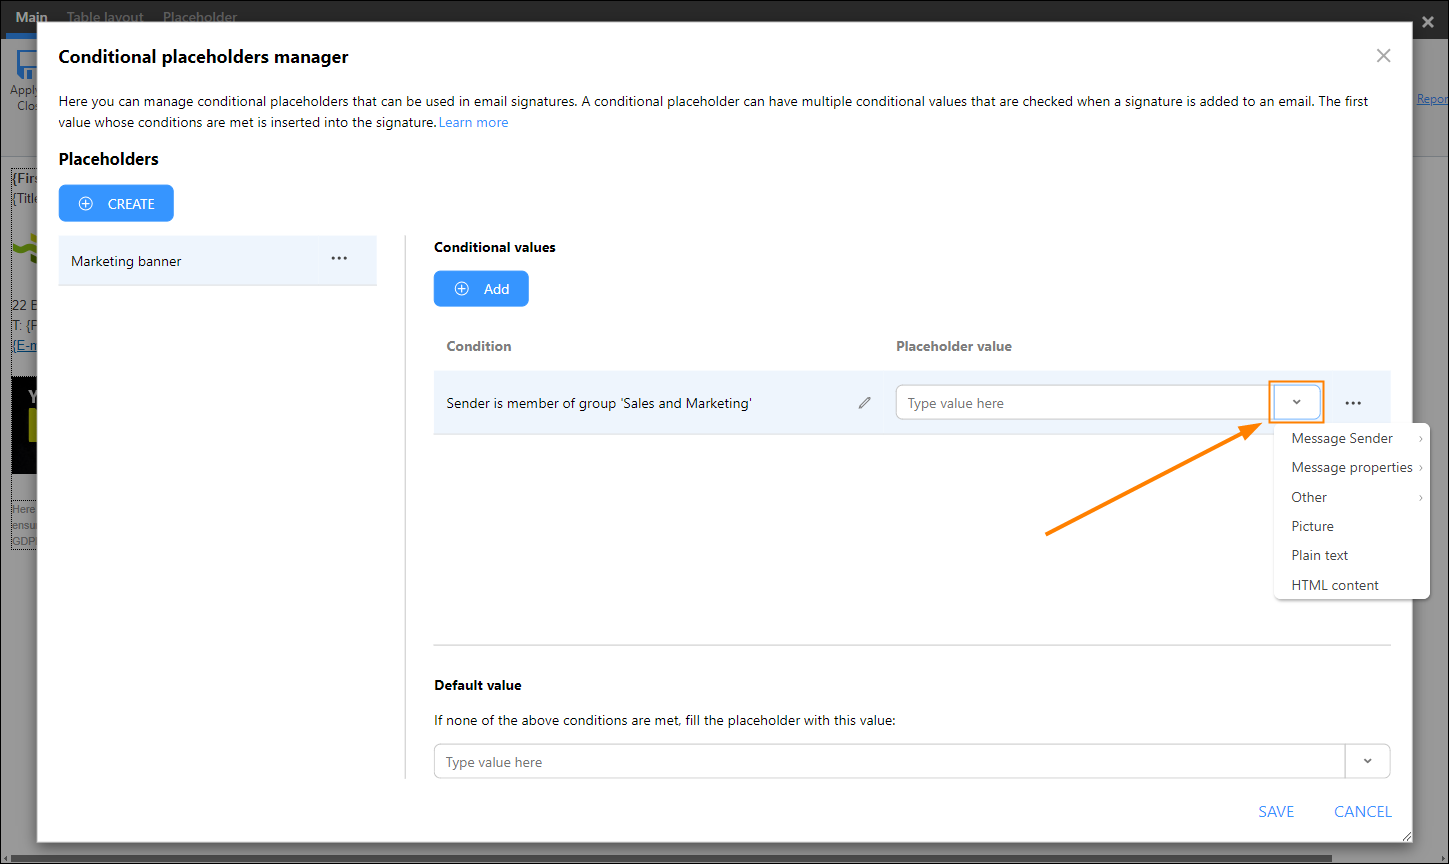
Fig. 11. A list of contents that can be used as placeholder values.
The following can be used as placeholder value:
Important
The size limit of all conditional placeholders configured for your Microsoft 365 tenant is 30 MB. Keep this in mind, especially if you plan on using embedded pictures as placeholder values, as these typically take up the most space.
You can include multiple content types within a single placeholder value (e.g., two regular placeholders, a placeholder and a picture, two pictures, etc.). However, if you plan to do so, it would be a good idea to use the HTML content option that gives you more editing options and a better view of how the placeholder value will look when added to an email signature.
Regular placeholders
Regular placeholders are grouped into three categories: Message Sender, Message properties* and Other*, as shown in Fig. 11. These placeholders include the sender’s Entra ID (Azure AD) attributes (e.g. City, Company, Phone number, etc.), as well as Message ID, Current date/time, and more. You can select multiple regular placeholders and separate them with commas, fixed text, or even use the <br> tag between them (however, the latter will change the placeholder value field to HTML content the next time you open the Conditional placeholders manager).
Learn more about regular placeholders available in CodeTwo Email Signatures 365
* Regular placeholders in the Message properties and Other categories – except for the Display name (e-mail's From field) and E-mail (e-mail's From field) placeholders – only work with cloud (server-side) signatures and auto-reply messages.
The <Placeholder> as link (e.g. E-mail as link) and QR Code image placeholders are not available in the Placeholder value drop-down menu. To use these placeholders in a conditional placeholder, use the HTML content option instead and select them by clicking Placeholder on the ribbon of the Edit HTML Snippet window (see Fig. 13.).
Picture
If you want the conditional placeholder to be replaced with an image, select Picture from the drop-down menu. This will open the same window that is used to insert images to an email signature template (learn more about the Insert picture option). After you select the image, you can use the edit (![]() ) button to change its properties (Fig. 12.).
) button to change its properties (Fig. 12.).
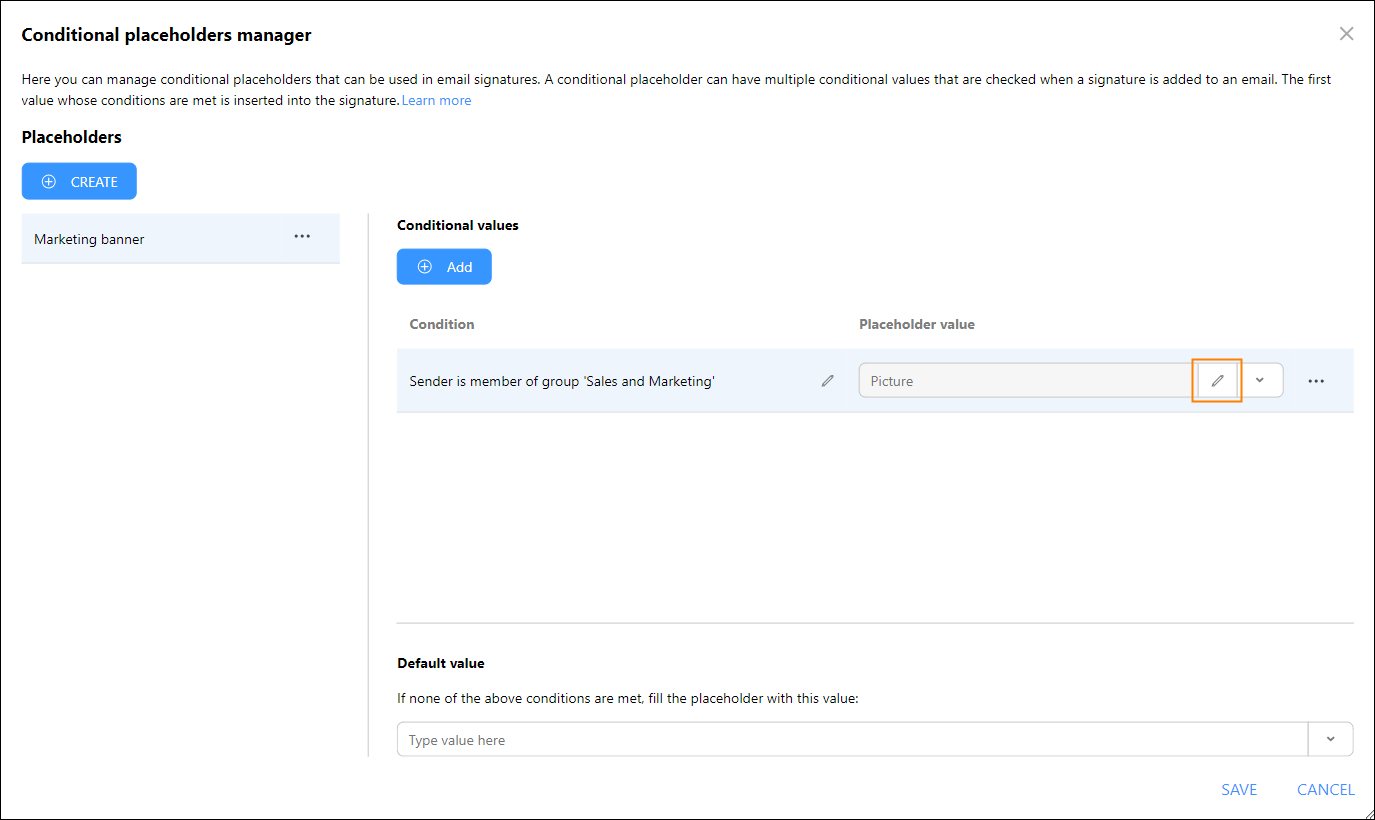
Fig. 12. You can change the picture properties by clicking the edit button.
Plain text
Select Plain text if you want to use static text as a placeholder value.
Tip
You can also use this option to reset the contents of the Placeholder value cell.
HTML content
Select HTML content to open the Edit HTML Snippet window (Fig. 13.) that looks like a simplified version of the signature template editor. This simplified editor also has most of the options used to create full-featured email signature templates.
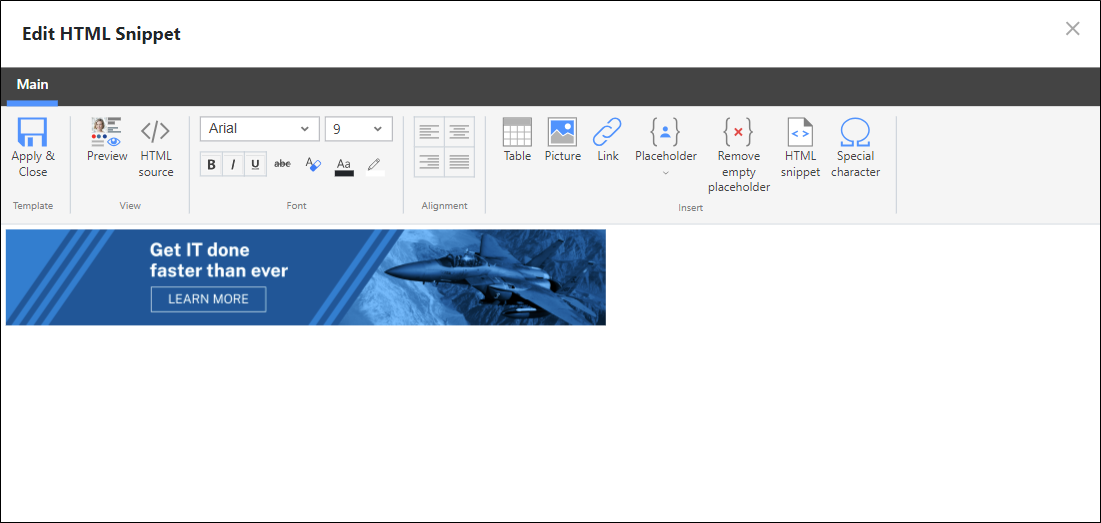
Fig. 13. The Edit HTML Snippet window is used to edit placeholder values.
If you select a different content type in the Placeholder value cell (e.g. a placeholder or picture) and then select HTML content from the drop-down menu, the previously selected content will appear in the Edit HTML Snippet window as well (Fig. 14.). You can use the available tools to make additional changes to your value (e.g. apply bold formatting, change font size or color, etc.).
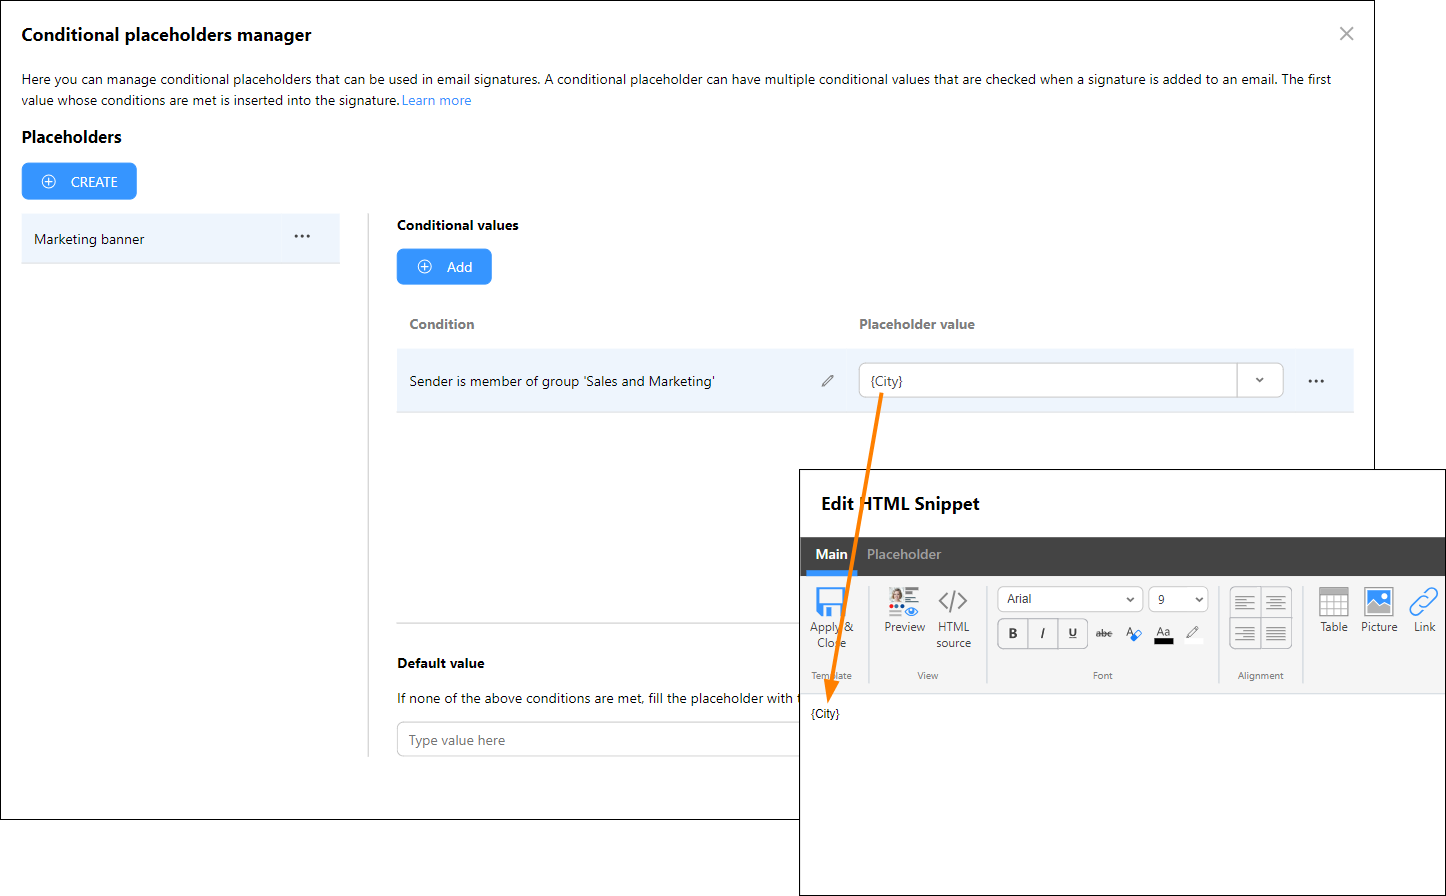
Fig. 14. All placeholder values can be further edited in the Edit HTML Snippet window.
After you finish configuring conditional values for your placeholder, you should also define the Default value (the same way as described here). Once done, click SAVE (Fig. 15.) to apply your changes and make the placeholder available for use in the template editor.
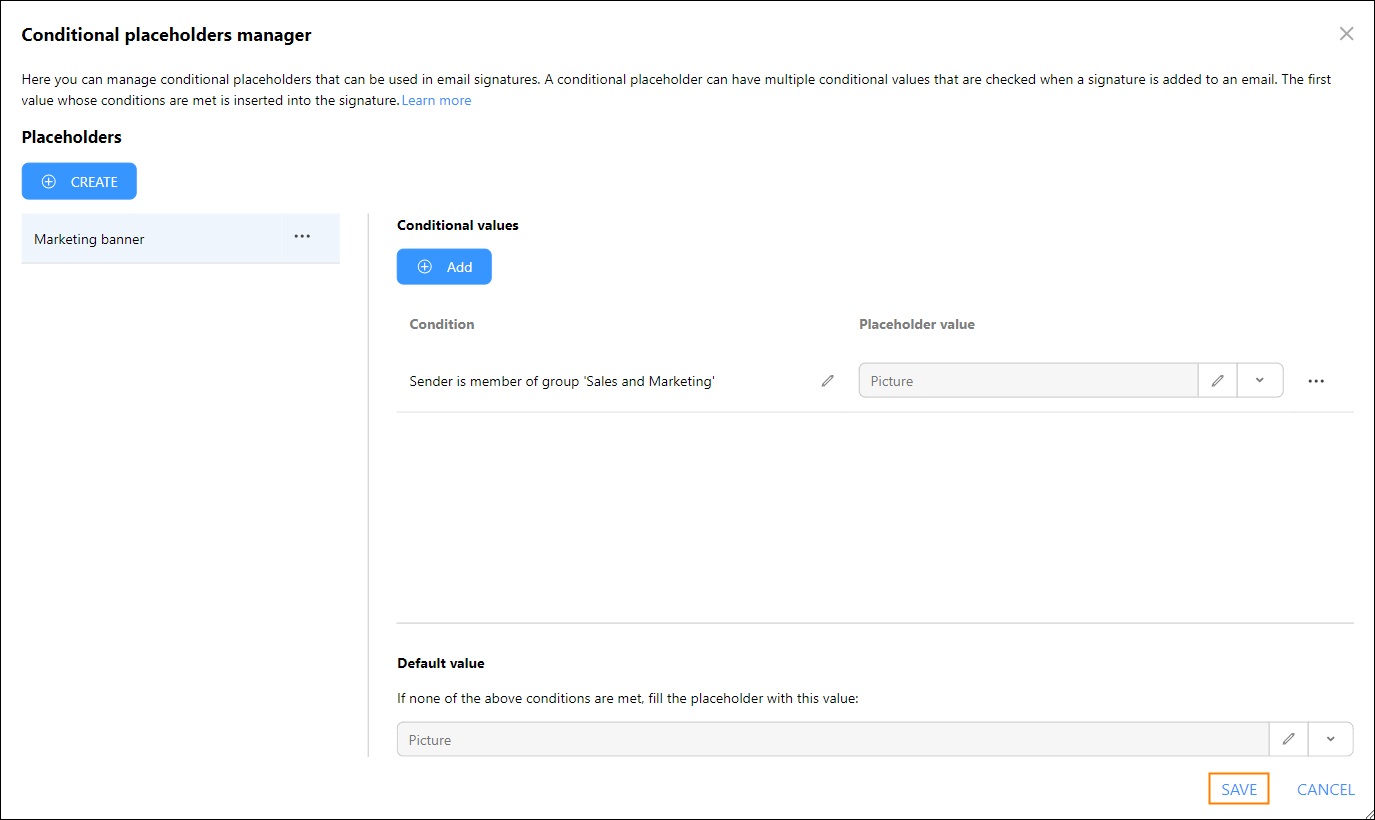
Fig. 15. Saving a conditional placeholder.
The program will notify you when it finds any issues with your placeholder (e.g. a missing default value, as shown in Fig. 16.). However, if you left the value field blank on purpose, you can click SAVE CHANGES ANYWAY. Note that sometimes you won't be able to save your changes until you fix all issues.
Tip
Make sure to use RT tags together with your conditional placeholder. That way, if the placeholder has no value, the program can remove the empty space from the email signature. Learn more about the Remove if blank feature
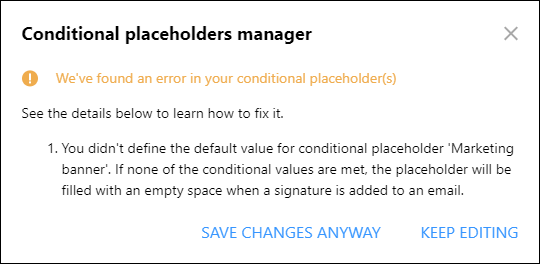
Fig. 16. A validator checks if there are any problems with your conditional placeholders.
Insert a conditional placeholder
After you created a conditional placeholder, you can insert it into your email signature or auto-reply message template. To do so, first place the cursor in the signature where you want to insert the placeholder. Next, select Conditional placeholders on the ribbon and click the name of the conditional placeholder you want to use (Fig. 17.).
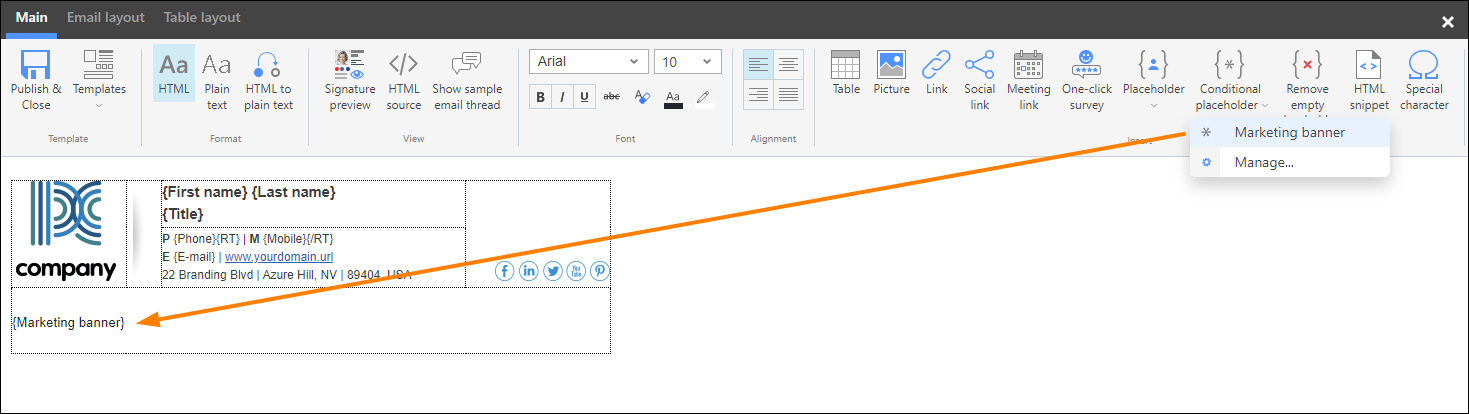
Fig. 17. Inserting a conditional placeholder into a signature template.
You can use the Signature preview functionality to see how the conditional placeholder’s value changes as you select different users (provided that different conditions are met).
Edit conditional placeholders
You can edit all your conditional placeholders in the Conditional placeholders manager (see Fig. 1.). To edit a specific placeholder that's already added to your template, you can also right-click it and select Edit placeholder (Fig. 18.). This will open the Edit conditional placeholder window, where you can change the placeholder's conditions and values.

Fig. 18. Editing a conditional placeholder by using the Edit placeholder option from the shortcut menu.
Once you make your changes, click OK to apply them. Your changes will be applied to all templates (signatures and automatic replies) that include this placeholder.
Legacy conditional placeholders
The above information about editing placeholders does not apply to legacy conditional placeholders. If you still use them in your templates, refer to this section to learn how to edit them.
Examples of use
How to insert different information to an email signature if a certain Entra ID (Azure AD) attribute is missing
By default, if a placeholder cannot be replaced with data pulled from Entra ID (e.g. since that data is missing), an empty space will appear in its place in an email signature or automatic reply (this empty space can be easily removed by using the Remove if blank feature). However, by using conditional placeholders, you can instead replace that placeholder with different data, e.g. a fixed value or information taken from another Entra ID attribute.
Conditional placeholders prove very useful in the common scenario illustrated below, where a different phone number is inserted into an email signature if the Phone attribute has no value specified in the sender’s Entra ID. Follow the steps below to create a conditional placeholder for such a scenario:
- Open the Conditional placeholders manager and create or edit a conditional placeholder (as described here).
- Click Add to add a new conditional value.
- To define the first condition for the conditional value, click the edit (
 ) button.
 - Add the following condition:
- Sender property > Phone
- Operator > exists (Fig. 19.) and click OK.
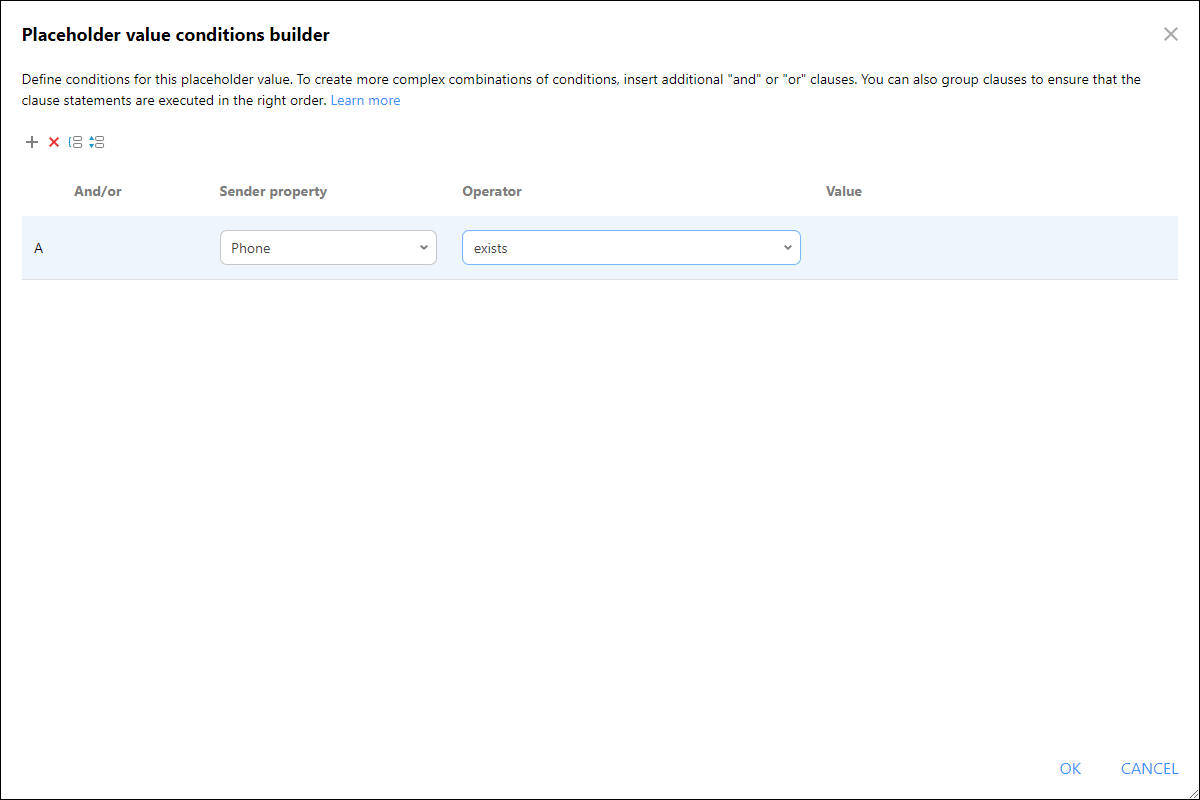
Fig. 19. Creating a condition that will apply to all users who have the Phone Entra ID attribute defined.
- In the Placeholder value column, click the
 button and select: Message Sender > Phone & fax > Phone (Fig. 20.). That way, if the sender has the Phone attribute defined in Entra ID, this value will be inserted into an email signature or an auto reply.
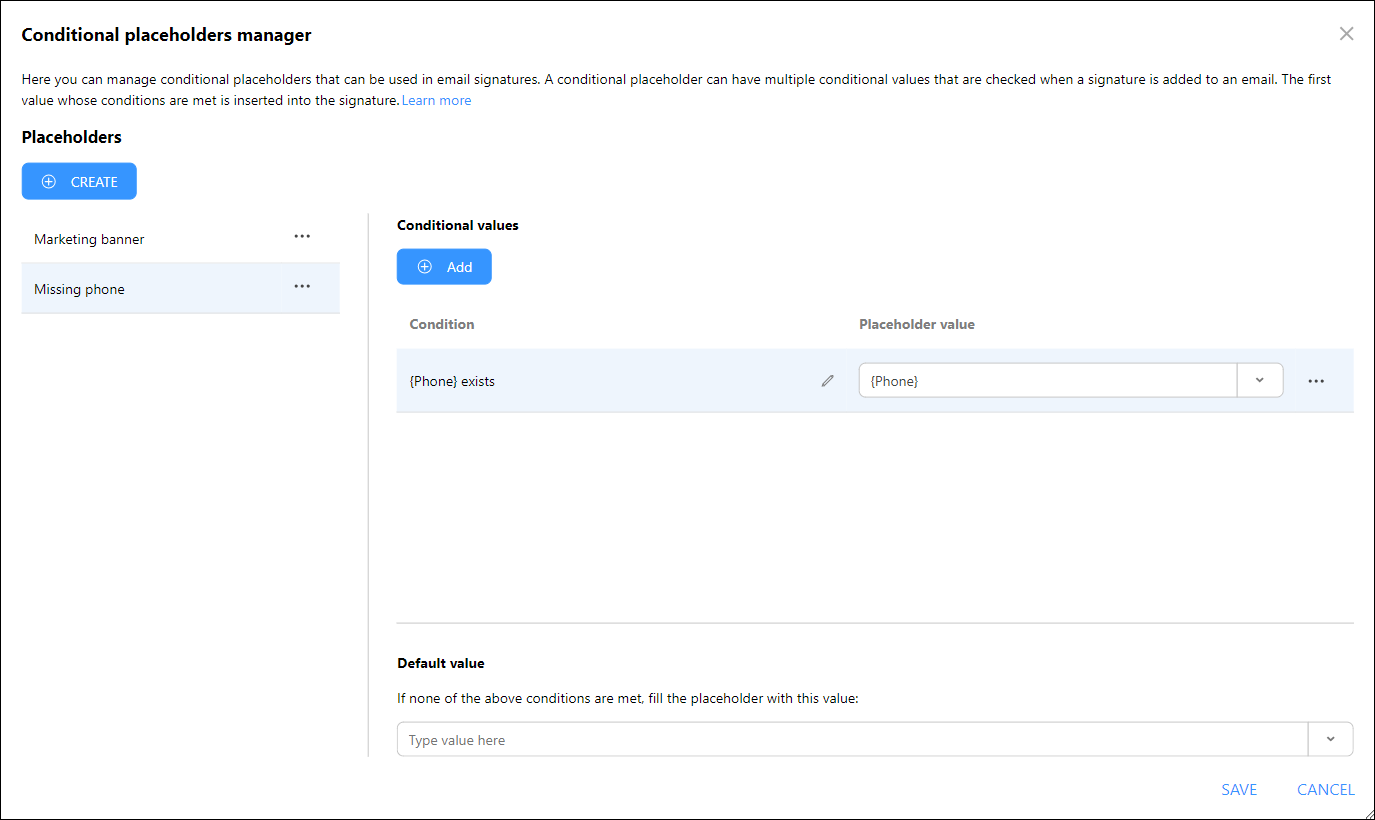
Fig. 20. Selecting the Phone attribute as the placeholder value.
- (Optional) If you also want the program to search for a phone number through other Entra ID attributes (Mobile, Home phone, etc.) and insert whatever can be found, you can define additional conditional values, as shown in Fig. 21.
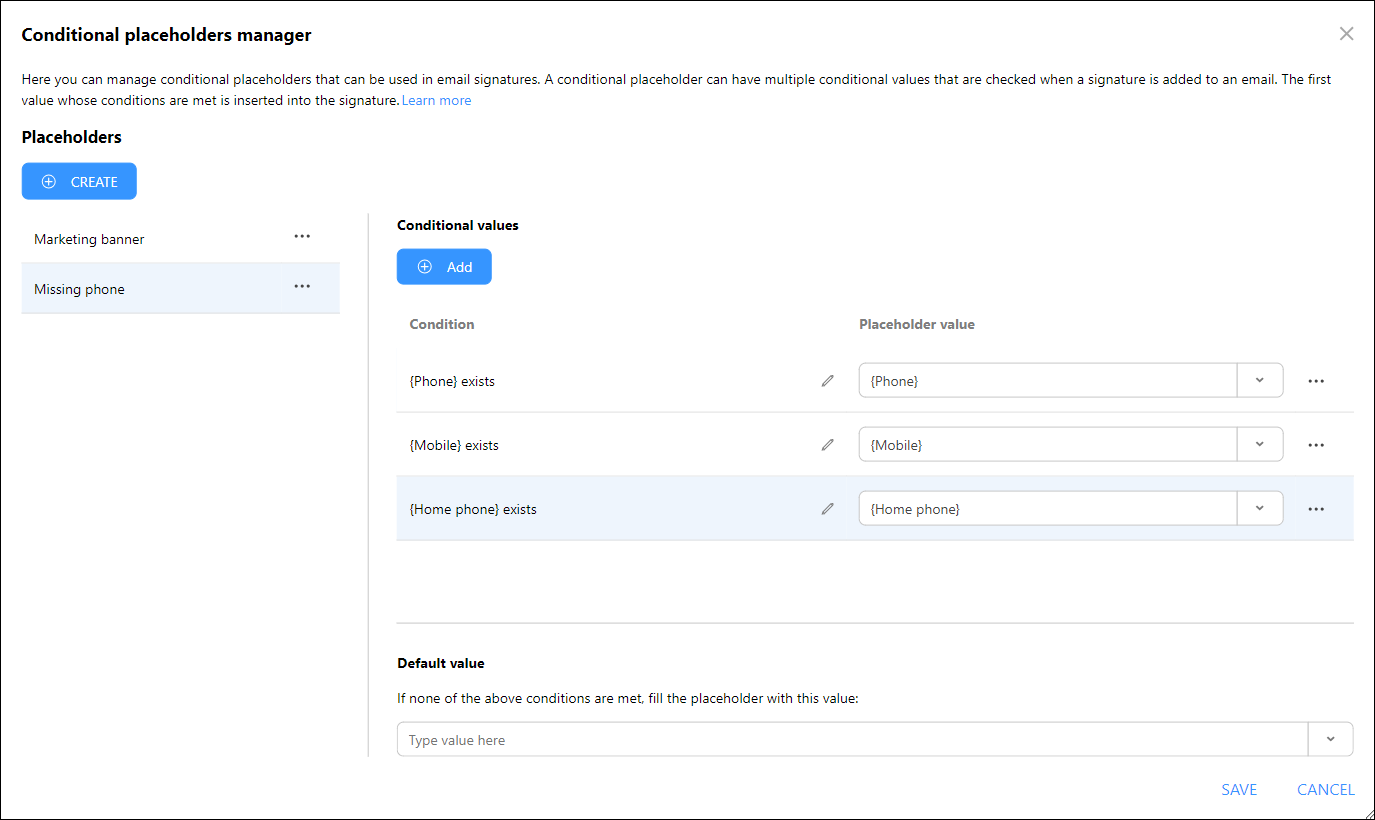
Fig. 21. Adding more conditional values to the conditional placeholder.
Important
The conditional values are checked from top to bottom, and the conditional placeholder will be replaced with the first value whose conditions are met.
- In the Default value field (Fig. 22.), click the button, select Plain text and provide a phone number (e.g. the company's generic phone number). This phone number will replace the conditional placeholder in the email signature if none of the conditions defined for the conditional values are met (when the email sender has no phone number defined in the specified Entra ID attributes).
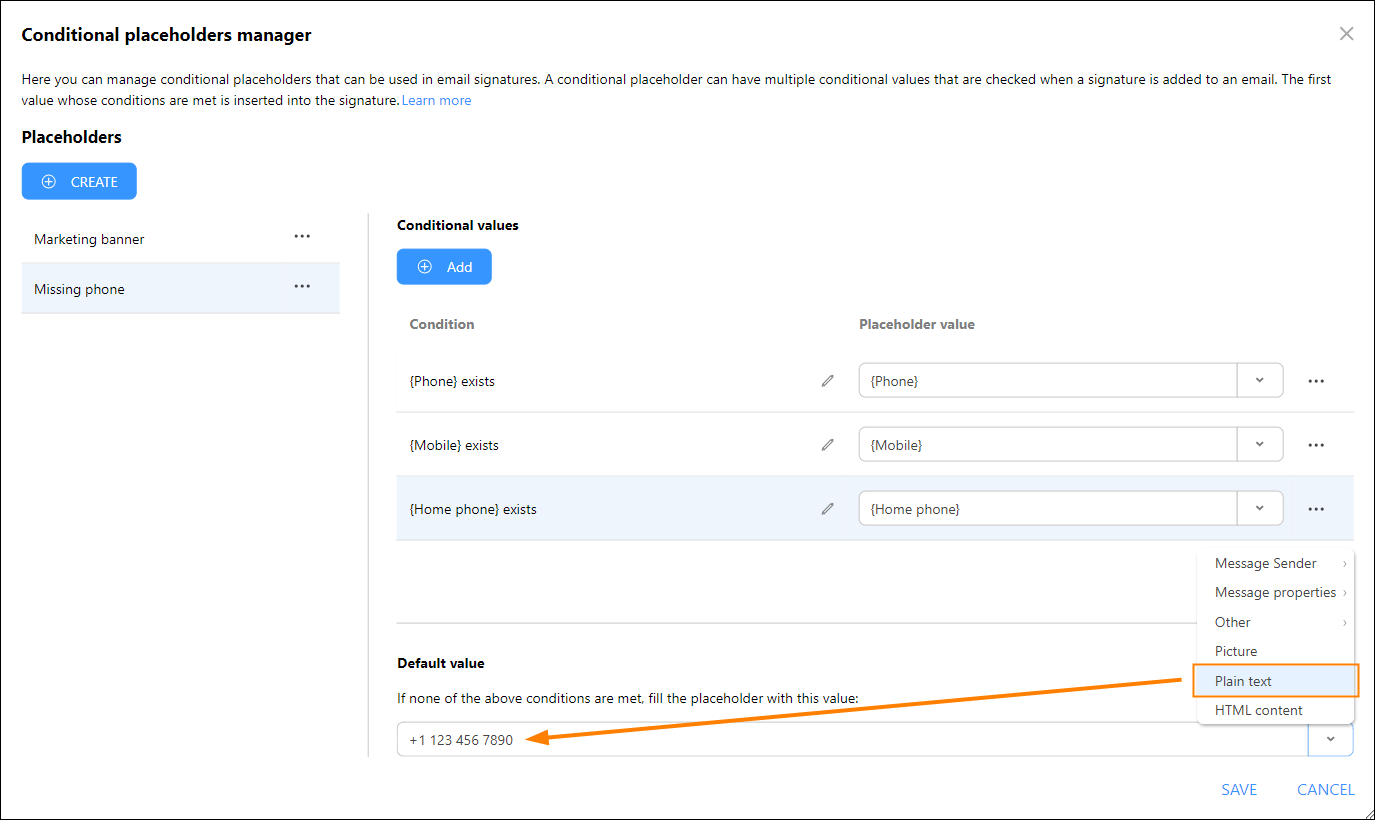
Fig. 22. Providing the default value that will replace the placeholder if none of the conditional value conditions are met when an email is sent.
- Click SAVE and then insert the conditional placeholder to your signature template(s).
- You can use the Signature preview functionality to check what the placeholder will look like when inserted into an email sent by different users.
Legacy conditional placeholders
Conditional placeholders created before the April 2024 app update are now considered legacy (read more about the update on CodeTwo blog). They will continue to work as usual in your templates but will not get any new updates. For the best experience, we recommend recreating all legacy placeholders as new ones by following these steps.
If you want to continue using the legacy conditional placeholders, here's what you need to know:
- To edit a legacy placeholder that's already added to a template, right-click it and select Edit placeholder. This will open the Edit legacy conditional placeholder window, where you can modify placeholder conditions, values, etc. (as shown in Fig. 23.). Note that your changes will apply to the current template only. If this legacy conditional placeholder is used in other templates as well, you need to modify all instances of the placeholder the same way.
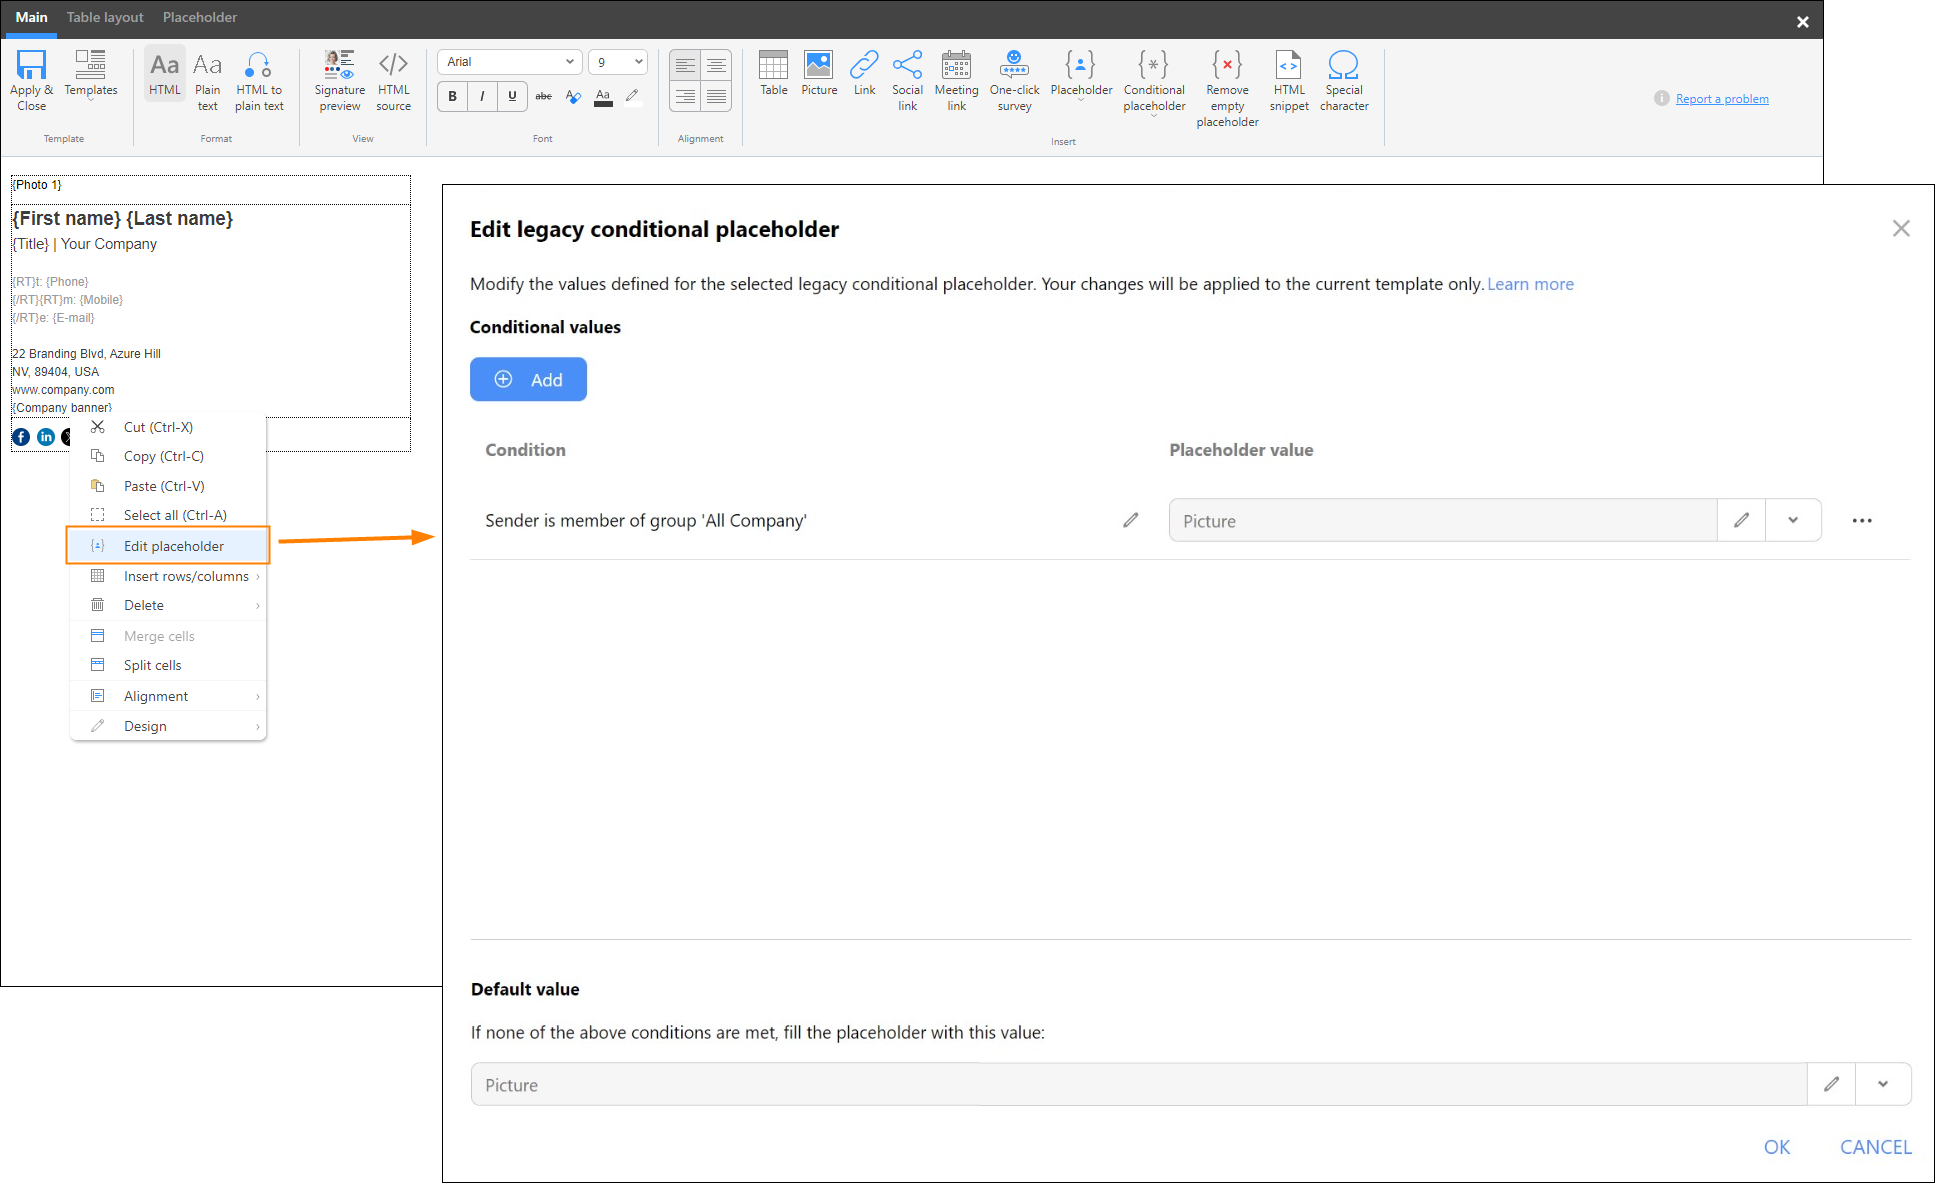
Fig. 23. Editing the legacy conditional placeholders.
- To access all your existing legacy conditional placeholders, go to Conditional placeholders > Legacy placeholders in the editor (Fig. 24.). Click Manage (legacy placeholders) to open the Legacy conditional placeholders manager, where you can edit your legacy placeholders or create new ones. Note that changes made in the manager are not applied to legacy placeholders that are already inserted into your template(s) – you need to replace the modified legacy placeholder in each template.
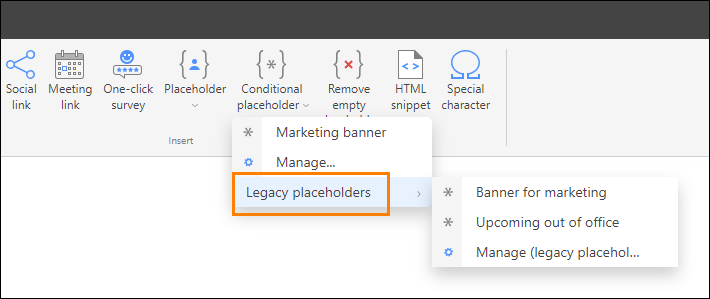
Fig. 24. Accessing the legacy conditional placeholders.
If you want to automatically apply the changes across all placeholders in all your templates, start using the new conditional placeholders.