Configuring Exchange Online connectors
If you use CodeTwo Email Signatures 365 in cloud (server-side) or combo mode, you configured Exchange Online connectors (inbound & outbound) and transport rule when registering your Microsoft 365 tenant with CodeTwo. These connectors are required so that emails sent by your organization can be routed through the CodeTwo service. The transport rule identifies emails that will be processed by CodeTwo – our service checks such emails against the signature rules you created and adds the right cloud signature. Every user specified in the transport rule also consumes one license from your signature license pool.
This article will help if you need to reconfigure the connectors and transport rule for your tenant.
- Configure CodeTwo connectors and transport rule automatically in CodeTwo Admin Panel
- Configure CodeTwo connectors and transport rule manually in the Exchange admin center
- Check users whose emails are routed through CodeTwo
- Change users whose emails are routed through CodeTwo
Important
- Cloud email signatures will not be added by CodeTwo until the connectors are configured correctly.
- If you use CodeTwo Email Signatures 365 in Outlook (client-side) mode, no connectors' configuration is required because your emails are not routed through CodeTwo to get signatures. You need to deploy a dedicated Outlook add-in instead.
- If you plan on using only the Autoresponder feature, you also need to configure the connectors because the CodeTwo services take part in sending automatic replies.
- If you use smart host (mail relay) services in your organization (e.g. Barracuda, Proofpoint, Mimecast, Reflexione, and similar), additional configuration might be required. See this article for details
- Only the users specified in the scope of licensed users can consume licenses and benefit from the CodeTwo service. Learn more about this scope
If you want to remove the existing connectors, see the article on uninstalling CodeTwo Email Signatures 365.
Automatic configuration of Exchange Online connectors
You can configure Exchange Online connectors automatically in CodeTwo Admin Panel. On the Tenants page, select your Microsoft 365 tenant, and then select Exchange Online connectors from the left menu (Fig. 1.). Click Configure connectors automatically.
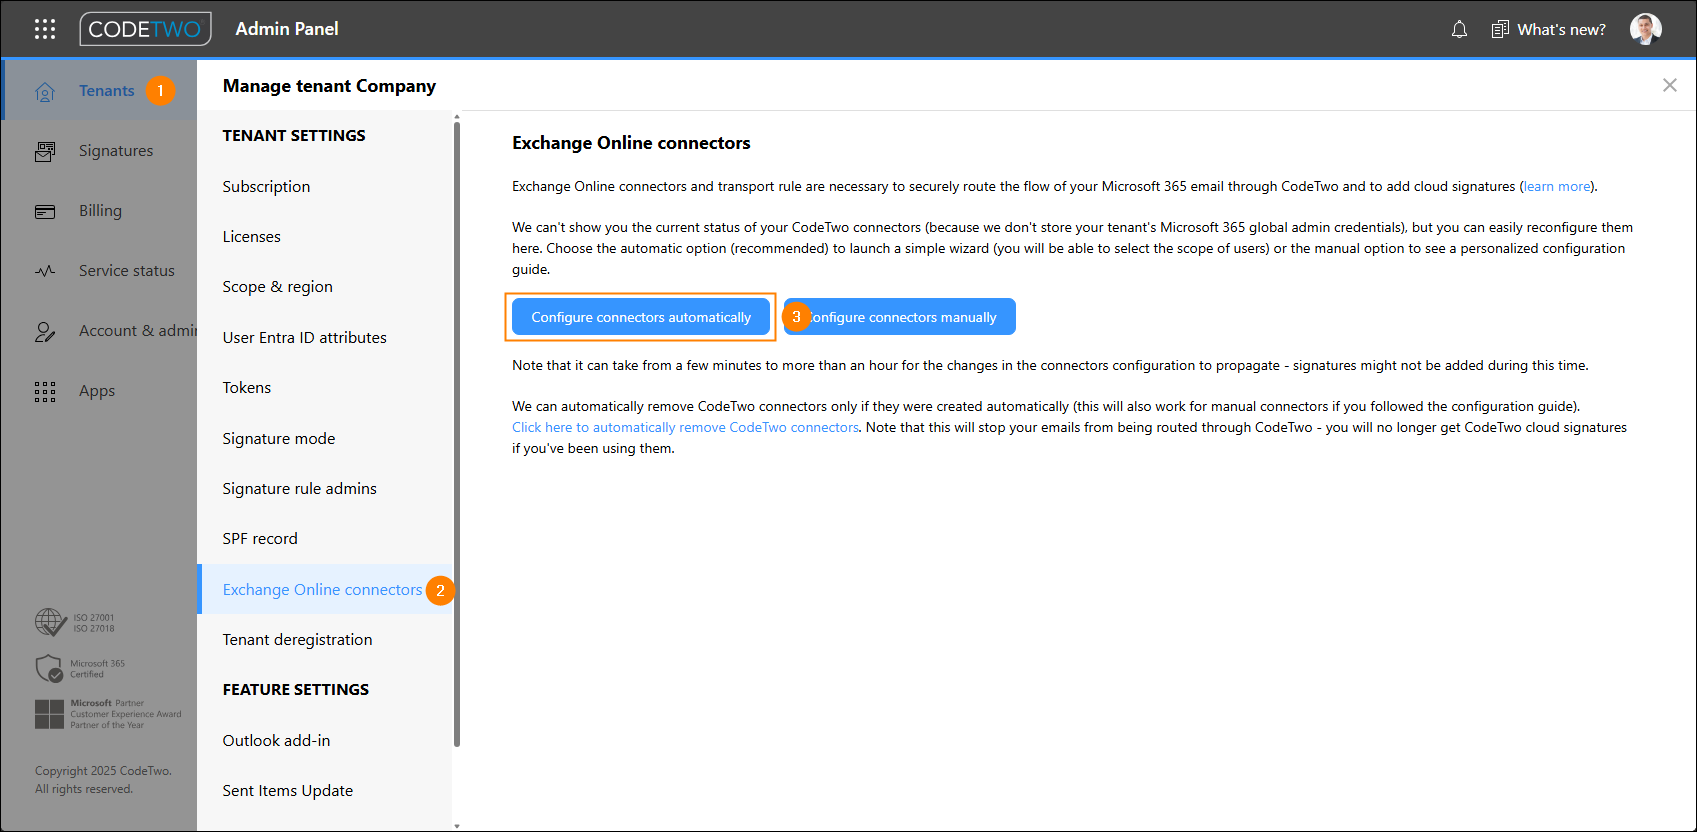
Fig. 1. Exchange Online connectors configuration settings.
The connectors configuration wizard starts (Fig. 2.). It will help you create Exchange Online connectors and transport rule in your tenant. Click Next to begin.
Here's how the CodeTwo connectors and transport rule work:
- The outbound connector forwards your emails to the CodeTwo service.
- The inbound connector accepts processed emails coming from the CodeTwo service. These emails go then to your final recipients.
- The transport rule is responsible for filtering emails to be processed by the CodeTwo service. The rule also helps to avoid processing loops and signature duplicates.
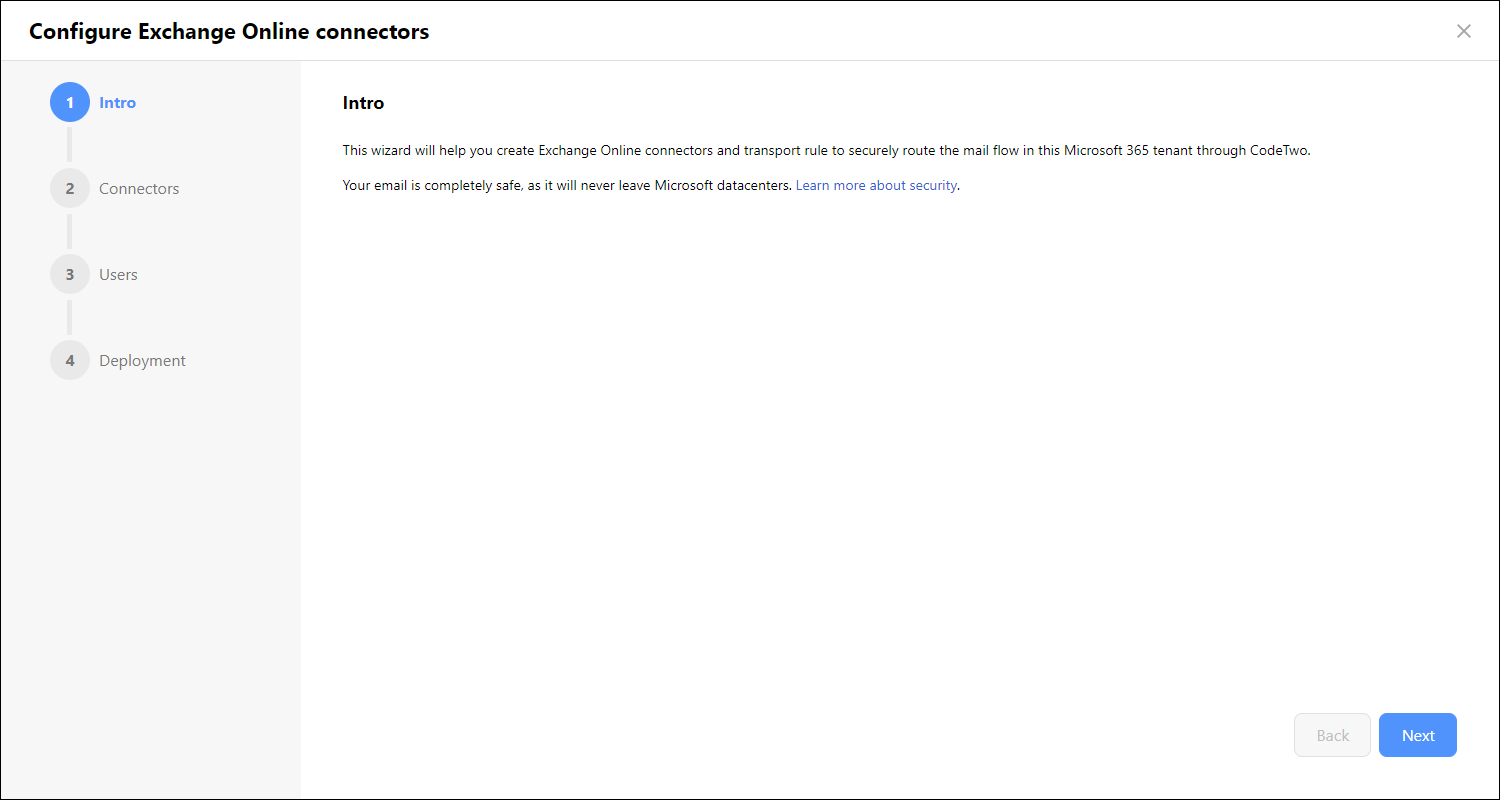
Fig. 2. Exchange Online connectors configuration wizard.
Click Next to start the configuration. In the Connectors step, click Authorize and sign-in to your Microsoft 365 tenant by providing global admin credentials. Accept the permissions that are needed to authorize us to create the connectors and transport rule for you. Once you have successfully signed in, the Microsoft sign-in page will close automatically.
Important
Your credentials are not stored with any CodeTwo service. To ensure maximum security, to perform this task we use self-expiring security tokens from Microsoft that will expire after 90 minutes or sooner.
If necessary, you can skip the connectors' configuration via the wizard and set them up manually in your Microsoft 365. However, we strongly advise against manual configuration of connectors.
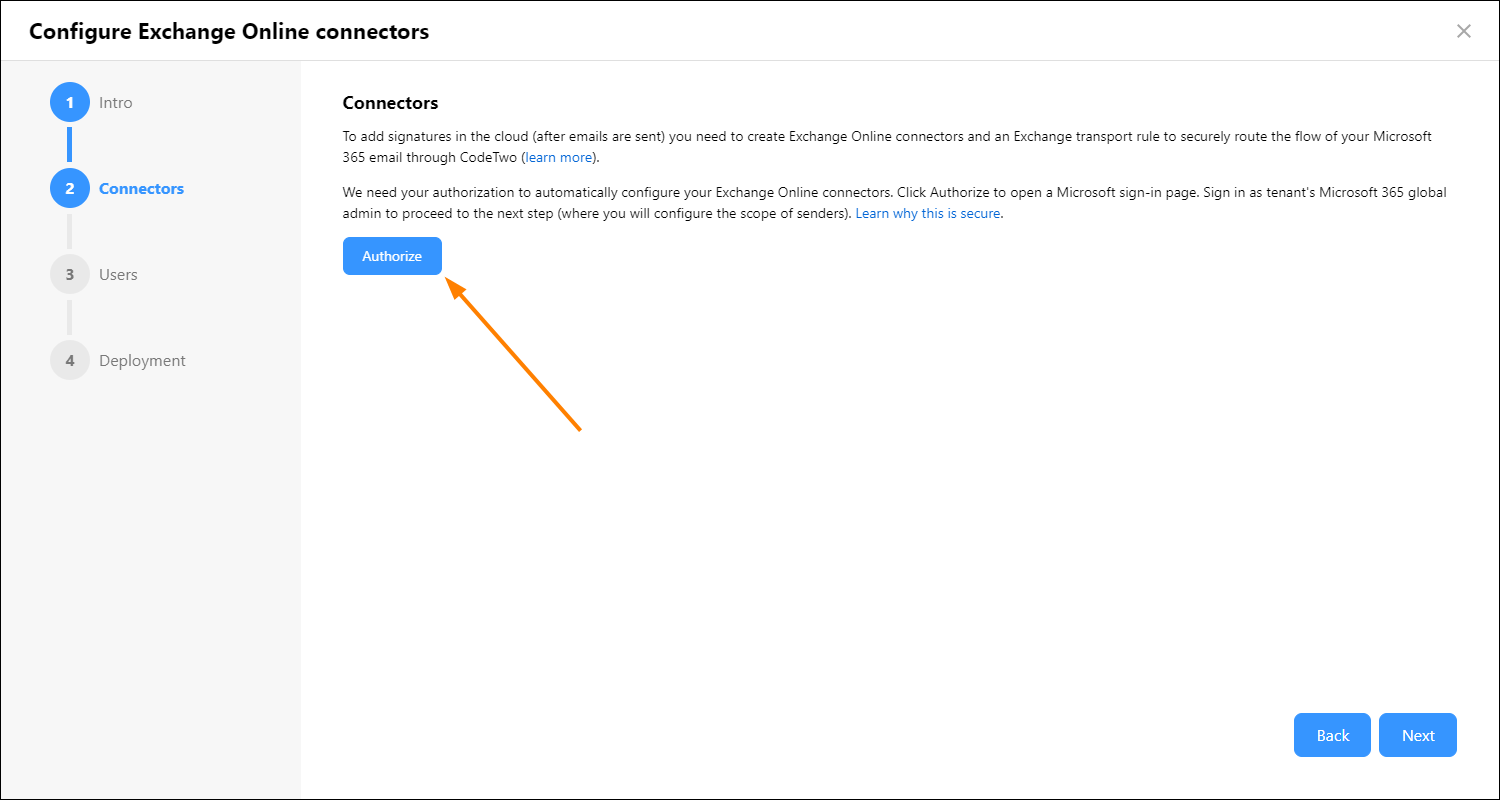
Fig. 3. We need your authorization to automatically configure your Exchange Online connectors.
Users (scope of senders)
Back in the configuration wizard, proceed to the next step – Users (Fig. 4.). Here, you need to specify users whose emails will be routed through the CodeTwo service to get cloud signatures (scope of senders). You can select all Entra ID (Azure AD) users or you can limit the scope of senders to members of a particular group in your Microsoft 365 (a distribution list or any mail-enabled group).
Note that every sender whose emails go through our service uses one license from your license pool, no matter if this user is defined in any signature rule. Learn more about license counting
See also this article to learn how the CodeTwo service behaves if the scope of senders (handled by connectors) is different from the scope of licensed users.
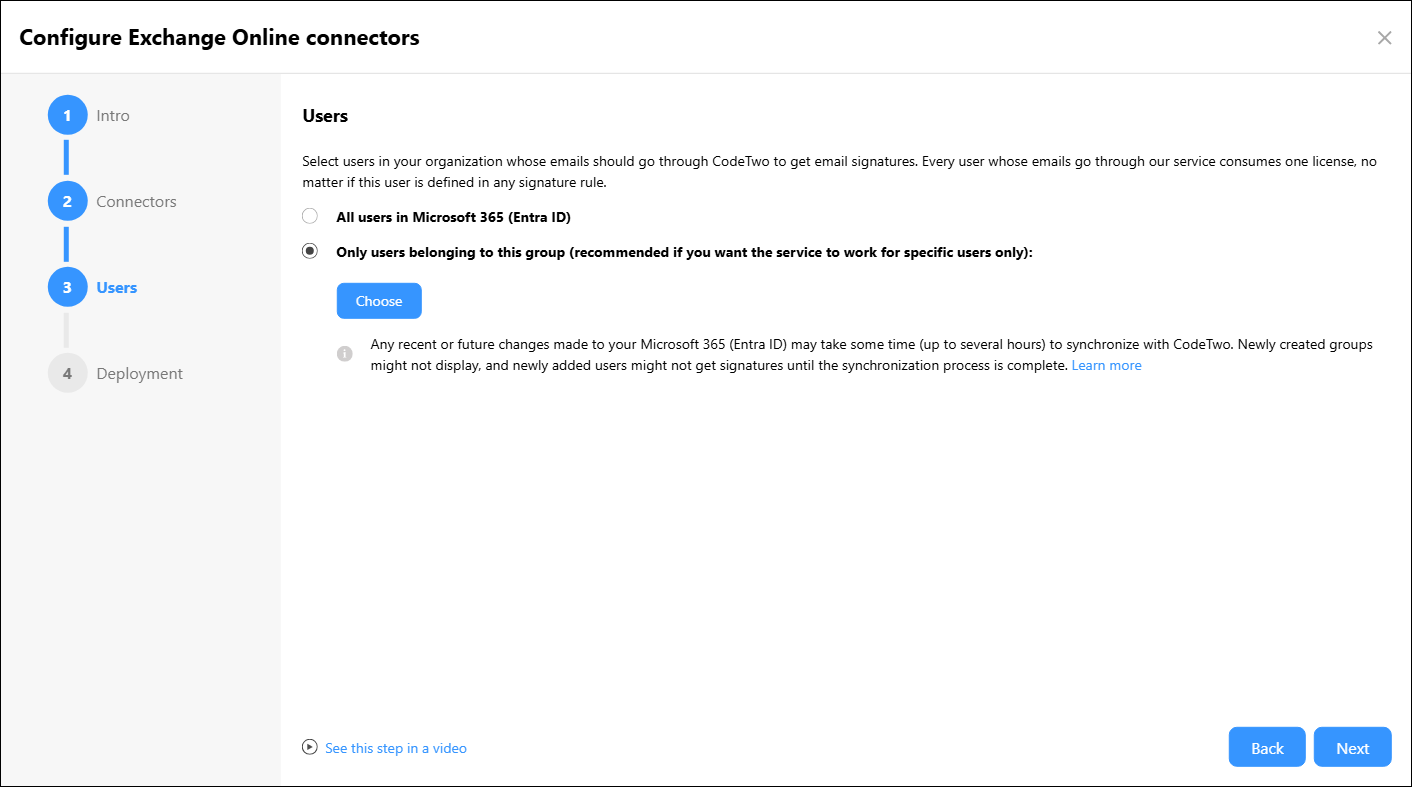
Fig. 4. Configuring the scope of users whose emails will be routed through the CodeTwo service.
Note that any changes in your Entra ID might take some time (up to several hours) to propagate and synchronize with CodeTwo services:
- If you have just created a new group, it may not be available in the group picker (Fig. 4.) right away.
- Any future changes you make to the group selected in the wizard also need time for propagation. For example, if you add new users to this group, they might not get signatures right away. Learn more
If you select a group that has other groups nested inside, emails sent by members of the nested groups will also travel through the CodeTwo service.
Tip
If you want to add more than one group, you need to edit the transport rule and add another group manually.
If you wish to further customize the range of users whose emails will be stamped with cloud signatures, you can do that by creating signature rules.
Click Next proceed to the Deployment step. The configuration of Exchange Online connectors will start automatically. When the deployment is complete (Fig. 5.), click Finish.
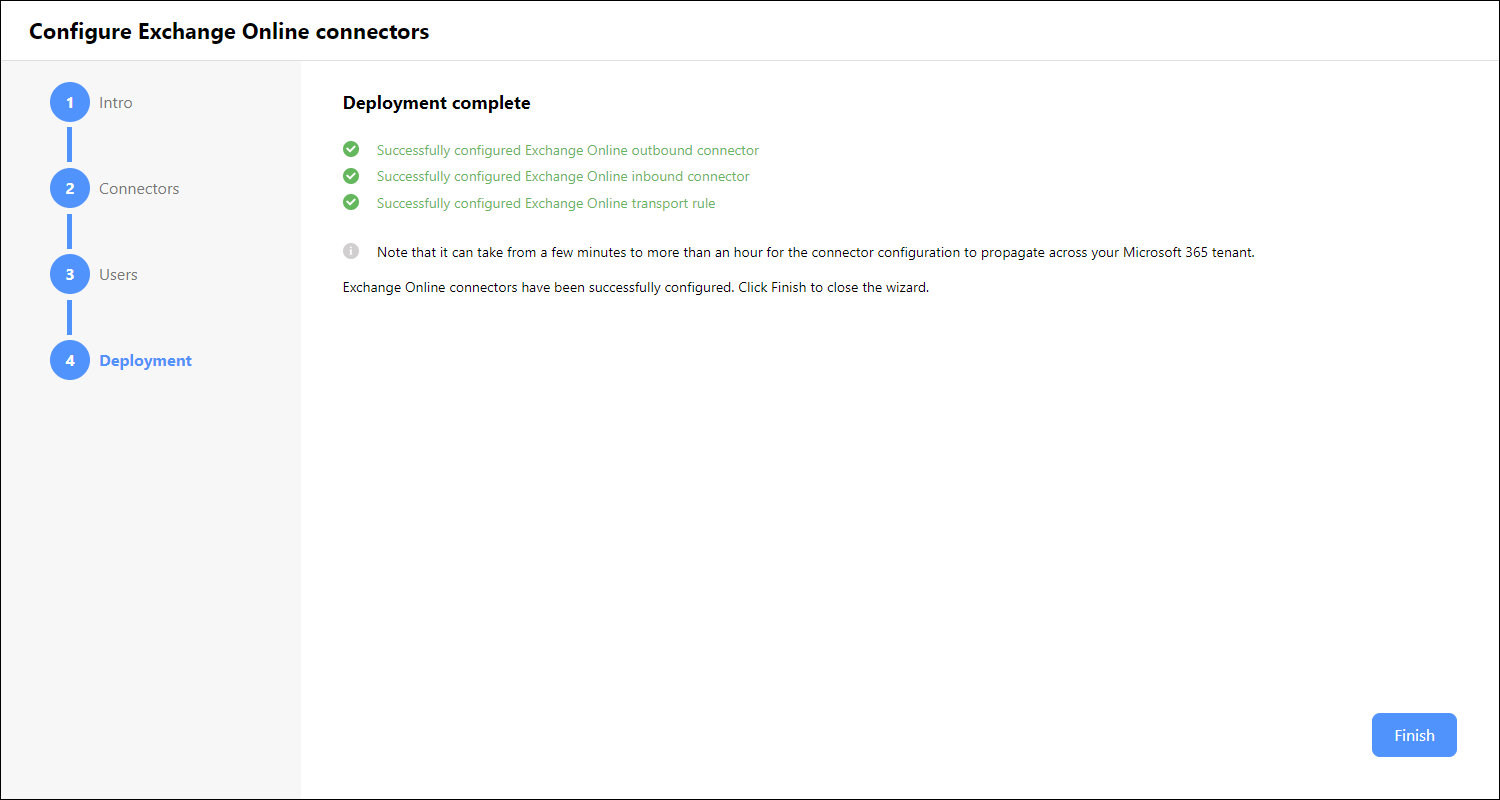
Fig. 5. Successful configuration of connectors.
Info
It can take from a few minutes to more than an hour for the changes in the connectors' configuration to propagate. Email signatures created in the program might not be added to messages sent from your tenant during that time.
If you configured the program to process messages sent to a particular group, every change made to this group (such as adding new users) also requires time to propagate in your Microsoft 365. Learn more
By default, the CodeTwo Exchange transport rule excludes emails with unspecified sender data (null sender) from being routed through CodeTwo. Such emails include e.g. Microsoft 365 automatic replies, out of office messages and other automated emails. This is intended to avoid adding signatures to emails that are not sent directly by users (but by an automated process or a bot), as such emails might end up being blocked or rejected due to incorrect or missing configuration in Exchange Online. If necessary, you can still enable routing emails with null sender through CodeTwo. See this article for more information.
Once the connectors are set up, you can start managing your signature rules. Read this article for guidelines.
If you use smart host (mail relay) services in your organization, additional configuration might be required. See this article for details.
Manual configuration of Exchange Online connectors
You can also configure Exchange Online connectors manually in the Exchange admin center of your Microsoft 365 tenant.
Alternatively, if you prefer doing things with PowerShell, you can manually configure the connectors by following the instructions from this Knowledge Base article.
Important
CodeTwo strongly recommends that you use the connectors configuration wizard instead of manually setting up connectors to avoid mistakes and unsupported customizations. Manual configuration might be useful only if you have any problems with automatic connectors configuration or need to use non-standard (not available in the configuration wizard) settings.
To configure the connectors manually, follow the steps below.
- Access the mail flow configuration pages in the Exchange admin center.
- Configure the inbound connector for CodeTwo Email Signatures 365.
- Configure the outbound connector for the program.
- Configure the transport rule for the outbound connector.
Accessing mail flow configuration in the Exchange admin center
The manual configuration procedure is described in detail in the sections below. In a nutshell, you will need to add two connectors and a transport rule (mail flow rule):
- The outbound connector will forward your emails to the service. Learn how to configure the outbound connector
- The inbound connector will accept processed emails coming from the CodeTwo service. Learn how to configure the inbound connector
- The transport rule will be responsible for filtering emails to be processed by the CodeTwo service. The rule also helps to avoid processing loops and signature duplicates. Learn how to configure the transport rule
All the steps required for manual configuration are performed in the Exchange admin center. To access it, sign in to the Microsoft 365 admin center and expand the menu on the left by clicking Show all. Then, click Exchange in the Admin centers section (Fig. 6.). You can also access the Exchange admin center directly by clicking this link.
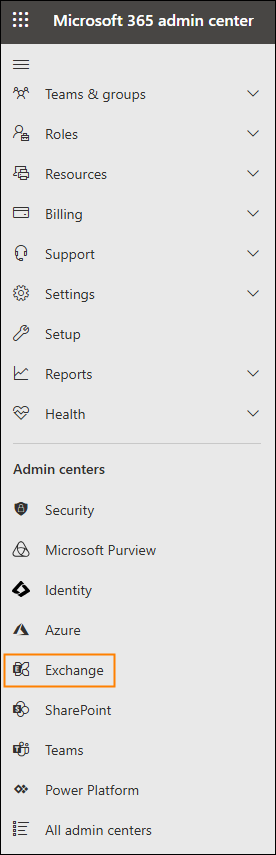
Fig. 6. Accessing the Exchange admin center from the Microsoft 365 admin center.
Configuration of the outbound connector
In the Exchange admin center, go to Mail flow > Connectors. Click Add a connector to create a new connector (Fig. 7.).
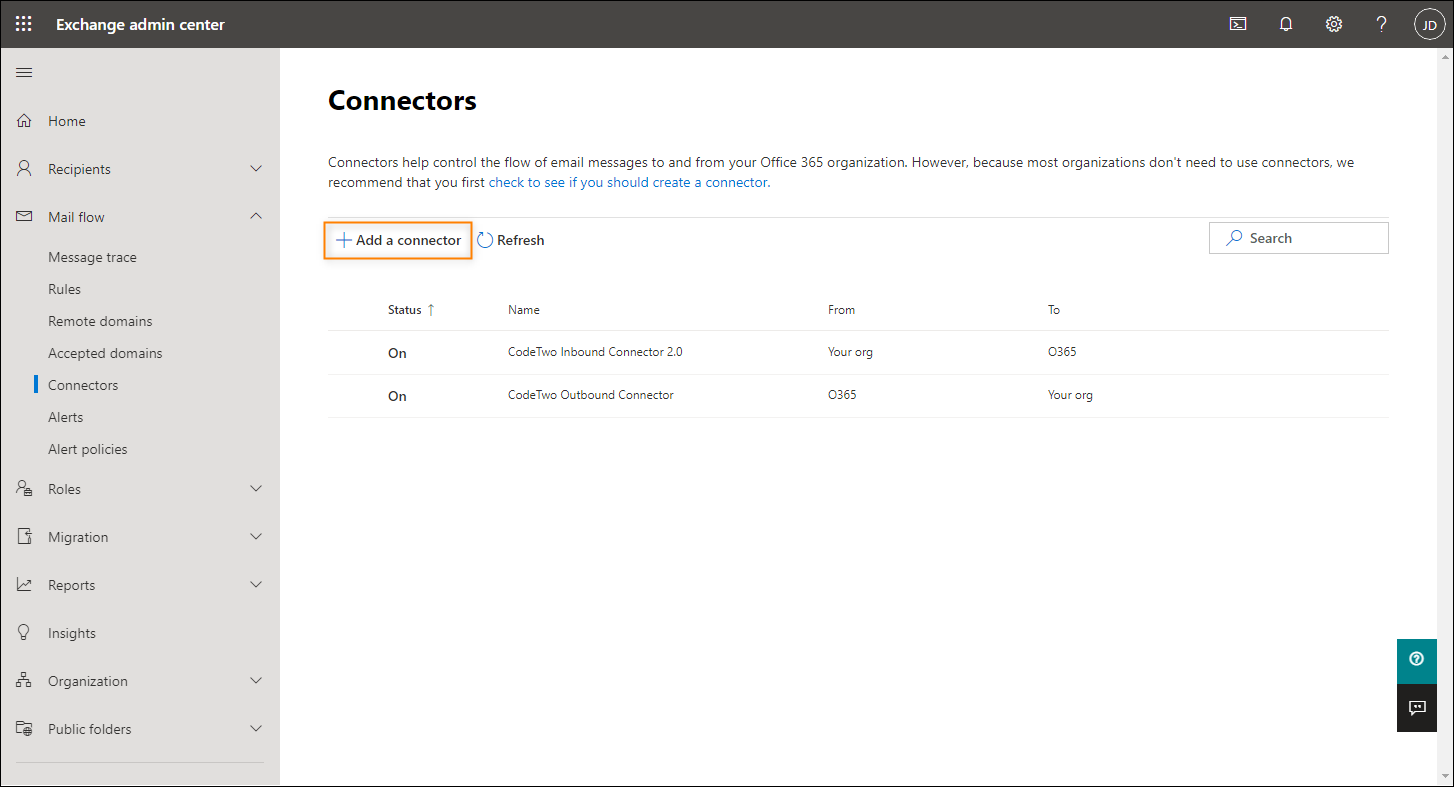
Fig. 7. Adding a new connector.
In the new pane that opens, select:
- Connection from > Office 365
- Connection to > Your organization's email server
as shown in Fig. 8. Click Next to continue.
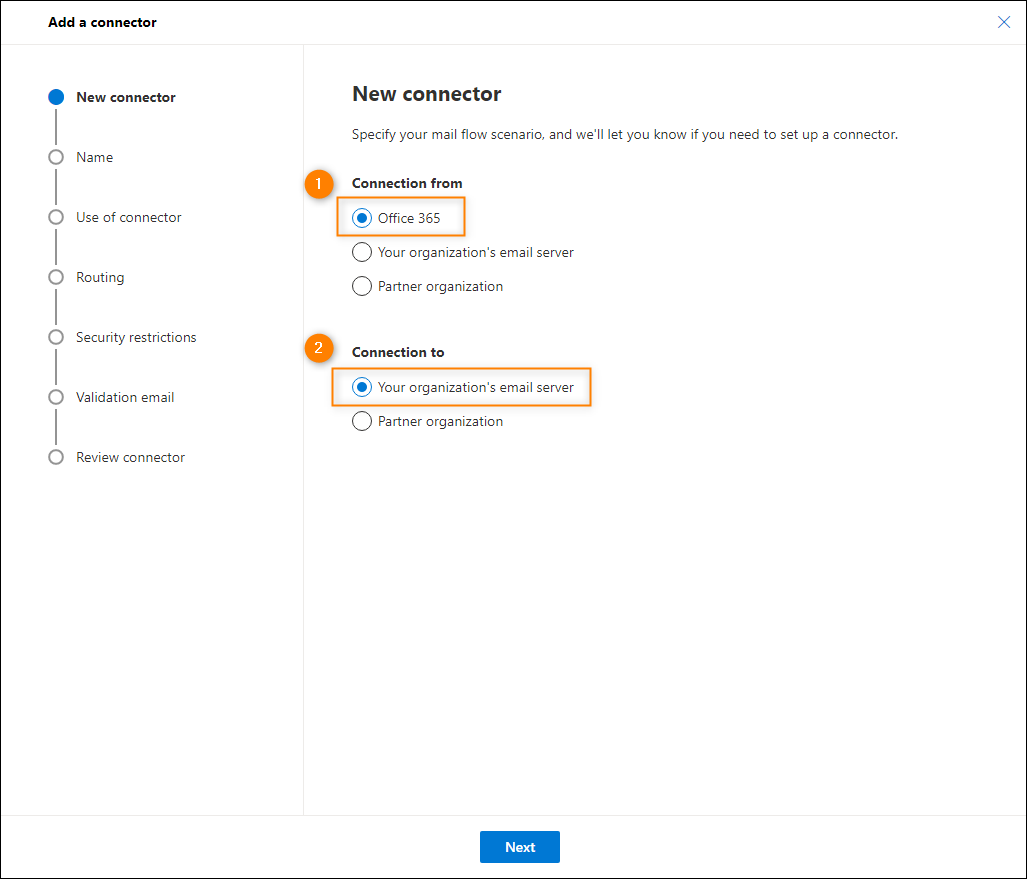
Fig. 8. Mail flow scenario configuration for the outbound connector.
In the next step of the wizard, enter the following name: CodeTwo Outbound Connector and make sure that the Turn it on and Retain internal Exchange email headers (recommended) checkboxes are both enabled (selected), as shown in Fig. 9. Click Next to continue.
Important
Make sure that you name your connector exactly the same as indicated above to avoid any configuration issues in the future, for example if you decide to reconfigure connectors automatically using the wizard.
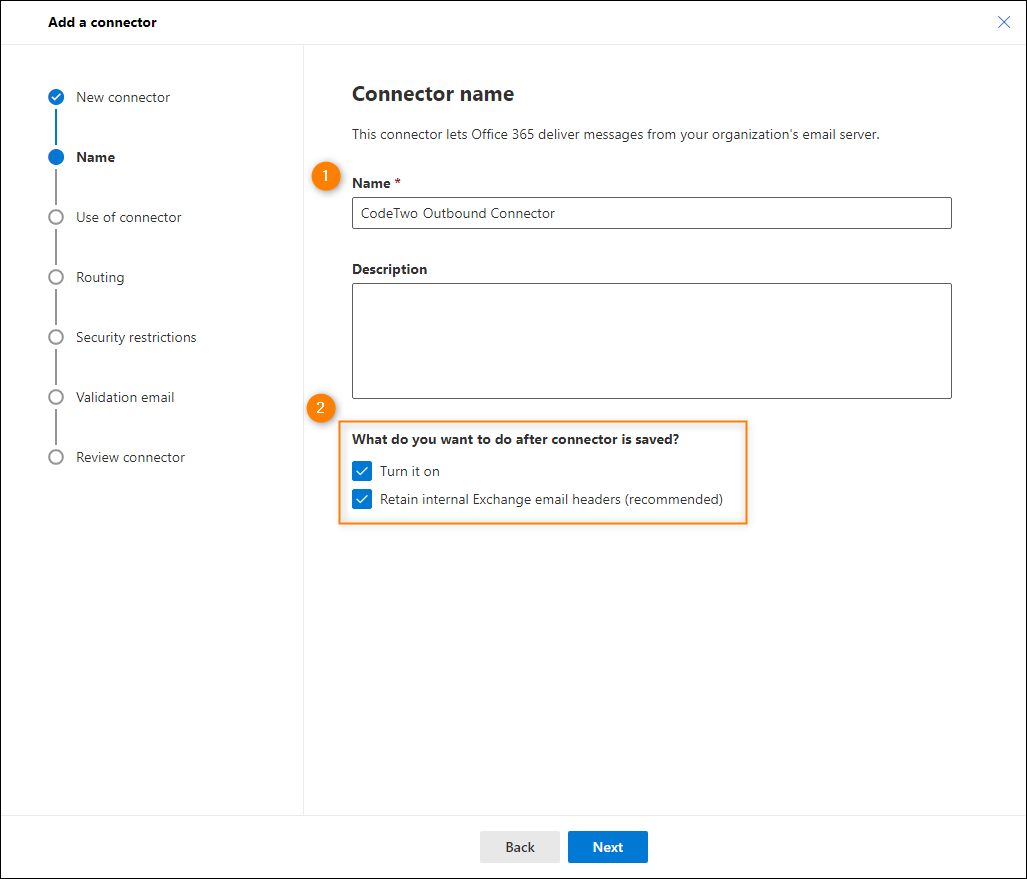
Fig. 9. Naming and enabling the outbound connector.
In the next step, choose the second option (Only when I have a transport rule set up that redirects messages to this connector), as shown in Fig. 10. Proceed to the next step.
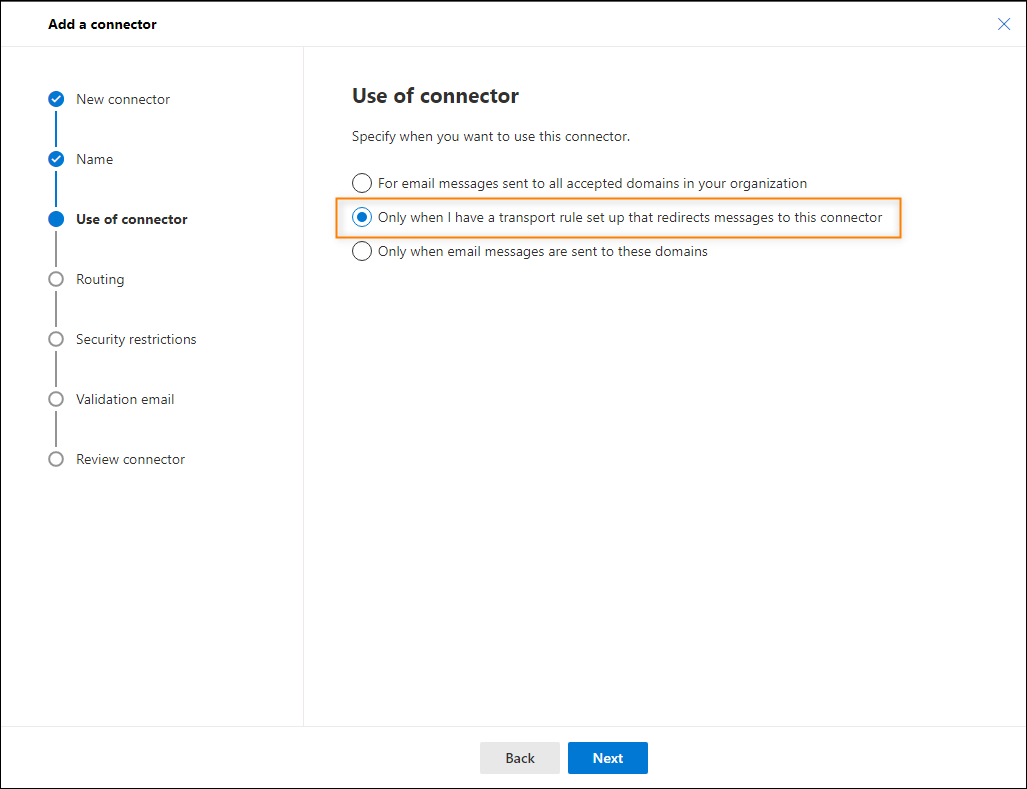
Fig. 10. Selecting when the outbound connector is going to be used.
In the Routing step, add the following CodeTwo smart host address (Fig. 11.):
[your unique subdomain name].smtp.codetwo.online
Info
In order to get [your unique subdomain name], sign in to CodeTwo Admin Panel, click your tenant on the Tenants page to open tenant settings, and go to Exchange Online connectors. Next, click Configure connectors manually and then click the Follow this personalized guide link. This link opens the same article you are reading right now, but the box above will instead display your unique subdomain name.
For other ways to find the CodeTwo domain, see this article.
Click the Add (+) button and then click Next to continue configuring the connector.
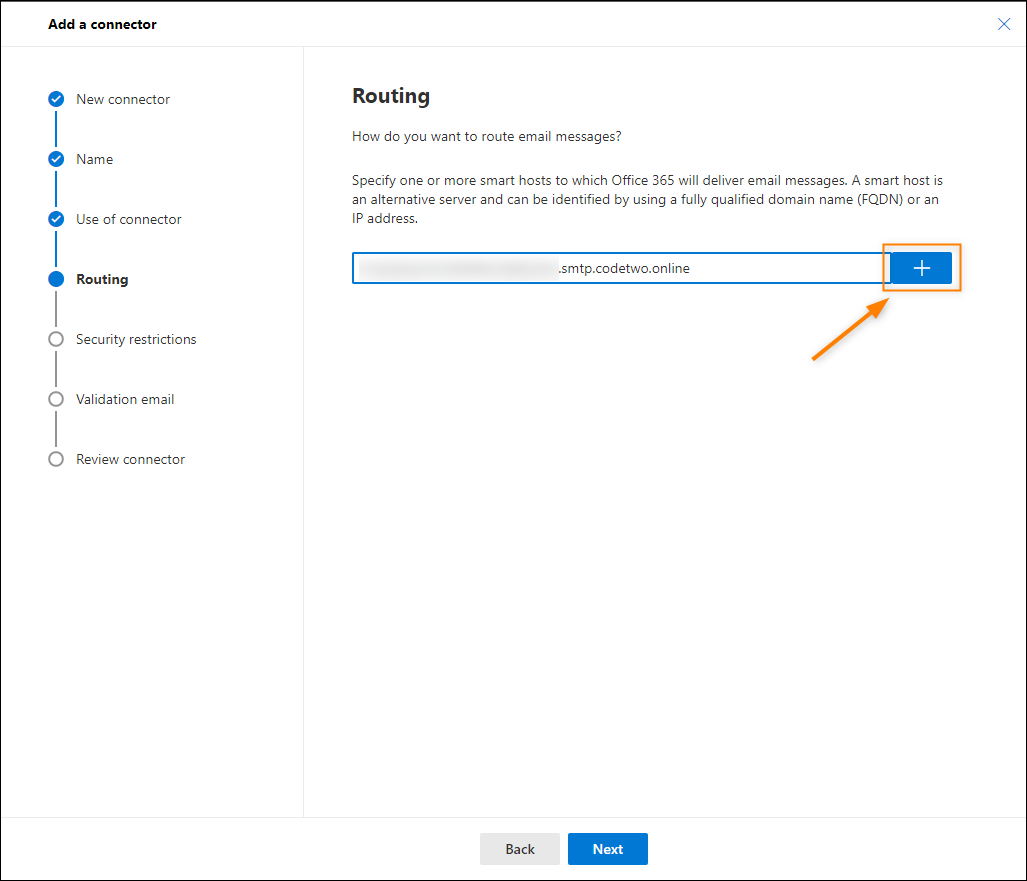
Fig. 11. Routing configuration for the outbound connector.
In the Security restrictions step, configure the options as shown in Fig. 12. and make sure that you provide this address:
*.codetwo.com
as the domain name on the certificate. Proceed to the Validation email step by clicking Next.
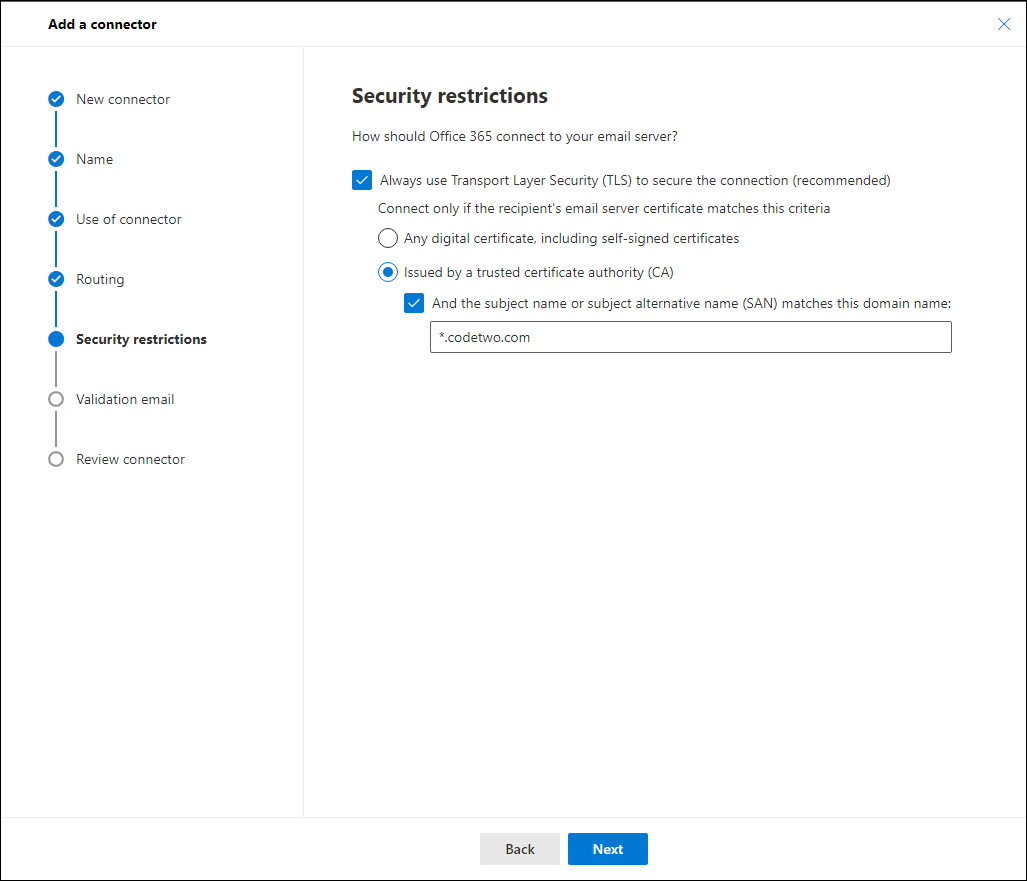
Fig. 12. Configuring security restrictions for the outbound connector.
You need to validate the outbound connector (Fig. 13.) by typing an email address of any active mailbox in your organization's domain and clicking the Add (+) button. After adding the email address, click Validate and - after successful validation - click Next to continue.
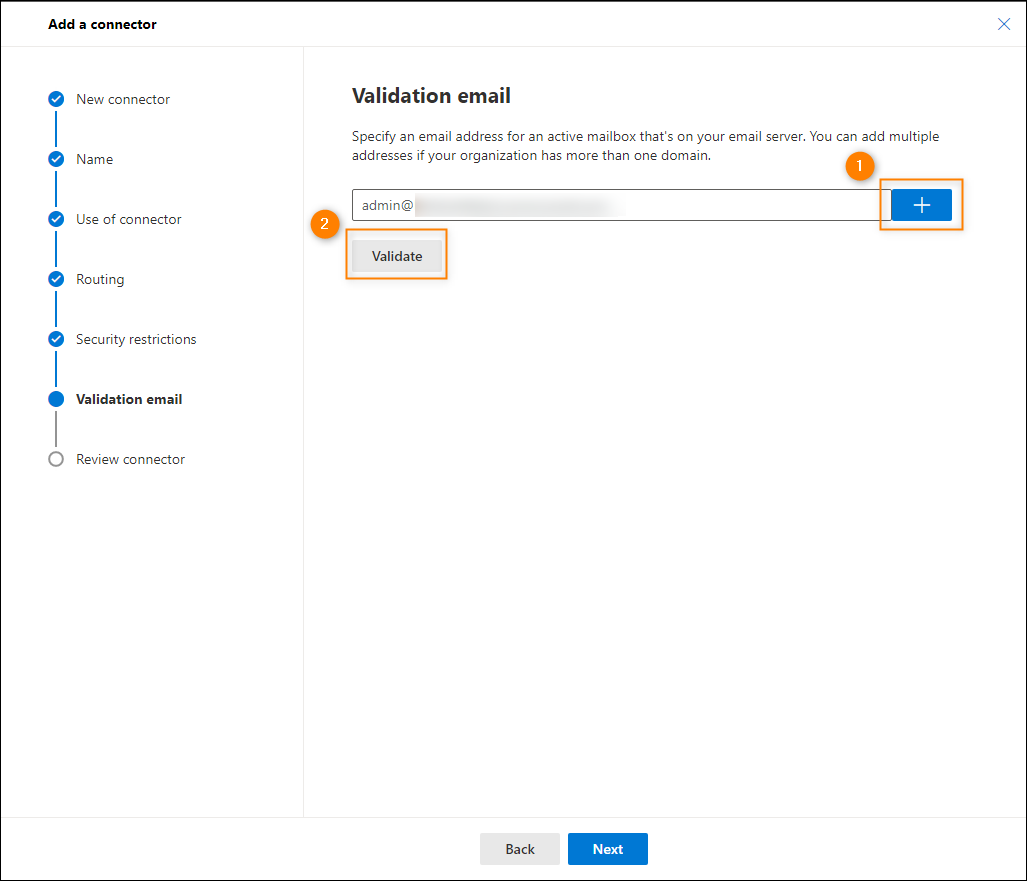
Fig. 13. Validation of the outbound connector.
Warning
If you are not able to validate your connectors and you get the following (or similar) error:
401 4.5.4 Invalid arguments - possible version mismatch [VE1EUR01FT009.eop-EUR01.prod.protection.outlook.com]
then you might be experiencing a recent Microsoft 365 health issue. This problem is not related to our software.
In the Review connector step, click Create connector to finish the configuration. When the connector is created click Done.
Configuration of the inbound connector
Next, create an inbound connector. Click the Add a connector button (as shown in Fig. 7.). In the new pane that opens, select Connection from > Your organization's email server. The Connection to selection is made automatically (as shown in Fig. 14.). Click Next to continue.
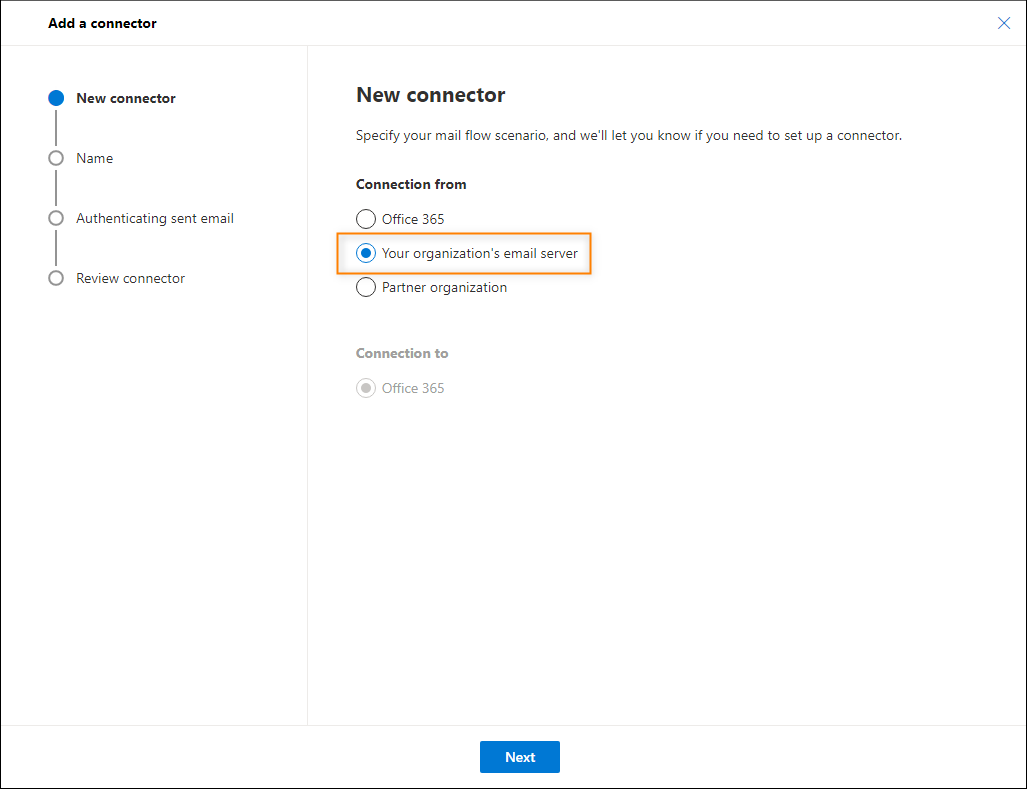
Fig. 14. Mail flow scenario configuration for the inbound connector.
In the next step of the wizard, enter the following name: CodeTwo Inbound Connector 2.0 and make sure that the Turn it on and Retain internal Exchange email headers (recommended) checkboxes are both enabled (selected), as shown in Fig. 15. Click Next to continue.
Important
Make sure that you name your connector exactly the same as indicated above to avoid any configuration issues in the future, for example if you decide to reconfigure connectors automatically using the wizard.
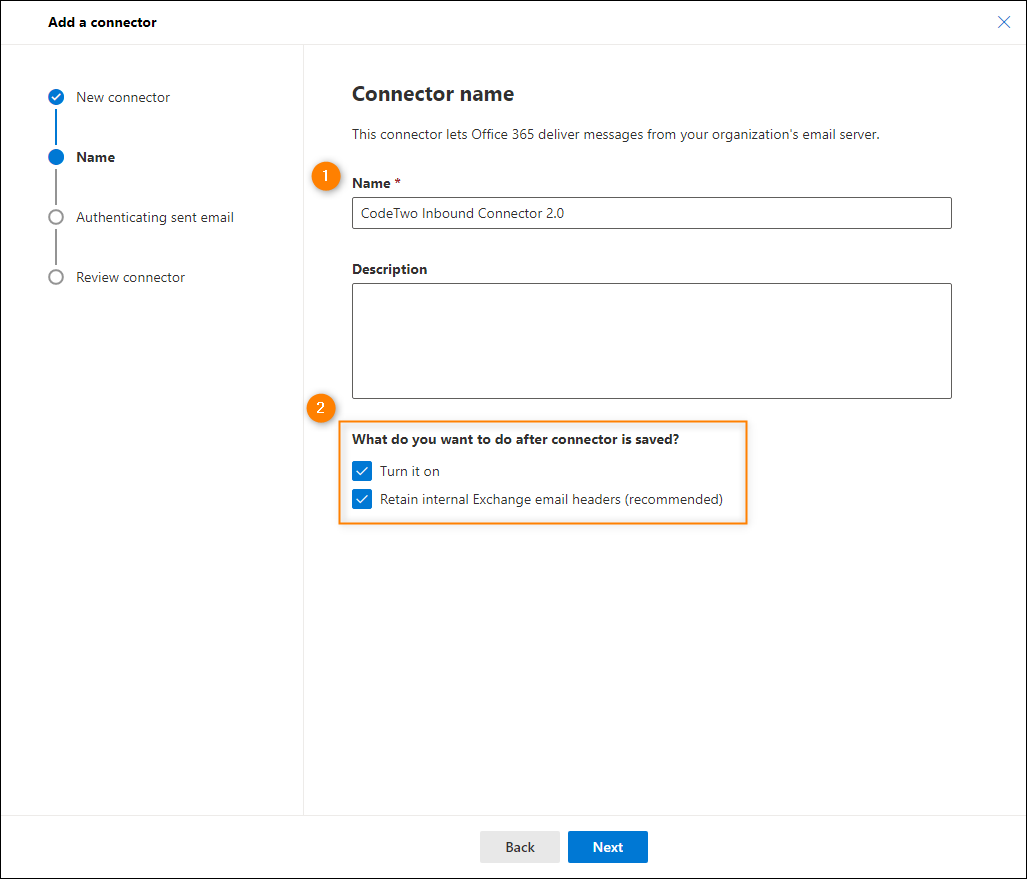
Fig. 15. Naming and enabling the inbound connector.
On the Authenticating sent email page, select the first option (By verifying that the subject name...) and provide the domain name as follows (Fig. 16.):
[your unique subdomain name].smtp.codetwo.online
Info
In order to get [your unique subdomain name], sign in to CodeTwo Admin Panel, click your tenant on the Tenants page to open tenant settings, and go to Exchange Online connectors. Next, click Configure connectors manually and then click the Follow this personalized guide link. This link opens the same article you are reading right now, but the box above will instead display your unique subdomain name.
For other ways to find the CodeTwo domain, see this article.
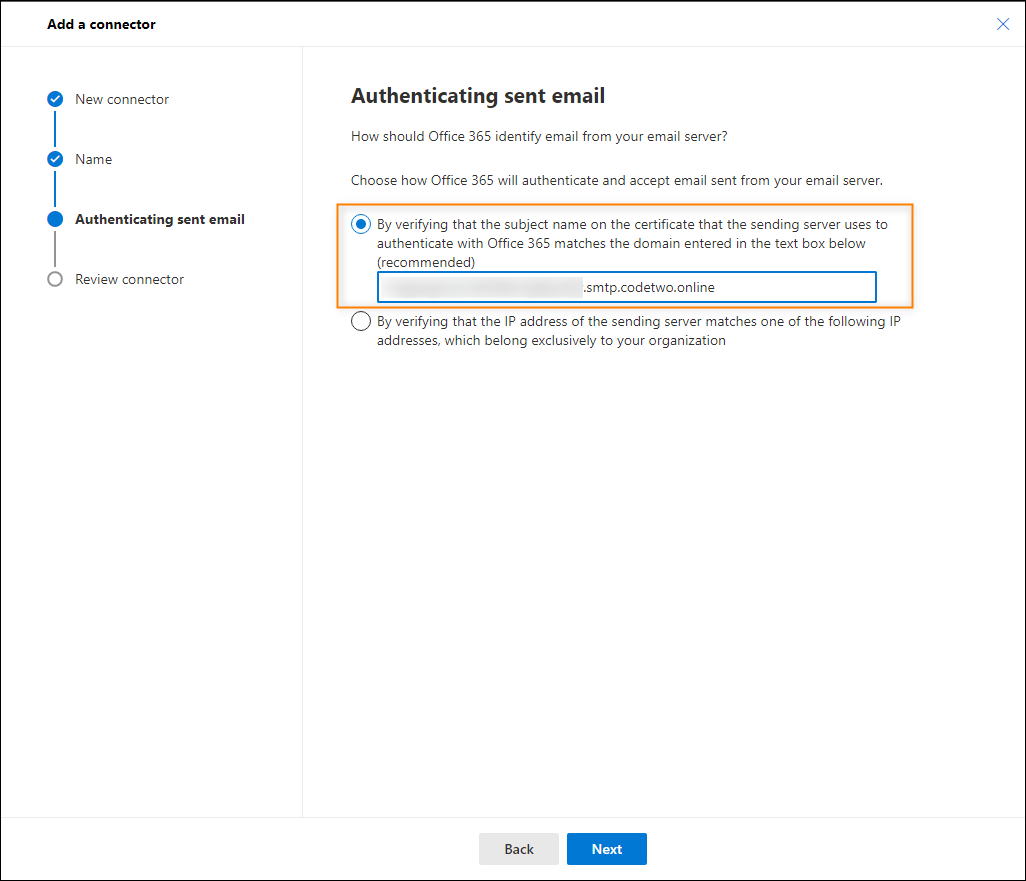
Fig. 16. Email authentication method configuration.
Click Next to proceed to the Review connector step and then click Create connector to finish the configuration. When the connector is created, click Done.
Configuration of the CodeTwo Exchange transport rule
Once you're done configuring the connectors, you need to create a new transport rule (mail flow rule) that will identify emails to be processed by the CodeTwo service.
The CodeTwo Exchange transport rule:
- Determines a scope of users (senders) from your Microsoft 365 organization whose emails are routed through CodeTwo to get cloud (server-side) signatures. Every sender specified in the rule will use one license from your signature license pool, no matter if the sender is defined in any signature rule. Find out more on how the license counting works
- Excludes emails with unspecified sender data (null sender), e.g. Microsoft 365 automatic replies, out of office messages or automated emails, and calendar messages (e.g. meeting requests) from being routed through CodeTwo. This is intended to avoid adding signatures to emails that are not sent directly by users, but by an automated process or a bot.
- Helps avoid loops and duplicate signatures.
This configuration corresponds to the Senders scope step of the automatic configuration of Exchange Online connectors (described earlier in this article). You can specify the following scopes of senders:
- all of your Entra ID (Azure AD) users,
- only selected users or users belonging to a specific group or groups,
- all or selected Entra ID users but excluding internal messages.
Configuration of the transport rule for all Entra ID users
To add and configure a new transport rule for all Entra ID users (including emails sent internally in your organization), open the Exchange admin center and go to Mail flow > Rules. Use the Add a rule button and select Create a new rule from the drop-down list (Fig. 17.).
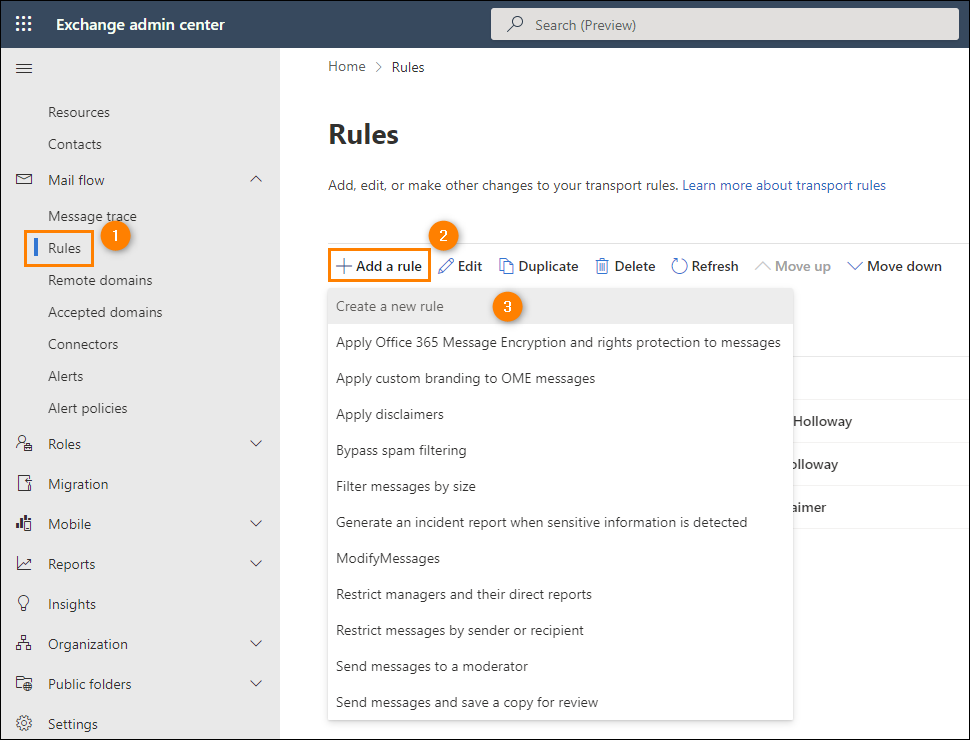
Fig. 17. Adding a new transport rule for the program's outbound connector.
Configure the rule in the following way:
In the Set rule conditions step:
- Type the following name: CodeTwo Exchange transport rule
- In the Apply this rule if section, add the following condition: The sender > is external/internal. Select Inside the organization as sender location.
- In the Do the following section, add the following action: Redirect the message to > the following connector > CodeTwo Outbound Connector
- In the Except if section, add the following three exceptions (click + to add another exception):
- * The sender > address matches any of these text patterns. Enter the following text pattern: <>
- The message properties > include the message type. Select the following message type: Calendaring
- The message headers > matches these text patterns. Enter the following header name: X-CodeTwoProcessed, and enter the following text pattern: true
- * The message headers > includes any of these words. Enter the following header name: Return-Path, and enter the following phrase: <>
* These two exceptions are intended to exclude emails with unspecified sender data (null sender address) from being routed through CodeTwo. Such emails (e.g. automatic replies) might end up being blocked or rejected due to incorrect or missing configuration in Exchange Online. However, if necessary, you can enable routing emails with null sender through CodeTwo. See this article for more information.
Click Next to proceed to the Set rule settings step. Leave the default settings for all options except:
- the Defer the message if rule processing doesn't complete checkbox must be enabled (selected),
- in the Match sender address in message section, select Header or envelope
Review your settings – compare them with Fig. 18. and make sure your rule looks exactly the same at this point. If it does, click Finish to create the new transport rule and then click Done to close the rule creation wizard.
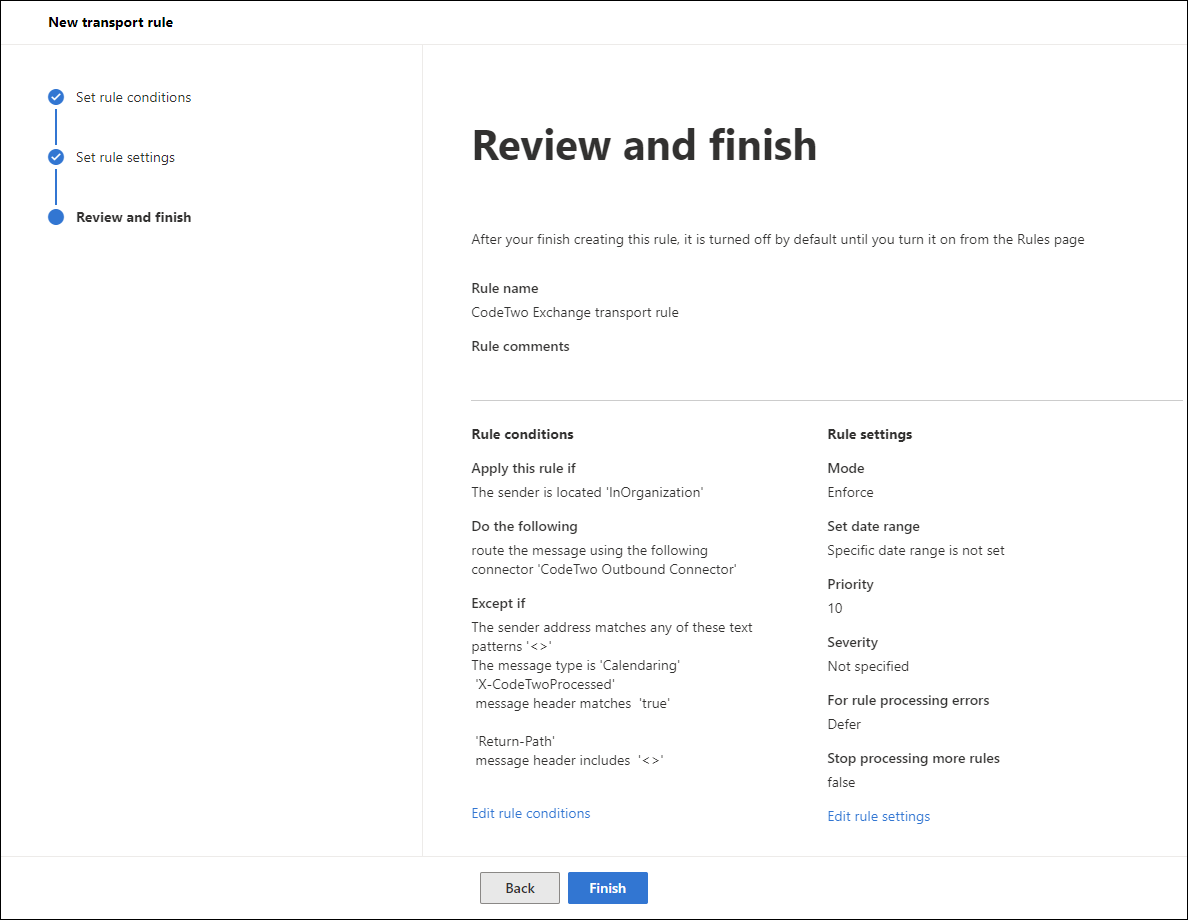
Fig. 18. The correct configuration of the CodeTwo Exchange transport rule for all users.
On the Rules page, use the Move up button to place the CodeTwo Exchange transport rule at the top of the rules list, as shown in Fig. 19., item 1 (you can also edit the rule's settings and set its priority to 0). Finally, click the rule and use the toggle to enable the rule (Fig. 19., item 2).
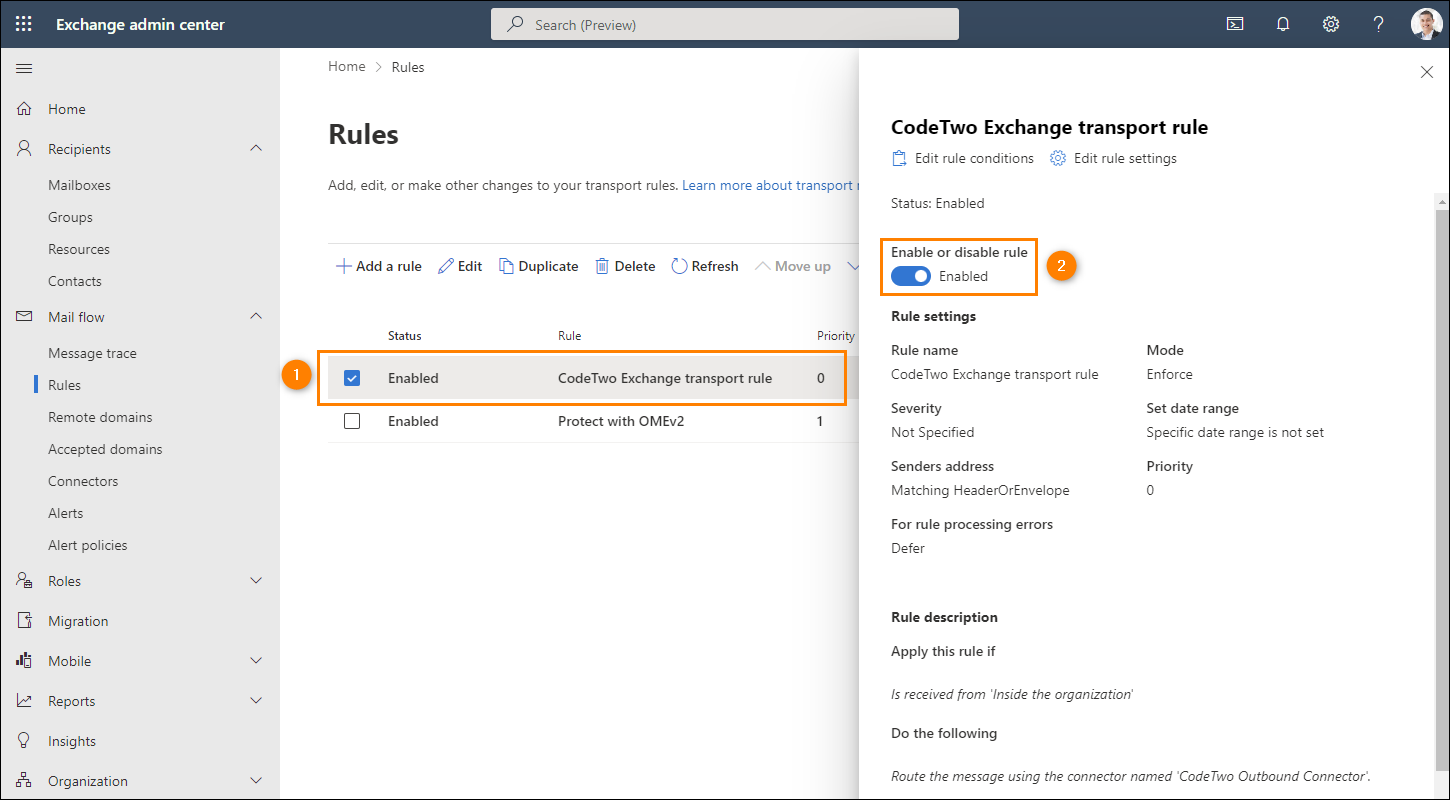
Fig. 19. Placing the CodeTwo Exchange transport rule at the top of the rules list and enabling it.
Important
In the above configuration, emails of all of your users will be routed through the CodeTwo service to receive cloud signatures. This might lead to excessive usage of licenses (learn more).
The created transport rule is applied to both outgoing and internal messages. If you do not want to add signatures to emails sent between the users inside your tenant, you need to specify an additional condition, as described in this section.
Configuration of the transport rule for selected users or groups
If you want to add a transport rule that limits your users to a particular group in your Microsoft 365, start with configuring a transport rule for all users, as described earlier in this article. The only difference is that in the Apply this rule if section you need to add another condition (by clicking the + button): you can select individual senders (The sender > is this person) or groups (The sender > is a member of this group) from the drop-down menu. An example of changing the scope of senders to a distribution group (Sales) is shown in Fig. 20.
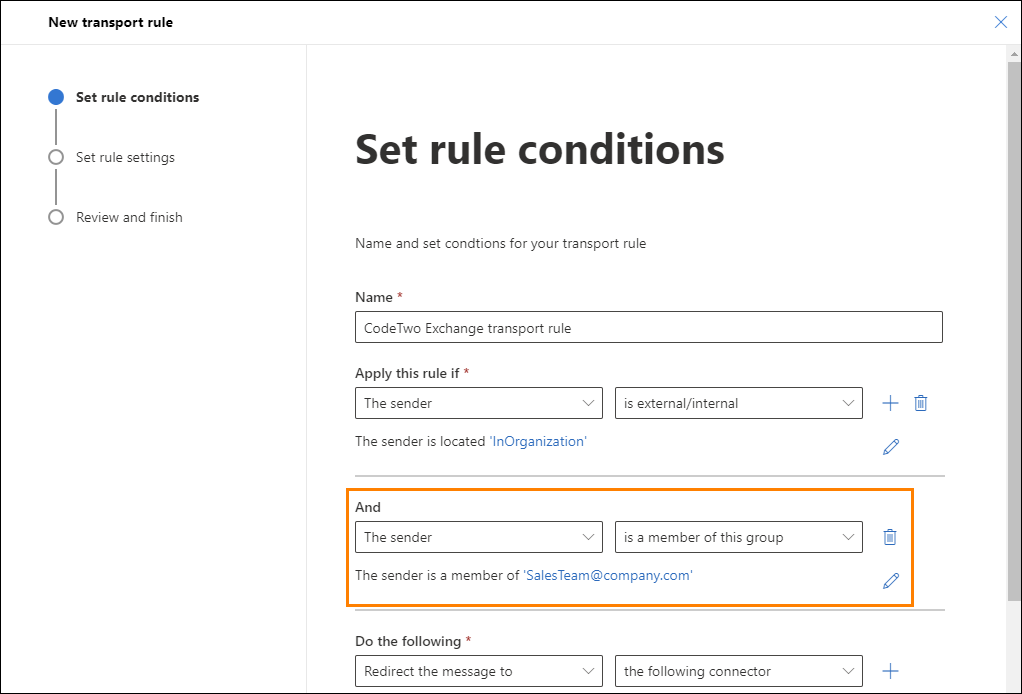
Fig. 20. Limiting the scope of senders.
The transport rule will be applied to both outgoing and internal messages sent by the users and/or members of the group(s) you specified. Note that if the group you selected has other groups nested inside, emails sent by members of the nested groups will also travel through the CodeTwo service.
If you need guidelines on how to add multiple groups or if some of your groups are not displayed in the group picker (for example, Microsoft 365 groups are never shown on the list), see our Knowledge Base article.
If you do not want to add signatures to emails sent between the users inside your tenant, you need to add and configure another condition, as described in the next section.
Configuration of the transport rule to exclude internal emails
If you would like to stop adding signatures to your internal correspondence, you need to modify your transport rule by adding an extra condition in the Apply this rule if section. Click the + button, select The recipient > is external/internal and select Outside the organization as recipient location. The condition should appear as shown in Fig. 21.
Important
For Microsoft 365 tenants with multiple domains, emails exchanged among those domains are treated as internal.
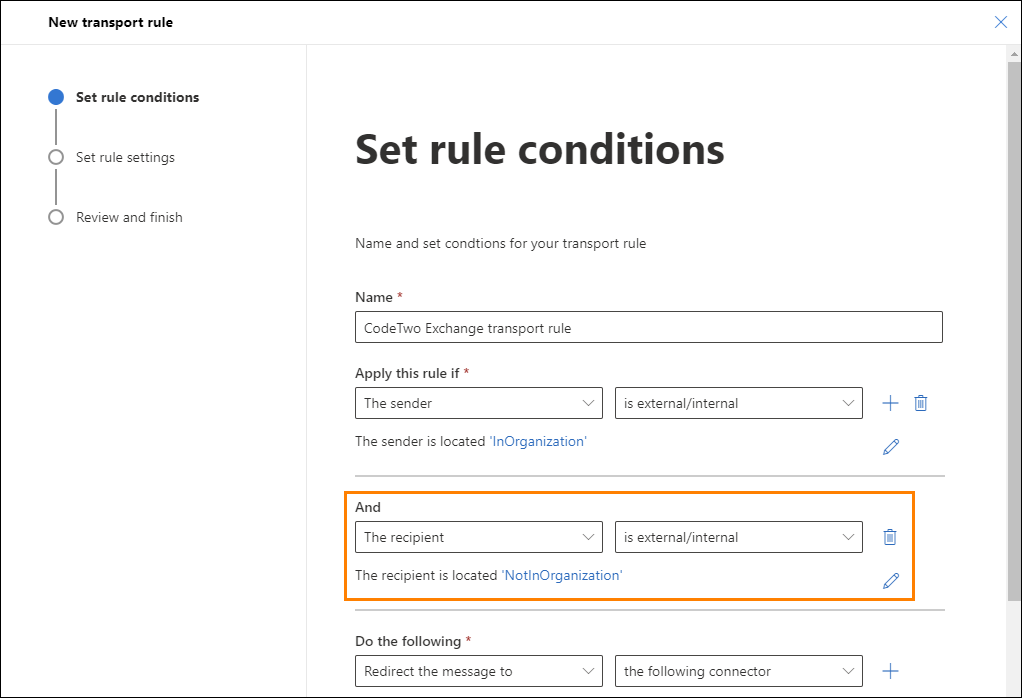
Fig. 21. Additional condition to exclude internal correspondence.
Check the scope of users whose emails are routed through CodeTwo
If you want to check the scope of users (senders) whose emails are routed through CodeTwo to get cloud signatures (each of those users consumes one license from your signature license pool), you can do this in the Exchange admin center:
Sign in to the Exchange admin center as a global administrator or Exchange administrator. Next, go to Mail flow > Rules and select CodeTwo Exchange transport rule. In the pane that opens, the scope of senders is provided in the Apply this rule if section shown in Fig. 22.
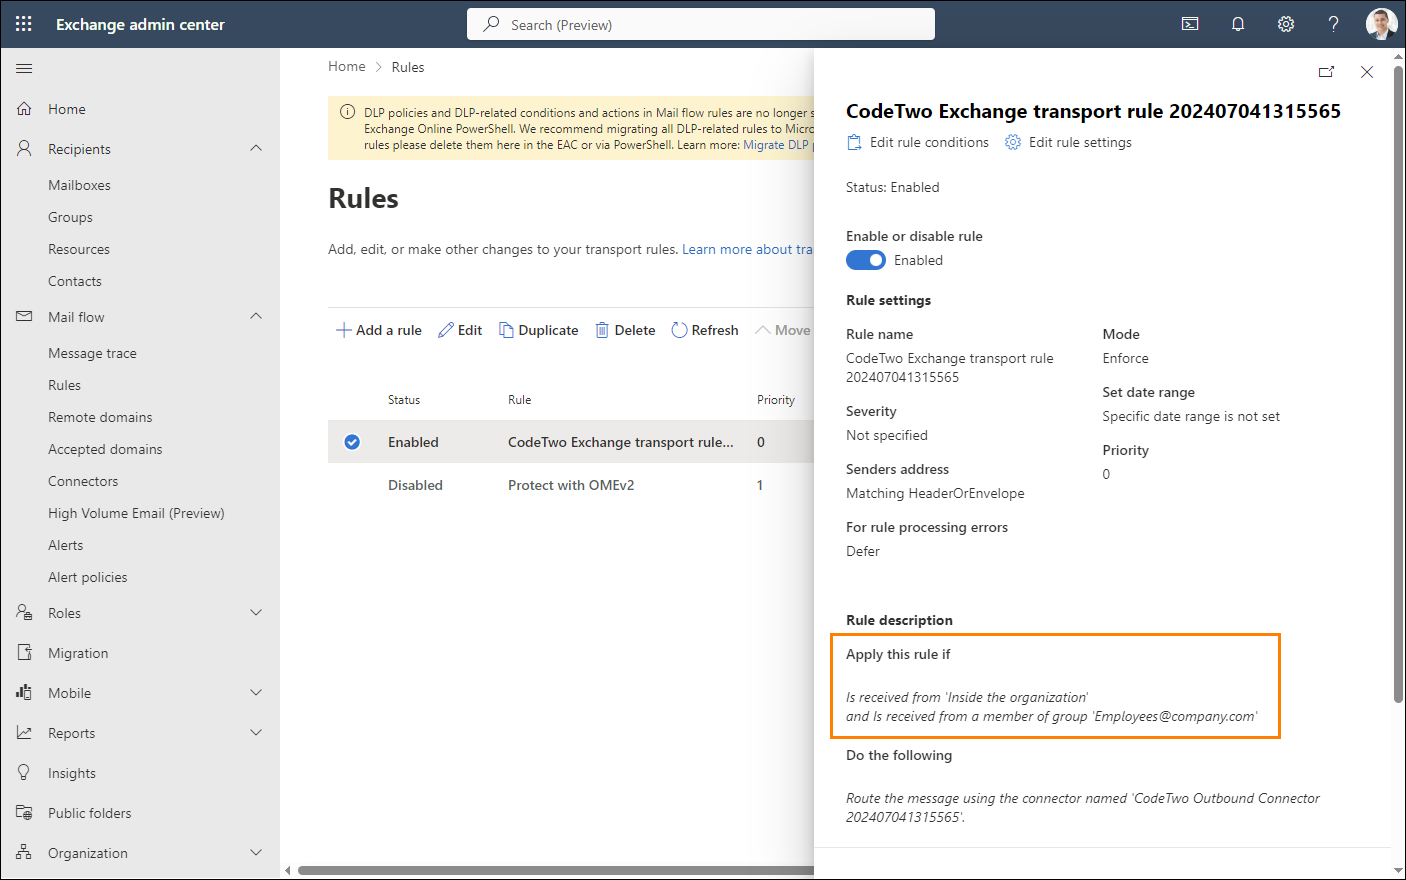
Fig. 22. Here you can check which emails are routed through CodeTwo to get cloud signatures.
Change the scope of users whose emails are routed through CodeTwo
If you need to change the scope of users (senders) whose emails are routed through CodeTwo (each of those users consumes one license from your signature license pool), you can do this:
- In the Exchange admin center: edit the CodeTwo transport rule in the Exchange admin center, as shown in this article. This method is recommended only if you have modified the CodeTwo Exchange transport rule in the past (e.g. added additional senders, exceptions, etc.) or if you use CodeTwo with smart host / mail relay services such as Barracuda, Proofpoint, Reflexion or Mimecast.
or
- In CodeTwo Admin Panel: perform the automatic configuration of Exchange Online connectors again in CodeTwo Admin Panel, as shown here. This method is fully automatic but will also restore the CodeTwo rule's settings to defaults. Note that there might be slight downtime for your email signatures during this process.
See next
Start managing email signatures in your organization