How to configure smart host (mail relay) services to work with CodeTwo software
Problem:
You use smart host (mail relay) services (e.g. for security, anti-virus/anti-spam protection) and you would like to configure them to work with CodeTwo cloud services.
If you use one of the following smart hosts: Barracuda, Proofpoint*, Mimecast, Reflexion and similar solutions, then this article is for you.
* If you use Proofpoint, you might be required to complete these additional steps, in addition to the basic configuration steps outlined below.
Solution:
To ensure correct mail flow in your organization (see examples in Fig. 1.), double-check that after you send a message and it goes through EOP servers, it is routed directly to the CodeTwo cloud service before it is passed to any other smart host services. This is essential to ensure proper processing of your messages by our services. If messages are routed to other smart hosts before they are processed by CodeTwo Email Signatures 365, you might experience the following issues:
- your signatures are missing because messages are never received by our service, or they are received in an encrypted format that we cannot process;
- your messages cannot be delivered due to a routing loop, and you receive non-delivery reports (NDRs) with the following error code: ATTR1;
- signatures are added in a wrong place in messages because the message body is modified by your smart host(s). As a result, our service is not able to find the correct reply separators;
- your message is corrupted.

Fig. 1. The correct mail flow for smart hosts and CodeTwo services: (a) - when a smart host delivers emails to recipients; (b) - when a smart host returns emails to Office 365 (EOP) for final delivery.
- Make sure your messages are always routed to the CodeTwo cloud service first.
- If this is not true, you need to reconfigure your smart host's outbound connector so that it's controlled by a transport rule. After that, you need to ensure correct email routing by modifying the CodeTwo transport rule. Watch the short video below that walks you through these configuration steps and read on for detailed guidelines.
Video: How to configure a smart host's outbound connector and required transport rules in Exchange Online.
Ensuring that messages are always routed to the CodeTwo cloud service first
After our services are deployed and fully configured in your Office 365 tenant, an additional Exchange Online outbound connector, controlled by a dedicated transport rule, is created. Such a setup is responsible for routing your mail flow through the CodeTwo services. This approach is recommended by Microsoft and guarantees that our software can intercept all your messages before they are processed by other smart hosts.
Important
According to Microsoft's recommendations, if emails are redirected to a connector via a transport rule (such as the CodeTwo Exchange transport rule), then all subsequent redirections to other connectors (e.g. your smart hosts) should also be triggered by transport rules.
In certain cases, other smart hosts may still intercept your messages before they reach CodeTwo services. To check if your environment is configured correctly, follow these steps:
- Check if the transport rule (CodeTwo Exchange transport rule) created by our software has the highest priority: open the Exchange admin center, go to Mail flow > Rules, and make sure that the rule is at the top of the rules’ list.
- If you are running a hybrid environment, check if your on-premises Exchange server routes any messages to smart hosts. If the on-premises server is configured to relay your mail through smart hosts, consider moving this responsibility to your Office 365 tenant. Otherwise, you might not be able to control the mail flow priority correctly.
If your environment meets the above requirements, but you still experience any issues caused by incorrect mail flow, you can analyze the headers of your messages to make sure that your emails are routed to the CodeTwo services first (before they are passed to other smart host services). To examine message headers, you can use tools such as:
If the analysis of message headers confirms that any of the following cases is true:
- directly after leaving EOP servers, your messages are not relayed to the CodeTwo Email Signatures 365 services,
- your messages reach your smart host(s) several times (e.g. you are getting duplicated messages),
- your messages are not delivered because of a routing loop,
then you are probably experiencing a routing glitch in Office 365. To solve the problem, you need to reconfigure all outbound connectors created by third-party smart host services (like the ones from Mimecast, Symantec, etc.) so that these connectors are controlled via transport rules instead of being controlled automatically (autonomously). Then, you need to make a slight modification to the CodeTwo transport rule, to ensure correct message routing.
Reconfiguring a smart host's outbound connector
To reconfigure the outbound connector of your smart host service so that this connector is controlled by an Exchange transport rule, you need to:
- Sign in to the Exchange admin center and go to Mail flow > Connectors.
- Select the outbound connector of your smart host, as shown in Fig. 2.
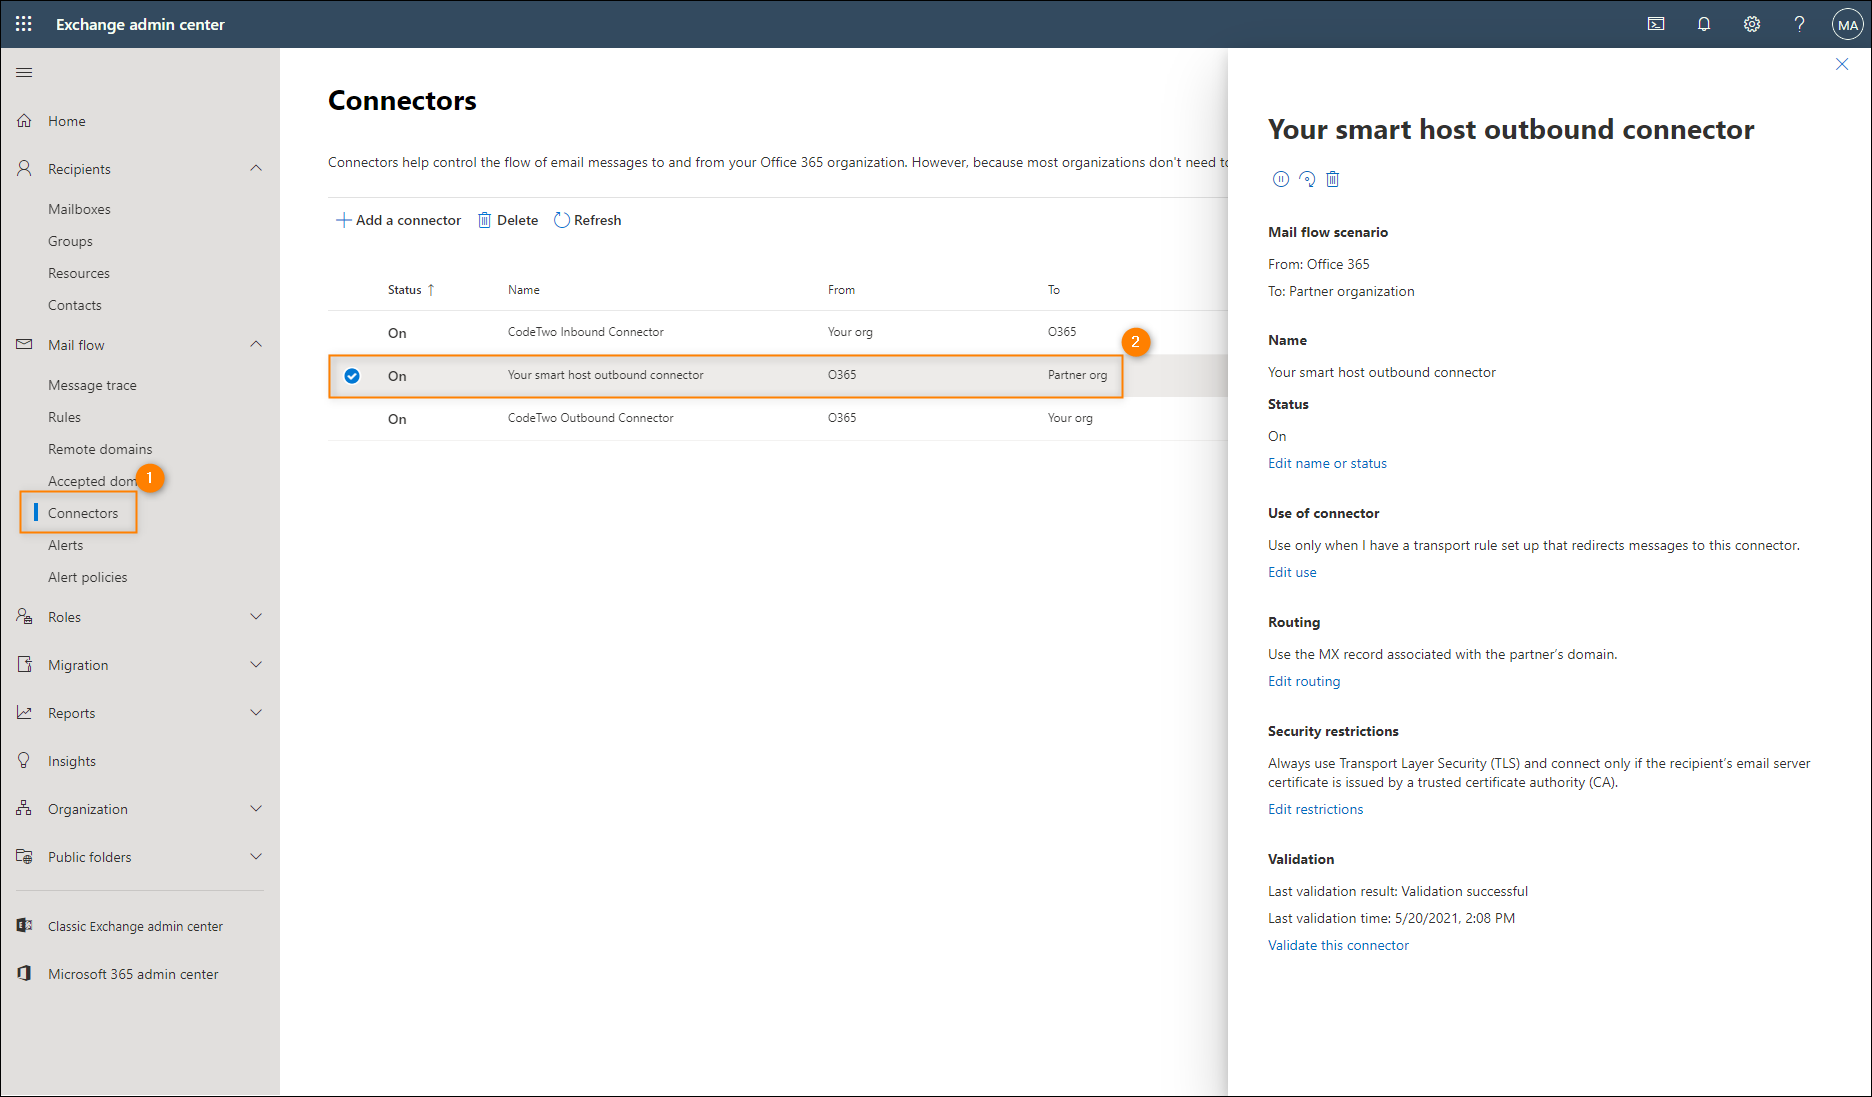
Fig. 2. The configuration of connectors in the Exchange admin center.
- In the pane that opens, click Edit use (Fig. 3.).
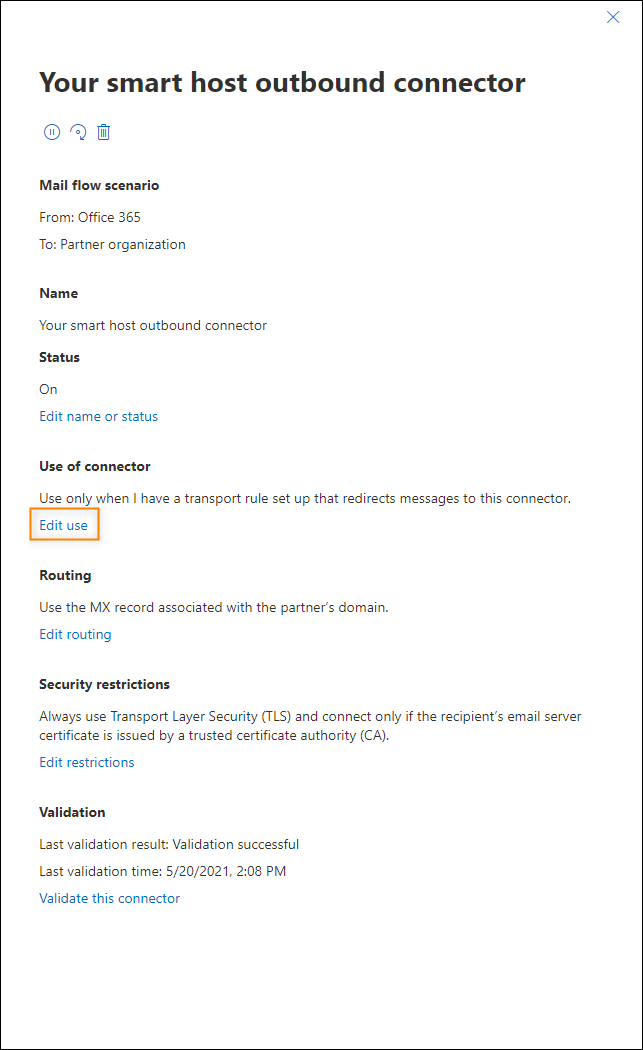
Fig. 3. The Edit use link.
- If there are any domains listed under Only when email messages are sent to these domains, write them down. You will need to reproduce these settings when you create a new transport rule that will be controlling this connector, as described in the next section.
- Select the first option (Only when I have a transport rule...), as shown in Fig. 4., and click Next. Complete the wizard without making any other changes and when you reach the last step close it by clicking Save.
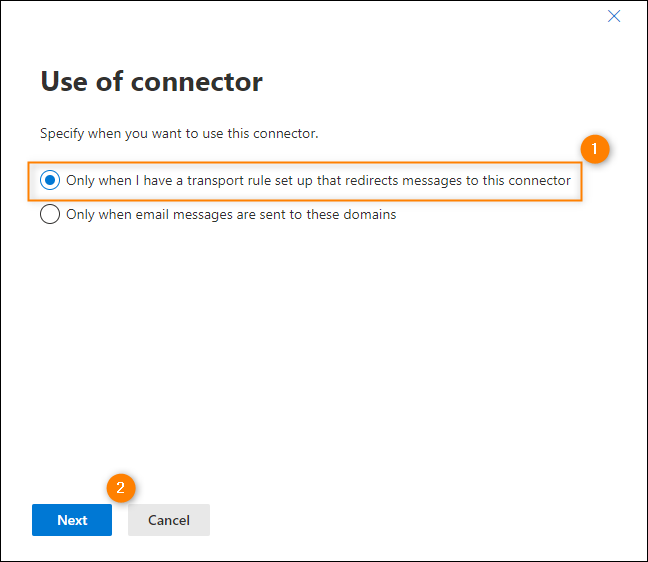
Fig. 4. The reconfiguration of a smart host's outbound connector.
Important
If you have more outbound connectors for custom services (smart hosts), you need to repeat the whole procedure (including the creation of the transport rule, as described further) for each connector.
From now on, your connector can be controlled only by transport rules. Therefore, you need to create a new transport rule for each of the reconfigured connectors.
Creating a transport rule to forward messages through a smart host
To route messages through your smart host, you need to create a new transport rule. This transport rule will forward messages to your smart host if they meet the conditions you specify. Additionally, the rule prevents messages from looping. To create a transport rule, you need to:
- In the Exchange admin center, go to Mail flow > Rules. Click the Add a rule button (Fig. 5.) and choose Create a new rule from the drop-down menu.
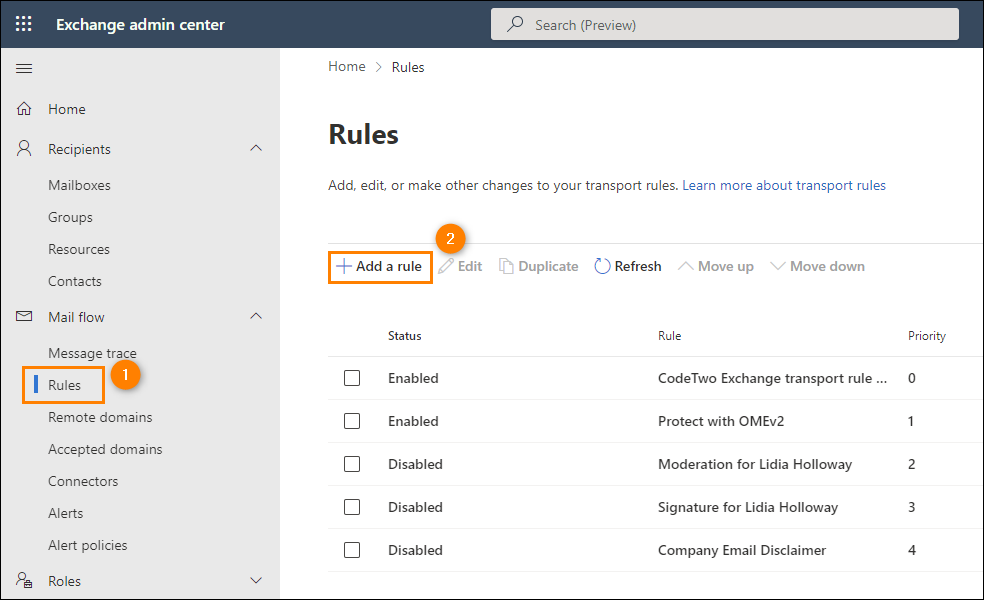
Fig. 5. Adding a new transport rule for the smart host's outbound connector.
- A new transport rule creation wizard opens. In the Set rule conditions step, name your rule and configure the following options:
- The conditions need to reflect the configuration of your smart host’s connector. In the Apply this rule if section:
- Select The sender > is external/internal and select Inside the organization. This condition is necessary because all outbound connectors should be active only for emails originating from your organization.
- Click the + button to add another condition to make sure the rule is active only for recipients outside of your organization: select The recipient > is external/internal and select Outside the organization. This condition is necessary because all outbound connectors should be active only for emails sent outside of your organization.
- If your connector was configured to work only when emails are sent to specific domains (see step 4 in the previous section), you need to reproduce this behavior here, by using the available conditions (such as The recipient > address matches any of these text patterns [domain]).
- In the Do the following section:
- Select Modify the message properties > set a message header. Type any name (e.g. X-AntiLoop-Smarthost) for a header and set the value to true.
- Click the + button to add a new action and select Redirect the message to > the following connector and select your smart host's outbound connector.
- In the Except if section, select The message headers >includes any of these words. Set the same name of your header as in the first action (e.g. X-AntiLoop-Smarthost) and set the value to true.
- Click Next to go to the Set rule settings step and enable (select) the Defer the message if rule processing doesn't complete option. With this feature enabled, your message will keep trying to use your smart host even if the previous attempt failed.
Click Next to go to the Review and finish step. The rule's configuration should look as shown in Fig. 6. or similar. Click Finish to create the rule.
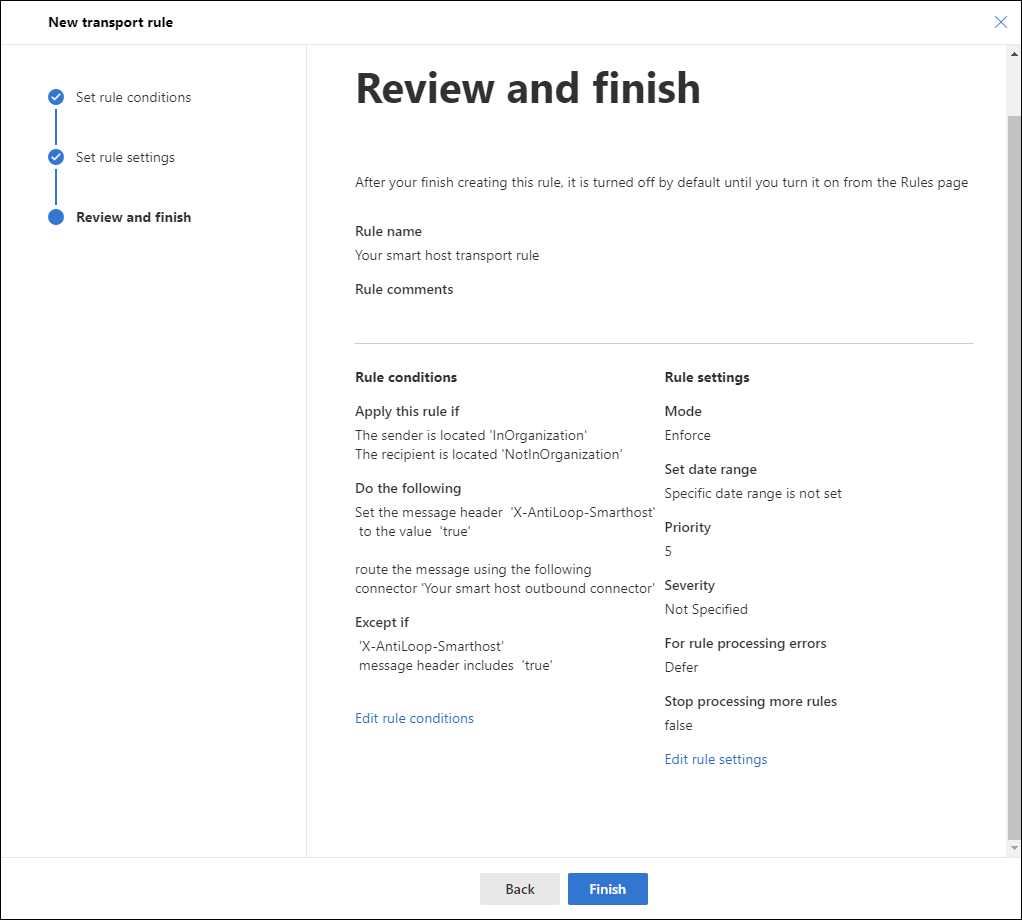
Fig. 6. The correct configuration of the transport rule for a smart host.
By configuring the transport rule in such a way, your messages will not get looped even if your smart host returns the message back to EOP. The created transport rule is configured to send a message to your smart host service only once.
- Once created, the rule is placed at the bottom of the rules list, with the lowest priority, and disabled. Use the Move up button to place it directly below the CodeTwo Exchange transport rule. By default, the CodeTwo rule has priority 0 – in this case, your smart host rule should have priority 1, as shown in Fig. 7., item 1 (note that you can also edit the rule and change the priority manually). Finally, select your smart host rule and use the toggle to enable the rule (Fig. 7., item 2).
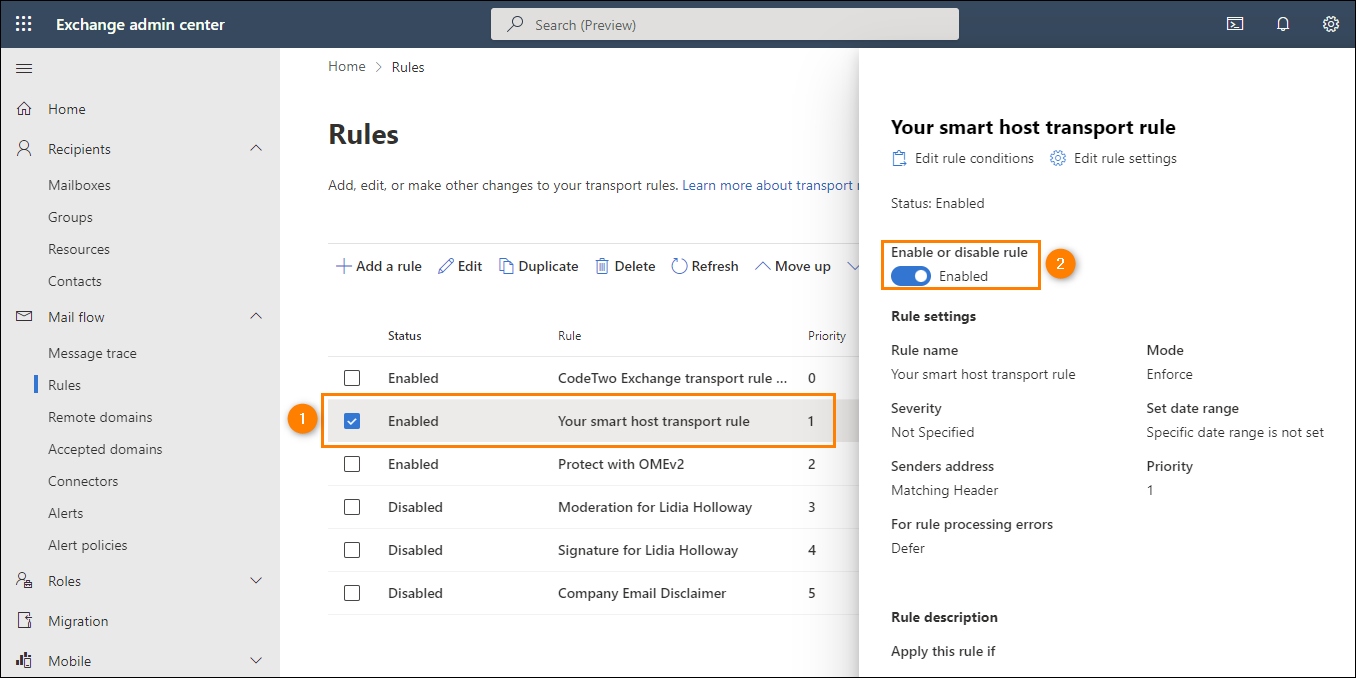
Fig. 7. Setting the priority of the smart host transport rule and enabling it.
Modifying the CodeTwo transport rule
Finally, you need to modify the CodeTwo Exchange transport rule. This is the key step to ensure correct message routing. By completing it properly, you can be sure that the CodeTwo service and your smart host service(s) will work as intended.
- Select the CodeTwo Exchange transport rule on the list of rules (the CodeTwo rule should be above your smart host's rule - see Fig. 7.) or click Edit rule settings (Fig. 8.).
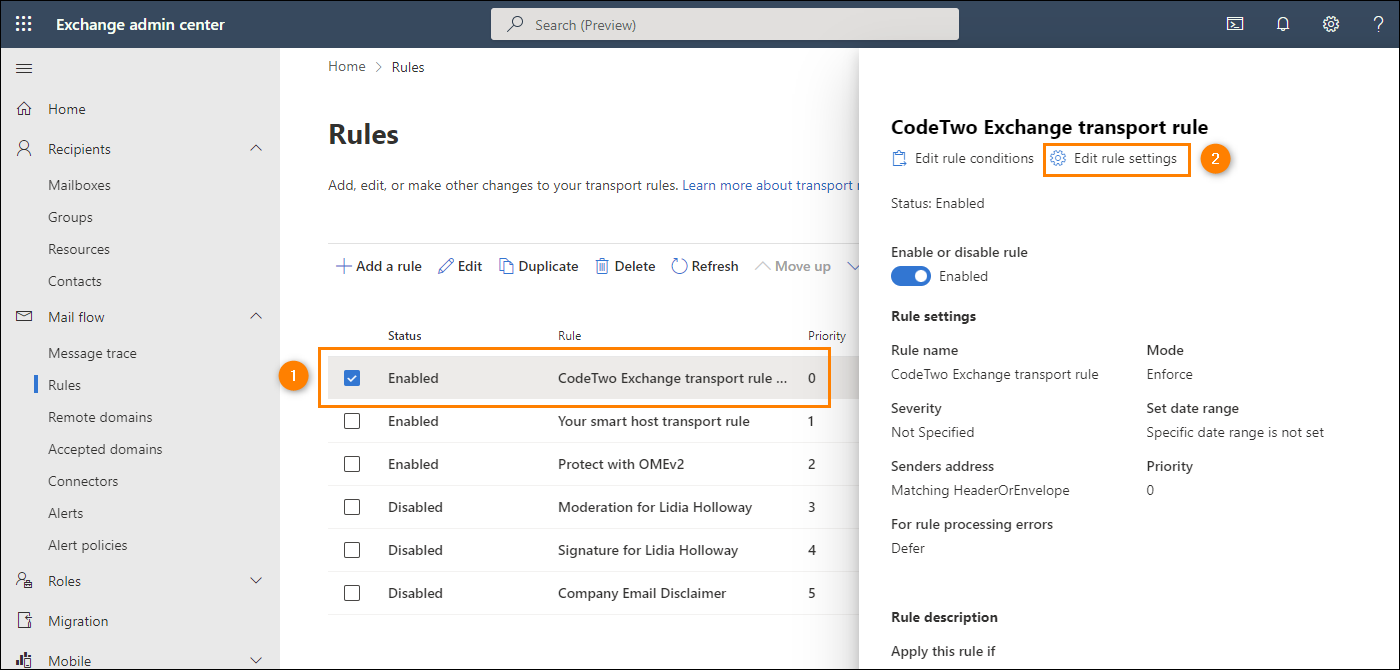
Fig. 8. Editing the settings of the CodeTwo Exchange transport rule.
- Enable (select) the Stop processing more rules option, as shown in Fig. 9.
Important
Each email getting a signature is processed by Exchange Online twice:
- For the first time: immediately after being sent. This is when the message should directly reach the CodeTwo cloud service. Selecting the Stop processing more rules option helps achieve this as it forces the CodeTwo Exchange transport rule to be the only one to be applied, provided it has the top priority (0).
- For the second time: after leaving the CodeTwo service. This is when the message (with added signature) should next go to your smart host service(s). Because the CodeTwo Exchange transport rule is not executed again, the Stop processing more rules option is not taken into consideration. It means that any other transport rule configured for your tenant will still be executed.
To summarize, using the Stop processing more rules option will NOT block other transport rules you’ve configured in your Exchange admin center. The CodeTwo Exchange transport rule (with the option in question) will be executed only during the first stage mentioned above. Other rules will be executed during the second stage as usual.
- Save the changes.
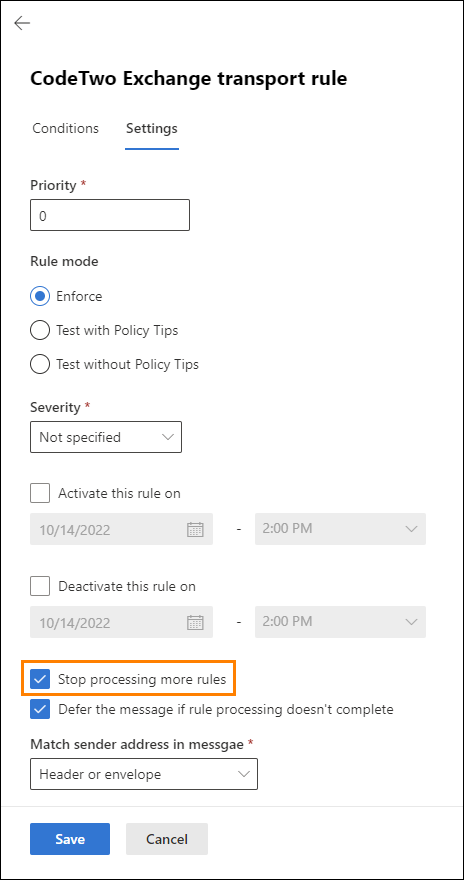
Fig. 9. The modification of the CodeTwo Exchange transport rule.
Your mail flow is now configured, and emails will be routed through our cloud services and your smart host service before they reach their recipients.
Info
If you experience any mail flow problems when sending emails via SMTP clients (e.g. Mozilla Thunderbird), see this article.
Additional steps for Proofpoint
If you use Proofpoint as your smart host, you might be required to manually add your unique CodeTwo domain to the list of domains in the Proofpoint management interface, e.g. to be able to properly configure the Azure Active Directory Connect sync (that lets you integrate AAD with Proofpoint). To do it, follow the steps below:
- Sign in to the Proofpoint management interface in your browser.
- Go to Account Management > Domains.
- Click the NEW DOMAIN button above the domains’ list.
- In the Add Domain pane that opens, configure the options as follows (see Fig. 10.):
- For the Domain Type option, choose Relay from the drop-down menu.
- In the Domain Name and Primary Delivery Destination fields, paste your unique CodeTwo domain.
Your CodeTwo domain
The unique CodeTwo domain is added to your Microsoft 365 tenant during the provisioning of CodeTwo Email Signatures 365. It has the following format [your unique ID].smtp.codetwo.online, and can be easily found by using these instructions.
- Click Save to apply the configuration (Fig. 10.).
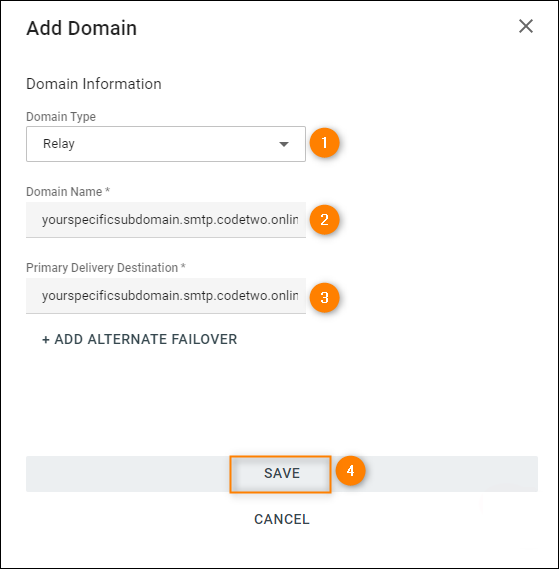
Fig. 10. Adding your unique CodeTwo domain to the Domains list in Proofpoint.
That’s all - adding the domain to the list is all you need to do to make Proofpoint coexist with our software without any issues. No actual verification is needed, so you should not worry about the Verification Pending and Inactive statuses displayed in the Domain Status and Mail Relay columns respectively.
| Related products: | CodeTwo Email Signatures for Office 365 |
| Categories: | How-To, Troubleshooting |
| Last modified: | September 15, 2023 |
| Created: | March 28, 2017 |
| ID: | 626 |


