How to add extra information to your signature with custom attributes
With CodeTwo Email Signatures 365, you can let your users enter additional, unique information to be included in their email signatures, disclaimers, or auto replies. To do that, you can use CodeTwo custom attributes managed in the Attributes manager app and shared with users in the My user info app (both apps are included in your CodeTwo license for free).
Watch this short video for a quick overview of how this works:
In a nutshell, CodeTwo lets you quickly create any number of custom attributes and integrate them into email signature templates using dedicated placeholders. For example, CodeTwo custom attributes can store information such as:
- working days or hours (see setup instructions),
- academic title,
- user language(s) (see setup instructions),
- professional license number (see setup instructions),
- NMLS ID,
- gender pronouns (learn more),
- name pronunciation (learn more),
- preferred first name,
- information about an award (e.g., teacher of the year),
- LinkedIn profile address, and many more.
Next, users can individually adjust their additional information by either selecting relevant attribute values from a list or entering them manually.
New to CodeTwo?
Learn more about signature modes our solution can work in. See how to set up your first signature rule and design an email signature template.
To read more about the free Attributes manager & My user info apps, see this article.
How to let users adjust their extra information using a list of available attribute values
In CodeTwo Attributes manager, you can add custom single-select or multi-select attributes that let users add extra information to their email signatures and auto replies. This is especially useful for attributes that store specific or predefined values, such as shift hours set in your organization.
Watch the video below to learn how to let users show their working hours in their signatures, or read on for more details about this scenario.
In the example below, we will create a CodeTwo custom attribute storing information on users’ working hours. The attribute will contain three time slots (Fig. 1.):
- 8:00 AM – 4:00 PM UTC
- 4:00 PM – 12:00 AM UTC
- 12:00 AM – 8:00 AM UTC
This approach can help you ensure a consistent format for working hours in your organization’s email signatures and auto replies, preventing all sorts of inconsistencies that may arise when users enter this information manually – especially in organizations spanning multiple time zones or using both 12-hour and 24-hour time formats.
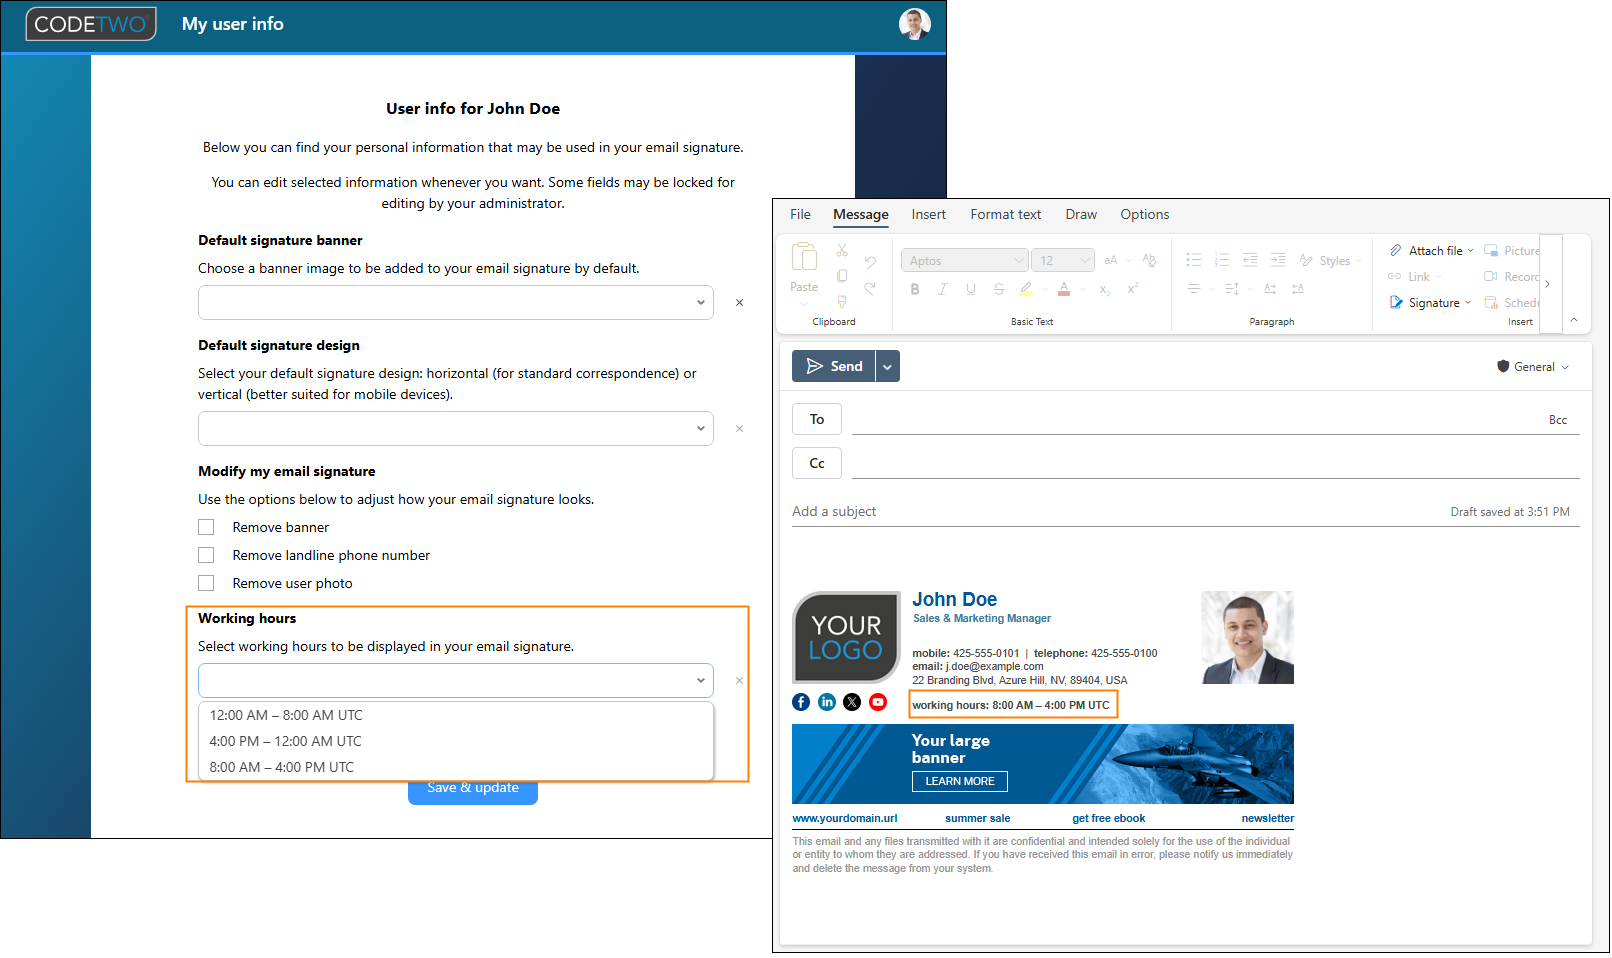
Fig. 1. Selecting working hours to be included in a user’s email signature.
The following instructions also apply to other use cases.
Important
All the changes you make with the Attributes manager app (creating custom attributes included) do not affect your original Entra ID (Azure AD) data. They are reflected only in the signatures, disclaimers, and automatic replies added by CodeTwo Email Signatures 365. If you want to restore original Entra ID data in your signatures, disclaimers, and auto replies, you can do it as well. Learn more
Create a custom attribute in the Attributes manager app
To start, sign in to the Attributes manager app.
Important
By default, only Microsoft 365 global admins can sign in to the Attributes manager, but they can also grant access to other users. See this article to learn more.
If you use the manager for the first time, you need to consent to permissions requested by our web app on behalf of your organization.
In the CodeTwo custom attributes section, click the Add button (Fig. 2.).
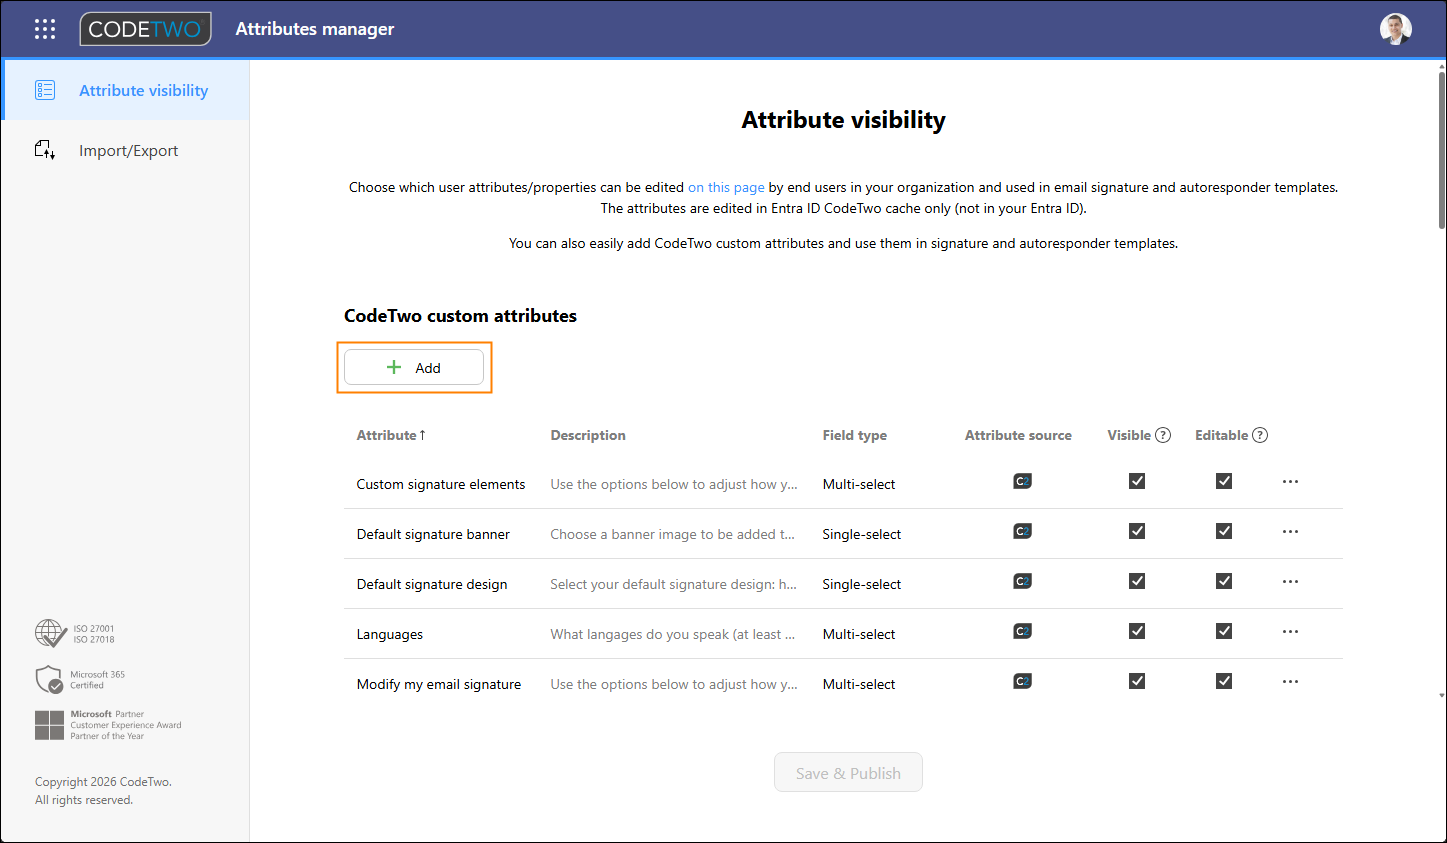
Fig. 2. Adding a custom attribute in the Attributes manager app.
In the window that opens, type the attribute’s name and (optionally) a description, and choose Single-select as the field type. Next, enter available time slots in the Option fields, as shown in Fig. 3. These time slots will be later displayed to users as available options in the My user info app. Keep in mind that they will be sorted alphabetically.
You can include as many time slots as needed using the Add option button.
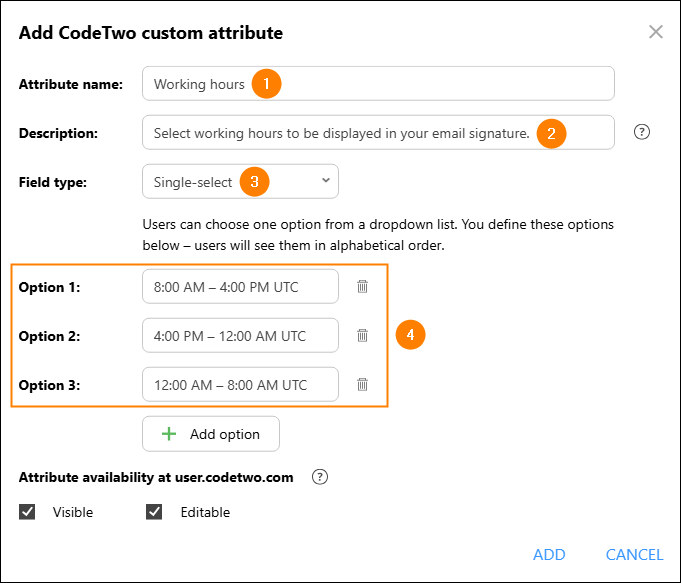
Fig. 3. Configuring the custom attribute for selecting working hours.
Tip
For other use cases, you can also set the field type as Multi-select to let users choose multiple attribute values. This is useful, for example, when adding a custom attribute to create a list of available working days, academic titles, or languages that users can communicate in. See this section for more information on multi-select attributes.
After you enter all necessary options, leave the Visible and Editable checkboxes selected and click ADD.
Back in the Attributes manager’s main window, click the Save & Publish button to confirm your changes and make the new custom attribute available in other CodeTwo apps (Fig. 4.).
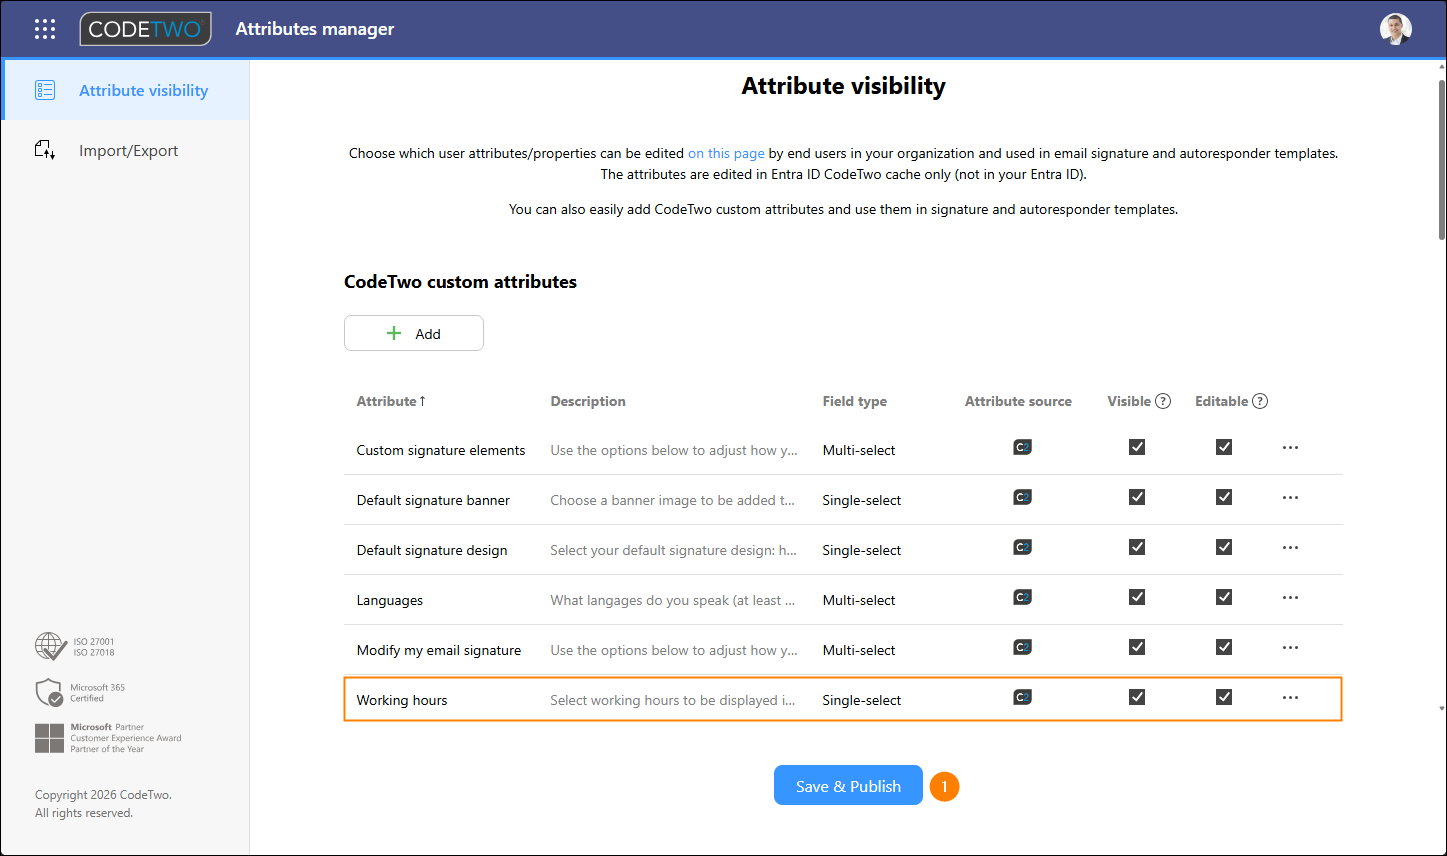
Fig. 4. Saving and publishing the new custom attribute in the Attributes manager app.
When the CodeTwo custom attribute is configured, you can move on to designing the email signature or auto reply in which you want to use the attribute.
Add the custom attribute to a template in the Signatures app
Sign in to the Signatures app, click CREATE RULE, and select Cloud (server-side), Outlook (client-side), or Autoresponder to create a new signature or autoresponder rule. Alternatively, you can edit an existing rule.
Use the links below for detailed instructions on how to create:
Name the rule and configure its conditions (and exceptions) as needed. Once you’re ready, go to the Design step and click Edit signature (or Edit auto-reply message) to open the template editor (Fig. 5.).
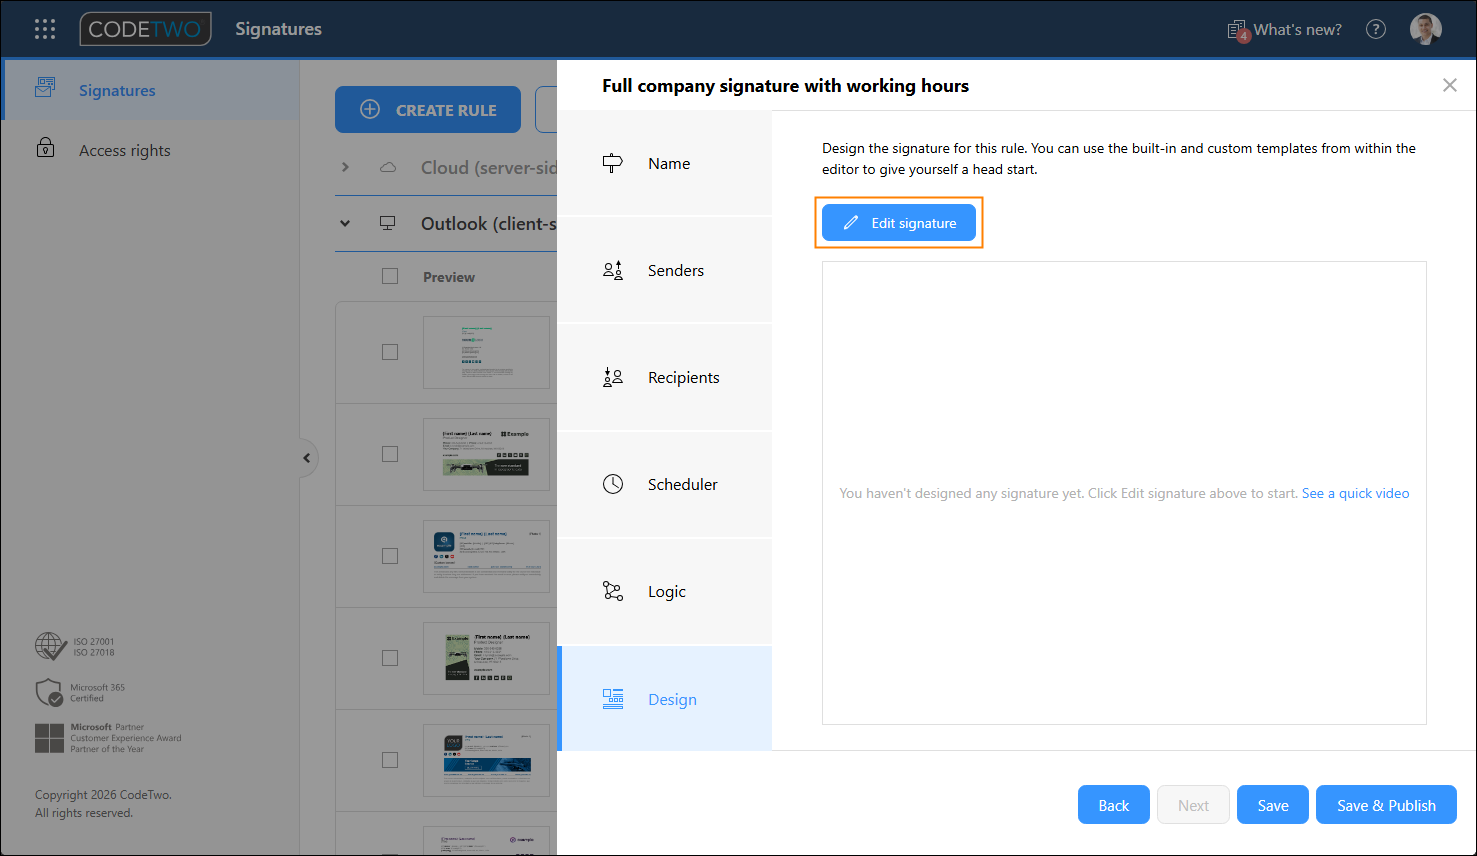
Fig. 5. Opening the template editor.
Create a signature or auto-reply template using built-in templates or design it from scratch.
Enter a short label (for example, Working hours) for the extra information in the right spot of your template. Make sure to include a space immediately after the label. Next, click CodeTwo attribs on the ribbon and choose your new custom attribute (Fig. 6.).
Important
If the new custom attribute is not visible in CodeTwo attribs, you may need to refresh the Signatures app.
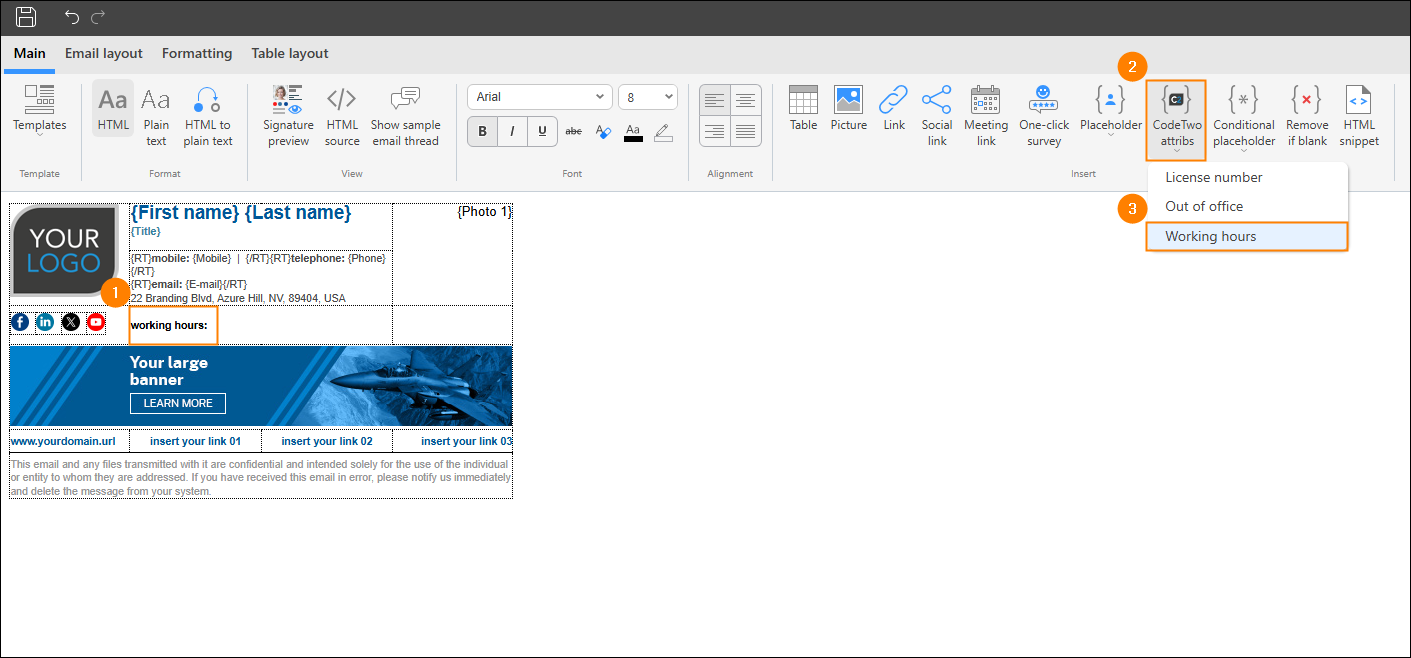
Fig. 6. Inserting the custom attribute-related placeholder into the email signature template.
Adjust the formatting for both the label and the placeholder. It’s also good practice to apply RT tags to the entire line – this way, you can make sure the attribute’s label is removed from the final signature or auto reply if a user doesn’t select any attribute value in the My user info app. To apply RT tags, highlight the label and the placeholder and click the Remove if blank button on the ribbon, as shown in Fig. 7. Learn more about using RT tags with placeholders
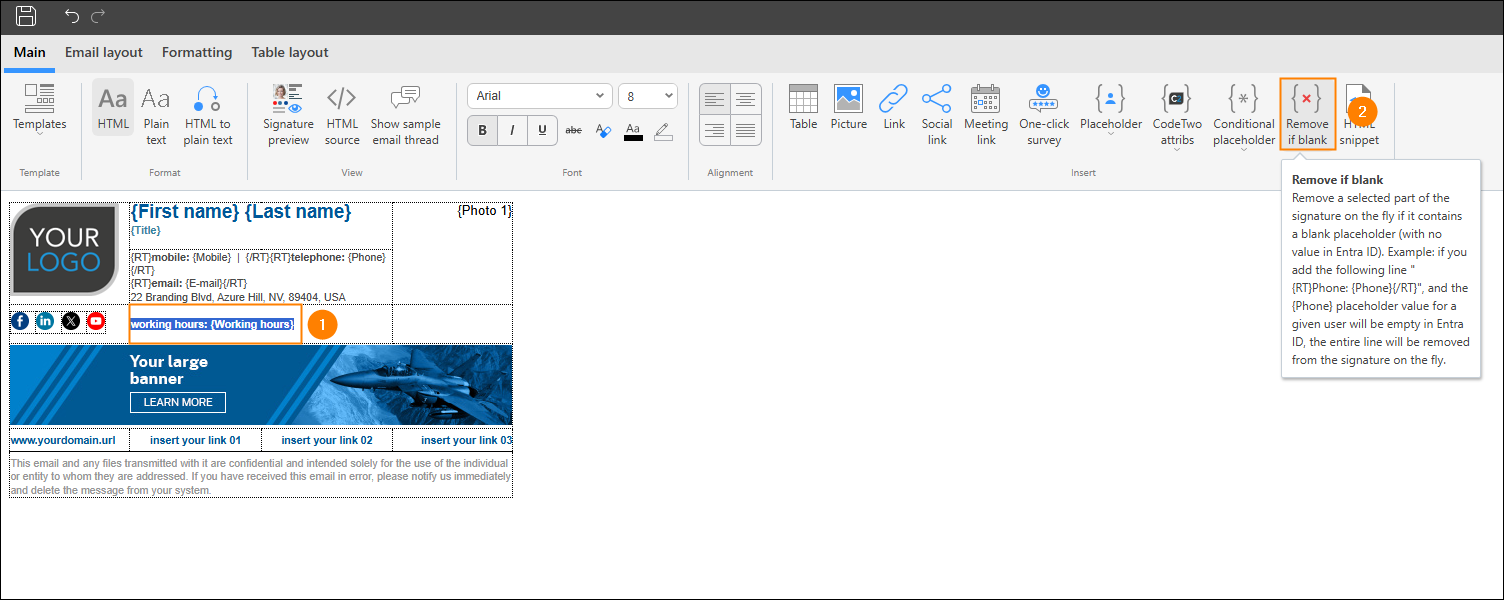
Fig. 7. Adding RT tags to the placeholder.
Save your changes in the template editor and submit your rule by clicking Save & Publish.
Make sure your new rule is placed in the correct position on the list of signature rules so that the signature can always be applied when intended. Learn more about rule processing logic
Ask users to choose an attribute value in the My user info app
Now, ask your users to sign in to the My user info app with their Microsoft 365 credentials and choose their working hours by selecting a relevant value of your new custom attribute (Fig. 8.).
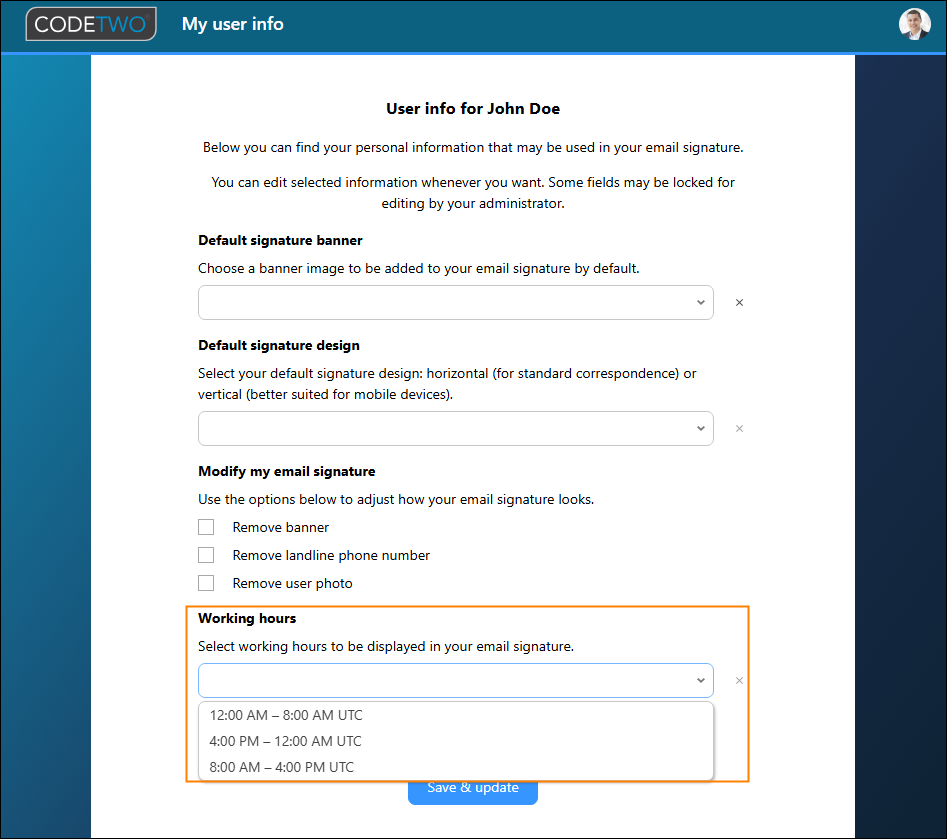
Fig. 8. Selecting an attribute value with working hours information in the My user info app.
Once a user selects an appropriate value and clicks Save & update, the chosen value will be displayed for that user in the previously configured signature or auto reply (Fig. 9.). If a user doesn’t select any value, the attribute’s label will be removed from the signature or auto reply, provided that you applied RT tags in your template (as described here).
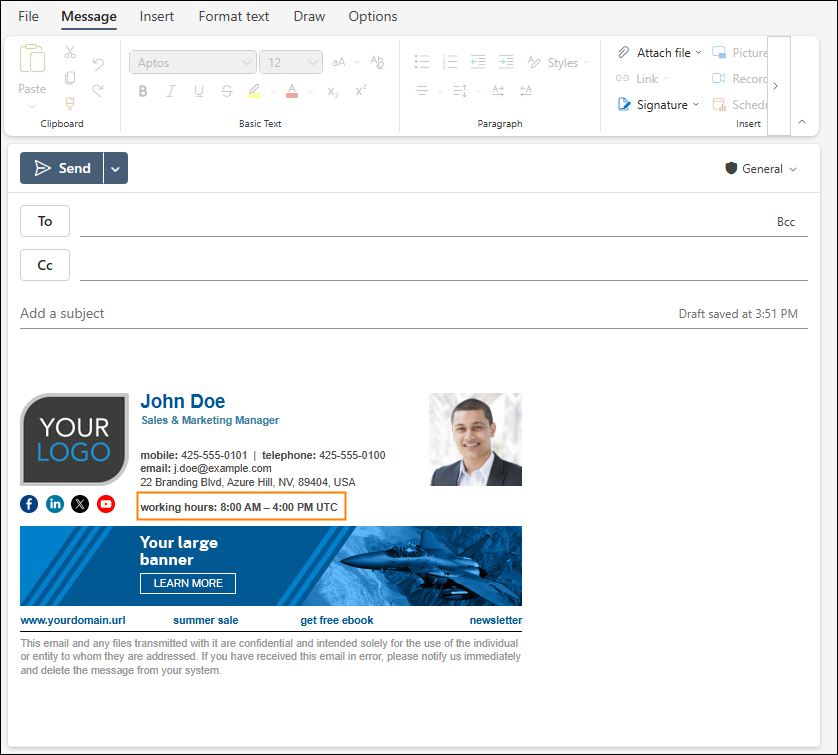
Fig. 9. Additional information on the user’s working hours displayed in an email signature.
Tip
If your user database is large or you cannot ask your users to fill out the necessary field for a different reason, the Attributes manager app lets you update user attributes in bulk. See this section to learn how.
Using multi-select attributes
If you want to let users select multiple values of a custom attribute and display the chosen values in email signatures or auto replies, use the Multi-select field type when adding the attribute in the Attributes manager app (Fig. 10.).
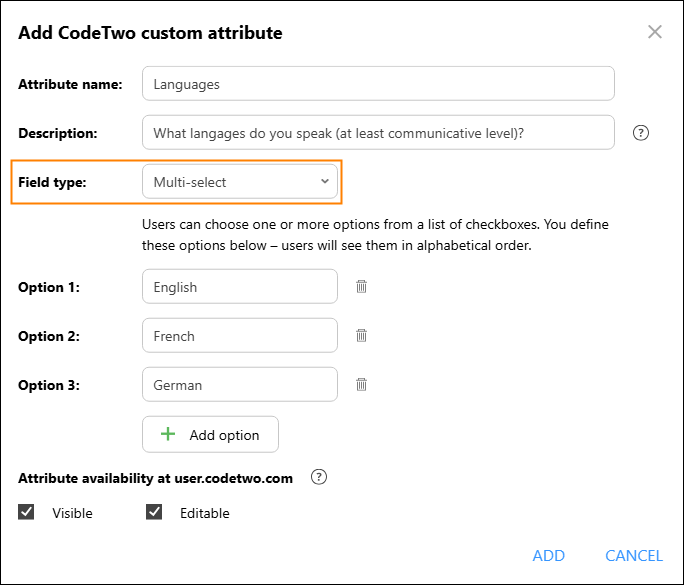
Fig. 10. Creating a multi-select custom attribute for user languages in the Attributes manager app.
The other steps are the same as when configuring a single-select attribute – see this section for details.
When the multi-select attribute is ready, users will be able to choose relevant values in the My user info app. The selected values will then be displayed in email signatures or auto replies where a corresponding placeholder has been added (Fig. 11.).
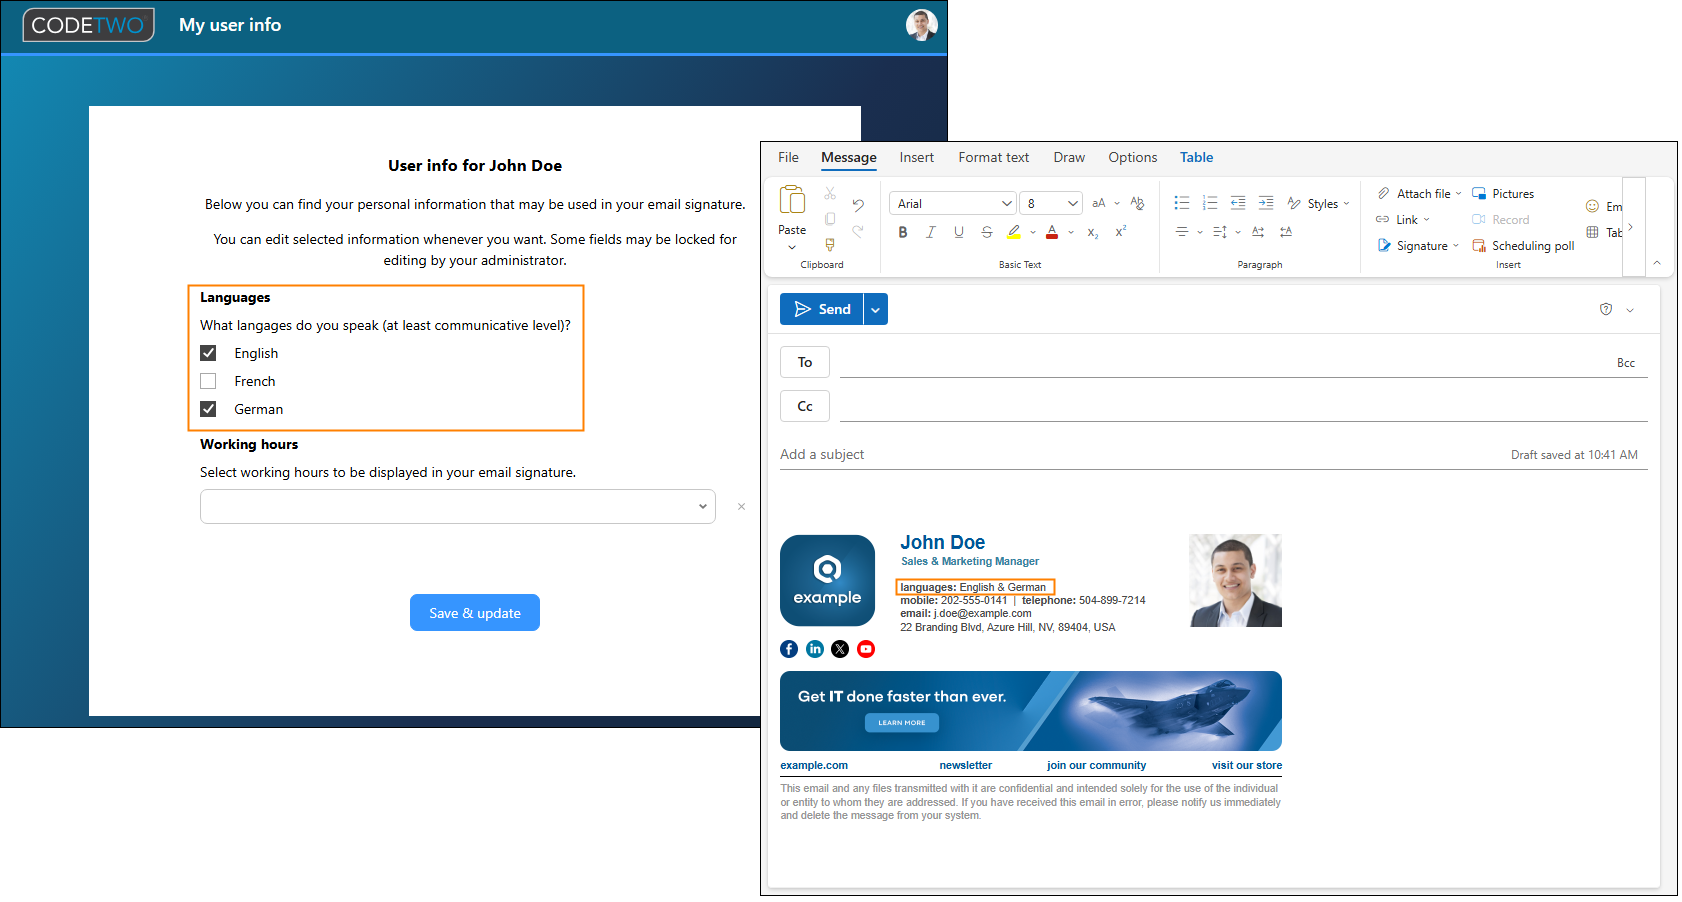
Fig. 11. Information about user languages shown in a signature according to a multi-value custom attribute.
Note that by default, subsequent values of a multi-select attribute are separated with the & character (ampersand), as shown in Fig. 11. See this article to learn how to replace it with another separator, such as a comma.
How to let users manually enter their extra information
With CodeTwo Attributes manager, you can also add custom attributes that users can manually fill in with text or numeric values to include in their email signatures or auto replies. This gives users the flexibility to show their distinctive details that are not stored in your user directory, such as license numbers, gender pronouns, and more.
In this example, we will create a CodeTwo custom attribute to store a medical license number to be individually entered by users (Fig. 12.). The instructions below will work for other uses cases too, regardless of what custom attribute you’re planning to deploy.
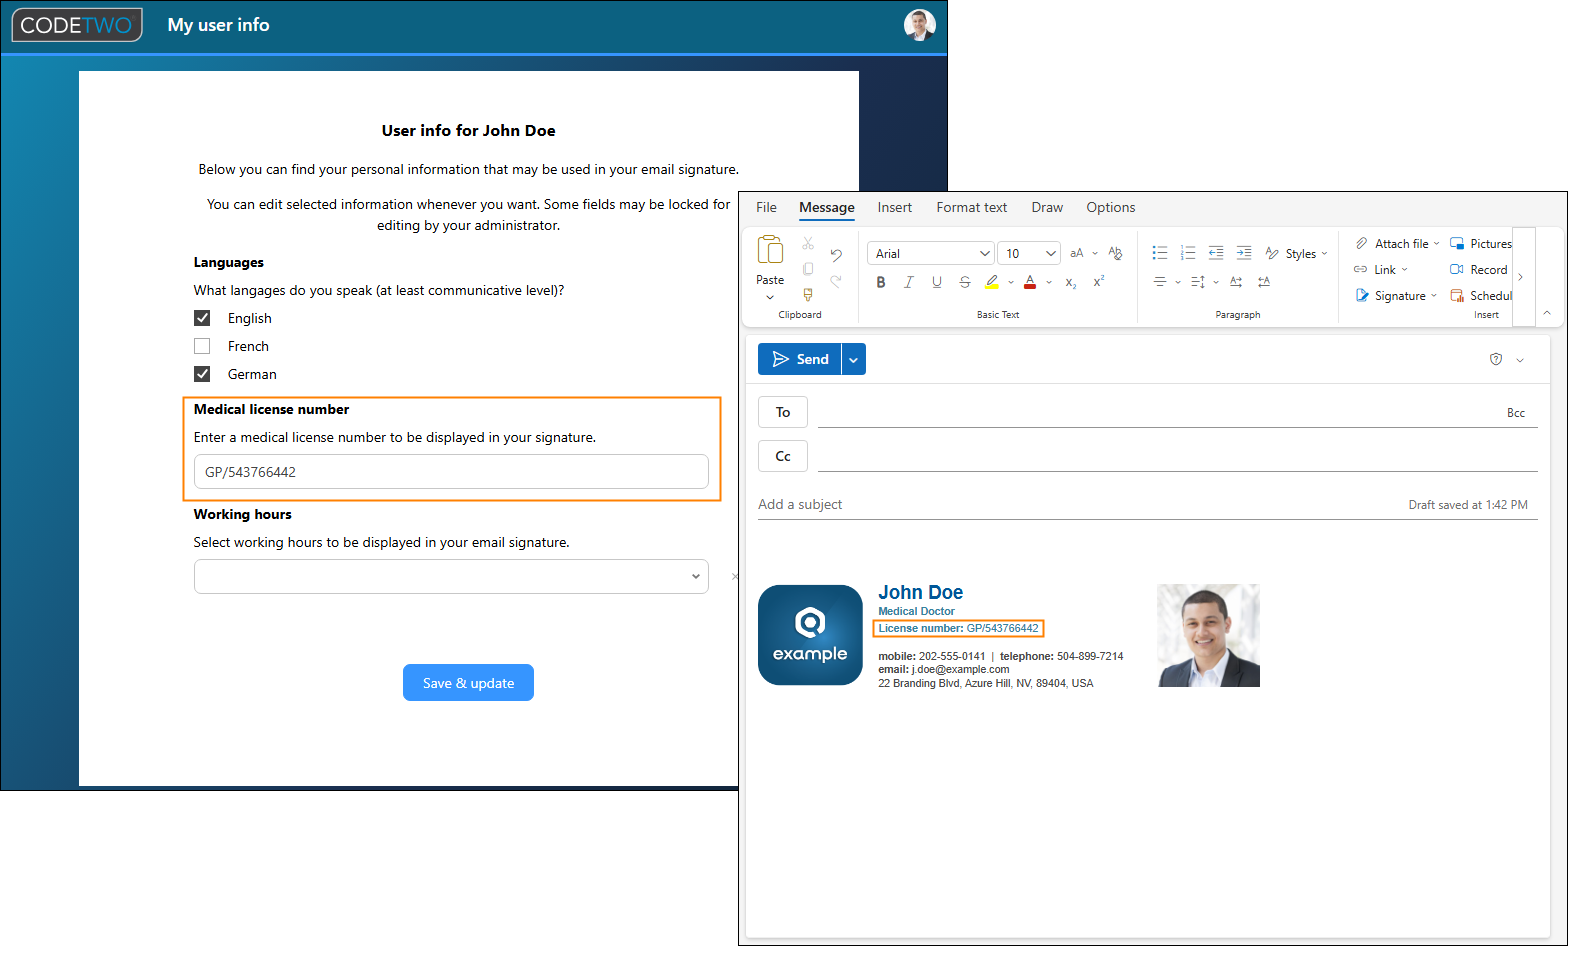
Fig. 12. Entering a license number to be included in a user’s email signature.
Important
All the changes you make with the Attributes manager app (creating custom attributes included) do not affect your original Entra ID (Azure AD) data. They are reflected only in the signatures, disclaimers, and automatic replies added by CodeTwo Email Signatures 365. If you want to restore original Entra ID data in your signatures, disclaimers, and auto replies, you can do it as well. Learn more
Create a custom attribute in the Attributes manager app
To start, sign in to the Attributes manager app.
Important
By default, only Microsoft 365 global admins can sign in to the Attributes manager, but they can also grant access to other users. See this article to learn more.
If you use the manager for the first time, you need to consent to permissions requested by our web app on behalf of your organization.
In the CodeTwo custom attributes section, click the Add button (Fig. 13.).
Fig. 13. Adding a custom attribute in the Attributes manager app.
In the window that opens, type the attribute’s name and (optionally) a description. As the field type, choose Text (for any text, including letters, numbers, or symbols) or Number (for numbers only, including decimals and negative values), as shown in Fig. 14.
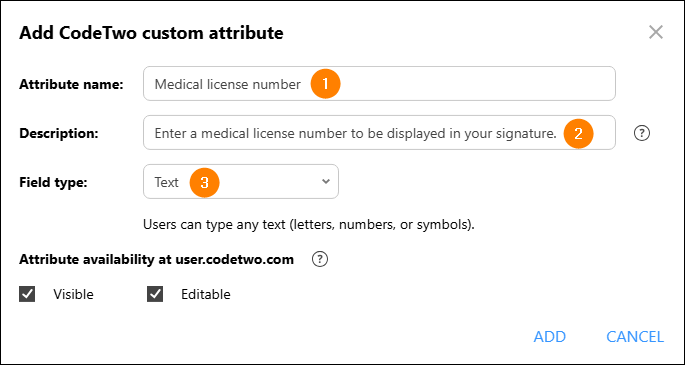
Fig. 14. Configuring the custom attribute for a medical license number.
Leave the Visible and Editable checkboxes selected and click ADD.
Back in the Attributes manager’s main window, click the Save & Publish button to confirm your changes and make the new custom attribute available in other CodeTwo apps (Fig. 15.).
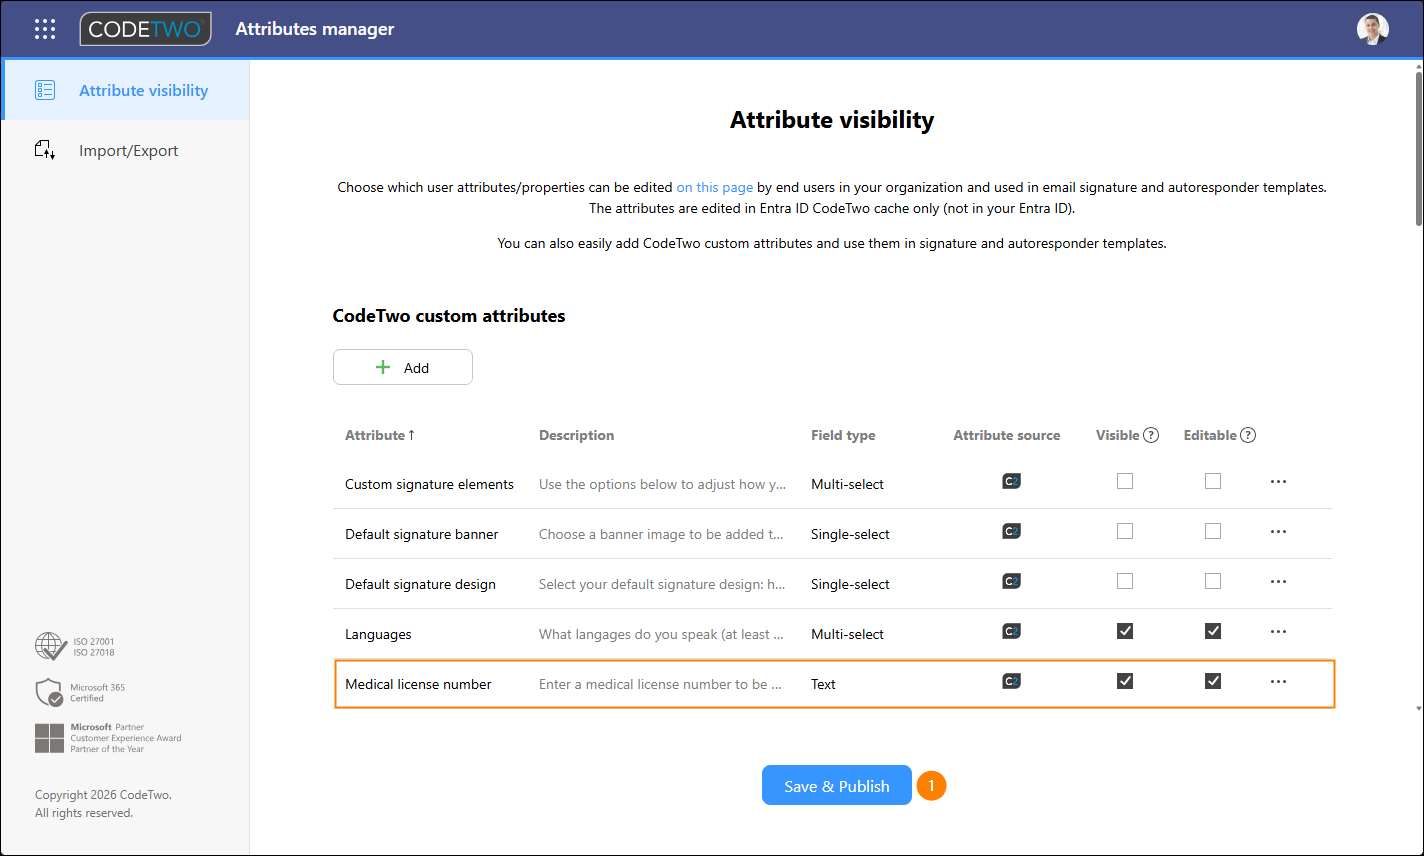
Fig. 15. Saving and publishing the new custom attribute in the Attributes manager app.
Once the attribute for the medical license number is configured, it’s time to add it to a signature (or auto reply) template.
Add the custom attribute to a template in the Signatures app
Sign in to the Signatures app and add the new custom attribute as a placeholder in the relevant signature, disclaimer, or automatic reply template. For detailed instructions, see this section. Once you’re ready, proceed to the section below.
Ask users to enter an attribute value in the My user info app
Now, ask your users to sign in to the My user info app with their Microsoft 365 credentials and enter their license numbers in your new custom attribute field (Fig. 16.).
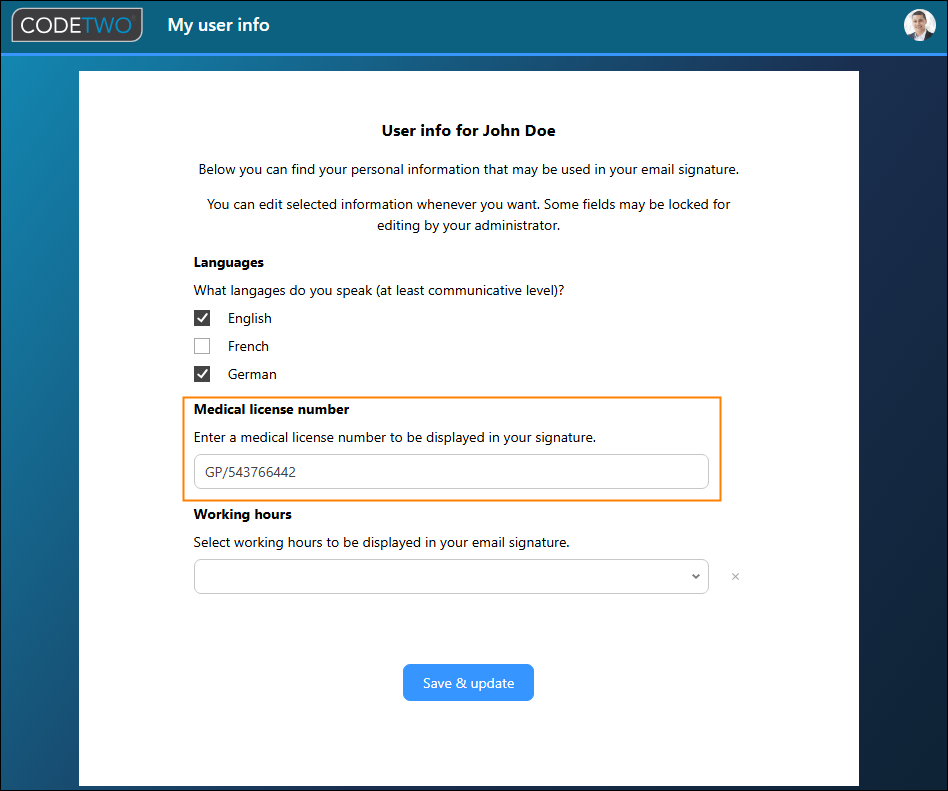
Fig. 16. Filling in a custom attribute for a medical license number in the My user info app.
Once a user selects an appropriate value and clicks Save & update, the entered value will be displayed for that user in the previously configured signature or auto reply (Fig. 17.). If a user doesn’t select any value, the attribute’s label will be removed from the signature or auto reply, provided that you applied RT tags in your template (as described here).
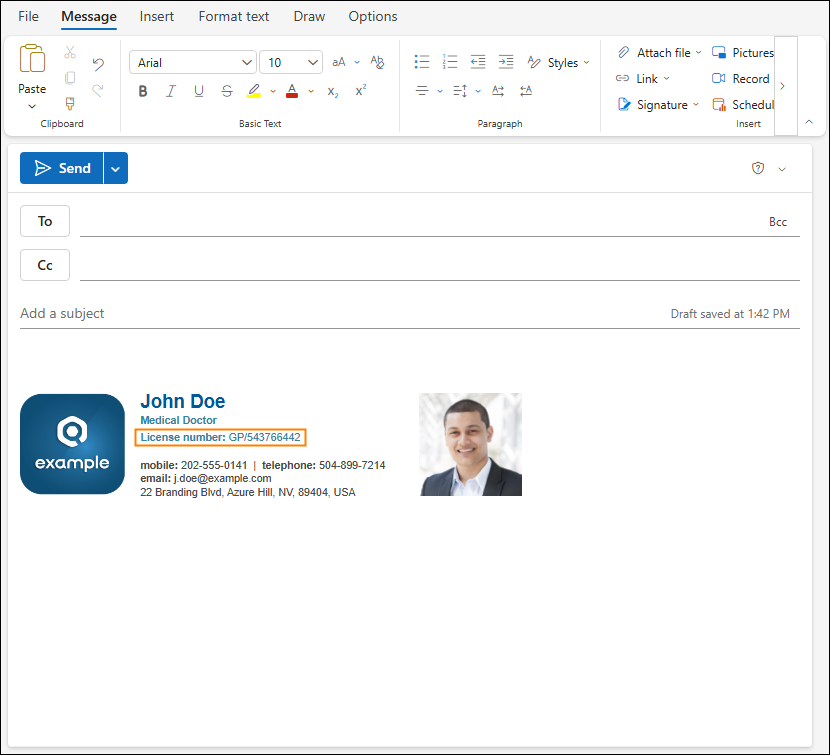
Fig. 17. Additional information on the user’s license number displayed in an email signature.
Tip
If your user database is large or you cannot ask your users to fill out the necessary field for a different reason, the Attributes manager app lets you update user attributes in bulk. See the section below to learn how.
Bulk editing custom attribute value for your users
The Attributes manager app allows you to import user attribute values in bulk. To do that, go to the Import/Export tab, and click Export to CSV to generate a file you’ll use as a template for importing data (Fig. 18.). Save the CSV file to a convenient location and open it for editing (for example, in Microsoft Excel).
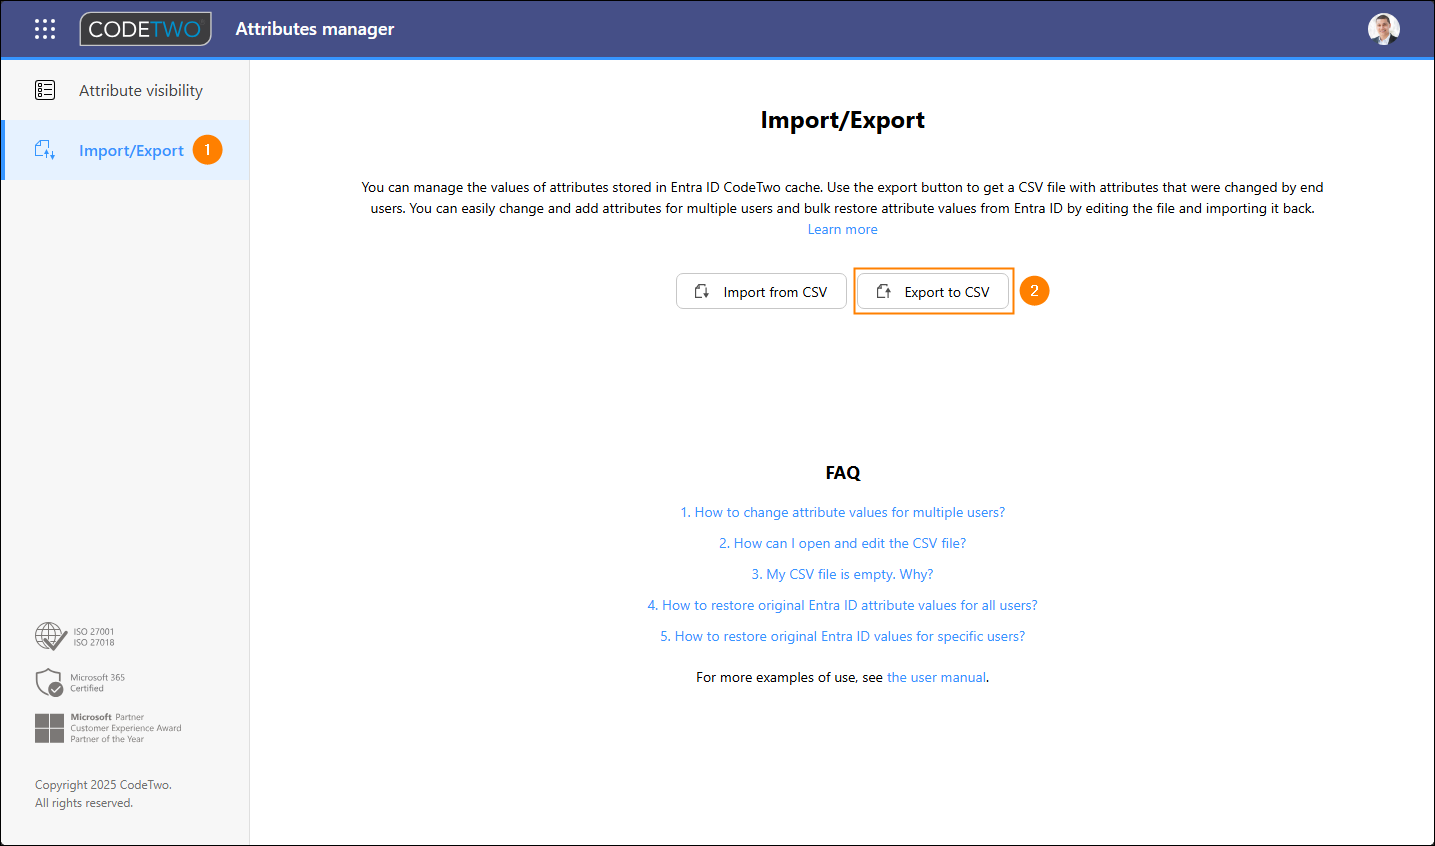
Fig. 18. Exporting a CSV file from the Attributes manager for bulk editing.
Once the file opens, paste the UPNs of all the users for whom you want to fill in a specific attribute into the UPN column. Next, hide some columns, so that you can see the UPN column and the relevant attribute’s column close to each other for easy editing.
Tip
Since the CSV file lists CodeTwo custom attributes after all the standard & additional Entra ID (Azure AD) attributes, it’s a good idea to temporarily hide most of the columns containing these Entra ID attributes, so that you can easily see for which user you edit the value of the CodeTwo custom attribute (e.g., Medical license number). To hide columns in Excel, select the columns, right-click anywhere inside your selection and choose Hide.
Finally, fill in the value of the custom attribute for each user. In our example, this will be a medical license number (Fig. 19.).
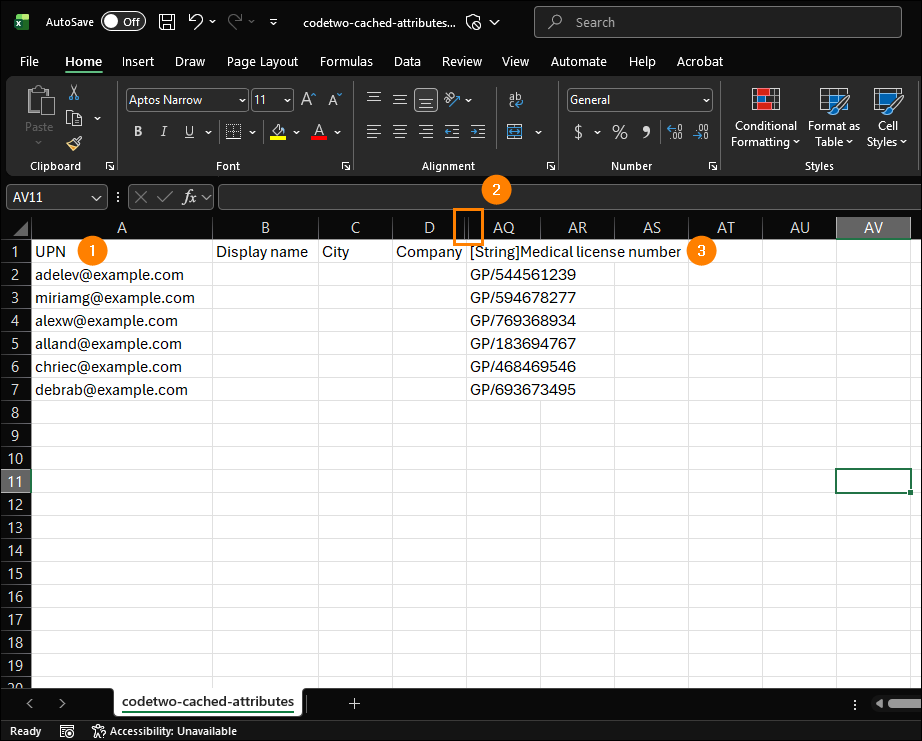
Fig. 19. Bulk editing your custom attribute for chosen users.
Once you’re OK with all the changes, save the file and import it back into the Attributes manager app. To do that, go to the Import/Export tab and click Import from CSV. Next, select your CSV file, choose Selective import, and click IMPORT (Fig. 20.).
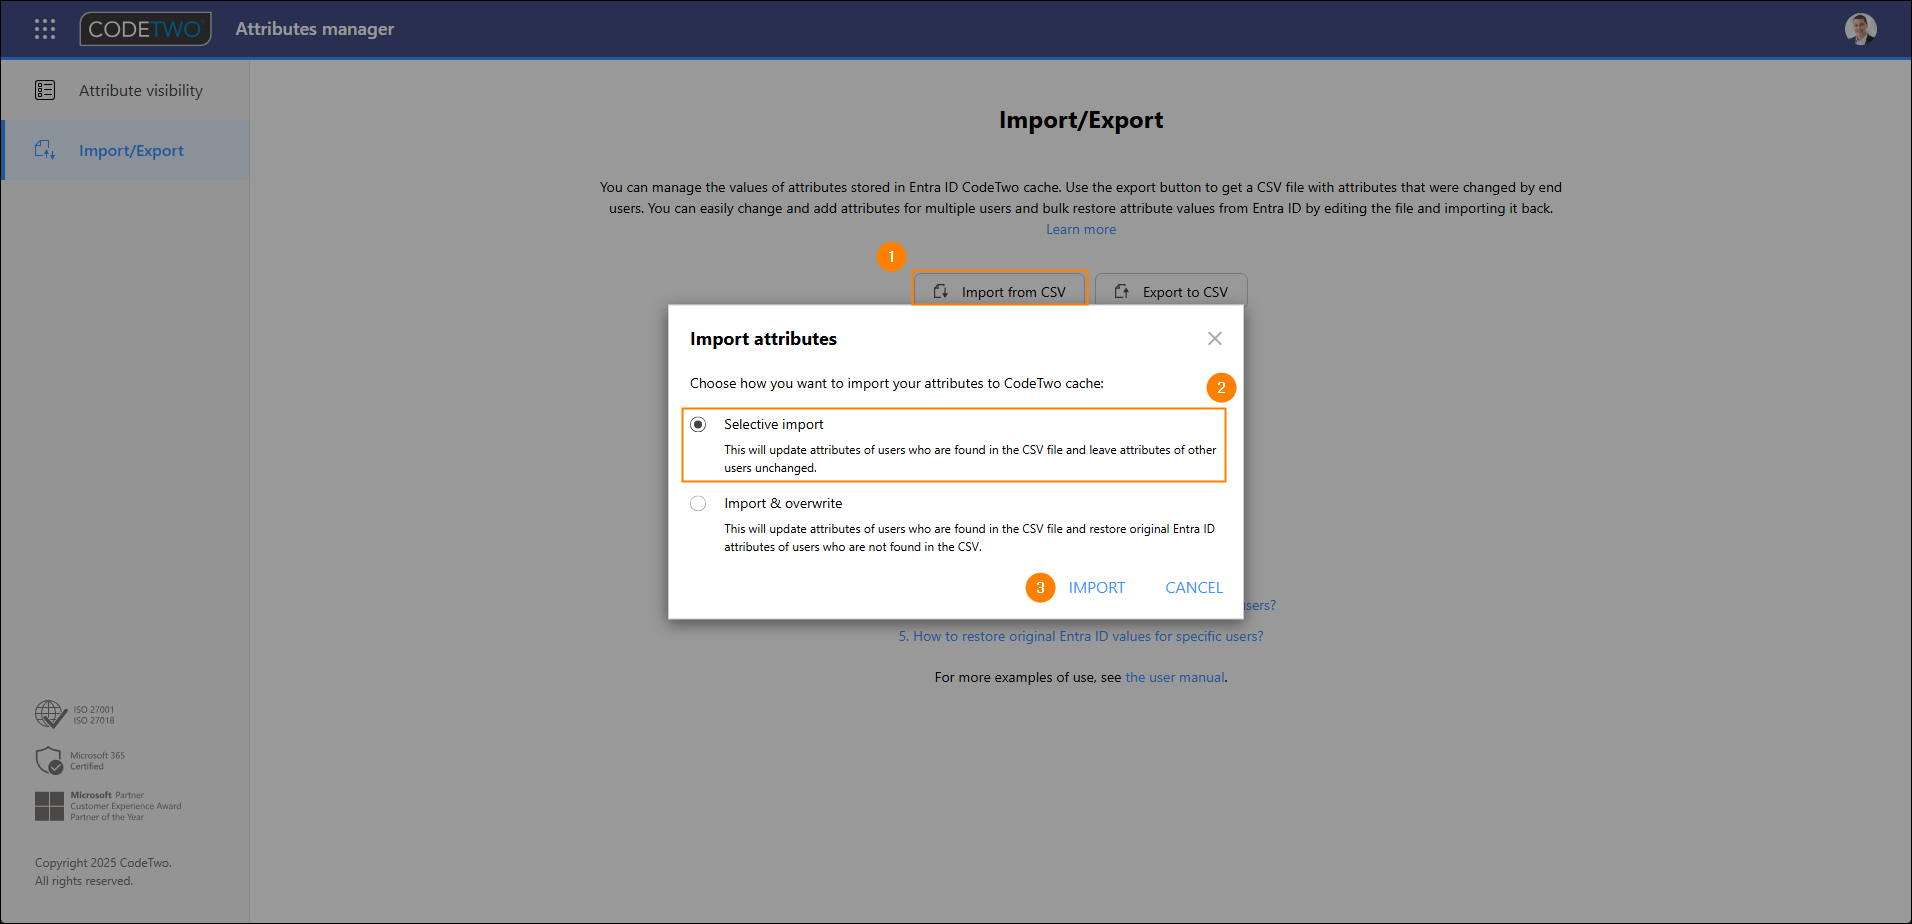
Fig. 20. Importing the updated CSV file into the Attributes manager app.
That’s it. Your changes are saved automatically – you don’t have to do or click anything to save them.
For more information about the bulk management of custom attributes, see this article.
See also
Letting users manage their information visibility – see how to let your end users decide which information about them should appear or not appear in their signatures, disclaimers and automatic replies.
In this article