How to let your users enable autoresponder rules by themselves
Learn how to allow your users to turn on automatic replies / out of office (OOF) messages in CodeTwo Email Signatures 365 on their own by using CodeTwo custom attributes.
Traditionally, your users can set up automatic replies in Outlook. With such a decentralized approach, they have a complete control over the set-up, including the contents of the message. Consequently, there’s a risk that their messages might include imprecise or misleading information, be written in a careless fashion, and so on. With Autoresponder available in CodeTwo Email Signatures 365, you’re in charge of setting up unified & officially approved automatic replies for all your users. For a common use case, see this article.
If you would like to:
- let your users decide when to turn on/off automatic replies,
- have control over the contents of all auto-reply and OOF messages and keep consistent branding,
- personalize these messages for both senders and recipients and enrich them with graphical & interactive elements,
you can use the Autoresponder feature combined with the Attributes manager available in CodeTwo Email Signatures 365.
Basics
This article shows how to configure CodeTwo Email Signatures 365 for a specific usage scenario. If you need more basic information, use the links below:
- Learn more about Autoresponder
- See how to manage your users attributes with Attributes manager
- Quick guide to creating an autoresponder rule
- Design a template that you can use for auto-reply messages
When your organization is licensed to use CodeTwo Email Signatures 365, you can use the Autoresponder feature to create auto-reply messages for your users and teams at no extra cost.
Automatic replies are added in the cloud and require the software to work in either cloud (server-side) mode or combo mode. If you use Outlook (client-side) mode and want to use Autoresponder, simply switch to combo mode Learn more about signature modes
The Autoresponder feature is not enabled by default. If you haven’t turned it on in CodeTwo Admin Panel yet, follow these steps.
How to configure the program for this scenario
In this example, we’ll set up three CodeTwo custom attributes:
- the first one will allow your users to manually activate/deactivate their OOF reply,
- the second one will be used to provide a return-to-work date in the OOF reply,
- the third one will be used to provide details of an employee who substitutes for an employee who is OOF.
Then we’ll create an autoresponder rule to send the OOF message that uses these attributes. Finally, you’ll see how simple it is for your users to activate the rule each time they want to set up an auto-reply for themselves.
Creating CodeTwo custom attributes
To start, sign in at attributes.codetwo.com by using your Microsoft 365 global admin credentials. The Attribute visibility settings page will appear.
If you use the manager for the first time, you need to consent to permissions requested by our web app on behalf of your organization.
Create the first custom attribute that your users will use to activate/deactivate their OOF messages. In the CodeTwo custom attributes section, click the Add button. Type the name of the attribute, e.g. Out of office, and click ADD (Fig. 1.).

Fig. 1. Adding a new CodeTwo custom attribute in the Attributes manager.
Repeat the steps above to create two more custom attributes:
- Return date – it will contain the date your users are expected to return to work.
- Substitute – it will contain the name of a person who substitutes for them.
Tip
With the Attributes manager, you can create as many custom attributes for use in signatures, disclaimers, and auto-replies as you want. For example, you can create another one which your user will be able to populate with e.g. their substitute’s email address, manager’s name, etc.
Once you’ve created all the custom attributes you need, make sure that checkboxes Visible and Editable next to them are selected (Fig. 2., item 1). That way, you users will be able to see them and modify their values. Finally, click Save to apply your configuration (Fig. 2., item 2).
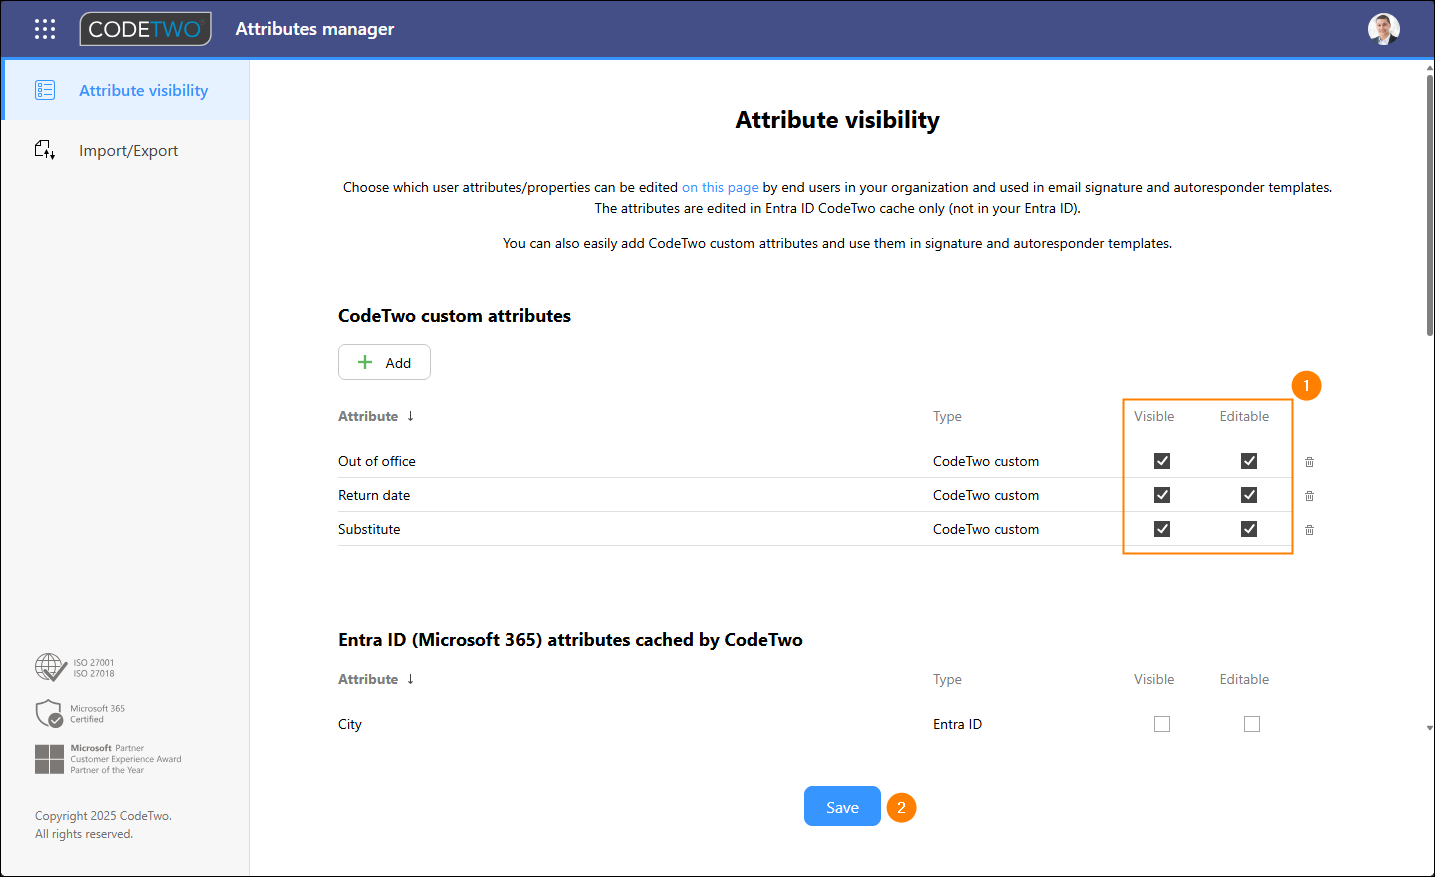
Fig. 2. Making sure your users can view selected attributes and change their values.
As the CodeTwo custom attributes are configured, you can now sign out of the Attributes manager.
Configuring the OOF automatic reply
Now, you need to configure an autoresponder rule that will be responsible for sending OOF replies. Begin with signing in at app.codetwo.com. Click the CREATE RULE button and select Autoresponder (Fig. 3.). In the Name step, provide name for the rule, e.g. OOF message, and optional description.
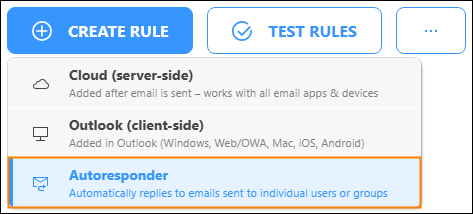
Fig. 3. Creating a new autoresponder rule.
Move on to the Reply from step. In the upper section (top list), go to Add > Entra ID (user property) filter (Fig. 4.).
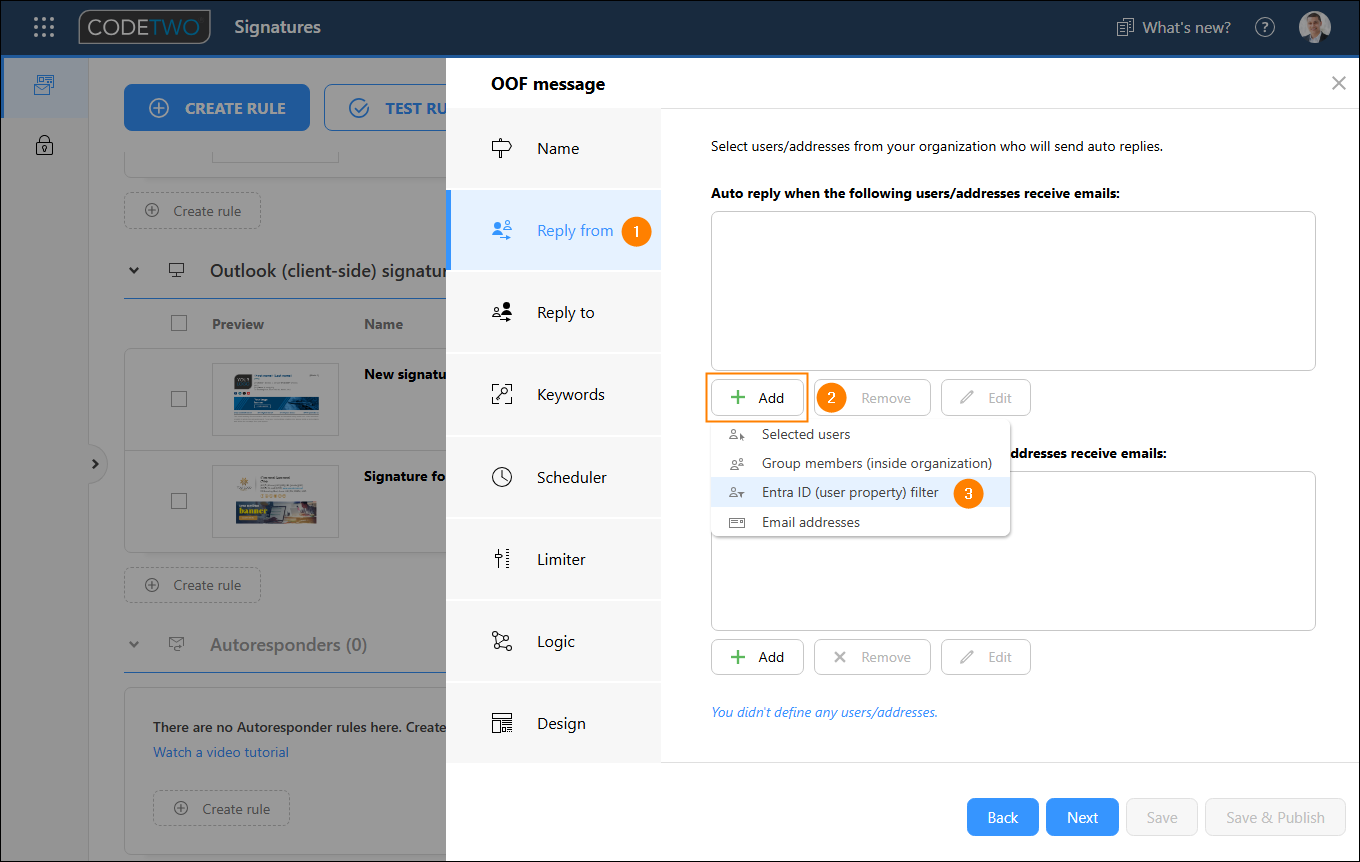
Fig. 4. Choosing the Entra ID (user property) filter condition.
Configure the Entra ID (user property) filter as follows:
- Click the User Entra ID attribute drop-down list and choose the custom attribute that is used to activate OOF replies. In our example, this will be Out of office (Fig. 5., item 1).
- Choose Equals as the Operator (Fig. 5., item 2).
- Type yes in the Value text field (Fig. 5., item 3).
- Click the Add to list button to add the condition (Fig. 5., item 4).
- Click OK to finish (Fig. 5., item 5).
With this condition added, the autoresponder rule will be activated only for users who type yes as the value for the Out of office custom attribute, as highlighted later.
Tips
The word yes is just an example. In fact, you can use any other one when configuring the Entra ID (user property) filter. Just remember to provide the exact word to your users when instructing them how to enable the OOF reply, as shown in the Result section.
The filter is case sensitive. If you’re worried your users might use wrong capitalization when typing the custom attribute’s value, you can add additional conditions, e.g. Out of office > Equals > Yes and Out of office > Equals > YES, and then select the At least one of the conditions above is met radio button at the bottom of the Entra ID (user property) filter configuration window (see Fig. 5.).
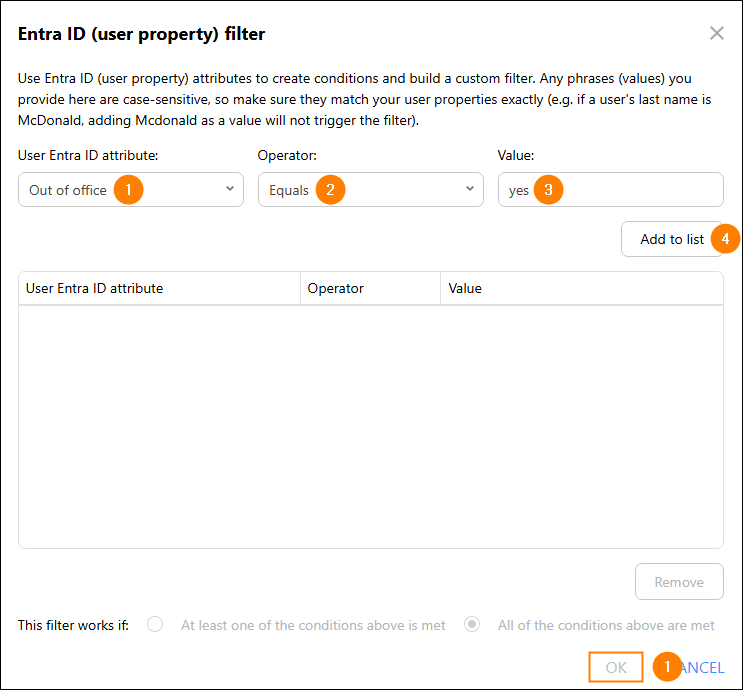
Fig. 5. Adding the condition that activates the rule.
In the Reply to step, you can specify users / email addresses to whom the auto-replies will be sent. Possibly, the best and safest option is to choose All users (Fig. 6.). Alternatively, you can narrow users down e.g. to your organization, customers (external users) or specific Entra ID (Azure AD) group only.
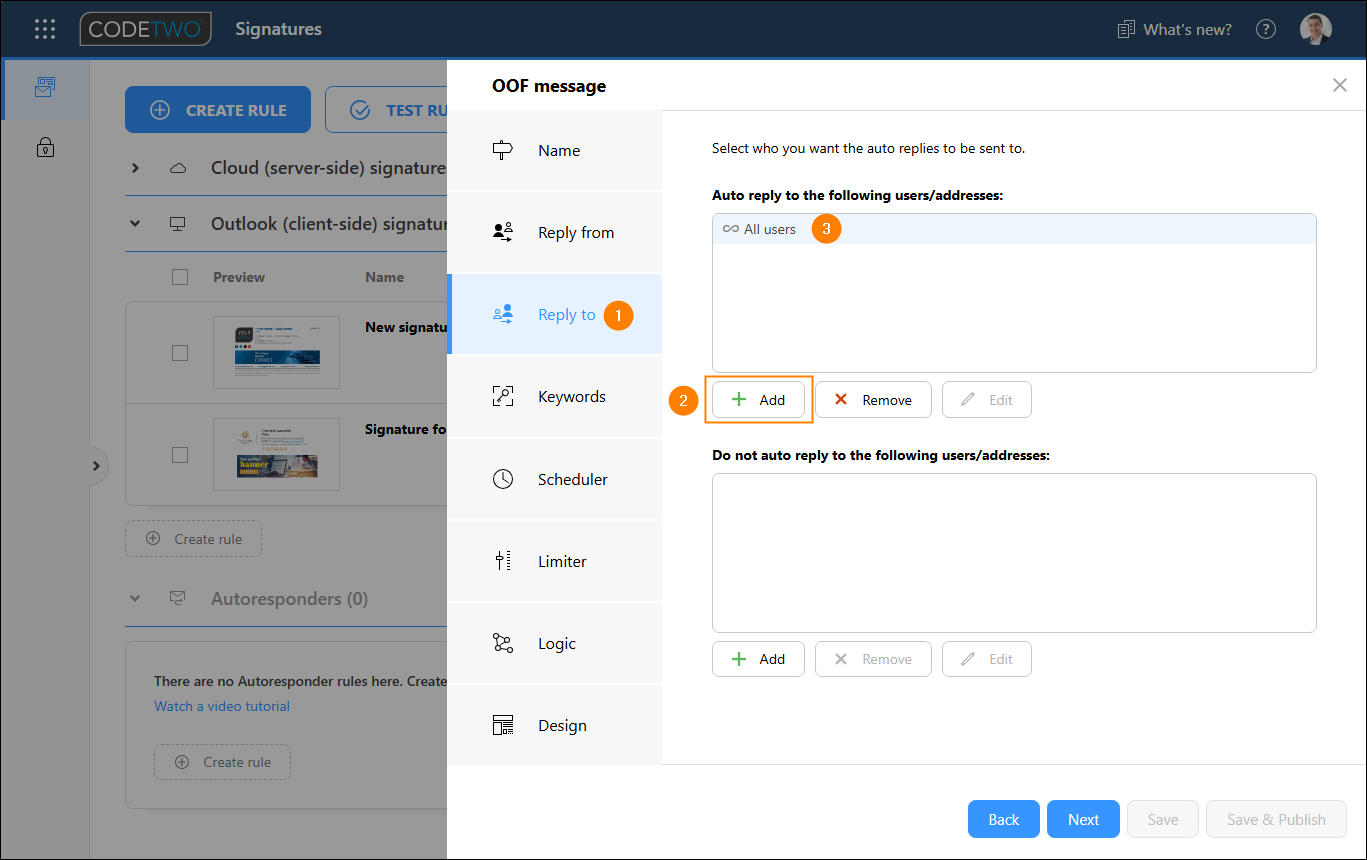
Fig. 6. Specifying who will get the OOF message from your user(s).
For the basic use scenario, you don’t have to configure anything in the Keywords step. Learn more about using keywords
The next thing to configure is the limit of autoreplies sent to the original sender in a given timeframe. To achieve this, go to the Limiter step.
In our scenario, it is reasonable to send just one auto-reply per day, as it should be sufficient for a sender to learn about the fact that the user they tried to contact is out of office (Fig. 7., item 2).
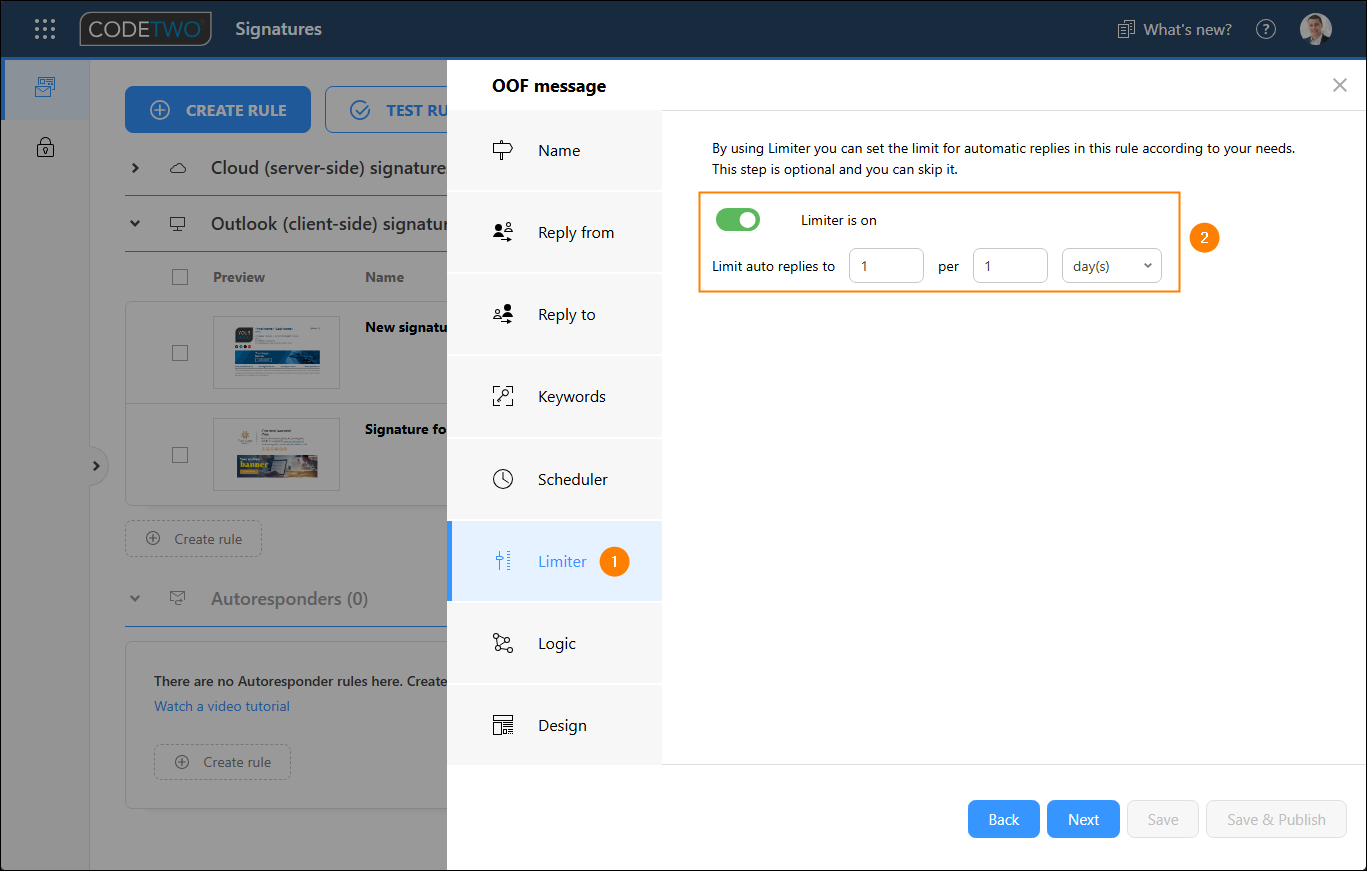
Fig. 7. Configuring the Limiter.
The Design step allows you to configure different aspects of the auto-reply message. Usually, the default settings for the From, To, Subject, and Behavior options should be OK for most of the scenarios, including this one. Still, you might want to e.g. modify the subject of an original message to include the phrase I’m out of office: in front of it (Fig. 8., item 2). To learn about the settings available in this step in detail, consult this article.
Next, click the Edit reply message button (Fig. 8., item 3) to launch the template editor and start designing the OOF reply visually.
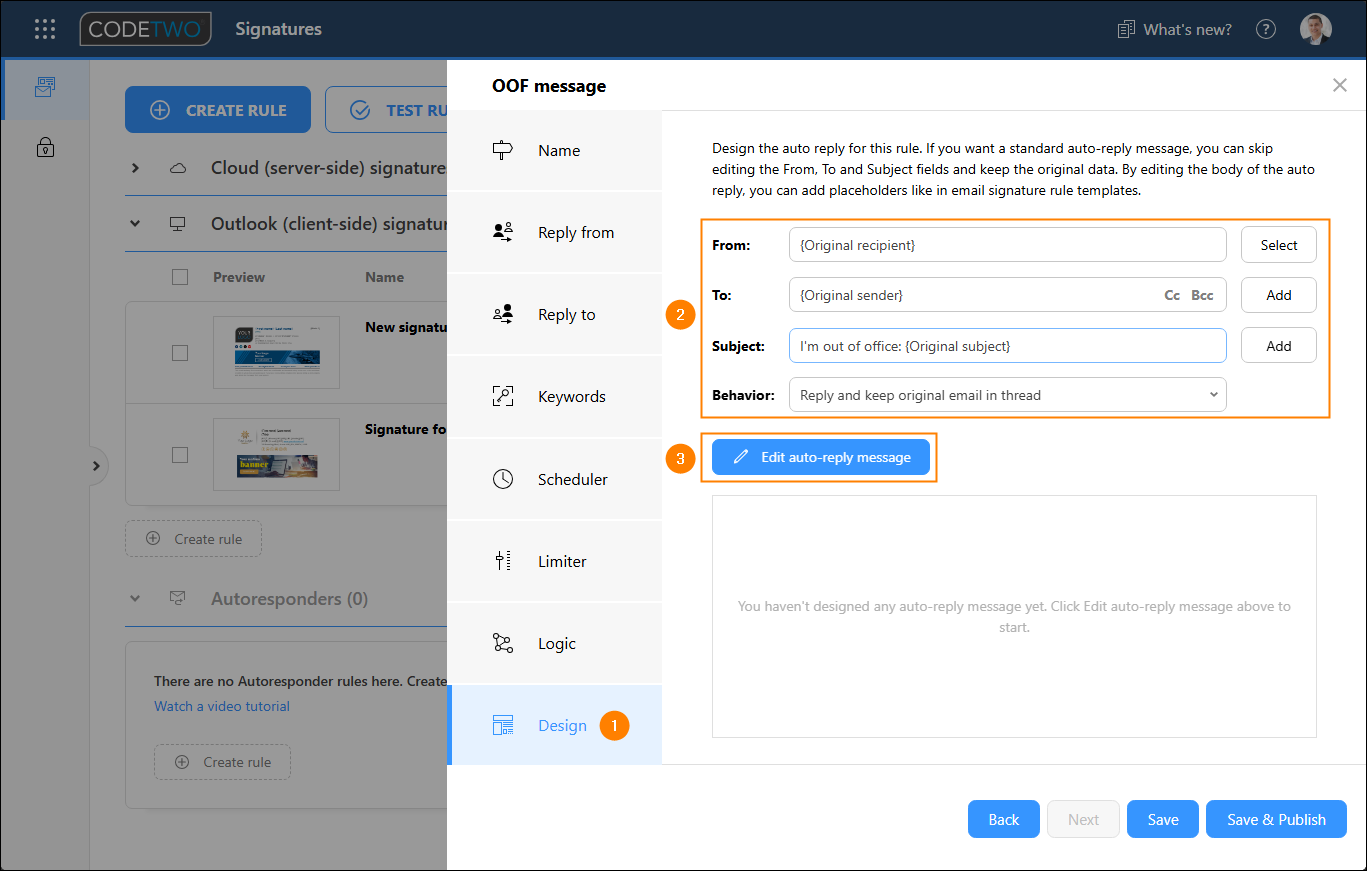
Fig. 8. Specifying different aspects of the OOF reply message.
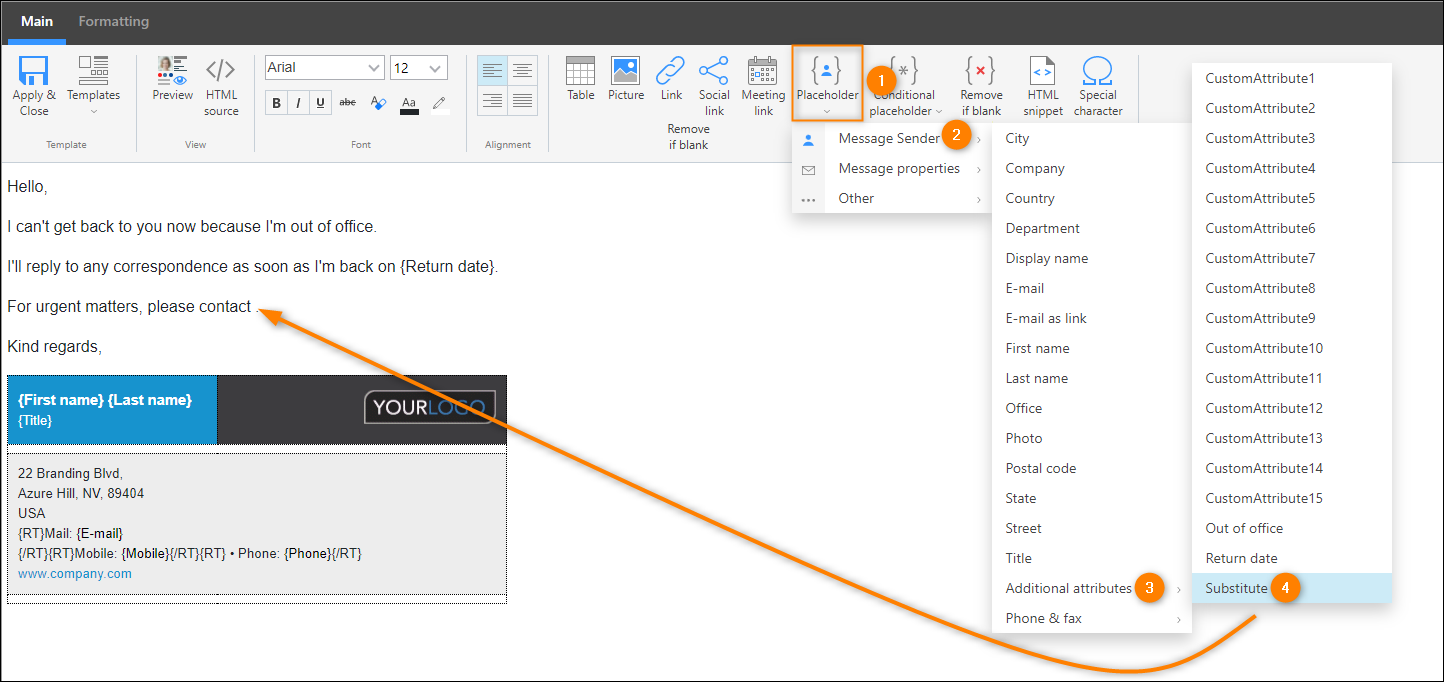
After you’ve opened the template in the editor, you can select one of the professionally designed templates available in our software and adjust it to your needs or create an OOF message template from scratch. Either way, you should take the following aspects into account:
- Type the generic OOF message that will work for all users in your organization.
- Use the remaining CodeTwo custom attributes you created in the appropriate places of the message. To insert the attributes, click Placeholder > Message Sender >Additional attributes and choose your custom attribute from the list (Fig. 9.).

Fig. 9. Inserting the CodeTwo custom attribute into the OOF reply template. - Use the Remove if blank option to surround the inserted custom attributes (with accompanying phrases) with RT tags, as shown in Fig. 10. This way, you can avoid unnecessary empty spaces in the OOF reply if a user forgets to enter values for some custom attributes. Learn more about this feature
- CodeTwo Email Signatures 365 gives you an advantage over the native solutions in terms of personalization. That’s why, it might be a good idea to include your standard company signature in the auto-reply message to keep consistency with your branding.
The final version of your OOF auto-reply message may look like the one shown in Fig. 10. below:
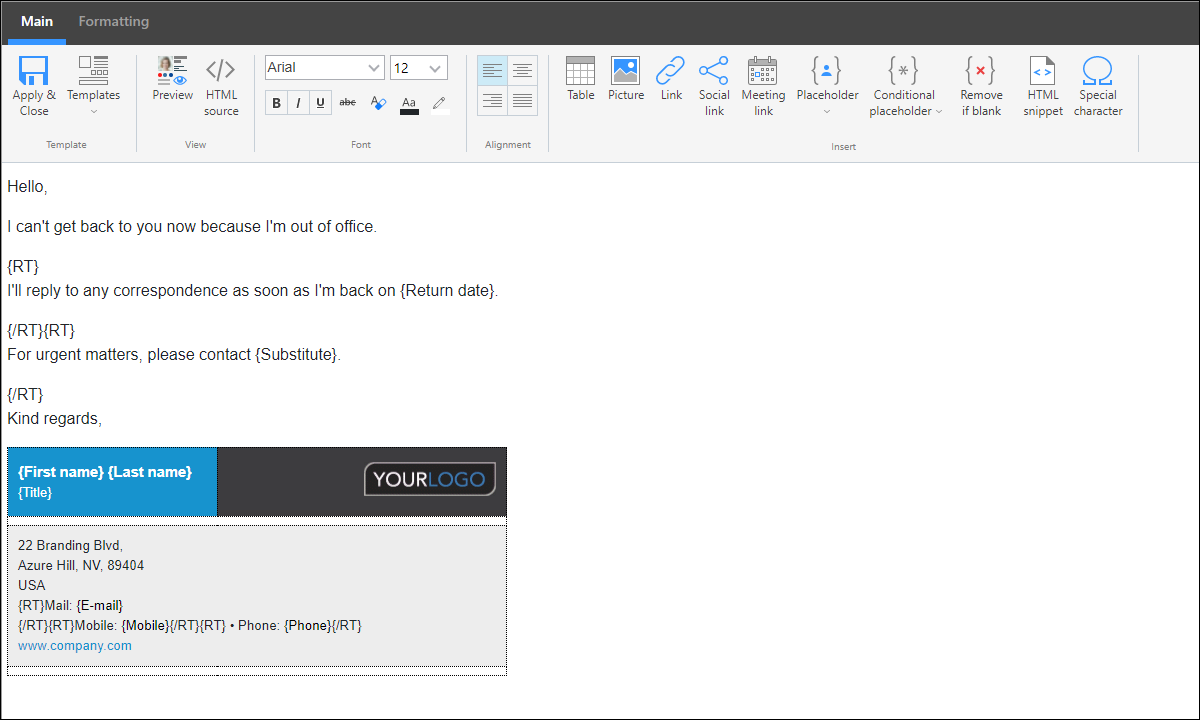
Fig. 10. The complete OOF reply message template.
Once you’re OK with your design, click Apply & Close to save the OOF template and close the editor.
Finally, click Save & Publish to apply the entire configuration of your autoresponder rule.
Result
Once you’ve set everything up, you can send the following instructions to your users:
Here’s how to set up an out of office (OOF) reply for yourself:
- Sign in at user.codetwo.com, using your Microsoft account credentials.
Info
If you use the editor for the first time, you might need to consent to permissions requested by the web app.
- To enable the OOF reply, type yes in the field next to Out of office (Fig. 11., item 1).
Important
Mind the capitalization – you need to enter exactly yes. If you type Yes or YES, your auto-replies will not work.
- Remember to fill out the remaining fields with the information necessary to compose your OOF message:
- Enter the date of your return to work in the Return date field (Fig. 11., item 2).
- Type first and last name of a colleague who substitutes for you in the Substitute field (Fig. 11., item 3).
- Click the Save & update button at the bottom to finally enable the OOF reply for your mailbox (Fig. 11., item 4).
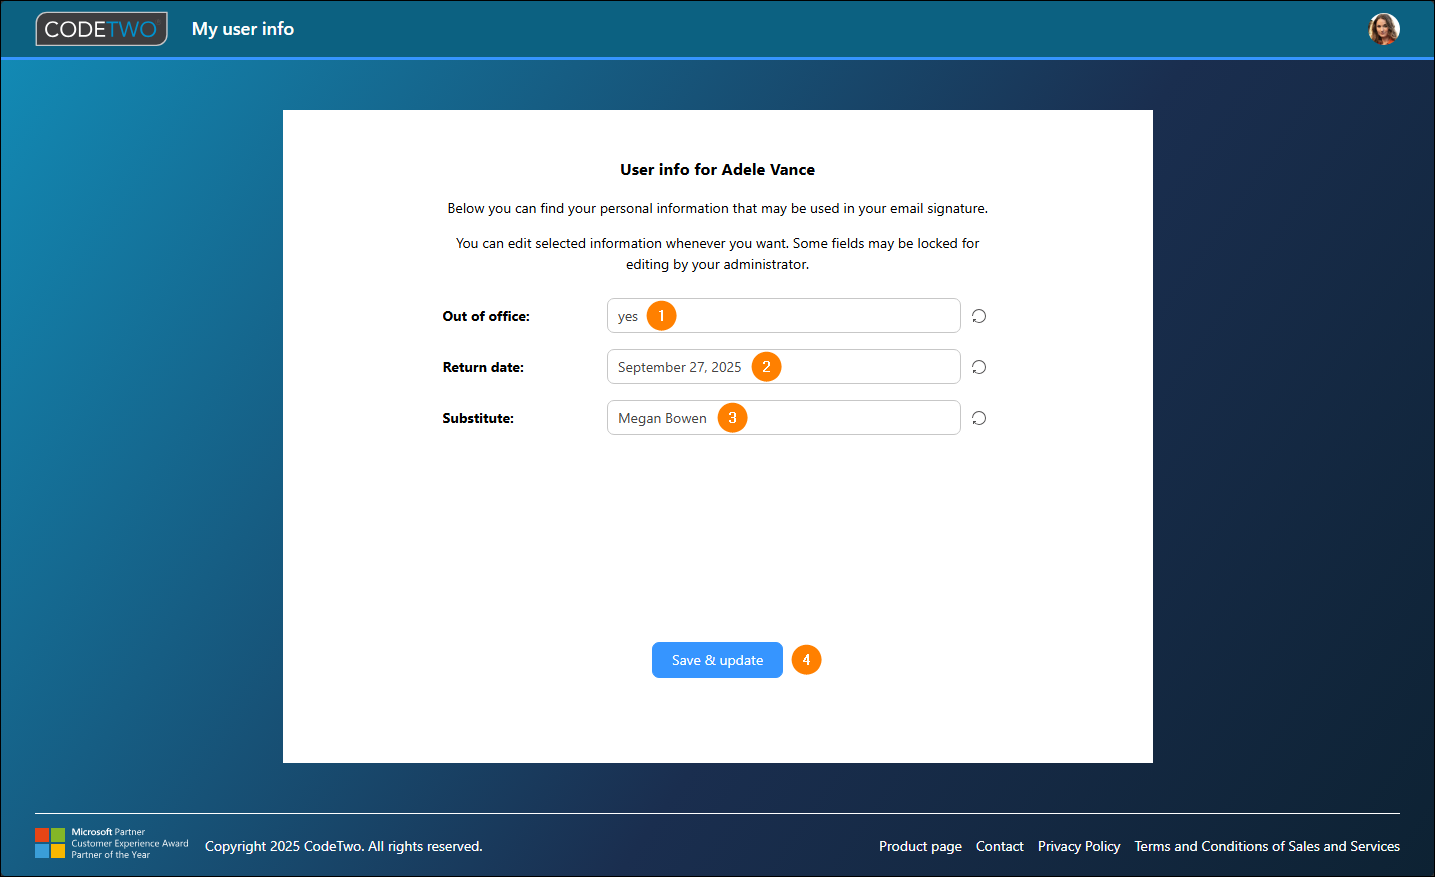
Fig. 11. A sample configuration for OOF replies.
When you’re back to office, remember to disable OOF automatic replies. To do so:
- Sign in at user.codetwo.com once again.
- Delete yes in the Out of office field (or simply click the circular arrow icon next to the field), as shown in Fig. 12., item 1.
Info
You don’t have to modify the remaining fields in any way for now – you’ll change their contents accordingly when you set up OOF next time in the future.
- Save your changes by clicking Save & update (Fig. 12., item 2).
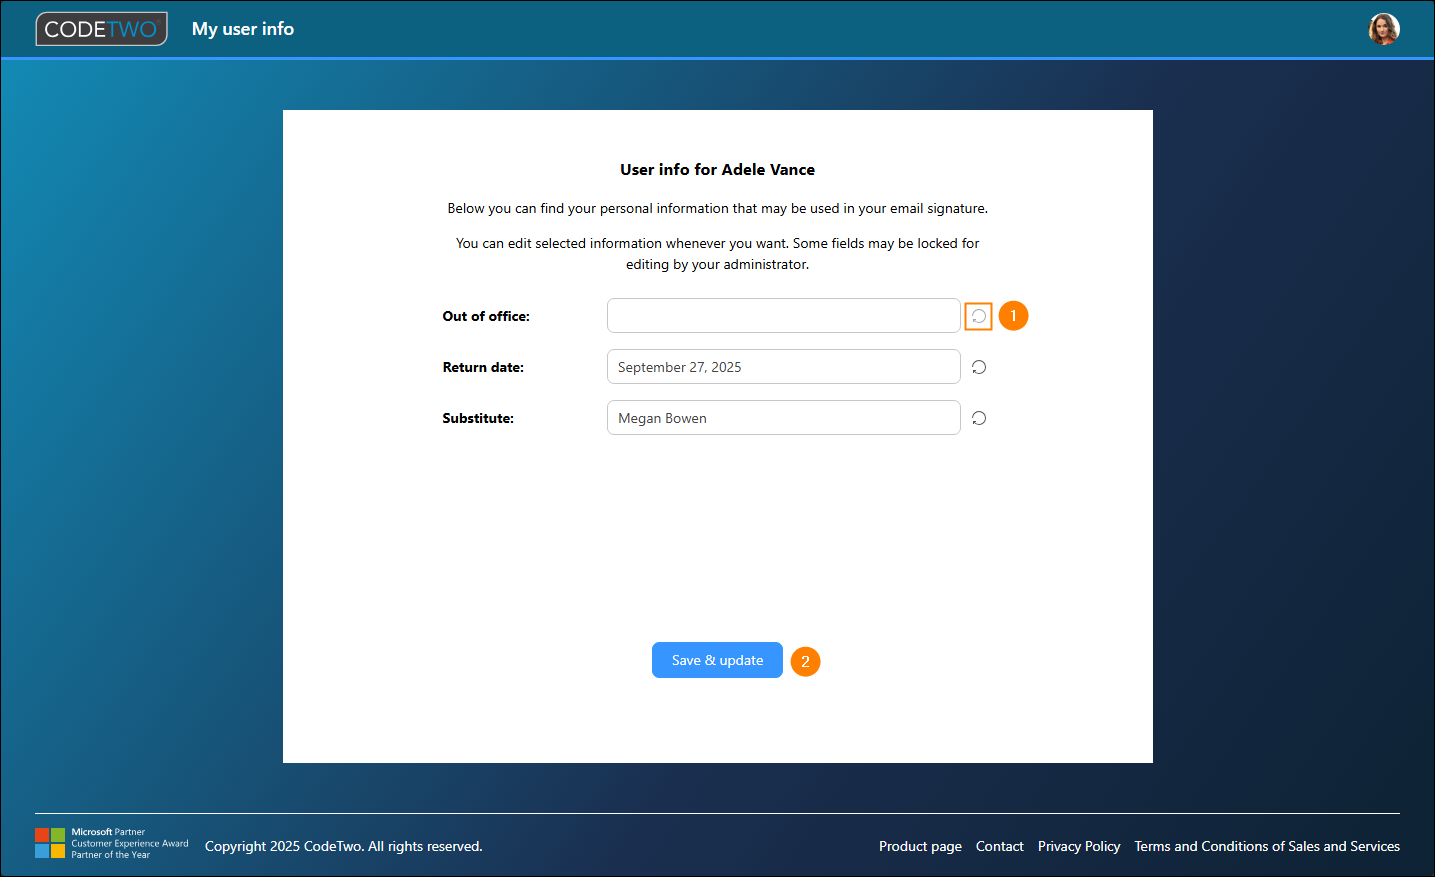
Fig. 12. Disabling OOF autoreplies when you're back.
When a user in your organization enables autoreplies (and provides information in the remaining fields) according to the above instructions from you, each person that sends an email to their mailbox during the absence will receive the OOF reply, as shown in Fig. 13.
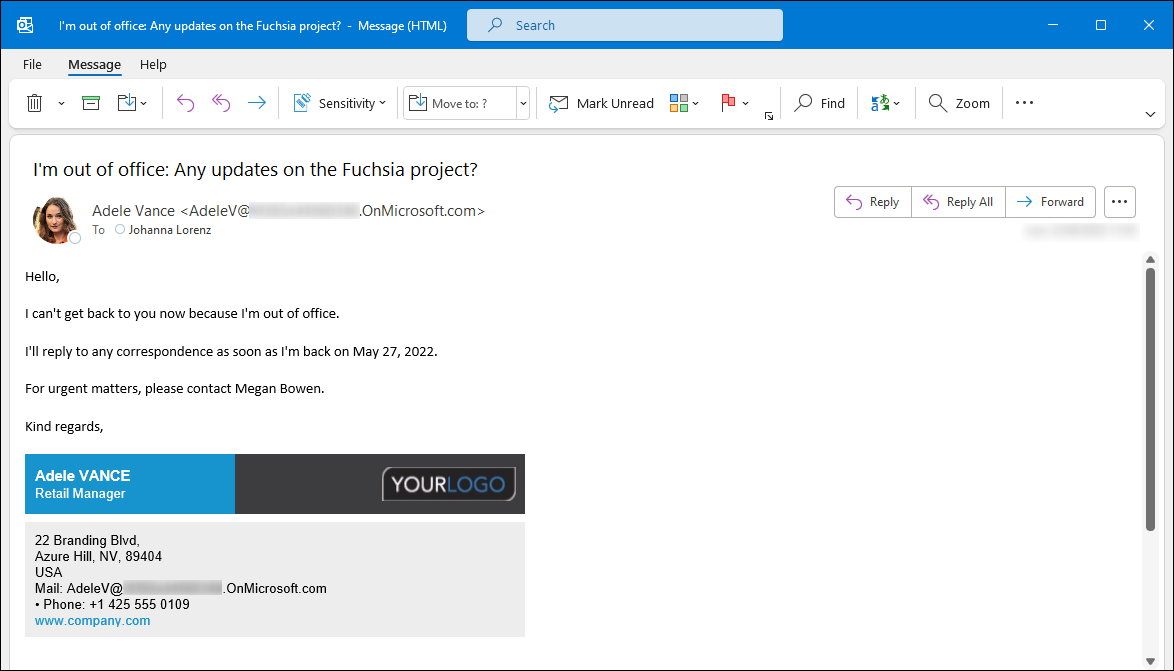
Fig. 13. A sample OOF auto-reply sent to a person contacting your user who is not at work.
See also
How to let your users manage their contact information - see how you can allow your users to decide which details they want to show in their signatures, disclaimers and automatic replies.
How to allow your users choose their default signature - learn how people from your organization can make use of a CodeTwo custom attribute (once you've configured it for them) to select the preferred signature of theirs.
In this article