How to manage out-of-office replies for all users
Learn how to set and manage automatic out-of-office (OOF) replies for all users in your Microsoft 365 organization with the Autoresponder feature available in CodeTwo Email Signatures 365.
With the traditional approach to OOF auto-replies, your users configure these in Outlook, providing all the necessary details and editing the message contents according to their liking. In the case of an emergency (e.g. sudden leave due to a sickness), usually someone from the IT Team needs to set automatic replies for other users in the Microsoft 365 admin center, the Exchange admin center, or via PowerShell.
Even though the native solutions are easy to configure and obviously useful, they are not perfect and come with certain drawbacks like:
- limited formatting that does not allow you to e.g. keep OOF messages in line with your company branding;
- original message missing from an auto-reply, which makes it more difficult to follow a conversation in context;
- and more.
If you’re looking for more configuration options and would like to have more control of OOF messages’ contents, we’ve got you covered. Read on to learn how to set up better OOF auto-replies for users in your organization.
Basics
This article shows how to configure CodeTwo Email Signatures 365 for specific usage scenarios. If you need more basic information, use the links below:
- Learn more about Autoresponder
- Quick guide to creating an autoresponder rule
- Design a template that you can use for auto-reply messages
- Delegate auto-reply management to other users from your organization
When your organization is licensed to use CodeTwo Email Signatures 365, you can use the Autoresponder feature to create auto-reply messages for your users and teams at no extra cost.
Automatic replies are added in the cloud and require the software to work in either cloud (server-side) mode or combo mode. If you use Outlook (client-side) mode and want to use Autoresponder, simply switch to combo mode. Learn more about signature modes
The Autoresponder feature is not enabled by default. If you haven’t turned it on in CodeTwo Admin Panel yet, follow these steps.
How to configure the program for this scenario
In this example, we’ll show how to configure a sample OOF message:
- in the case of an unplanned absence (e.g. sickness),
- in advance, for a planned/scheduled absence (e.g. holiday).
To create a new autoresponder rule, sign in to app.codetwo.com, click the CREATE RULE button and select Autoresponder (Fig. 1.).
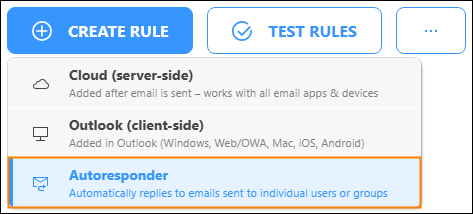
Fig. 1. Adding a new autoresponder rule.
In the first step (Name), enter the name of the rule and (optionally) its description. Click Next to go to the next step.
Select the user for whom the OOF auto-reply you’re configuring will be sent. To do so, click Add (below the upper list) and choose Selected users (Fig. 2.). Use the picker to choose the absent user.
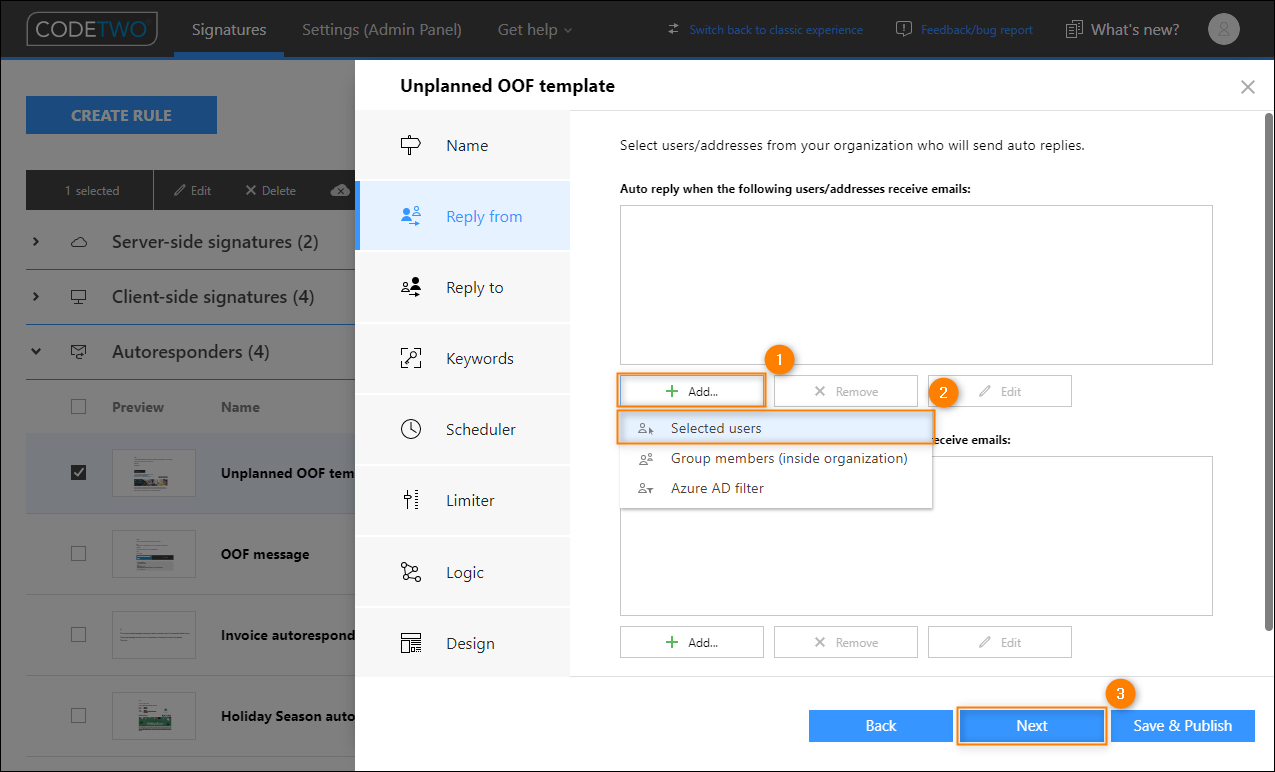
Fig. 2. Adding a user for whom an OOF auto-reply will be sent.
Tip
To save any rule, you need to select at least one user in the Reply from step. If you want to create an OOF template for later use (without turning auto-replies on for a particular user), you can select e.g. yourself in this step and later save the rule without publishing it (click Save instead of Save & Publish in the rule creation wizard).
Later on, you can use this template rule to create rules for specific absent users. To this end, clone the rule as shown in Fig. 3. and change, for example, the following settings only:
- the name of the rule in the Name step,
- the absent user in the Reply from step,
- the time range in the Scheduler step.
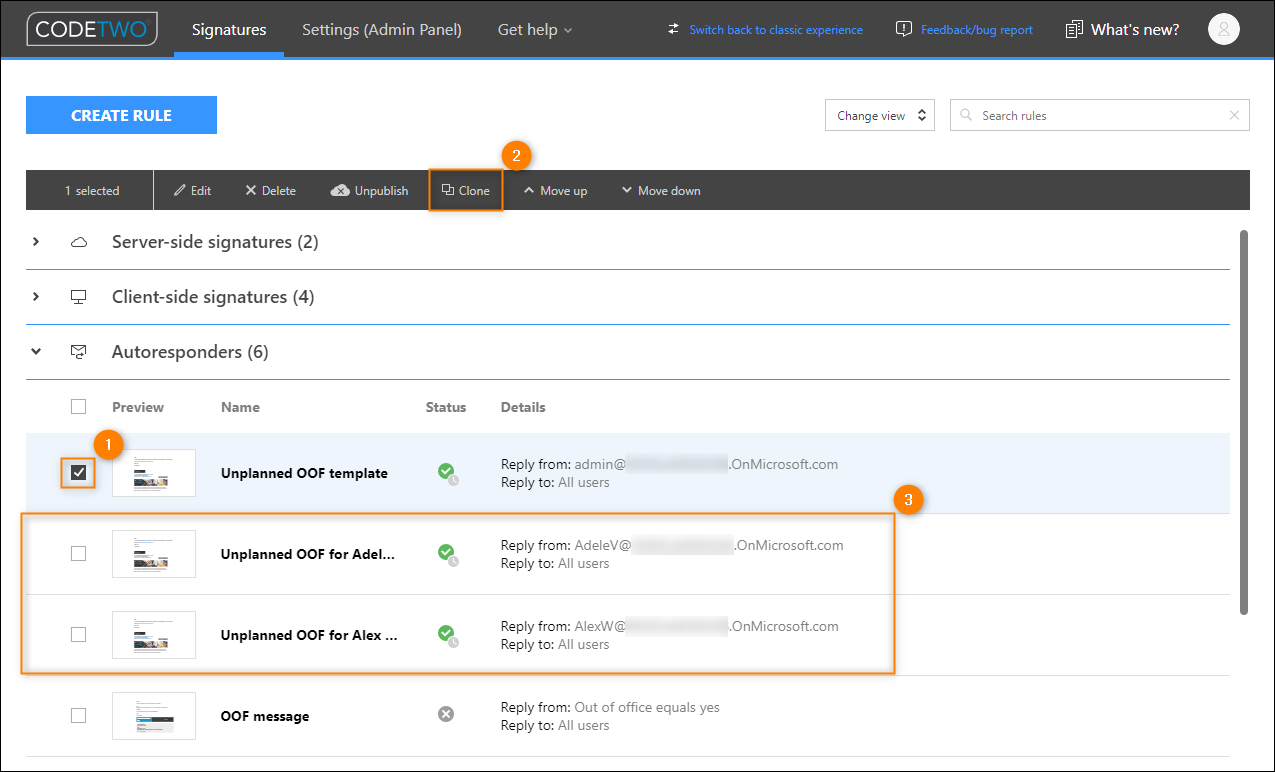
Fig. 3. Two new rules cloned based on the OOF template rule.
In the Reply to step, decide who will receive the OOF message from the absent employee. The best (and the safest) option is to leave the default entry: All users (Fig. 4.). Thanks to that, the auto-reply will be sent when both an internal user (a colleague) or an external user (e.g. customer) sends a message to the absent person.
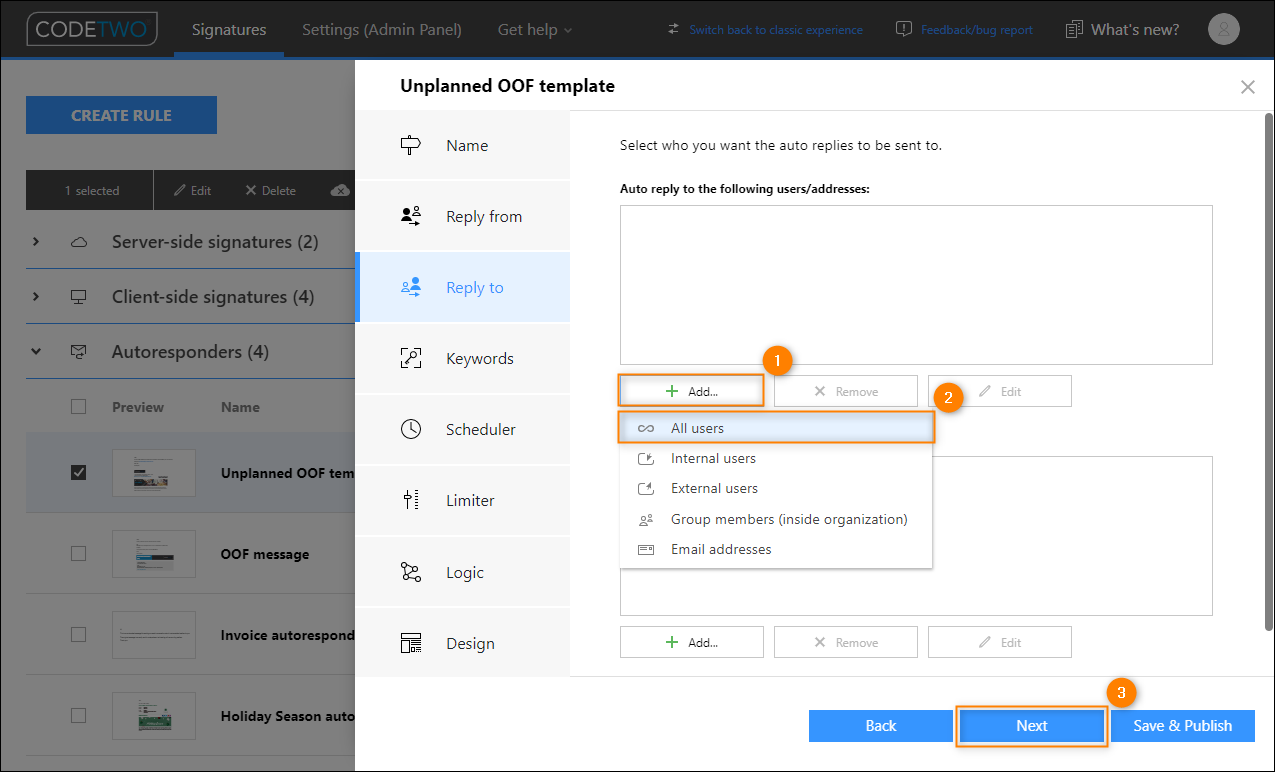
Fig. 4. Selecting users to whom automatic replies will be sent.
For this use scenario, you don’t have to configure any keywords, so you can skip this step.
The Scheduler step lets you control the period when your rule will be active. In other words, here you specify absence date range during which the OOF will be sent. The configuration differs slightly depending on your use case.
If you set-up OOF for an unplanned absence (e.g. sick leave), configure the settings as follows (Fig. 5.):
- Enable the scheduler by using the toggle switch.
- Choose desired time zone – most likely this will be the time zone you’re in.
- Select the Custom rule activity pattern.
- Click Add and:
- Leave the default value (today’s date) in the Start time field – since your user got sick out of a sudden, the auto-reply needs to be sent right away.
- In the End time field, specify the day on which the auto-reply must stop being sent (e.g. the day that comes directly after the last day of user’s sick leave).
- Leave the All day event option checked.
- Your date range will appear on the Time ranges list.
- Finally, click Next to go to the next step.
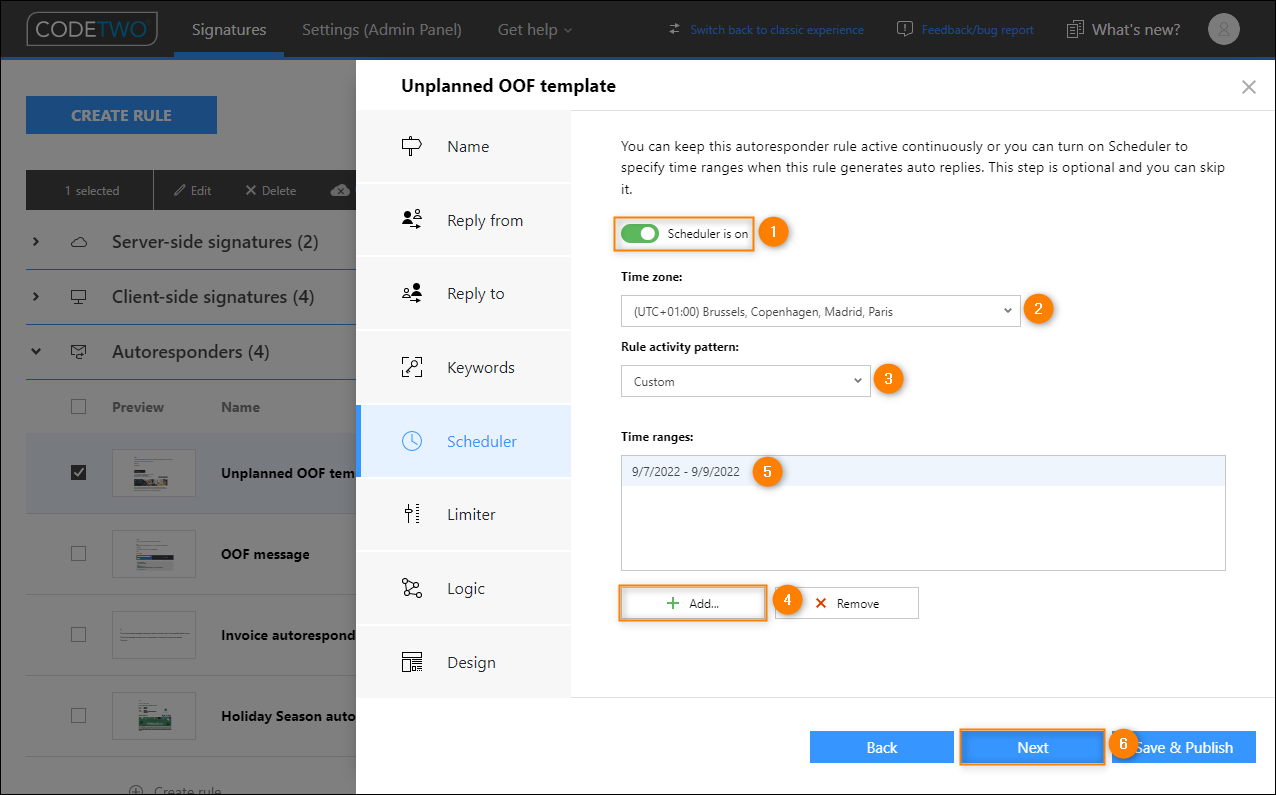
Fig. 5. Scheduler configuration in detail – the day to start sending OOF message is set for today.
If you set-up OOF for a planned absence (e.g. holiday leave):
For this use case, you can generally follow instructions from the section above. The only difference is that you need to remember to set the appropriate future dates in the Start time and End time fields (Fig. 6.), so that the OOF automatic reply will be sent when the planned absence comes.
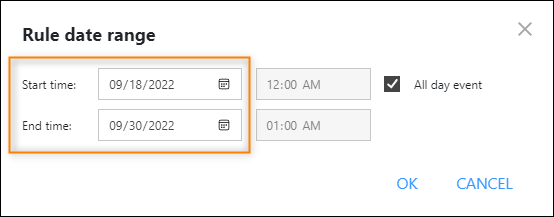
Fig. 6. Setting future dates to start and end sending the OOF autoreply (a planned absence).
Tip
Instead of using Scheduler, you can let your users control when to start and stop sending OOF on their own. Learn more
With the Limiter feature available in the next step, you can specify the number of auto-replies sent to the same email address per hour or day. You can safely leave the default setting for this use case – a sender of an original message will get 1 auto-reply per day regardless of how many messages they send to the absent user. Still, CodeTwo Email Signatures 365 gives you an advantage over the native solution to set this option the way you want.
The default settings in the Logic step should be OK for most use cases. If you want to modify them, you can learn more about the settings here.
The last step, Design (Fig. 7.), allows you to configure different aspects of your auto-reply message. Usually, the default settings for the From, To, Subject, and Behavior options should be OK for most of the scenarios. Still, you might want to:
- put an email address of a person to whom the thread should be forwarded in the Cc field, e.g. the manager of the absent employee who can handle an urgent matter (note: you need to click the Cc button to add the field);
- put a phrase such as I’m out of office: before the subject of an original email; or
- change the autoresponder’s behavior to include original message not in the thread but as an attachment.
To learn about the settings described above in detail, consult this article.
Next, click the Edit reply message button (Fig. 7.) to launch the template editor and start designing your OOF reply visually.
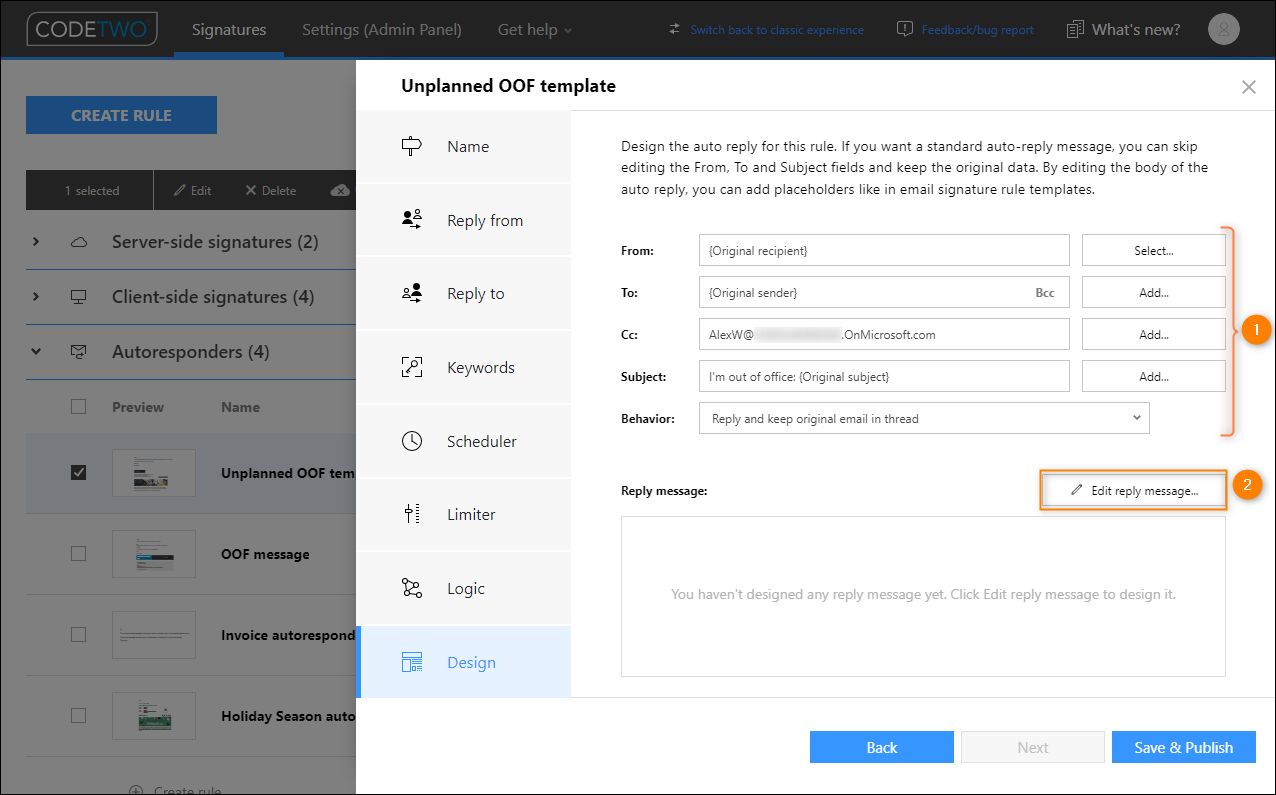
Fig. 7. Specifying different aspects of the OOF auto-reply message.
When preparing a template message, keep the following in mind:
- Make the text as universal as possible, so you can use it for any user, e.g. I’m OOF and will be back on [Return date]. You can also add information about a person substituting for an absent user (if that’s a common practice in your organization): For any queries during my absence, contact [colleague’s full name + email address]. If you look for inspirations, see this blog article.
- Instead of editing placeholders in the text (e.g. Return date) every time you set up an OOF, you can make use of our Attributes manager to let your users fill in these details on their own, as shown in this example of use.
- CodeTwo Email Signatures 365 gives you an advantage over the native solutions in terms of branding and personalization. That’s why, it might be a good idea to include a signature with e.g. a company logo, colors, and so on to make the OOF message consistent with your company’s visual identity. Learn more
- The signature can contain common Entra ID (Azure AD) placeholders, like First name or Department, that are automatically populated with the details of a user for whom the OOF is sent. Learn more
Once you’re OK with your design, click Apply & Close to save the OOF template and close the editor.
Finally, remember to save your rule for all the changes to take effect by clicking Save & Publish (see the bottom right corner of Fig. 7.).
Result
When someone contacts the user for whom you’ve enabled OOF in the selected time period, they will get an appropriate auto-reply.
Here, the absent user was emailed during their sick leave, and the sender received the following version of OOF auto-reply:
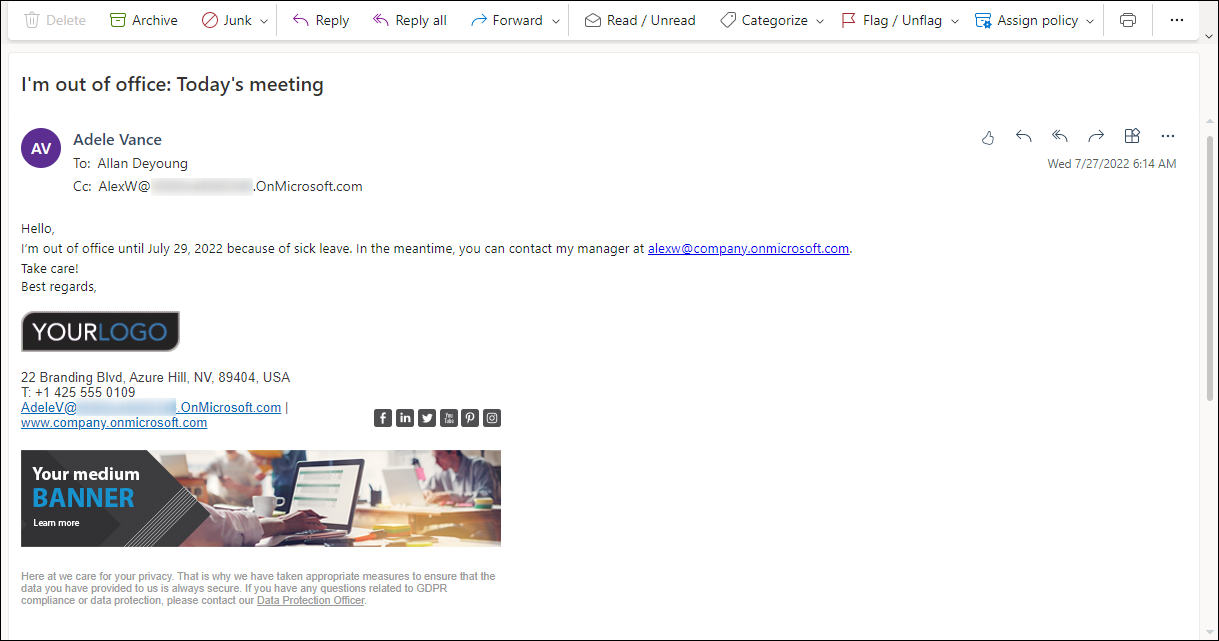
Fig. 9. A sample OOF automatic reply for an unplanned absence (sick leave).
In this article