How to let users choose what to include in their email signatures
Email signatures consist of different elements, such as the sender’s details and photo, company information, marketing banners, and more. Typically, organizations create a single signature template that includes all these elements or deploy different templates for users to choose from.
But CodeTwo Email Signatures 365 gives you even more flexibility – you can create a single template and let users decide which elements to include in it. This way, users can customize their individual email signatures while staying within the boundaries of your organization’s signature template (Fig. 1.).
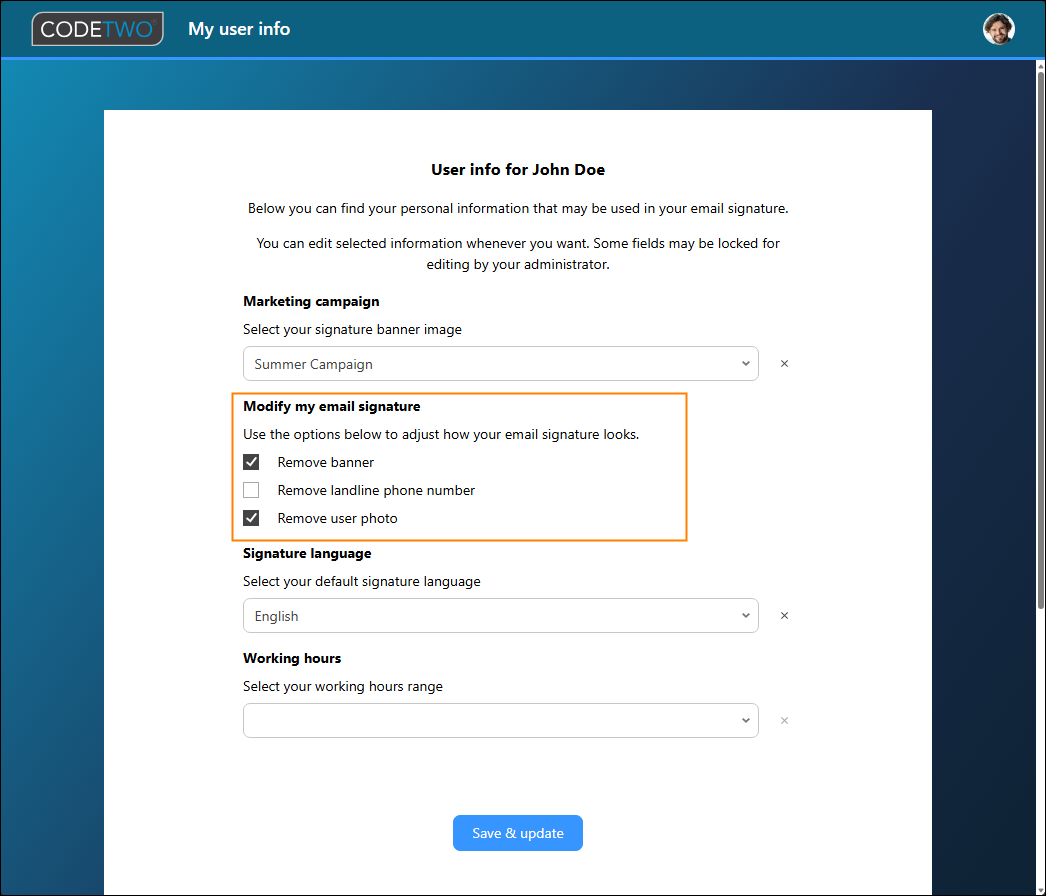
Fig. 1. Users can select what information is included in their email signature.
This article shows how to set up a signature template with a dynamic user photo, landline phone number, and banner that can be switched on or off by your users. To configure this, you will mainly make use of these two features:
- CodeTwo custom attributes – they let users choose what signature elements to include or exclude. See setup instructions
- Conditional placeholders – they modify the design of your company signature based on the CodeTwo custom attributes selected by users. See setup instructions
Note that this method allows users to show or hide existing signature elements. If you are looking for a way to let users add or edit elements that aren’t included in your template by default, like gender pronouns, working days/hours, academic titles, and more, see this article instead.
New to CodeTwo?
Learn more about signature modes our solution can work in. See how to set up your first signature rule and design an email signature template.
Set up CodeTwo custom attributes to control signature elements
With CodeTwo Email Signatures 365, you can let users control their signature elements using CodeTwo custom attribute values created in the Attributes manager app and shared with users in the My user info app.
Info
My user info and the Attributes manager are extra apps included for free in your CodeTwo Email Signatures 365 subscription. Learn more
Let’s create a custom attribute that will allow your users to remove some or all of the following elements from their signatures:
- User photo
- Landline phone number
- Marketing banner
Start by signing in to the Attributes manager app.
Important
By default, only Microsoft 365 global admins can sign in to the Attributes manager, but they can also grant access to other users. See this article to learn more.
If you use the manager for the first time, you need to consent to permissions requested by our web app on behalf of your organization.
In the CodeTwo custom attributes section, click Add to create a new custom attribute and fill in the following info:
- Attribute name – any generic name will do, e.g., Modify my email signature.
- Description – this field is optional, but it’s a good idea to make it clear for your user what this attribute does.
- Field type – choose Multi-select. This way, your users will be able to choose which signature elements to remove by using checkboxes.
- Option # – specify the elements that can be removed from the signature using this attribute. You can add more options by using Add option.
Important
By default, all custom attribute values remain empty until provided or selected by users in the My user info app. This is why it’s best to create a signature that includes all elements, and use custom attribute values to remove the elements that users don’t want to display. To make these values easier to understand, give them descriptive names, e.g., Remove user photo, Remove banner, etc., as shown in Fig. 2.
- Leave the Visible and Editable checkboxes selected and click ADD.
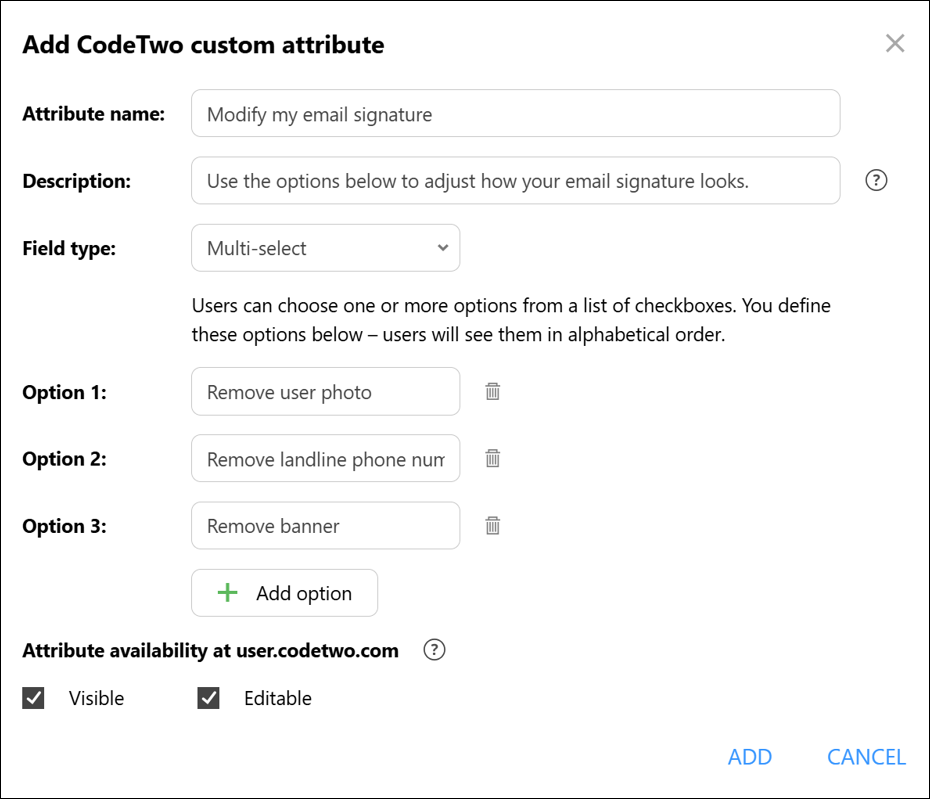
Fig. 2. Adding a multi-select custom attribute to let users remove certain elements from their signatures.
Back in the Attributes manager’s main window, click the Save & Publish button to confirm your changes and make the new custom attribute available in other CodeTwo apps.
Set up a signature template with conditional placeholders
Now, sign in to the Signatures app and either create a new signature rule or click the Edit signature button by an existing rule, as shown in Fig. 3., to quickly access its Design step and open the signature template editor.
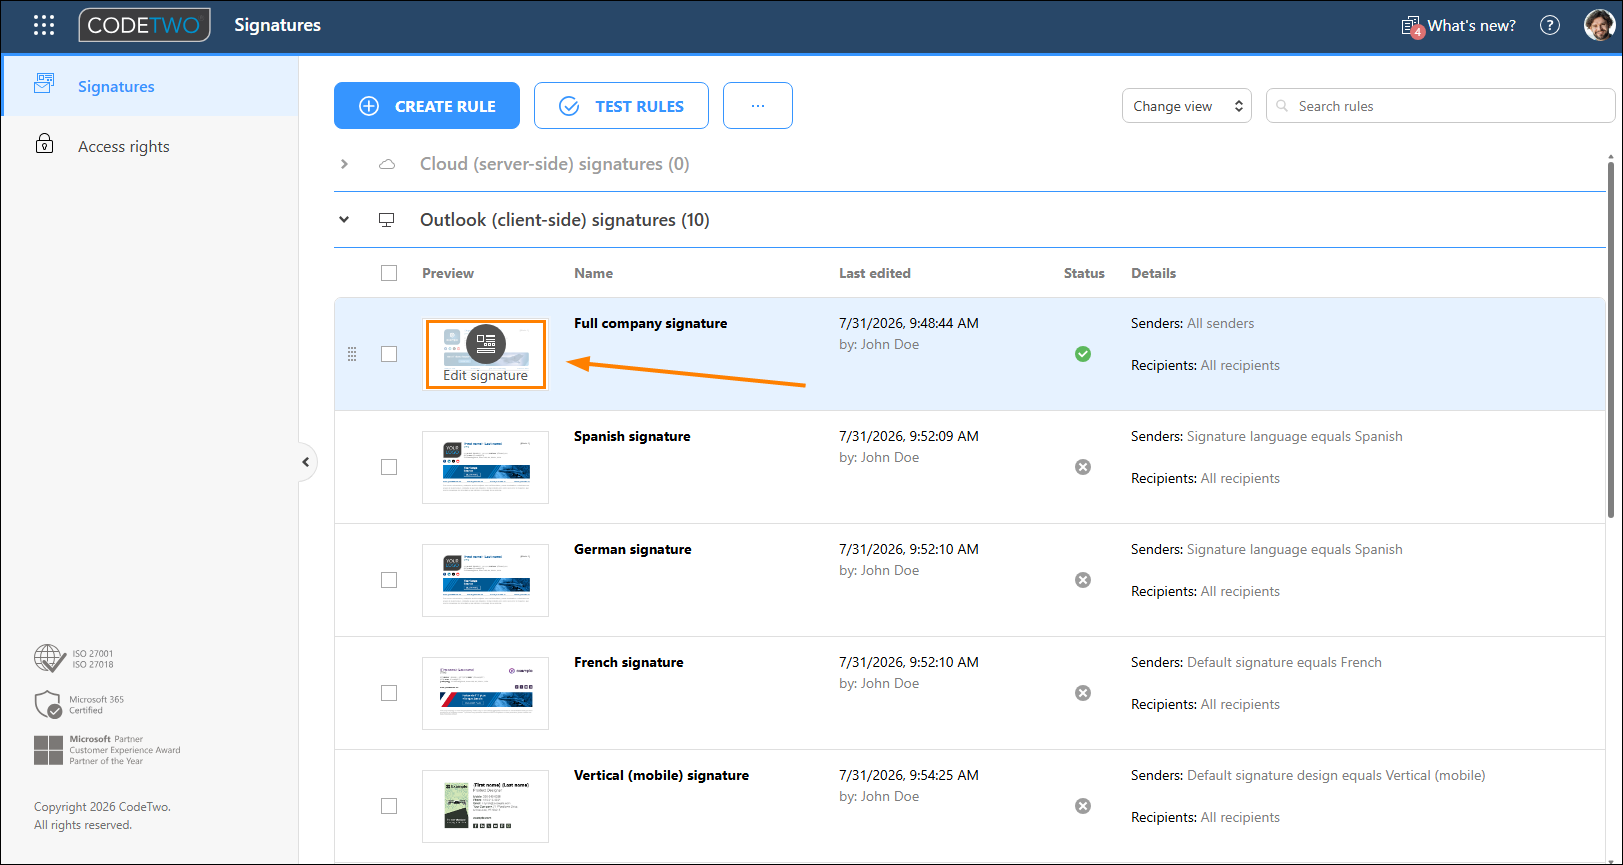
Fig. 3. Click this button to quickly edit your existing signature template.
Once you open the signature template editor, the idea is to replace the static template elements (user photo, landline phone number, and banner) with conditional placeholders. That way, if a specific condition is met (based on what users select in the My user info app), the signature will either include or exclude the specific element for specific senders.
Before you start, remove any existing photo and phone placeholders and banner from your current signature template.
Now, let’s add the conditional placeholders, starting with the one that will insert or remove the user photo. Click Conditional placeholder > Manage on the ribbon to open the conditional placeholders manager (Fig. 4.). See this article if you want to learn more about conditional placeholders.
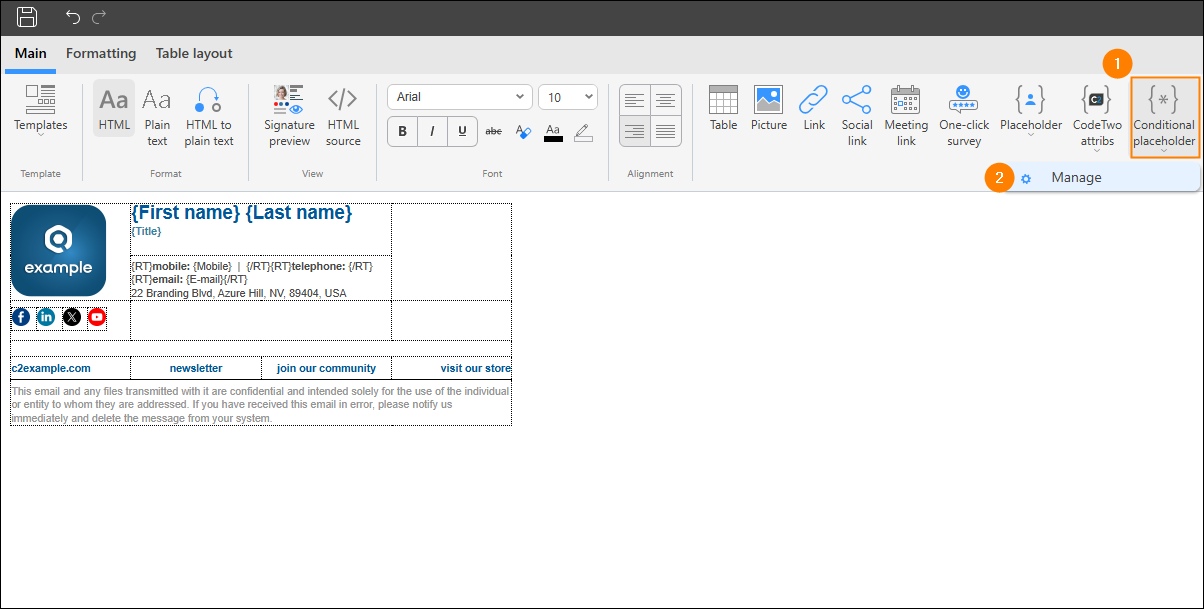
Fig. 4. Accessing the conditional placeholders manager in the signature template editor.
In the window that opens, click Create and enter the placeholder name (e.g., User photo), and click OK (Fig. 5.).
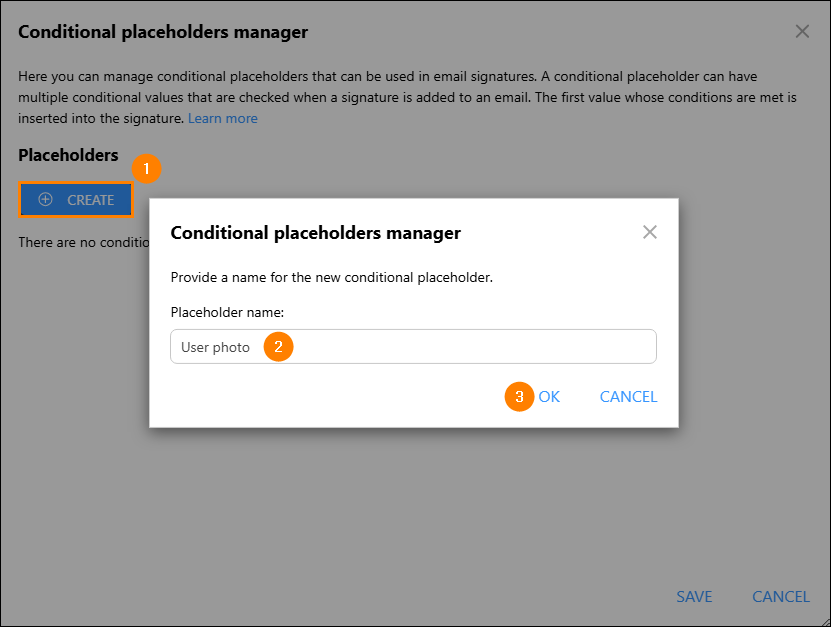
Fig. 5. Entering the conditional placeholder’s name.
In the Conditional values section, click Add, confirm the info message if prompted, and select the Edit (pencil) button to open the placeholder value conditions builder (Fig. 6.).
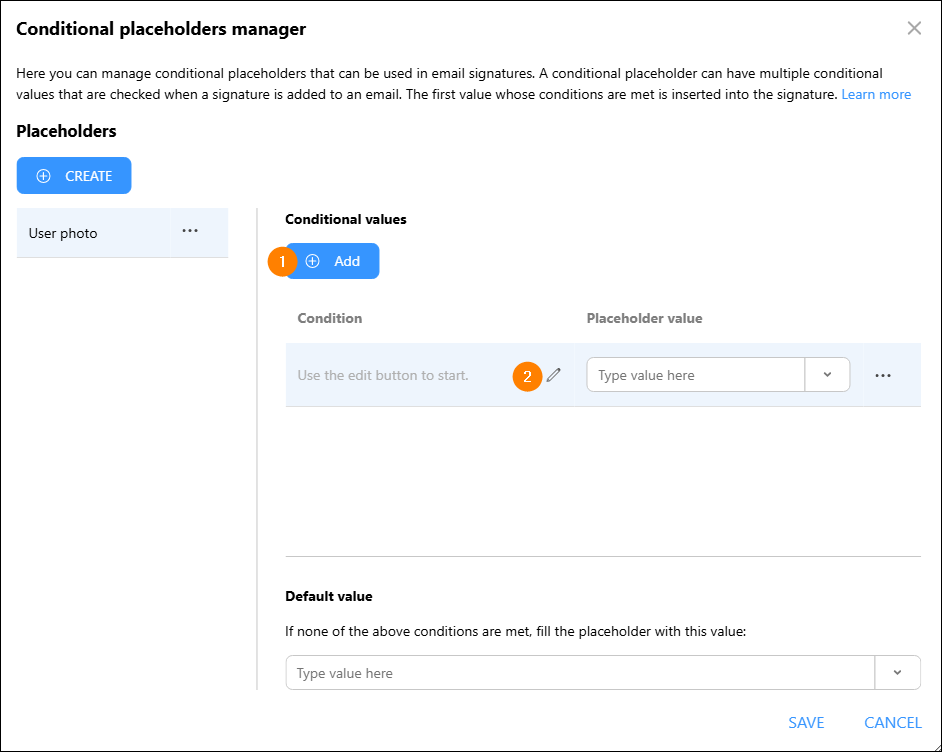
Fig. 6. Accessing the placeholder value conditions builder.
In the Sender property column of the conditions builder, click Choose > Additional attributes and select your CodeTwo custom attribute (in this example, it’s Modify my email signature), as shown in Fig. 7.
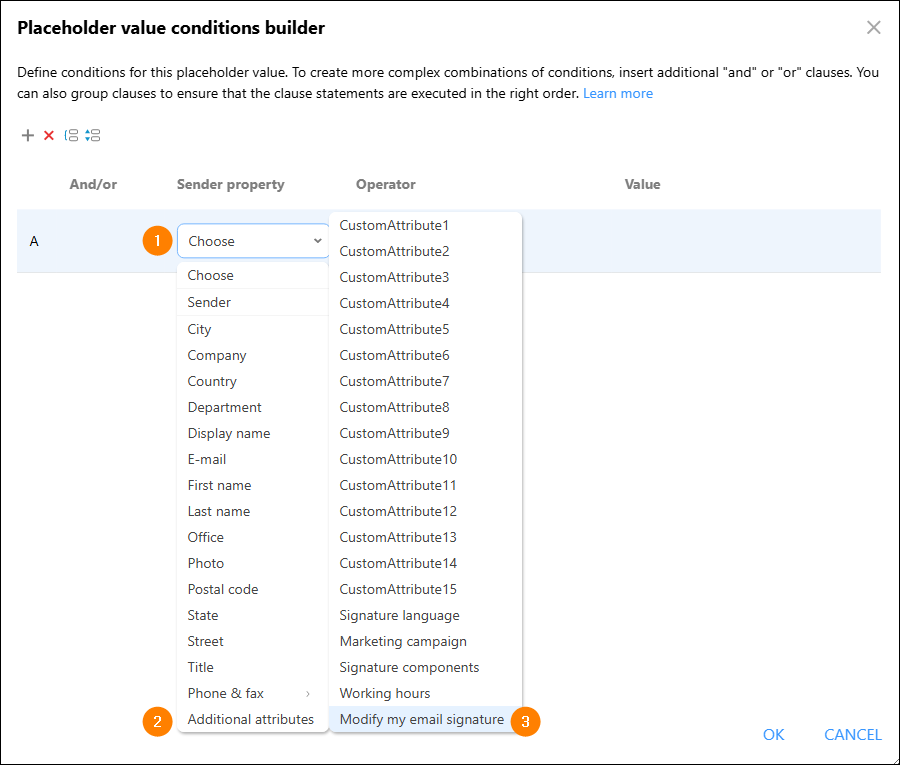
Fig. 7. Selecting the CodeTwo custom attribute in the placeholder value conditions builder.
In the Operator column, select contains. Next, enter Remove user photo in the Value column to match the name of the CodeTwo custom attribute option for removing user photos (as shown in Fig. 2. above) and click OK to save your changes (Fig. 8.).
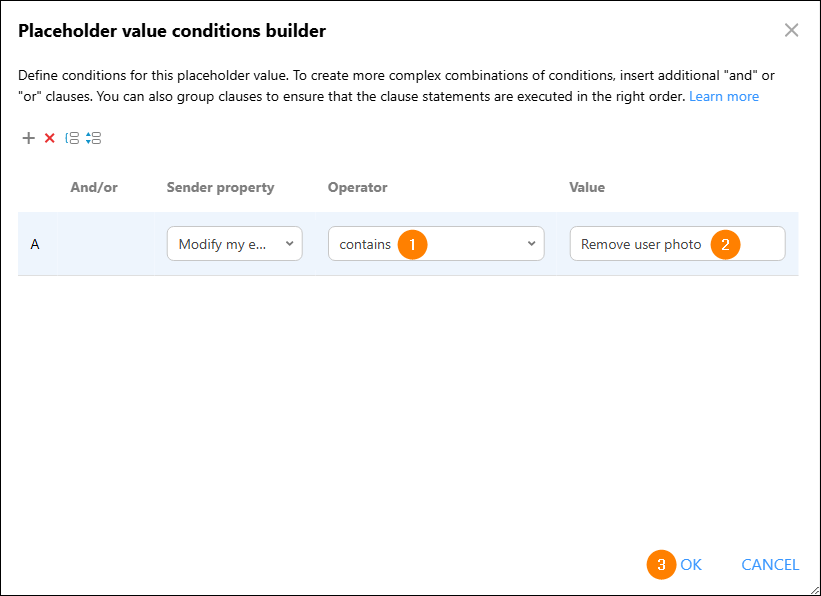
Fig. 8. Setting up the operator and value of the placeholder value condition.
Back in the conditional placeholder manager window, leave the Placeholder value column empty for the new condition. This way, selecting the Remove user photo option in My user info will prevent the user photo from being added to the signature template.
To add the photo in all other cases, use the Default value section. Click the down arrow to open the section’s drop-down menu and select Message Sender > Photo (Fig. 9.). If needed, adjust photo dimension settings in the popup that opens.
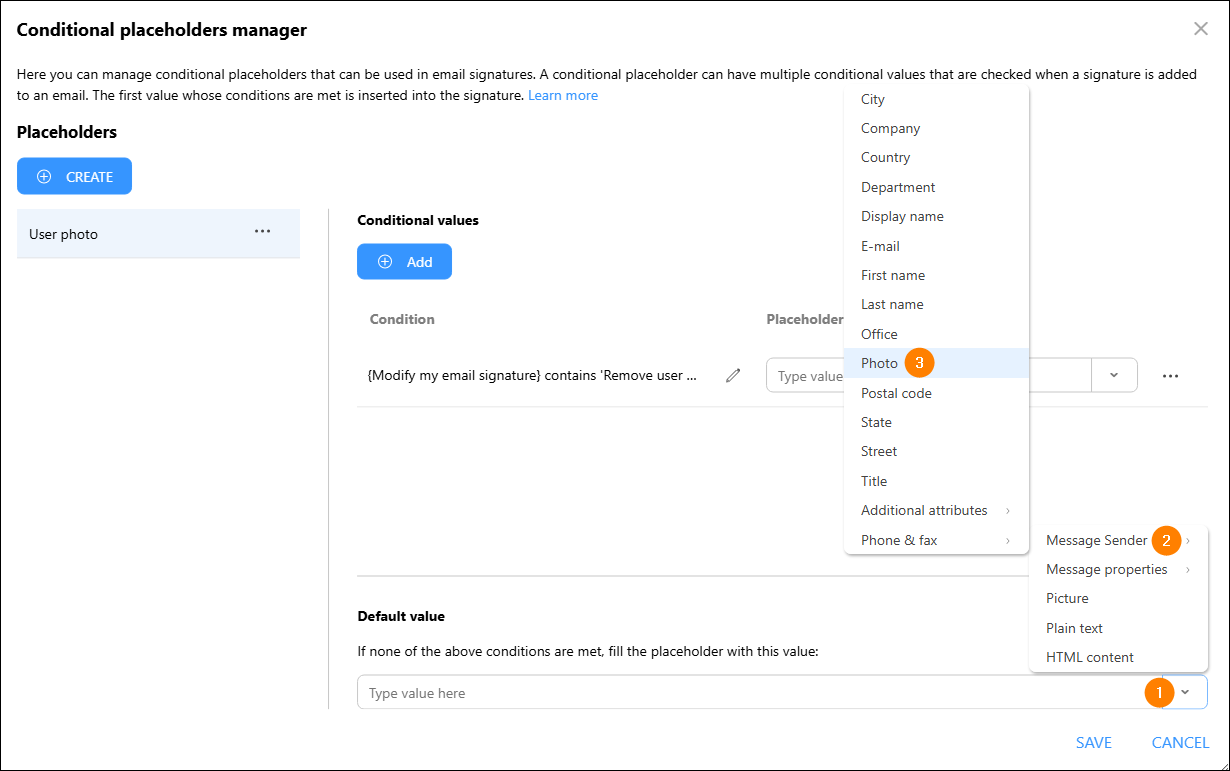
Fig. 9. Setting the default value of the conditional placeholder.
Your conditional placeholder’s settings should now look like those shown in Fig. 10. Click Save to save your changes and close the conditional placeholders manager.
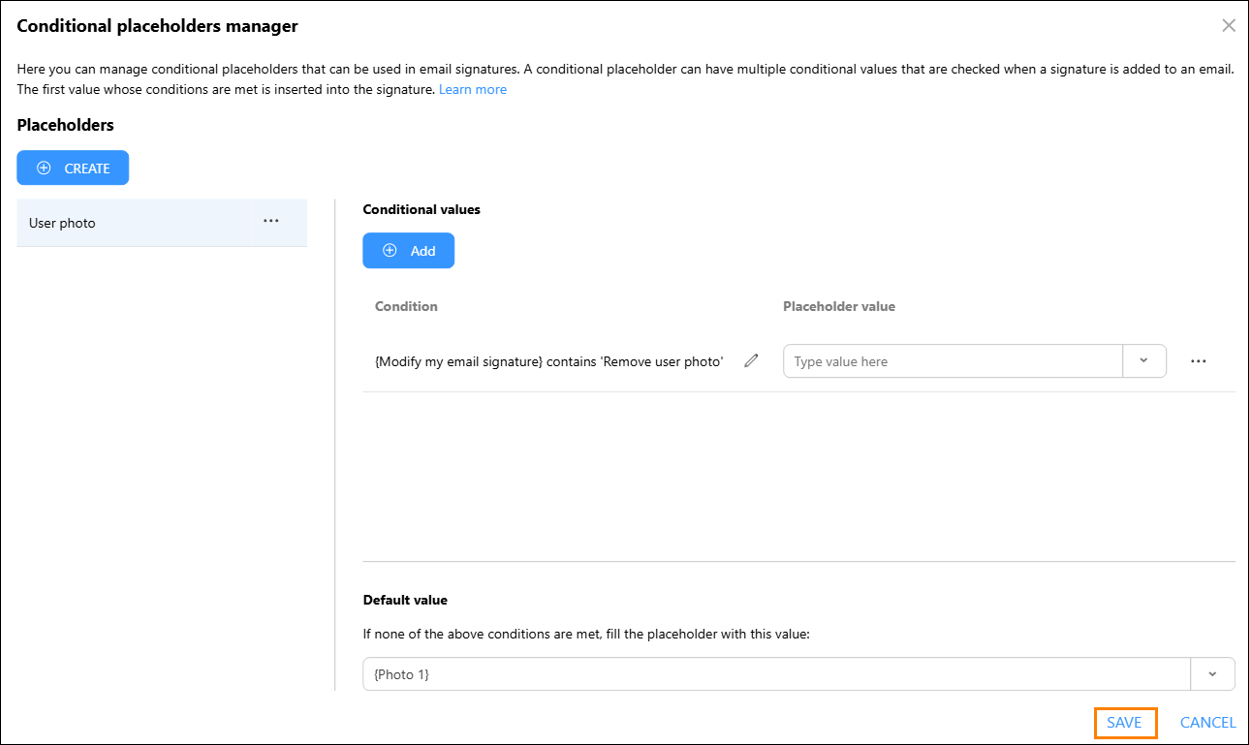
Fig. 10. Saving the conditional placeholder used for showing and hiding user photos in the signature template.
Back in the signature template editor, place the cursor wherever you want to show the user photo (unless the user chooses to remove it), click Conditional placeholder on the ribbon, and select the User photo placeholder you’ve just created. This will insert it into your template, as shown in Fig. 11.
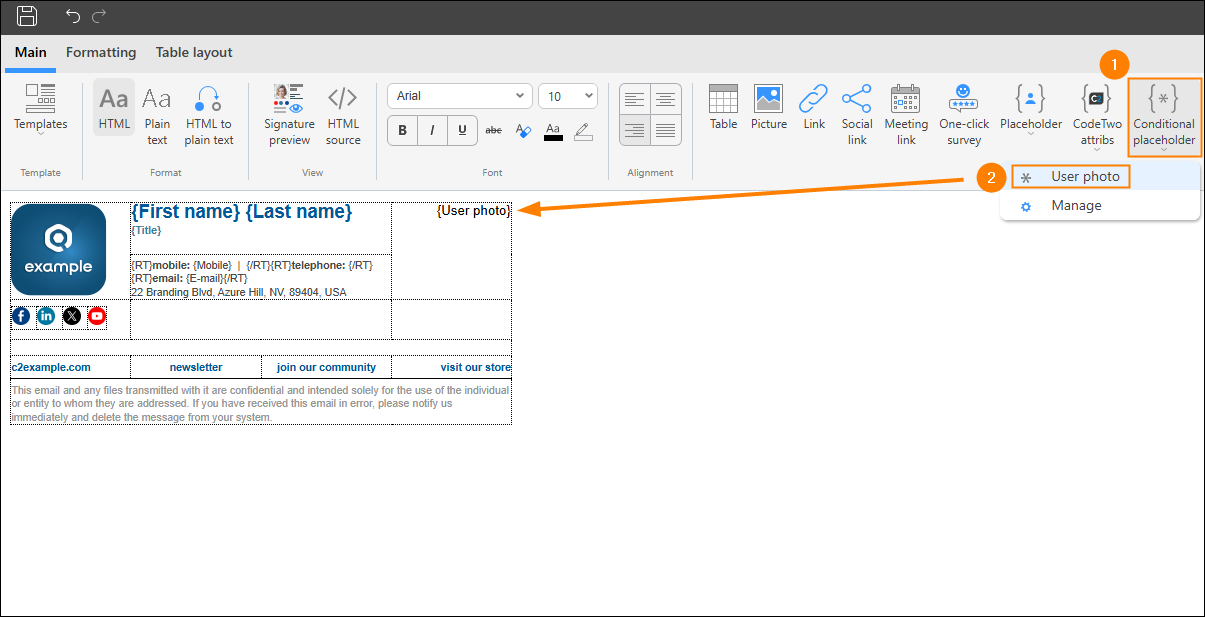
Fig. 11. Inserting the User photo placeholder into the signature template.
Now, repeat the steps above (starting from this section) to create and insert conditional placeholders for the other custom attribute values: Remove landline phone number and Remove banner. Note the following differences:
- When setting the default value of the placeholder showing/hiding the landline phone number, select Message Sender > Phone & fax > Phone from the drop-down menu (Fig. 12.).
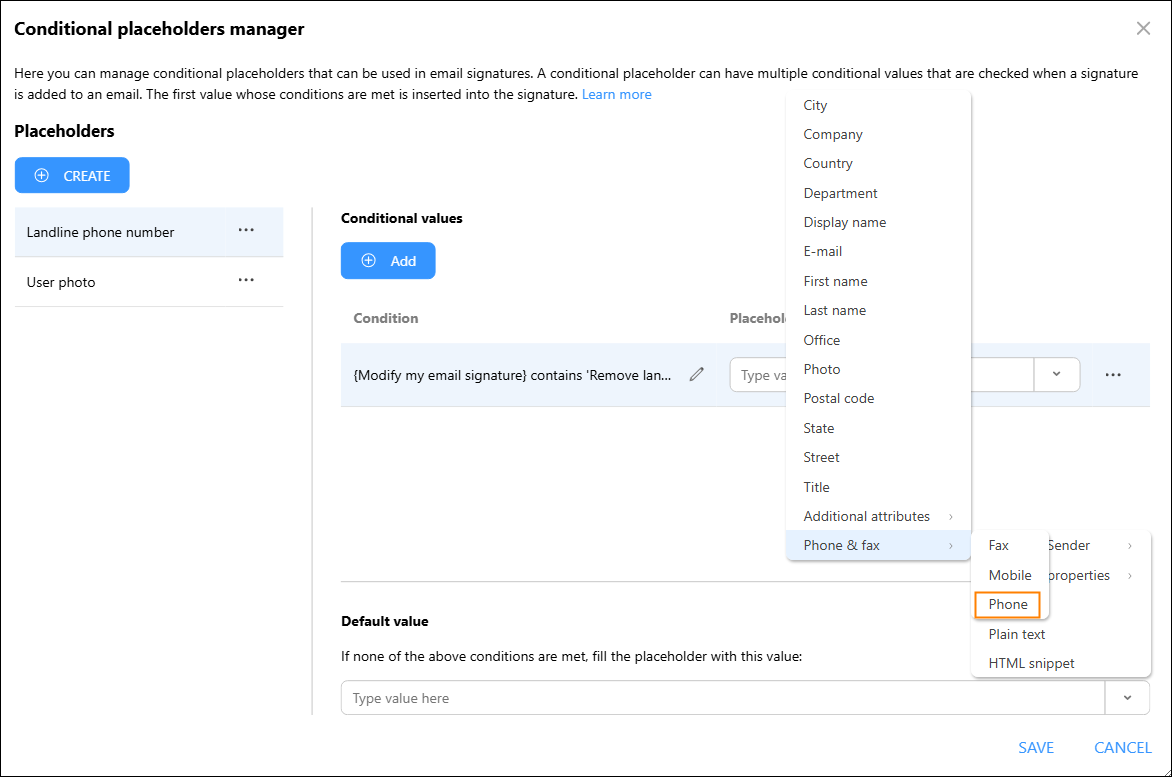
Fig. 12. Selecting the Phone placeholder as the default value of the conditional placeholder showing/hiding the landline phone number.
- When setting the default value of the placeholder showing/hiding the banner, select Picture from the drop-down menu (Fig. 13.) and choose or upload the banner image in the Insert picture window that opens. Learn more about inserting pictures into signature templates
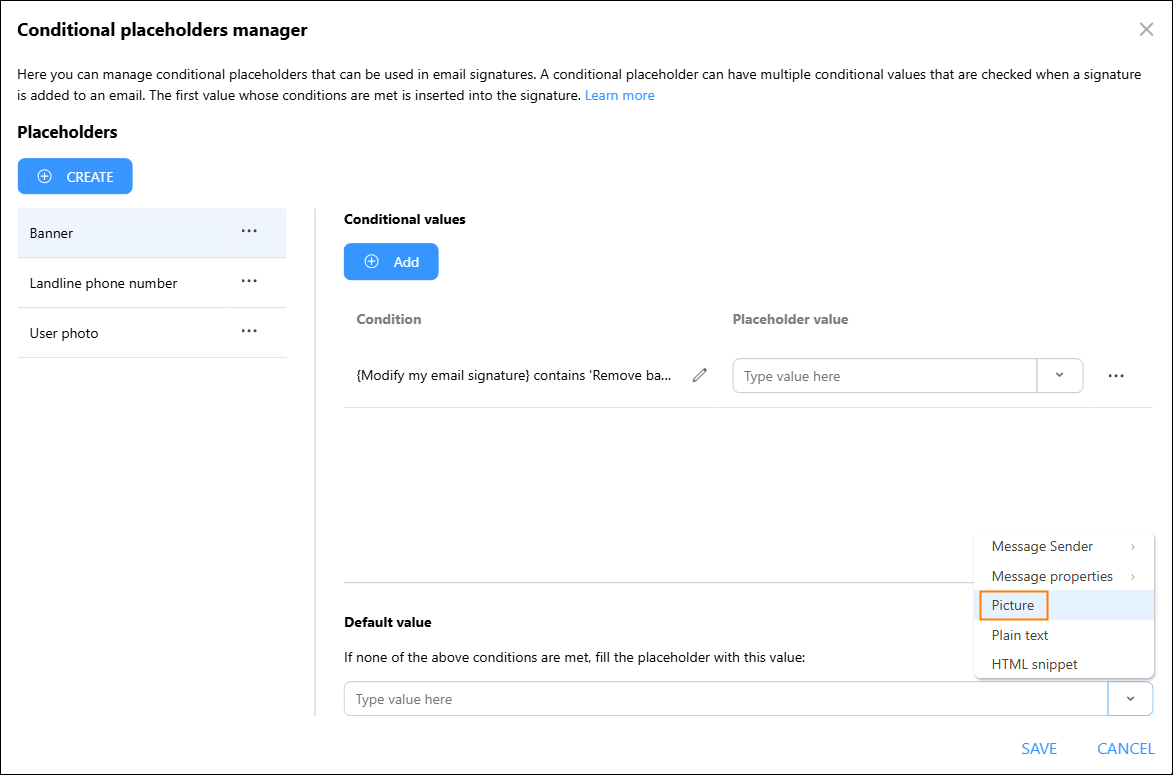
Fig. 13. Selecting the Picture placeholder as the default value of the conditional placeholder showing/hiding the banner.
Once you have inserted all the placeholders into your template, consider using the Remove if blank option to surround them (and their accompanying phrases) with RT tags. This way, you can avoid unnecessary empty spaces in the signature if a placeholder cannot be replaced with the corresponding data, e.g., a landline phone number. Learn more about this feature
Finally, save your changes in the signature template editor and publish the rule, if it’s not published yet.
That’s it: from now on, end users can remove their photo, landline phone number, and banner by selecting an appropriate attribute value in the My user info app, as shown in Fig. 14. Make sure to let your users know about this so they can customize their signatures as needed.
For more information on how to manage attributes in My user info, see this article.
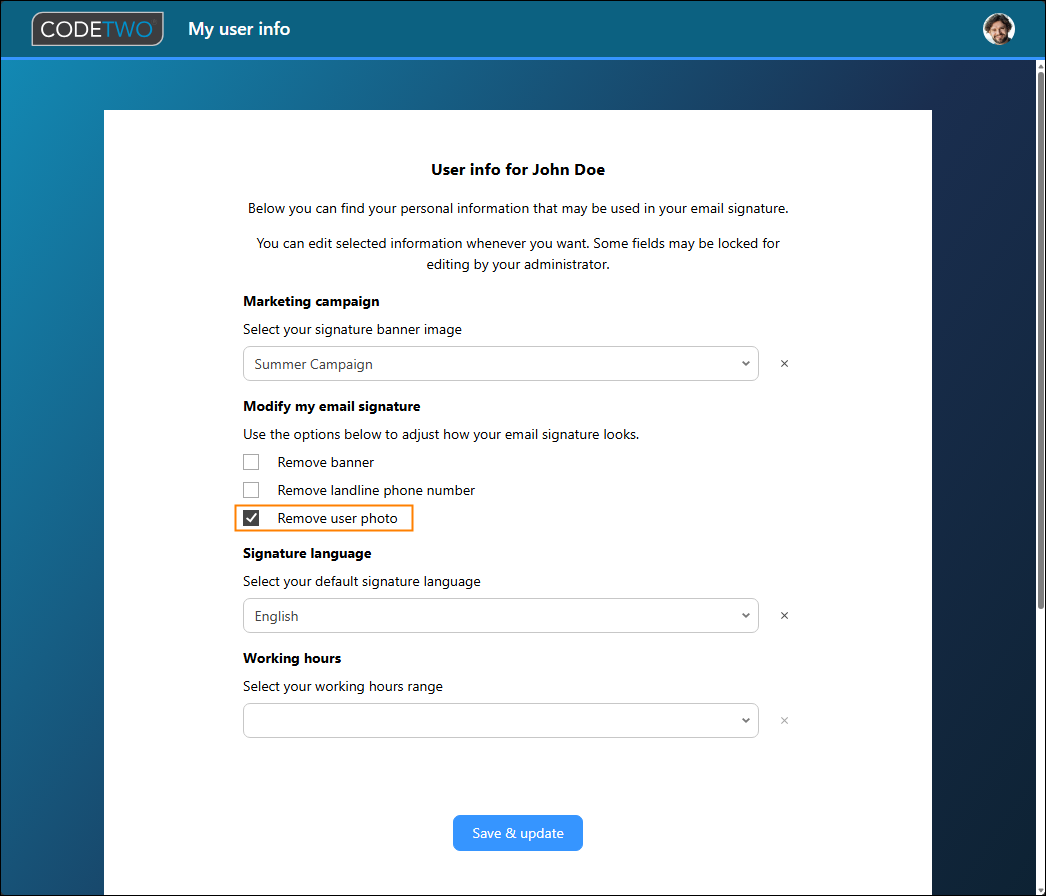
Fig. 14. Hiding the user photo in the signature template by selecting an attribute value in My user info.
See also
In this article