How to let users choose their default signature banner
This article explains how to let users select a default banner for their email signature template from a list available in the My user info app, without the need to create separate signature rules for each banner. Since all other signature elements remain unchanged, this solution helps you ensure consistent branding in all signatures while still giving users the flexibility to adapt their signatures for different purposes.
This solution is especially useful if:
- your Sales or Marketing teams need different banners for different team members (for example, to better support targeted advertising),
- your organization runs multiple marketing campaigns at the same time,
- you want to provide your users with seasonal or holiday-themed banners,
- your users occasionally need to add a different banner to their signature (for example, a call to action before a special event), or
- you want to allow your users to have no banner in their signature at all.
In this example, we’ll provide users with several signature banners to choose from in the My user info app (Fig. 1.), including:
- a standard marketing banner well suited for all messages,
- a seasonal banner for winter holidays,
- a call to action (CTA) banner with an event registration link.
Users will also be able to choose not to include any banner.
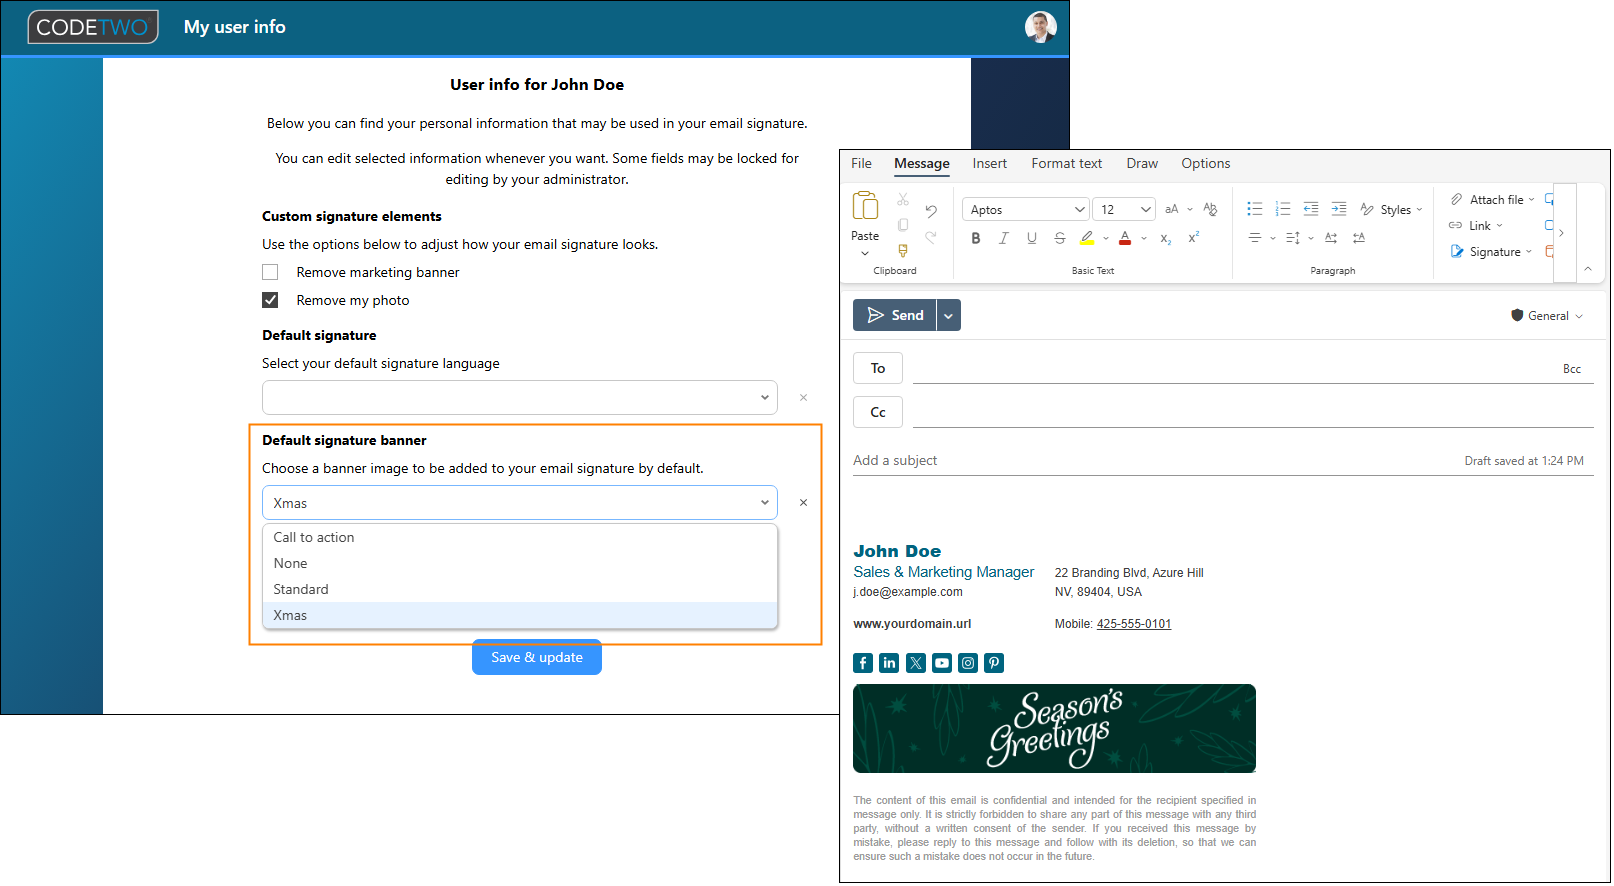
Fig. 1. This user selected a holiday-themed image as the default signature banner.
To handle this scenario, you need to:
- create a list of available banners using a CodeTwo custom attribute in the Attributes manager app, and
- set up a signature rule that will use a conditional placeholder to determine which banner should be added to a specific user’s signature.
The solution below will work for both cloud (server-side) and Outlook (client-side) signatures. Additionally, if you use Outlook signatures, users will be able to manually select signature templates with other banners via the CodeTwo add-in pane in Outlook desktop and Outlook on the web (OWA), provided that you create separate rules for such templates. Learn more
New to CodeTwo?
Learn more about signature modes our solution can work in. See how to set up your first signature rule and design an email signature template.
My user info and Attributes manager are extra apps included for free in your CodeTwo Email Signatures 365 subscription. Learn more
Create a custom attribute in the Attributes manager app
To start, sign in to the Attributes manager app. The Attribute visibility settings page will appear.
Important
By default, only Microsoft 365 global admins can sign in to the Attributes manager, but they can also grant access to other users. See this article to learn more.
If you use the manager for the first time, you need to consent to permissions requested by our web app on behalf of your organization.
In the CodeTwo custom attributes section, click the Add button (Fig. 2.).
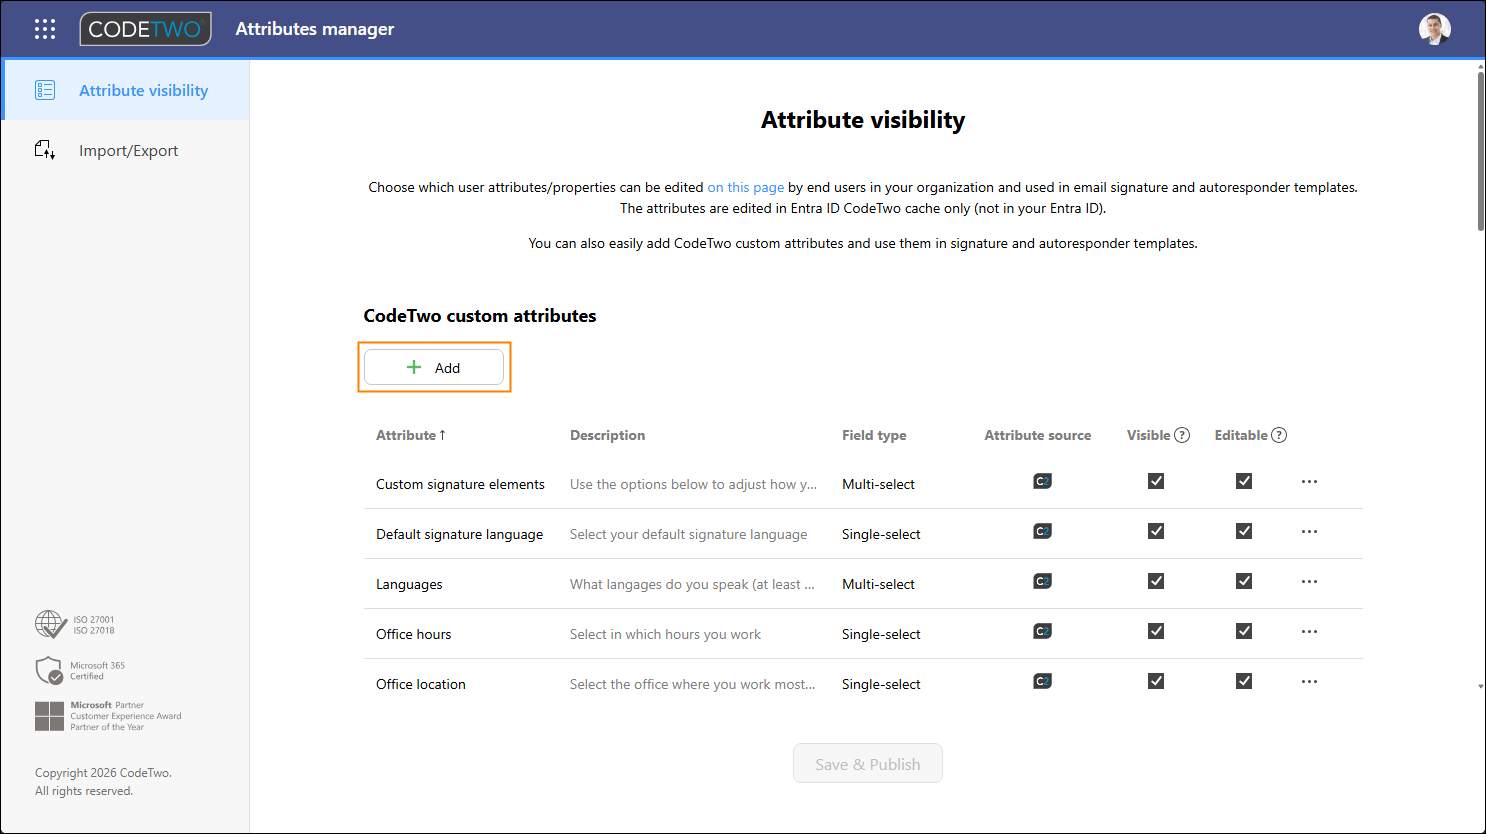
Fig. 2. Adding a custom attribute in the Attributes manager app.
In the window that opens, type the attribute’s name and (optionally) a description, and choose Single-select as the field type – this will allow users to select a single banner as their preferred one.
Next, enter the names of available banners in the Option fields, as shown in Fig. 3. You can include as many banners as needed using the Add option button.
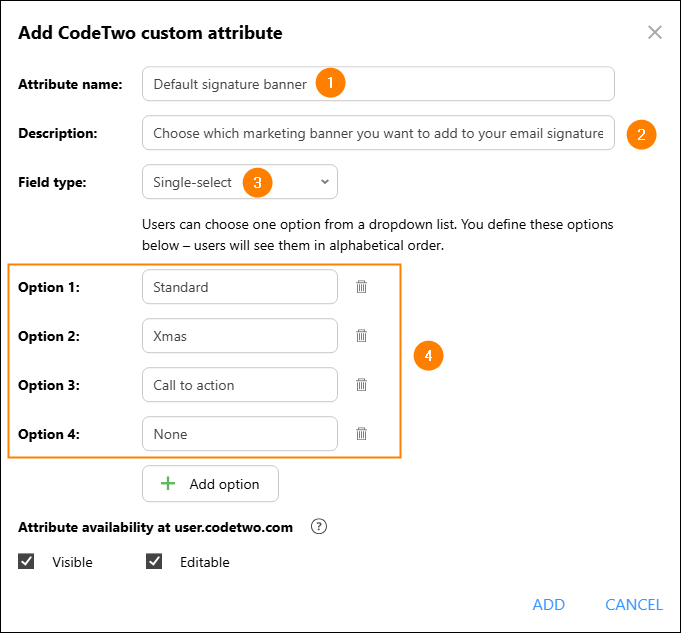
Fig. 3. Configuring the custom attribute for selecting the default signature banner.
After you enter all necessary options, leave the Visible and Editable parameters enabled and click ADD.
Back in the Attributes manager’s main window, click the Save & Publish button to confirm your changes and make the new custom attribute available in other CodeTwo apps (Fig. 4.).
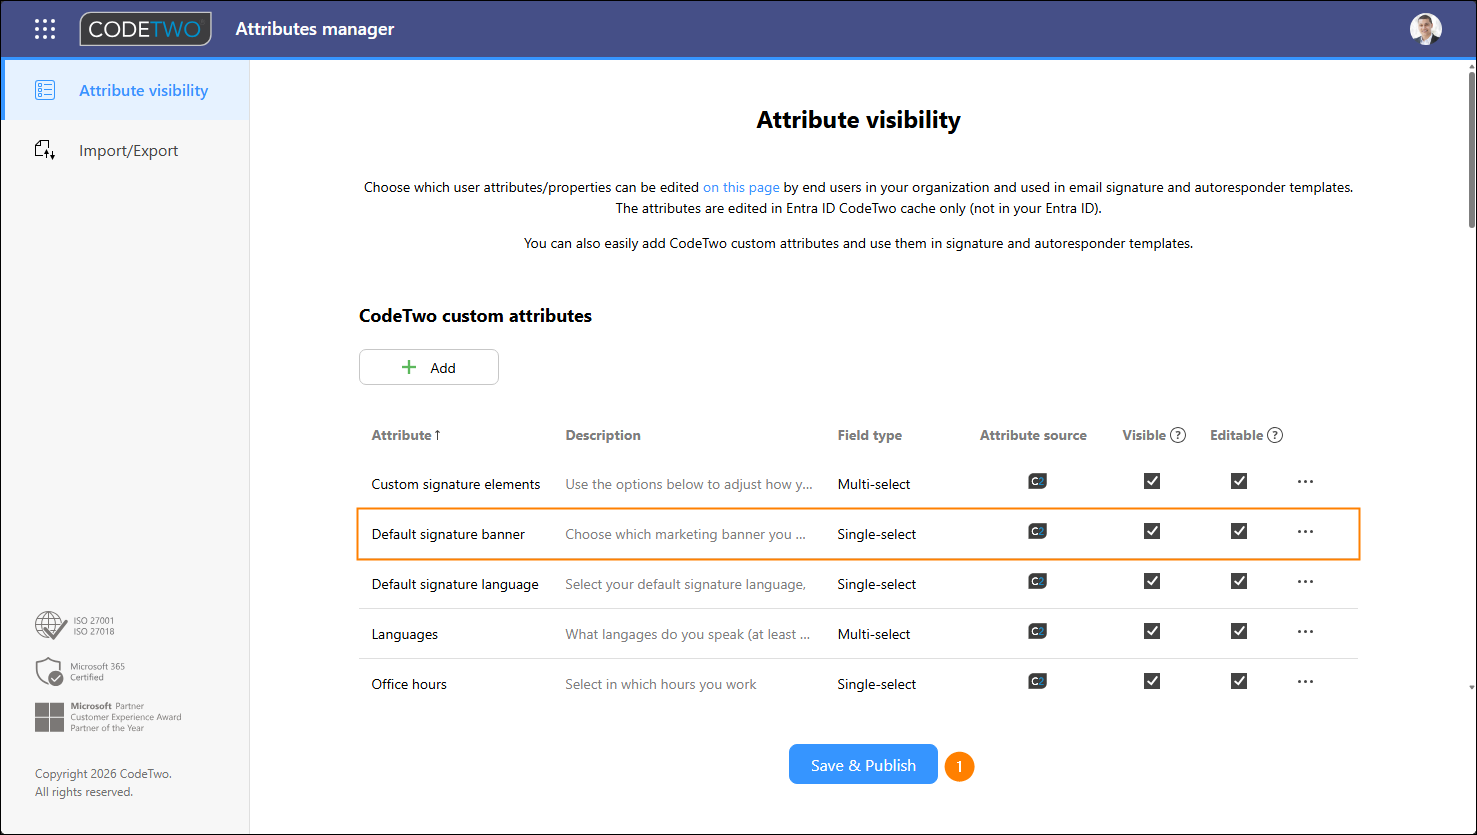
Fig. 4. Saving and publishing the new custom attribute in the Attributes manager app.
When the CodeTwo custom attribute is configured, you can move on to creating a signature rule that will add signatures with a relevant banner version.
Create an email signature template in the Signatures app
Sign in to the Signatures app and create a new signature rule (or edit an existing one).
Tip
Use the links below for general instructions on how to create:
Configure the rule’s conditions and exceptions as desired.
If you’re adding an Outlook (client-side) signature, go to the Logic step and make sure the Set this signature as default for new messages and Set this signature as default for replies and forwards options are enabled. Learn more about these options
Go to the Design step and create an appropriate signature template.
When you’re ready to insert your banner image, don’t use the Picture option – instead, click Conditional placeholder > Manage on the Main tab of the template editor’s ribbon (Fig. 5.). The Conditional placeholders manager window will open, allowing you to insert an appropriate banner in users’ signatures by using a conditional placeholder in the signature template.
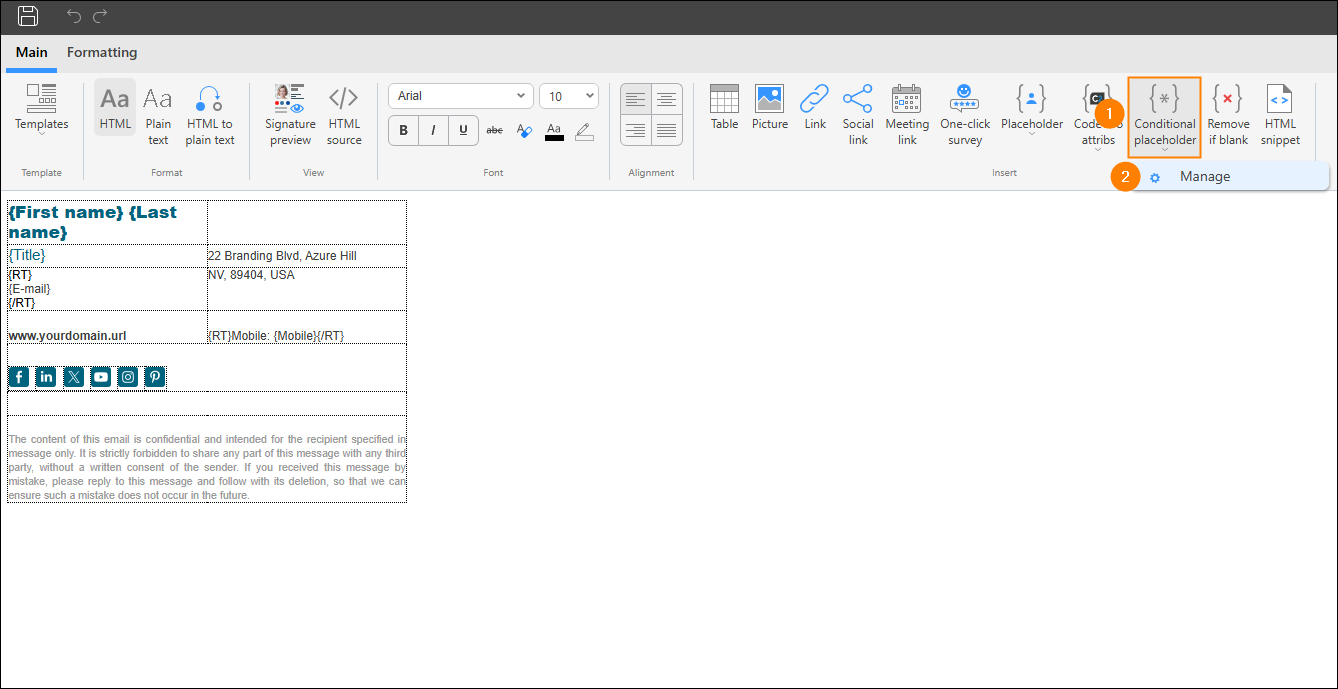
Fig. 5. Accessing the Conditional placeholders manager in the signature template editor.
In the Conditional placeholders manager, click the Create button, enter the new placeholder’s name (for example, Default banner), and click OK (Fig. 6.).
See this article if you want to learn more about conditional placeholders.
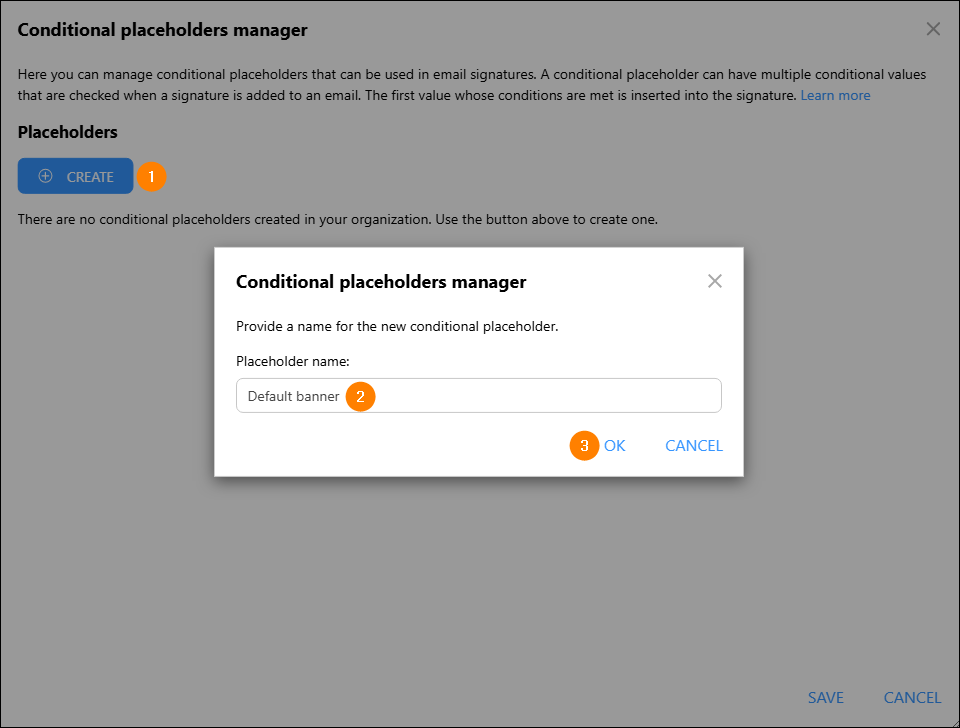
Fig. 6. Creating a new conditional placeholder that will insert a user’s default signature banner.
In the Conditional values section of the new placeholder, click Add and then click the Edit (pencil) button to open the placeholder value conditions builder (Fig. 7.).
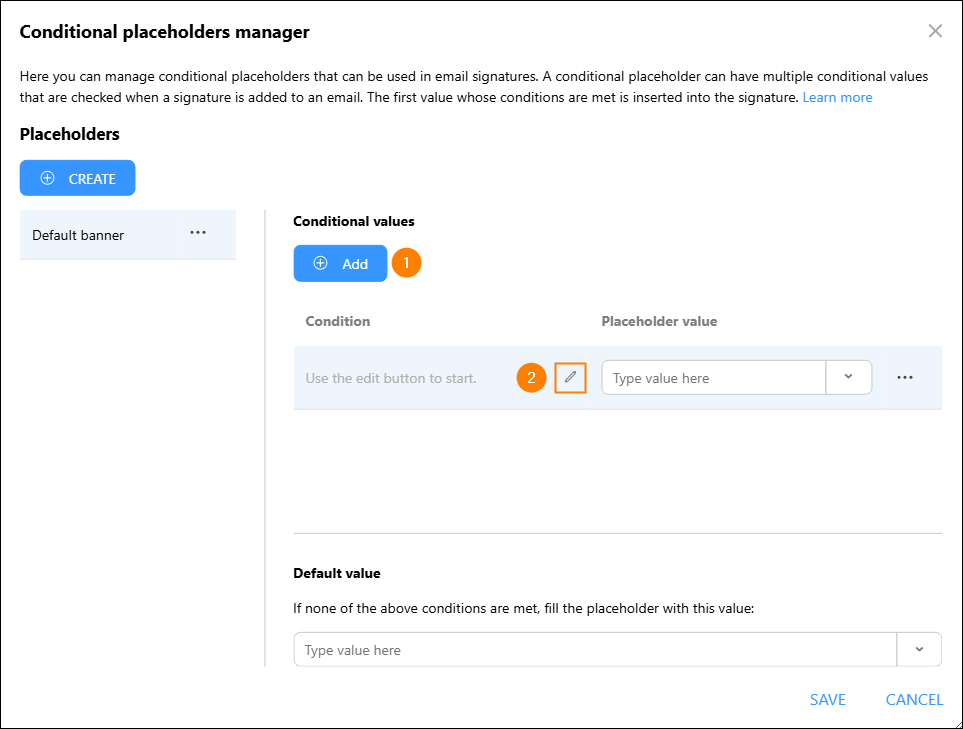
Fig. 7. Accessing the placeholder value conditions builder.
In the Placeholder value conditions builder window, expand the drop-down in the Sender property column, go to Additional attributes, and select your CodeTwo custom attribute for the default signature banner (if you can’t see the attribute, you may need to refresh the Signatures app). Next, set the operator as equals and type one of your custom attribute’s values in the Value field (Fig. 8.). Click OK to confirm.
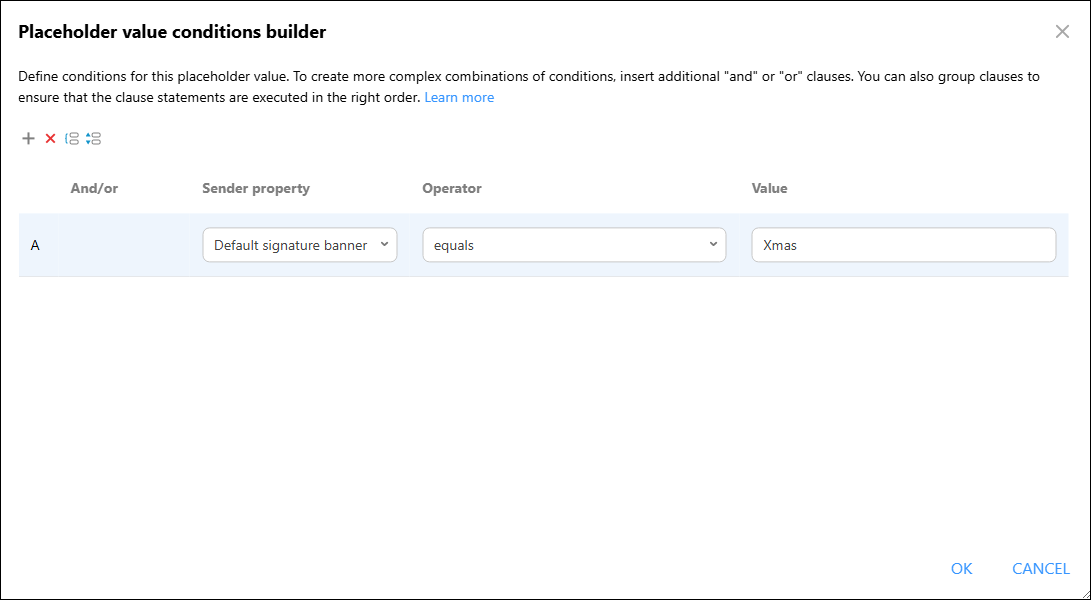
Fig. 8. Building the placeholder value condition for the first custom attribute value.
Back in the Conditional placeholders manager’s main window, click the down arrow in the Placeholder value column and select Picture (Fig. 9.).
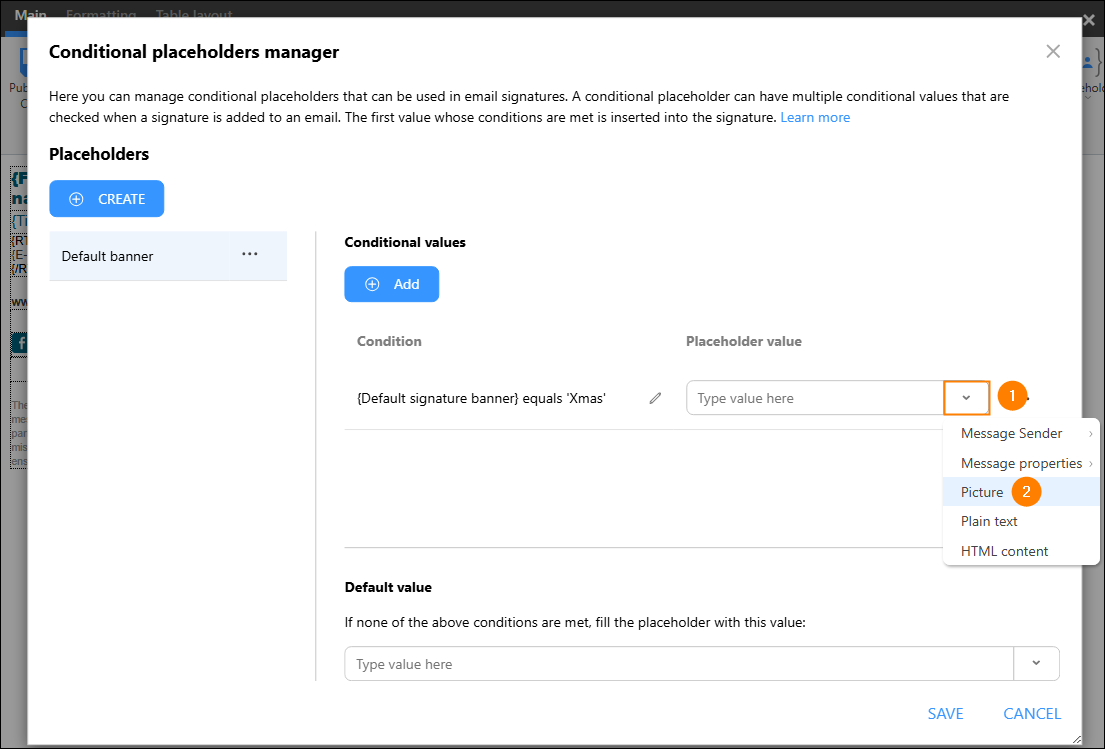
Fig. 9. Selecting the Picture placeholder value.
In the Insert picture window that opens, choose a banner image from your device or enter its URL and (optionally) specify the picture’s size and alternative text (Fig. 10.). Learn more about adding pictures to signature templates
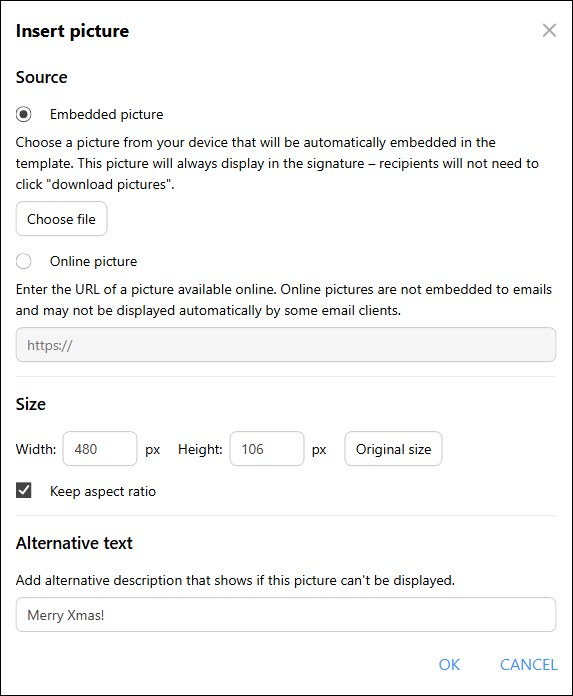
Fig. 10. Inserting the banner image.
Click OK to confirm and return to the Conditional placeholders manager window.
If you want your banner to contain a clickable link, click the down arrow next to the Picture placeholder value and select HTML snippet. A simplified version of the signature template editor will open, as shown in Fig. 11. Now, click your banner and use the Link button to add the link. See this article to learn more about adding links to images
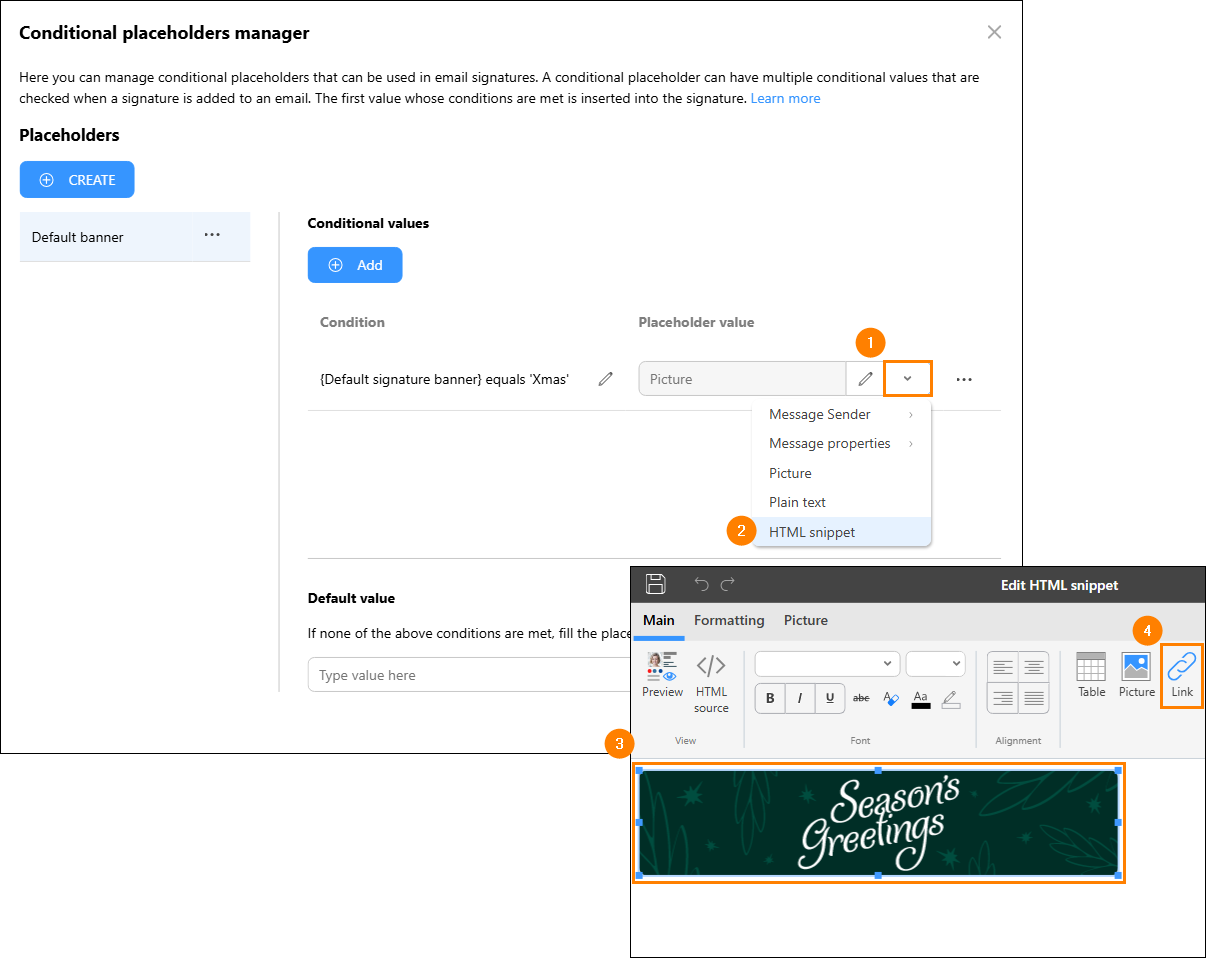
Fig. 11. Adding a clickable link to the banner in the Edit HTML snippet window.
Add separate conditions for the other values of your CodeTwo custom attribute – that is, for other banners. If you have a value that should insert no banner at all, leave the Placeholder value column empty for it (as shown in Fig. 12.).
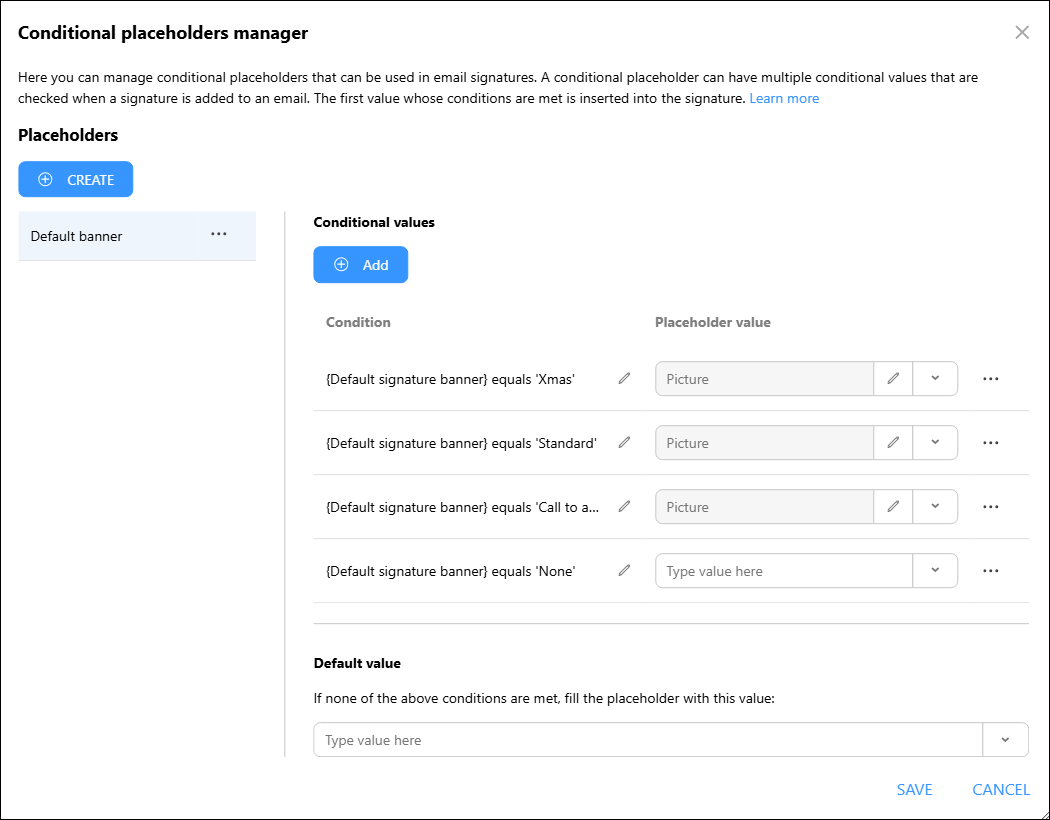
Fig. 12. All values of the CodeTwo custom attribute included in the Conditional placeholders manager.
Finally, you can use the Picture option in the Default value section of the Conditional placeholders manager to choose a banner that should be displayed if a user doesn’t choose any option in My user info – for example, your organization’s standard marketing banner (Fig. 13.).
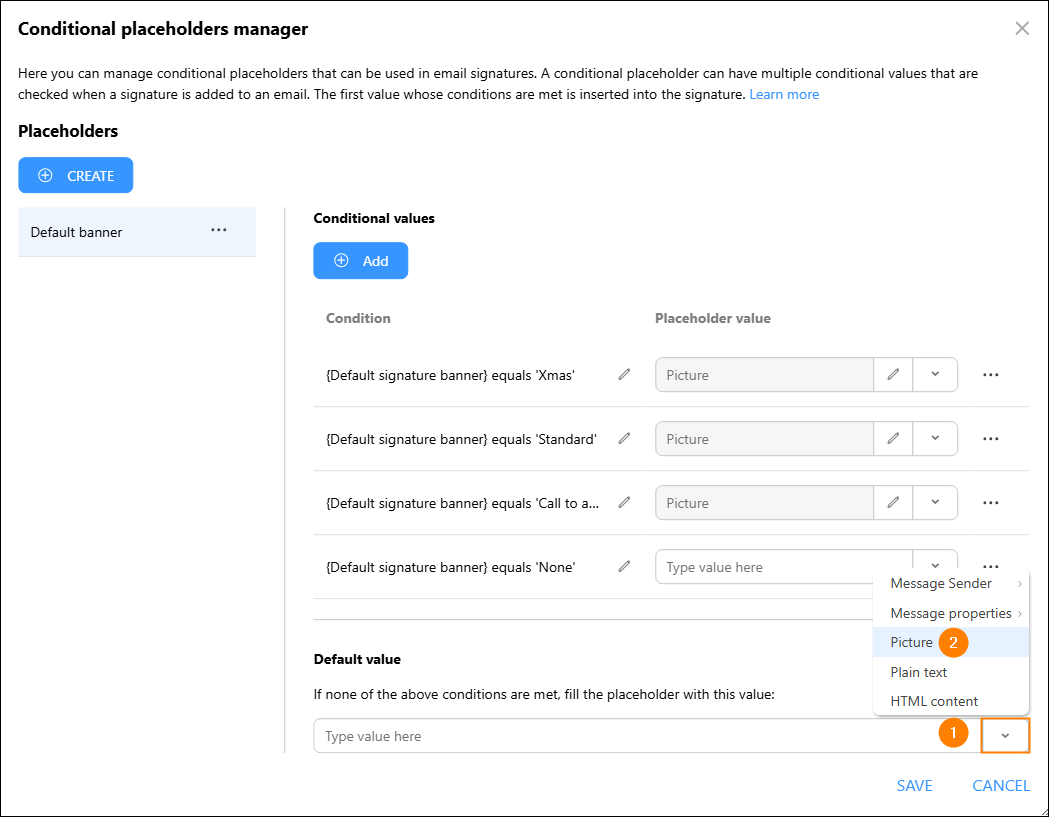
Fig. 13. Configuring the conditional placeholder’s default value.
Once your conditional placeholder is ready, click SAVE.
Back in the signature template editor, place the cursor in the intended position of the banner image, click the Conditional placeholder button on the ribbon again, and select your new conditional placeholder from the drop-down to insert it into the signature template (Fig. 14.).
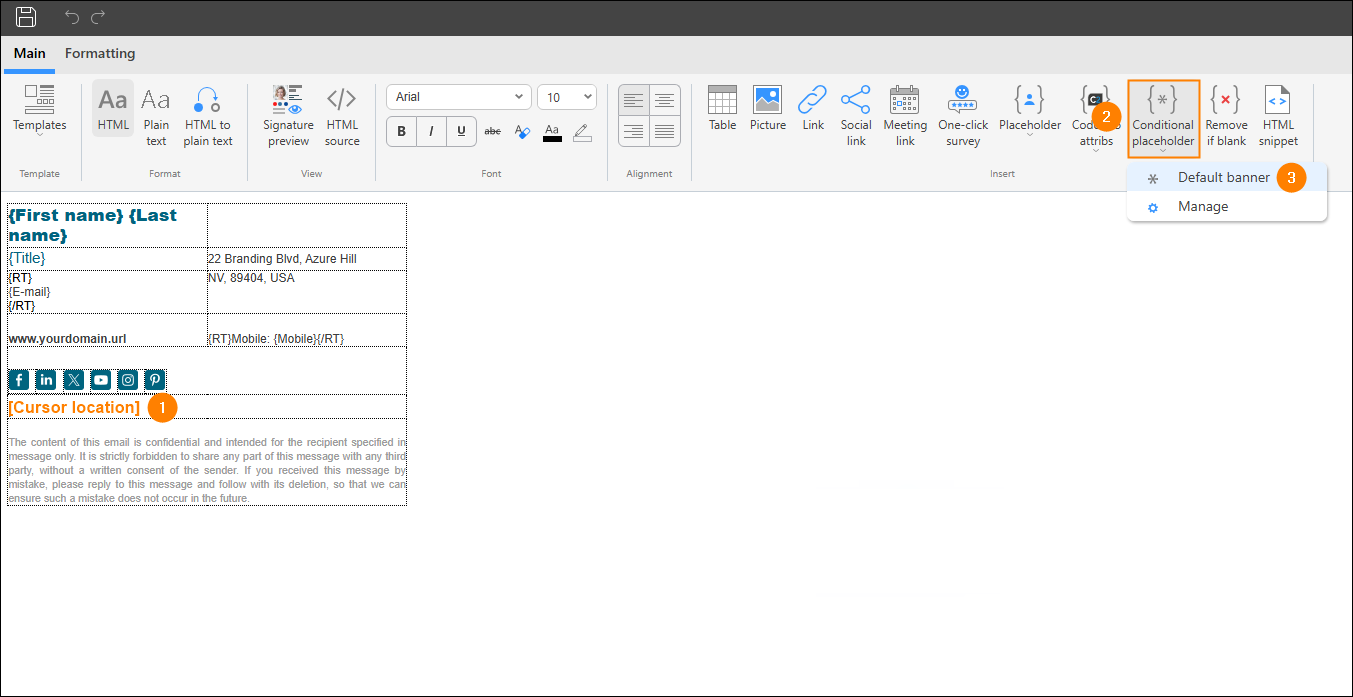
Fig. 14. Inserting the conditional placeholder into the signature template.
The conditional placeholder adding your users’ default banners will appear in the edited signature template, as shown in Fig. 15.
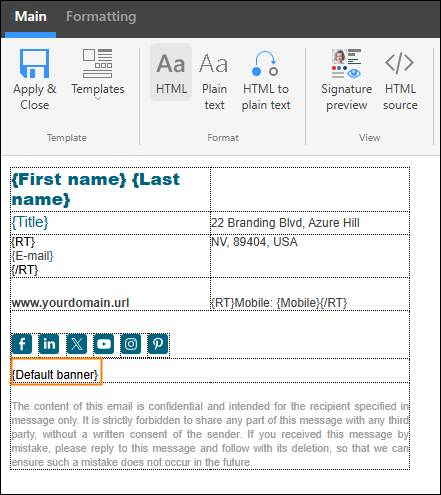
Fig. 15. The new conditional placeholder added in the email signature template.
Save your signature template (this will also close the editor) and then click Save & Publish (or Publish & Close, if you’re editing an existing signature rule) to publish the signature rule.
Make sure your new rule is placed in the correct position on the list of signature rules so that the signature can always be applied when intended. Learn more about rule processing logic
Now, ask your users to sign in to the My user info app with their Microsoft 365 credentials and choose their preferred signature banner by selecting a relevant value of your new custom attribute (Fig. 16.).
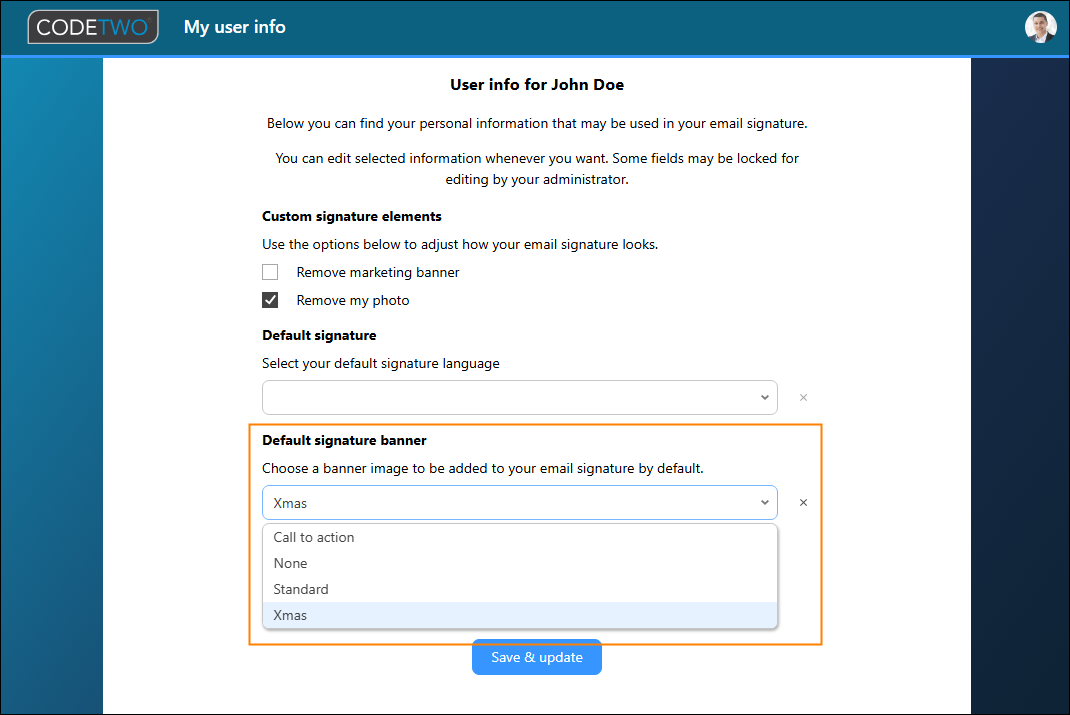
Fig. 16. Selecting the default signature banner in the My user info app.
After users save changes in the app, their signature banners will start to be added according to the selected value (Fig. 17.). If a user doesn’t choose any signature template version, the conditional placeholder’s default value will be used to insert a correct banner.
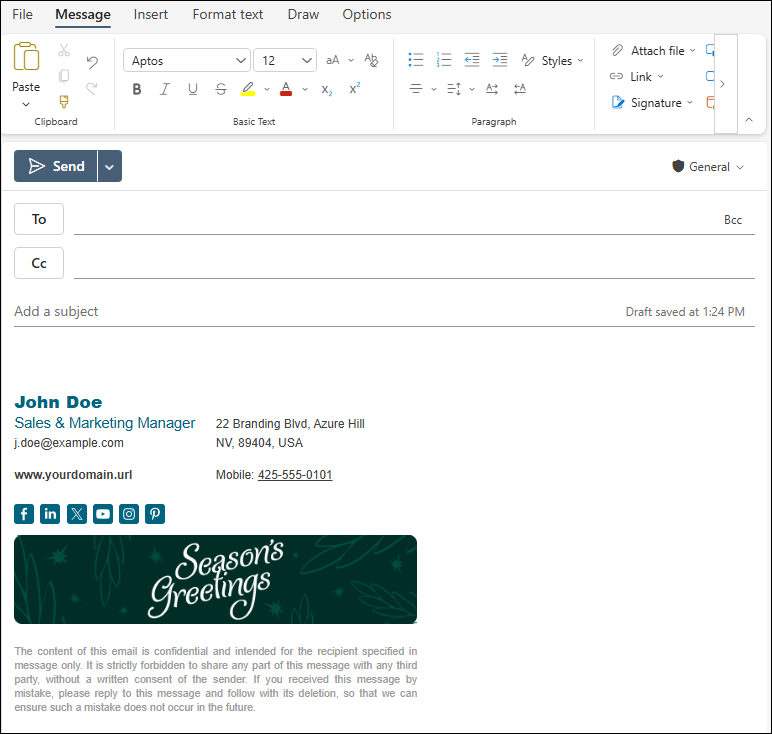
Fig. 17. A signature template with a default banner selected by the user.
In this article