This software has been discontinued. If you are looking for a way to manage email signatures and disclaimers in your Exchange Server organization and are using Exchange SE or Exchange 2019/2016 (until they’re supported by Microsoft), try out CodeTwo Email Signatures On-prem.
If you need to manage email signatures, disclaimers and marketing campaigns centrally in Microsoft 365 (Office 365), see our world-leading cloud solution: CodeTwo Email Signatures 365.
Auto respond
The Auto respond action in CodeTwo Exchange Rules Pro expands the limited native capabilities of Exchange Server when it comes to managing auto replies in your organization. With CodeTwo Exchange Rules Pro you can create sophisticated auto replies for any user or a group of users centrally, without setting up anything on the end users’ email clients. All auto replies are sent out automatically to incoming messages that meet the criteria defined in the Conditions, Exceptions, Actions and Options tabs.
How to configure this action
To activate this action, click Add on the Actions tab and select Auto respond (Fig. 1.).
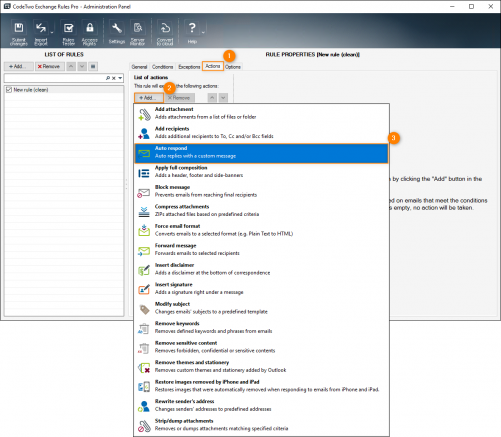
Fig. 1. Choosing the Auto respond action on the Actions tab.
The Auto respond action will appear on the list of actions, while the Action definition pane to the right will show its properties (Fig. 2.).
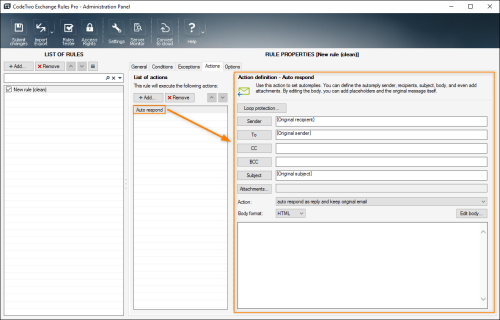
Fig. 2. The properties pane of the Auto respond action.
The Action definition pane lets you define the following properties:
Loop protection
The first available option is Loop protection (Fig. 3.). This feature prevents the looping of auto replies: a situation in which two users, who both have auto replies set up, start exchanging auto replies in an endless loop (an auto reply from one user triggers an auto reply on the other user’s end).
In the Loop protection window, you can specify how many Auto respond actions can be triggered within a given time frame. Loop protection is enabled by default and the limit is set to 10 auto replies per hour.
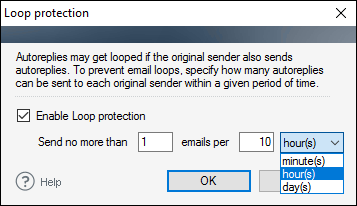
Fig. 3. The Loop protection window.
Auto replies are counted separately for each user that receives them. For example, if 5 different users send messages to the email address for which the Auto respond action is set, they will receive up to 50 auto replies in total (no more than 10 auto replies each).
Every counter is active for a specified period of time, which can be defined in minutes, hours or days. Every period of counter activity starts when the first auto reply is sent. Each rule has its own separate counter.
Using Loop protection in a multi-server environment
By default, Loop protection counters are applied individually to each server with the Mailbox role in your environment. If you want to change this behavior and make our software sync the counters between your servers, so that the maximum number of auto replies you set is always respected no matter which of your servers actually receives an original message, complete the steps from this Knowledge Base article.
These examples explain how Loop protection works for two autoresponder rules:
- There are two rules defined:
- Support Team Auto reply with a limit of 3 Auto respond actions per hour.
- Management Team Auto reply with a limit of 1 Auto respond action per day.
- John Doe sends his first message to the Support Team at 11:05 am and receives the team’s auto reply for the first time. The counter for the Support Team Auto reply now starts for him and will be active until 12:05 pm. At 11:35 am John realizes that he needs to provide the team with more information, so he sends two further messages and receives the team’s auto reply to each message. He has now sent 3 messages in total and received 3 auto replies, so his auto-reply limit has been used up. The counter resets at 12:05 pm and if John sends a message after that time, he will receive the auto reply again.
- John recalls that he has something to discuss with the company's Management Team, so he sends a message to that team. The counter for the Management Team Auto reply now starts for him. Since counters work independently from each other, John receives an auto reply from the management team. If he decides to provide more information in a separate message on the same day, he will receive no auto reply. The counter always resets at 0:00 am. Consequently, if John sends a message to the Management Team on the following day, he will receive the auto reply again.
The Sender, To, CC and BCC fields
In the Sender field you can choose the name that will appear in the From field of the auto reply.
The To button is used to define the Recipient of the auto reply.
You can also choose who will appear in the carbon copy field (the CC button) or will receive the blind carbon copy (the BCC button).
Click any of the buttons to select a user that will appear in the corresponding field. You can indicate:
- Email Address – a specific email address.
- AD User – Active Directory user that can be selected through a standard AD query dialog box.
- AD Group – Active Directory group that can be selected through a standard AD query dialog box.
- Original recipient – the original recipient of the message that triggered the auto reply.
Subject
In the Subject field (Fig. 4.), you can choose to either leave the original message subject (indicated by the {Original Subject} placeholder) or modify it using a variety of options. Click the Subject button to include additional information in the auto reply subject field, for example:
- the sender’s data, such as country, department, etc.,
- other information pulled from Active Directory,
- counters,
- current date/time,
- and other.
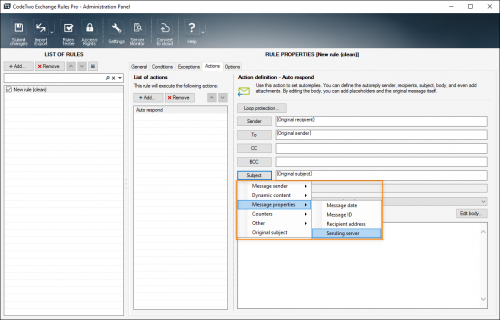
Fig. 4. The Subject field options.
Attachments
You can set the program to automatically add attachment(s) to auto replies. Click the Attachments button to open a dialog box where you can either select a folder containing all the files that you want to attach (Fig. 5.) or add files located in different folders.
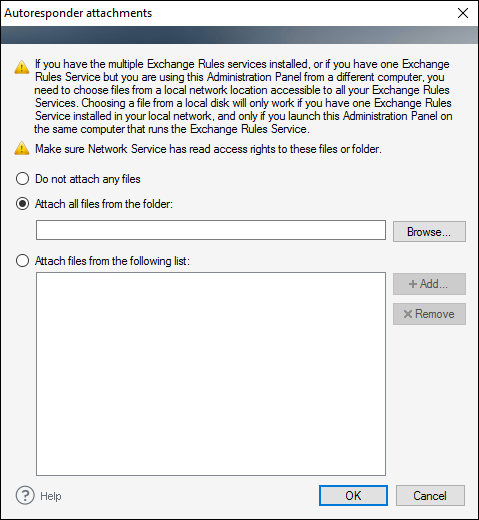
Fig. 5. Autoresponder attachment window.
Action
Next, you can specify what happens to the original message that triggered the auto-reply action. The choice is between (Fig. 6.):
- removing the original email text from the auto reply,
- keeping the original email text below the auto reply,
- adding the original email as an attachment.
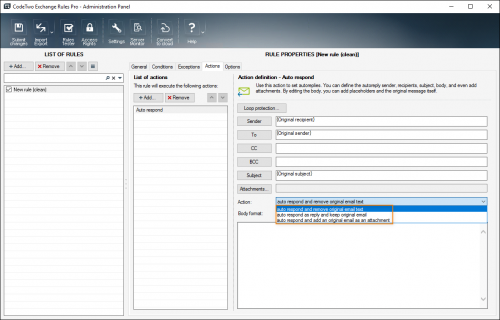
Fig. 6. Available auto respond actions.
Body format
The Body format field allows you to compose the body of the auto-reply message. Use the drop-down menu to toggle between the HTML and the Plain text format. Click the Edit body button to open the auto-reply editor and compose the message. The template library will open first. If you chose the HTML body format, you also will be able to select one of the predefined auto-reply templates. If the templates are not shown, select the auto reply checkbox (Fig. 7.).
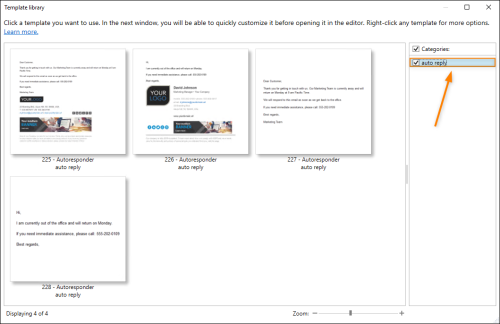
Fig. 7. Selecting the checkbox to display auto-reply templates.
The auto-reply editor looks similar to the built-in template editor, but fewer options are available. The auto-reply editor is also different for HTML (Fig. 8.) and for plain text (Fig. 9.) messages.
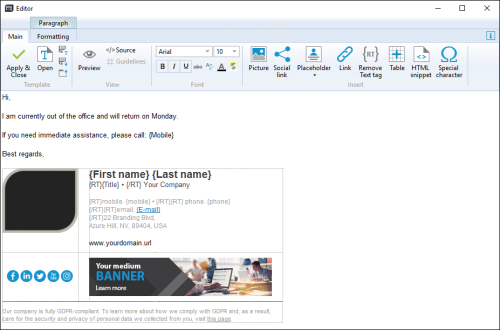
Fig. 8. The HTML auto-reply editor.
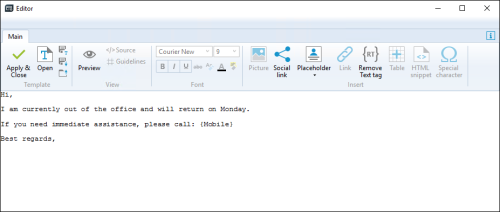
Fig. 9. The plain text auto-reply editor.
Important
Auto replies set up in CodeTwo Exchange Rules Pro work independently from auto replies set up in email clients. If a user creates an auto reply on their email client and you create an auto reply for that user in CodeTwo Exchange Rules Pro, both auto replies will be active. Depending on each auto reply’s settings, a sender may receive two auto replies to the same message: one set up by the user in their email client and the other set up by you in CodeTwo Exchange Rules Pro.
See next
How to configure the program to send autoreplies to incoming messages outside working hours
In this article