This software has been discontinued. You can check the list of
currently available CodeTwo products here.
Outlook Add-in settings
CodeTwo Public Folders consists of two modules: the Syncing Master and the Client Apps (the Outlook Add-in and File Sharing App). The Syncing Master handles communication and data synchronization between the Client Apps, and it should be installed only on one of the computers in the local network. The Outlook Add-ins and the File Sharing App should be installed on the computers that will be used for public folders in Microsoft Outlook or to share files via File Sharing App. If you want to use public folders in Outlook or share Windows files on a computer hosting CodeTwo Public Folders Syncing Master, you also need to install Client Apps on that computer. Read the installation walkthrough
 |
| Fig. 1. Outlook Add-in connected to the Syncing Master. |
A detailed description of the Add-in settings is presented below:
- The Syncing Master tab
- The Outlook sharing tab
- The File sharing tab
- Adding public folders to the Outlook profile
- Removing public folders from the Outlook profile
If you want to check or change the current Outlook Add-in settings, choose Public Folders, Options from the Outlook menu and the settings dialog box will be displayed.
The Syncing Master tab
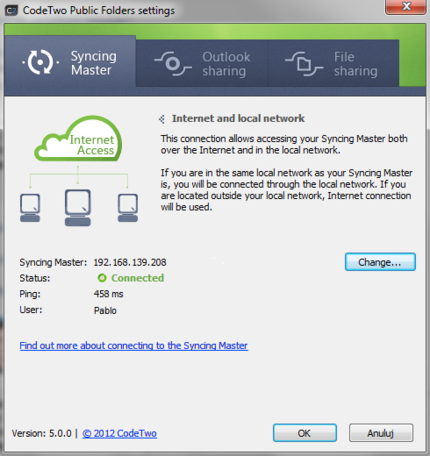
On the Syncing Master tab (Fig. 2.), you can choose how the Client Apps connect with the Syncing Master: over the Internet and the local network, over local network only, or if they should connect to the Demo Syncing Master (this is the default option).
Warning
Note that the Demo Syncing Master is publicly accessible and can be used for testing purposes only. Don’t use it to share sensitive and confidential data as it will be visible to users from other organizations connected to the Demo Syncing Master. Processing or storing any personal data in the Demo Syncing Master is strictly prohibited! We clear the Demo Syncing Master's database every Friday.
 |
| Fig. 2. The CodeTwo Public Folders Syncing Master tab. |
 |
| Fig. 3. Setting a connection type with the Syncing Master. |
Internet and local network - after choosing this option, the Outlook Add-in will connect to the Syncing Master via the internet and the local network. Therefore, if you have made the CodeTwo Public Folders Syncing Master available on the internet choose this connection type. In the next step enter the name or IP number of the Syncing Master along the logon details.
There are two types of logon credentials to choose from:
-
Domain user (the same as the Active Directory user, whose logon credentials and access rights are set by the company's domain administrator):

Fig. 4. Log in as the Domain user. - Codetwo Public Folders user (the same as the Standard user, whose logon credentials and access rights are set by the CodeTwo Public Folders administrator):

Fig. 5. Log in as the Codetwo Public Folders user. Info
Please note that CodeTwo Public Folders users' credentials must be obtained from the program's administrator. If you have not been provided with these credentials, you will not be able to use this logon type. Read more about setting users' accounts
After you choose the appropriate logon details, click Next.
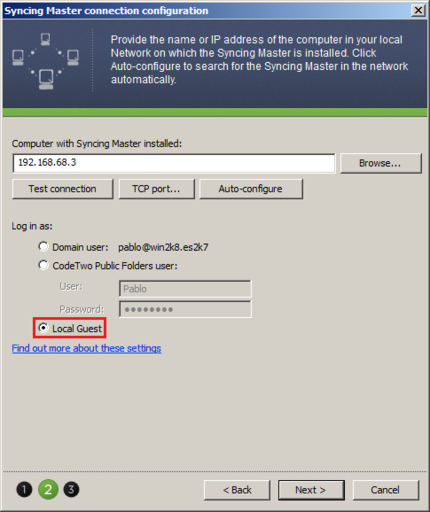
Local network only - after choosing this option, the Outlook Add-in will connect to the Syncing Master via the local network. Therefore, if the CodeTwo Public Folders Syncing Master was installed on one of the computers in the local network, choose this connection type. Next, enter the name or IP number of the Syncing Master and the logon details.
There are three types of logon credentials to choose from:
-
Domain user (the same as the Active Directory user, whose logon credentials and access rights are set by the company's domain administrator):

Fig. 6. Log in as the Domain user. -
Codetwo Public Folders user (the same as the Standard user, whose logon credentials and access rights are set by the CodeTwo Public Folders administrator):

Fig. 7. Log in as the Codetwo Public Folders user. -
Local Guest (a public folders kind of user, whose access rights to the public folders are restricted by default and may be changed by the CodeTwo Public Folders administrator):

Fig. 8. Log in as the Local Guest. Info
Please note that CodeTwo Public Folders users' credentials must be obtained from the program's administrator. If you have not been provided with these credentials, you will not be able to use this logon type. Read more about setting users' accounts
After setting the logon credentials click Next to finish the configuration.
Demo mode - when you choose this option, the Outlook Add-in will connect to the Demo Syncing Master. This type of connection allows you to test CodeTwo Public Folders for 30 days without a need to install your own Syncing Master. No further configuration is required because the add-in automatically connects to the Demo Syncing Master.
Warning
Note that the Demo Syncing Master is publicly accessible and can be used for testing purposes only. Don’t use it to share sensitive and confidential data as it will be visible to users from other organizations connected to the Demo Syncing Master. Processing or storing any personal data in the Demo Syncing Master is strictly prohibited! The Demo Syncing Master's database is cleared every Friday.
The Outlook sharing tab
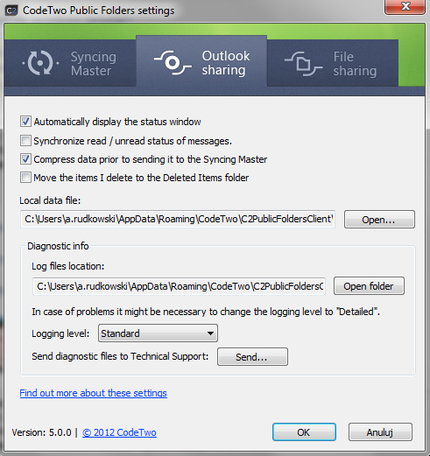
The Outlook sharing tab (Fig. 9.) enables to set additional synchronization options listed below:
 |
| Fig. 9. The Outlook sharing tab. |
Automatically display the status window option lets you decide whether the Outlook data synchronization status dialog should by displayed while synchronizing data in the shared folders. The window is automatically shown during the initial synchronization when you are running Outlook for the first time after the installation of CodeTwo Public Folders.
Synchronize read / unread status of messages makes the Syncing Master synchronize information whether a message has been read by any user in public folders. This option is disabled by default. See how to activate the synchronization of read / unread status of messages.
By selecting the Compress data prior to sending to the Syncing Master option, you decide whether the data send from the Outlook Add-in to the Syncing Master undergoes compression. Compression will improve the speed of synchronization between the Outlook Add-in and the Syncing Master.
The Move the items I delete to the Deleted Items folder option specifies whether items removed by a user of the Outlook Add-in will be moved to the Deleted Items folder in his or her C2PublicFolders tree. Checking this option will allow the user to restore all accidentally removed data. Even if this option is disabled, all deleted data can be easily retrieved from the Restore Items tab located in the Administration Panel.
The Local data file field shows the path to the PST file, where the local copy of the shared folders data is stored. The advantage of a local copy is that the program will synchronize only the data that was changed while the Outlook Add-in was not connected to the Syncing Master. This makes synchronization much faster and more effective. The local copy makes it possible to work in the offline mode when there's no connection to the Syncing Master.
The Diagnostic Info field shows the path to the Log files (text files containing diagnostic information). It may be changed later manually in this tab. The Logging level is set to Standard by default. However, it should be set to Detailed if data synchronization errors occur.
Warning
CodeTwo Public Folders has been discontinued and Customer Support for this software is no longer available. That is why you should not send diagnostic files to our Technical Support, but you can use these files for your own diagnostic purposes.
The File sharing tab
In the File sharing tab (Fig. 10.) you can define the shared files path for the client File sharing App. The shared files path may be also directly changed in the App itself.
 |
| Fig. 10. The File sharing tab. |
Compress data prior to sending it to the Syncing Master is an option, that defines whether data sent to the Syncing Master from the Outlook Add-in will be compressed beforehand. By checking this option, you can significantly speed up the communication between the File Sharing App and the Syncing Master.
The Diagnostic Info field shows the Log files path. It may be changed later manually in this tab. The Logging level may be changed from Standard (default option) to Detailed if any data synchronization errors occur.
Warning
CodeTwo Public Folders has been discontinued and Customer Support for this software is no longer available. That is why you should not send diagnostic files to our Technical Support, but you can use these files for your own diagnostic purposes.
Adding public folders to the Outlook profile
Once the CodeTwo Public Folders Outlook Add-in is installed, the default Outlook profile of the user displays a new C2PublicFolders tree, in which users can create public folders (Fig. 11.). To display the C2PublicFolders list, click Show All Public Folders on the CodeTwo Public Folders toolbar. Alternatively, to display the list of folders press Ctrl+6 or in Outlook 2003/2007 choose Go, Folder List:
 |
| Fig. 11. Public Folders on the Folder List in Outlook. |
Once the installation of CodeTwo Public Folders is finished and you decide to use another non-default profile or a different user in MS Outlook, the dialog box will display asking you whether you want to add public folders to that profile (Fig. 12.):
 |
| Fig. 12. A dialog box asking you whether you want to add public folders to a non-default profile. |
If you click No and don't ask me again, the public folders will not be added to the profile and the dialog box won't pop-up anymore. If you want to add public folders to the profile later, follow the tips below:
- Start Outlook using the profile in which you wish to add public folders.
- In the Outlook main menu choose File, New, Outlook Data File. or In the Outlook main menu choose Tools, Options, Mail Setup, click Data Files and then Add. or On the Outlook 2010 ribbon click New items, More items, Outlook data file.
- In the Outlook Data Files dialog box select the C2PublicFolders service and click OK.
- The above-described configuration dialog box of the CodeTwo Public Folders will appear. If the name of the computer hosting the Syncing Master is correct, click OK.
- Click Close and then OK.
How to create a new public folder (Outlook 2007/2010/2013/2016)?
Removing public folders from the Outlook profile
If you want to remove public folders from the current Outlook profile, click the right mouse button on the C2PublicFolders folder and select Close the folder: C2PublicFolders command from the popup menu.