Creating Exchange backup jobs
This article describes how to configure an Exchange backup job to create a local backup of your Microsoft 365 (Office 365) mailboxes and public folders. Use this job to back up:
- user mailboxes
- shared mailboxes
- resource mailboxes (room and equipment)
- public folders
If you want to back up your SharePoint Online and OneDrive for Business data, go to the article on creating SharePoint backup jobs.
All jobs in CodeTwo Backup are created by running configuration wizards. There are two ways to open the wizard that will guide you through the Exchange backup job configuration:
- on the Dashboard tab, click the Create a new Exchange backup job link on the How to start card, or
- go to the Jobs tab and click New > Backup > Exchange (Fig. 1.).
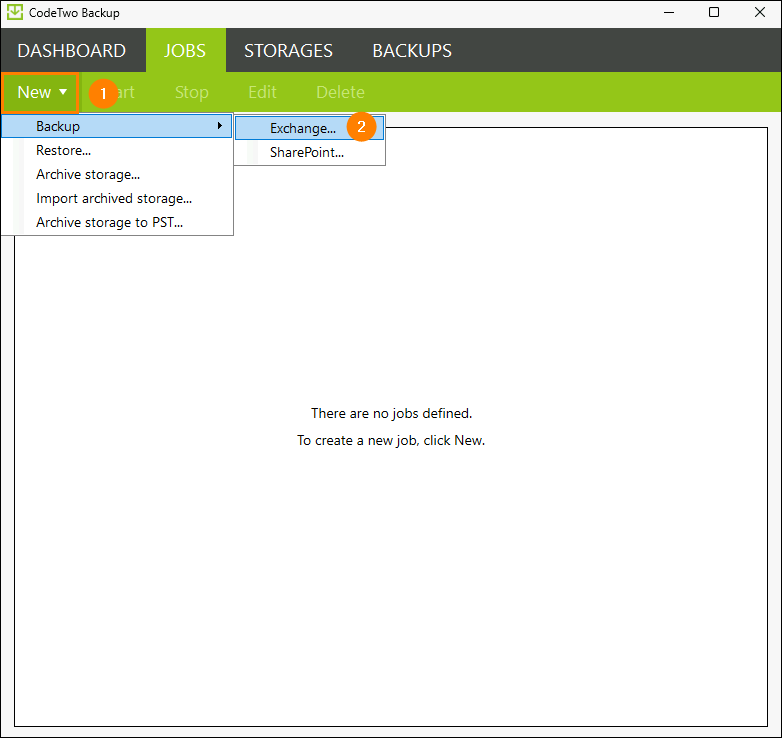
Fig. 1. Creating a new Exchange backup job.
Keep in mind that the How to start card is only available if you haven’t configured any backup jobs yet. In either case, the New Exchange backup job wizard will appear (Fig. 2.). It will guide you through the following steps of creating a backup job:
- Job name, where you define the name of your backup job.
- Job continuity, where you choose to run the backup job continuously or only once.
- Activity periods, where you can configure the backup job to start and stop automatically.
- Server connection, where you set up or select a connection to your Exchange Online environment.
- Mailboxes, where you select user, shared or resource mailboxes that you want to back up.
- Public Folders, where you select Exchange public folders that you want to back up.
- Target storage, where you select or create a storage location that is used to keep your backed-up data.
- Time filter, where you choose which items will be backed up depending on their age.
- Folder filter, where you decide which special folders to exclude from the backup process.
- Job summary, where you can review your backup job settings.
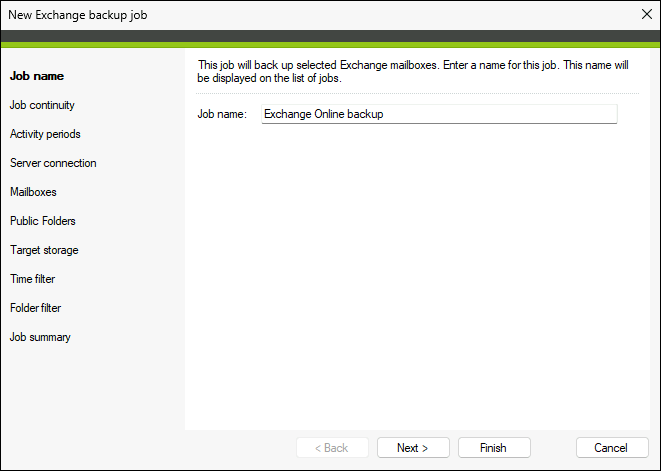
Fig. 2. The Exchange backup job wizard.
Tip
You can navigate between the wizard’s steps freely and configure them in any order you want.
Job name
In this step (see Fig. 2. above), enter a unique name of your backup job. You will not be able to finish the wizard if the entered name has already been used.
Job continuity
Here (Fig. 3.) you can decide if a job should run in multiple cycles (continuous backup) or in a single cycle (one-time backup) during its activity periods.
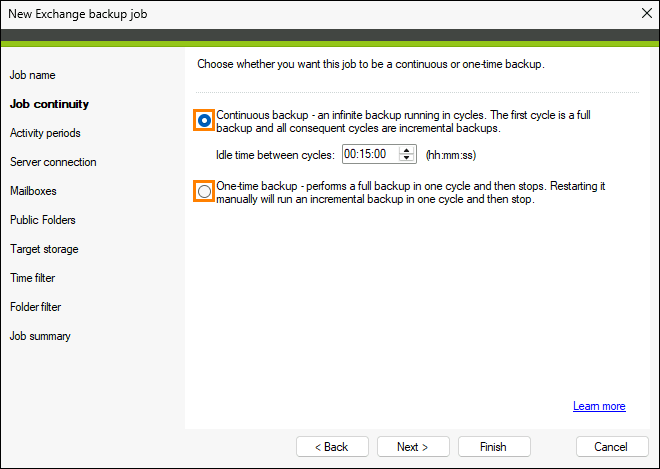
Fig. 3. Selecting the type of backup.
Select the first option, Continuous backup, if you want to back up your Exchange data infinitely, in cycles. The first cycle backs up all your data, while each subsequent cycle is an incremental backup, meaning that only changes in your data, including new items, are backed up. The Idle time between cycles functionality allows you also to specify how much time needs to pass before the next cycle can start.
If you select the One-time backup option, the backup job will run only once (one cycle). However, once finished, you can restart such backup job manually in order to perform an incremental backup.
Learn more about the backup model used in CodeTwo Backup.
Activity periods
This feature allows you to specify the time ranges during which the program will automatically start and stop your backup job. To enable it, select the Enable activity periods checkbox (Fig. 4.).
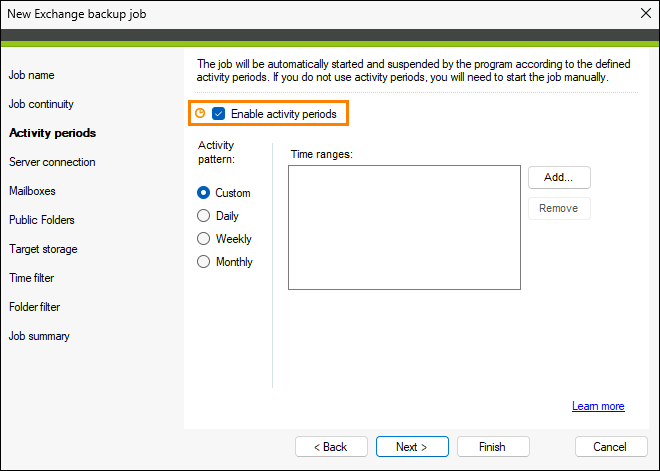
Fig. 4. Enabling the activity periods feature.
You can now schedule your backups on a daily, weekly, monthly or custom basis, or define the end date for the backup job (Fig. 5.).
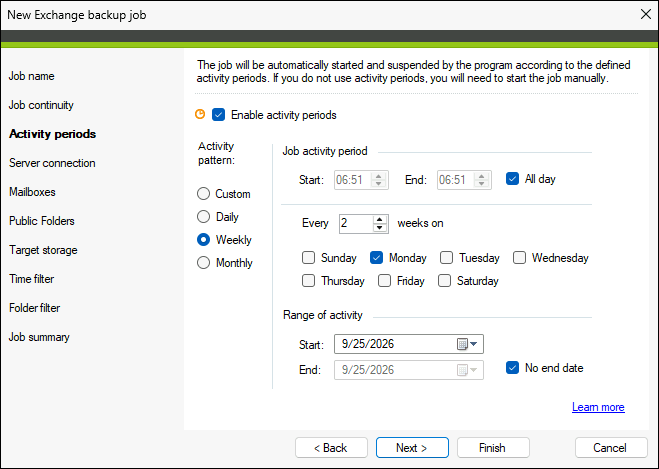
Fig. 5. Configuring activity periods for the backup job.
Learn more about the activity periods feature.
Server connection
This is where you select an Exchange Online environment from which you want to back up the data. If you haven't defined any connections yet, click Manage > New (Fig. 6.) to open the Exchange connection wizard where you can configure a connection to Exchange Online (Microsoft 365). Learn more about how to configure an Exchange Online connection
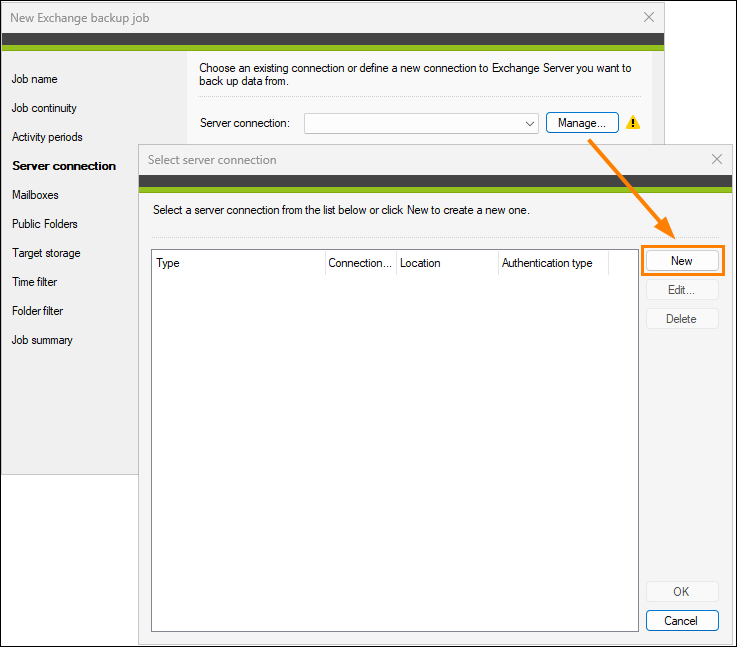
Fig. 6. Creating a new Exchange Online connection.
If you have already configured an Exchange Online connection, simply select it from the drop-down menu (Fig. 7.).
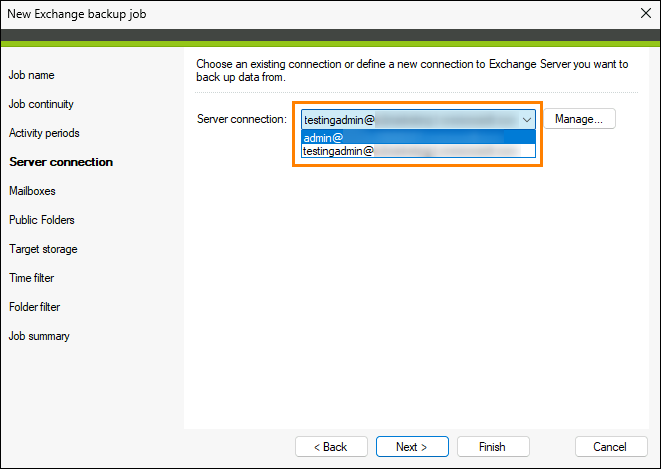
Fig. 7. Selecting an Exchange Online environment that you want to back up.
Mailboxes
CodeTwo Backup allows you to back up either all mailboxes existing within your tenant or only selected ones.
Upcoming feature
The Include archive mailboxes in the backup option is an upcoming feature that will be available in a future version of the program.
Backing up selected mailboxes
First, select one of the available options:
- Back up mailboxes from the list below
- Back up all existing and future mailboxes except the ones from the list below
and click Add. The Select mailboxes window will open. Depending on which option you have chosen previously, select the mailboxes that you (a) want to back up (Fig. 8.) or (b) exclude from the backup.
Important
If you can’t see all your mailboxes on the list, it may mean some of them are located in a subdomain. Such mailboxes are not detected by CodeTwo Backup by default. To enable discovery of mailboxes from a subdomain, change the configuration of CodeTwo Backup as described in this article.
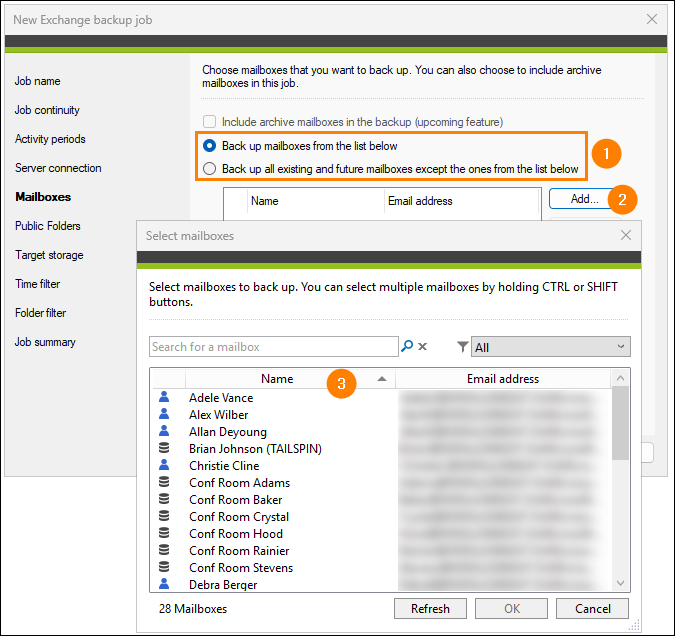
Fig. 8. Selecting the mailboxes that you want to back up.
You can use the search box (Fig. 9a) to find a particular mailbox or filter mailboxes by their type (Fig. 9b).
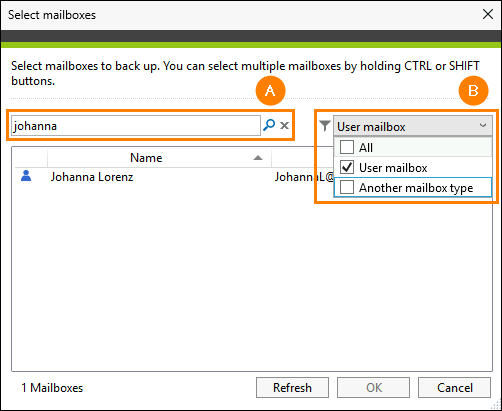
Fig. 9. Limiting the number of mailboxes shown in the mailboxes selection window.
The type of a mailbox is represented by an icon shown next to the mailbox name:
 – user mailbox (or a mailbox with an Exchange Online license assigned)
 – another mailbox type (shared, room, equipment or system mailbox, without Exchange Online license)
Backing up all mailboxes
To back up all mailboxes from your Exchange server, simply select the Back up all existing and future mailboxes except the ones from the list below option and don't add any mailboxes to the list (Fig. 10.). The number of mailboxes that will be backed up is shown below the table.
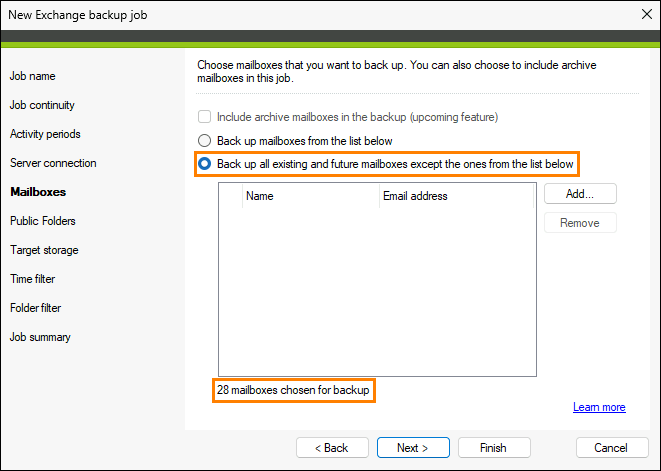
Fig. 10. Backing up all mailboxes.
Public Folders
In this step, you can decide which Exchange public folders to back up. Click Add to open the Select Public Folders window. Next, select the checkbox next to the public folders you want to back up (Fig. 11.).
Important
To back up public folders, the user account used to create the server connection must have a mailbox and permission to access those public folders.
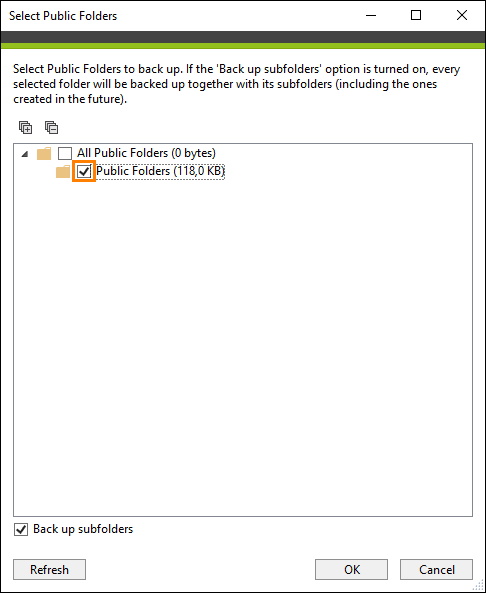
Fig. 11. Selecting public folders to be included in the backup job.
If any of these folders have subfolders and you want to include or exclude them from the backup, use the Back up subfolders checkbox (Fig. 11. above). Keep in mind that if you leave this checkbox selected, any future subfolders created in this public folder will be also backed up in subsequent backup cycles.
Target storage
A storage is where your backed-up data is kept. In this step, you can either click New to open a storage creation wizard or select an existing storage from the drop-down menu (Fig. 12.).
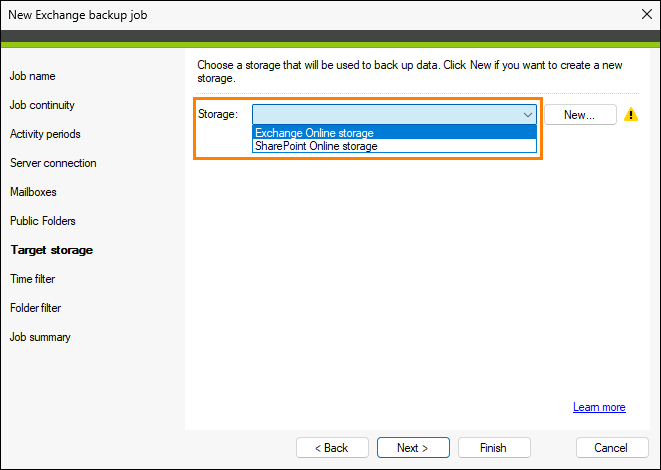
Fig. 12. Selecting an existing storage.
Time filter
In the Time filter step (Fig. 13.) you define which items from the source mailboxes will be backed up depending on their age.
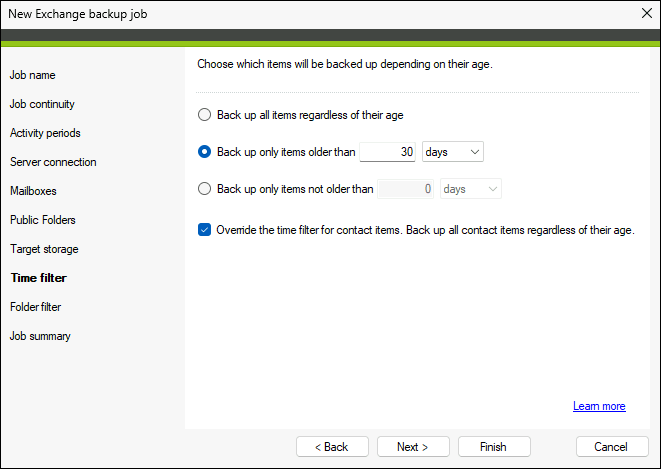
Fig. 13. Setting up a time filter.
You can configure the program to back up:
- all items regardless of their age – when a backup job processes mailboxes, all items will be backed up, no matter if they were modified or not.
- only items older than [period of time] – the program will examine source mailboxes and back up only those items that were created or modified before a specified period of time.
- only items not older than [period of time] – the program will back up only those items that created or modified within a specified period of time.
There is also an option to override the time filter for contact items, allowing you to back up all contacts, no matter when they were created or modified.
Assessing the age of items
The age of appointments, meetings or similar items (including a start/end date or another time property) is calculated based on the time when these items occur.
Example: today is 1 June and you decided to back up only items from the last 6 months. Over a year ago, in May last year, someone created an Outlook appointment which starts on 15 April this year and sent the notification email. In such a case, the appointment will be included in your backup, as it occurs within the defined time frame. However, the email sent in last year does not contain any start or end date, so it will not be backed up.
If an item does not contain a time value, its age is calculated based on its last modification date. The list below shows which properties are considered when defining the item’s age:
- Contacts – Last Modified Date
- Calendars:
- if you select the only items older than option – Start Date; if missing, then End Date
- if you select the only items not older than option – End Date; if missing, then Start Date
- Emails – Received Date, then Sent Date, and then Created Date (if the program cannot find the Received Date property, it searches for Sent Date, and so on)
- Tasks:
- if you select the only items older than option – Start Date; if missing, then Due Date
- if you select the only items not older than option – Due Date; if missing, then Start Date
- Notes – Last Modified Date
- Journal:
- if you select the only items older than option – Start Date; if missing, then End Date
- if you select the only items not older than option – End Date; if missing, then Start Date.
Folder filter
Here you can define a filter that excludes special folders, such as RSS Subscriptions or Drafts, in source mailboxes from the backup process (Fig. 14.). To do so, select the checkbox next to the folder type you want to exclude.
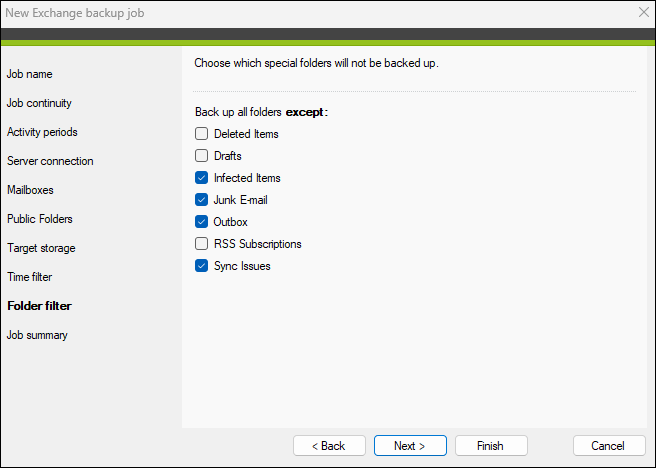
Fig. 14. Excluding special folders from the backup job.
Job summary
Here you can verify if you have configured the backup job according to your requirements (Fig. 15.).
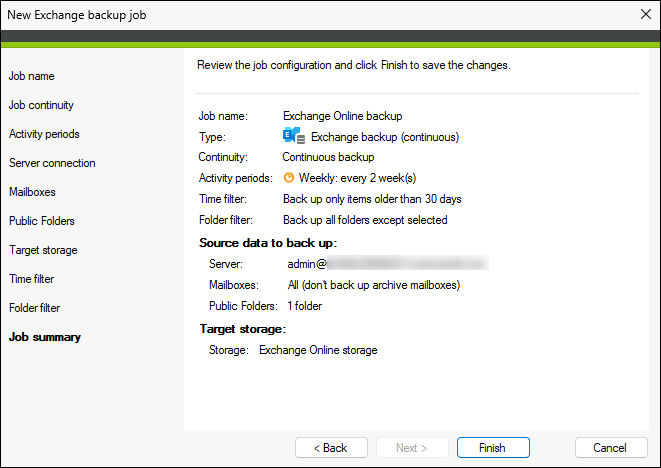
Fig. 15. The summary of the backup job.
In case you want to make any changes, click the name of any of the previous steps of the wizard and adjust your settings accordingly. If everything is correct, click Finish.
If you did not specify the job's activity periods, you need to start the job manually. However, as soon as you finish the wizard, a pop-up window will appear, allowing you to start the backup job immediately (Fig. 16.). Click Yes to do so.
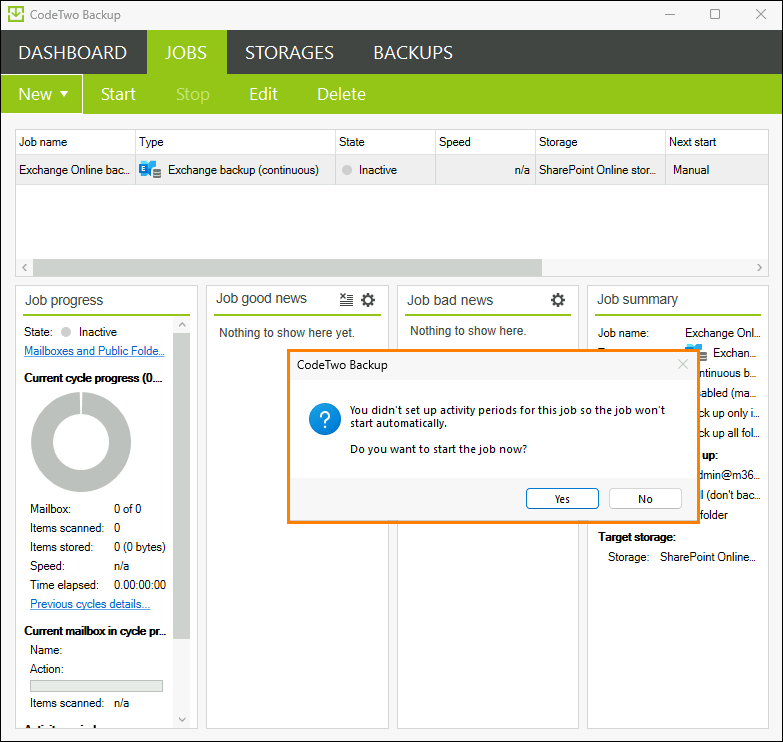
Fig. 16. A pop-up asking to start the backup job automatically.
Otherwise, use the Start button on the Jobs tab to start the selected job.
See also
Monitoring jobs – find out how to monitor and manage existing jobs.