Creating Exchange restore jobs
CodeTwo Backup can restore mailboxes and public folders from a local storage to a chosen Exchange server (Microsoft 365 / Office 365 or on-prem) via restore jobs. You can also choose to restore only selected folders (Inbox, Sent Items, etc.) or items (individual emails or files). Restore jobs can be created from the program's Backups tab (Fig. 1.).
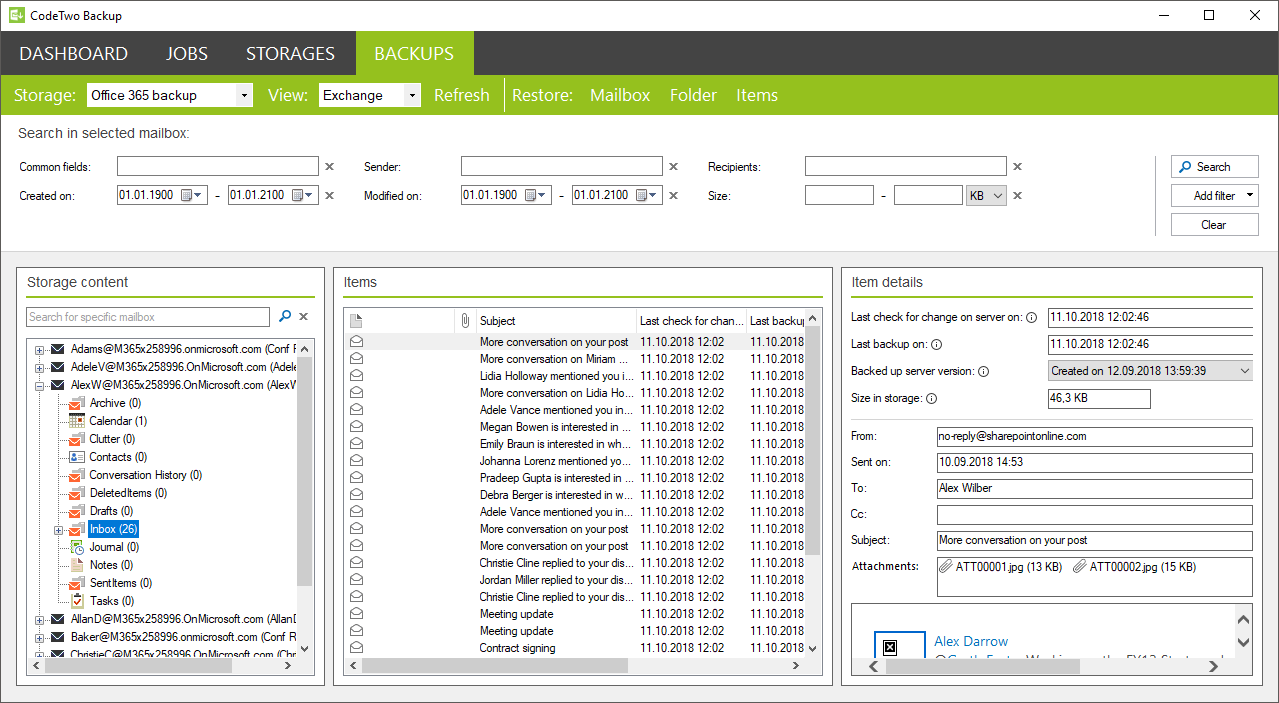
Fig. 1. The Backups tab.
Important
You can restore one mailbox per job. However, CodeTwo Backup can run multiple restore jobs simultaneously, making it possible to restore several mailboxes at the same time.
This rule does not apply to items (such as emails). You can restore multiple items from the same folder in a single restore job.
In this article you will learn how to:
To find out how to restore your SharePoint content, see this article.
Selecting an Exchange object to be restored
On the Backups tab, you can browse through storages that hold your backed-up data. To restore a specific object, you first need to:
- select the storage where the Exchange object in question is backed up by using the Storage drop-down menu
- select Exchange from the View drop-down menu (Fig. 2.) to show only the Exchange data from that storage.
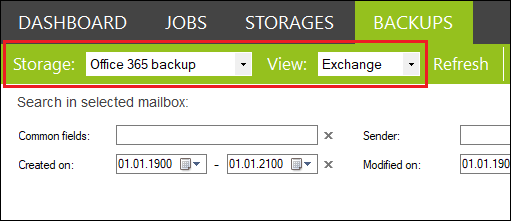
Fig. 2. Selecting a backup storage and data type to be displayed.
Important
Note that the storage content displayed in the Backups tab does not refresh automatically with each completed backup job cycle. If any current mailboxes, folders or items seem to be missing, use the Refresh button on the top menu to reload the most recent objects from the storage.
Use the Storage content card to navigate through backed-up data (mailboxes, folders, items). You can also use the search box (Fig. 3.) to find a specific mailbox. Learn how to use filters to find specific items in a given mailbox
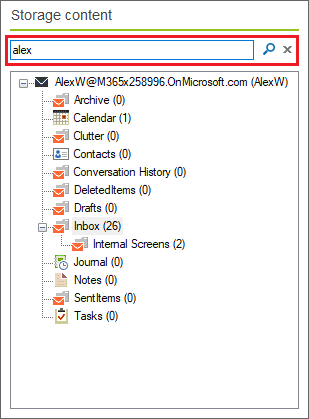
Fig. 3. Searching for a specific mailbox.
Info
If a storage is password protected, you first need to provide that password to view the backed-up data. If you do not enter the password, you will only see the names of mailboxes that were saved in this storage.
To restore a particular object, navigate to that object and select one of the Restore options available on the top menu (Fig. 4.). These options are:
- Restore: Mailbox – restores one mailbox with all its folders and items.
- Restore: Folder – restores one folder, including all sub-folders and items.
- Restore: Items – restores one or multiple items from a specific folder.

Fig. 4. Restore options available from the top menu of the Backups tab.
Keep in mind that some options will become available only when you select appropriate Exchange data in the Storage content card.
Tip
You can also right-click any object on the Storage content card and select the required Restore selected... option from the shortcut menu (Fig. 5.).
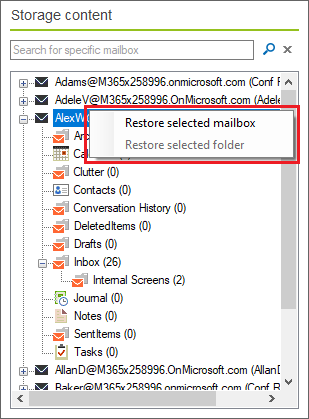
Fig. 5. Accessing the restore options from the shortcut menu.
The icons next to mailboxes represent the type of a mailbox:
![]() – user mailbox (This icon is also used for mailboxes with an Exchange Online license assigned.)
– user mailbox (This icon is also used for mailboxes with an Exchange Online license assigned.)
 – archive mailbox
![]() – Microsoft 365 group mailbox
– Microsoft 365 group mailbox
![]() – SharePoint site mailbox
– SharePoint site mailbox
![]() – Public Folders mailbox
– Public Folders mailbox
![]() – another mailbox type (This icon is used for shared, room, equipment or system mailboxes, without Exchange Online license.)
– another mailbox type (This icon is used for shared, room, equipment or system mailboxes, without Exchange Online license.)
![]() – unknown mailbox (This icon is shown only if the data in the storage has been backed up with a previous version of the program. The icon will be updated after the next backup cycle.)
– unknown mailbox (This icon is shown only if the data in the storage has been backed up with a previous version of the program. The icon will be updated after the next backup cycle.)
Once you select an object and choose the restore option, the restore job wizard will open (Fig. 6.).
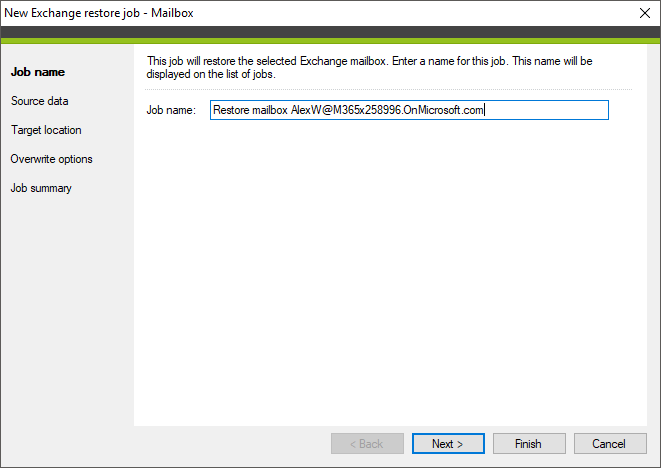
Fig. 6. The Exchange restore job wizard.
Configuring the Exchange restore job wizard
Depending on the type of Exchange object selected to be restored, the options available on individual steps of the restore job wizard may slightly differ. However, the wizard will always consist of the following steps:
- Job name, where you define the name of the restore job.
- Source data, where you review the source data for the job and decide which version of an object you want to restore.
- Target location, where you select a server connection and target location for your restored data.
- Overwrite options, where you decide what action the program will take in the event of a name conflict.
- Job summary, where you can verify the job's settings.
Job name
In the Job name step (see Fig. 6. above), provide a unique name for the restore job. By default, the job name field is filled automatically according to the following pattern:
Restore [mailbox|mailbox folder|item(s) from mailbox folder] [source mailbox email address]\[folder type]
You can change the default name, for example, if you plan to restore the same object in the future but to another location or by using different settings. The program will not allow you to create two jobs with the same name.
Source data
Since CodeTwo Backup features item versioning, in this step you can also choose which version of the object you want to restore (Fig. 7.).
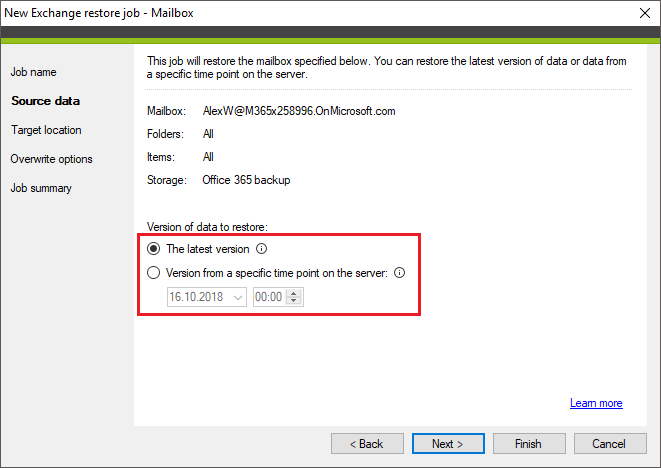
Fig. 7. Selecting the version of Exchange data to be restored.
The available restore options differ depending on the objects you are restoring:
| Version of data to restore | Mailbox | Folder | Multiple items |
Single item |
|---|---|---|---|---|
| The latest version |
|
|
|
|
| The latest existing version |
|
|
|
|
| Version from a specific time point on the server |
|
|
|
|
| Specific server version |
|
|
|
|
Restoring the latest version
This option will restore the most recently backed up version of the mailbox or folder. If any items were deleted on the server from the given mailbox or folder prior to the last backup cycle (and were marked as deleted in the storage), these items will not be restored.
Restoring the latest existing version
This option will restore the latest backed up version of the selected items. If any of these items were deleted from the server prior to the last backup cycle (and were marked as deleted in the storage), the program will restore the latest version of these items that existed before they were deleted.
Restoring a version from a specific time point on the server
This option will restore the selected object(s) from a specified point in time. Any items in the storage deleted before that point in time and created after that date will not be restored.
Restoring a specific server version
This option is available only when restoring a single item. It will restore the exact version of the item (selected from the drop-down menu) that existed on the server at a specific point in time (Fig. 8.).
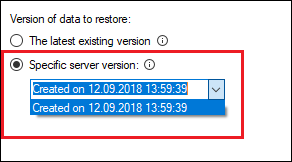
Fig. 8. Selecting a specific version of the item to be restored.
Important
Every time you delete an item on the server, the last backed-up version of that item is marked as deleted in the storage. If you want to restore that item, you need to create the restore Exchange item job and select the latest existing version option in the Source data step of the wizard. Configuring a mailbox or folder restore job will not restore that item unless you choose to restore the data from the point in time when that item still existed.
Target location
You can choose to restore the selected mailbox, folder or item to:
- the original location
- another mailbox / archive mailbox (available when restoring mailboxes only)
- another folder
Because of the structure of Microsoft 365 group mailboxes, some limitations apply when restoring the mailboxes data. The table below shows all supported restore scenarios:
| Non-Microsoft 365 group* | Microsoft 365 group | |||||
|---|---|---|---|---|---|---|
| mailbox | folder | item | mailbox | folder | item | |
| Original location |
|
|
|
|
|
|
| Another non-Microsoft 365 mailbox |
|
N/A | N/A |
|
N/A | N/A |
| Another non-Microsoft 365 mailbox folder |
|
|
|
|
|
|
| Another Microsoft 365 mailbox |
|
N/A | N/A |
|
N/A | N/A |
| Another Microsoft 365 mailbox folder |
|
|
|
|
|
|
* A non-Microsoft 365 group mailbox is any of the following: user mailbox, archive mailbox, shared mailbox, resource mailbox, SharePoint site mailbox and public folders mailbox.
Restoring backed-up data to the original location
To restore a mailbox, folder or item(s) to the same location from which they were backed up, simply select the Restore to the original mailbox/archive mailbox/folder option (Fig. 9.).
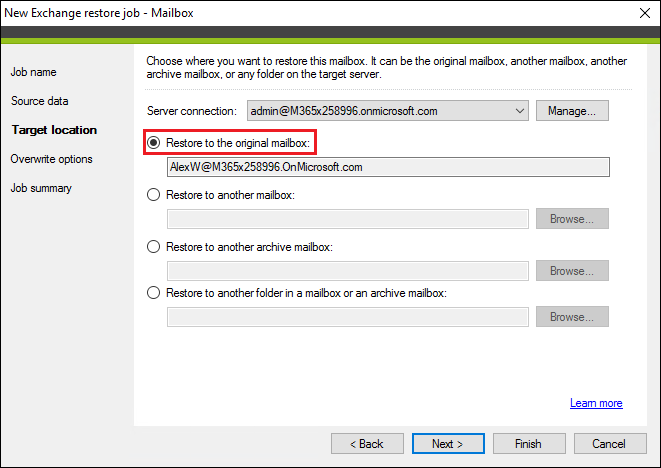
Fig. 9. Restoring a mailbox to its original location.
Important
This option will not be available if the connection to the original server has been deleted. You need to configure this connection again to be able to use that option. To create a new Exchange connection, click Manage > New. Learn more on how to create a new Exchange connection.
Restoring backed-up data to another mailbox / archive mailbox
Choose the appropriate Exchange server connection from the Server connection drop-down menu, select the Restore to another mailbox / archive mailbox option, and click the active Browse button (Fig. 10.).
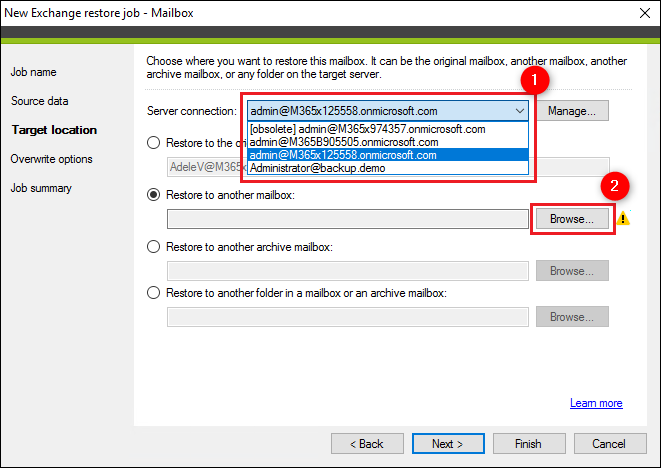
Fig. 10. Restoring the Exchange data to another mailbox.
In the window that opens, select the mailbox to which you want to restore your data and click OK. You can use the search box or mailbox filter to quickly find the mailbox you are looking for (Fig. 11.).

Fig. 11. Filtering mailboxes by using the search box (A) and mailbox filter (B).
Restoring backed-up data to another folder
Choose the appropriate Exchange server connection from the Server connection drop-down menu, select the Restore to another folder in a mailbox or an archive mailbox option, and click the active Browse button (Fig. 12.).
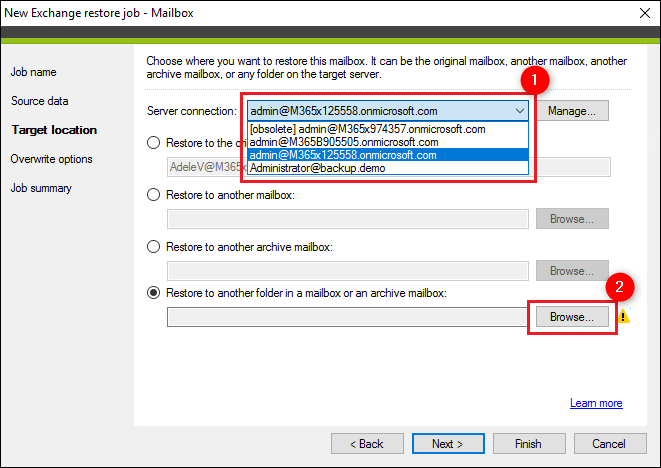
Fig. 12. Restoring the Exchange data to another folder.
In the window that opens, click Browse, select the mailbox to which you want to restore your data and click OK. You can use the Search box to quickly find the mailbox you are looking for (see Fig. 11. above).
Back in the Select folder window, choose any folder and click OK. If that mailbox has the archive mailbox enabled, it will be visible here as well. Additionally, you can use the New folder button or the shortcut (right-click) menu to create a new folder, either in the root of the mailbox or in any other folder (Fig. 13.).
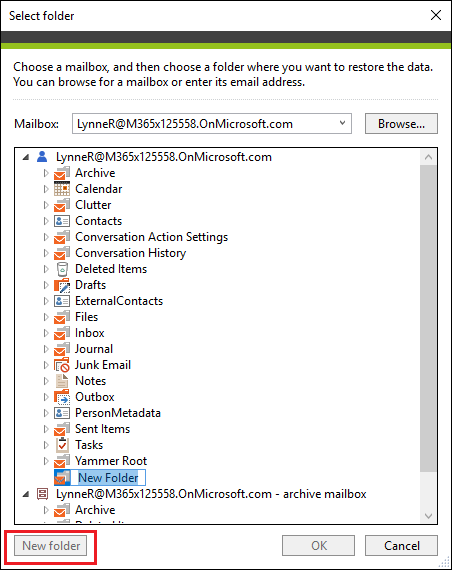
Fig. 13. Creating a new folder in the selected mailbox.
Important
The program doesn’t back up properties or permissions (delegates) of mailboxes or public folders. Therefore, if you intend to restore your Exchange data to a location other than the original one, you need to recreate these properties/permissions manually.
Learn also how to retain permissions to public folders after running a restore job
Overwrite options
Select what action the program should execute (Fig. 14.) in case the same object already exists in the target location:
- Do not restore existing items
If the data being restored already exists on in the target location, the program will not restore it.
- Overwrite existing items
The program will overwrite the existing data with the data backed up in the storage.
- Create a copy
Selecting this option will restore the items from the storage, even though their counterparts already exist in the target location. In other words, this will create duplicates on the target server.
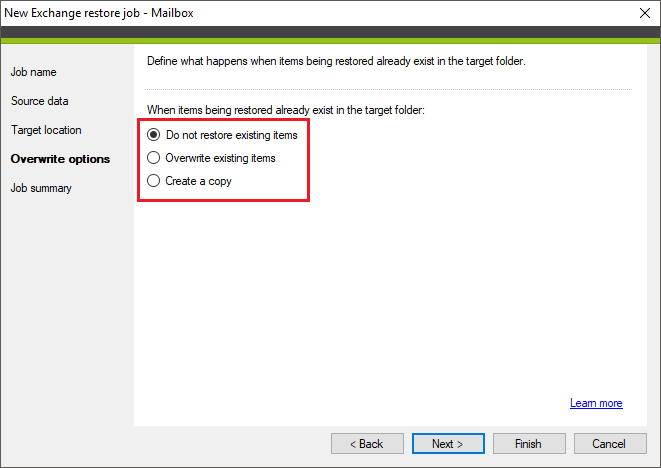
Fig. 14. Available overwrite options.
Warning
If in the Target location step you've selected to restore the Exchange data to a location other than the original one, the program will not be able to identify if a given item already exists in the target location. Therefore, for safety reasons, the program will always create a copy of the items being restored in case of a name conflict, regardless of the option you have chosen.
Job summary
In the Job summary step, you can review your settings (Fig. 15.).
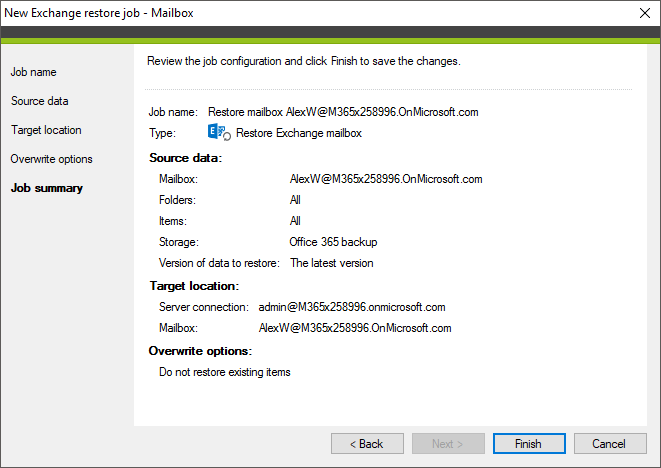
Fig. 15. The summary of the restore job.
In case you want to make any changes, click the name of any of the previous steps of the wizard and adjust your settings accordingly. If everything is correct, click Finish.
As soon as you finish the wizard, a pop-up window will appear, allowing you to start the restore job immediately (Fig. 16.). Click Yes to do so.
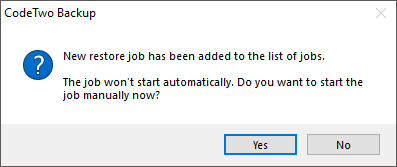
Fig. 16. A pop-up asking to start the backup job automatically.
Otherwise, use the Start button on the Jobs tab to start the selected job.