Creating SharePoint restore jobs
Backed-up SharePoint data can be restored from a local storage to the original location or another SharePoint environment. This is achieved with restore jobs. CodeTwo Backup allows you to restore entire SharePoint sites (site collections not connected to Microsoft 365 groups as well as team sites), OneDrive for Business sites, or individual SharePoint libraries, lists, folders (including OneNote notebooks), and items. Restore jobs can be created from the program's Backups tab (Fig. 1.).
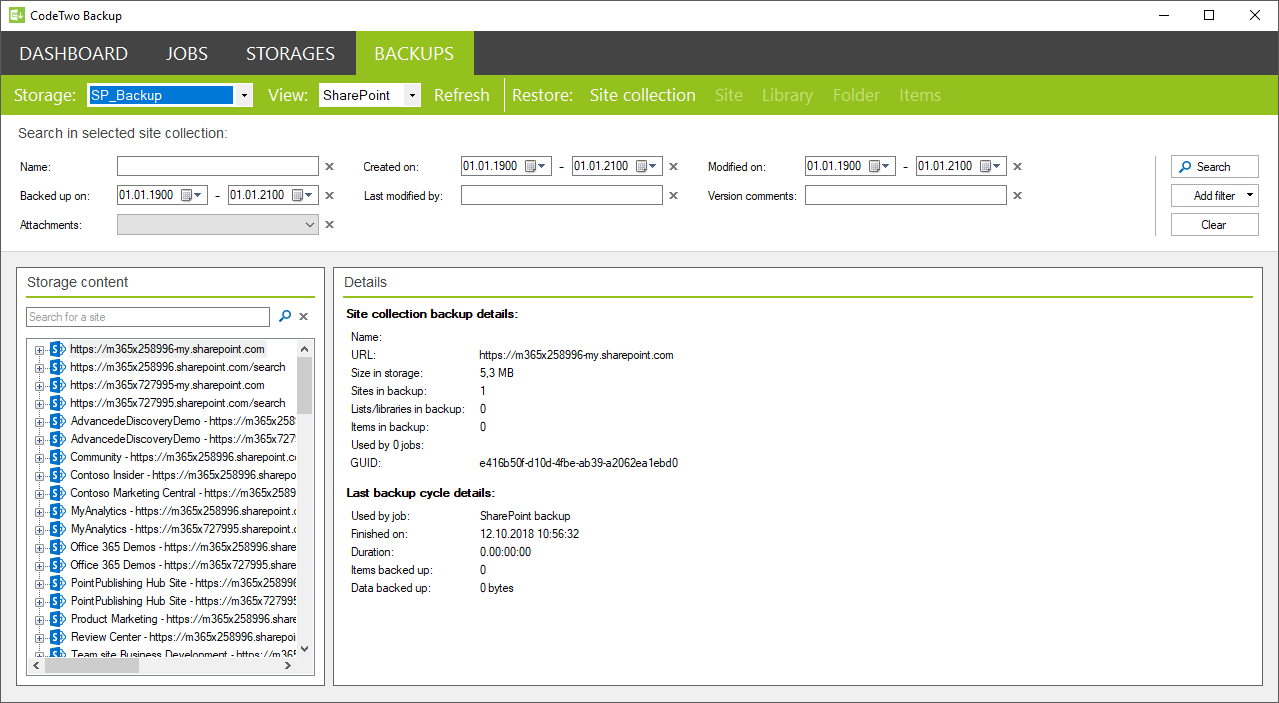
Fig. 1. The Backups tab.
Important
You can restore one object per job. However, CodeTwo Backup can run multiple restore jobs simultaneously, so multiple objects can be restored at the same time.
This rule does not apply to items (library items, such as documents, or list items). You can restore multiple items from the same list, library or folder in a single restore job. Additionally, it is also possible to restore multiple sections from OneNote notebooks or section groups.
Follow the links below to learn how to:
To find out how to restore your backed-up Exchange data, see this article.
Selecting a SharePoint Online object to be restored
On the Backups tab, you can browse through storages that hold the data backed up on your local PC. To restore a specific object, you first need to:
- select the storage where the SharePoint object in question is backed up by using the Storage drop-down menu
- select SharePoint from the View drop-down menu (Fig. 2.) to show only the SharePoint data from that storage.
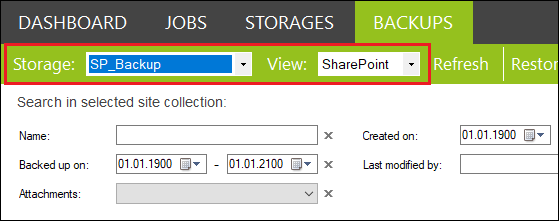
Fig. 2. Choosing a storage where the data you want to restore is located.
Important
Note that the storage content displayed in the Backups tab does not refresh automatically with each completed backup job cycle. If any SharePoint data seems to be missing, use the Refresh button on the top menu to reload the most recent objects from the storage.
Use the Storage content card to navigate through backed-up data (sites, libraries, lists, etc.). You can also use the search box (Fig. 3.) to find a specific site collection, team site or OneDrive site. Learn how to use filters to find specific items in a selected site
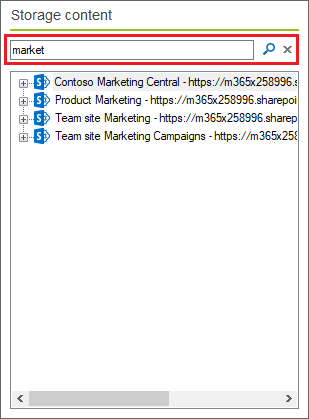
Fig. 3. Searching for a specific site.
Info
If a storage is password protected, you first need to provide that password to view and restore the backed-up data. If you do not enter the password, you will only see the names and/or URLs of sites saved in this storage.
Individual files are shown in the Items card once you select any library, list or folder (Fig. 4.). Additionally, if versioning is enabled for a given library in SharePoint, you can also browse through different versions of files backed up from that library on the Details card (learn more). However, if you select OneNote notebooks or section groups in the Storage content card, the OneNote sections card will be shown instead of the Items card.
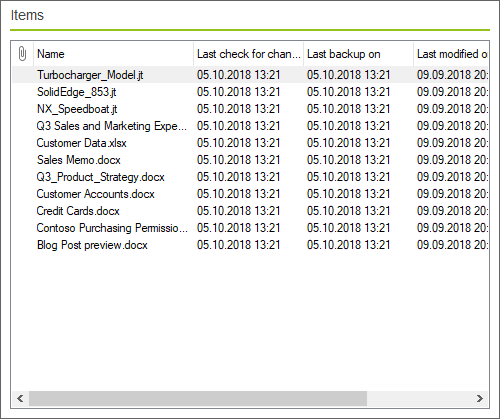
Fig. 4. Browsing through individual SharePoint files in the storage.
To restore a particular object, navigate to that object and select one of the Restore options available on the top menu (Fig. 5.). Some options will be shown or become available only when you select appropriate SharePoint data on the Storage content card. These options are:
- Restore: Site collection / Team site / OneDrive site – used to restore a top-level SharePoint site, together with its contents (sub-sites, lists, libraries, items, etc.).
- Restore: Site – used to restore an entire subsite of the top-level site.
- Restore: Library / List – used to restore a specific SharePoint library (e.g. document library) or list (e.g. custom list) of the top-level site or subsite, with all its folders and items.
- Restore: Folder / OneNote notebook / OneNote section group – used to restore a single library or list folder, together with all subfolders and items. OneNote notebook is practically a library folder as well, but with different properties. OneNote section group is simply a subfolder in the OneNote notebook folder.
- Restore: Items / OneNote sections – used to restore one or multiple items from the selected list, library or folder. OneNote sections are individual sections contained in a OneNote notebook or section group.

Fig. 5. Restore options available from the top menu of the Backups tab.
Tip
You can also right-click any object and select the required Restore selected... option from the shortcut menu (Fig. 6.).

Fig. 6. Accessing the restore options from the shortcut menu.
Once you select an object and choose the restore option, the restore job wizard will open (Fig. 7.).
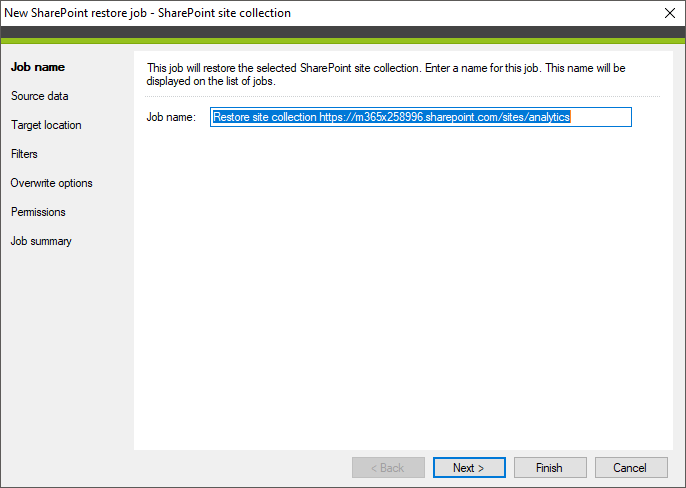
Fig. 7. The SharePoint restore job wizard.
Configuring the SharePoint restore job wizard
Depending on the type of SharePoint object selected to be restored, the options available on individual steps of the restore job wizard may slightly differ. However, the wizard will always consist of the following steps:
- Job name, where you define the name of the restore job.
- Source data, where you select the version of the data you want to restore.
- Target location, where you choose the location where the selected data should be restored.
- Filters, where you can exclude some type of data from being restored.
- Overwrite options, where you decide what action the program will take in the event that similar data already exists in the target location.
- Permissions, where you map users, groups, and permissions between the original and target locations.
- Job summary, where you can review your restore job settings.
Important
It is no longer possible to restore certain SharePoint data types (custom web part page layouts and surveys that don’t allow for multiple responses). This feature is deprecated because it used a legacy authentication protocol (Basic Authentication) that was retired in SharePoint Online on May 1, 2026.
Job name
In the first step of the wizard, provide a unique name for the restore job (see Fig. 7. above). By default, the Job name field is filled automatically according to the following pattern:
Restore [object type] [site URL]
You can change the default name, for example, if you plan to restore the same object in the future but to another location or by using different settings. You cannot create two jobs with the same name.
Source data
Since CodeTwo Backup features item versioning, you can choose which version of the object you want to restore (Fig. 8).
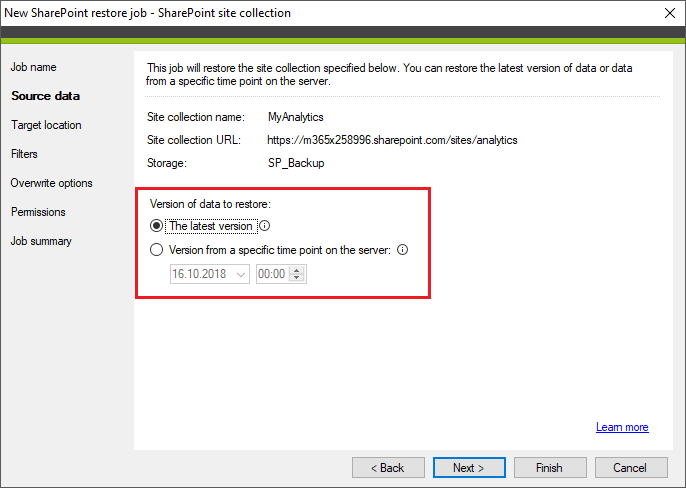
Fig. 8. Selecting the version of SharePoint data to be restored.
The available restore options differ depending on the objects you are restoring:
| Version of data to restore | Site collections/ sites/libraries/ lists/folders |
OneNote notebooks and section groups |
Multiple items/ OneNote sections |
Single item/ OneNote section |
|---|---|---|---|---|
| The latest version |
|
|
|
|
| The latest existing version |
|
|
|
|
| Version from a specific time point on the server |
|
|
|
|
| Specific server version |
|
|
|
|
Restoring the latest version
This option will restore the most recently backed up version of the selected object (site, library, list, OneNote notebook & section group, or folder). If any items were deleted in the SharePoint environment from the given object prior to the backup (and were marked as deleted in the storage), these items will not be restored.
Restoring the latest existing version
This option will restore the latest backed up version of the selected items (including OneNote sections). If any of these items were deleted from the server prior to the last backup cycle (and were marked as deleted in the storage), the program will restore the latest version of these items that existed before they were deleted.
Restoring a version from a specific time point on the server
This option will restore the selected object(s) from a specified point in time. Any items in the storage deleted before that point in time and created after that date will not be restored.
Restoring a specific server version
This option is available only when restoring a single item or OneNote section. It will restore the exact version of the item (selected from the drop-down menu) that existed on the server at a specific point in time (Fig. 9.).
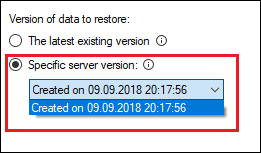
Fig. 9. Selecting a specific version of the item to be restored.
Important
Every time you delete an item (or OneNote section) on the server, the last backed-up version of that item is marked as deleted in the storage. If you want to restore that item, you need to create the restore SharePoint item job and select the latest existing version option in the Source data step of the wizard. Configuring any other type of restore job (site, library, folder, OneNote notebook, etc.) will not restore that item unless you choose to restore the data from the point in time when that item still existed.
Target location
You can choose to restore the selected SharePoint data to:
- the original location
- another location in the original SharePoint environment
- another location in a different SharePoint environment
Restoring backed-up data to the original location
To restore the selected SharePoint object to its original location, simply select the Restore to the original [location] option (Fig. 10.).
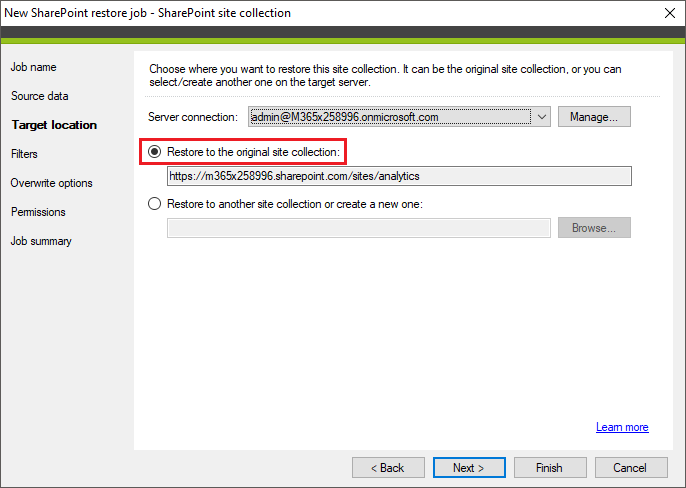
Fig. 10. Restoring SharePoint data to its original location.
Important
This option will not be available if the connection to the original server has been deleted. You need to configure this connection again to be able to use that option. To create a new SharePoint connection, click Manage > New. Learn more about how to create a new SharePoint connection.
Restoring backed-up data to another location in the original SharePoint environment
Select the SharePoint environment from the Server connection drop-down menu from which the data you intend to restore has been backed up. Next, select the Restore to another [location] or create a new one option and click Browse to select an existing location, e.g. site collection, list, folder, etc., depending on the object type you want to restore. You can also create a new object by navigating to the exact spot you want to create that object, clicking Create new, and selecting the appropriate object type (Fig. 11.).
Creating team sites in SharePoint Online
You can no longer create team sites from within CodeTwo Backup when restoring your SharePoint data. This feature is deprecated because it used a legacy authentication protocol (Basic Authentication) that was retired in SharePoint Online on May 1, 2026.
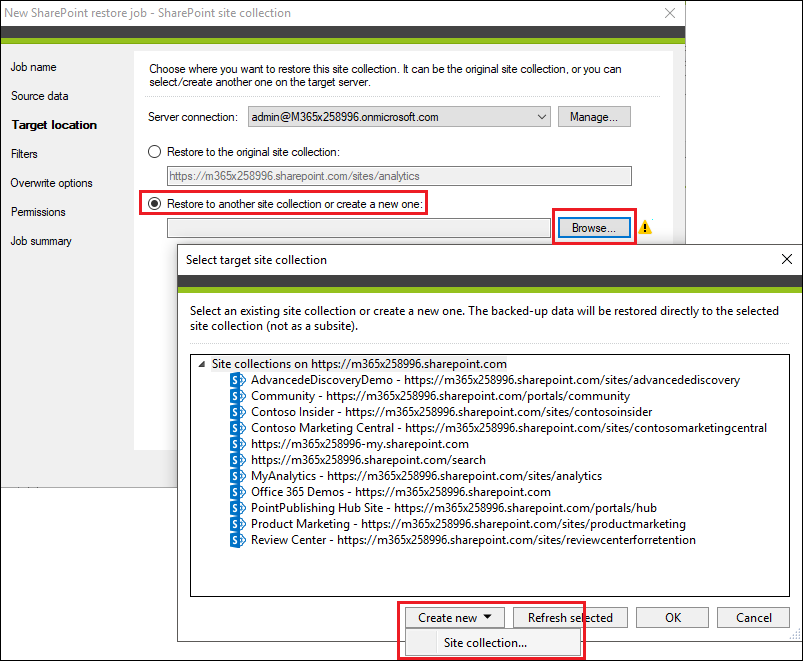
Fig. 11. Restoring SharePoint data to a new location.
Restoring backed-up data to another location in a different SharePoint environment
Select an appropriate SharePoint environment from the Server connection drop-down menu. You can also create a new connection by clicking Manage > New (learn more on how to create a new SharePoint connection). Next, click Browse to select an existing location, e.g. site collection, list, folder, etc., depending on the object type you want to restore. You can also create a new object by navigating to the exact spot you want to create that object, clicking Create new, and selecting the appropriate object type (see Fig. 11. above).
Warning
When selecting another site collection or team site as the target location for your SharePoint data, make sure these objects were created based on the same template as the object you intend to restore. Otherwise, the restore job may encounter errors or even fail. If you cannot find such a site collection, create a new one by using the Create new button. The program will create new site by applying the same template that the object you want to restore is using.
Keep in mind that creating new OneDrive sites is not supported. If you select Create new > OneDrive site, you will get this error:
Can't create a new site based on the source site type: 'OneDrive site'.
In addition, when restoring OneNote notebooks to a document library other than the original one, make sure this library is configured for storing notebooks. Otherwise, you may experience some synchronization problems. Learn more
Filters
In this step, you can filter out some data from being restored. To do so, click the checkbox next to that type of data (Fig. 12.).
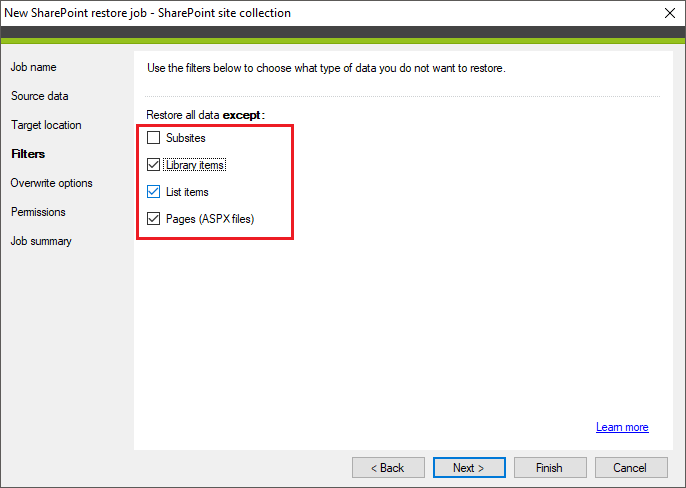
Fig. 12. An example of data that can be excluded from the restore job.
Important
The Filters step will show different options for different types of data you intend to restore.
Overwrite options
Select what action the program should execute in case the same object already exists in the target location:
- Do not overwrite
If the data being restored already exists in the target location, the program will not restore it. This option is especially useful if, for example, you are restoring an entire site collection, but you don't want the program to overwrite lists, libraries or individual documents that remain in SharePoint.
Important
If you are restoring a single SharePoint list that has some custom columns, make sure to select either the Overwrite option or the Overwrite only specific parts and attributes of existing objects option and mark the Columns checkbox in the Parts and attributes of the objects to overwrite window (see Fig. 14. below). Otherwise, these columns will not be restored.
If the data being restored already exists in the target location, the program will overwrite that data with the data backed-up in the storage.
You can also select the Create copies of [items/sections] instead of overwriting them checkbox (Fig. 13.) to create duplicates of such items instead of overwriting the existing items. Higher-level objects like site collections, lists, libraries, folders or OneNote notebooks will still be overwritten.
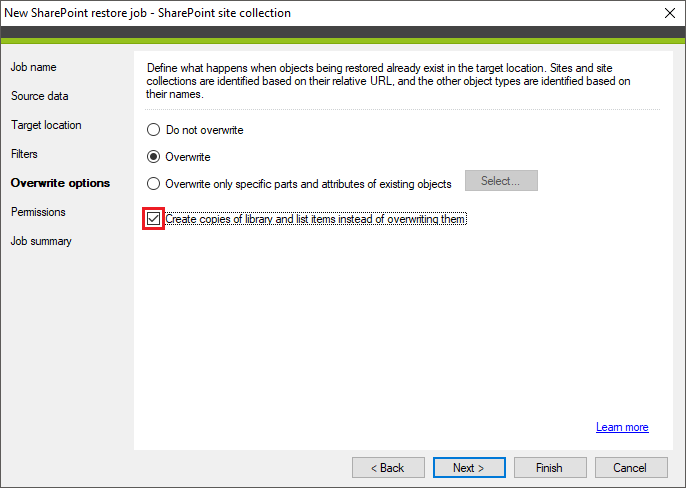
Fig. 13. An additional option allowing to override the overwrite option for certain items.
If in the Target location step you've selected to restore the SharePoint data to a location other than the original one, the program will not be able to identify if a given list item already exists in the target location. Therefore, for safety reasons, instead of overwriting such an item the program will create its copy in case of a name conflict.
Additionally, when restoring SharePoint web pages (also known as ASPX pages) to either the original or another location, the program will always create copies of such items in the target location instead of overwriting them. This is to prevent a situation in which the whole layout of the restored web page gets messed up. Once the copy of such item is restored on your SharePoint, you can change the name of the restored page manually and see if everything looks ok.
This option allows you to specify which exact parts and attributes of a given object (site, library, list, etc.) should be overwritten, and which should not be restored at all. Click the Select button to open the Parts and attributes of the objects to overwrite window (Fig. 14.), and then mark the checkbox next to the part or attribute that should be overwritten in the target location or leave the checkbox unselected to omit these parts/attributes.
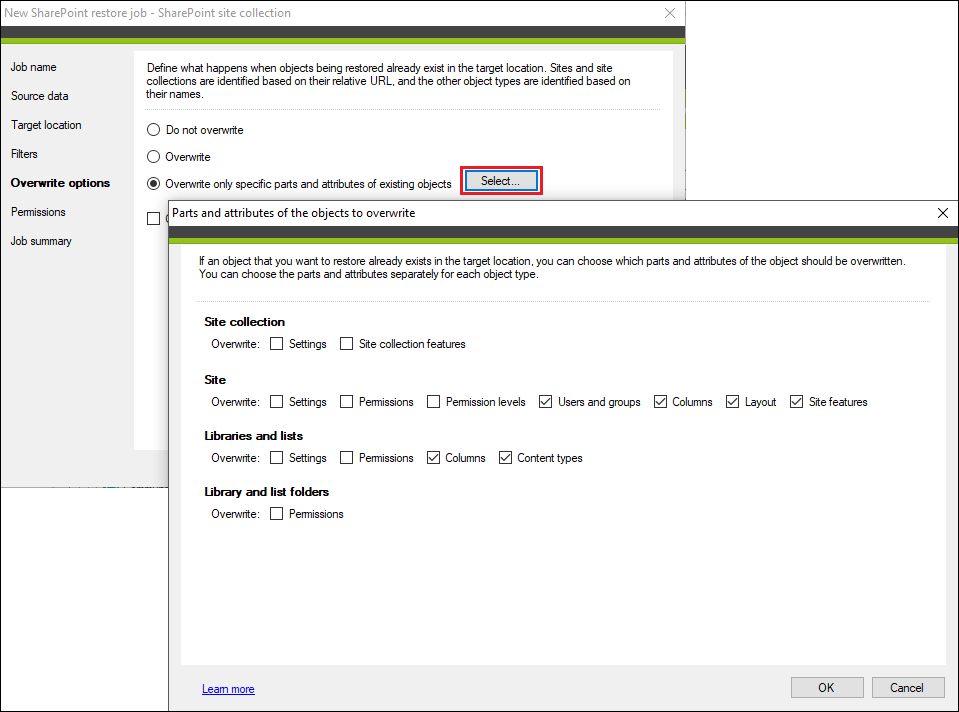
Fig. 14. The Overwrite options steps available for SharePoint items restore job.
Important
Keep in mind that different options will be available in the Parts and attributes of the objects to overwrite window for different objects you intend to restore.
The Create copies of [items/sections] instead of overwriting them checkbox is also available for this option. The same exceptions apply regarding list items and ASPX pages as mentioned above.
- Create a copy
This option is available only if you are restoring individual items (Fig. 15.). Selecting this option will create duplicates of these items in the target location in a case similar items already exist.
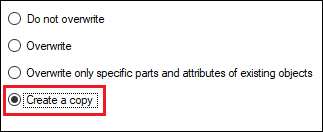
Fig. 15. The Overwrite options steps available for SharePoint items restore job.
Permissions
In this step, you can also restore permission levels in the target location for users and groups. There are two options available:
- Map to original objects, available only if you are restoring the SharePoint data to its original location. The mapping process will be performed automatically by the program.
- Map objects, where you can manually map users, groups and permission levels between the source (backed-up) and target site collections. To do so, simply click the relevant Map button (Fig. 16.).
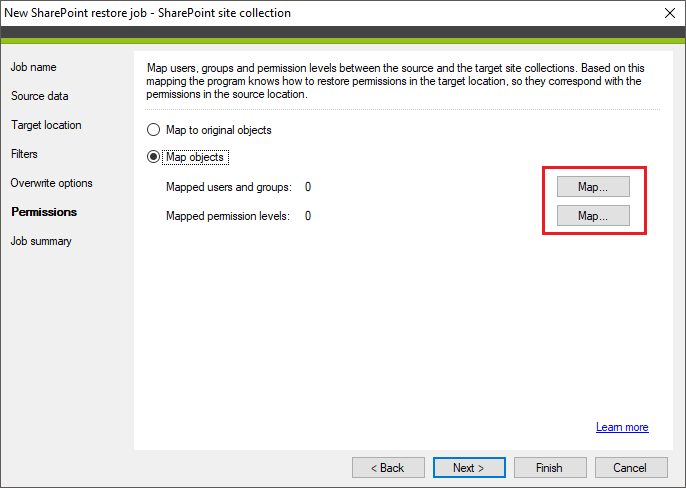
Fig. 16. Accessing the manual mapping functionality.
Clicking the upper Map button opens the Map users and groups window (Fig. 17.), while the bottom Map button opens the Map permission levels window.
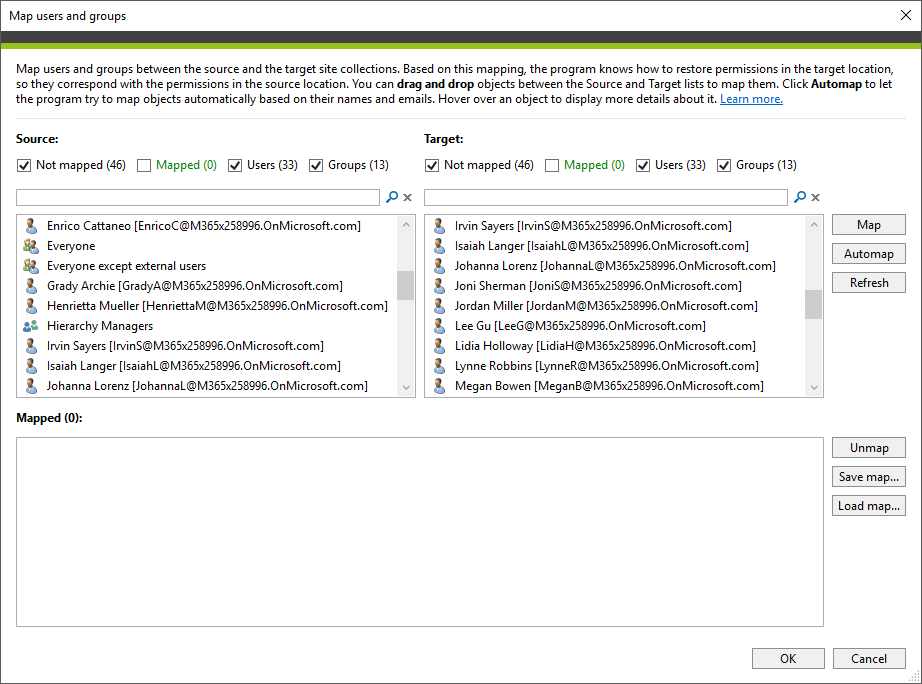
Fig. 17. The Map users and groups window.
Warning
If you don't map any users or groups and permission levels, only the administrator whose account was used to connect to the target SharePoint environment will be able to access the restored data.
Learn how to manually map SharePoint users, groups and permission levels in CodeTwo Backup.
Job summary
Here you can verify if you have configured the restore job according to your requirements (Fig. 18.).
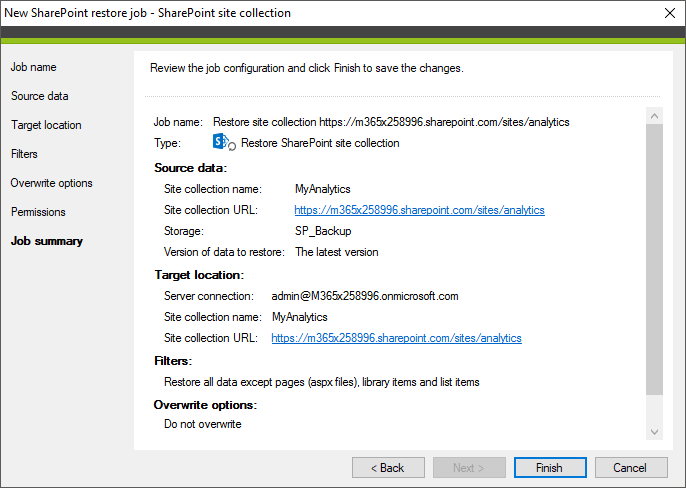
Fig. 18. The summary of the restore job.
In case you want to make any changes, click the name of any of the previous steps of the wizard and adjust your settings accordingly. If everything is correct, click Finish.
As soon as you finish the wizard, a pop-up window will appear, allowing you to start the restore job immediately (Fig. 19.). Click Yes to do so.
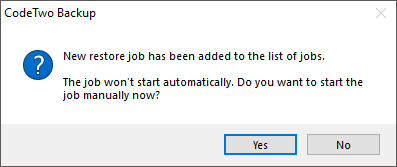
Fig. 19. A pop-up asking to start the backup job automatically.
Otherwise, use the Start button on the Jobs tab to start the selected job.