How to configure shared mailboxes to work with CodeTwo signatures
Problem:
You want to learn how to configure Microsoft 365 shared mailboxes for use with CodeTwo Email Signatures 365.
To learn how to set up CodeTwo Email Signatures 365 to add signatures to shared mailboxes, see this article.
Solution:
Microsoft 365 shared mailboxes need to be correctly configured to work with our service. For this purpose, complete the following steps:
- Configure users' delegate permissions (Send as / Send on behalf) for a shared mailbox
- Add the necessary details to a shared mailbox’s properties (Entra ID attributes)
- Include a shared mailbox in CodeTwo's scope of licensed users
Further steps depend on what type of signatures you want to use with shared mailboxes.
For Outlook (client-side) signatures (in either Outlook or combo mode), complete one additional step:
For cloud (server-side) signatures (in either cloud or combo mode), complete two additional steps:
- Include a shared mailbox in CodeTwo's Exchange transport rule
- Enable message copying to the Sent Items folder of a shared mailbox
If you need further help, see this troubleshooting article.
Configure users' delegate permissions (Send as / Send on behalf) for a shared mailbox
Delegate permissions set for shared mailboxes in the Exchange admin center affect how CodeTwo cloud (server-side) signatures are added:
- The Send as permission allows users to receive a shared mailbox signature when sending emails from the shared mailbox.
- The Send on behalf permission allows users to receive their personal signatures instead.
If a user is granted both the Send as and Send on behalf permissions, the Send as permission will take precedence.
In the case of Outlook (client-side) signatures, users need to be assigned either of the two delegate permissions. For this signature type, however, the assigned permission does not determine which signature is applied. Instead, this is controlled by the CodeTwo add-in setting Change CodeTwo Outlook (client-side) signatures to match the email address in the From field. To learn more, see the Adjust CodeTwo Outlook add-in settings (Outlook signatures only) section.
Learn more about email signatures vs. delegate permissions
To grant the delegate permissions to chosen users, you need to:
- Sign in to the Exchange admin center with your Microsoft 365 global admin or Exchange admin account.
- Go to Recipients > Mailboxes and select a shared mailbox for which you want to configure the delegate permissions:
To grant the Send on behalf permission for the shared mailbox, click Send on behalf (Fig. 1.) and select the desired users with the user picker. Save your changes by clicking Save > Confirm.

Fig. 1. Configuring the Send on behalf permissions for a shared mailbox.- To grant the Send as permission, go to the Delegation tab, click the Edit button in the Send as section (Fig. 2.) and choose the desired users with the user picker. Save your changes by clicking Save > Confirm.
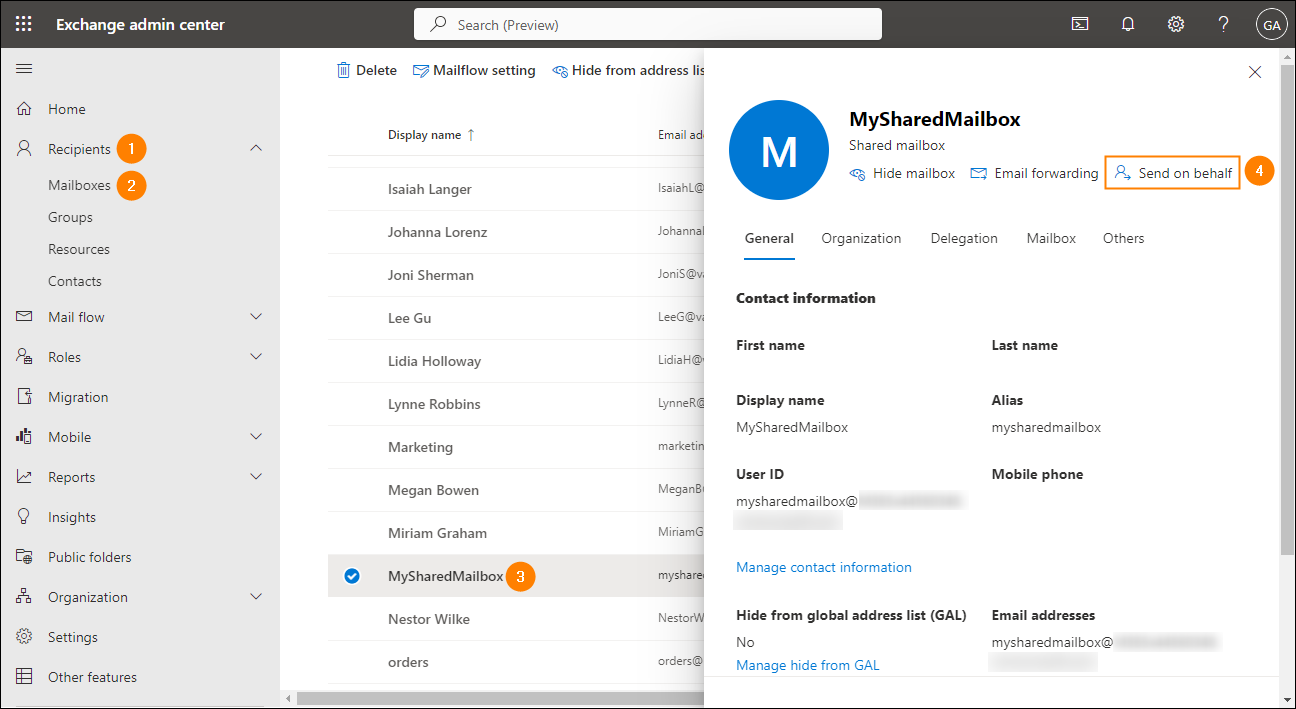
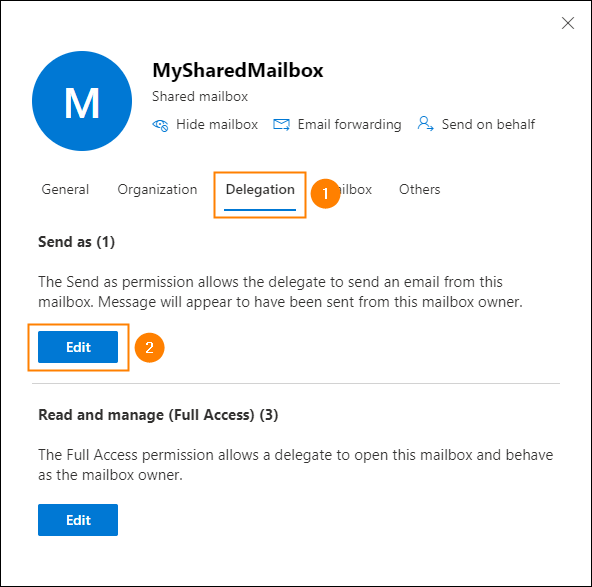
Fig. 2. Configuring the Send as permissions for a shared mailbox.
Add the necessary details to a shared mailbox's properties (Entra ID attributes)
If you plan to use placeholders in the signature template of your shared mailbox, keep in mind that shared mailboxes typically don't have contact or personal details filled in Entra ID (Azure AD). To make sure no information is missing in the signature, add the necessary details by editing the mailbox properties in the Exchange admin center or by using CodeTwo's Attributes manager. For example, to display a team name (e.g., Customer Support), you can enter it in the First Name attribute and leave the Last Name attribute empty to achieve the result shown in Fig. 3.

Fig. 3. A sample configuration of the First name placeholder for a shared mailbox.
Important
Note that Exchange Online attributes that have no equivalents in Entra ID, such as Initials or Notes, are not supported by shared mailboxes.
Include a shared mailbox in CodeTwo's scope of licensed users
A shared mailbox needs to be included in the scope of licensed users if you want to set up a separate signature for it. This scope is defined in CodeTwo Admin Panel (in the Scope & region settings). You can either include all users in your Microsoft 365 tenant or limit the scope to a selected group (Microsoft 365 group, distribution list, or security group) that includes the shared mailbox, as shown in Fig. 4. Learn more about this scope
Note that in the case of Outlook (client-side) signatures, if a user sends an email as or on behalf of a shared mailbox, no additional license is consumed for that mailbox. On the other hand, shared mailboxes whose emails are routed through the CodeTwo service to get cloud (server-side) signatures are treated as separate users and must be assigned a license. Learn more about licensing
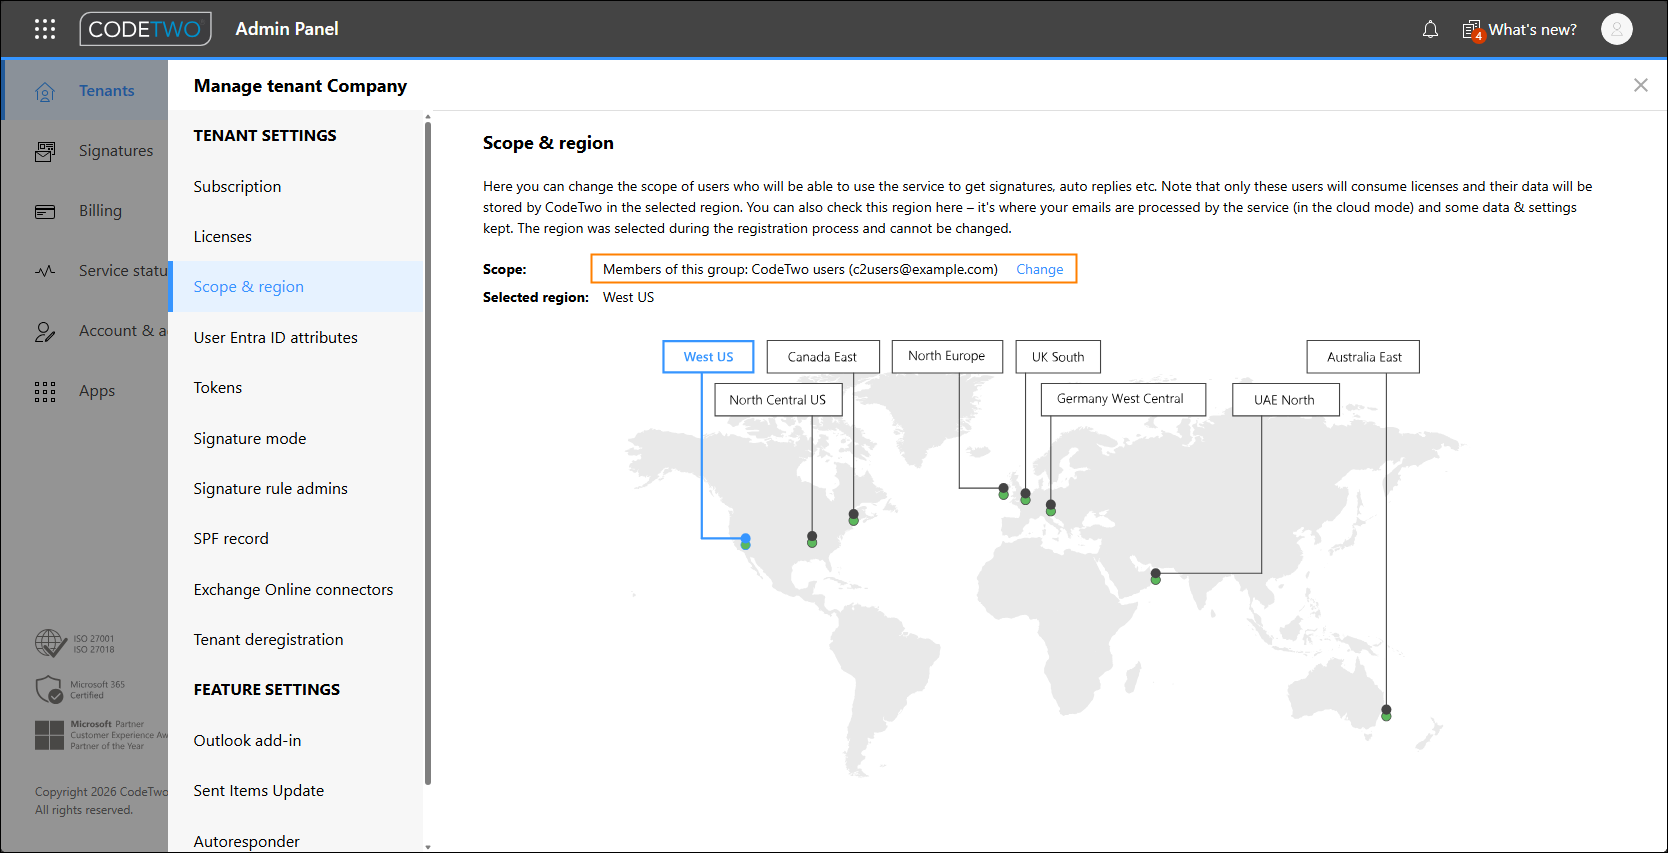
Fig. 4. Here you can limit the scope of licensed CodeTwo users to members of a specific group only.
If you've limited the scope of licensed users to a selected group, as shown in Fig. 4., be sure your shared mailboxes are added as members of this group. Here's how to do that:
- Sign in to the Exchange admin center with your Microsoft 365 global admin or Exchange admin account.
- Go to Recipients > Groups, locate the group with the users licensed to use CodeTwo by clicking an appropriate tab (e.g., Distribution list) and click the group’s name.
- In the pane that opens, select the Members tab and click View all and manage members (Fig. 5.).

Fig. 5. Accessing the group membership settings.
- Click Add members and add shared mailbox(es) by using the picker.
- When ready, click Add. The changes to the group membership will be saved.
Important
It may take some time (up to several hours) for this change to synchronize with CodeTwo. Newly added users (including shared mailboxes) might not get signatures until the synchronization process is complete.
The next steps depend on what type of signatures you want to use with shared mailboxes:
- For Outlook signatures (in Outlook or combo mode), complete the Adjust CodeTwo Signatures add-in settings step.
- For cloud signatures (in cloud or combo mode), complete the two following steps:
Adjust CodeTwo Outlook add-in settings (Outlook signatures only)
This step is required if you use CodeTwo Outlook (client-side) signatures with shared mailboxes.
When a delegated user selects a shared mailbox in the From field, CodeTwo can either insert that user’s personal signature or a signature designed for the selected shared mailbox. This depends on the CodeTwo add-in's setting Change CodeTwo Outlook (client-side) signatures to match the email address in the From field (Fig. 6.):
- If the setting is disabled (this is the default option), the personal signature will be used.
- If the setting is enabled, the shared mailbox signature will be used, but the CodeTwo add-in will also allow the user to change this behavior and apply their personal signature for all emails sent from shared mailboxes (and other alternative addresses).
To find this add-in setting, sign in to CodeTwo Admin Panel, select your Microsoft 365 tenant on the Tenants tab, and go to Outlook add-in. The setting is located in the advanced settings section, as shown in Fig. 6.
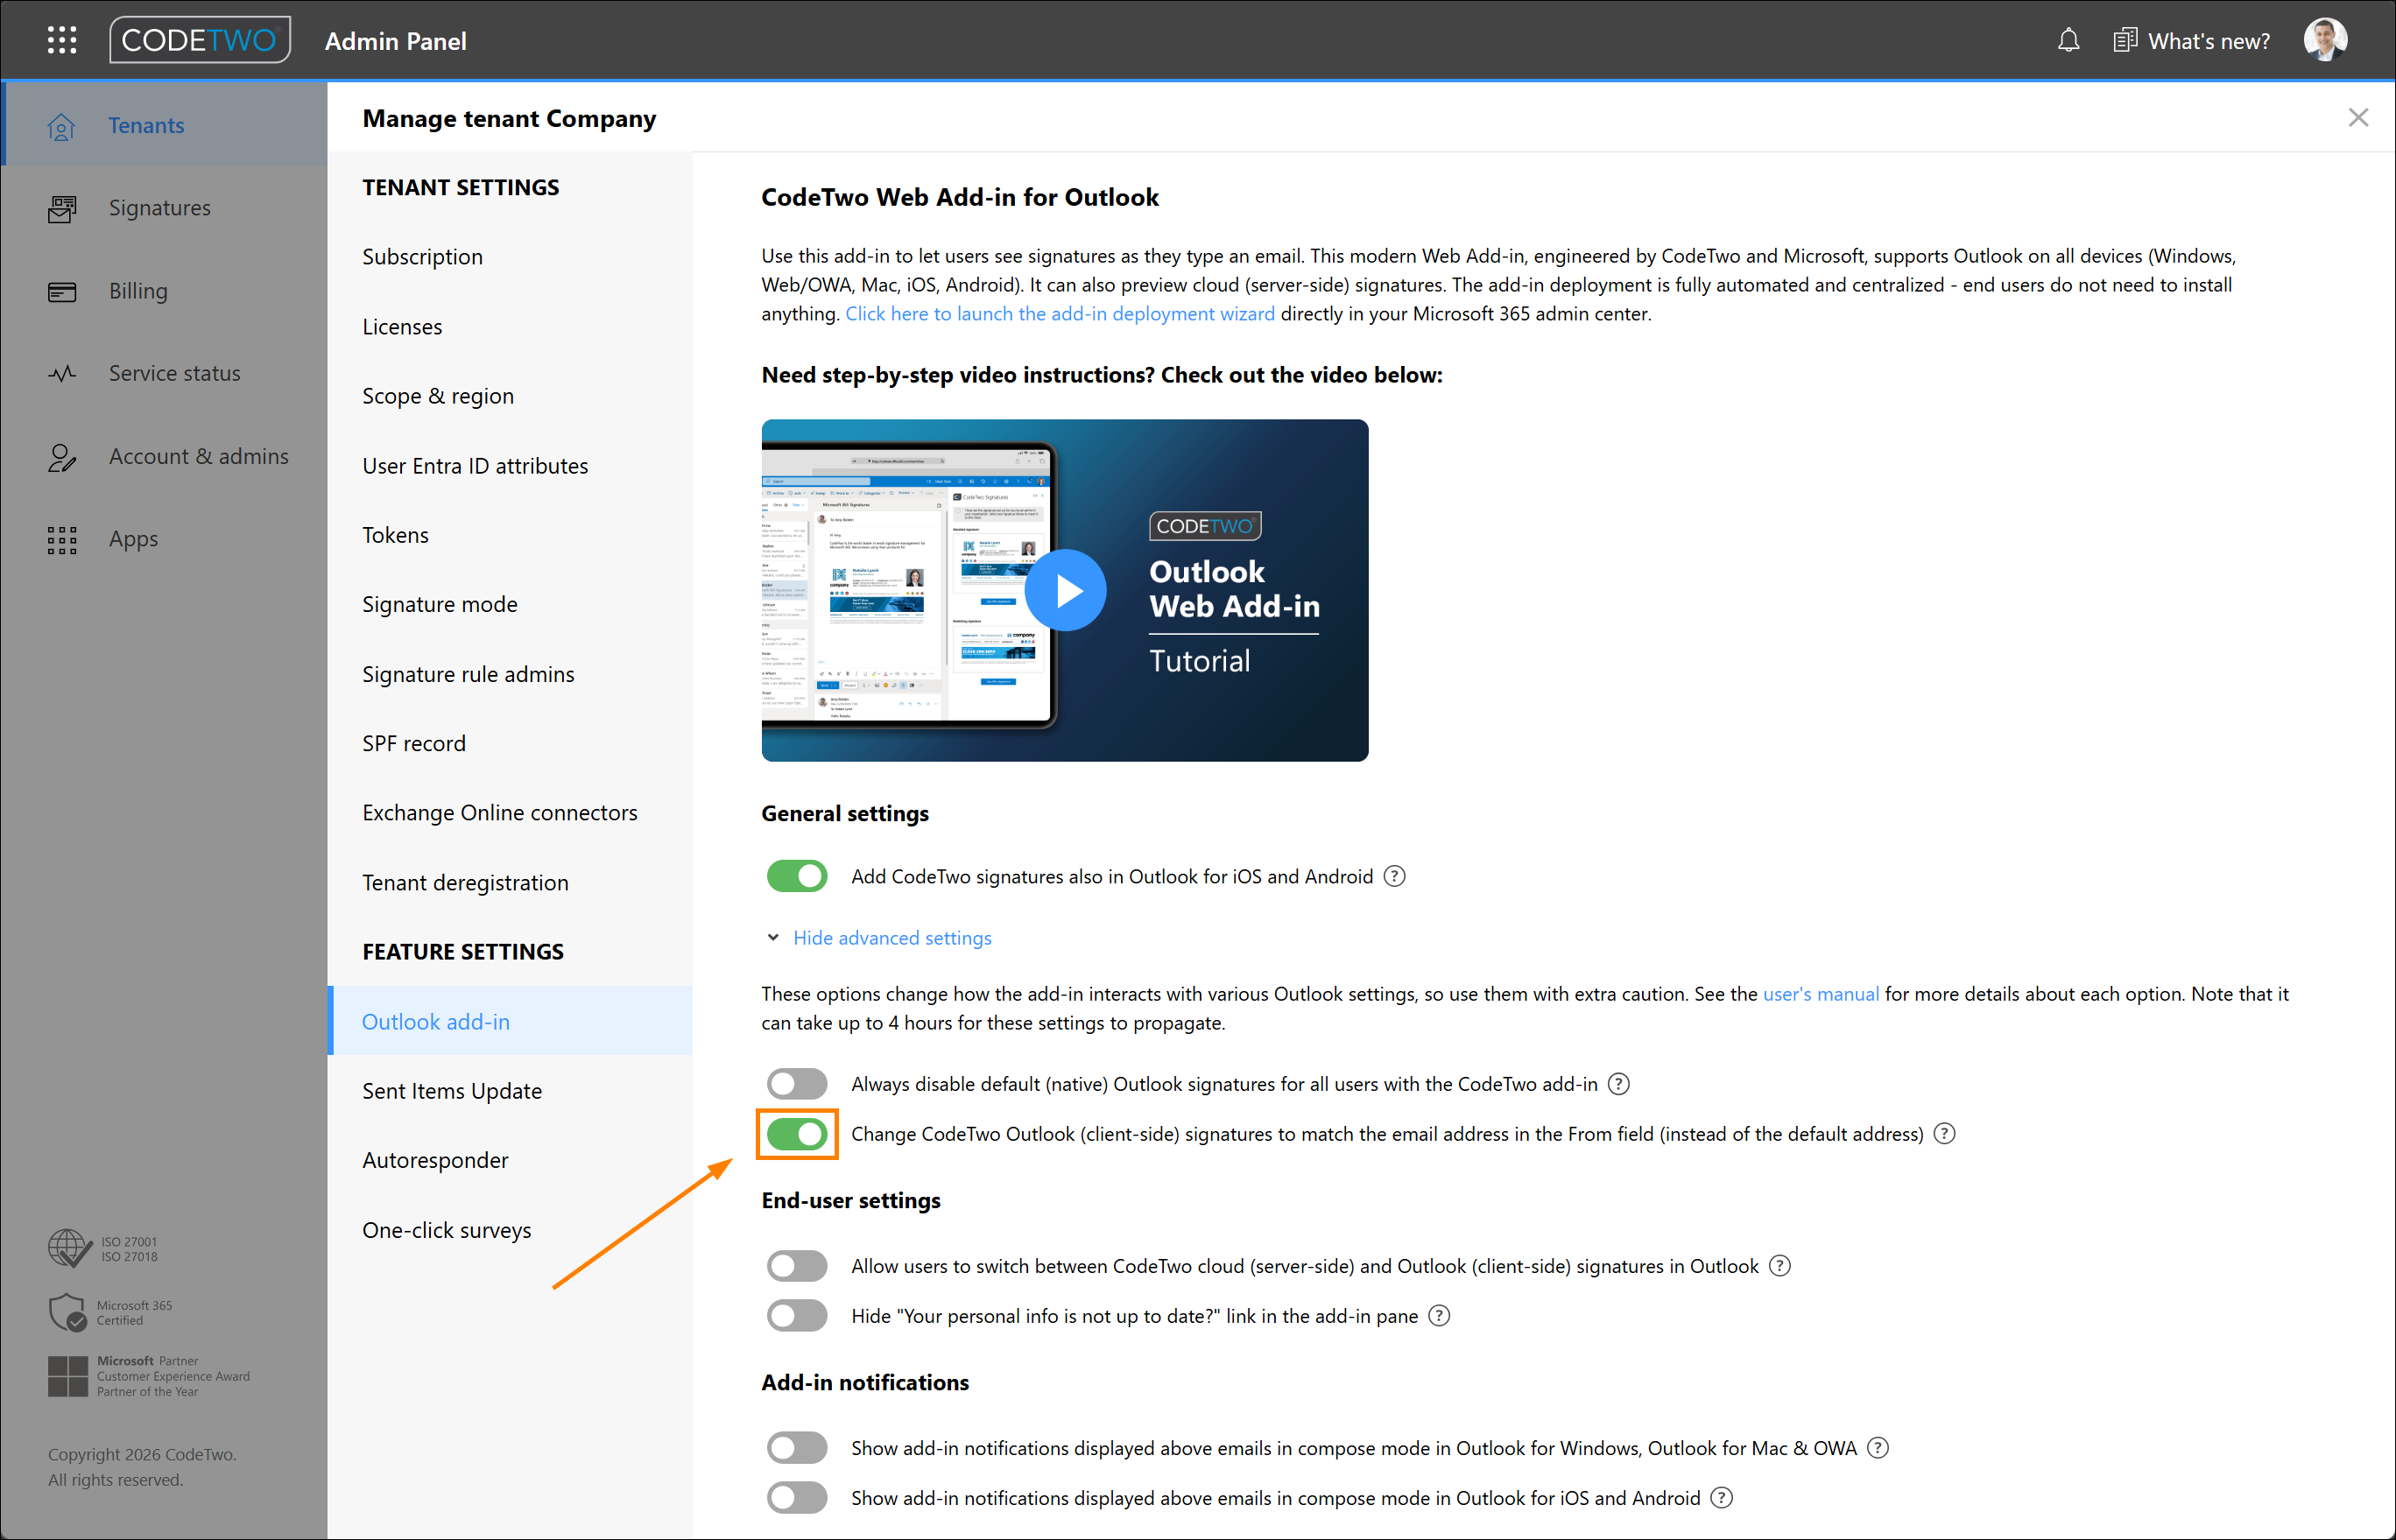
Fig. 6. Change CodeTwo Outlook (client-side) signatures to match the email address in the From field setting in CodeTwo Admin Panel.
Note that this setting applies when the user is signed in to their personal Outlook account. If the user accesses a shared mailbox as a separate account by using the Open another mailbox option in Outlook on the web (OWA) or when the mailbox is converted to a full account in the new Outlook for Windows, the shared mailbox signature will typically be used by default.
Important info regarding mobile Outlook apps
In Outlook for iOS and Android, changing the sender in the From field will remove an Outlook signature from an email. This is a limitation of Outlook mobile apps and is not related to CodeTwo’s add-in. If you want to add CodeTwo signatures for a shared mailbox in Outlook mobile:
- use cloud (server-side) signatures, or
- add the shared mailbox as a secondary account (see this article to learn how to set a password for a shared mailbox and add the mailbox as a secondary account in Outlook for iOS and Android).
As a workaround, you can also sign in to your personal account using Outlook on the web (OWA) on your mobile device. Next, switch to the desktop site view in your mobile browser to use OWA as you would on a desktop computer. This will allow you to insert Outlook (client-side) signatures into emails sent as or on behalf of a shared mailbox and use the full functionality of the CodeTwo add-in, as described above.
Include a shared mailbox in CodeTwo's Exchange transport rule (cloud signatures only)
This step is required if you use CodeTwo cloud (server-side) signatures with shared mailboxes.
When you use CodeTwo in cloud or combo signature mode, you need to configure Exchange Online connectors and a transport rule in CodeTwo Admin Panel to specify users (mailboxes) whose emails are to be routed through CodeTwo's service to get signatures. You can either select all users in your Microsoft 365 tenant or limit this scope to users belonging to a selected group (a distribution list or any mail-enabled group), as shown in Fig. 7. Learn more
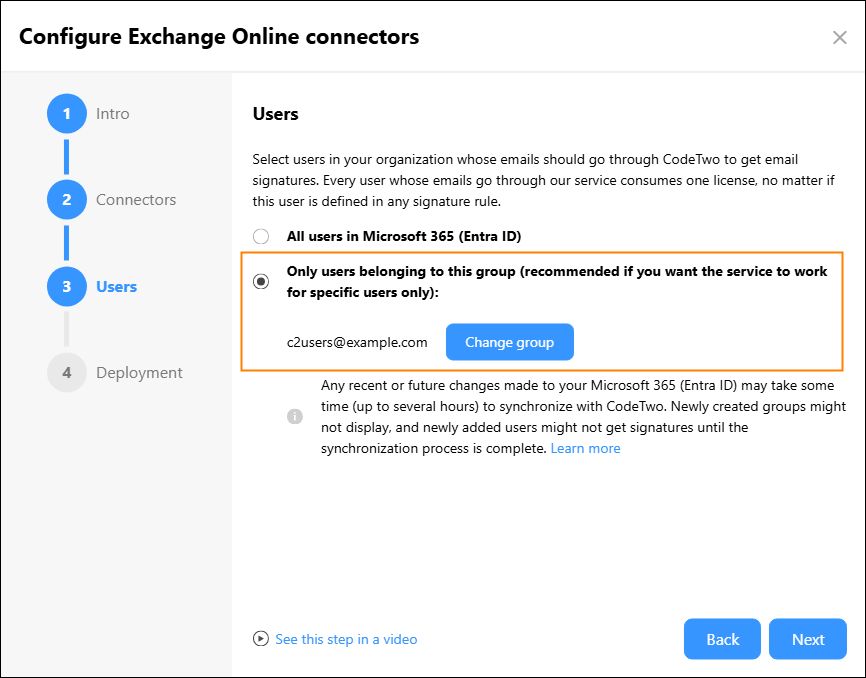
Fig. 7. Selecting users whose emails should go through CodeTwo to get cloud email signatures.
If you've limited the scope of senders to a selected group, as shown in Fig. 7., be sure your shared mailboxes are added as members of this group, as described here.
Enable message copying to the Sent Items folder of a shared mailbox (cloud signatures only)
This step is required if you want to use the Sent Items Update (SIU) feature with CodeTwo cloud (server-side) signatures.
If message copying is enabled for your Microsoft 365 shared mailbox, the copy of all emails sent as or on behalf of that mailbox will also be saved in the Sent Items folder of that mailbox. This allows CodeTwo's Sent Items Update (SIU) service to add signatures to emails in the shared mailbox’s Sent Items folder.
To configure message copying in Microsoft 365, you need to:
- Connect to Exchange Online, as explained in this article.
- Run the following cmdlets to allow Exchange Online to copy emails sent by delegates with either type of delegate permissions:
Set-Mailbox <shared-mailbox-email-address> -MessageCopyForSentAsEnabled $true
Set-Mailbox <shared-mailbox-email-address> -MessageCopyForSendOnBehalfEnabled $true
Replace <shared-mailbox-email-address> in each cmdlet with the exact email address of your shared mailbox.
- Finally, disconnect Exchange Online by running this cmdlet:
Disconnect-ExchangeOnline
Which Sent Items folder is updated by CodeTwo?
If a user sends an email as a shared mailbox, the Sent Items Update (SIU) service will only update the copy of that email in the Sent Items folder of the shared mailbox (Fig. 8.). The original email in the user's Sent Items will not be updated with any signature.
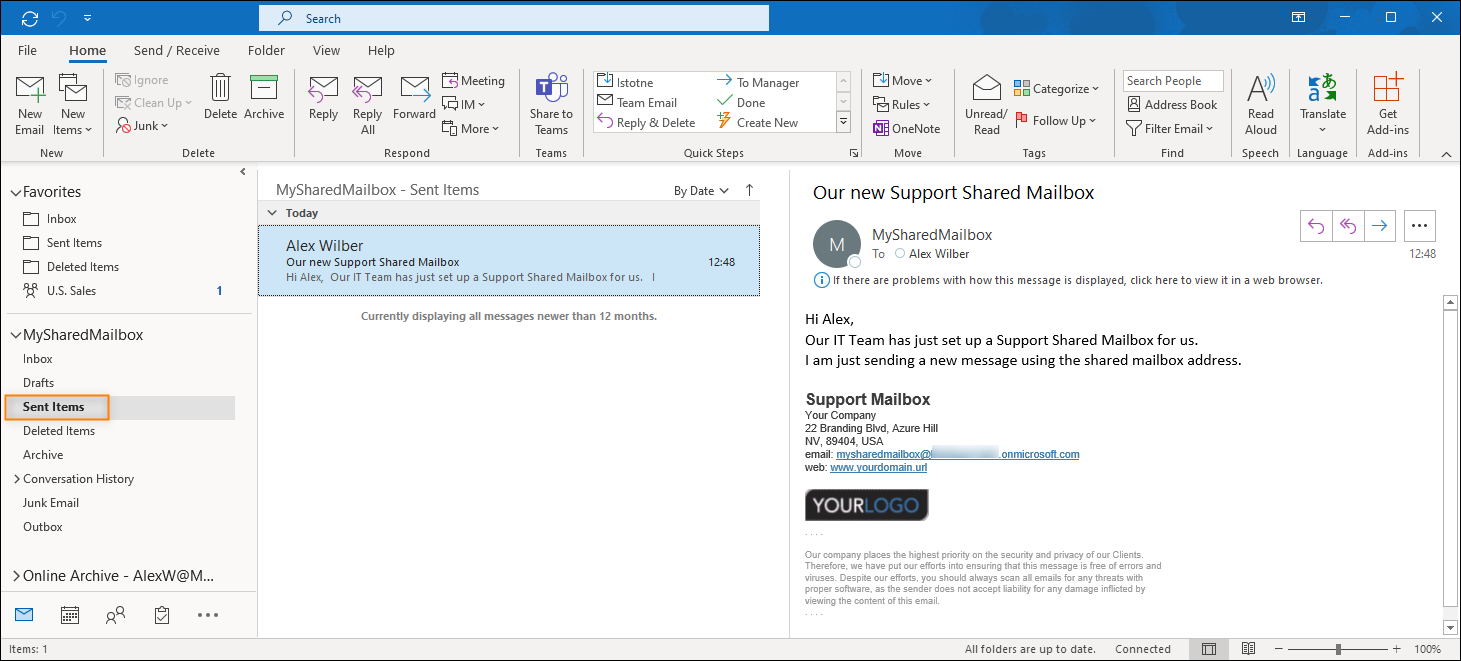
Fig. 8. Send as permissions: SIU updates emails in the Sent Items of a shared mailbox.
If a user sends an email on behalf of a shared mailbox, SIU will only update the original email in the Sent Items folder of the user (Fig. 9.). The email copy in the shared mailbox's Sent Items will not be updated with any signature.
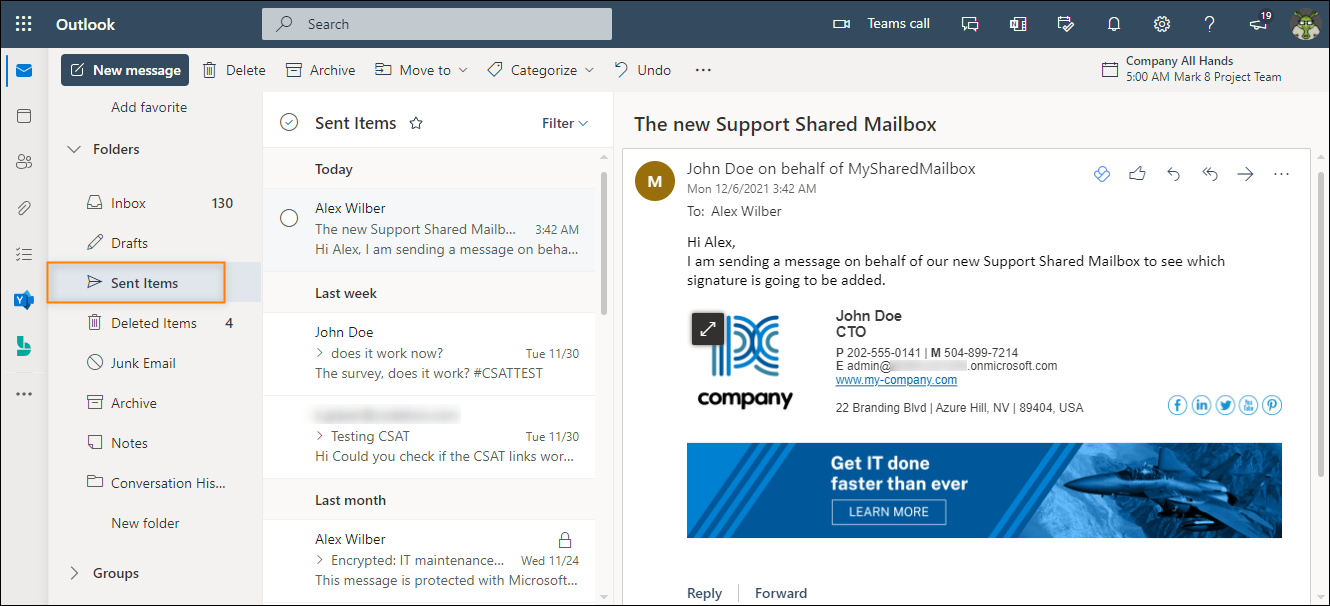
Fig. 9. Send on behalf permissions: SIU updates emails in the Sent Items of the sender.
Important
Note that an email sent from a shared mailbox accessed through the Open another mailbox feature in Outlook on the web (OWA) won’t be copied to the sender’s mailbox by Exchange Online, which prevents the SIU service from updating the email in the delegate's Sent Items folder. To avoid it, as a delegated user, always send emails from the shared mailbox by selecting it in the email's From field (after clicking Other email address, as shown in Fig. 10.).

Fig. 10. Sending an email on behalf of a shared mailbox in OWA.
See also:
| Related products: | CodeTwo Email Signatures for Office 365 |
| Categories: | How-To |
| Last modified: | July 6, 2026 |
| Created: | January 9, 2018 |
| ID: | 676 |


