
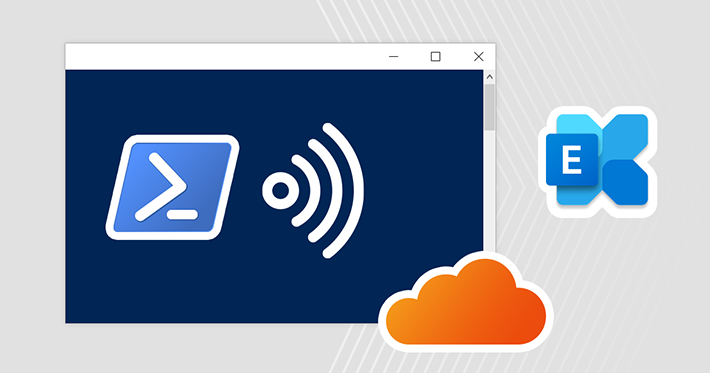
Carrying out the mailbox migration without third-party tools has always been a complex task. Unfortunately, with years passing by, the Redmond giant still favors ‘the old good way’ of doing things. Multiple PowerShell scripts that require customization, hours of manual labor… For some admins it’s daily bread, for others: something to run away from.
Well, I didn’t intend to scare you in any way. But if I did, you might want to have a look at how to run the migration with a third-party tool to save hours of labor and gain peace of mind.
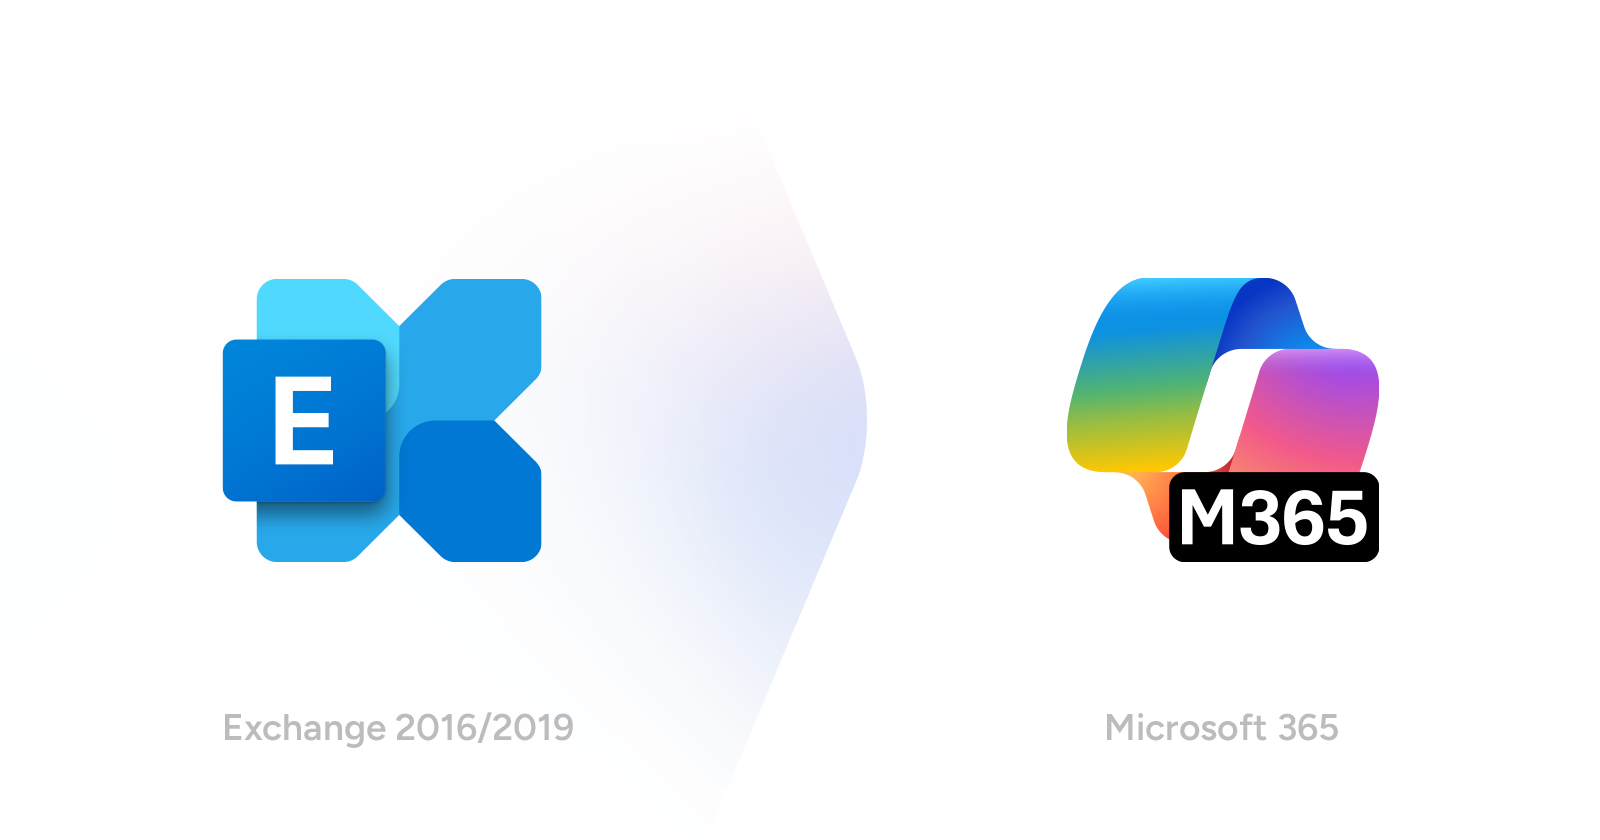
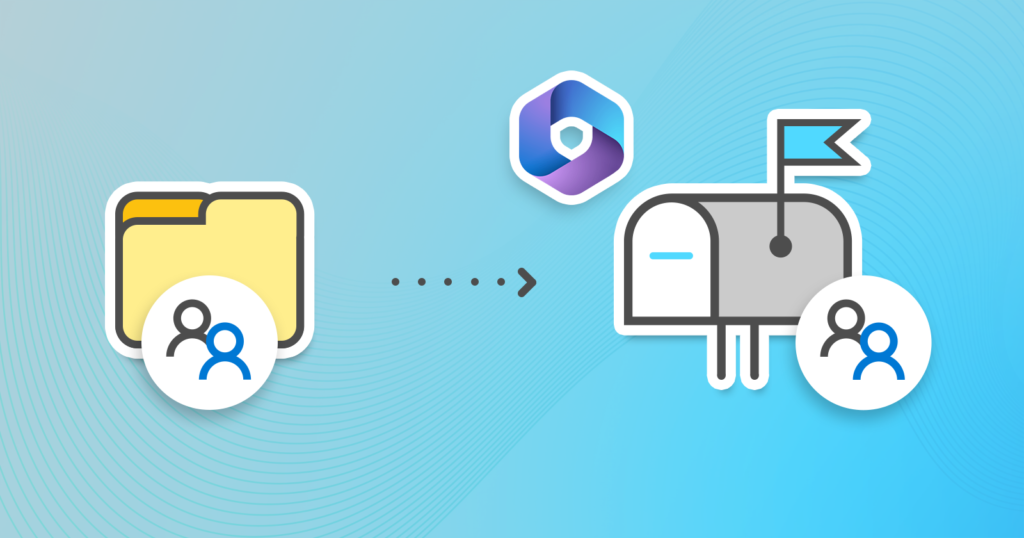
How to migrate mailboxes between Microsoft 365 (Office 365) tenants?
If you’re a DIY-admin and want to face absolutely everything (and not die), this article will surely help you. As they say, “Nothing ventured, nothing gained”.
Microsoft 365 migration tool licensing
Regardless of what your Microsoft 365 / Office 365 plan is, you need to buy licenses from Microsoft to run a cross-tenant migration natively. You’ll need as many Cross Tenant User Data Migration add-on licenses as the number of users you want to migrate.
But hold on! Do not add them to a cart just yet. First answer the following two questions:
- Is your organization on the Enterprise Agreement with Microsoft?
- Do you have at least 500 users/devices?
Learn more about Enterprise Agreement licensing
If at least one answer is negative, you’d better use the link provided a couple of paragraphs above, as you won’t be able to buy the add-on licenses.
If your organization meets the requirements and the you’re ready to accept the cost of ‘you need to contact your Microsoft account team for details’, you can proceed to buying the add-on licenses in the Microsoft 365 admin center (Billing > Purchase services) of your source tenant. If you can’t see the add-on, you might need to contact your Microsoft representative.
Once the licenses are there, you can assign them right away to your source tenant users to be migrated. You need to assign the licenses before you start the migration process.
Learn all about cross-tenant migration licensing from Microsoft
Cross-tenant migration prerequisites
Apart from the licenses, you’ll need the right set of admin permissions. Due to diversity of the preparations, it might be a good idea to have an account with the Global Administrator role.
If you don’t manage the target Microsoft 365 tenant, you will need to cooperate with the target tenant’s admins to, for example, get the tenant’s ID, create users, etc.
Preparations: Create and fill a CSV file with migration data
To make the process as easy as possible, it’s best to start by creating a CSV file and filling it with the necessary data. Thanks to that, you won’t have to make custom changes to each part of the scripts later on (yup, there will be quite a lot of scripting involved).
To create the CSV file, connect to your source Exchange Online as described here and run the following code:
$csvFileLocation = "c:\migration.csv" <# or any other location #>

$migrationCSV = {} | Select "SourceTenantId","SourceTenantDomain","MigrationSecurityGroup","UsersTxtFile","UsersXmlFile","TargetTenantId","TargetTenantDomain","MigrationAppId","MigrationAppSecret","TargetUsersCsvLocation","MigrationEndpointName","OrganizationRelationshipName","MigrationBatchName","LicensingGroupName" | Export-Csv -LiteralPath $csvFileLocation -NoTypeInformation
The script creates a csv file in C:\Migration.csv. You can freely change its location, but remember to reference the new location later on. To fill in the data, open the file in any text editor and add relevant values under the right headers.
By the way, you don’t have to use the CSV file, but it will make the process much easier for you.
I’ll explain what each header is for. When I mention “any name”, it really means that you can add any name, but it’s best practice to use names which are relevant to the migration process. You don’t want to frustrate other admins that could come across your “qwerty” endpoint or [email protected] security group in the Exchange admin center.
Here are the headers along with example values:
- SourceTenantId – your source tenant ID value, from the Microsoft Entra admin center. Here’s how to find it
- SourceTenantDomain – your source tenant’s onmicrosoft.com domain, for example
domain.onmicrosoft.com - MigrationSecurityGroup – name of the security group containing users to be migrated. Any name, for example:
UsersToMigrate - UsersTxtFile – location of a TXT file with your users’ aliases. One of the scripts provided later on will create this file, and this value points to the location where it will be created. For example:
$home\desktop\UsersToMigrate.txt - UsersXmlFile – location of an XML file with your users’ data. One of the scripts provided later on will create this file, and this value points to the location where it will be created, for example:
$home\desktop\UsersToMigrate.xml - TargetTenantId – your target tenant ID value, from the Microsoft Entra admin center. Here’s how to find it
- TargetTenantDomain – your target tenant’s onmicrosoft.com domain, for example
2nddomain.onmicrosoft.com - MigrationAppId – migration app ID, created in target tenant’s Microsoft Entra admin center. Here’s where to get it from
- MigrationAppSecret – app secret of the migration app I’ve just mentioned. Here’s where to get it from
- TargetUsersCsvLocation – location of a CSV file with target users’ email addresses, for example:
$home\desktop\MailUsersAddresses.csv - MigrationEndpointName – any name for your migration endpoint, for example:
2024-cross-tenant-migration - OrganizationRelationshipName – any name for your organization relationship, for example:
2024-acquisition - MigrationBatchName – any name for the migration batch, for example:
2024-migration-1 - LicensingGroupName – any name for the group on the target tenant that will be helpful for bulk licensing users, for example
licensing-group
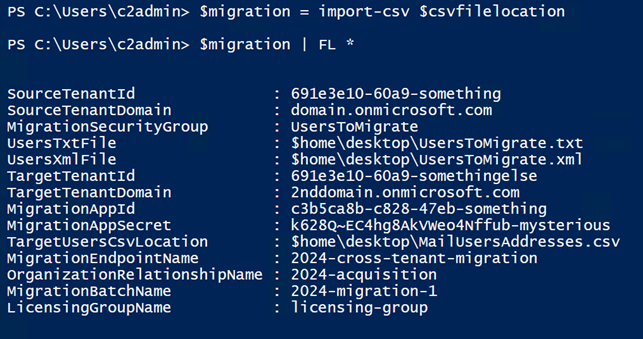
Once you fill in the migration CSV file, run the following code to test if everything works correctly:
$migration = Import-Csv $csvFileLocation

$migration | FL *
If the output looks like on the screenshot below, you’re ready to begin the migration process.
Important: Whenever you’re running any of the scripts from the article (in the source or the target environment), remember to first load the CSV file contents using:
$csvFileLocation = "c:\migration.csv" <# or another location #>
$migration = Import-Csv $csvFileLocation
Otherwise, the scripts won’t work and will throw error(s).
Do not disconnect the Exchange Online and do not close the console yet.
Find and copy source and target tenant IDs
- Sign in to the Microsoft Entra admin center.
- From the navigation menu, choose Overview and copy the value next to Tenant ID. Store it in your CSV file under SourceTenantId.
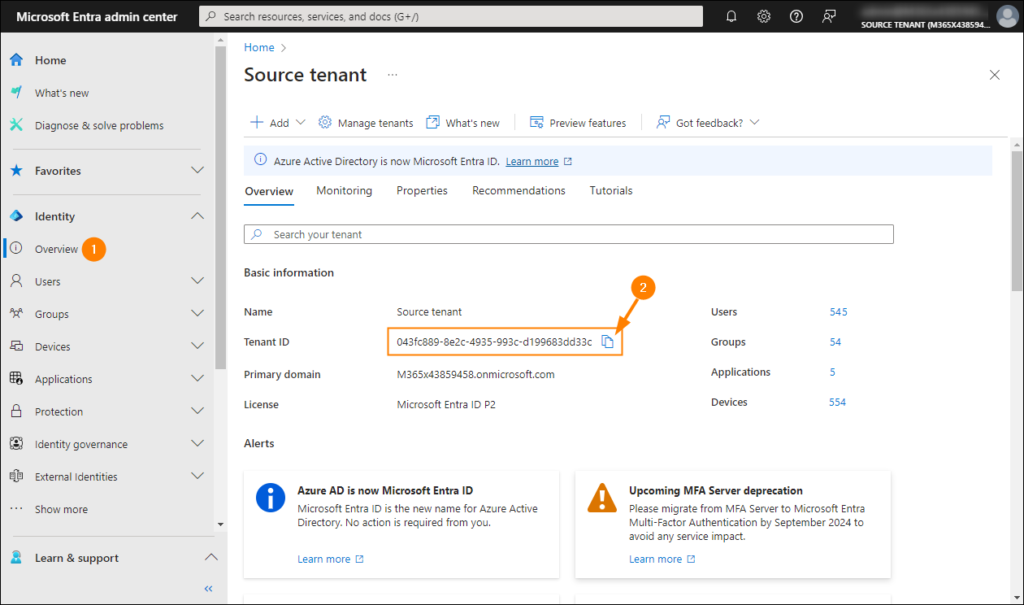
- Repeat the steps 1-2 in the target tenant – here, you might need to ask target tenant’s admin for help if you aren’t permitted to manage this tenant. Store the ID in your CSV file under TargetTenantId.
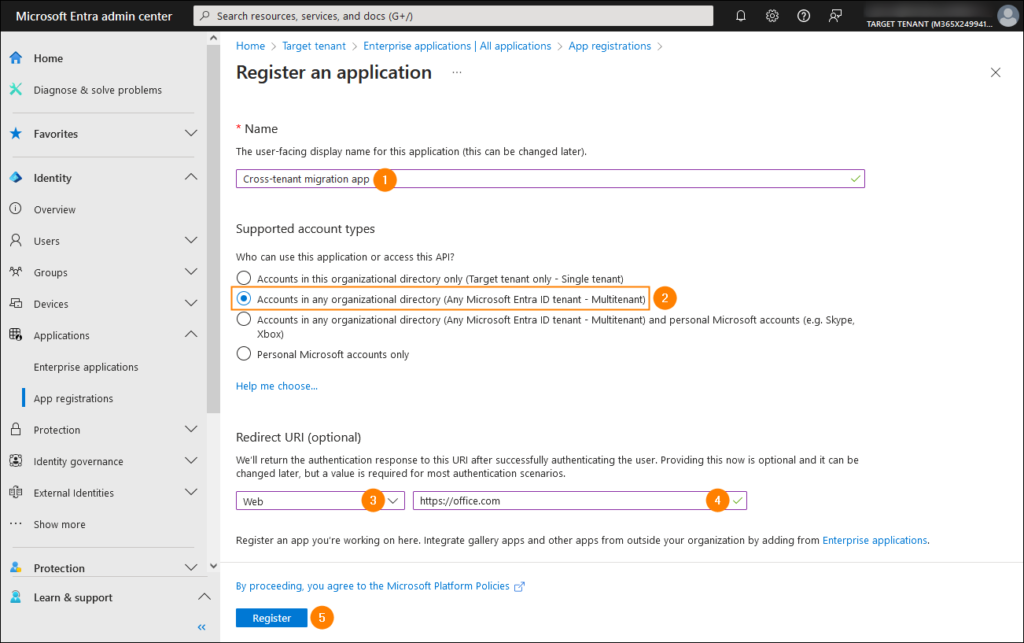
Create a migration application in the target tenant
- Staying in the target tenant’s Microsoft Entra admin center, access the App registrations page by going to Identity > Applications > App registrations. Click New registration.
- Register a new application by configuring these options:
- Name your application the way you want.
- Select Accounts in any organizational directory (Any Microsoft Entra directory – Multi-tenant) under Supported account types.
- In the Redirect URI section, choose Web from the dropdown, and paste the following address in the box on the right:
https://office.com
Click Register to finish.
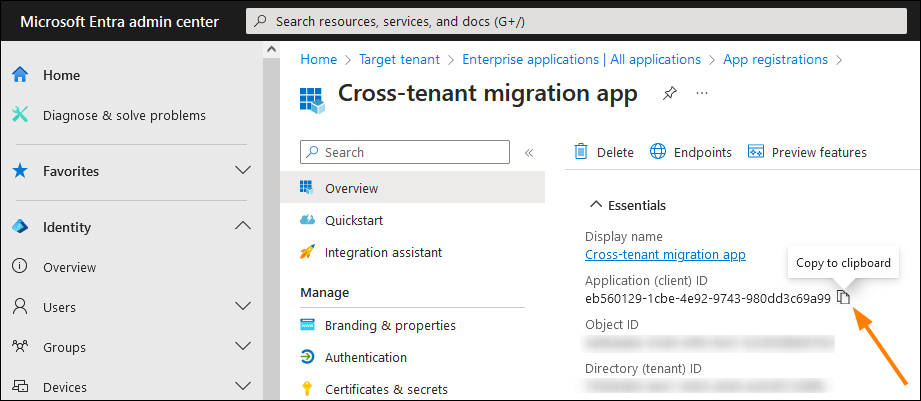
- As you land on the Overview page of your newly created app, copy the value under Application (client) ID. It is the value for MigrationAppId in your CSV file – be sure to paste it there.
- Go to API permissions. Once there, remove the default permission (User.Read), as you won’t need it.
- Click Add a permission.
- In the pane that opens, go to the APIs my organization uses tab and type Office 365 Exchange Online in the search box. Click the Office 365 Exchange Online result on the list.
- Click Application permissions.
- Expand the Mailbox item, select Mailbox.Migration, and click Add permissions.
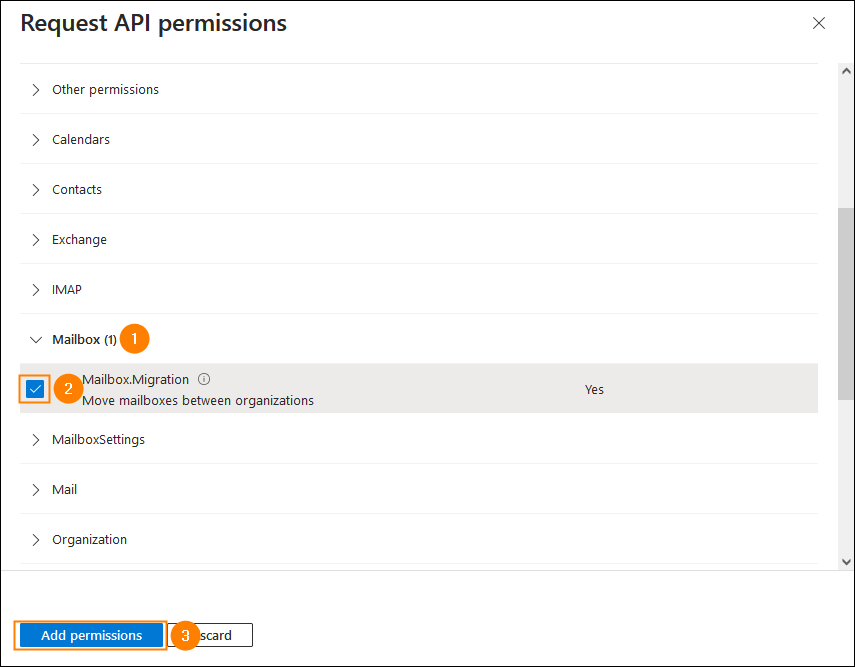
- When you land back on the API permissions settings page, click Grant admin consent for <target organization name> and grant the consent.
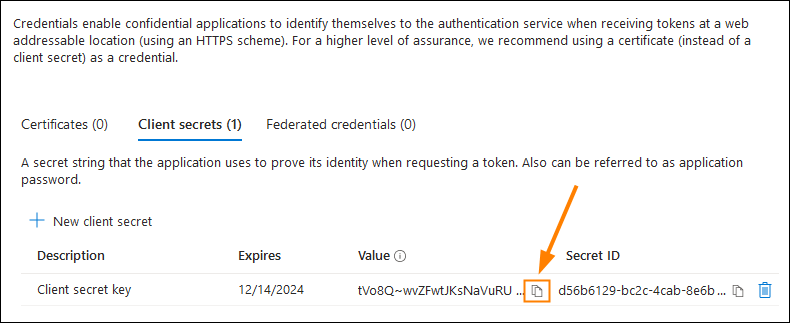
- Next, navigate to Certificates & secrets and click New client secret. In the pane that opens, add any description and click Add.
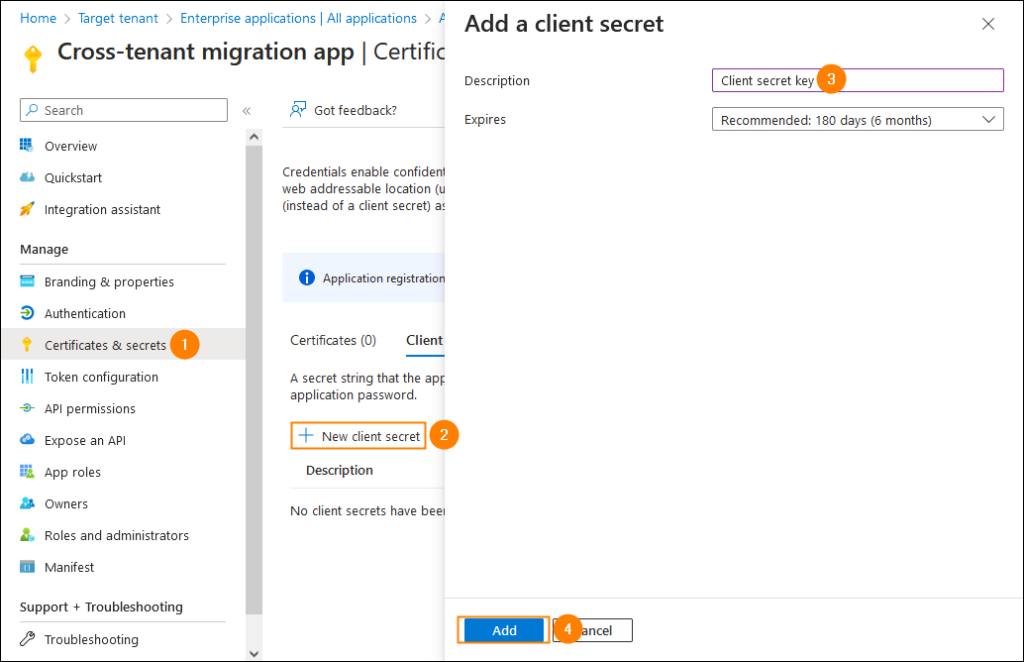
- Important: Copy the value in the Value column right after creating the secret key, as you won’t be able to see & copy it later on. Paste it in your CSV file under MigrationAppSecret.
Configure the source tenant: Part 1
Prepare a list of users you want to migrate
Next, you need to generate a list with all the users you want migrate along with a set of required parameters like ExchangeGuid or Legacy ExchangeDN. To do it, run the script shown below:
Get-Mailbox -RecipientTypeDetails UserMailbox,SharedMailbox | Select-Object -ExpandProperty Alias | Out-File $migration.UsersTxtFile

$mailboxes = Get-Content $migration.UsersTxtFile

$mailboxes | ForEach-Object {Get-Mailbox $_} | Select-Object PrimarySMTPAddress,Alias,SamAccountName,FirstName,LastName,DisplayName,Name,ExchangeGuid,ArchiveGuid,LegacyExchangeDn,EmailAddresses | Export-Clixml $migration.UsersXmlFile
Note:
- If you do not want to migrate shared mailboxes but just user mailboxes, remove
,SharedMailboxfrom the script above. - If you want to migrate just a subset of users, refer to Microsoft documentation for the
Get-Mailboxcmdlet for the available filtering options. Learn more - If you haven’t used archiving features & archive mailboxes in the source tenant, you can skip
ArchiveGuid.
Do not disconnect the Exchange Online yet. Proceed to the next section to run the script that creates a mail-enabled security group.
Create a mail-enabled security group
Now, you need to create a mail-enabled security group that covers all migrated users in the source.
- Run the following cmdlet to create a new mail-enabled security group:
New-DistributionGroup -Name $migration.MigrationSecurityGroup -Type "Security"- Next, run the following script to populate the group with users from the XML file (assuming you haven’t changed the location of the file):
$users = Import-Clixml -Path $migration.UsersXmlFile

Foreach ($user in $users) {Add-DistributionGroupMember -Identity $migration.MigrationSecurityGroup -Member $user.PrimarySmtpAddress}
Important: Do not close the console and disconnect from Exchange just yet, as there’re still some steps to complete in the source tenant.
Configure the target tenant: Part 1
Now, let’s move on to the target environment.
If you’re allowed to manage the target tenant, it might be a good idea to launch another Windows PowerShell console window, connect to the target environment as described here and run scripts designed for target tenant in it.
If you aren’t an admin in the target organization, complete the steps below in cooperation with a target tenant’s admin – preferably within the same time frame & being in touch at all times.
Important: Regardless of your approach, always remember to first load the CSV file you prepared:
$CsvFileLocation = "c:\migration.csv" <# or another location if you went creative while creating the CSV file #>

$migration = Import-Csv $CsvFileLocation
and keep the console open.
Create users (mail-enabled users)
Run the script shown below. The script assumes your XML file with users to migrate is still in the same location (Desktop).
If you need to delegate the task of creating users to a target organization’s admin, you also need to share the XML file with them, and ask them to copy it to the location you specified in the CSV file under UsersXmlFile.
The first script generates a random password for each mail user:
$symbols = '!@#$%^&*'.ToCharArray()

$characterList = @([char[]]([char]'a'..[char]'z'), [char[]]([char]'A'..[char]'Z'), [char[]]([char]'0'..[char]'9') + $symbols)

function GeneratePassword {

    param(

        [ValidateRange(12, 256)]

        [int]

        $length = 16

    )

    do {

        $password = -join (0..$length | ForEach-Object { $characterList | Get-Random })

        [int]$hasLowerChar = $password -cmatch '[a-z]'

        [int]$hasUpperChar = $password -cmatch '[A-Z]'

        [int]$hasDigit = $password -match '[0-9]'

        [int]$hasSymbol = $password.IndexOfAny($symbols) -ne -1

    }

    until (($hasLowerChar + $hasUpperChar + $hasDigit + $hasSymbol) -ge 4)

return $password | ConvertTo-SecureString -AsPlainText -Force

}
The second script creates mail-enabled users in the target tenant with all the necessary parameters. It might take some time to execute.
Note: if you skipped the ArchiveGuid property when creating a list of users you want to migrate, remove -ArchiveGuid $user.ArchiveGuid from the script below.
$users = Import-Clixml -Path $migration.UsersXmlFile

foreach ($user in $users) {

    $organization = "@"+$migration.TargetTenantDomain

    $userId = $user.Alias + $organization

    $password = GeneratePassword

    $x500 = "x500:" + $user.LegacyExchangeDn

    $tmpUser = New-MailUser -MicrosoftOnlineServicesID $userId -PrimarySmtpAddress $userId -ExternalEmailAddress $user.PrimarySmtpAddress -FirstName $user.FirstName -LastName $user.LastName -Name $user.Name -DisplayName $user.DisplayName -Alias $user.Alias -password $password

    $tmpUser | Set-MailUser -EmailAddresses @{add = $x500 } -ExchangeGuid $user.ExchangeGuid -ArchiveGuid $user.ArchiveGuid

    $tmpx500 = $user.EmailAddresses | Where-Object { $_ -match "x500" }

    $tmpx500 | ForEach-Object {Set-MailUser $user.Alias -EmailAddresses @{add = "$_" } }

}
Prepare and send an invitation link
The final step of this configuration phase in the target tenant is to customize and share a migration invitation link with the source tenant administrator.
Customize the following link:
https://login.microsoftonline.com/[source_tenant_initial_onmicrosoft_domain]/adminconsent?client_id=[application_id_of_the_app_you_just_created]&redirect_uri=https://office.com
by replacing:
- [source_tenant_initial_onmicrosoft_domain] with the initial onmicrosoft.com domain of the source tenant, for example
domain.onmicrosoft.com. Note: this value is stored in the CSV file with migration data (you prepared at the beginning) under SourceTenantDomain. - [application_id_of_the_app_you_just_created] with the ID of your migration application you copied here. Note: This one you can also find in the CSV file with migration data under MigrationAppId.
So, for example, the link can look like this:
https://login.microsoftonline.com/domain.onmicrosoft.com/adminconsent?client_id=c3b5ca8b-c828-47eb-aad2-43ad26d13b4b&redirect_uri=https://office.com
Next share/send the link.
If you’re also the source tenant admin, complete the steps in the next section.
Configure the source tenant: Part 2
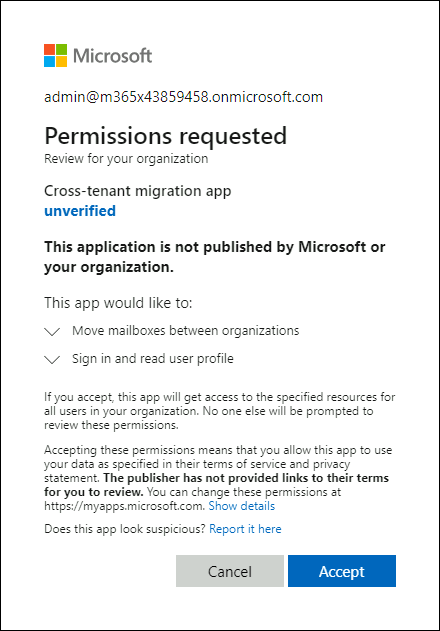
To accept the invitation:
- Paste the link in the browser and press Enter to navigate to it.
- Sign in with your source tenant global admin credentials and click Accept.
Configure the target tenant: Part 2
Prepare a CSV file with mail users’ email addresses
Run the following script to create a CSV file with mail-enabled users’ email addresses:
$targetusers = Get-MailUser | Select-Object -property @{Name= 'EmailAddress';Expression={$_.UserPrincipalName}} | Export-Csv -Path $migration.TargetUsersCsvLocation -NoTypeInformationCreate a migration endpoint
Run the following script to create a migration endpoint:
<# A dehydrated tenant is the one with standard Exchange Online configuration. To create a migration endpoint, the script must first enable your tenant customization. #>

$dehydrated = Get-OrganizationConfig | select isDehydrated

if ($dehydrated.isDehydrated -eq $true) {Enable-OrganizationCustomization}

$Credential = New-Object -TypeName System.Management.Automation.PSCredential -ArgumentList $migration.MigrationAppId, (ConvertTo-SecureString -String $migration.MigrationAppSecret -AsPlainText -Force)

New-MigrationEndpoint -RemoteServer outlook.office.com -RemoteTenant $migration.SourceTenantDomain -Credentials $Credential -ExchangeRemoteMove:$true -Name $migration.MigrationEndpointName -ApplicationId $migration.MigrationAppId
Establish an organization relationship from the target
Next, run this script to establish the relationship from the target organization:
$orgRels = Get-OrganizationRelationship

$existingOrgRel = $orgRels | ?{$_.DomainNames -like $migration.SourceTenantDomain}

If ($existingOrgRel) {Set-OrganizationRelationship $existingOrgRel.Name -Enabled:$true -MailboxMoveEnabled:$true -MailboxMoveCapability Inbound}

Else {New-OrganizationRelationship $migration.OrganizationRelationshipName -Enabled:$true -MailboxMoveEnabled:$true -MailboxMoveCapability Inbound -DomainNames $migration.SourceTenantId}
Configure the source tenant: Part 3
Establish an organization relationship from the source
Now, go back to the source tenant and run the following script to establish the relationship from the source organization:
$orgRels = Get-OrganizationRelationship

$existingOrgRel = $orgRels | ?{$_.DomainNames -like $migration. TargetTenantDomain}

If ($existingOrgRel) {Set-OrganizationRelationship $existingOrgRel.Name -Enabled:$true -MailboxMoveEnabled:$true -MailboxMoveCapability RemoteOutbound -OAuthApplicationId $migration.MigrationAppId -MailboxMovePublishedScopes $migration.MigrationSecurityGroup}

Else {New-OrganizationRelationship $migration.OrganizationRelationshipName -Enabled:$true -MailboxMoveEnabled:$true -MailboxMoveCapability RemoteOutbound -DomainNames $migration.TargetTenantId -OAuthApplicationId $appId -MailboxMovePublishedScopes $migration.MigrationSecurityGroup}
Run & maintain the migration process
Before starting the migration, you might want to test if your configuration is OK. To do it, run the following script in the target tenant:
Test-MigrationServerAvailability -EndPoint $migration.MigrationEndpointName -TestMailbox "[Primary SMTP address of a MailUser in target tenant]"replacing [Primary SMTP address of a MailUser in target tenant] with the primary SMTP address of any email-enabled user (MailUser) in the target tenant.
If no errors are reported, you can finally start the migration process by run the following script in the target tenant:
New-MigrationBatch -Name $migration.MigrationBatchName -SourceEndpoint $migration.MigrationEndpointName -CSVData ([System.IO.File]::ReadAllBytes($migration.TargetUsersCsvLocation)) -Autostart -TargetDeliveryDomain $migration.TargetTenantDomainTo check the status of the migration in progress, use the following command:
Get-MigrationBatch | fland check the information in the Status, State, and WorkflowStage lines.
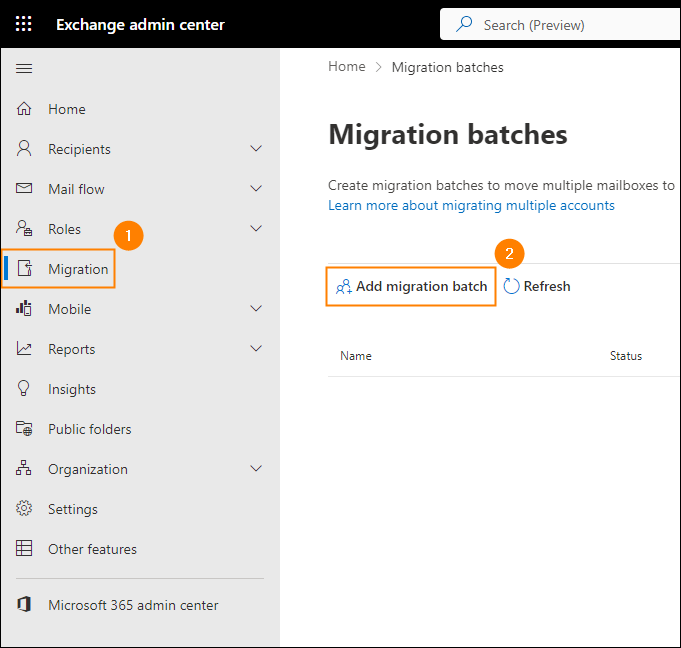
Tip: Alternatively, you can do use the Migration menu in the target tenant’s Exchange admin center to add a migration batch, and later start and control the migration process by using the GUI:
Post-migration clean-up
Once your mailboxes are migrated, there’re certain things you need to do to complete the migration.
Assign licenses
During the migration, mail users are converted into regular user mailboxes and shared mailboxes. To continue using those, you need to assign them Microsoft 365 (including Exchange Online) licenses within the 30-day grace period.
The best idea for bulk license assignment is to first create a mail-enabled security group in your target tenant and add all the migrated users to the group by executing the following cmdlets:
New-DistributionGroup -Name $migration.LicensingGroupName -Type "Security"

$members = Get-MailUser | Select-Object -ExpandProperty PrimarySmtpAddress

Foreach ($member in $members) {Add-DistributionGroupMember -Identity $migration.LicensingGroupName -Member $member}
Then sign in to the Microsoft 365 admin center, navigate to Billing > Licenses, and select the product(s) for which you want to assign the licenses. Next, go to the Groups tab, click Assign licenses, provide the name of the mail-enabled security group (and click it to choose it) and click Assign.
Note: Once the target mailboxes are licensed, remember to unassign licenses in the source tenant to minimize your organization’s costs.
Domains & DNS records
How you handle domains and DNS records depends on your scenario:
- If you’re just moving your users to a new organization & need a new domain, you need to:
- Assign target organization’s domain to the migrated users in the Microsoft 365 admin center – go to Users > Active users, select the migrated users, click Change domains above the list, choose the domain from the dropdown list, and click Save changes.
- Decommission the old tenant and the old domain if you no longer need them.
- If you need to preserve and transfer your old domain:
- Remove your domain from the old tenant in the Microsoft 365 admin center – go to Settings > Domains, select your domain and choose Remove domain. If necessary, unassign the domain from the users first.
- Add your old domain to the new (target) tenant by going to Settings > Domains > Add domain in the Microsoft 365 admin center. You might be required to update your DNS records with your domain registrar.
- Once the domain is added to your new tenant, assign it to the migrated users. To do it, in the Microsoft 365 admin center, go to Users > Active users, select the migrated users, click Change domains above the list, choose the domain from the dropdown list, and click Save changes.
Rebuild Outlook profiles
If your classic Outlook has problems connecting to the new Microsoft 365 tenant, you need to create a new Outlook profile for each migrated user in your target domain. You can do it by using GPO or Microsoft Intune.
Consider third-party migration tools
What a relief! That was a lot. If you panicked at some point or went straight to this last section hoping to find something considerably easier than what you’ve just faced, we’ve got good news for you. The third-party migration tools, like CodeTwo Office 365 Migration, make the process much easier and less time-consuming. Just look at the table below and compare all the benefits:
| Native migration method | CodeTwo Office 365 Migration | |
|---|---|---|
| Microsoft Licensing requirements | Enterprise Agreement & Microsoft 365 Enterprise plan, a minimum of 500 users | Any plan with Exchange Online, any number of users |
| Technical support during migration |  (FastTrack assistance) | |
| Support for archive mailboxes | (but auto-expanded archive mailboxes are not supported) | |
| Support for public folders |  | |
| Simple process | | |
| Automated target users licensing & creation | | |
| Setting mailbox priority for migration | Create separate migration batches, additional manual work & scripting | Done with just a few clicks |
| Filtering items to migrate | Limited | Advanced |
| Running migration in chosen time periods (Scheduler) | | |
| Delta migration (migrate additional items, added after the migration process started) | | (learn more) |
| Source mailboxes accessible after the migration | (converted to MailUser objects) | (you can use them until you change the DNS records) |
| Notifications | Basic | Advanced & configurable (learn more) |
| Reporting | Basic summary | Advanced & configurable (learn more) |
If you wish to have a look at how to run a tenant-to-tenant migration with CodeTwo Office 365 Migration, watch this video:
Click here to learn more about the trial version. If our tool meets your expectations, you will be able to easily resume your migration once you purchase the licensed version.
Recommended articles
Nice Post! Thanks for sharing with us!