
In the past few months, even the more conservative on-premises Exchange admins have at least considered migration to Office 365 (Microsoft 365). And, to be honest, they have (or would have) joined the majority. As the businesses operate in the cloud, companies more frequently look for the steps for a tenant-to-tenant migration. While those migrations have various grounds (mergers and acquisitions being the most common), they all have one thing in common – they require quite a lot of effort from IT teams.
In 2020, Microsoft introduced a native way to perform this type of move. However, it’s difficult to call this approach a convenient one – it requires a lot of manual configuration and running scripts in Exchange Online PowerShell. Moreover, the functionality is still in preview stage and is lacking some important features, e.g. the migration of public folders is currently not being supported. Microsoft still suggests using a third-party tool to accomplish this administration task. Having this in mind, I will show you how to easily migrate mailboxes between Office 365 tenants using CodeTwo Office 365 Migration.
The video below explains the Office 365 tenant to tenant migration process in general. The article below goes into more detail, showing a tenant-to-tenant migration guide.
Before migration
Before you start the migration, make sure you have prepared your source and target servers, downloaded and installed CodeTwo Office 365 Migration as well as purchased a license* for all users you need to migrate from one Office 365 tenant to another.
Note: If you are migrating public folders too, keep in mind that they consume 100 licenses of CodeTwo Office 365 Migration.
* If you want to test the software before purchasing it, you can try it out first – it’s free. The trial version works 30 days and you can use it to migrate up to 10 items per folder. However, if you prefer to migrate all items from a limited number of mailboxes, you can request a special license key from our Customer Success team. Once you decide to use the program in a full version, simply activate the trial version with the license key you have purchased and continue with the migration process – all program settings will remain unchanged.
Configure CodeTwo Office 365 Migration
Once the program is installed and licensed, you can start the configuration of all program settings. First, let’s connect the program to source and target servers.
Set up a connection to the source Office 365 tenant
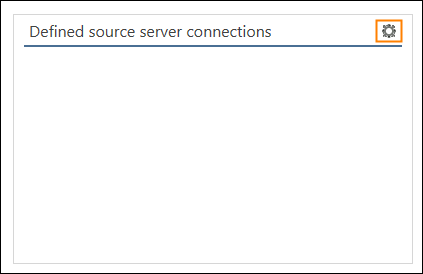
- Open the CodeTwo Office 365 Migration application. On the Dashboard tab, go to the Defined source server connections card, and click the gear icon.

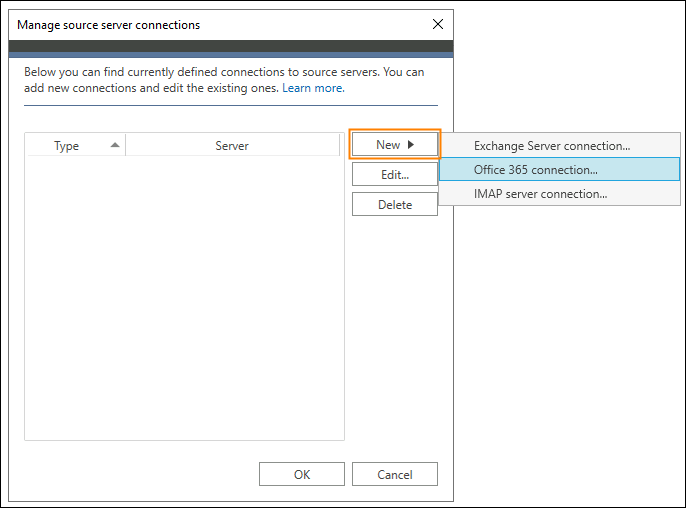
- In the Manage source server connections window, click the New button, and then Office 365 connection.

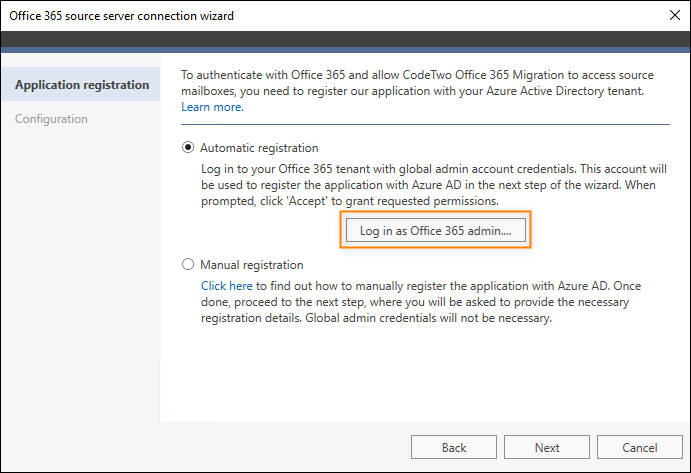
- The Office 365 source server connection wizard will pop up. On the Application registration tab, register CodeTwo Office 365 Migration in your tenant’s Microsoft Entra ID / Azure Active Directory (learn more) and click Next.

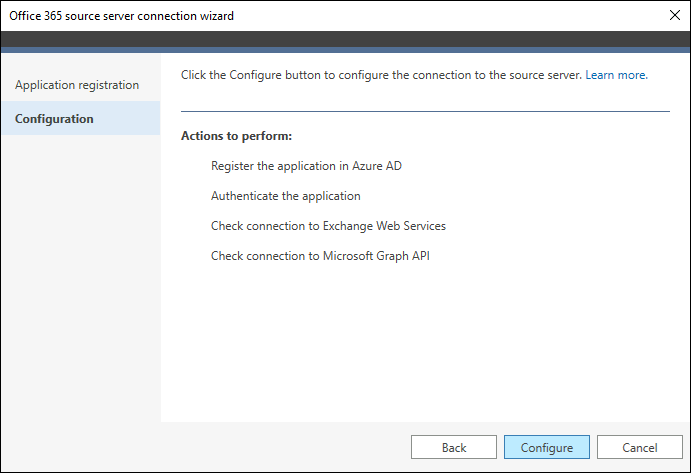
- To set up a connection with the source Office 365 server, click the Configure button.
- Once the source server connection is configured, click Finish.
Set up a connection to the target Office 365 tenant
To connect to the target Office 365 organization, follow the steps below:
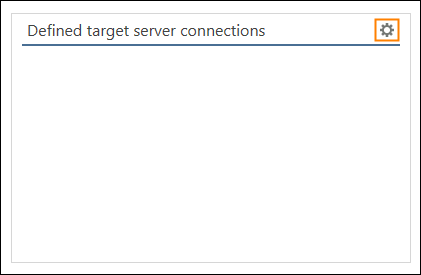
- On the Dashboard tab, go to the Defined target server connections card and click the gear icon.

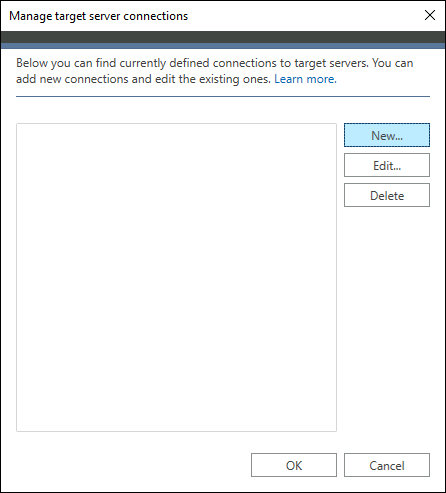
- In the Manage target server connections window, click the New button.

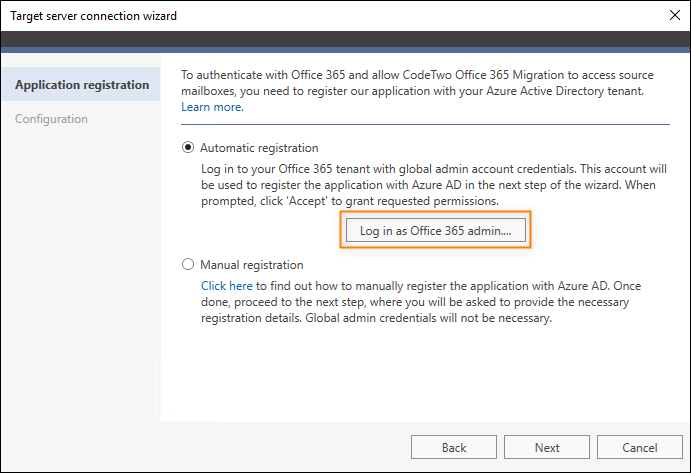
- On the Application registration tab of the Target server connection wizard, register the application in your tenant’s Microsoft Entra ID / Azure Active Directory (learn more). Once done, click Next.
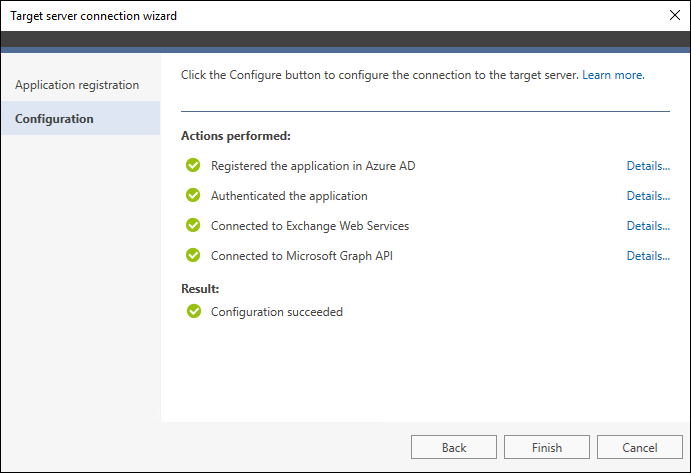
- Then, click Configure to set up the server connection to the target Office 365 tenant. Once it is complete, click Finish.
Configure a migration job
Now as the application is connected to both source and target Office 365 organizations, you can start the migration process. For this purpose, you need to create a migration job:
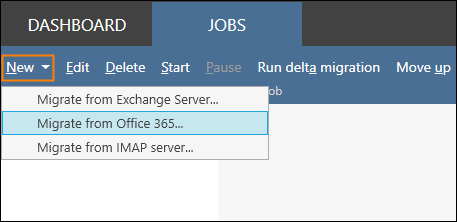
- On the Jobs tab, click the New button and select Migrate from Office 365.

- The Create Office 365 migration job wizard will open. On the General tab, provide the name for your migration job. Click Next.
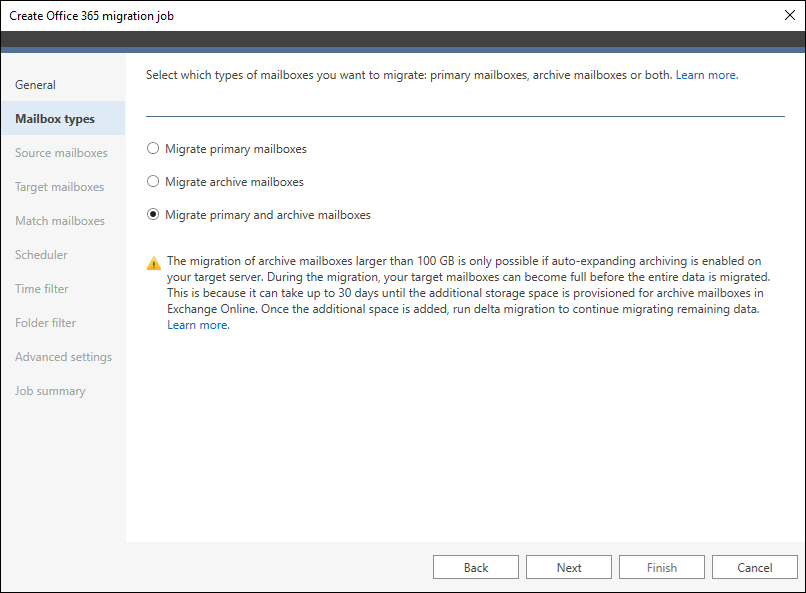
- Using the Mailbox types tab, decide which types of mailboxes you want to migrate. If your organization uses archive mailboxes, you might want to migrate them as well. To transfer both primary and archive mailboxes, choose the last option.
Note: Migrating both mailbox types for 1 user consumes 1 license only. Archive mailboxes do not require separate licenses.
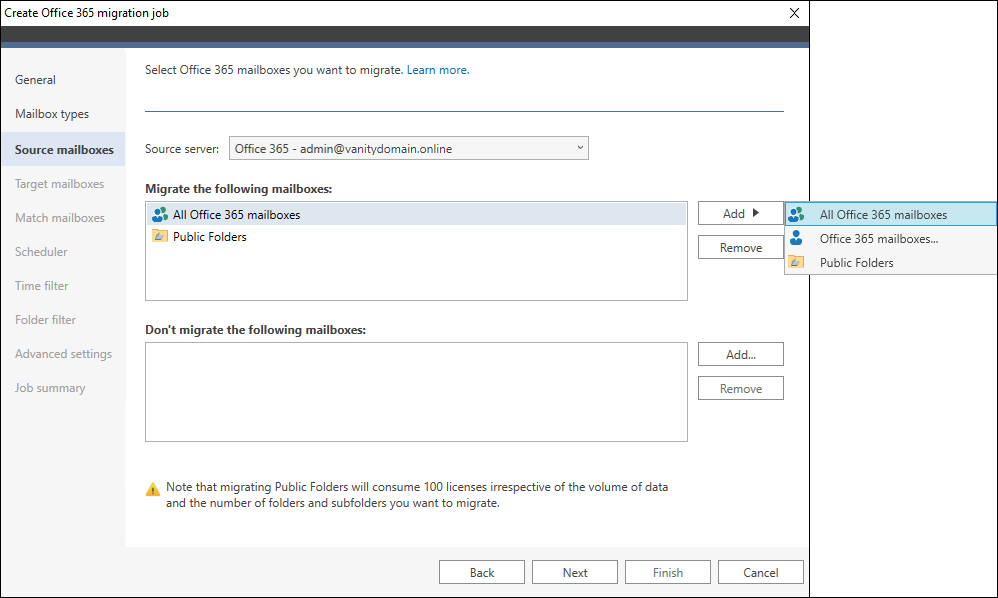
- On the Source mailboxes tab, add mailboxes you want to migrate within this migration job. To add users, click the Add button and to delete them use the Remove button. Here you can also manage the already set-up source Office 365 tenant connection. Click Next.
Note: To migrate public folders to another Office 365 tenant, the application always consumes 100 licenses of CodeTwo Office 365 Migration (irrespective of public folders volume and number of folders and subfolders). Make sure you have enough licenses beforehand.
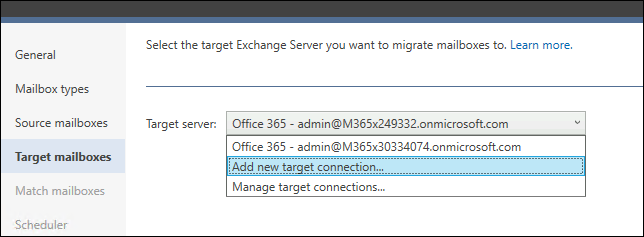
- On the Target mailboxes tab, the target Office 365 tenant connection should be already set up (I’ve covered this at the very beginning of this instruction). If you want to change the target server connection to point to another Office 365 tenant, click the arrow in the Target server section and from the drop-down menu select Add new target connection.

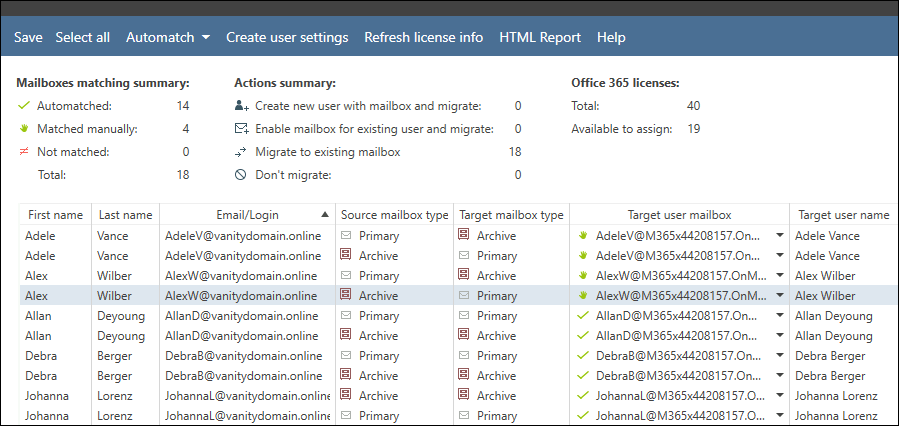
- On the Match mailboxes tab, click the Match mailboxes button to open a new window where you can pair source and target Office 365 mailboxes. You can run the Automatch option or match mailboxes manually (learn more) – the latter option might be useful if you need more customization, e.g. you want to match a source primary mailbox with an archive mailbox in the target. Click the Save button when you have finished and close the window.

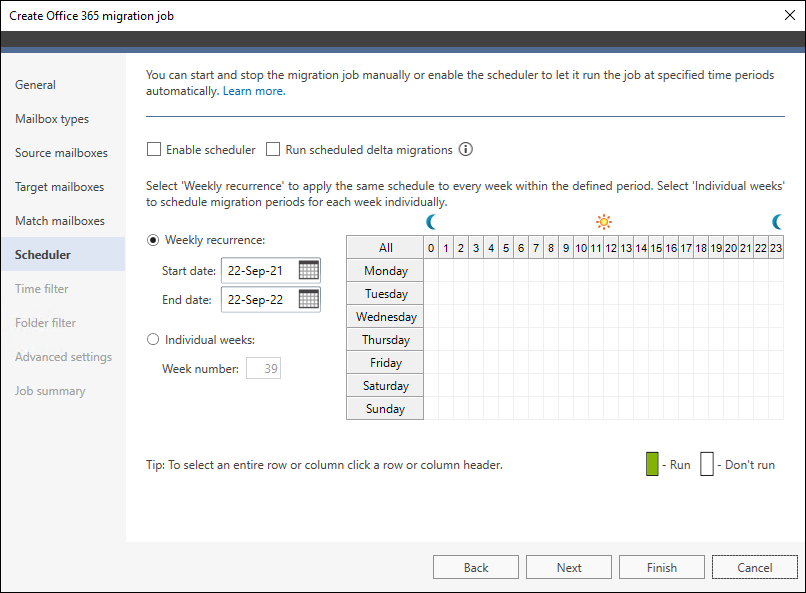
- On the Scheduler tab, you can specify activity periods of a migration job. Once the scheduler is enabled, it is also possible to set up automated delta migrations. I will leave the scheduler disabled to run migration manually later on. Click Next.

- If you want to narrow down the scope of migrated items, you can filter them by age in the Time filter. Click Next.
- On the Folder filter tab, specify which folders you want to migrate. Click Next.
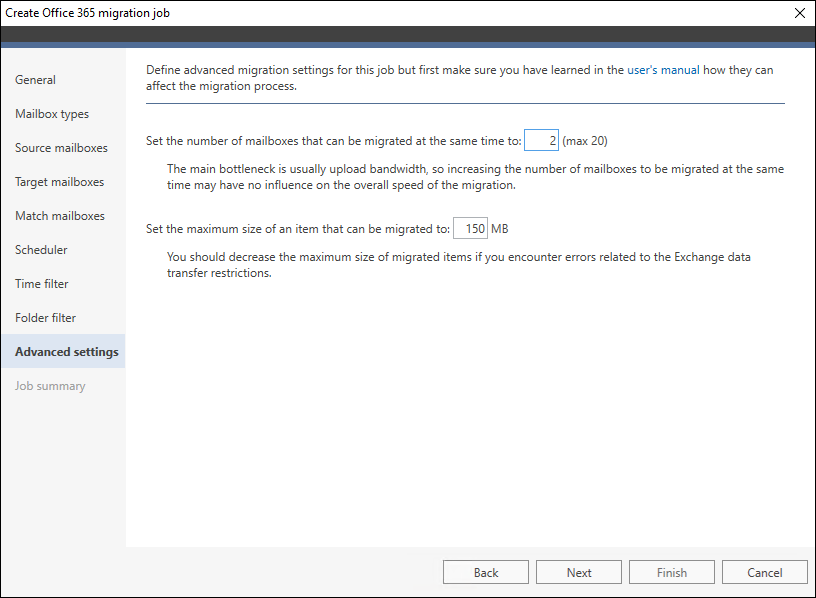
- The Advanced settings tab lets you set the number of mailboxes you want to migrate at the same time as well as the maximum size of migrated items. Click Next.

- On the Job summary tab, check whether all settings are correct. If yes, click Finish.
Migrate mailboxes between Office 365 organizations
Various migration paths
As you can see above, CodeTwo Office 365 Migration has a lot of different setup options. This lets you configure it to meet your requirements perfectly. Before showing how the migration job goes, let me list some of the most popular ways to use it:
- Quick migration. If you’re in a hurry and want to let your users switch to the new environment right away, you can do that easily. For example, use the Time filter to migrate only the newest items, switch to the new environment and then migrate older items. This way, you can make the switch over the weekend, regardless of how large the organization is.
- Traditional migration. Instead of staging the move, you can set up the software to migrate everything and make the organizational switch after the target environment is completely ready. Delta migration feature lets you migrate the items that pile up since the beginning of migration process.
- Forced cleanup. In some cases, source environments contain gigabytes of items that are better left behind. Migration is a perfect moment to get rid of unnecessary luggage. Many companies use filters and cooperate with end-users to start fresh in the new tenant. This might be the most time-consuming scenario, but it results in having a good, clean working environment after the migration is over.
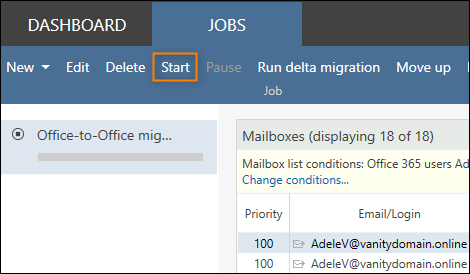
Start the migration job
To start migration between Office 365 tenants, go to the Jobs tab. On the left pane, there is a list of migration jobs you have created – at this moment there is just one migration job.
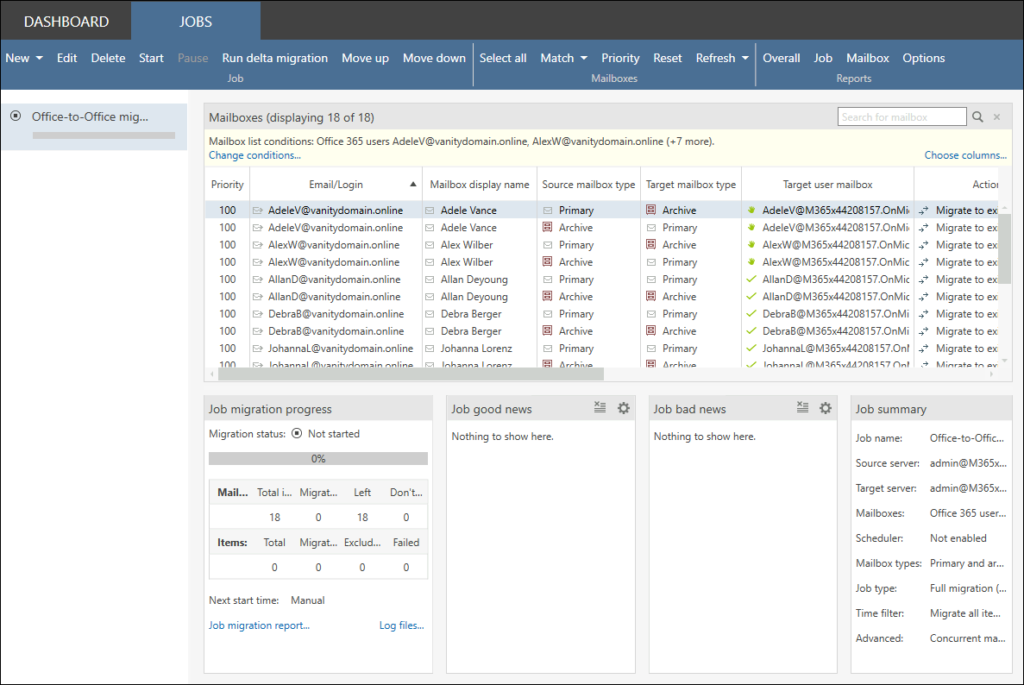
Click your job name and then click the Start button in the top menu. The migration job will start right away.
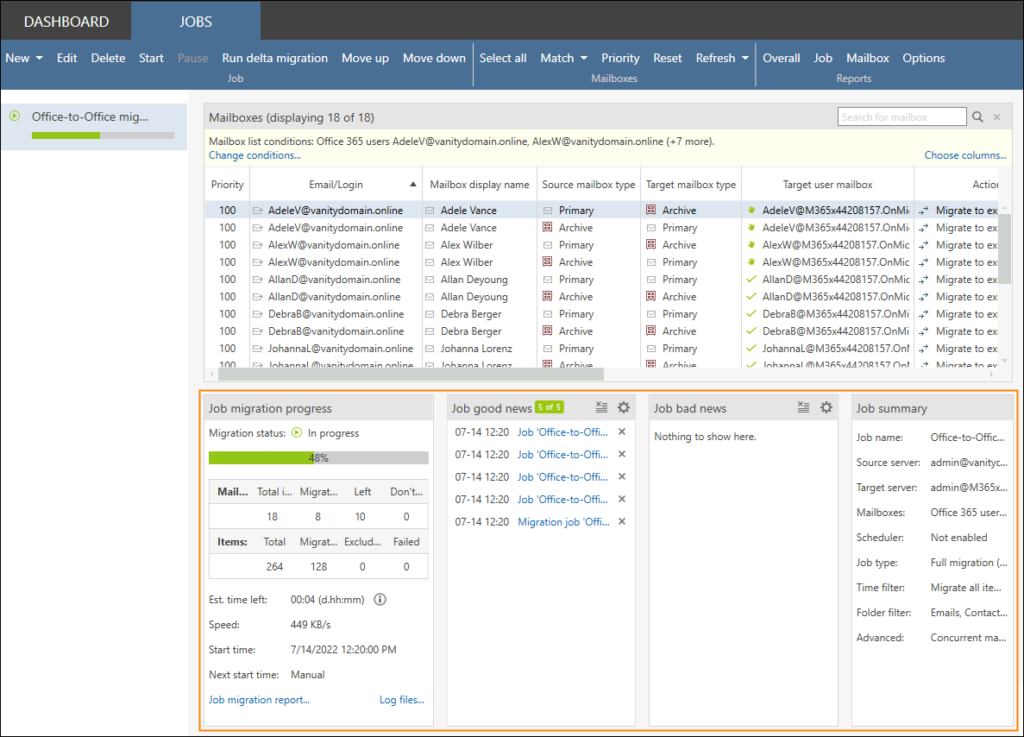
Monitor the migration
CodeTwo Office 365 Migration allows you to monitor the migration process from the very beginning to the end – separately for each migration job. The program reports its operations on mailboxes in real time. All statistics are displayed on the Jobs tab for currently selected migration job.
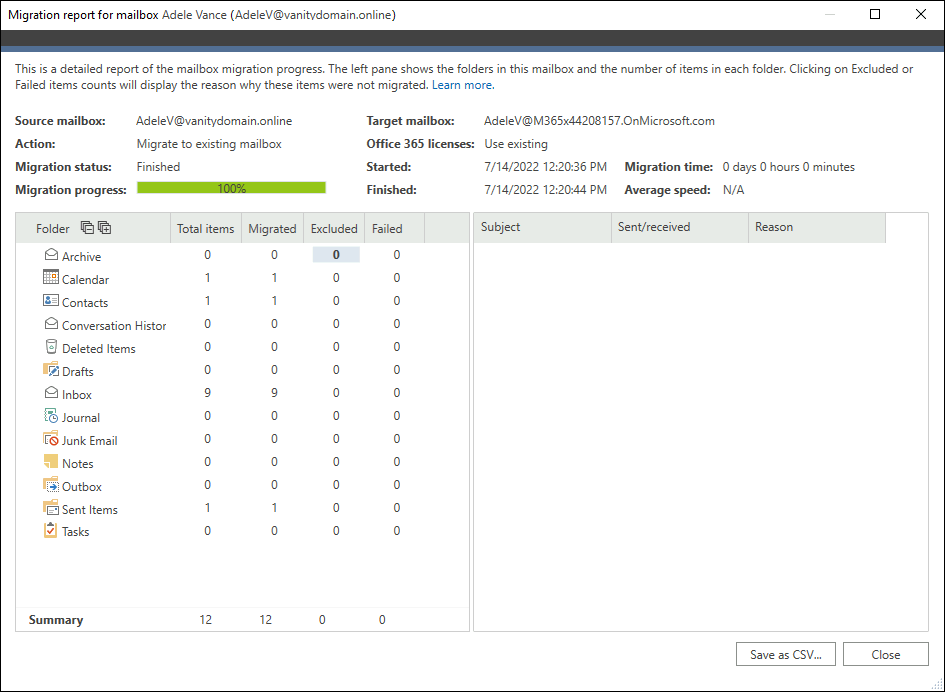
View migration reports
To view more detailed reports from the mailbox migration, go to the Reports section in the top menu of the program’s Jobs tab. There you can open Overall, Job and Mailbox reports. Here is an example of a Mailbox report:
Run delta migration
No matter what your exact setup is, there’s always some time between the initial migration and the final transition. During this time, there are always some new items bound to appear on the source server. That’s where the delta migration comes into play:
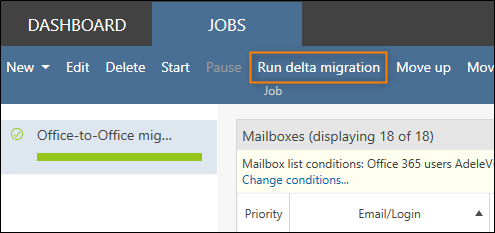
This option allows you to safely run the migration process again to move only new emails to the target Office 365 tenant. No duplicates will be created as the application while rescanning mailboxes, searches only for new items. You can view migration reports to see whether new items were moved as well.
That’s it. Now the content of all source Office 365 mailboxes selected for migration is copied to mailboxes on a different Office 365 tenant. The source mailboxes remain untouched during the process so users can work without any interruption. In this example, I used just one migration job but the program allows to create numerous migration jobs depending on the individual company requirements – so this is where you can suit the program to your needs.
Suggested reading:
Recommended articles

Hi, Thanks for sharing us valuable solution on this.
Do you migrate only the Exchange mailboxes, not the SharePoint sites and Teams? Don’t see any mentioning of it on your website.
Also, what counts as a mailbox, every email address in use or active users?
CodeTwo Office 365 Migration currently supports moving Exchange mailboxes and public folders, but doesn’t allow to migrate SharePoint and Teams data.
There are different kinds of mailboxes – user mailboxes, shared mailboxes and so on. In this article, you can learn more about all the supported data.
If you have any questions or doubts, our Customer Success team is available 24/7 and will be more than happy to assist.