Additional migration options for mailboxes
The program offers some additional migration settings for individual mailboxes. To access them, open the JOBS tab and select a migration job from the menu on the left. Choose any mailbox from the list (Fig. 1.) and right-click it to see the available migration options.
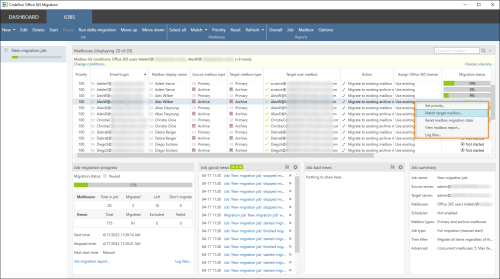
Fig. 1. Accessing the shortcut menu.
Use the links below to read about each option.
- Set priority of the migrated mailbox/public folders
- Match target mailbox
- Reset mailbox migration state
- View mailbox report
Set priority
This option lets you decide about the order according to which the mailboxes will be migrated. The migration priority pattern starts with 1, which means that the mailbox(es) marked with 1 will be the first to be migrated. Furthermore, if you leave 1 as the default priority for all listed mailboxes, they will be migrated in alphabetical order. Note that once the priority is set, it will be visible in the first column from the left on the Mailboxes list.
To set the mailbox migration priority, either double-click any cell in the Priority column and enter a number (Fig. 2.) or select one or more mailboxes, right-click any highlighted row and choose the appropriate option from the shortcut menu.
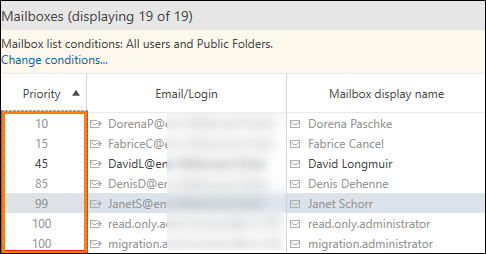
Fig. 2. Changing the priority of a mailbox.
Match target mailbox
The Match target mailbox option in the shortcut menu lets you match selected source mailboxes e.g. with different target mailboxes. Once you select this option, the Match mailboxes window will open (Fig. 3.).
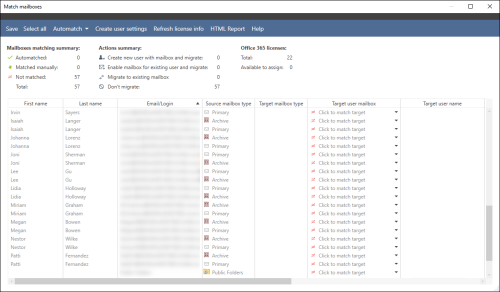
Fig. 3. The Match mailboxes window.
Tip
Even if you perform a migration by using a CSV file containing matched source and target mailboxes, you can still use this option – target mailboxes specified in the file will be overwritten by mailboxes you set in the program.
If you want to start the migration from scratch between the same pair of mailboxes, use the Reset mailbox migration state option. If you want to migrate only new items (that appeared after the migration process was completed), click the Run delta migration button.
Reset mailbox migration state
CodeTwo Office 365 Migration stores information about the items that are being migrated between the source and target mailboxes in its cache. This solution allows the program to check the migration state each time the migration job is restarted and omit items that have already been migrated. Read more about the delta migration process
However, if you want the program to migrate all the data from the source mailbox to the target one anew, you need to use the Reset mailbox migration state option. This will delete the state of previously performed migration for the selected mailboxes, allowing you to restart the migration as if it never took place. This option is especially useful in case you need to migrate items that were modified on the source server or deleted from the target server after the initial migration.
To reset the state of migration of a particular mailbox, first go to the Jobs tab and select the appropriate migration job on the left side of the window. Next, select the pair or pairs of mailboxes in the Mailboxes list (you can select multiple rows by using the Ctrl and Shift buttons or press Ctrl+A to choose all rows), and click Reset on the top menu bar (Fig. 4.).
Important
Before you restart the migration, besides resetting the migration state in the program, you also have to manually remove all the previously migrated items from the mailbox(es) on your target server to avoid creating duplicates.
It is not possible to reset the migration information for selected items only (like emails or tasks). However, if you want to re-migrate only particular items without purging your target server of the already-migrated data, make sure to apply appropriate time or folder filters in your migration job after resetting the mailbox migration state.
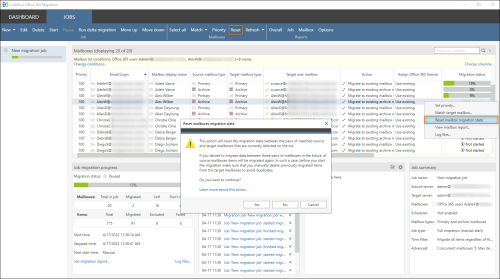
Fig. 4. Resetting the mailbox migration state.
View mailbox report
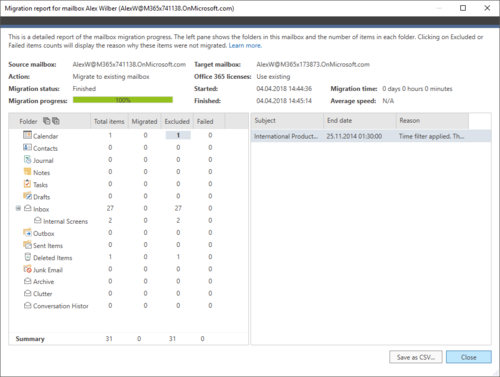
By choosing this option, you will generate a detailed report on the mailbox migration process (Fig. 5.). A mailbox report window provides detailed information on all items included in the migration. All counted items are split into four categories:
- Migrated – items migrated successfully,
- Excluded – source items excluded from the migration (customized both in the Folder filter and Time filter option),
- Failed – all items that the program attempted to migrate but eventually skipped because of errors,
- Total items – a summary of all three categories above.
In this article
