



IMAP migration sources
IMAP is short for Internet Message Access Protocol.
Here’s an example list of possible source servers that allow for migration via IMAP:
- Google Workspace (G Suite)
- HCL Notes (IBM Notes, Domino)
- Kerio Connect
- Zimbra
- Zarafa
It is also possible to perform IMAP migration from other sources like, for example, hosted Exchange, but for hosted Exchange there is a better protocol to go with – EWS. The catch there, however, is that you need to get full access admin rights to your Exchange, and this can be limited by some hosts.
Limitations of IMAP migration
When performing this kind of migration, it is good to be aware of possible roadblocks that can appear along the way:
- The only supported mailbox item for migration is email. Contacts, calendar entries or tasks won’t be transferred.
- Maximum supported email size is 35 MB.
- Limit of 500 000 items per mailbox. If the item count exceeds this number, oldest emails won’t be migrated.
- Archiving policies and messaging records management (MRM) are not supported. To avoid problems, Microsoft recommends disabling all policies before migration.
Before the migration starts
One of the universal truths about migration is that much of the work is preparation. Before you start your migration project, you need to first:
- Pick a Microsoft 365 plan that suits your needs, and create a new Microsoft 365 tenant.
- Find out what the FQDN of your source server is.
- Prepare a CSV file which lists email addresses, usernames and passwords for mailboxes you are about to migrate. You will need this file to create a migration batch later on. It’s a good practice to reset users’ passwords for this purpose, instead of asking them for their personal passwords.
The CSV file should include the following headers: EmailAddress, UserName, Password. - An important step, yet often overlooked, is communication. Migration from an IMAP source to Microsoft 365 is not only about changing your email hosting service. It’s also about changing one of basic tools people in your company use every day. Think about how this change can affect users and let them know what to expect.
- (Optional) Migration is always a good moment for some cleaning-up. If you advise users to delete unnecessary items, not only will you speed up the migration process, but also declutter mailboxes.
IMAP migration guide
To perform the IMAP migration, follow the steps below:
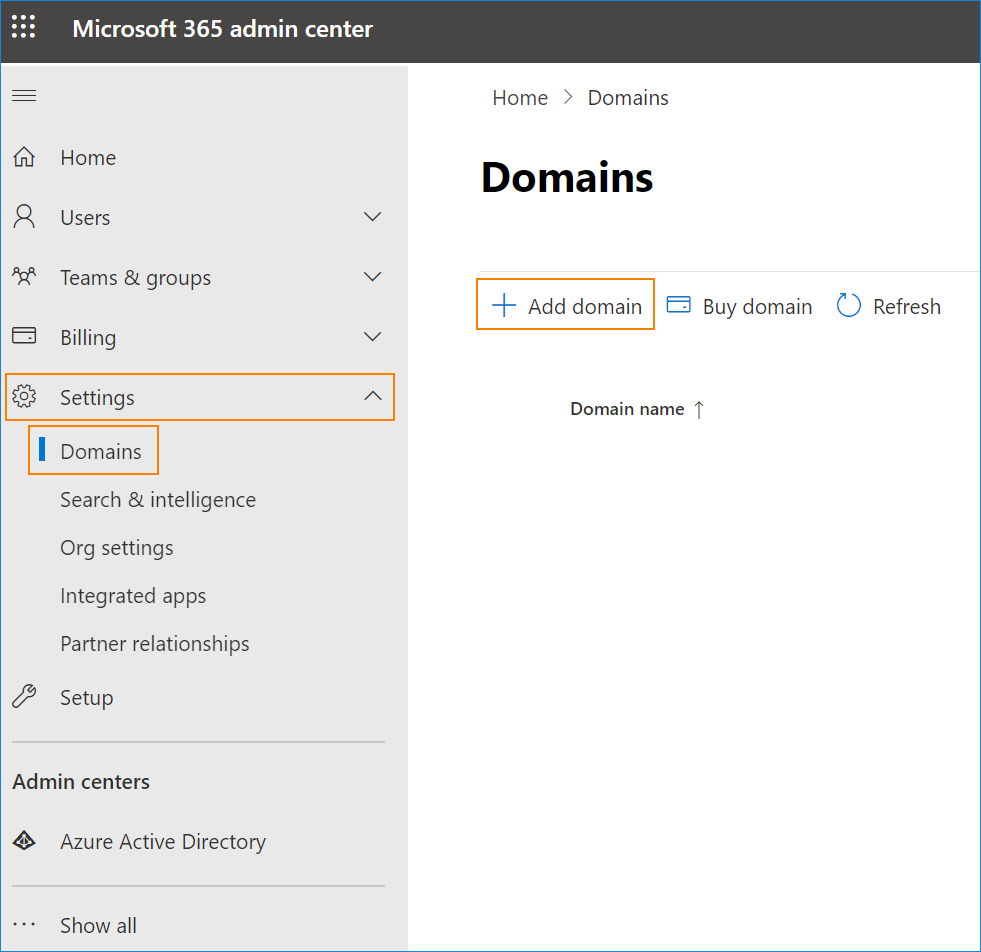
- First, add your custom domain to Microsoft 365. To do that, go to Microsoft 365 admin center > Settings > Domains and click Add domain. It’s best to add the domain at this point, so that all newly created users have this domain in their primary email address.
- In your Microsoft 365 tenant, create all mailboxes (users) to match the mailboxes on your source IMAP server. This article shows possible ways to do that.
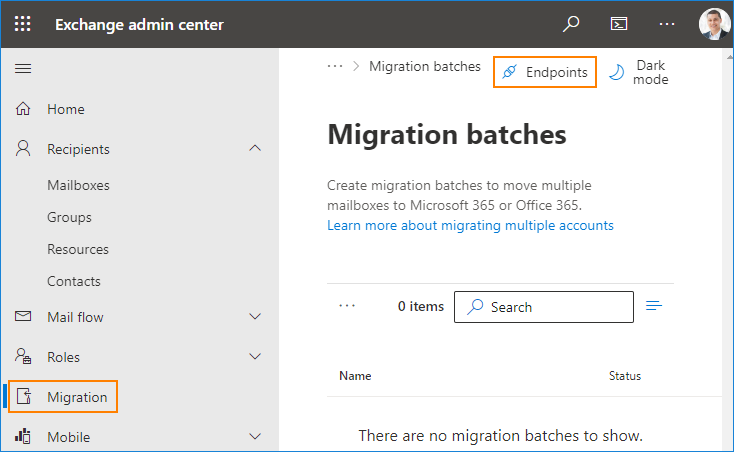
- In the Exchange admin center, go to Migration and click Endpoints.
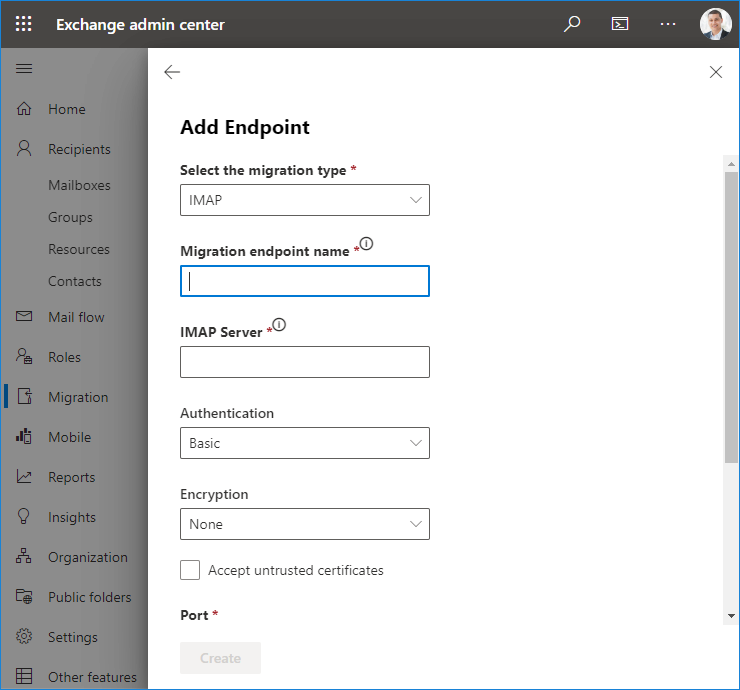
- To add your IMAP migration endpoint, in the Select the migration type field, choose IMAP. In the next filed, provide your migration endpoint name, and in IMAP Server, insert the source server’s FQDN. After you fill in all required fields, click Create.
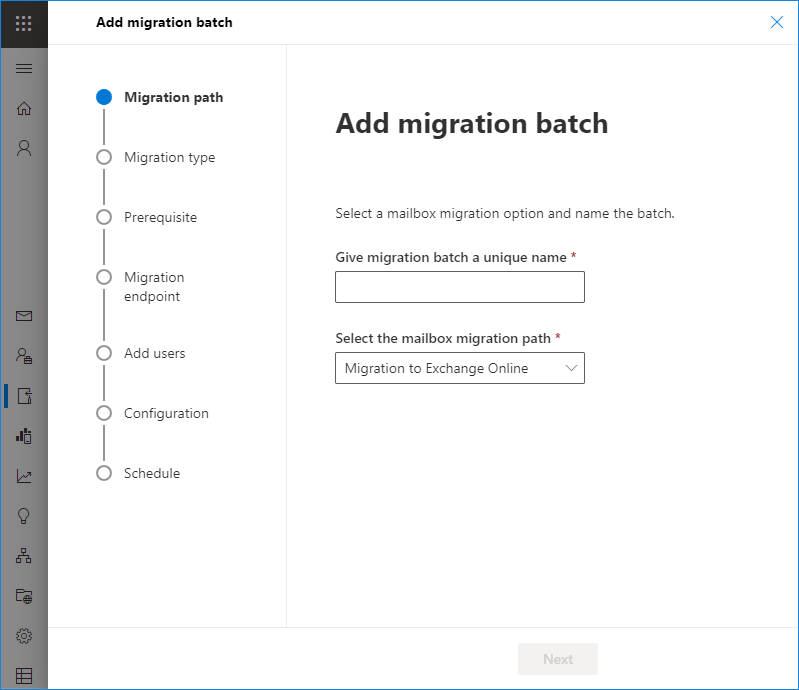
- After creating the endpoint, back in Migration batches, click Add migration batch.
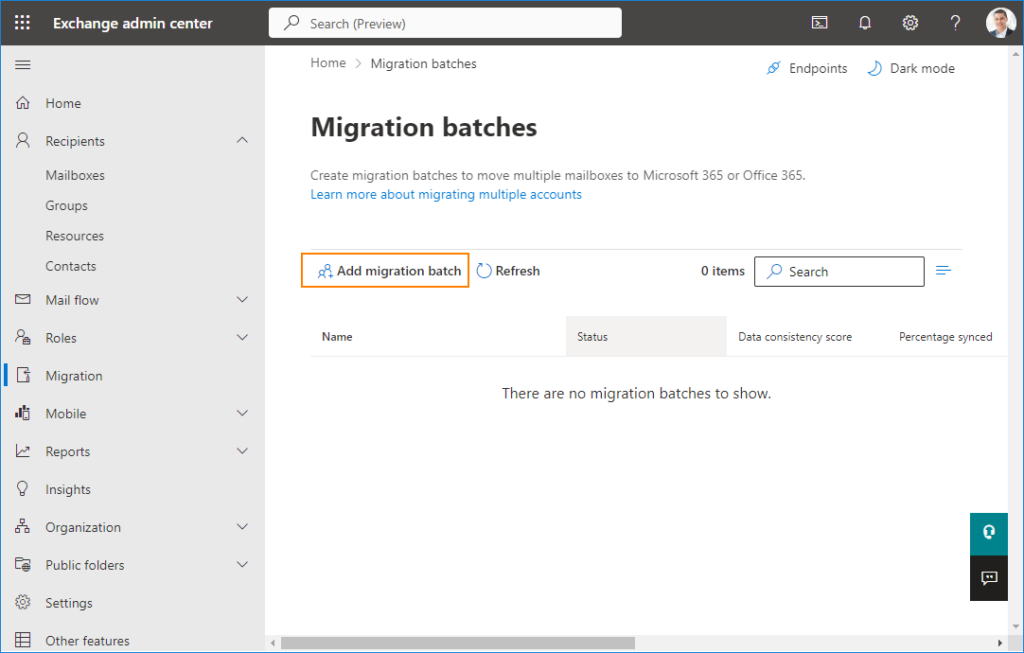
- A migration batch is a collection of users that will get migrated in one go. Follow the simple wizard to configure the batch. You will need to choose IMAP as the migration type, add an endpoint created in step 4, and upload the CSV file with listed users (mentioned in Before the migration starts).
After IMAP migration
There are some additional steps to follow after the IMAP migration is complete:
- Since IMAP to Office 365 migration supports only emails, you can advise your users to manually recreate other mailbox items, like contacts, tasks and calendar items.
- One of the crucial steps is verifying if all necessary items were migrated successfully.
- Finally, after all steps are done, you need to change DNS records to point to Office 365 (instead of your source server).
Ease your migration with CodeTwo
While IMAP migration is a built-in option, you can significantly ease the process with the use of CodeTwo migration tool.
CodeTwo Office 365 Migration gives you the following benefits:
- Automatic creation of target mailboxes and assigning licenses.
- Set up & forget deployment. Follow an easy wizard to configure the migration process and let it run in the background.
- Advanced options. Use time & folder filters to, for example, migrate only the newest items, or exclude items you won’t need in the new environment.
- Scheduler option to run migration only during certain periods, making the process invisible to end-users.
- Automated reports and notifications that let you know what’s going on with your IMAP migration.
- Delta migration that lets you move emails, which appeared after the initial migration was finished, lowering the risk of missing items.
- Free 30-day trial to see how the tool works.
- 24/7 support.
See the detailed migration plan from IMAP to Microsoft 365 with CodeTwo

Recommended articles

CodeTwo sp. z o.o. sp. k. is a controller of your personal data.
See our Privacy Policy to learn more.