How to prevent Outlook for Windows from adding native signatures
Problem:
You are managing email signatures centrally in your organization by using dedicated signature software (such as CodeTwo Email Signatures 365 or CodeTwo Email Signatures On-prem). You would like to disable native/personal signatures added in Outlook for Windows to avoid the problem of duplicated signatures in your users’ emails.
Solution:
To turn off Outlook for Windows native signatures centrally, you can use one of the modern Web Add-in’s advanced options (CodeTwo Email Signatures 365 only), a Group Policy Object (GPO) or Microsoft Intune. Click the links below to learn more.
- Disabling native Outlook signatures with the modern Web Add-in
- Disabling native Outlook signatures with GPO
- Centrally disabling signatures in Outlook for Windows with Intune
The solutions outlined below work only for the classic Outlook for Windows. If you look for a solution to centrally disable native email signatures in different Outlook versions (e.g., the new Outlook for Windows, Outlook for Mac), see this section.
Using Web Add-in to disable native Outlook signatures
If you use CodeTwo Email Signatures 365 together with our Outlook Web Add-in, you can centrally disable native Outlook signatures for all your users for whom the add-in was deployed. It’s possible for both the users who get Outlook (client-side) signatures in Outlook and who use the add-in to preview cloud (server-side) signatures in Outlook. To achieve this, sign in to CodeTwo Admin Panel and access the Web Add-in’s settings page, as described here. Turn on Always disable default (native) Outlook signatures for all users with the CodeTwo add-in under advanced settings (Fig. 1.).
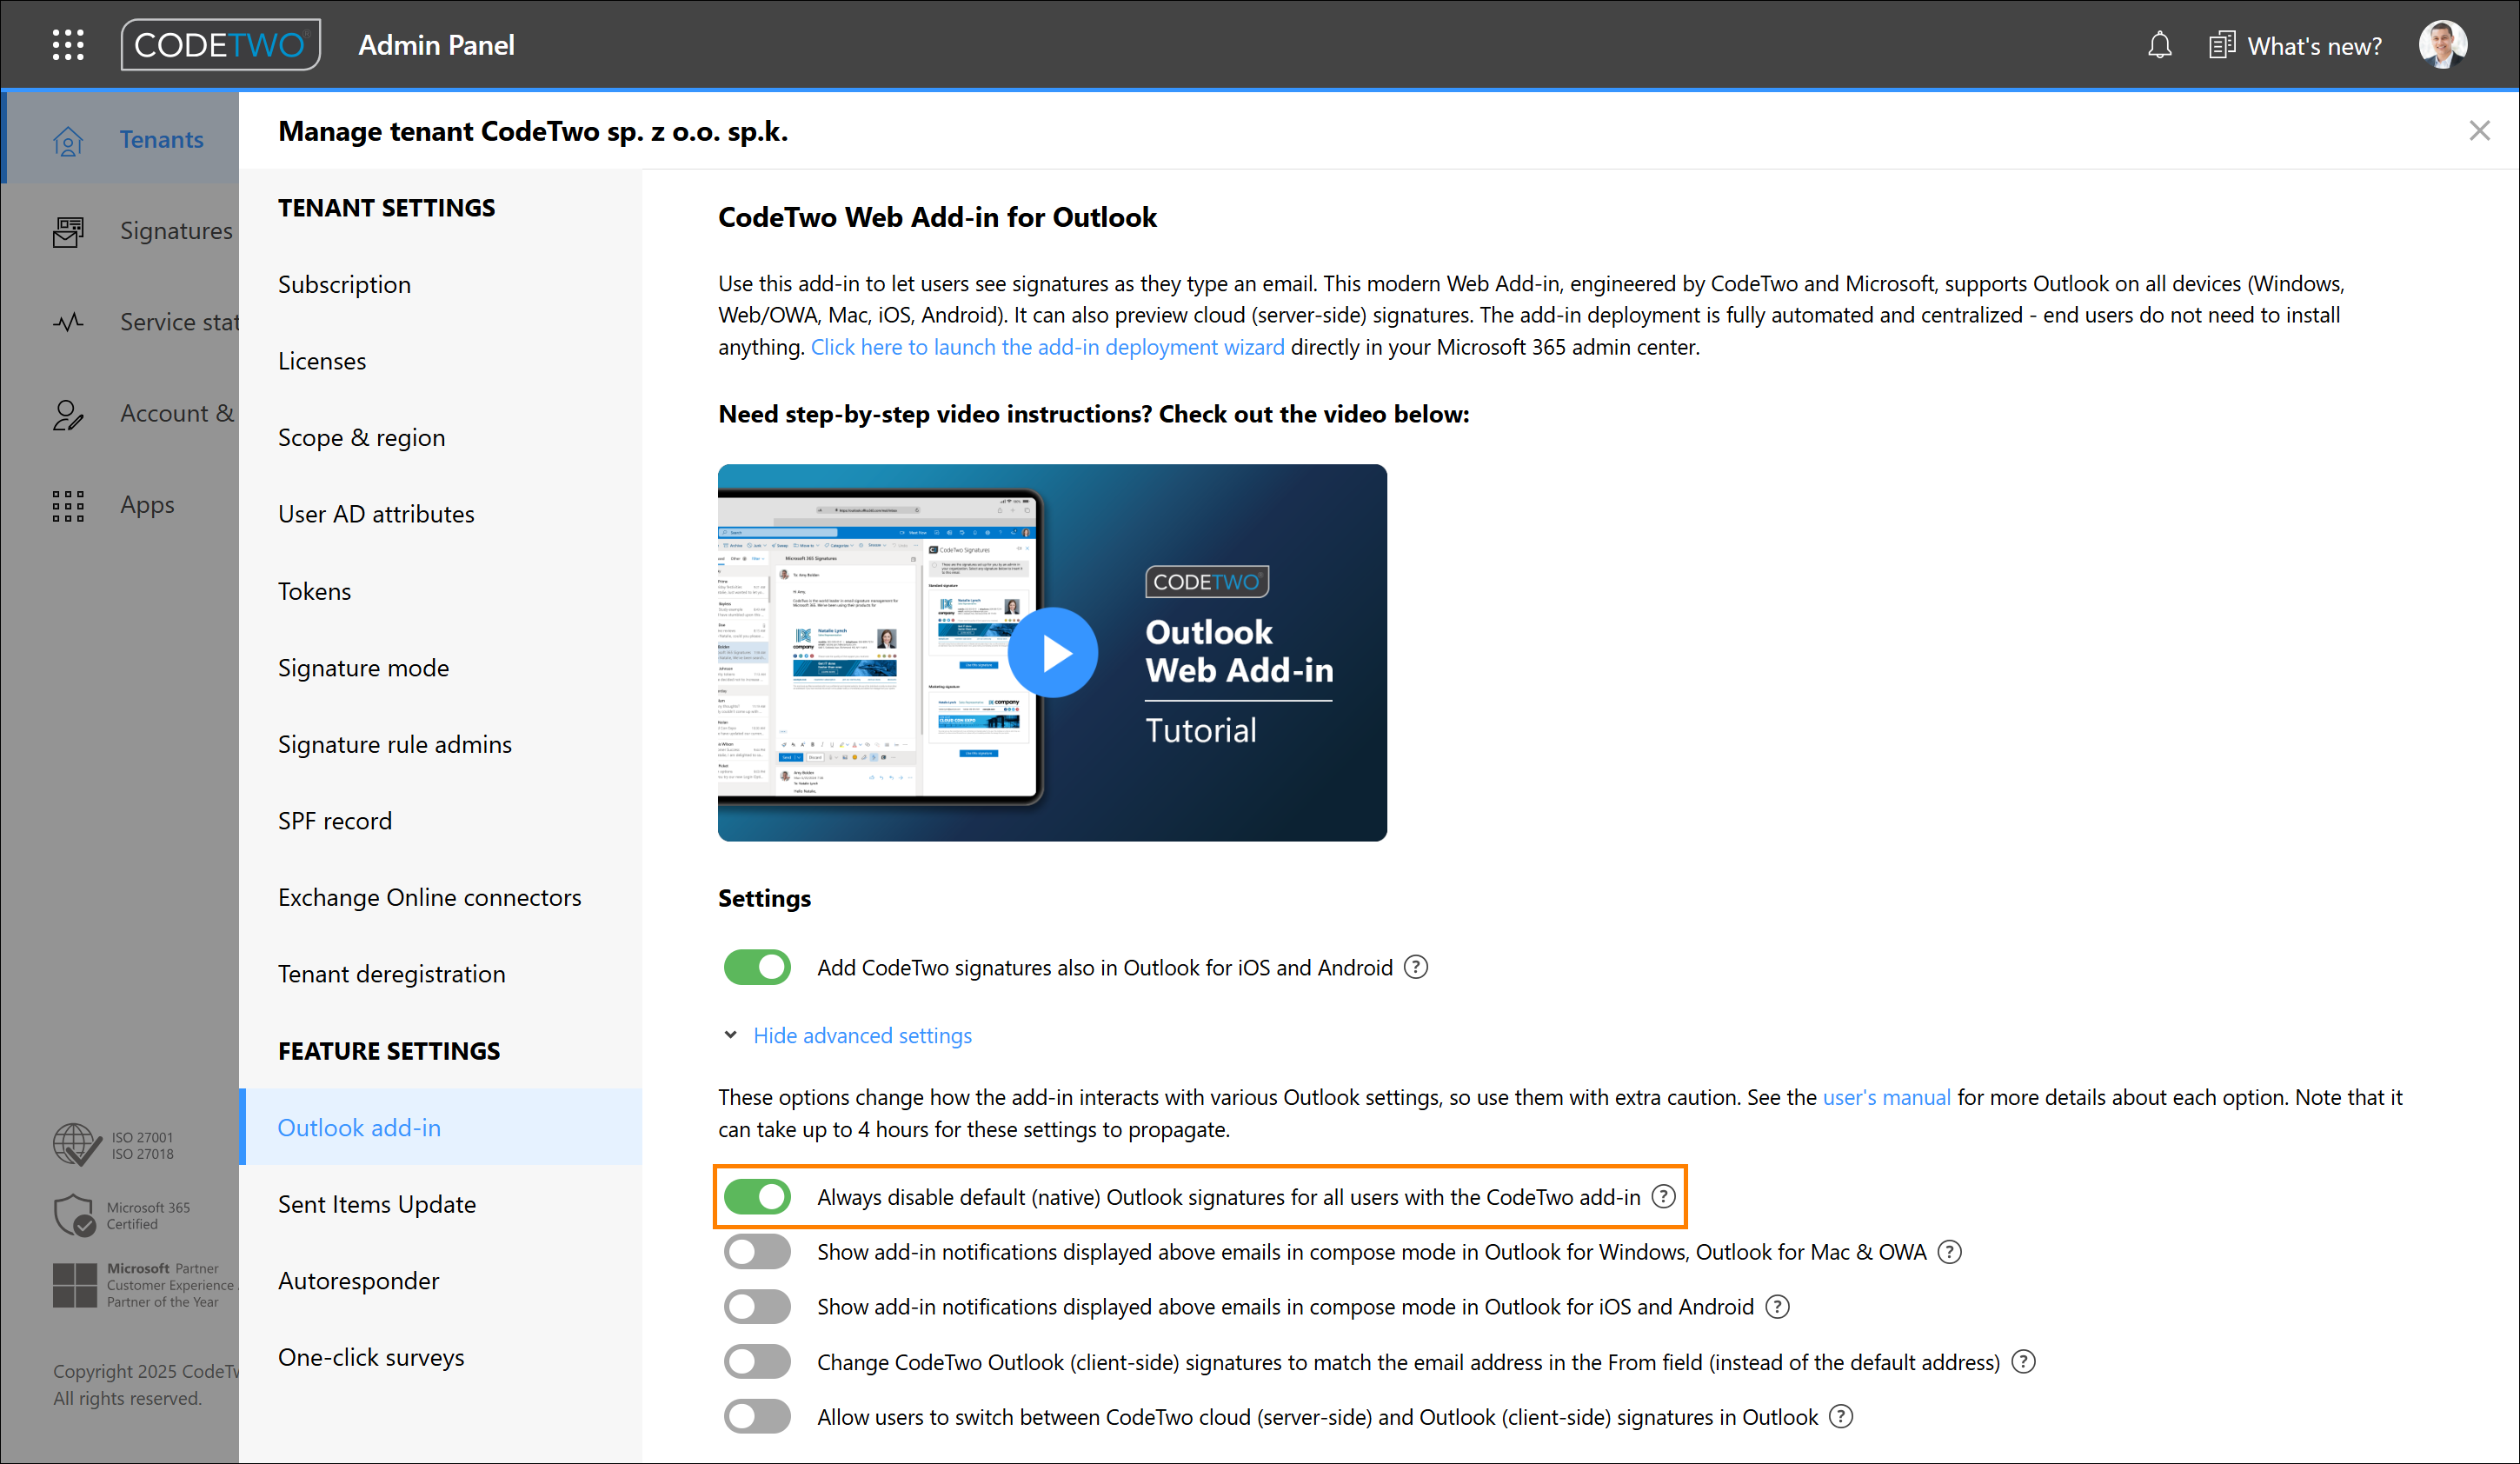
Fig. 1. Disabling native Outlook signatures for users with both cloud and CodeTwo Outlook signatures (combo mode).
As of now, native signatures will no longer be added automatically when users compose a new message or use the reply/forward option in Outlook, regardless of the signature mode. Learn more
Disabling native Outlook signatures with GPO
Downloading policy definitions (ADM/ADMX files)
Before you proceed
Your users need to be signed in to a domain to which you have full administrative access, because they have to be subject to your GPO policies for this solution to work. Organizations working with Exchange Online (Microsoft 365) can also apply this solution if their users are connected to the on-premises Active Directory or Entra ID (Azure AD) to which you have full administrative access.
The solution provided requires a Security Group containing all users who should not have access to the native signature settings in Microsoft Outlook. If you do not have such a Security Group (e.g., Users with no signature – see Fig. 2.), create a new one directly under your domain.
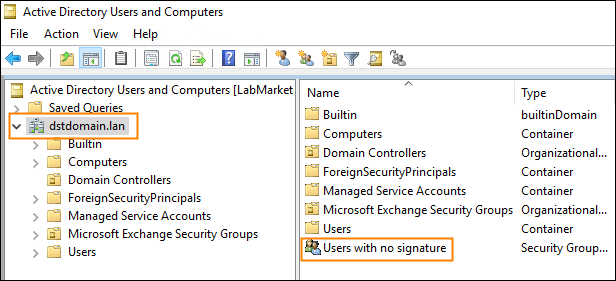
Fig. 2. A Security Group with users who should not receive a signature.
If you don't have the Administrative Template policy settings (ADM or ADMX) files for the Outlook version used in your organization, you need to download them:
- Office 2016, Office 2019, Office 2021 LTSC, Office 2024 LTSC or Microsoft 365 Apps for enterprise
- Office 2013
- or find them yourself in the Microsoft Download Center.
Creating a new GPO in Windows Server
Important
Both the ADMX and ADML files are necessary to complete the installation. For more information on these files, see this Microsoft article.
- To install policy definitions in Windows Server 2008 and newer, open the location of the downloaded ADM/ADMX files.
- Open the ADMX folder and copy all the .admx files to the following directory:
%SystemRoot%\PolicyDefinitions
- The ADML files are a significant part of the policy definition and need to be installed along with the ADMX files. If you open the PolicyDefinitions folder (see step 2) you can see at least one directory with the name that corresponds to your system's locale, e.g., en-US. Inside the downloaded policy settings package, in the ADMX folder, there are several subfolders with similar locale-related names. In order to complete the installation of the policies, you need to:
- Ensure that you have opened the PolicyDefinitions folder and the ADM/ADMX files' download location (Fig. 3.).
- Find out which directories with language-based names exist both in the PolicyDefinitions folder and in the download location.
- In the download location, copy the folders whose names can also be found in the PolicyDefinitions folder.
- Paste the copied folders into the PolicyDefinitions folder (see Fig. 3.).

Fig. 3. Copying files to PolicyDefinitions.
Important
Before you proceed, ensure that you have a relevant Security Group containing all users who should not have access to the native Microsoft Outlook signatures.
- Now you need to create a new Group Policy Object. Open the Group Policy Management Editor by launching gpmc.msc from the Windows Start menu.
- In the left pane, right-click your domain and select Create a GPO in this domain, and Link it here.
- Name your new GPO (e.g., No signatures) and click OK.
- Select the newly created object to open it.
- On the Scope tab, remove Authenticated Users from the Security Filtering pane and add Domain Computers instead.
- In the same pane, add the Security Group that you created earlier (e.g., Users with no signature), as shown in Fig. 4.
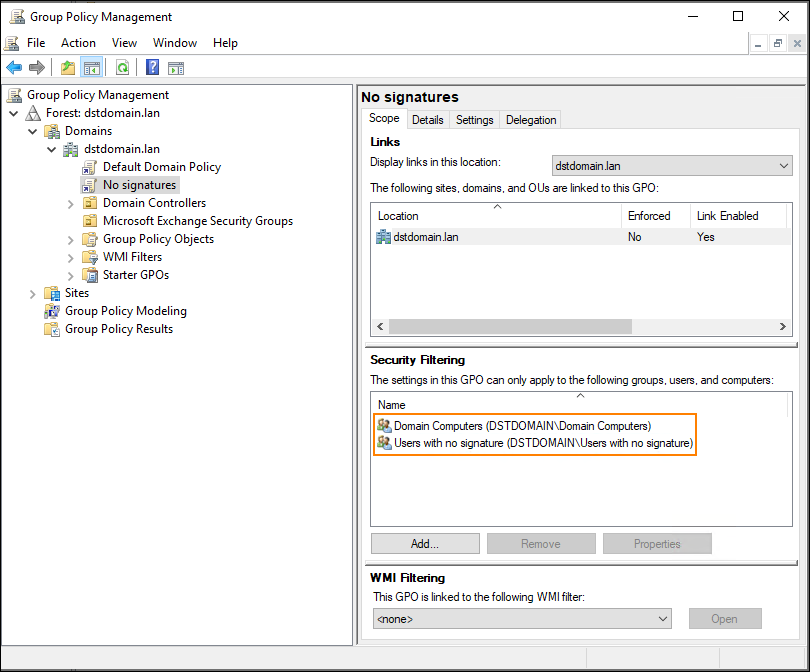
Fig. 4. Setting up a new GPO object for a specific security group.
- Finally, right-click your GPO in the left pane and select Edit from the shortcut menu. In the window that appears, navigate to User Configuration > Policies > Administrative Templates (or Classic Administrative Templates) > Microsoft Outlook [2010] (the number depends on your Outlook version) and Outlook Options, then Mail Format (Fig. 5.).

Fig. 5. The location of the enabled policy.
- In the right pane you will see the Do not allow signatures for e-mail messages option. Enable it, as shown in Fig. 5.
(Optional) Remove manually created email signatures
The GPO you’ve set up blocks access to the signature settings. However, it does not delete signatures that have already been created. To delete existing native Outlook email signatures, follow these steps.
- Paste the following code into any text editor:
Get-ChildItem -Path "$env:USERPROFILE\AppData\Roaming\Microsoft\Signatures" | ForEach-Object {Remove-Item -Path $_.FullName -Recurse} # This script accesses the roaming profile of the active user and deletes all email signatures found there.- Save the file with a *.ps1 extension, for example, RemoveSignatures.ps1. Then, copy it to a network location, preferably accessible by all domain users.
- Edit your No signatures GPO and go to User Configuration > Windows Settings > Scripts (Logon/Logoff) and open Logon properties or Logoff properties.
- Click the PowerShell Scripts tab and find your PowerShell script using the browser.
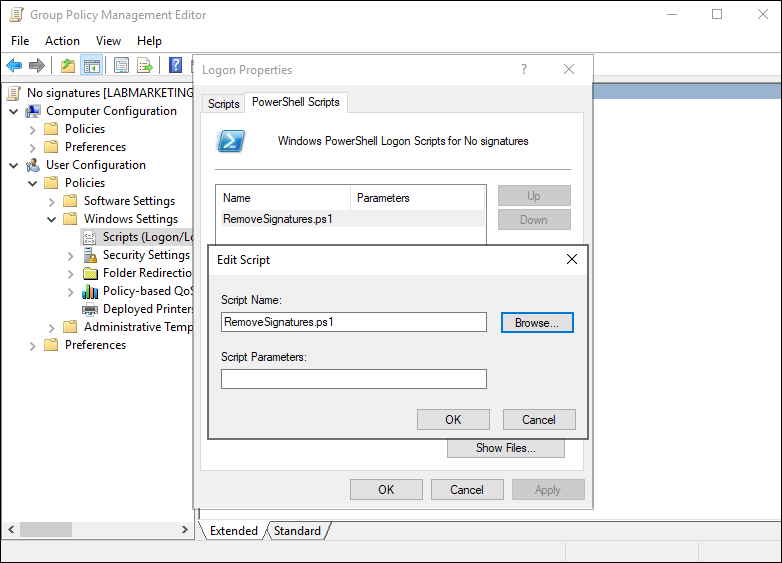
Fig 6. Applying a new Logon script.
- Apply the changes.
All users have to log out and then log in for the changes to be applied. Moreover, you can manually force the policy update by running gpupdate /force. Keep in mind that these changes do not take effect immediately because the time of this process depends on your environment's configuration.
Additional steps for click-to-run and Microsoft 365 Outlook versions
Once you complete the procedure described above, the following key will be added to the Windows registry for each user included in the GPO:
HKEY_CURRENT_USER\SOFTWARE\Policies\Microsoft\Office\16.0\common\mailsettings
"disablesignatures"=dword:1
Unfortunately, Outlook for Microsoft 365 and Outlook installed using the click-to-run installer seem to ignore this key. As a result, the policy to disable personal signatures is not applied at all for users with these versions of Outlook.
To solve the problem, you need to either:
- Use a Cloud Policy instead of a GPO (recommended) or
- add a slightly different registry key, which will work with the affected Outlook versions, to your policy (as shown below).
Here’s how to do it:
- Right-click your No signatures (or whatever you named it) policy and choose Edit.
- Once you’re in the editor window, go to User Configuration > Preferences > Windows Settings in the left-hand pane.
- Next, right-click Registry, and choose New > Registry Item, as shown in Fig. 7.
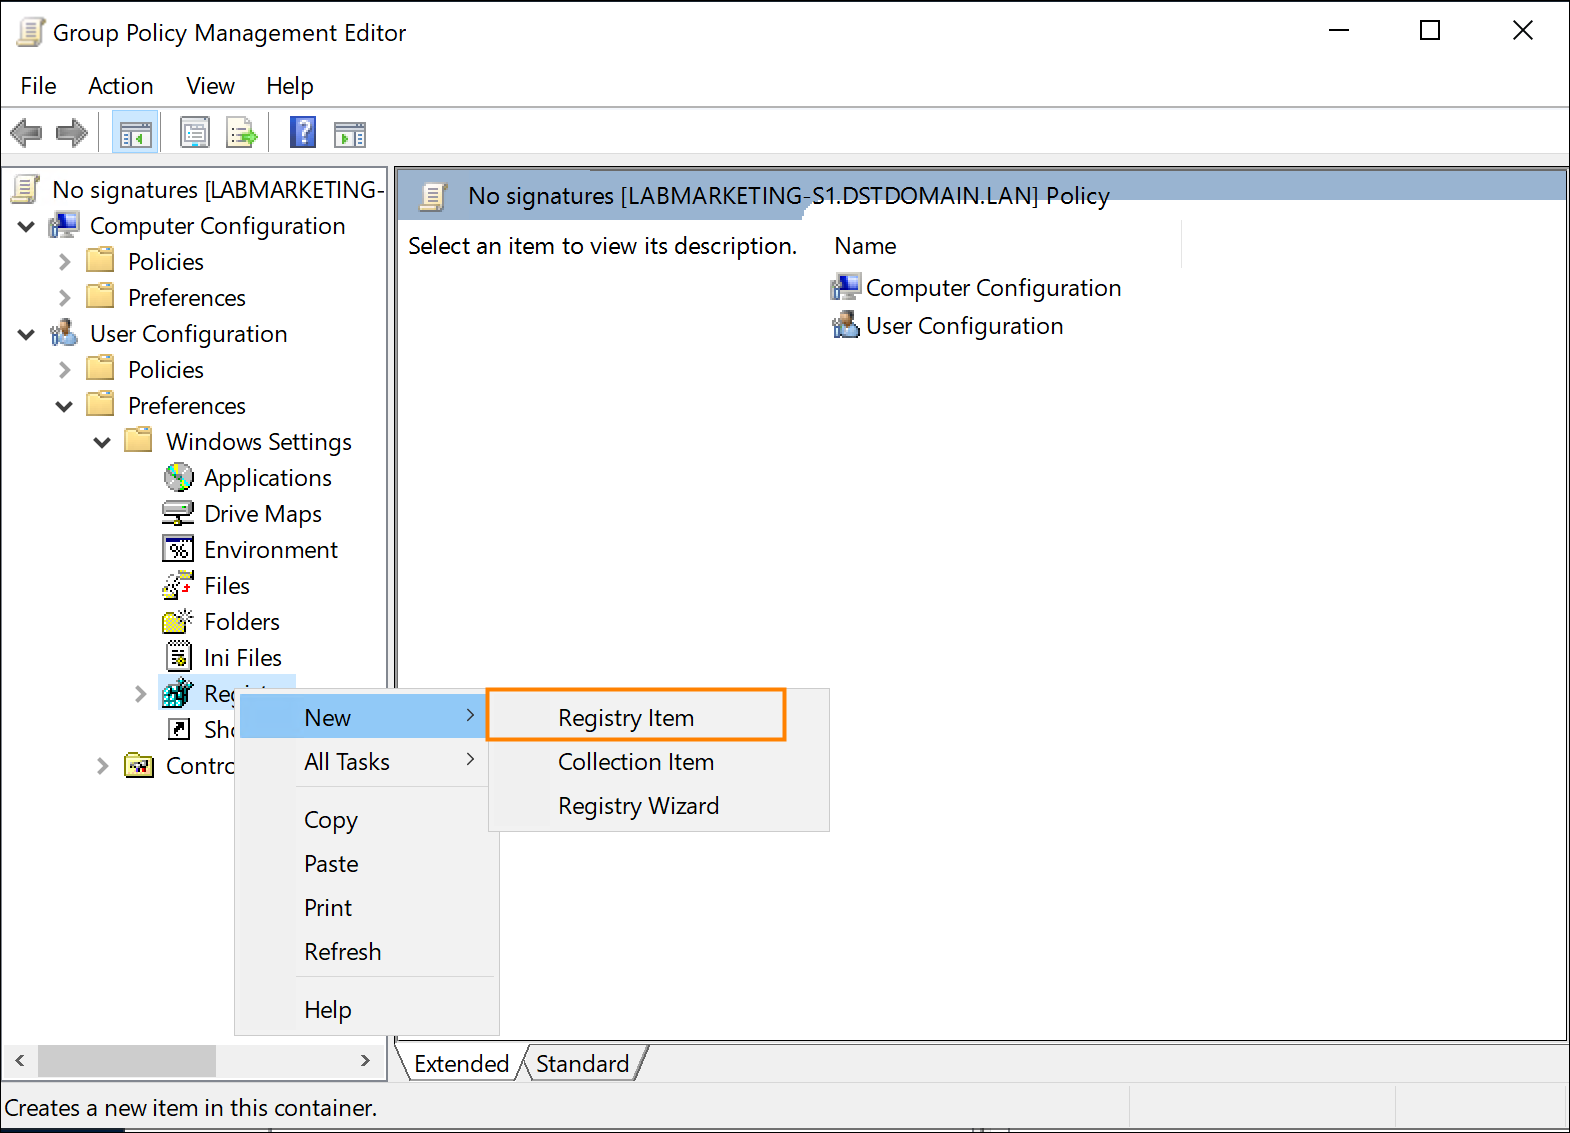
Fig. 7. Adding a new registry key to your policy.
- In the dialog that opens, provide the following details (Fig. 8.):
- Software\Microsoft\Office\16.0\Common\MailSettings in the Key Path field (bear in mind your Office version may be different, so you’ll need to replace 16.0 with the actual number of your version),
- disablesignatures in the Value name field,
- choose REG_DWORD for Value type,
- in the Value data field type 1,
- select Decimal as Base.

Fig. 8. Configuring the registry key settings.
- Finally, click OK.
See also:
| Related products: | CodeTwo Email Signatures for Office 365, CodeTwo Email Signatures On-prem, CodeTwo Exchange Rules 2.x, 3.x, CodeTwo Exchange Rules 2007 1.x, 2.x, 3.x, 4.x, CodeTwo Exchange Rules 2010 1.x, 2.x, 3.x, CodeTwo Exchange Rules 2013 1.x, 2.x, CodeTwo Exchange Rules 2016 1.x, CodeTwo Exchange Rules 2019 1.x, CodeTwo Exchange Rules Pro 1.x, 2.x |
| Categories: | How-To |
| Last modified: | September 29, 2025 |
| Created: | October 22, 2008 |
| ID: | 52 |


