How to disable email signatures in Outlook for Windows using Intune
Problem:
You would like to use Microsoft Intune to prevent your users from manually creating email signatures in Outlook for Windows on their machines.
Solution:
You can’t use Intune to disable email signatures in the new Outlook for Windows. To see steps for the new Outlook, have a look at this article instead.
With CodeTwo Email Signatures 365, you can also use our Outlook Web Add-in to centrally disable native Outlook (desktop, mobile and OWA) signatures for the users you’ve deployed the add-in for. Learn more
You can disable the native email signature feature in classic Outlook for Windows via Intune in two ways – either by using a configuration policy or a PowerShell script to be run on users’ machines. Click the links below to go to the method of your preference:
- Disabling email signatures in Outlook with a configuration policy
- Disabling email signatures in Outlook with a PowerShell script
Disable email signatures in Outlook with a configuration policy
To disable email signatures in Outlook for Windows using a configuration policy, proceed as follows:
- Sign in to the Microsoft Intune admin center.
- Go to Devices > Configuration and click Create > New Policy (Fig. 1.).
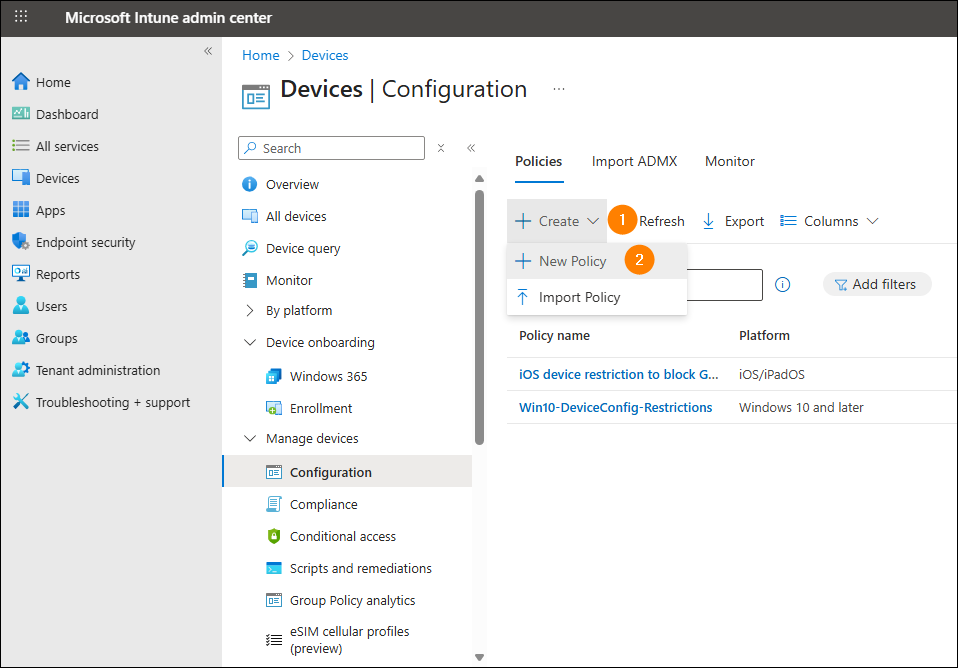
Fig. 1. Accessing the configuration policy creation settings in the Microsoft Intune admin center.
- From the Platform and Profile type drop-down menus, choose Windows 10 and later and Settings catalog, respectively. Next, click Create to add the new configuration policy profile (Fig. 2.).
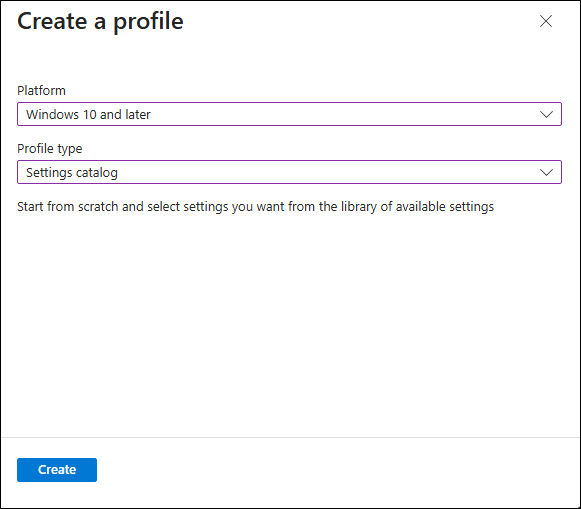
Fig. 2. Choosing the right policy profile for Outlook for Windows.
- Now, configure the policy profile settings. In the Basics step, provide the profile’s name (mandatory) and description (Fig. 3.). Click Next to proceed.
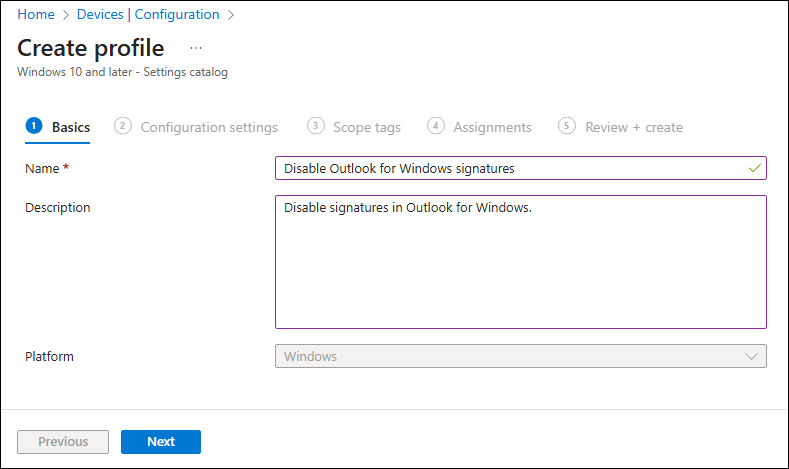
Fig. 3. Configuring basic policy profile settings.
- Click the + Add settings link to open a settings picker. Next, type Do not allow signatures in the picker’s search box and click the Microsoft Outlook 2016\Outlook Options\Mail Format category in the Browse by category section to display the setting you’re looking for (Fig. 4.).
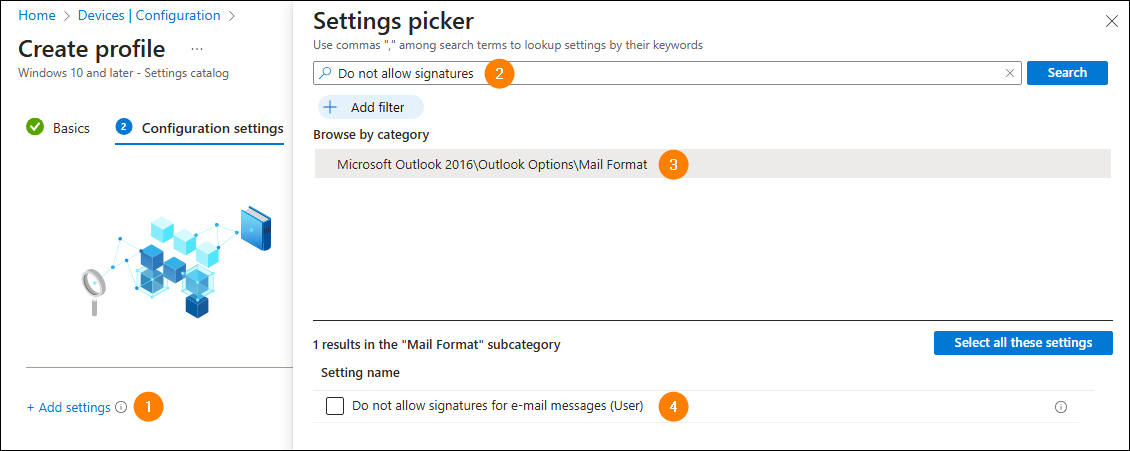
Fig. 4. Finding the appropriate setting from the Mail Format category.
- Click the Do not allow signatures for e-mail messages (User) setting (see Fig. 4.) to open it in the main window. To disable signatures in Outlook for Windows, switch the toggle to Enabled (Fig. 5.) and click Next to proceed.
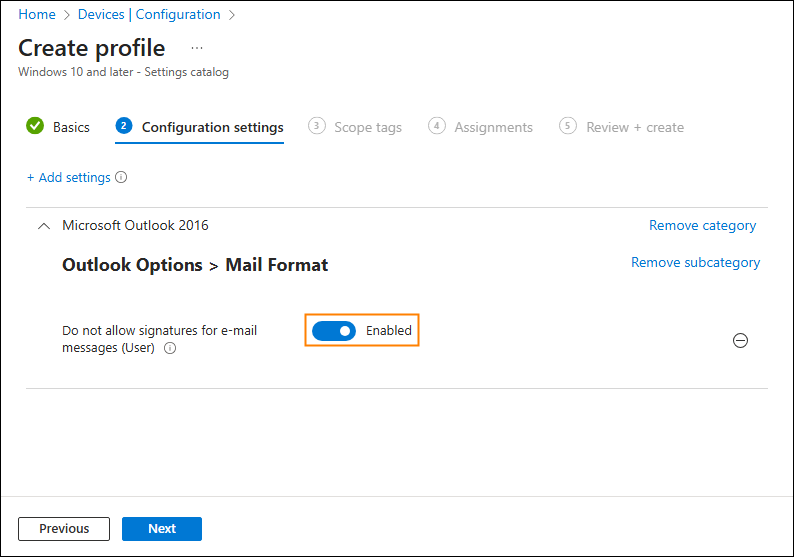
Fig. 5. Disabling the native signature feature in Outlook for Windows.
- In the next step, you can configure Scope tags if you use this feature. Click Next to move on.
- The Assignments step allows you to define the scope of users for whom the signatures will be disabled. Simply click Add all users to disable signatures for all users in your organization (Fig. 6.). Alternatively, you can click Add groups to turn off signatures for selected Microsoft Entra ID (Azure Active Directory) user groups. If you wish to allow users belonging to certain Entra ID (Azure AD) groups to use the native signature feature in Outlook for Windows instead, you can exclude them from this policy by clicking Add groups under Excluded groups (see the bottom portion of Fig. 6.).
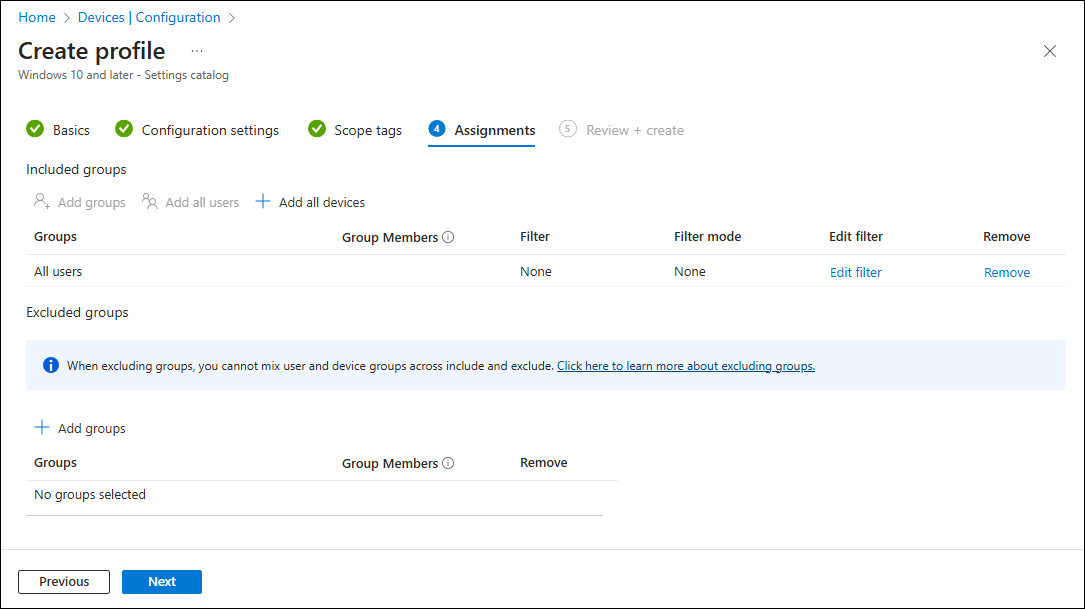
Fig. 6. Assigning the policy to all users in the organization.
- In the last step, Review + create, you can verify if all the settings are correct. If you’re fine with them, click Create (Fig. 7.) to save and apply your policy. From now on, the native signature feature in Outlook for Windows will be disabled on the machines of all/selected users.
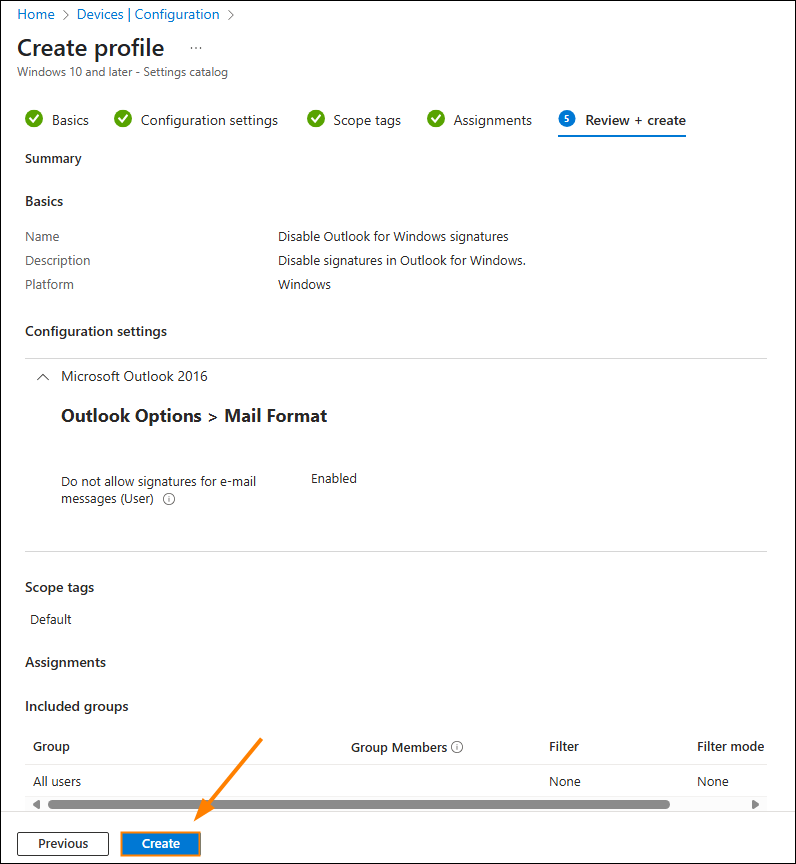
Fig. 7. Reviewing the policy profile settings and applying the policy.
You can track the progress of policy assignment by clicking the configuration policy name on the list of policies (Devices > Configuration).
The policy summary page (Fig. 8.) allows you to check to how many devices and users the configuration policy was assigned successfully. To show more information about devices assigned to the policy, click the View report button. To get more detailed information on device assignment or particular settings, click Device assignment status or Per setting status, respectively (Fig. 8.).
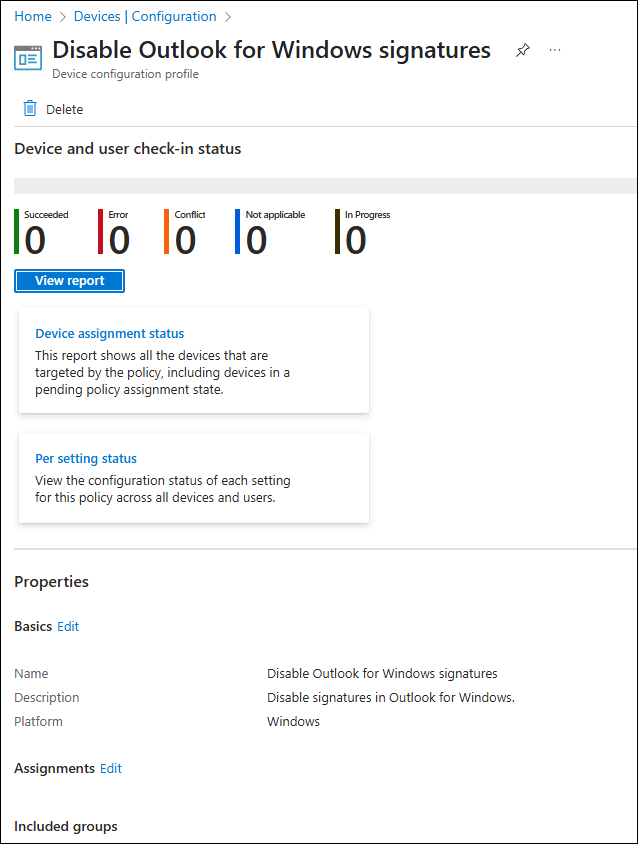
Fig. 8. The policy summary allows you to monitor policy assignments.
Disable email signatures in Outlook with a PowerShell script
If you prefer applying a PowerShell script via Microsoft Intune to disable the native email signature feature in Outlook for Windows, complete the following procedure. The PowerShell script below disables the signature feature and deletes locally saved Outlook email signatures.
Prepare a PowerShell script file
- Open any text editor (e.g. Notepad) or the PowerShell ISE app and paste the code below into it.
New-ItemProperty -path "HKCU:\SOFTWARE\Microsoft\Office\16.0\Common\MailSettings" -Name "DisableSignatures" -Value '1' -PropertyType 'DWORD' -Force # This part of the script creates a new registry key, which disables native Outlook signatures. Get-ChildItem -Path "$env:USERPROFILE\AppData\Roaming\Microsoft\Signatures" | ForEach-Object {Remove-Item -Path $_.FullName -Recurse} # This part of the script removes all locally saved Outlook email signatures. - Use the Save As option (Ctrl+Shift+S) to save the file in the .ps1 format, e.g. Disable_signatures.ps1 (Fig. 9.).
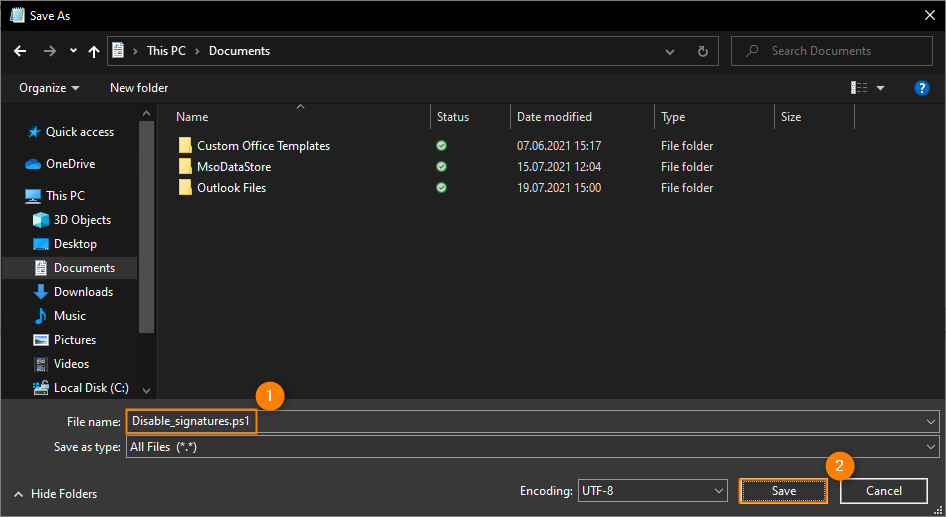
Fig. 9. Creating a PowerShell script file.
Configure Intune to run the script for given users
- Sign in to the Microsoft Intune admin center.
- Go to Devices > Scripts and remediations > Platform scripts, then click Add and choose the Windows 10 and later option (Fig. 10.).
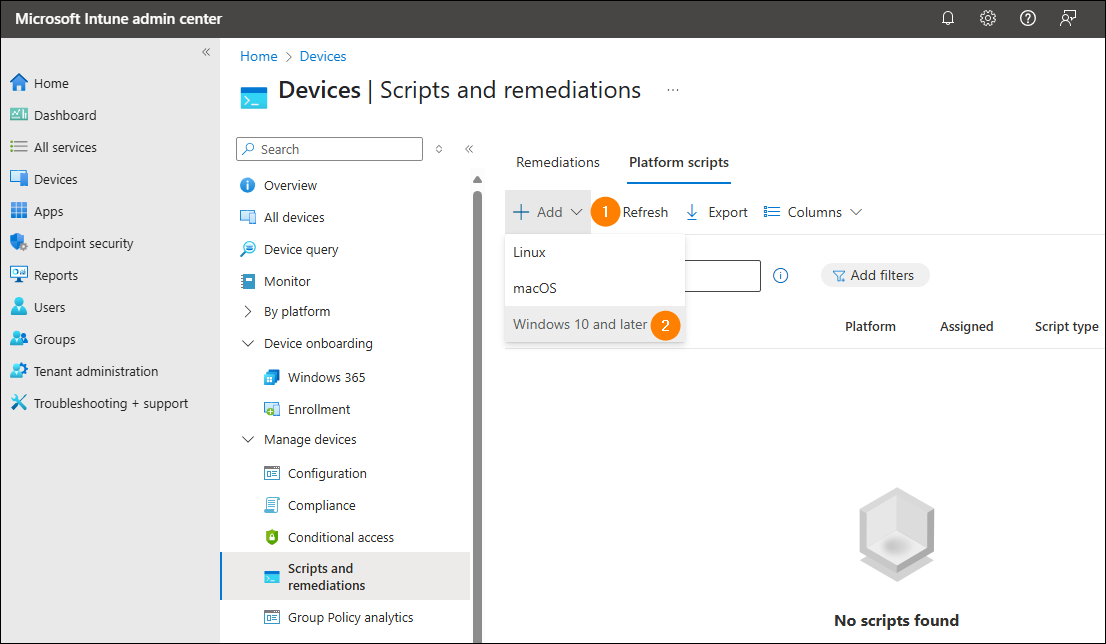
Fig. 10. Adding a new script to be executed with Microsoft Intune.
- Name your script, provide an optional description for it, and click Next (Fig. 11.).
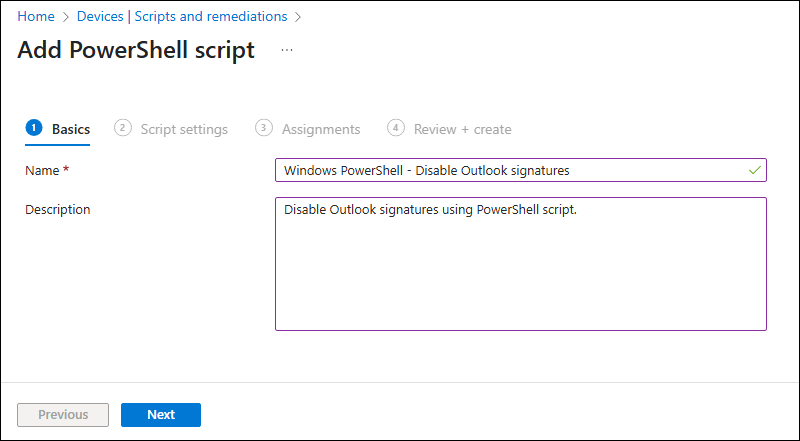
Fig. 11. Naming and describing the script.
- In the Script settings step, load the file you’ve prepared in the previous section of this article and configure the settings as follows:
- Run this script using the logged on credentials > Yes (this will allow to run the script for each specific user that logs in on a machine and disable signatures for their specific account)
- Enforce script signature check > No
- Run script in 64 bit PowerShell Host > Yes (in the case the users’ machines are in 32-bit architecture, choose No)
The final configuration should look as shown in Fig. 12. below. If you’re OK with your settings, click Next.
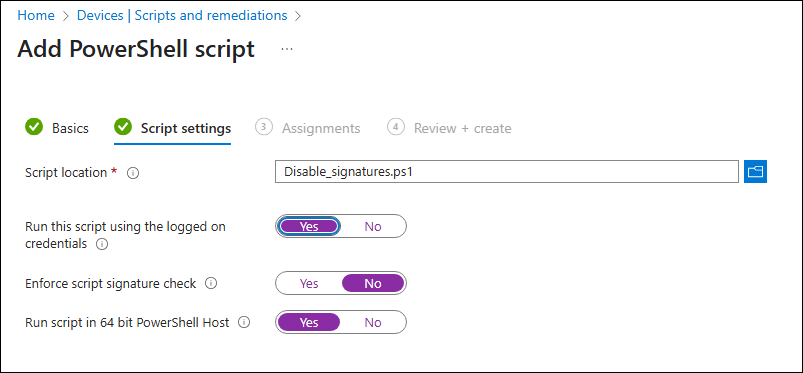
Fig. 12. Correct configuration in the Script settings step.
- The Assignments step allows you to define the scope of users for whom the script will be executed. Simply click Add all users to execute it for all users in your organization (Fig. 13.). Alternatively, you can click Add groups to execute the script for selected Microsoft Entra ID (Azure Active Directory) user groups. If you wish to allow users belonging to certain Entra ID (Azure AD) groups to use the native signature feature in Outlook for Windows instead, you can exclude them from this policy by clicking Add groups under Excluded groups (see the bottom portion of Fig. 13.).
Important
Remember to define assignments according to users and NOT devices, as the script modifies an entry in the Current User registry key. If more than one person uses the same machine, the script must be executed for each user that logs in to it.
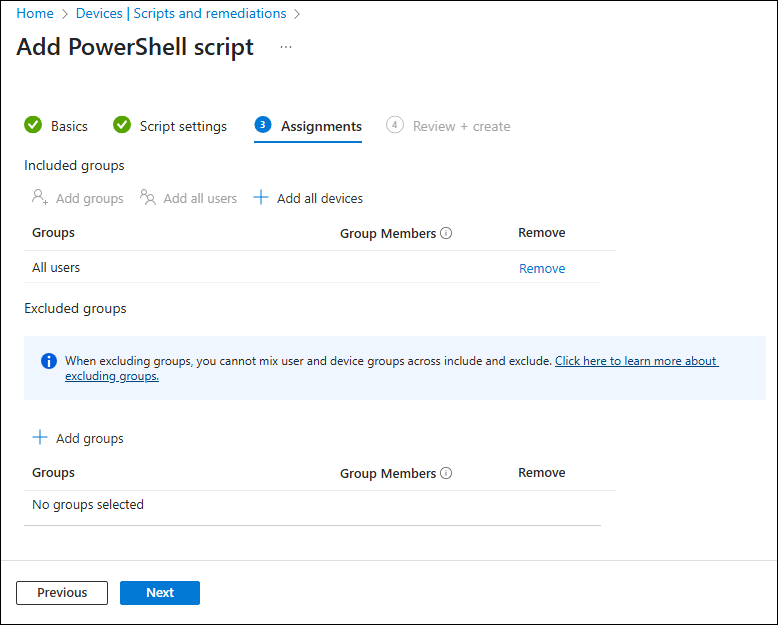
Fig. 13. The Assignments step allows you to decide for which users the script will be executed.
- The last step, Review + create, lets you check all the settings for your script policy. If you’re fine with them, click Create (Fig. 14.) – the script will be added to the scripts list.
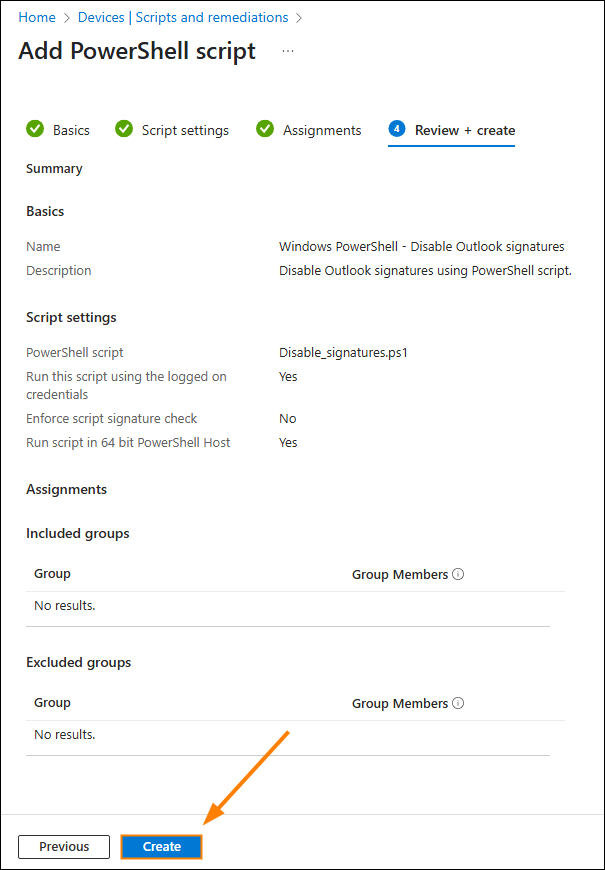
Fig. 14. Review your configuration and click Create to start executing the script.
You can track the progress of script executions by clicking a script name on the list of scripts (Devices > Scripts and remediations > Platform scripts).
The script overview page (Fig. 15.) allows you to check for how many devices and users the script was executed successfully. To get more detailed information on devices or users, e.g. particular device names or user names, etc., click Device status or User status, respectively.
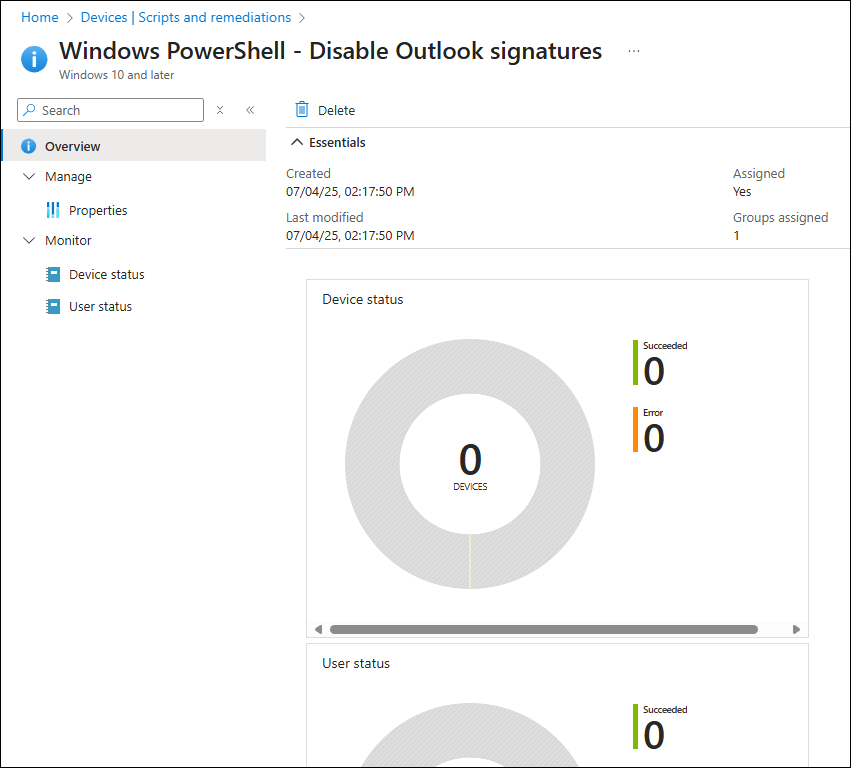
Fig. 15. The script overview allows you to monitor script executions.
See also:
| Related products: | CodeTwo Email Signatures for Office 365, CodeTwo Exchange Rules 2.x, 3.x, CodeTwo Exchange Rules Pro 2.x |
| Categories: | How-To |
| Last modified: | August 4, 2025 |
| Created: | November 19, 2021 |
| ID: | 955 |






