Disable native signatures in Outlook on the web (OWA) and the new Outlook for Windows
This article applies to Exchange Server SE, 2019, 2016, 2013, and Exchange Online (Microsoft 365). For older versions of Exchange Server, i.e., 2007 and 2010, see this article.
Problem:
You would like to prevent users from creating individual signatures and adding them to emails in Outlook on the web (OWA) and the new Outlook for Windows.
Solution:
Info
If your organization’s emails are handled by Exchange Online, you can also use the modern CodeTwo Signatures Web Add-in for Outlook (a part of CodeTwo Email Signatures 365) to centrally disable native signatures for the users you’ve deployed it for. Learn more
To prevent your users from adding their own email signatures in Outlook on the web and the new Outlook for Windows, you need to disable the Email signature option in the Outlook web app (OWA) mailbox policy assigned to these users. You can do it in three ways: via PowerShell, the modern Exchange admin center (Exchange Online) or the classic Exchange admin center (Exchange Server).
Before you begin, note the following information:
- For these solutions to work, you need to make sure your Exchange/Microsoft 365 plan supports Group Policy Objects (GPO).
- The solutions are based on modifying the default OWA mailbox policy. If you want to use your custom policy, adapt the instructions below to your needs and see the relevant subsections for further steps.
- The solutions also work for the new Outlook for Windows, but only when you are connected to Exchange Online.
- Regardless of the method you choose, it might take up to 60 minutes for the changes to an OWA mailbox policy to propagate.
- Disabling email signatures with the methods described below does not remove signatures that are already configured. You can use PowerShell to remove all OWA signatures – see our article to learn how to do so.
Use the links below to find out how to disable native email signatures:
- With a PowerShell cmdlet
- In the modern Exchange admin center (Exchange Online)
- In the classic Exchange admin center (Exchange Server)
Disabling OWA signatures with a PowerShell cmdlet
This method is quite similar for both Exchange Online and Exchange Server, except for some minor differences.
- Run Windows PowerShell to connect to your Exchange Server (as described here) or to Exchange Online (as described here). If you are signed in directly on your Exchange Server, you only need to launch Exchange Management Shell (no connection procedure required).
- Paste and execute the following cmdlet:
- For Exchange Server:
Set-OwaMailboxPolicy -Identity "Default" -SignaturesEnabled $false
- For Exchange Online:
Set-OwaMailboxPolicy -Identity "OwaMailboxPolicy-Default" -SignaturesEnabled $false
Tip
To modify your custom OWA mailbox policy instead of the default one, replace Default or OwaMailboxPolicy-Default in a cmdlet above with your custom policy name.
To quickly get information on available OWA mailbox policies regardless of your environment, use the following cmdlet:
Get-OwaMailboxPolicy | Select Identity
- For Exchange Server:
- The next steps depend on your environment and the policy you’ve just modified:
- If you’ve modified only the default OWA mailbox policy in Exchange Online, you’re all set – your modified policy is applied to all user mailboxes by default.
- If you’re working in an Exchange Server environment or using a custom policy, you also need to (re-)assign the modified policy to all the users you want to apply it to. To do it, complete the steps from the subsection just below.
Assigning the modified policy with PowerShell
The example below shows cmdlets that let you assign the OWA mailbox policy to all user mailboxes.
- Run the following cmdlet to list all user mailboxes:
$users = Get-User -ResultSize unlimited -Filter "(RecipientType -eq 'UserMailbox')"
- Run the following cmdlet to assign your modified OWA mailbox policy to all user mailboxes, remembering to replace <Name of your policy> with the actual name of your policy:
- For Exchange Server:
$users | foreach {Set-CasMailbox -Identity $_.UserPrincipalName -OwaMailboxPolicy "<Name of your policy>"} - For Exchange Online:
$users | foreach {Set-CasMailbox -Identity $_.MicrosoftOnlineServicesID -OwaMailboxPolicy "<Name of your policy>"}
- For Exchange Server:
For more PowerShell methods of assigning an OWA mailbox policy, have a look at this Microsoft article.
Disabling OWA signatures in the modern Exchange admin center (Exchange Online)
- Sign in to the modern Exchange admin center.
- Navigate to Roles > Outlook web app policies, click the policy that is assigned to the users for whom you want to block custom OWA signatures, and click Manage features (Fig. 1.).
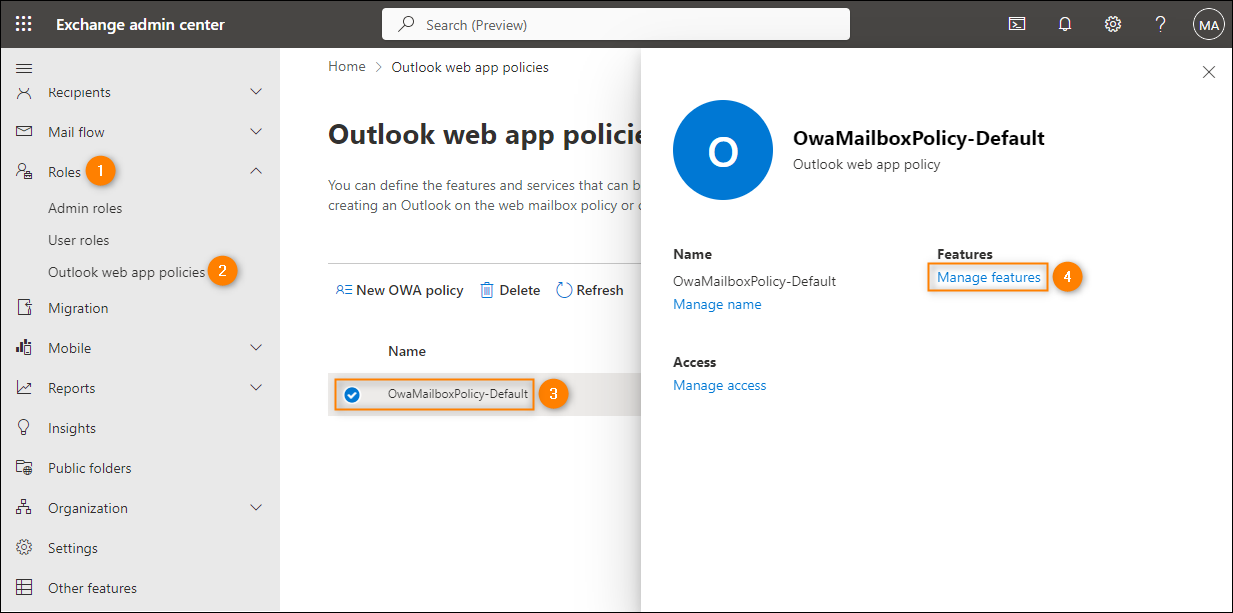
Fig. 1. Accessing the OWA policy settings to disable/enable features.
- Expand the User experience feature list, clear the checkbox next to Email signature, and click Save changes to apply your settings (Fig. 2.).

Fig. 2. Disabling email signatures in OWA in the modern Exchange admin center.
- (Optional) If you decided to work with a custom (non-default) OWA mailbox policy, remember to (re-)assign the policy to appropriate users by following the steps in the subsection just below.
Assigning the modified policy in the modern Exchange admin center
- Go to Recipients > Mailboxes, select all the user mailboxes for which OWA email signatures should be disabled, and click Edit > App settings above the list (Fig. 3.).
Important
The App settings option is only available when you select multiple mailboxes from the list. To access these settings for a single mailbox, click the mailbox and select Manage email apps settings in the Email apps & mobile devices section of the pane that opens. In the next step, you will also need to remove the default policy from the Outlook web app mailbox policy text box to be able to search for your custom policy.
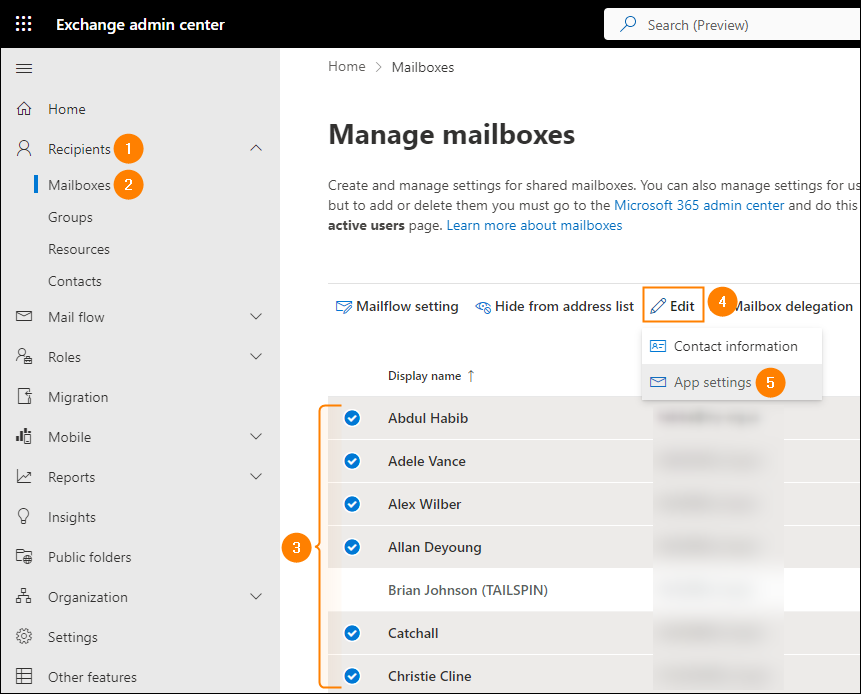
Fig. 3. Accessing the OWA mailbox policy assignment settings for multiple mailboxes in the modern Exchange admin center.
- Choose Enabled for Outlook on the web. In the text box below, start typing the name of the OWA mailbox policy you’ve just modified (in our example, it’s Disable native signatures). When the name appears under Suggested results, click it to choose it. Finally, click Save to apply the changes (Fig. 4.).
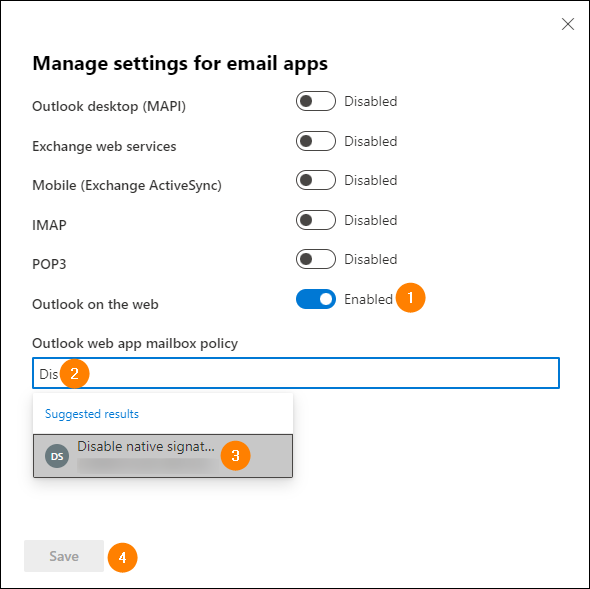
Fig. 4. Assigning a custom OWA mailbox policy to multiple users.
Disabling OWA signatures in the classic Exchange admin center (Exchange Server)
- Sign in to your classic Exchange admin center.
- Go to permissions > Outlook Web App policies and double-click the policy that is assigned to the users for whom you want to block custom OWA signatures (Fig. 5.).

Fig. 5. Opening OWA policy settings in the classic Exchange admin center.
- In the window that pops up, navigate to features and expand the list of features by clicking the More options link at the bottom.
- On the list of features, find and clear the Email signature checkbox. Finally, click Save to apply your changes (Fig. 6.).
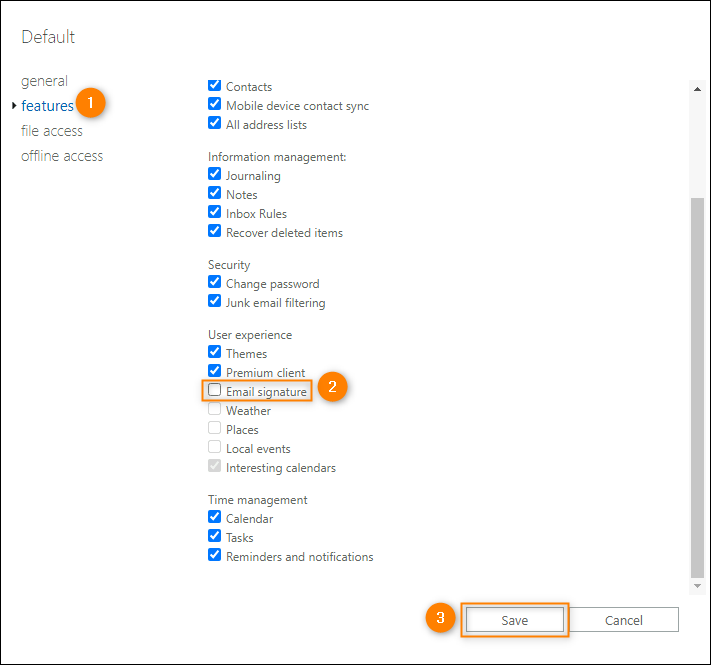
Fig. 6. Disabling email signatures in OWA in the classic Exchange admin center.
- Remember to (re-)assign the policy you’ve just modified to appropriate users by following the steps in the subsection below.
Assigning the modified policy in the classic Exchange admin center
- Click recipients in the left menu and select all the user mailboxes for which OWA email signatures should be disabled. In the pane on the right, click Assign a policy under Outlook on the web (Fig. 7.).
Important
The Assign a policy option for OWA is only available when you select multiple mailboxes from the list. To access these settings for a single mailbox, click the mailbox and select View details for Outlook on the web in the Email Connectivity section of the mailbox’s pane.
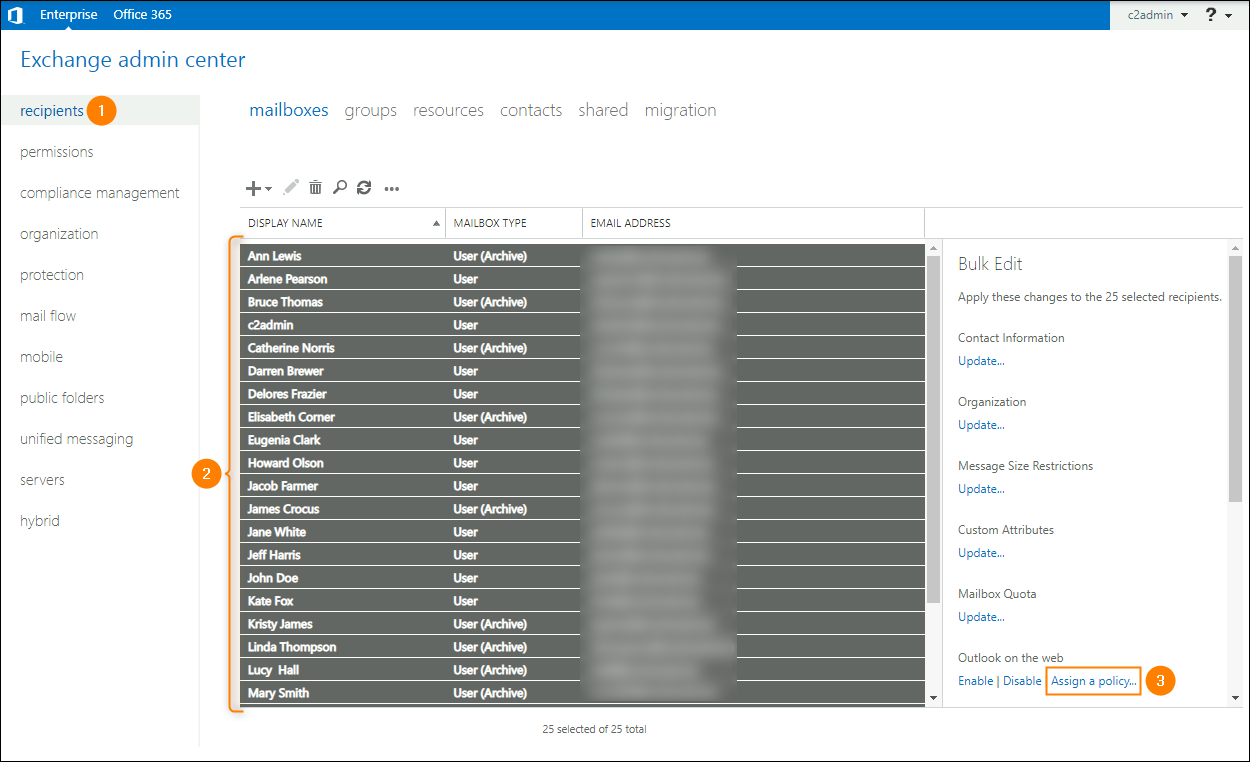
Fig. 7. Accessing the OWA mailbox policy assignment settings for multiple mailboxes in the classic Exchange admin center.
- In the pop-up that opens, click Browse and select the policy you’ve just modified (in our example, it’s Default). Your configuration should look similar to the one shown in Fig. 8. Finally, click Save to apply the changes.
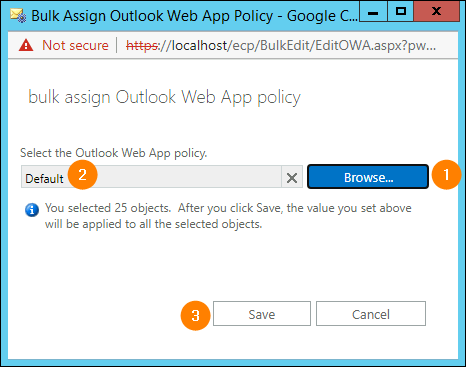
Fig. 8. Assigning your OWA mailbox policy to multiple users.
| Related products: | CodeTwo Email Signatures for Office 365, CodeTwo Email Signatures for Email Clients, CodeTwo Email Signatures On-prem, CodeTwo Exchange Rules 2013 1.x, 2.x, CodeTwo Exchange Rules 2016 1.x, CodeTwo Exchange Rules 2019 1.x, CodeTwo Exchange Rules Pro 1.x, 2.x |
| Categories: | How-To |
| Last modified: | February 2, 2026 |
| Created: | March 22, 2016 |
| ID: | 535 |


