
Multifactor authentication (MFA) offers additional layer(s) of security for the traditional login and password authentication method. According to this Microsoft’s study, it reduces the risk of account being compromised by more than 99.2% – the figure that is hard to ignore in the times of widespread cyberthreats, in particular phishing, and almost daily leaks from various databases.
So even if a bad actor gets login credentials, it’s very unlikely that they’ll get access to an employee’s device (e.g. mobile phone) where additional authentication takes place. And that’s the major advantage of multifactor authentication – the physical separation of authentication steps.
As the leading collaboration solution for businesses around the world, Microsoft 365 naturally offers MFA, giving end users a choice of authentication methods, from more traditional ones like phone call or SMS, to more recent & safer ones such as the Microsoft Authenticator app or physical security key or a passkey.
MFA-related news
Since October 15, 2024, Microsoft started enforcing mandatory multifactor authentication for Azure and other admin portals. With the enforcement currently under way, you might be required to take certain urgent steps like:
- Update break glass or emergency access accounts to also use MFA (Microsoft the recommends passkey/FIDO2 and certificate-based auth methods).
- If you use user identities to sign in as a service account to run e.g. scripts, you need to update the scripts. To check if given users access Azure resources using MFA or not, use this script from Microsoft.
Learn more about the enforcement of MFA for Azure admins
Why is multifactor authentication important?
It greatly reduces security risks. It’s as simple as that. Think about possible aftermath of gaining access to an admin account in your organization:
- Data breaches – bad actors get access to sensitive information and intercept critical correspondence (customer personal details, intellectual property, etc.)
- Access loss – if you are attacked by ransomware, you will get cut out from your company resources. Even if you have a well-thought disaster recovery plan, and can avoid paying ransom, it’s not likely to avoid access loss.
- Financial losses and legal consequences – you might lose money directly (e.g. pay ransom) or face costs associated with an attack (e.g. fines, compensation, etc.)
- Reputation damage – a damaged organizational image can result in a shrinking customer base or lost business opportunities.
- Operational disruption – bad actors might tamper with your IT systems, causing a downtime or failure to provide services.
- Reduced employee morale – an attack might rise anxiety among employees, damage your reputation as a secure employer, etc.
I’m sure most people know about the consequences, yet somehow magically many organizations still haven’t adopted MFA to date. That’s why Microsoft launched a number of campaigns focused on improving security in Microsoft 365:
- Auto-enabling Security defaults (since October 21, 2019). Learn more
- Disabling Basic Authentication in Exchange Online (since October 2022). Learn more
- Enforcing MFA for all admin accounts signing in to Azure and other admin portals (since October 15, 2024), as highlighted at the beginning.
While MFA doesn’t guarantee 100% resilience, it greatly increases your odds. Let’s explore this method of safeguarding your Microsoft 365 organization.
Does each Microsoft 365 (Office 365) plan include multifactor authentication?
Yes, all Microsoft/Office 365 plans let you benefit from multifactor authentication.
For example, if you are wondering, “Does my Microsoft 365 Business Standard license include MFA?” – the answer is yes. MFA is available in all plans and doesn’t require any license add-ons.
The main difference is that higher-tier plans with the Microsoft Entra ID Plan 1 or 2 licenses allow you to customize MFA, e.g. enable it to specific groups of users or require it under certain circumstances (e.g. if a user signs in from a chosen location).
How to configure MFA in Microsoft 365?
Before you begin setting up multifactor authentication, it’s a good idea to inform your end users. Microsoft has prepared pre-made communications that you can customize, brand and later distribute among your co-workers. There’s also end user documentation you can share with people in your organization. This helps facilitate the process, avoid unnecessary questions and limit the time spent on troubleshooting later on.
Next, you can finally proceed to the configuration stage. So, how to setup MFA in Microsoft 365 (Office 365)? To learn more about the method that works with your Microsoft/Office 365 plan, click an appropriate link below:
- Security defaults (all Microsoft/Office 365 plans) – no customization, lets you enable/disable MFA for all users in your organization in a very simple way.
- Conditional Access Policies (Microsoft 365 E3, E5, F1, F3, F5, A3 and A5) – allow flexible customization of user scope, MFA triggering conditions.
- Microsoft Entra ID Protection (Microsoft E5, F5 and A5) – it’s a simple control like Security defaults but offers flexible customization of user scope.
- Legacy per-user MFA (all Microsoft/Office 365 plans) – the legacy setting that is likely to be deprecated, but lets you enable MFA per user.
If you can use more than one method in your tenant and you’re now evaluating each option, be aware that:
- Security defaults and Conditional Access Policies are mutually exclusive.
- Legacy per-user MFA takes precedence over the other methods.
- If you previously enabled MFA, e.g. for selected admin users, using the Legacy per-user MFA method, and then enabled MFA with a modern method, the legacy MFA setting for these users will appear as Disabled – this is the expected behavior.
Security defaults
This method is ideal for a quick start, as you can enable MFA organization-wide with just a few clicks. With Security defaults enabled:
- All users will be required to use one of the MFA authentication methods – either the Microsoft Authenticator app or a physical security USB key.
- Legacy authentication will be blocked in your tenant. Important: Before enabling Security defaults, make sure no administrators in your organization use login & password based legacy authentication protocols (learn more). If you intend to continue using desktop apps that require legacy authentication, after enabling Security defaults, ensure you use an app password (instead of the regular admin/user Microsoft 365 password) in them. Learn more
Security defaults are enabled by default in newly created tenants starting from October 21, 2019. On the other hand, pre-2017 Exchange Online tenants have modern authentication disabled by default. If modern authentication is still disabled in your tenant, to avoid a login loop after enabling Security defaults, you need to first enable modern authentication in Exchange Online.
Being familiar with that info, you should now be ready to start with Security defaults. You’ll need at least the Security Administrator role.
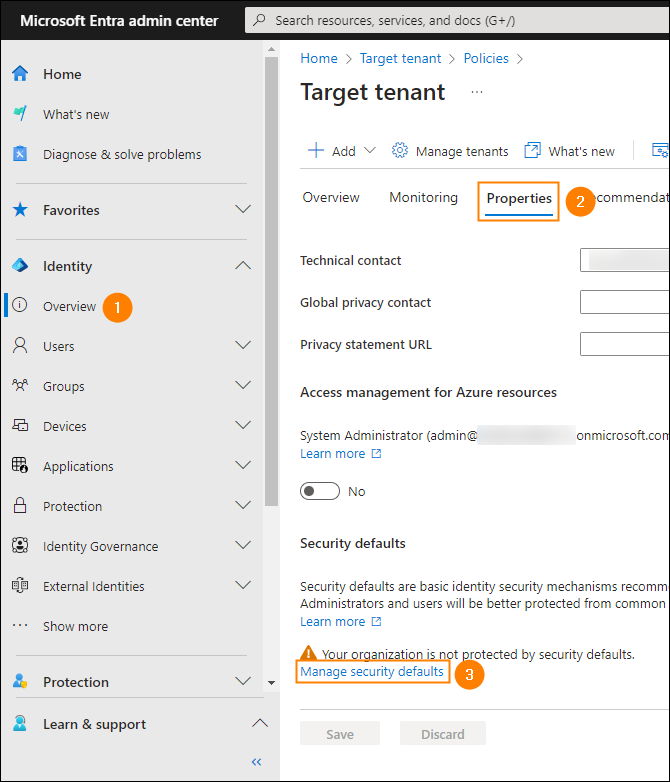
- Sign in to the Microsoft Entra admin center.
- Click Overview in the navigation menu, go to the Properties tab. In the Security defaults section at the bottom, click Manage security defaults.
- In the pane that opens, choose Enabled from the drop-down menu and click Save.
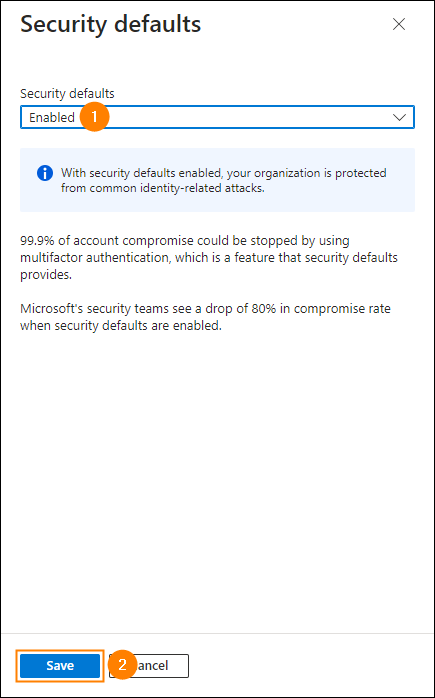
- That’s it! MFA is now enabled for all your users.
Now you and your users will be prompted to configure MFA on a first sign-in attempt. As per old rules, users could continue using the basic sign-in method for 14 days. Once 14 days have passed, they weren’t able to sign in unless they completed the MFA configuration for their account. Starting December 2, 2024, the grace period will no longer be available in newly created tenants, and users will be required to set up MFA immediately. As for existing tenants, the change will be rolled out, starting from January 2025.
Nevertheless, if you wish to speed up the adoption of multifactor authentication, you can additionally revoke existing sign-in tokens to force previously authenticated users to re-authenticate using MFA. For instructions, head over to this section.
If you’re interested to learn what the multifactor authentication experience will be for users & admins, consult this section.
Conditional Access Policies
Conditional Access Policies (CAPs) offer the greatest flexibility, letting you customize multiple conditions for displaying MFA requests to end users as well as have a granular control over user scope.
In principle, CAPs are rules that can consist of multiple conditions (e.g. user scope, geographical location, app in Microsoft 365) that evaluate sign-in attempts to either block or allow them. They are enforced after first-factor authentication (login + password) is completed.
Learn all the basics about Conditional Access Policies from our comprehensive guide
If you previously implemented MFA via Security defaults as instructed earlier, but then circumstances for your organization changed or you suddenly felt you need more customization and control, Microsoft provides you with a short guide on how to migrate to CAPs. Learn more
Before you start working with CAPs, make sure your admin account has the necessary role – you’ll need Conditional Access Administrator, Security Administrator or Global Administrator one.
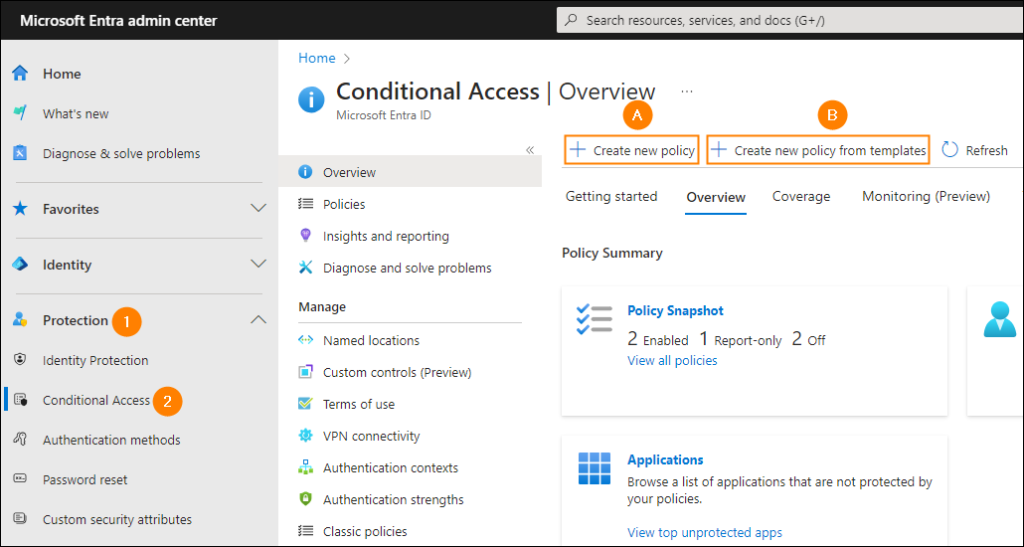
To start, sign in to the Microsoft Entra admin center. In the navigation menu, go to Protection > Conditional Access.
Here you’ve got two options to enable MFA: Create new policy (A) or Create new policy from templates (B). As you might expect the first one is more advanced and lets you handle even most complex scenarios. Conversely, the latter one comes with much easier approach but with very little customization – it your environment is not complex, it can make deploying your first policy easier.
Click the option that interests you and an appropriate link to get the instructions:
How to create an MFA-focused Conditional Access Policy from scratch?
Since the number of possible setups is virtually unlimited, I’ll show the quickest way to configure MFA as well as discuss conditions that you might find useful.
The minimum set of options needed to enable MFA for your organization is as follows:
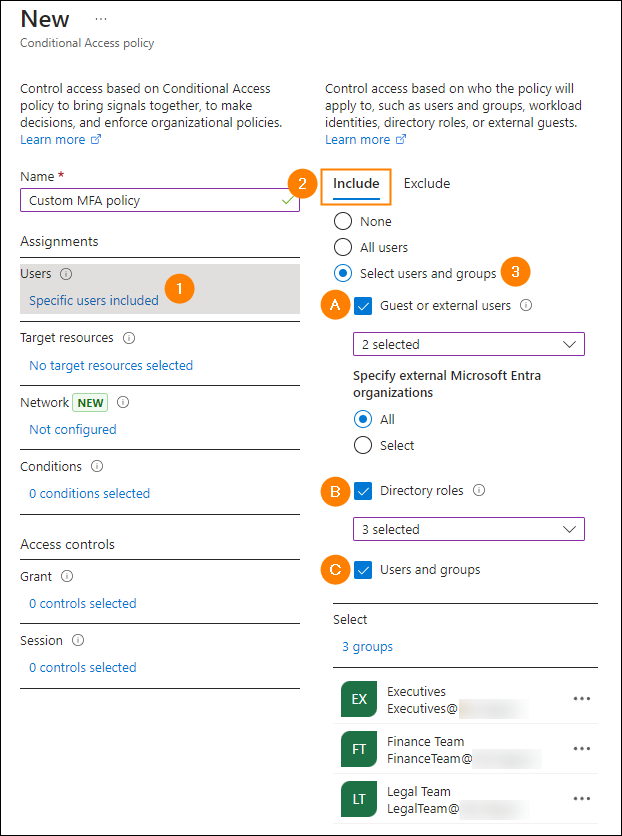
- Name – name is required for each CAP.
- Users – you can precisely define which users/groups to include or exclude from policy. After selecting Select users and groups, you can include guest users (A), directory roles (B) as well as regular users/groups (C) in the users’ scope. The same settings are available on the Exclude tab, so granularity is great. To avoid lock-out, it’s a good idea to create emergency or ‘break-glass’ admin account(s) beforehand (learn more) and exclude those from the users scope.
- Target resources – you will most likely select All cloud apps (native Microsoft 365 apps and 3rd party apps in Microsoft 365) most often. However, you might as well choose Select apps and precisely define which apps will require MFA. Exclusions are of course possible too.
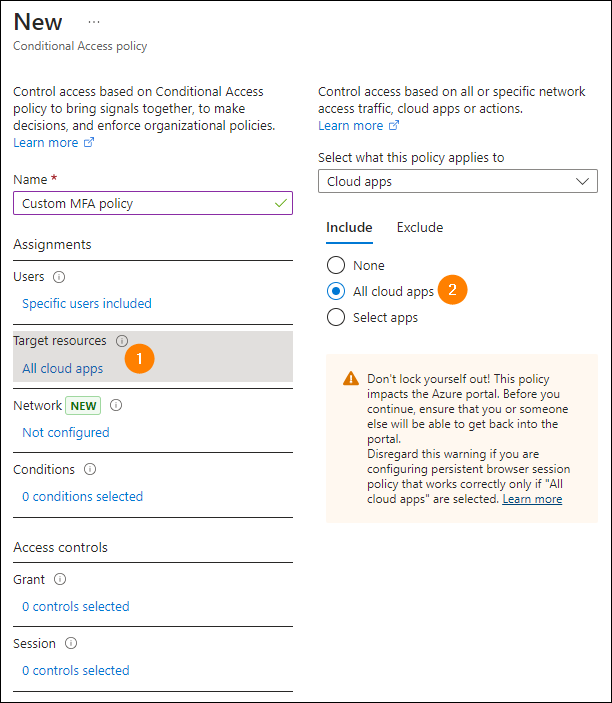
- Grant – to grant access to users who meet the MFA authentication requirement, click Grant, select Grant access, choose the Require multifactor authentication option and click Select at the bottom.

Other valuable options to better customize your MFA Conditional Access Policy include:
Under Conditions:
- Locations – with this you can, for example, allow sign-in only for users whose device is located in the country your company is based or for users with selected IPs only. If you do, remember to make exclusions for business trips and allowed VPN uses.
- Filter for devices – very robust feature that can allow sign-ins from devices with a specific DeviceID, DisplayName, EnrollmentProfileName, Manufacturer, Model and so on.
Under Grant:
- Require device to be marked as compliant – if you use Microsoft Intune compliance policies, you can allow users to sign in from only those devices that meet policy requirements.
Under Session:
- Sign-in frequency – you can require users to re-authenticate every 14 days or 24 hours to prevent situations where someone who signed in a year ago still has access to sensitive information.
For descriptions of all options and what they do, I again encourage you to read our comprehensive guide on CAPs.
When you complete your setup, the last option, Enable policy, lets you choose how you want to enable your policy. To avoid unpleasant surprises like lock-out of all admin accounts in your tenant, it’s a good idea to first test your policy. To do this, choose Report-only and click Save – the policy will be enabled but not enforced.
To monitor if sign-ins are successful after the policy has been enabled, you can use:
- Conditional Access insights and reporting (Protection > Conditional Access > Insights and reporting). To use it, you need an additional Azure license (also free trial is available). More info on insights and reporting can be found here.
- Sign-in logs (Protection > Conditional Access > Sign-in logs)
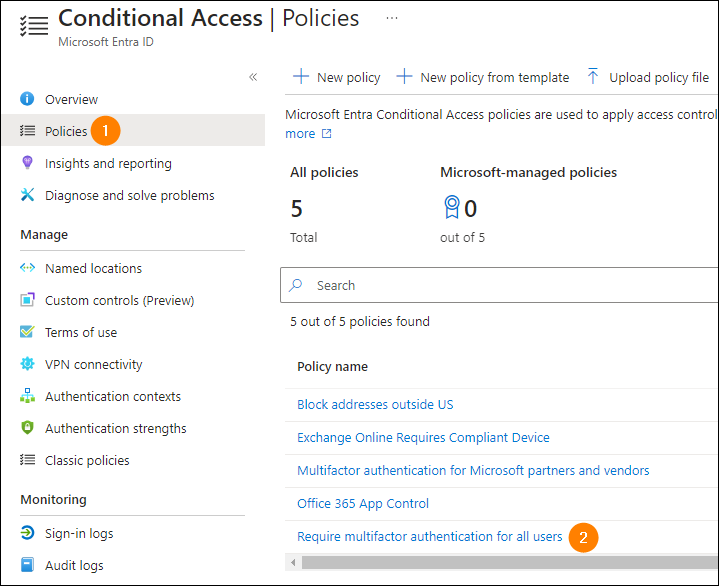
If you’re confident that your MFA policy works as intended, go to Protection > Conditional Access > Policies, locate and click your policy on the list, choose On for Enable policy and click Save. Now that your CAP is enabled and enforced, all users in the policy will need to use MFA when the policy’s conditions are met for them.
How to create an MFA-focused Conditional Access Policy from template?
Creating a policy from a template is quicker and simpler than starting from scratch.
Once you get to the page with predefined policies from Microsoft, type multifactor in the search box to find all MFA-focused policy templates. Next, select a policy that interests you (e.g. Require multifactor authentication for all users) by clicking the radio button next to it and click Review + create at the bottom.
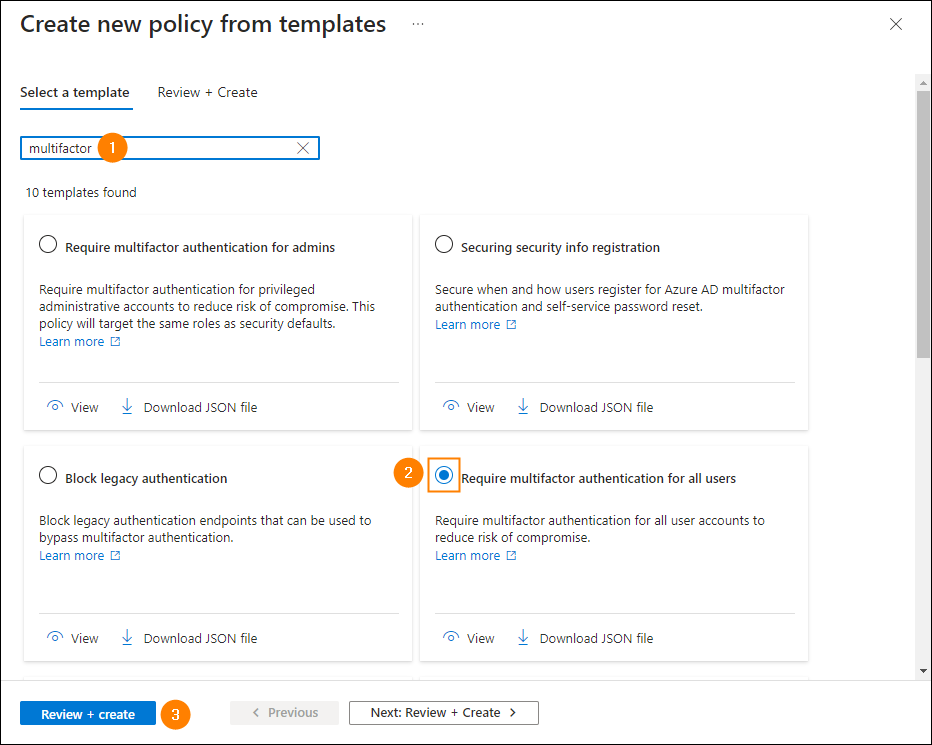
In the Review + Create step, you can configure a minimum set of options:
- Policy name
- Policy state – choose On to enable the policy

Felt like a piece of cake? So it was! You can use the same steps to create & enable other policies from templates like Require multifactor authentication for guest access, Require multifactor authentication for Azure management, etc.
According to Microsoft’s recommendations, larger companies and enterprises are encouraged to set up the following template-based policies:
Note that by default, each template-based policy is applied to all users except yourself. This is to avoid locking yourself out. If you make sure that everything works fine, and users can sign in using MFA normally, you can later add your admin account to the policy by clicking the policy on the Policies settings page and editing the user scope.
Microsoft Entra ID Protection
Microsoft Entra ID Protection is a feature in the Microsoft Entra admin center that detects risky behaviors, such as anonymous IP address usage, leaked credentials, etc., and feeds this information to other security features in Microsoft 365 (e.g. Conditional Access) to further investigate them and coordinate actions.
To configure MFA through Microsoft Entra ID Protection, you need to have an account with at least Security Administrator role and complete the following steps.
- Sign in to the Microsoft Entra admin center.
- In the navigation menu, go to Protection > Identity Protection > Multifactor authentication registration policy.
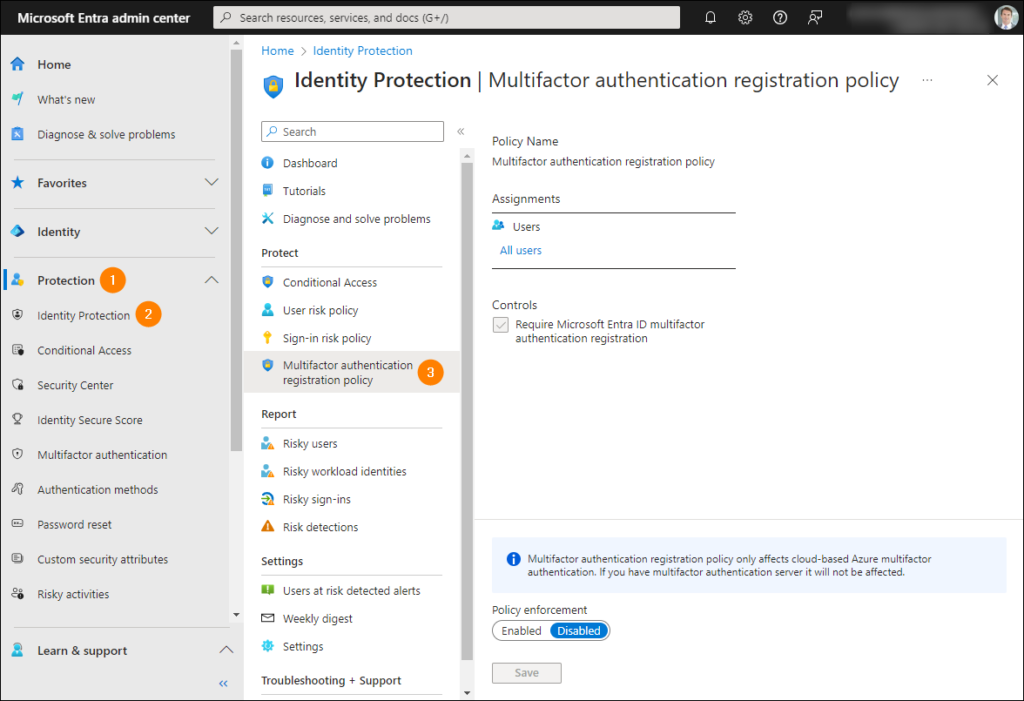
- Click Users (under Assignments) and define users for whom you want to enable MFA (the Include tab) or not enable MFA (the Exclude tab). Either way, select All users for company-wide assignment or choose Select individuals and groups to precisely customize the scope by using a groups and user picker.
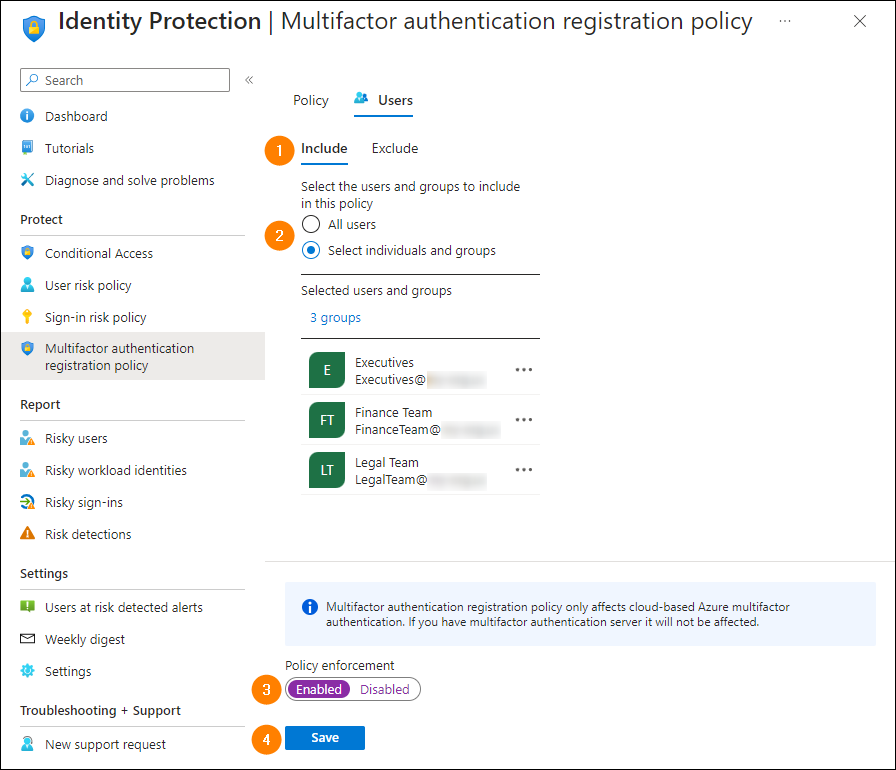
- Finally, set Policy enforcement to Enabled and click Save to enable multifactor authentication for the users’ scope you’ve defined.
Legacy per-user MFA (not recommended)
Microsoft hasn’t recommended this method for some time. Judging by the availability of more modern methods and the outdated appearance of the legacy MFA portal, it’s on the “to be retired” list. As the Redmond giant writes, you should use it “only when other methods can’t be used”. One of the possible excuses for that is when you need to use app passwords for some uncommon or legacy apps.
Here’s how to enable legacy per-user MFA:
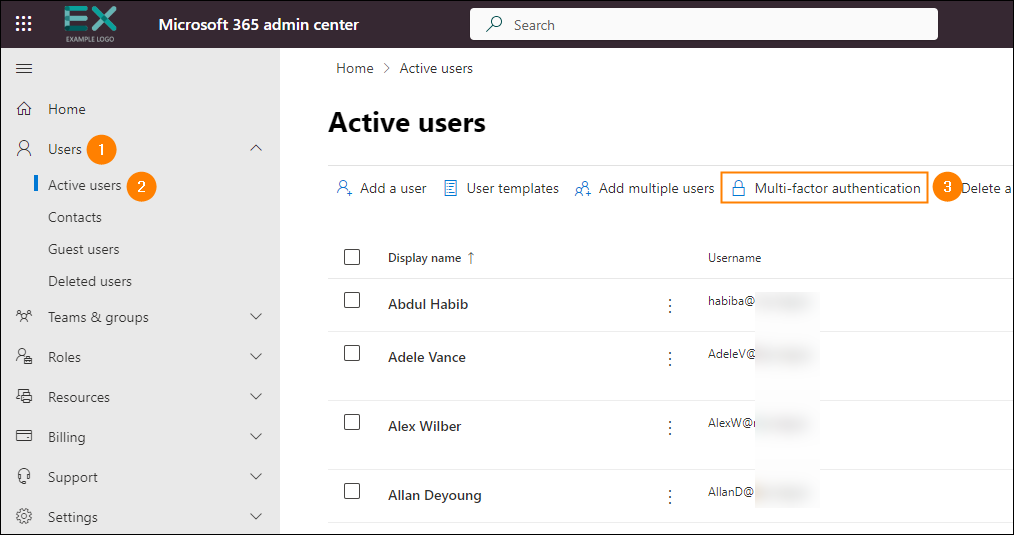
- Sign in to the Microsoft 365 admin center with an account having at least Global Administrator role.
- Go to Users > Active users and click Multi-factor authentication above the users list.
- You should get to the users tab by default. To enable MFA for a user, select them on the list, click Enable and confirm your choice by clicking enable multi-factor auth in the popup.
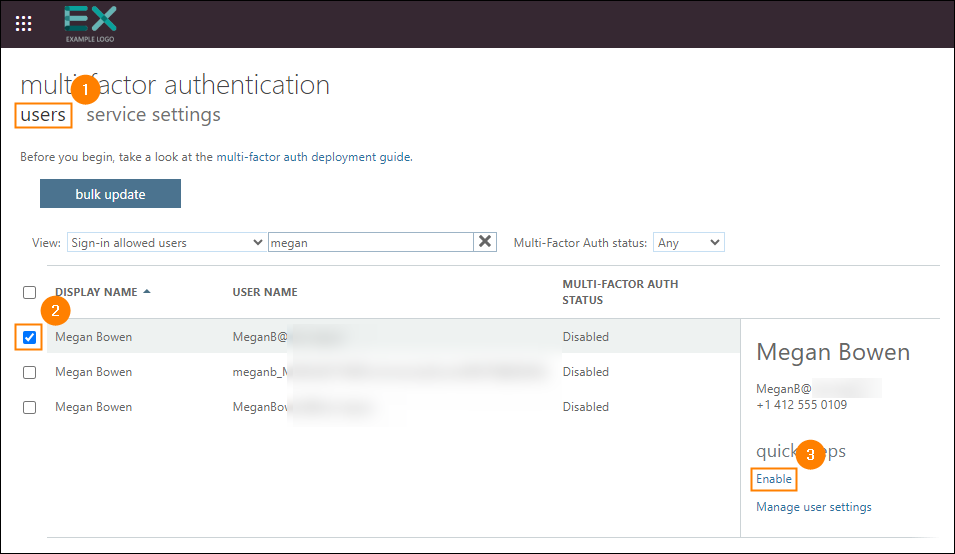
- To enable MFA for multiple users, select the checkboxes next to them, click Enable and, again, confirm your choice in the popup that opens. Note: MFA cannot be enabled using the bulk update button.
Additional configuration after enabling MFA
With MFA enabled, you can configure additional settings to give your users more options & accelerate the implementation:
How to configure different MFA sign-in methods?
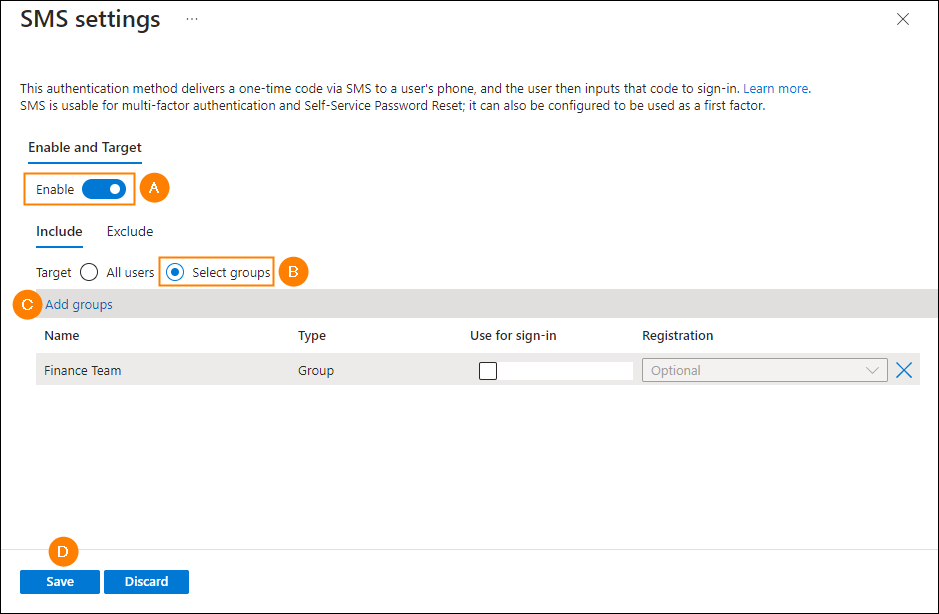
If you you’re on at least the Microsoft 365 E3 license and have used Conditional Access Policies or Microsoft Entra ID Protection to enable MFA, you can choose which sign-in methods to make available and to which users. This is done in the Microsoft Entra admin center by going to Protection > Authentication methods > Policies.

Once you click an MFA method, you can enable it (A) to all users (default setting, or choose the Select groups option (B) and click Add groups (C) to decide which groups this method will be available to. You can also exclude all users or group(s) from using this MFA method by configuring the settings on the Exclude tab. To apply the changes, click Save (D).
How to revoke active tokens to speed up MFA adoption?
To benefit from the enhanced security instantly, you might want to force multifactor authentication for your users by revoking your users’ active sign-in tokens. This will sign them out of all Microsoft 365 services/apps and start MFA configuration on their end when they try to sign in, without the 14-day grace period (if applies). You can do it as follows:
- Launch Windows PowerShell.
- (Optional) If you haven’t installed the Microsoft Graph PowerShell module yet, use this cmdlet to install it first:
Install-Module Microsoft.Graph -Scope CurrentUser- Connect to organization’s Graph API, providing admin credentials:
Connect-MgGraph -Scopes 'User.ReadWrite.All'- Next, copy and run the following script to revoke tokens for all users in your Microsoft 365 tenant:
$users = Get-MgUser -All | Select-Object -Property Id
foreach ($user in $users) {Revoke-MgUserSignInSession -UserId $user.Id}
How does multi-factor authentication work in Microsoft 365 once enabled?
After multifactor authentication is enabled, when a user tries to sign in to a Microsoft 365 service, they will see the following screen after providing their password:
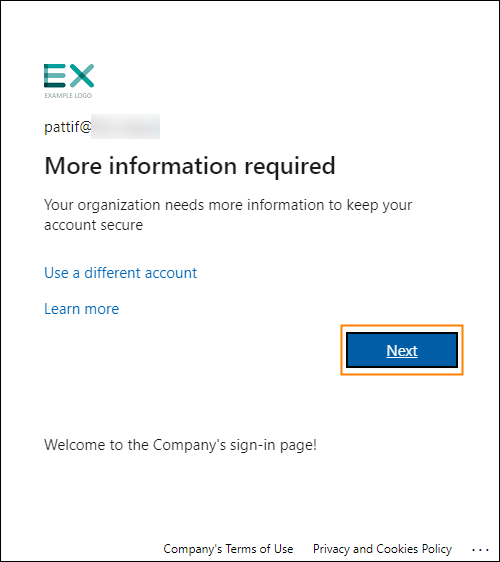
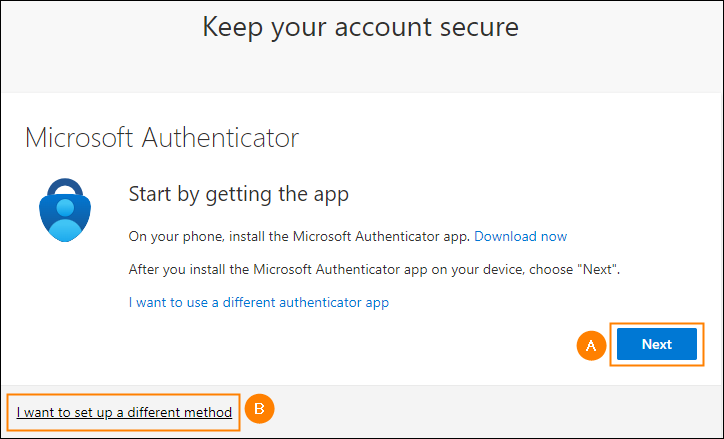
After clicking Next, a wizard will launch to help the user configure an MFA method of their choice. By default, Microsoft wants the user to complete setup for the Microsoft Authenticator app. To do this, the user needs to download and install the app, click Next (A) and complete a simple wizard (scan QR code, perform a test authentication).
Optionally, if MFA has been enabled using Conditional Access Policies or Microsoft Entra ID Protection and you’ve configured additional MFA methods for that user, they can click I want to set up a different method (B) to configure a different method like SMS, Phone call, etc.
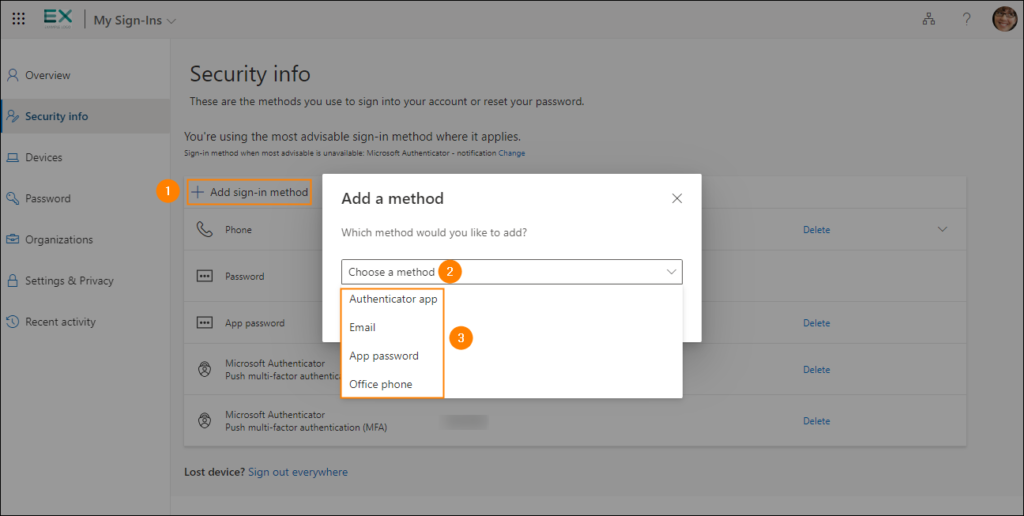
With MFA configured, the user can use the Security info page to manage and set up their MFA sign-in methods, e.g. re-configure the Microsoft Authenticator app on another device. To set up a new method, they need to click Add sign-in method, choose the desired method and follow the configuration wizard.
Finally, it’s worth noting that:
- For user accounts, MFA prompts appear, as decided by your CAP settings or Microsoft algorithms based on a given user’s location, device, role, and task. The same applies to B2B guest users.
- For admin accounts, MFA prompts appear on every sign-in, with Azure portal, Microsoft Entra admin center, Azure PowerShell and Azure CLI always requiring multifactor authentication. Note: If you’re on a hybrid setup and use Security defaults to configure MFA, the Microsoft Entra Connect synchronization account will be excluded from registering for MFA. Therefore, to maintain security, do not use this account for any purpose other than synchronization.
Recommended articles


CodeTwo sp. z o.o. sp. k. is a controller of your personal data.
See our Privacy Policy to learn more.