


Before you start
There are two crucial pieces of information you need to know before you start playing with Conditional Access in Entra ID.
First, Conditional Access is a powerful tool that you can potentially use to lock yourself out of your organization. That’s why, you should always thread lightly and remember not to completely block access for your Global Admins. At the very least, you might configure an emergency account that should be available to access your tenant in the worst case scenario.
Second, just because you’re an Exchange admin, doesn’t mean you can do anything in Entra ID. And setting up conditional policies requires some permissions and a license that don’t have to be assigned by default.
- For a tenant to have Conditional Access Policies available, you need Microsoft Entra ID P1 licenses
- To create a Conditional Access policy, you need Conditional Access Administrator, Security Administrator or Global Administrator.
- To create Authentication context (advanced option) the Conditional Access Administrator or Security Administrator role is needed.
- To configure advanced conditions for a policy, Microsoft Entra ID P2 license is required.
Possible conditional access use cases
Conditional Access Policies give you much freedom when it comes to conditions configuration. Some of the most popular scenarios include:
- Allowing connections to your organization only from certain IP addresses and devices.
- Requiring multi-factor authentication (MFA) when trying to access crucial company assets.
- Requiring MFA for admin accounts.
- Blocking certain apps for selected users.
- Preventing guest or external users from accessing certain data.
Explanation of Conditional Access policy controls
Below, I’m listing the options you have when configuring a Conditional Access policy.
Users
This section lets you control which users will the policy apply to:
- All Users applies the policy settings to everyone apart from the exceptions (that’s what I’ll do)
- Select users and groups lets you target guest and external users, specific roles or specific users or group members. That’s the point in which you need to be careful not to lock yourself out. If you ever apply policies to all users, it might be a good idea to add Global Administrator role group (at the very least) to the exceptions.
Target resources
Target resources lets you specify what you’re blocking access to.
- Cloud apps lets you target all or specific apps registered in your Entra ID organization.
- User actions can be applied when a user tries to Register security information or Register or join devices.
- Authentication context needs to be specified before trying to create a new policy. It lets you apply custom security requirements to specific Entra ID resources.
Conditions
Conditions, as the name suggests, is where you can set up conditions that need to be met to block or allow access to the resources.
- User risk / Sign in risk can be set to High, Medium or Low. The risk is configured based on ID Protection policies which are applied, for example, if someone’s IP address change suggests impossible travel, or when a password spray attack is detected.
- Device platforms lets you control which OSes are allowed or denied. Available choices are Android, iOS, Windows Phone, Windows, macOS, Linux.
- Locations lets you specify IP ranges or specific locations that are accepted or denied.
- Client apps include Browser, Mobile apps and desktop clients, Exchange Active Sync clients, and Other clients (such as older office clients).
- Filter for devices is a very useful property that lets you allow or block devices that have access to your organization. You can use various methods to select only company approved devices.
Grant
Grant lets you either Block or Grant access when additional conditions are met. For example, you can grant access but only if a user confirms their identity with MFA.
Session
Finally, Session is where you can use additional controls, like:
- Use app enforced restrictions, which currently applies only to Microsoft 365, Exchange Online and SharePoint Online. It lets you force limited access to selected assets.
- Use Conditional Access App Control, which can, for example, prevent uploading unlabeled files or block downloads.
- Sign-in frequency is where you can demand fresh authentication tokens. Otherwise, there’s a risk that someone might use a browser in which they signed in a year ago to access confidential information. This control lets you change this to, for example, 3 hours or 7 days.
- Persistent browser session, available only if you chose All cloud apps in the target resource. Using this option, you can reset tokens after a browser is closed.
- Customize continuous access evaluation lets you make use of Continuous Access Evaluation – a near real-time system that blocks access when a critical security event is detected. Critical events are: disabling an user account, changing or resetting a password, enabling MFA for a user, revoking refresh tokens, or detecting a high-user risk.
- Require token protection for sign-in sessions is the option that requires using an advanced identity protection, like a software key binding, to access organization assets.
Applying the policy
When you’re done configuring, choose whether you want to launch the policy in Report-only, On or Off mode.
Creating a Conditional Access policy
You can use any conditions set, based on the information from the previous section. In this example, I’ll create a policy that disables Microsoft Graph PowerShell for all users, except for global administrators. Keep in mind that it’s a very restrictive policy that might negatively affect your organization when trying to use third-party apps – many solutions require Microsoft Graph access to your organization to function properly.
- Go to the Conditional Access setting page and click Create new policy.
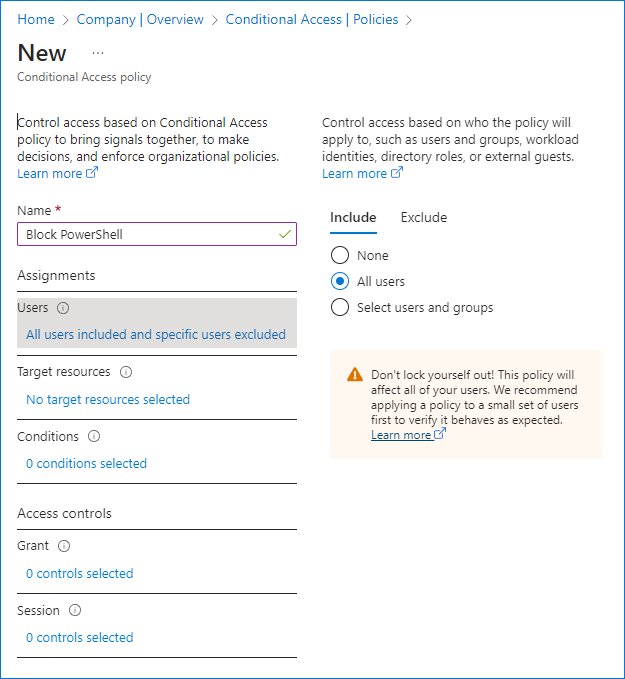
- First, name your policy the way you want, for example Block PowerShell.
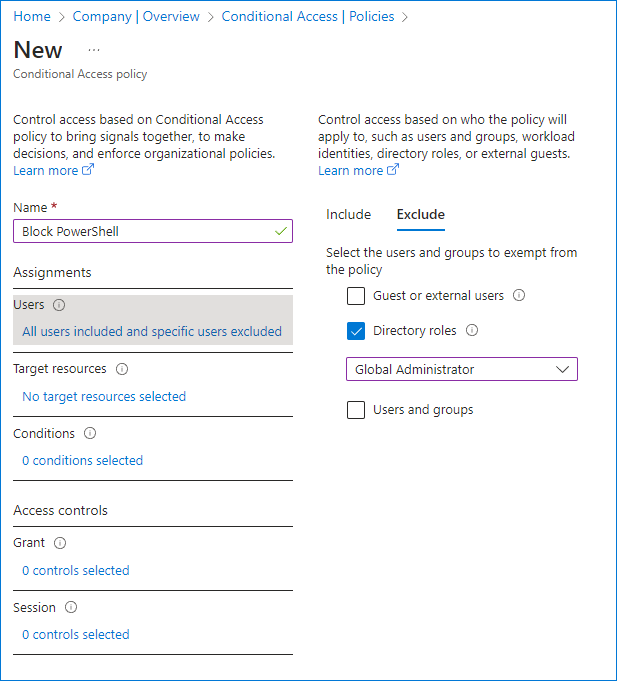
- In Users > Include, pick All users. In Exclude, click Directory roles and choose Global Administrator.
- In Target resources, click Select apps > Select. Search for Microsoft Graph PowerShell, click it and then click Select. If you can’t find Microsoft Graph PowerShell, it probably means that it’s never been used in your tenant. The first time you sign in with Graph SDK, an enterprise app (14d82eec-204b-4c2f-b7e8-296a70dab67e) is created in Entra ID.
You can add more apps, e.g., Microsoft Admin Portals is a good choice.
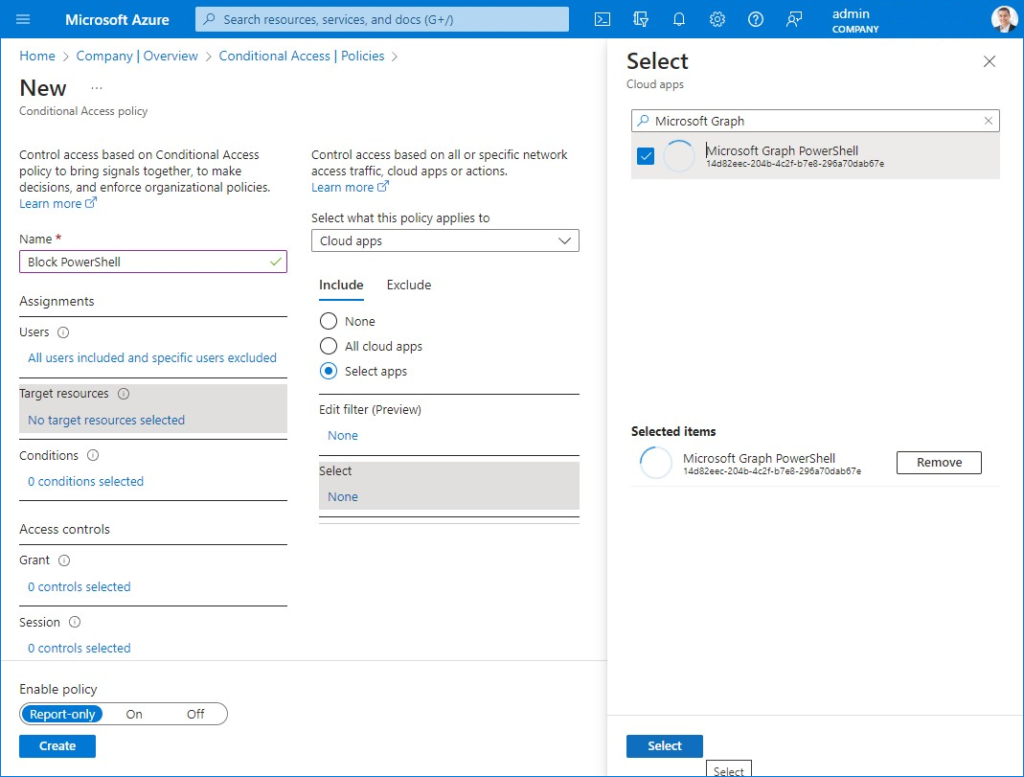
- Skip Conditions, go straight to Grant and choose Block. This way, only Global admins will have access to Microsoft Graph PowerShell, no questions asked.
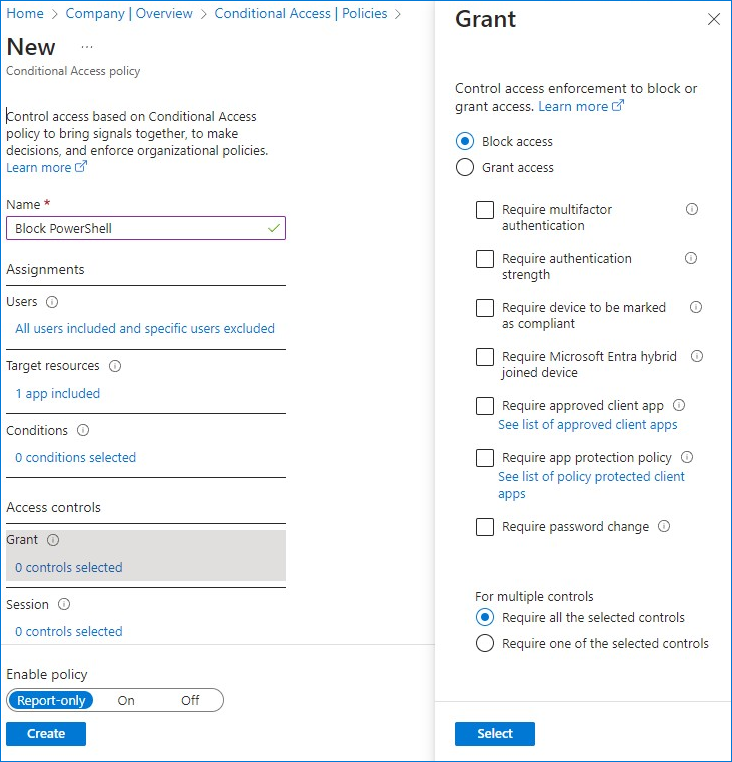
- Flip the Enable policy switch from Report-only to On and click Create.
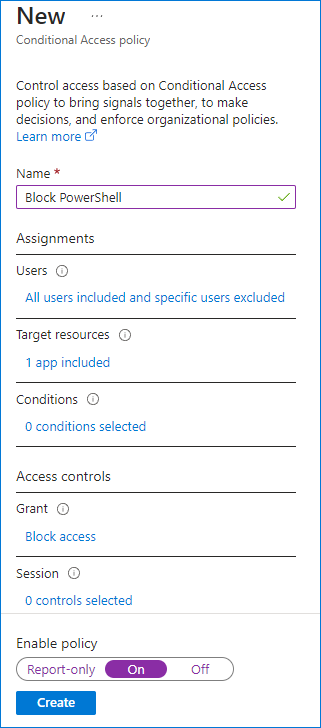
You can use any selection of conditions to fine tune your policies.
How to disable PowerShell access for users
With Client Access Rules, you could have blocked Remote PowerShell based on chosen criteria. Unfortunately, when it comes to Conditional Access Policies, there’s currently no way to choose Remote PowerShell as the target protocol. Fortunately, you can use another method.
So, if you want to disable PowerShell access to your tenant for more than Microsoft Graph PowerShell module, you can set user attribute RemotePowerShellEnabled to $false. You’ll need to user PowerShell for that:
First, connect to Exchange Online PowerShell and then, run:
Set-User -Identity [email protected] -RemotePowerShellEnabled $falseThis will block block PS access for a single user ([email protected] in this example).
If you, however, want to block PowerShell for more than a single user, launching the cmdlet mailbox by mailbox isn’t the way to go.
Disable PowerShell access for all users except admins (with PowerShell)
Below, you will find a script that prevents all users (except from admins) from using Remote PowerShell in your Microsoft 365 tenant.
Warning! Before you start, take a close look at the script, make sure you understand it, and that it does exactly what you need. For example, you might need to be more specific when choosing admin users,e.g. add more roles to the exceptions list. Keep in mind that you might also have some service accounts that use PowerShell to perform automated tasks. Ultimately, you’re responsible for your environment and if you lock yourself out of your tenant, unable to use PowerShell – it’s not my fault. To be ultra safe, you might want to run the script line by line and check what gets saved to each new array you fill.
<# First, we’re creating some arrays in PowerShell and make sure there isn’t any leftover data that might disrupt how the script works #>
$admingroup = @()
$adminusers = @()
$nested = @()
$allusers = @()
$allusersexceptadmins = @()

<# Below, we’re listing all members of the Organization Management role group. Users from this group will be excluded later on, so that their PowerShell access isn’t blocked. #>
$admingroup = Get-RoleGroupMember -Identity "Organization Management"

<# The next part takes care of groups nested inside the Organization Management role group. If the member is a User, then they are added to the $adminusers array. If not – the next part adds users from the nested group to the array. #>
$admingroup | foreach {if ($_.Recipienttype -eq "UserMailbox") {$adminusers += $_} else {$nested += $_}}; $nested | foreach {$nestedgroupmembers  += (Get-RoleGroupMember -identity $_.Name); if ($nestedgroupmembers.Recipienttype -eq "UserMailbox"){$adminusers += $nestedgroupmembers} else {$nested += $nestedgroupmembers}}

<# The line below removes duplicates from the $adminusers array and stores them in $unique array #>
$unique = $adminusers.name | Select-Object -unique

<# Getting all Microsoft 365 users #>
$allusers = get-user

<# Removing Organization Management members, saving the result to $allusersexceptadmins #>
$allusersexceptadmins = $allusers | Where-Object {$unique -notcontains $_}

<# Blocking PowerShell for all non-admin users #>
$allusersexceptadmins | foreach {Set-User -Identity $_.name -RemotePowerShellEnabled $false -Confirm:$false}

<# Checking if the script succeeded. If you get an error at this point, you might have locked yourself out of your organization #>
Get-user | FL name,remotepowershellenabled
Recommended articles


CodeTwo sp. z o.o. sp. k. is a controller of your personal data.
See our Privacy Policy to learn more.