



Microsoft 365 admins have many tools they can use to secure documents and emails. Sensitivity labels configured in the Microsoft Purview portal are one of them. In this article, I will explain in detail:
- what sensitivity labels are,
- how to set them up,
- how to test if they work well, and
- how to monitor changes to labeled documents and emails in your organization.
What is a sensitivity label?
A sensitivity label is a kind of digital stamp added to your email or document (such as a Word document or Excel workbook) to secure it. Most commonly, sensitivity labels are used to indicate that a message or file is confidential, secret, or intended for a specific audience only. For example, a sensitivity label may be applied to inform users that a document contains personal information and should not be shared with unauthorized recipients.
Going beyond traditional role-based access control, sensitivity labels come with a bunch of unique features. For instance, with a sensitivity label, you can prevent users from viewing or downloading certain documents – and even if a document is downloaded by a user who isn’t intended to view it, a label can continue to limit access and protect sensitive information.
In Microsoft 365, you can set up multiple sensitivity labels and configure them for different purposes, depending on your company needs. For example, you can:
- create labels for the whole company, specific groups, or individual users only,
- use labels to specify different levels of access to company data for different groups,
- apply labels to emails or documents to allow or block specific actions (for example, preventing users from copying, downloading, or printing a document).
For most organizations, it makes sense to create multiple labels that correspond to different levels of data sensitivity. This way, for instance, critical business assets can be assigned a Top Secret label, making them read-only and accessible only to selected people, while HR documents containing employee personal data can be labeled Personal Data to help prevent potential data breaches.
What to consider before setting up sensitivity labels?
Although extremely useful, this security-focused feature can make your life a bit harder. Much depends on how you configure your labels, but if you decide to use them, some trade-offs will be inevitable. Here’s what you should consider.
First, every time you open a labeled document or email, your Outlook, Word, Excel, or another relevant app needs to communicate with Azure Information Protection (AIP). As a result, it takes longer to access your resources.
Second, keep in mind that sensitivity labels are smart. For example, when they prevent copying content, it’s not only your Ctrl+C key combination that’s blocked – you also won’t be able to capture content using Print Screen, scan it with OCR software, or share it via Teams. In other words, labels prevent almost every capture scenario, apart from taking a picture with an external device. From the security perspective, that’s a great feature, until you need to discuss a labeled document during an online meeting, and it turns out that nobody except the file owner can see it.
Finally, I’ve seen situations in which labeled documents cause extremely bizarre issues. For example:
- Microsoft Word informs you that you can’t access the document because it’s checked out to someone else, even though it’s checked out to you.
- Microsoft Word or Outlook (especially the classic Outlook for Windows) crashes on saving or opening a labeled document or sending an email.
Are the labels worth the trouble, then? Definitely! Just remember it’s not a good idea to over-protect documents or apply labels to all emails: it might hurt productivity a lot.
Default sensitivity labels in Microsoft 365
Default sensitivity labels provided by Microsoft are a fast-track solution that you can use to secure your data quickly. While they may not be perfectly suited to your specific business context, they can serve as a preliminary security scaffolding that you can build upon by adding other labels or modifying the default ones.
Take a look at the table below for a list of default labels.
| Label name | Applies to | Additional info |
|---|---|---|
| Personal | 1. Files & other data assets 2. Email 3. Meetings | Intended for personal, non-business data. |
| Public | 1. Files & other data assets 2. Email 3. Meetings | Intended for publicly distributed content. |
| General | 1. Files & other data assets 2. Email | Intended for content that shouldn’t be publicly distributed but that might be shared with external recipients, such as internal phone numbers or company standards. It contains two sublabels (applicable to meetings, too) that can be used to further specify the scope of recipients: 1. Anyone (unrestricted), 2. All Employees (unrestricted) – used when the shared data shouldn’t leave the organization. |
| Confidential | 1. Files & other data assets 2. Email | Intended for sensitive business data, such as contracts, reports, or sales figures. It contains three sublabels (applicable to meetings, too) that further specify the scope of recipients: 1. Anyone (unrestricted) – used when the data doesn’t need to be encrypted, 2. All Employees, 3. Trusted People – used when the confidential data can be shared with trusted external recipients. |
| Highly Confidential | 1. Files & other data assets 2. Email | Intended for the most sensitive information, such as passwords, source code, or employee and customer data. It contains two sublabels (applicable to meetings, too) that further specify the scope of recipients: 1. All Employees 2. Specific People |
Default sensitivity labels can be generated in the Microsoft Purview portal, but only as long as no other labels have been created yet. Here’s how you can generate default labels in your organization:
- Sign in to the Microsoft Purview portal.
- Go to Solutions > DSPM for AI (classic). Ignore the “for AI” part in the solution’s name – that is the one you’re looking for.
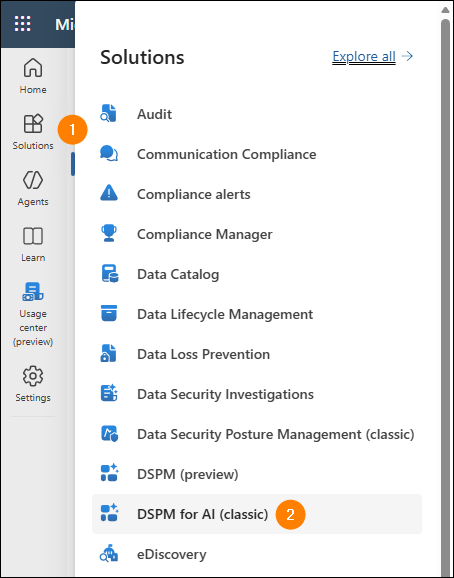
- Go to Recommendations and select Protect your data with sensitivity labels. A separate pane will open.
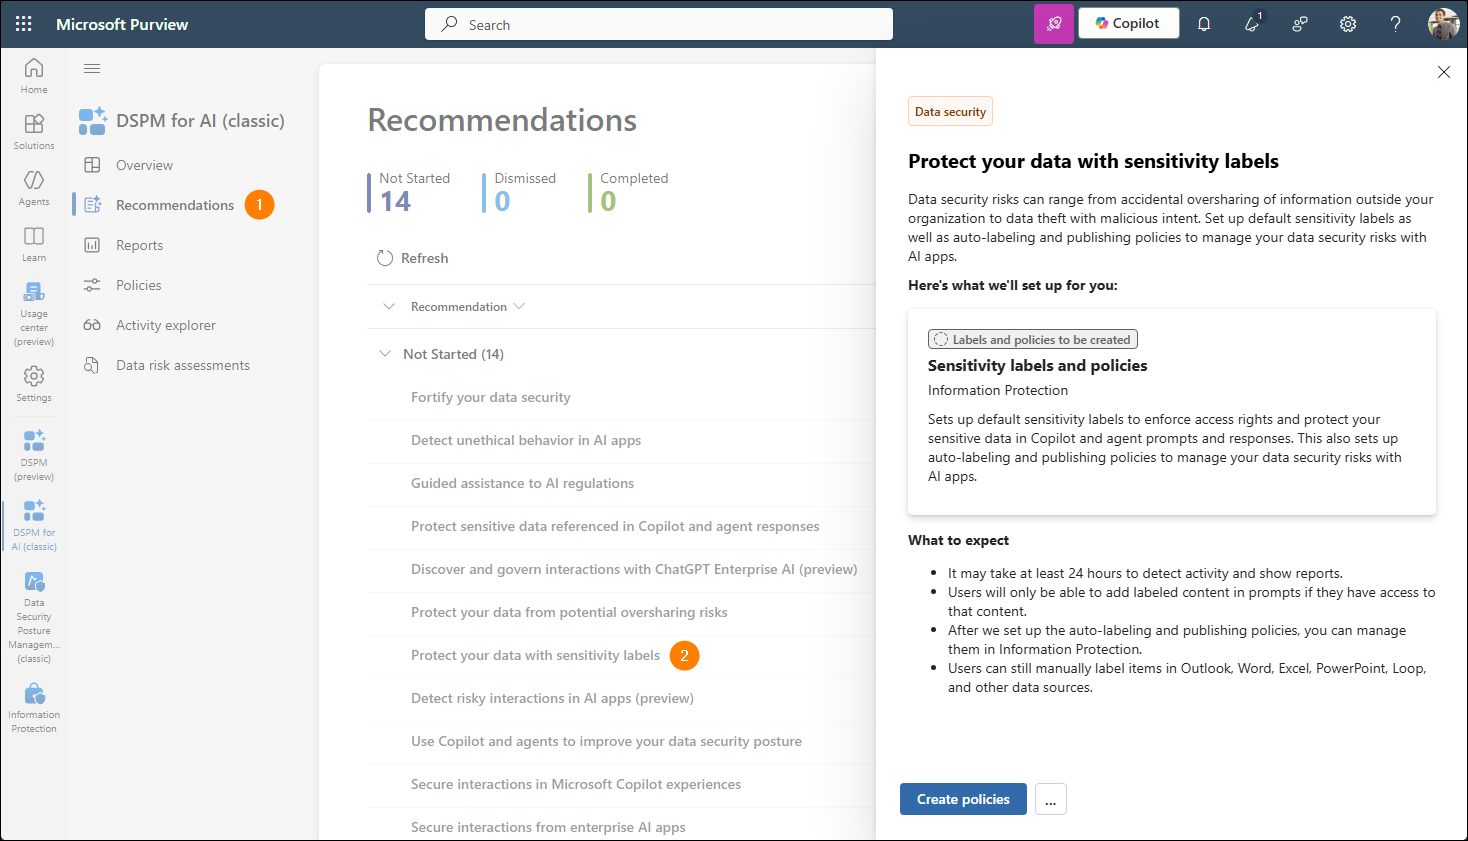
- Click Create policies and wait for the labels and a related label policy to be created.
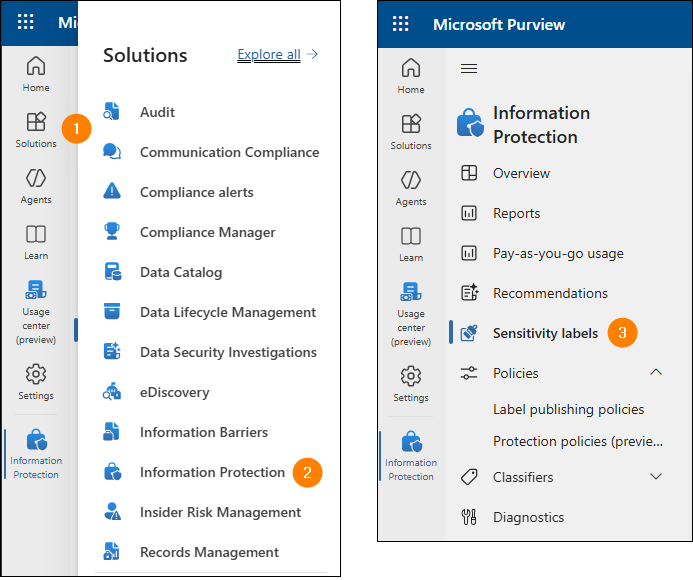
You can preview and edit the generated labels by going to Solutions > Information Protection > Sensitivity labels in the Microsoft Purview portal. In turn, the global sensitivity label policy that publishes the labels across Microsoft 365 apps, groups, and SharePoint sites is available in Solutions > Information Protection > Label publishing policies.
Now, let’s unpack how to create sensitivity labels and label policies from scratch or how to edit existing ones.
Creating a new sensitivity label
To create a new sensitivity label in your organization, go to the Microsoft Purview portal, select Information Protection from the list of solutions, and click Sensitivity labels. Or use this direct link.
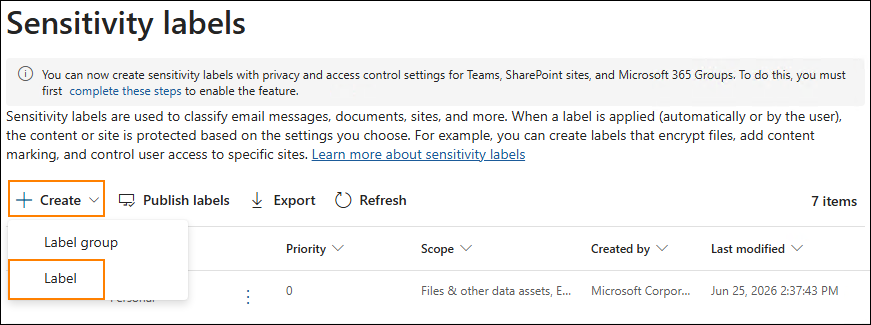
To add a new label, simply click Create > Label.
Label details and scope
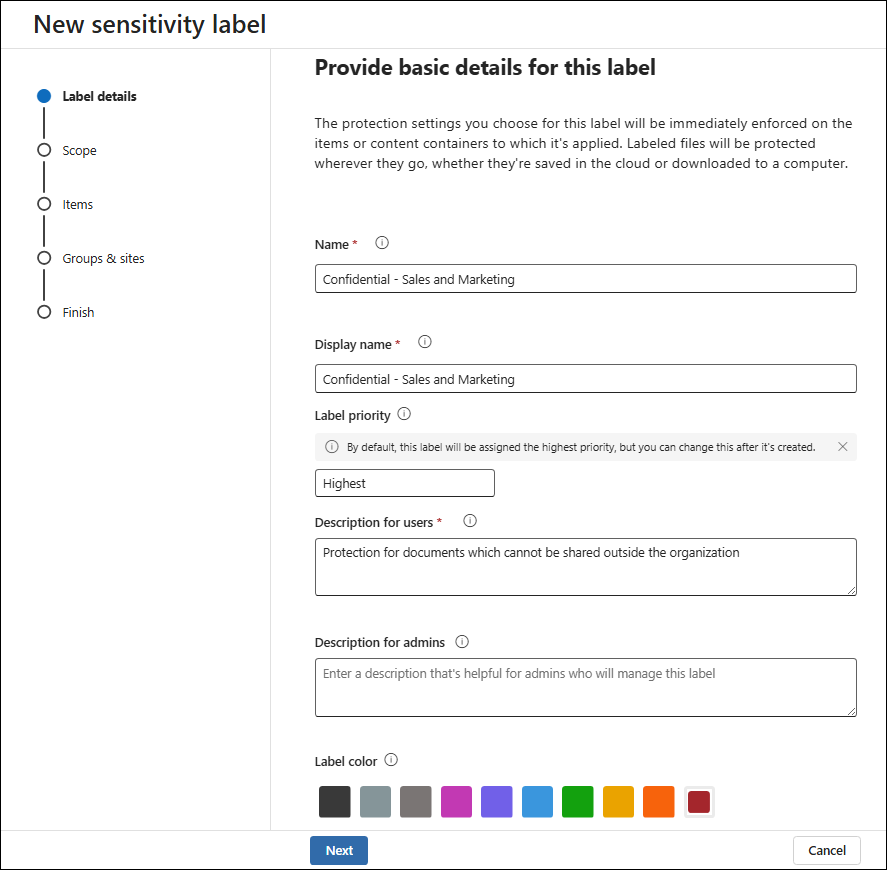
In the first step of the label creation wizard, specify the following label details:
- Name – visible in the Microsoft Purview portal.
- Display name – visible to users, for instance, in Microsoft Word.
- Label priority – set as Highest by default; you can only change it after you finish creating the label.
- Description for users – appearing as a tooltip when users hover over the sensitivity label.
- (Optional) Description for admins – displayed in the Microsoft Purview portal.
- (Optional) Label color – used for an easy identification of the label.
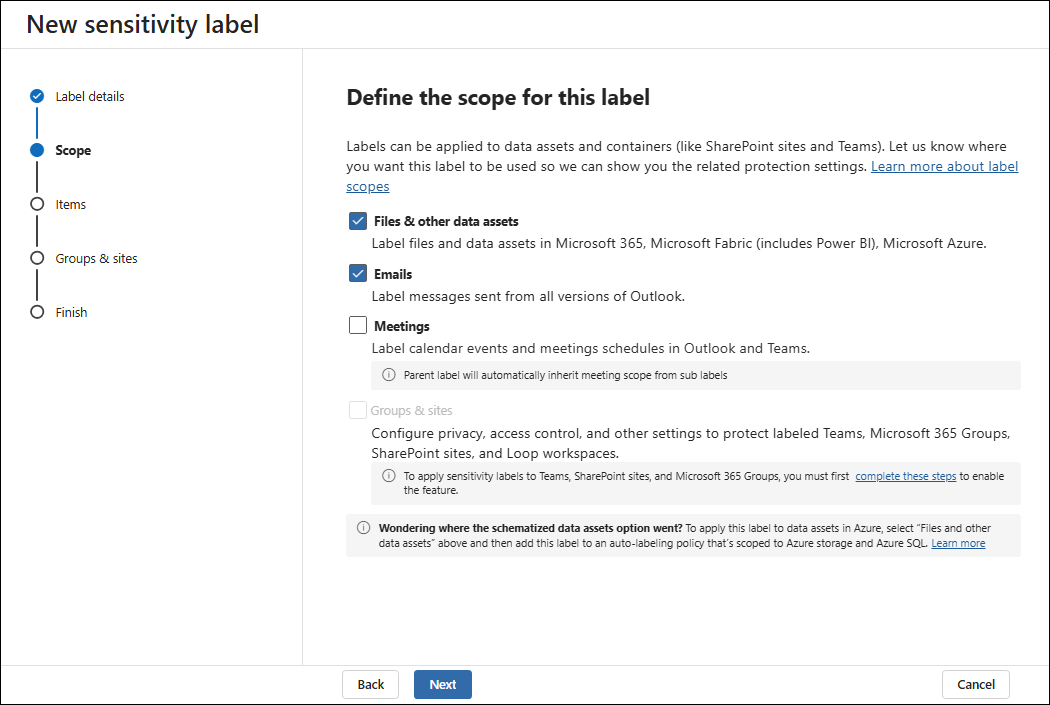
In the Scope step, you can define the scope for the label. In this example, I will apply the label to Files & other data assets and Emails.
Tip: If you want to select the Groups & sites option, you need to complete the steps described in this Microsoft article first.
Protection settings
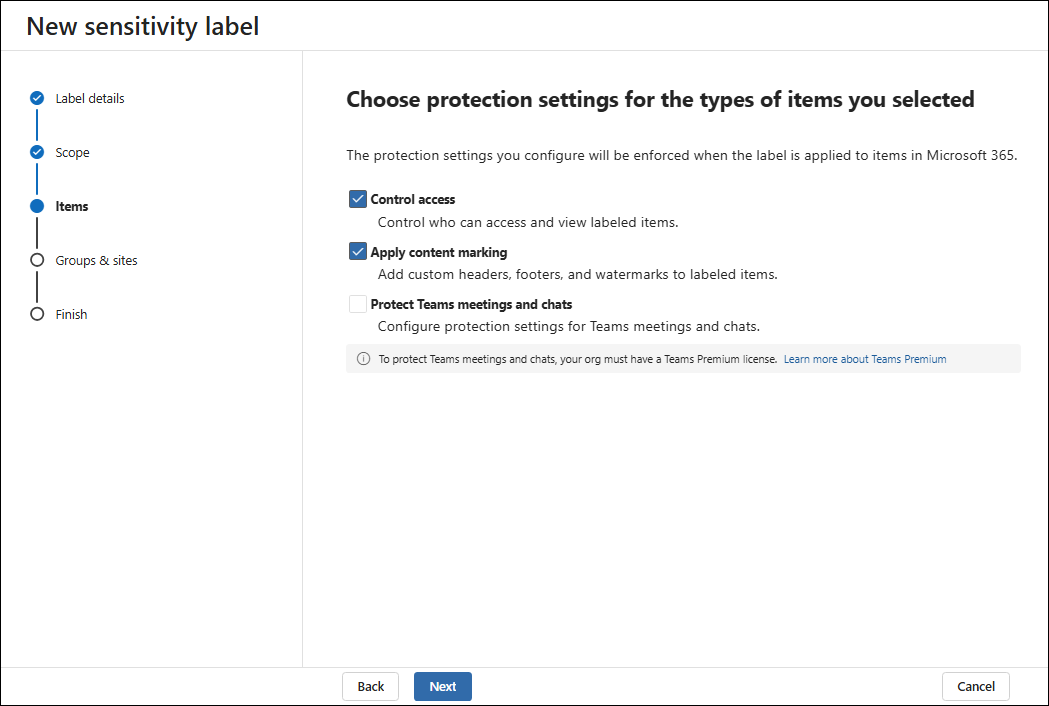
The Items step allows you to decide which label protection settings you want to configure for files, emails, and meetings. It contains three options:
- Control access – lets you control who can see and access the content with your label applied.
- Apply content marking – lets you add the label’s name (or other text notes) to headers, footers, and watermarks in your documents.
- Protect Teams meetings and chats – allows you to label meeting invites and enforce protection for Teams meetings and chats.
In this scenario, I will select the first two options only. After clicking Next, the wizard displays separate sub-steps for the selected options, where the corresponding settings can be configured.
Access control
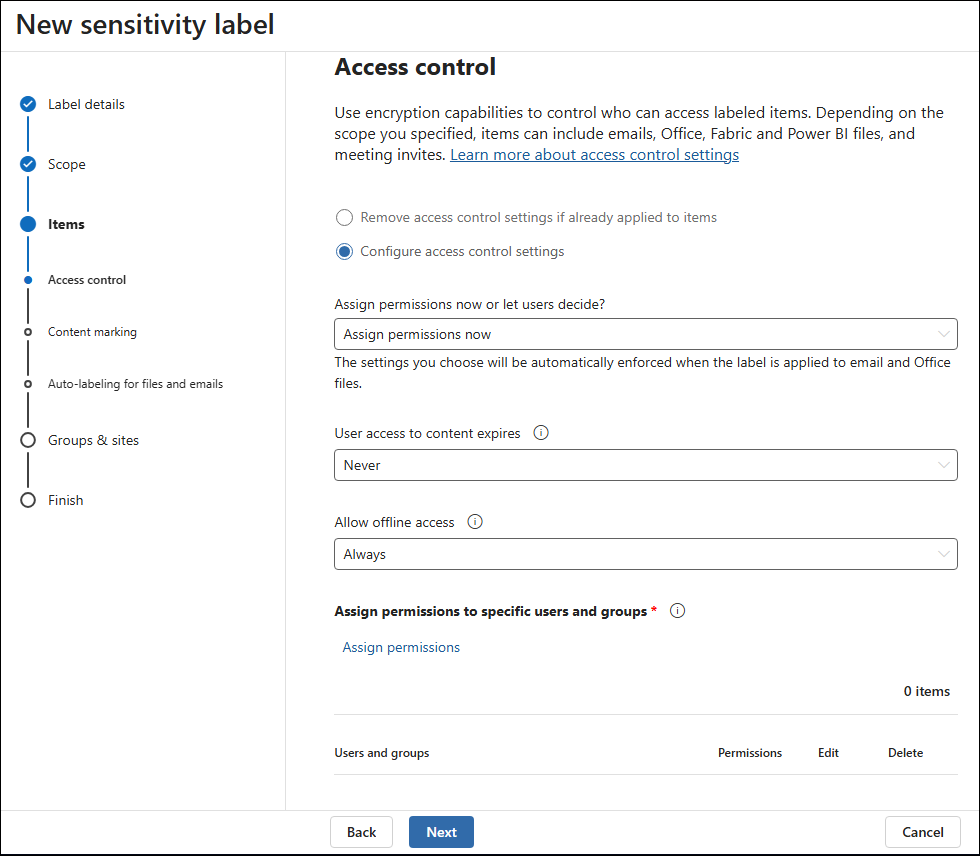
In the Access control step, you can choose whether applying the label should enforce specific access restrictions or, conversely, remove any previously applied access control settings. In this example, the primary reason for creating the label is to secure files and emails, so I will keep the Configure access control settings option selected and focus on the associated fields:
- The Go to co-authoring setting button lets you enable co-authoring for labeled documents in Office desktop apps (unless you’ve already enabled this feature). Co-authoring allows your users to work with the same files at the same time – super helpful in some scenarios.
- In the Assign permissions now or let users decide? field, you can decide if users should be able to assign content permissions on their own when they apply the created sensitivity label. To predefine permissions that are automatically applied when the label is used, select Assign permissions now.
- In the User access to content expires field, you will usually choose the Never option, since it lets users access files without any time limit.
- In the Allow offline access field, you can allow or deny offline access to your data. If offline access is denied, users will need to be reauthenticated each time they want to open a document or email.
- The Assign permissions link lets you choose which users or groups should be able to access data with the new label applied. Clicking the link opens a separate wizard in a flyout pane – I will cover it in the next section.
Assigning permissions
You have several options for defining the right audience. In this scenario, I will click Add users or groups to choose a single Microsoft 365 group. Next, click Choose permissions to define an access level for this group. You can choose from four predefined levels – Owner, Editor, Restricted Editor, and Viewer – or set a non-standard level with the Custom option. In this example, I will choose the Editor permission set.
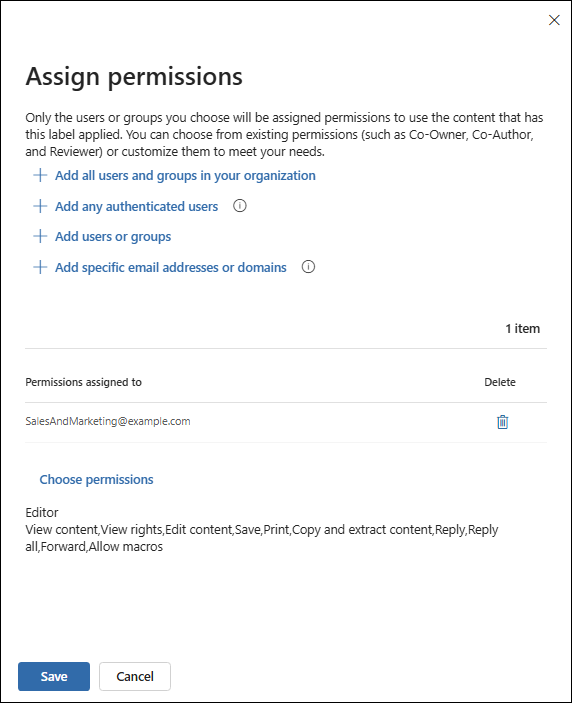
Once you’re ready, click Save to apply your settings and leave the permission wizard. Then, click Next to continue.
Content marking
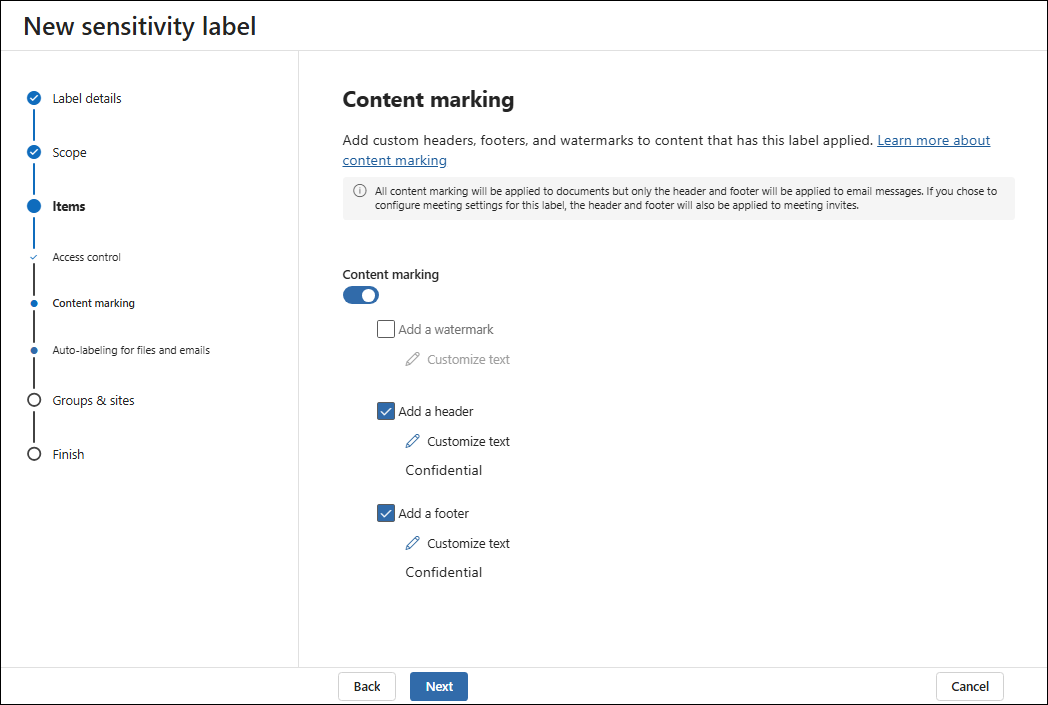
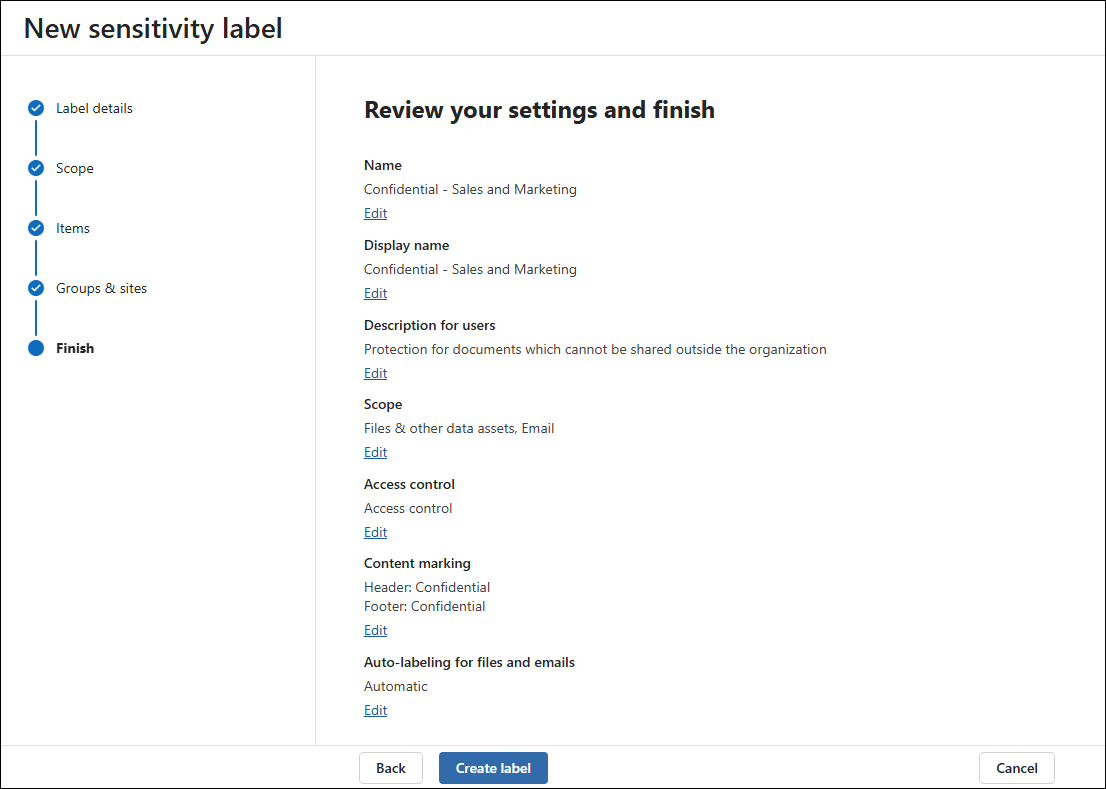
The Content marking step allows you to add clear information about the applied labels directly to your documents and emails. You can choose if you want to add a watermark, header, and footer, and define the text for each.
Auto-labeling
In the Auto-labeling for files and emails step, you can turn on the auto-labeling mechanism. That way, documents or emails containing certain types of data (for instance, sensitive information) can be automatically marked with your label.
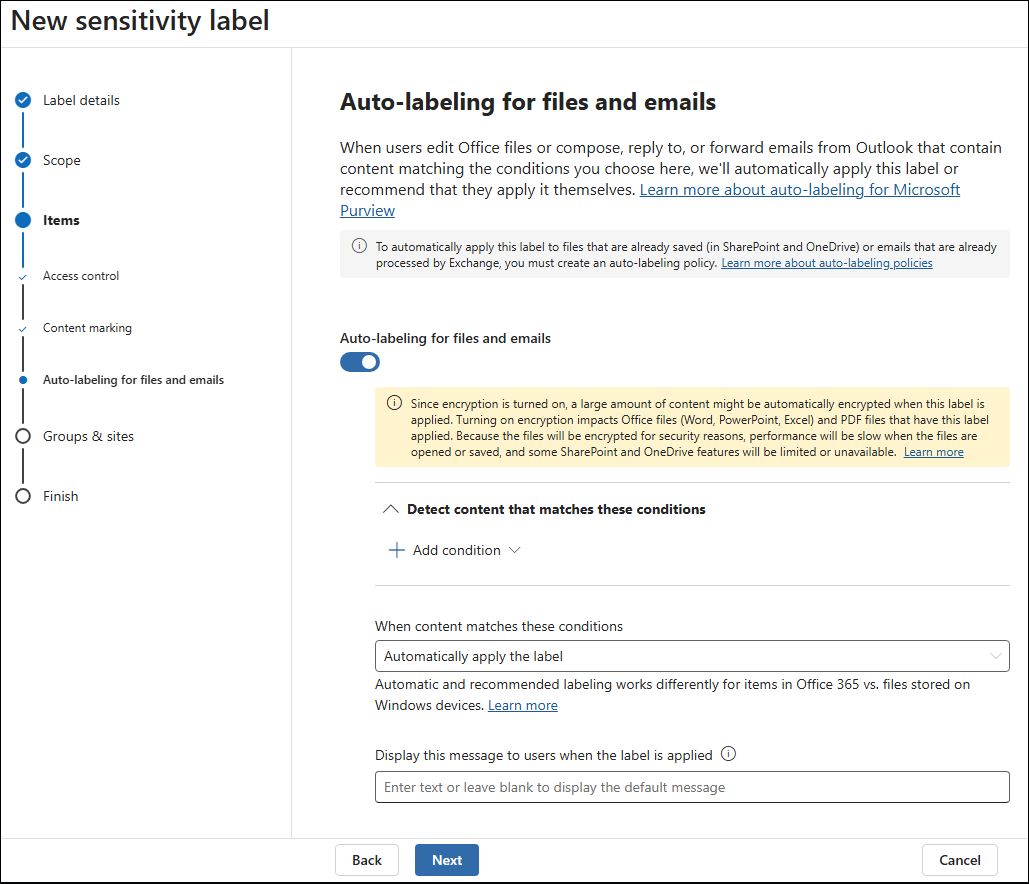
This helps you ensure that all data is classified in the correct way, and nobody forgets about applying labels. On the other hand, auto-labeling can create problems if you intend to share some documents outside your organization. Keep in mind that those auto-labeling settings are applied to new documents and emails or when users edit existing ones. To apply automatically apply labels to data at rest, see auto-labeling policies.
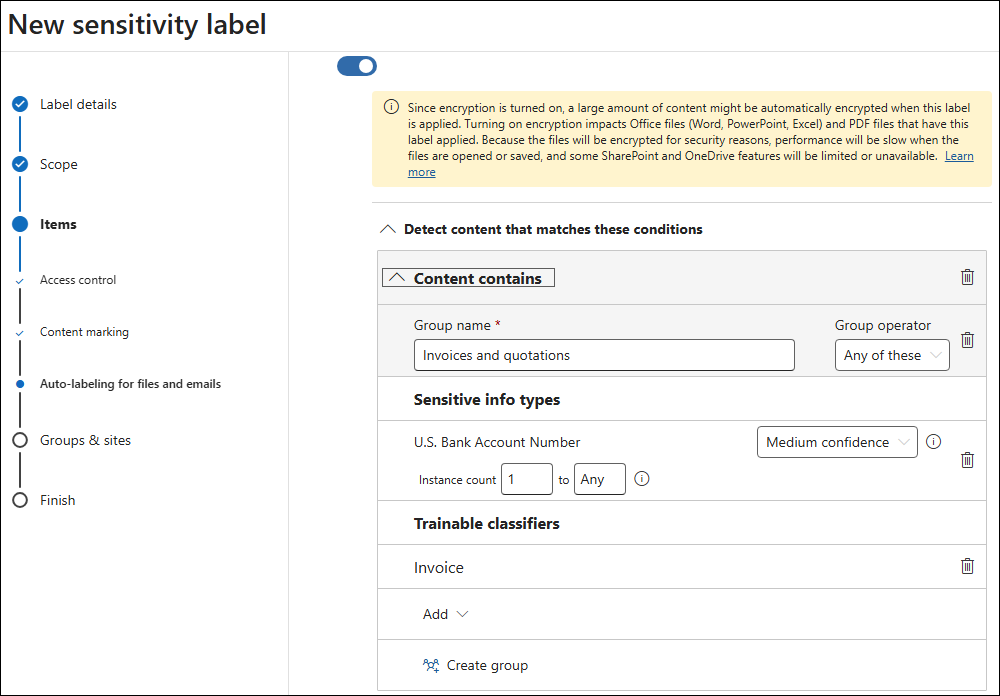
To specify content that should be auto-labeled, you need to create one or more groups of conditions that would trigger the auto-labeling mechanism. Within such groups, you can select predefined data types from two categories:
- Sensitive info types – it includes data such as national bank account numbers, passport numbers, IDs, driver’s license numbers, etc., but also medical information, or user credentials.
- Trainable classifiers – it contains broader categories of content, such as tax, invoicing, or HR data, as well as profane content, or source code.
For each of your condition groups, you can choose whether auto-labeling should be applied when any or all of the specified data types are detected. Multiple condition groups can also be combined using the AND or OR operator.
Finally, under the list of condition groups, you can choose whether you want your label to be automatically applied or only recommended to users when certain content matches the specified data types. You can also enter a default text to be displayed after the automatic label is applied.
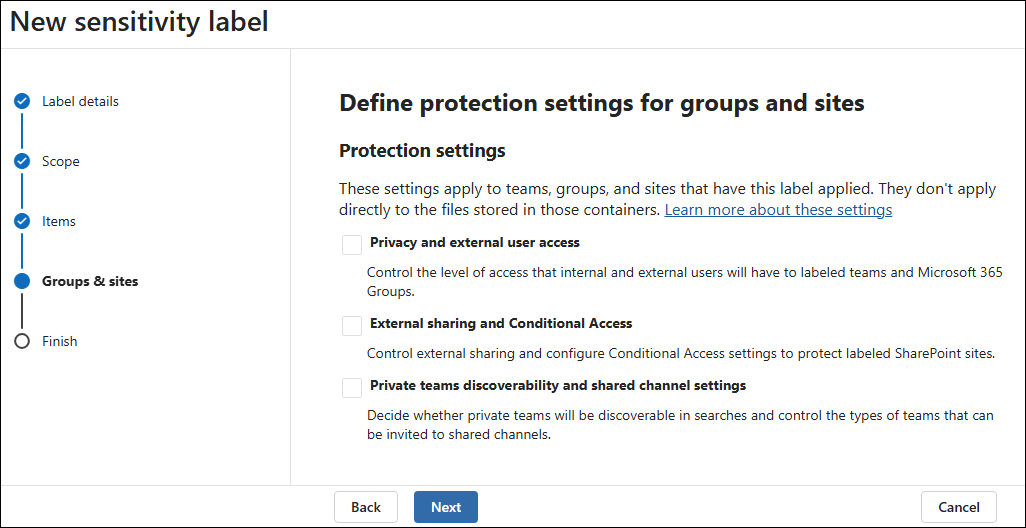
Groups and sites
In the next step, you can define protection settings for groups and sites. Those settings, unlike the previous ones, apply to teams, groups, or sites, and not the documents stored in them, so I will skip over this part for now.
Settings review
You can move on to publishing your label right away by selecting Automatically apply label to sensitive content (I cover this separately in another section) or Publish label to users’ apps (to make the label available) and clicking Done in the last step of the New sensitivity label wizard. In this example, I will choose the Publish label to users’ apps option.
Publishing a sensitivity label
You can move on to publishing your label right away by selecting Automatically apply label to sensitive content (if you use auto-labeling) or Publish label to users’ apps (to let users apply the label themselves) and clicking Done in the last step of the New sensitivity label wizard. In this example, I’ll choose the Publish label to users’ apps option.
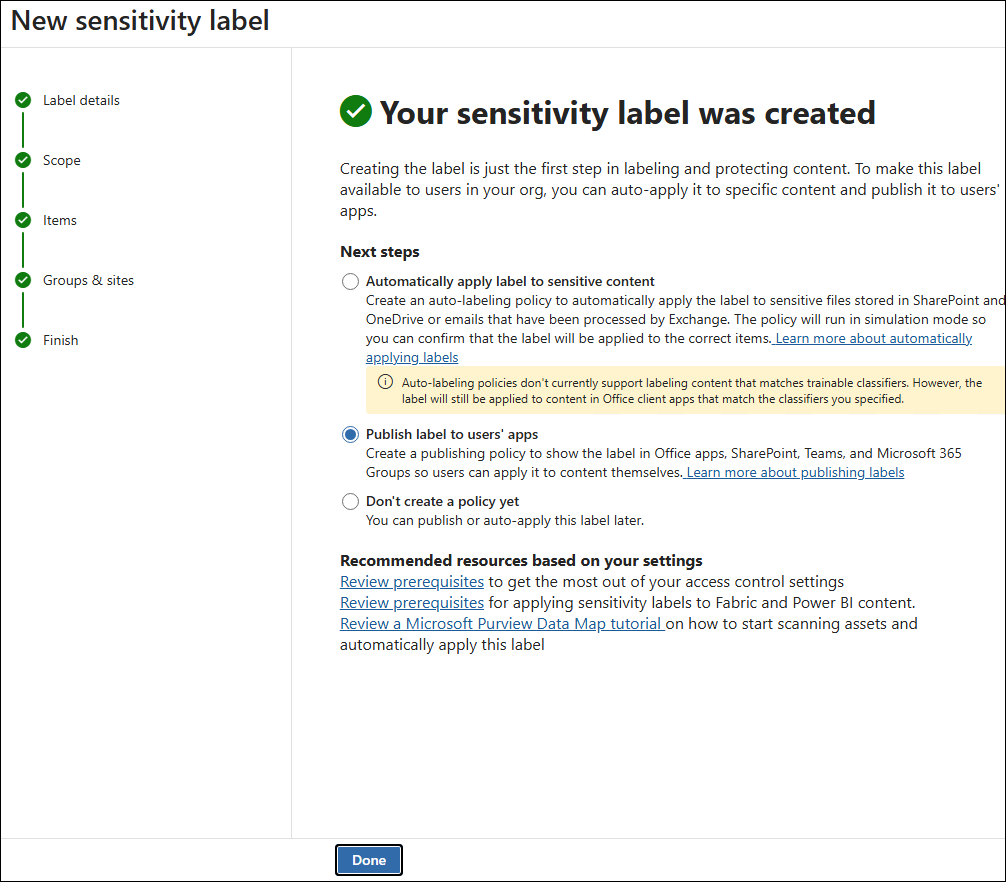
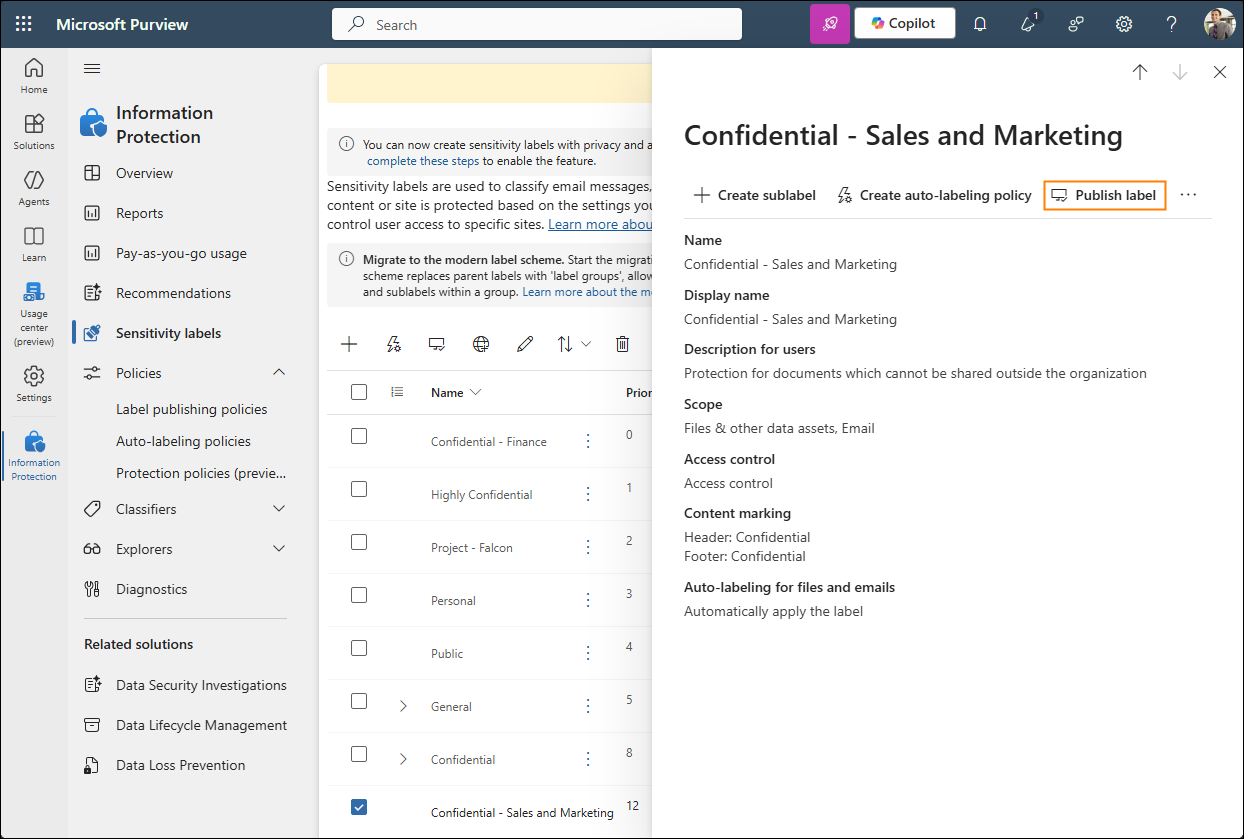
If you choose not to publish the label for now, choose Don’t create a policy yet and click Done. You can always publish it later by going to Information Protection > Sensitivity labels, selecting your label from the list and clicking Publish label. Next, skip directly to this step.
Creating a label policy
In this guide, I’m going to create a new label policy from scratch to show you all the configuration steps. To do this:
- click Create new label policy in the pane that opens after creating a new label in the Microsoft Purview portal (as shown below), or
- go to Solutions > Information Protection > Policies > Label publishing policies and click Publish label.
Tip: You can also add your newly created label to an existing policy, if you have one.
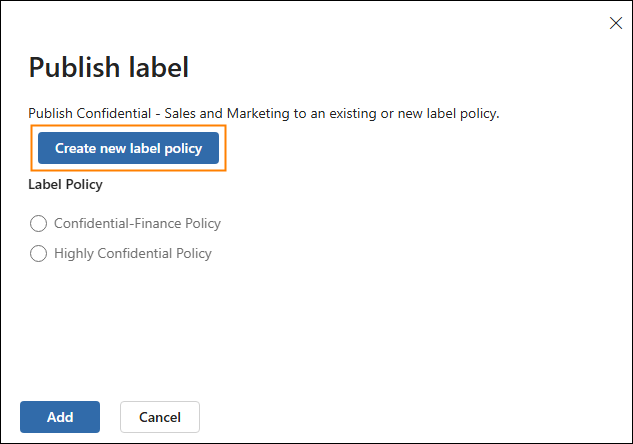
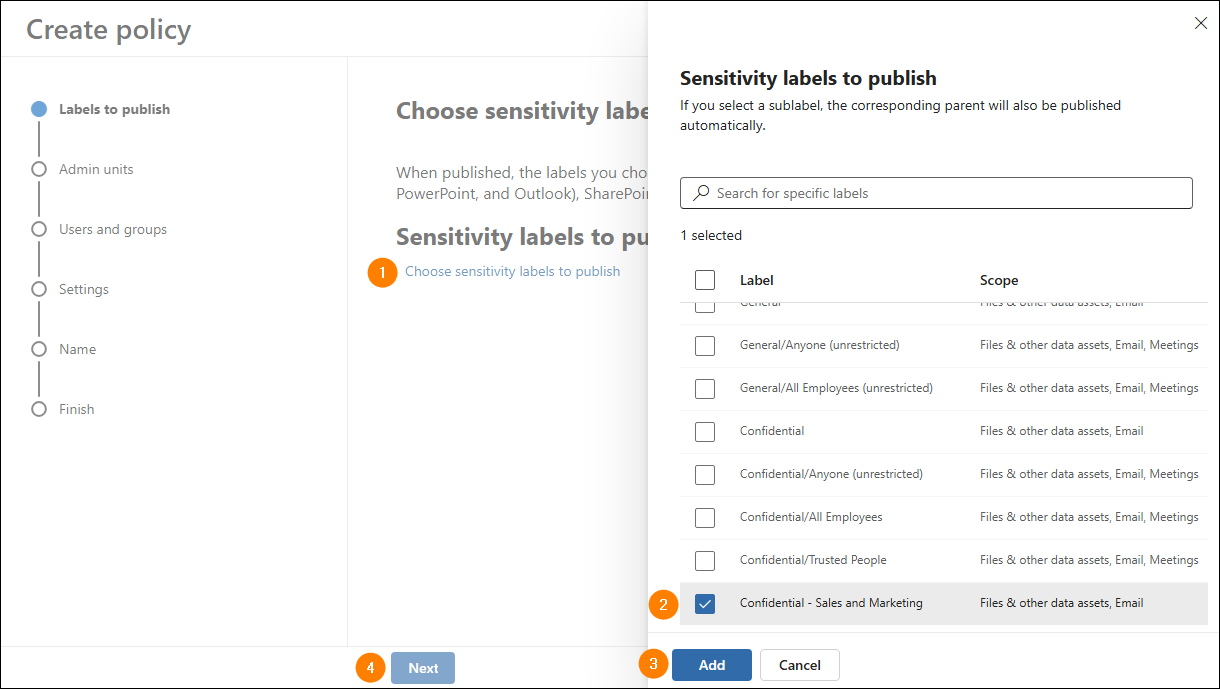
After the new policy wizard opens, click Choose sensitivity labels to publish and pick the label you’ve created earlier. Click Add and Next.
If your organization uses Microsoft Entra ID admin units, the next step allows you to restrict the policy to relevant units only. In this example, I will skip this step.
Next, choose which groups or users should have the label available. By default, labels are published for all users and groups. To change this, select the Users and groups location and click Edit in the Actions column. Next, select the Specific users and groups option in the pane that opens and click Include users and groups.
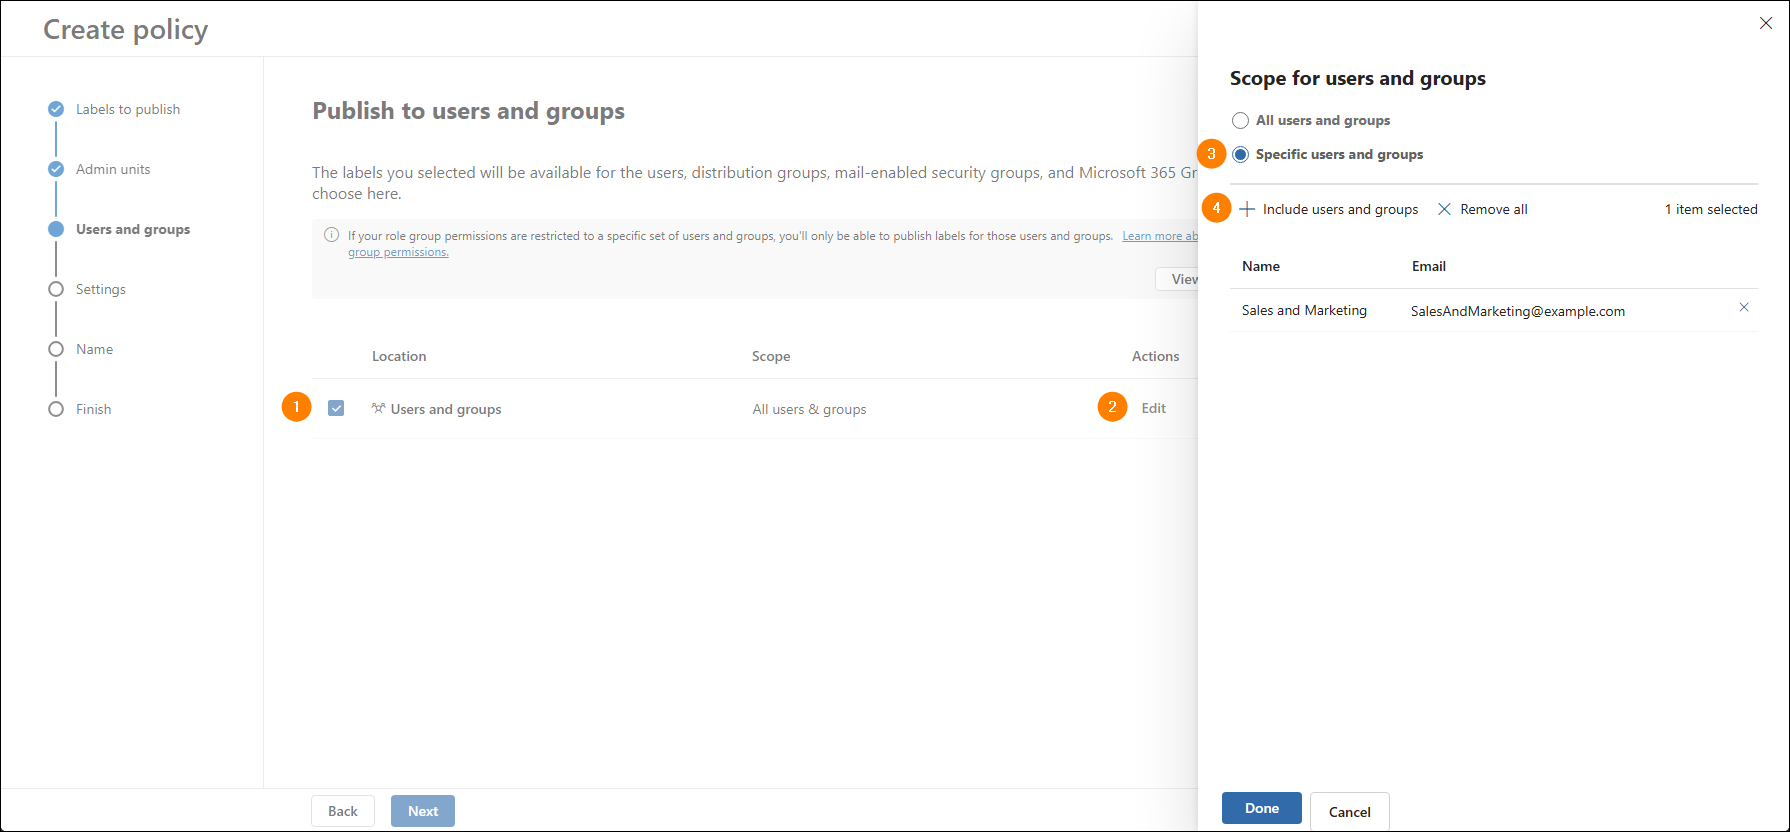
Once you select relevant users and groups, click Done and Next.
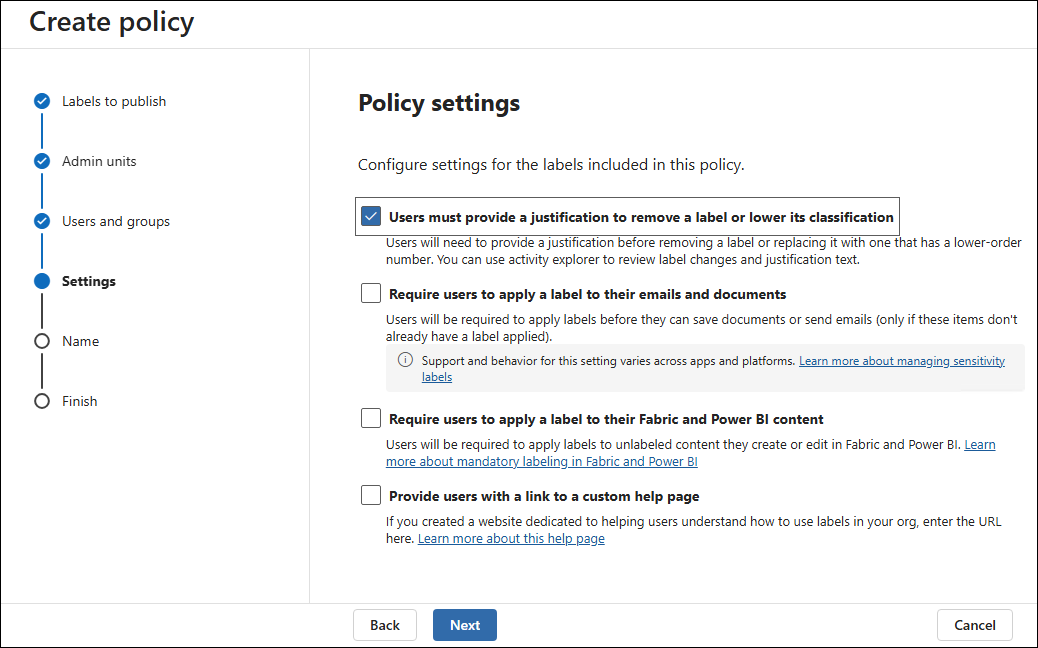
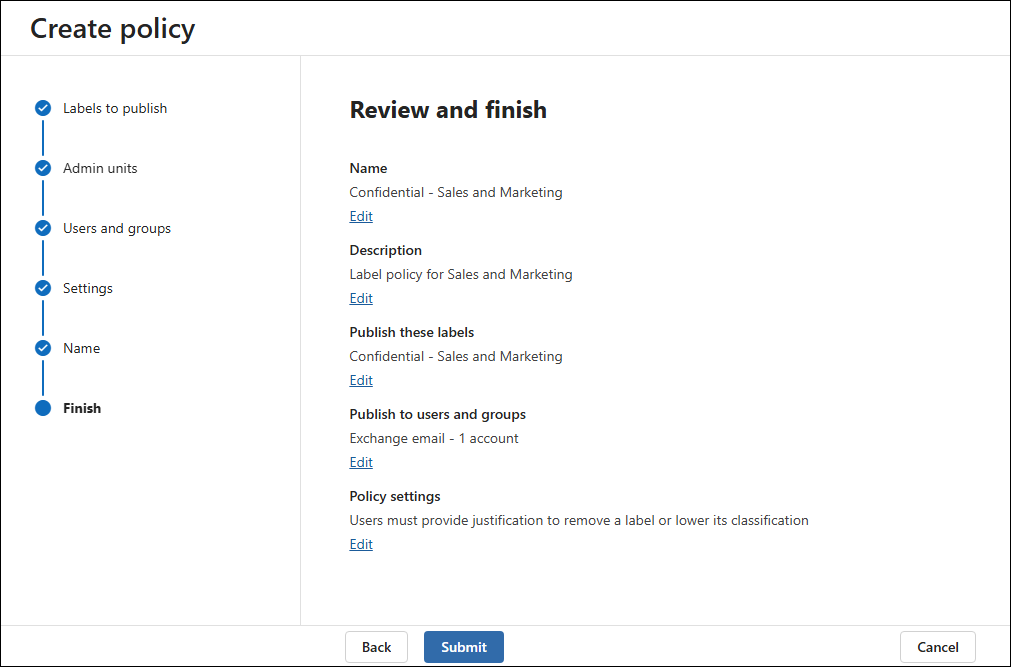
Next, you can choose whether to apply various policy settings. In this example, I will only select the first one – Users must provide a justification to remove a label or lower its classification – to make sure that no label is removed without providing a reason. See how to monitor label changes and see their justifications
The next step allows you to apply a default label to documents. If you leave the default None option, users will have the choice to apply the label or use the document without enhanced protection. The latter is especially worth considering for teams that need to contact external recipients regularly.
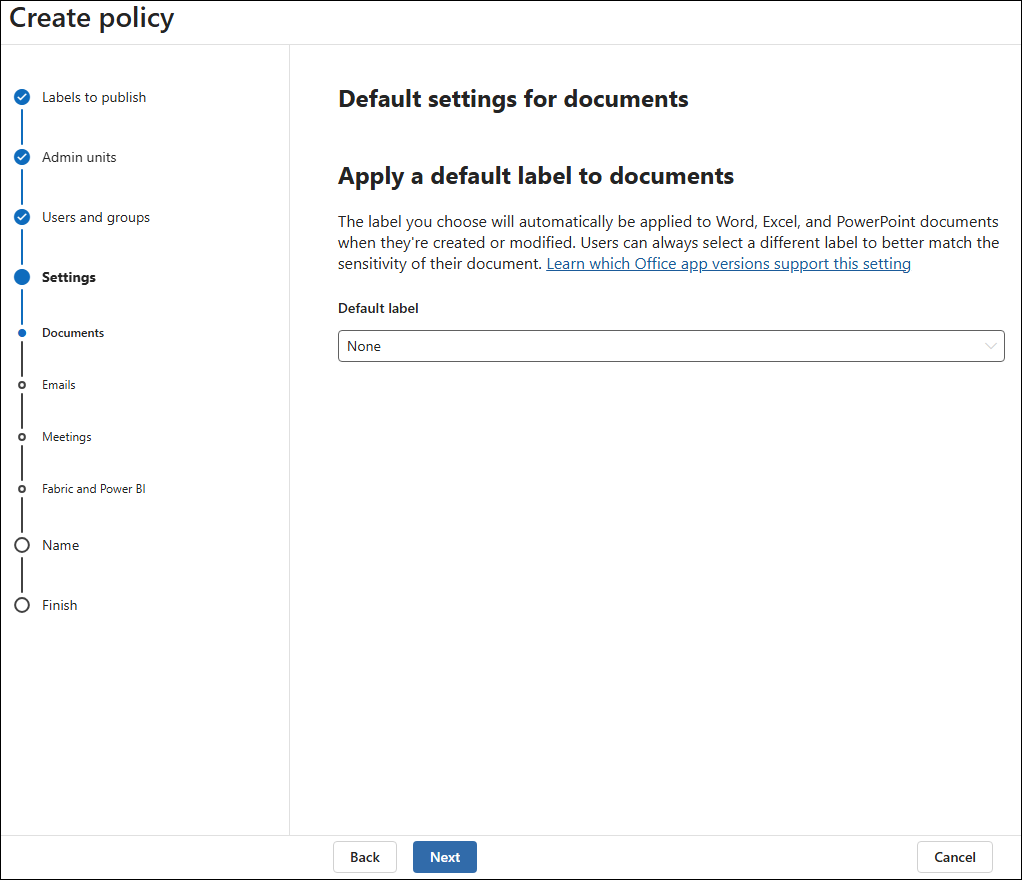
In the Emails step, you can also choose which label should be applied to email messages by default.
The option Email inherits highest priority label from attachments lets you enable auto-inheriting of higher priority labels from attachments. For example, if your user attaches a labeled file to an email, the email will get the same label. The email’s label won’t be changed only if the attachment’s label is of a lower priority. If you attach multiple protected documents, an email message will inherit the label of the highest priority.
To make the inheriting mechanism less strict, you can choose to display a recommendation to change the label to your users instead of doing it automatically.
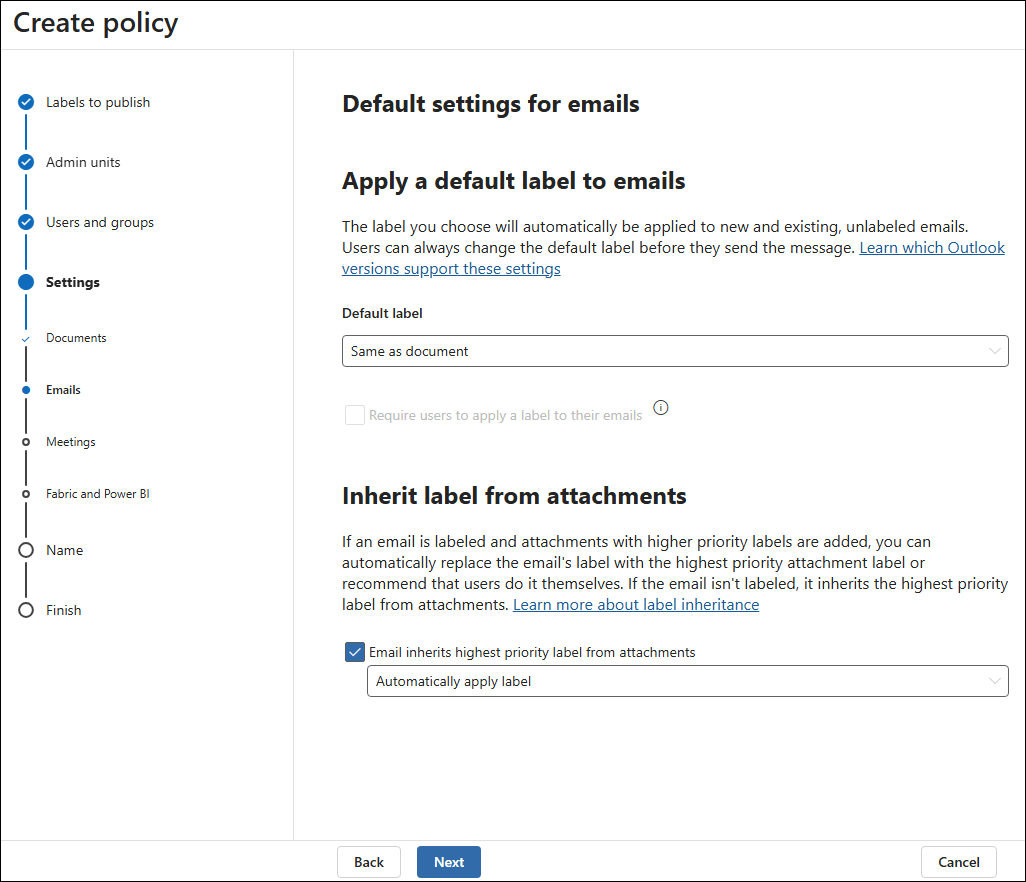
The next two steps of the wizard let you configure the default labels for:
- meetings & calendar events,
- Fabric & Power BI.
Afterwards, you can name your label policy and provide its description.
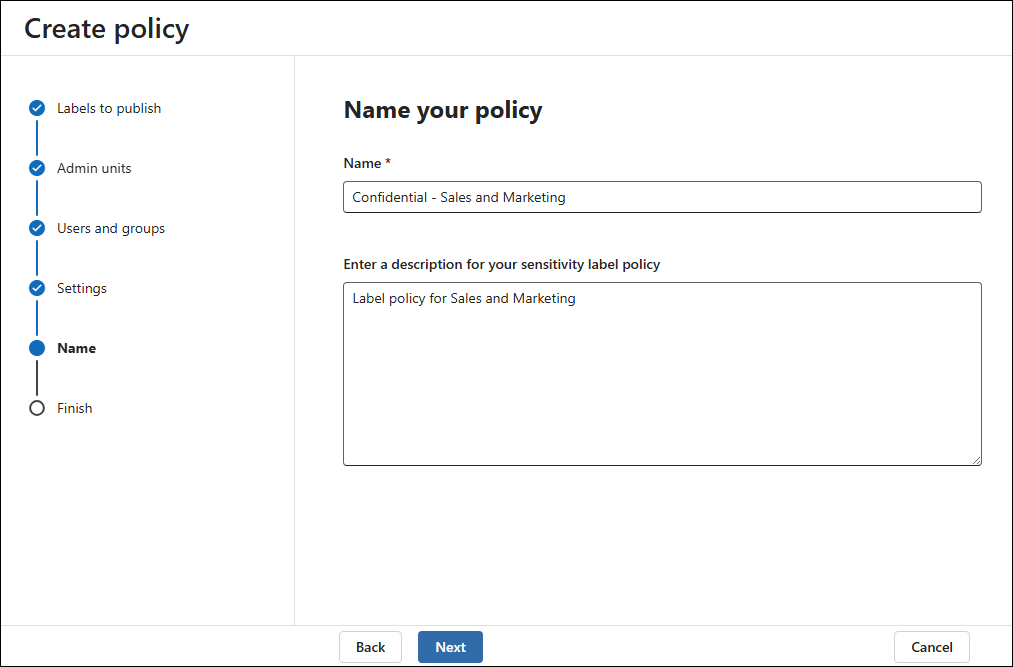
Finally, review your policy. Click Submit and Done when everything is set.
It might take up to 24 hours for the label policy to be effectively published. I’ve seen one label published in 50 minutes and another one in 14 hours, so any value in between is also possible. You can check if your labels started working by using Outlook on the web or Word for the web.
Auto-labeling policies
While a label policy makes a sensitivity label available to use and applies it on, for example, document creation, an auto-labeling policy can apply (or remove) labels in bulk to existing files and emails. Before creating an auto-labeling policy, keep in mind that:
- Auto-labeling policies will not work right away. Before turning one on, it will run in simulation mode to verify how many items in your tenant will be affected. According to Microsoft documentation, simulation can take 12 hours to complete. In my test environment, it took mere minutes, but there were few documents to analyze. The admin who configures the policy gets an email notification as soon as the simulation ends.
- A policy can apply labels to all documents in your organization. If your settings are too strict, you can make work harder for the entire company at once. Imagine that all documents meant to be sent to customers get labels that deny those customers access. Chaos. On the other hand, if your settings are too lenient, you risk potential data breaches.
Creating an auto-labeling policy
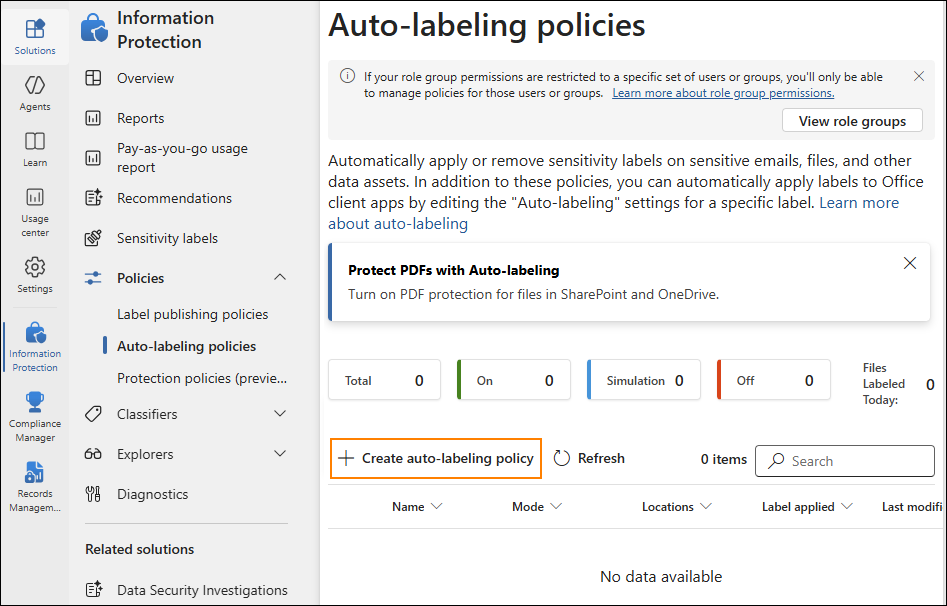
To create an auto-labeling policy, you can either select the appropriate option when you first create a label (as shown here) or go to Information Protection > Policies > Auto-labeling policies > Create auto-labeling policy. In both cases, the same policy wizard will open.
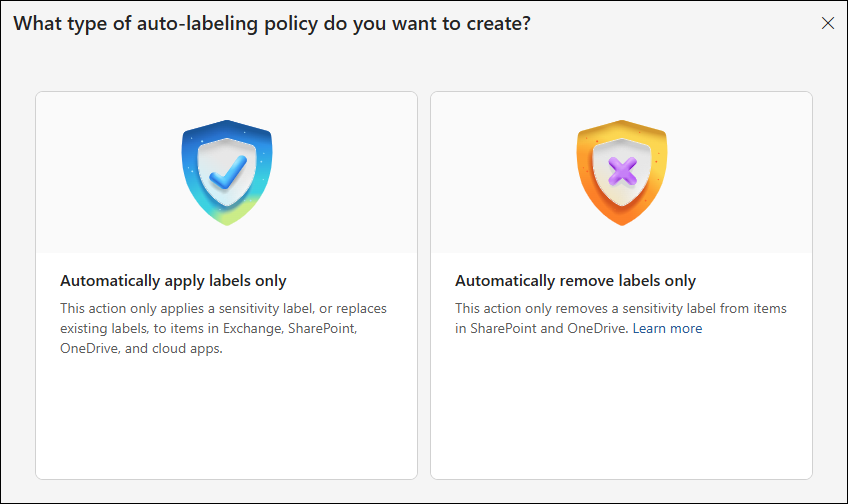
First, choose if your auto-labeling policy will apply or remove labels. While those two options perform opposite actions, they use a very similar wizard in which you specify rules and conditions for selecting content to be labeled (or unlabeled). I will choose to apply labels.
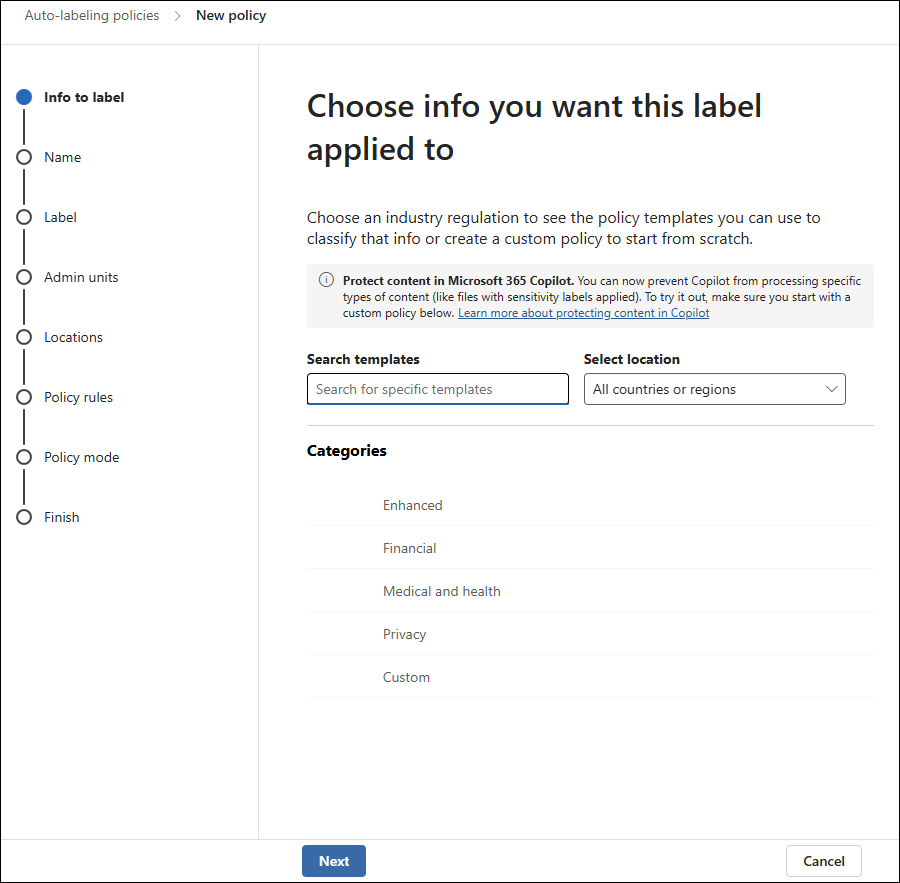
In the first proper step of the wizard, you can select a predefined template to help you find and classify specific information related to, for example, medical information. Click Next to skip this part and start creating a policy from scratch.
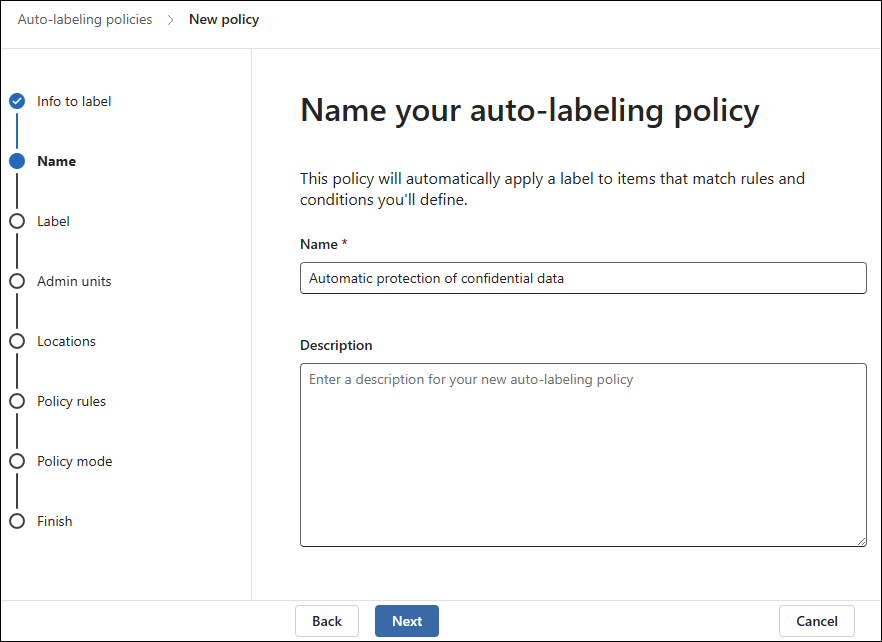
Name the auto-labeling policy and click Next.
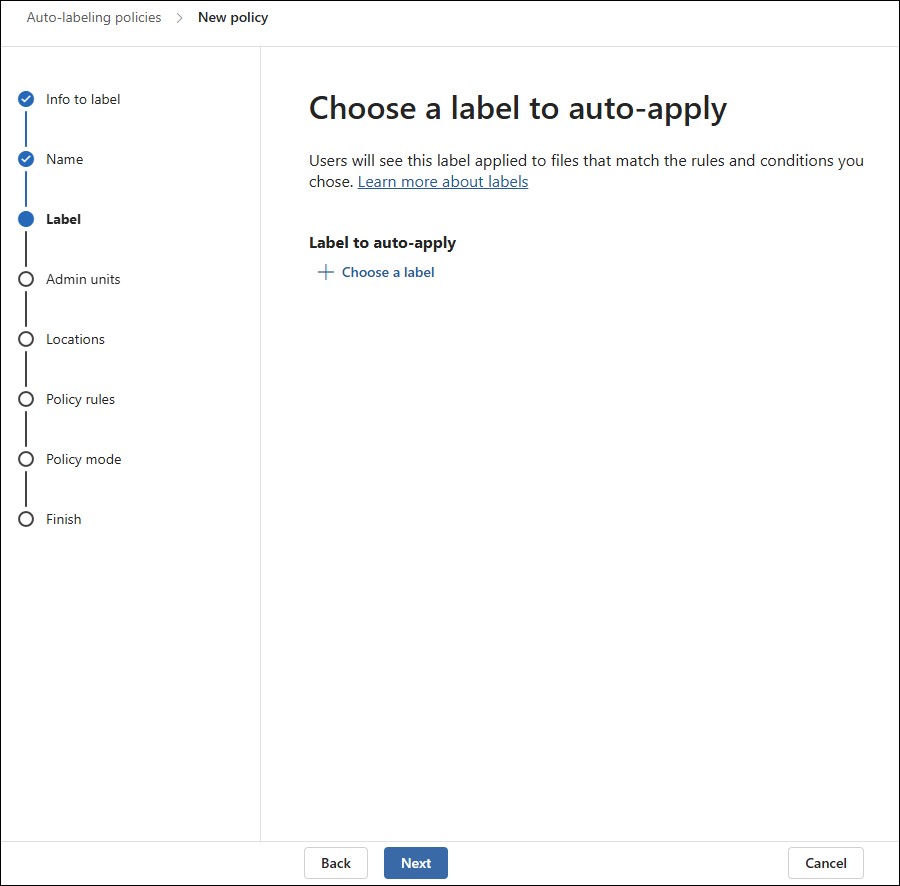
Choose which label you wish to apply. I will use the one created earlier, for Sales and Marketing. If you entered this wizard directly after creating a new label and choosing Automatically apply label to sensitive content, the label will be automatically added.
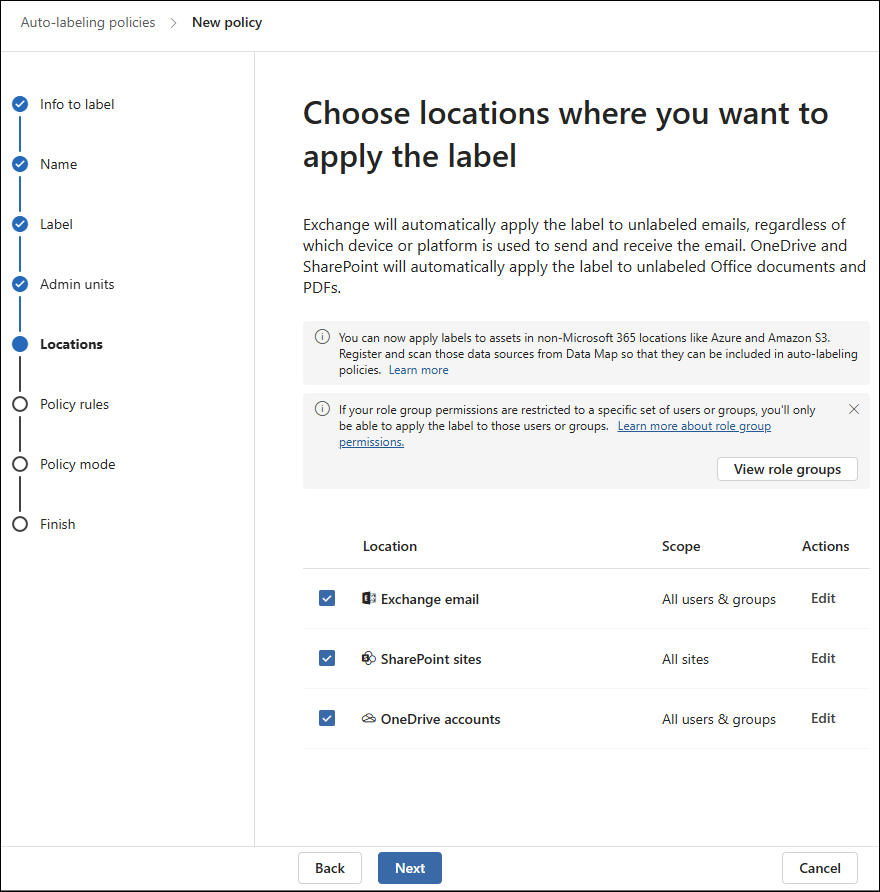
After skipping the Admin units step (like in standard label policies, this step lets you restrict the policy to relevant units only), you need to choose locations. That’s the first content filter to specify. Since I’m applying a team-specific label, I will choose all locations (Exchange, SharePoint, and OneDrive) and then edit each one to apply only to the relevant department.
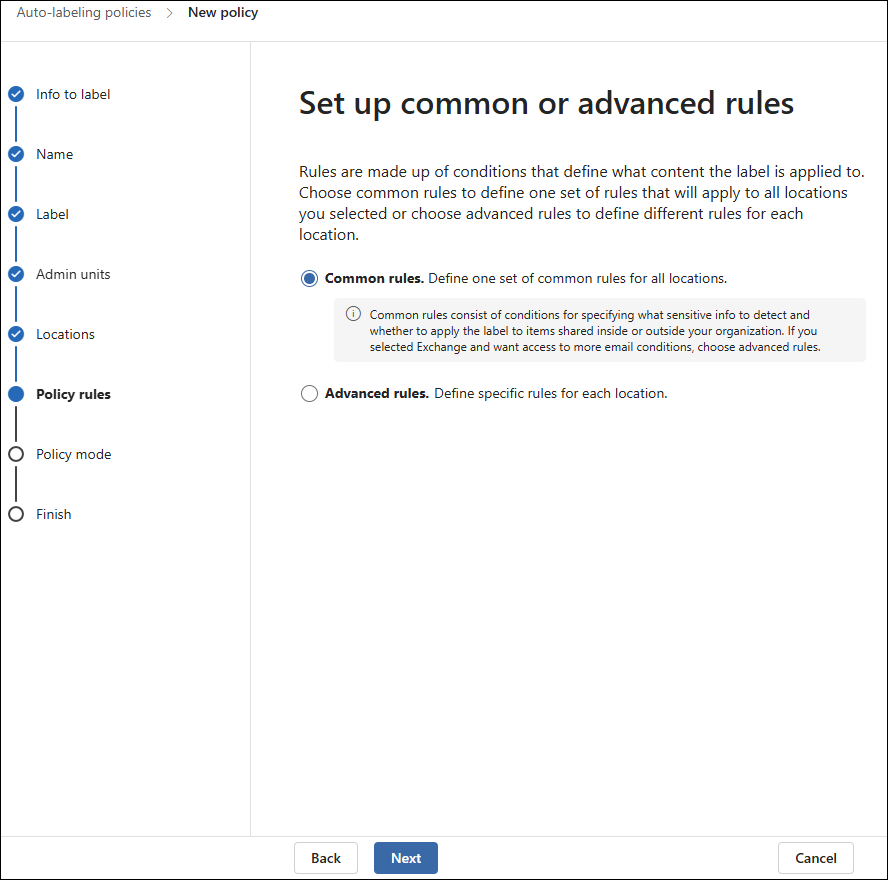
Next, you can choose between common and advanced rules. The common rules apply the same conditions for all locations chosen in the Locations step, while the advanced rules let you get location-specific. I will choose the common set of rules here.
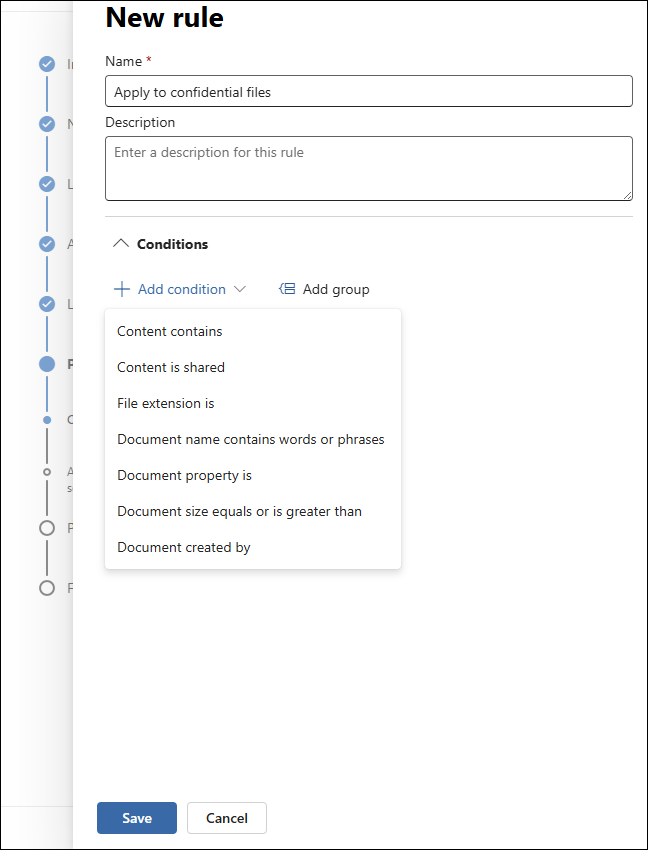
At this point, you can specify conditions that a document (or an email) needs to fulfill to have a label automatically applied. If you started from a template, some conditions will already be here. The list below presents a quick overview of available conditions:
- Content contains lets you choose Sensitive info types or Trainable classifiers from an extensive range of available options. Microsoft Purview will look for the information type you choose.
- Content is shared can select the content shared inside or outside your organization. Keep in mind that if, for example, a confidential file was sent outside of your organization as an attachment, the label can be applied to the email but won’t reach the recipient’s mailbox or the file they downloaded.
- File extension supports only 4 file types at this moment: .docx, .xlsx, .pptx, .pdf.
- Document name contains words or phrases lets you add any word or phrase. Label will be applied whenever this word or phrase is found in a document’s name within the searched locations.
- Document property requires you to use SharePoint managed properties that need to be set up separately.
- Document size equals or is greater than allows you to specify the file size above which the label will be applied.
- Document created by lets you specify independent users.
You can add selected or all conditions and use AND and OR logical operators, depending on what exactly you want to achieve. Here, for test purposes, I’ll just add Document name contains words or phrases: confidential. As this condition is the easiest to bypass, I wouldn’t use it in a production environment. For simple testing purposes, it will do.
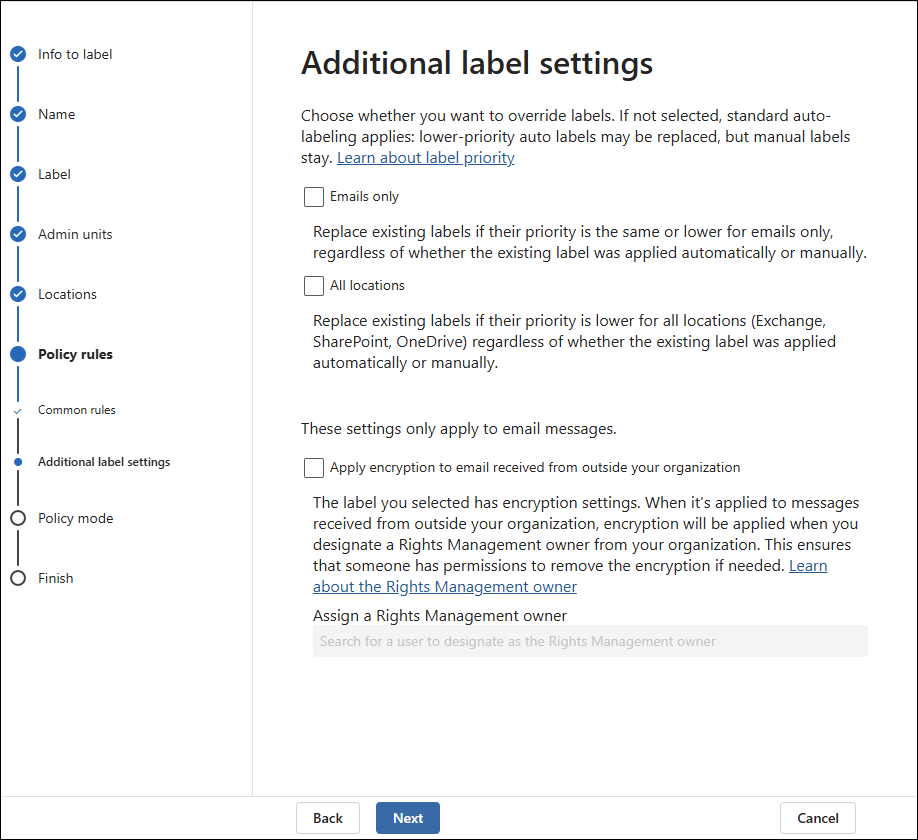
In Advanced label settings you can choose what will happen if there are any label conflicts. The main point here is to decide whether the auto-labeling policy should override labels applied manually by users or override only the automatically applied labels of a lower priority.
Another important setting is Apply encryption to email received from outside your organization. If your label has encryption settings and the conditions will apply the label to emails originating from outside your organization, here you can decide whether to encrypt those messages or not. It requires your organization to have a Right Management owner, otherwise you risk cutting yourself off from access to your own data.
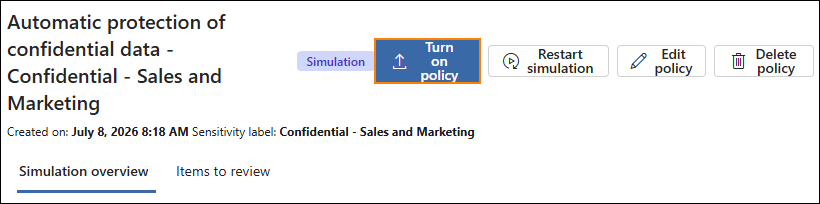
Finally, you can choose whether to launch the policy in simulation mode or turn it off, review your settings, and complete the wizard. As I mentioned before, you cannot turn the auto-labeling policy on right away. Such a policy requires at least one simulation to be completed.
After Microsoft Purview completes the simulation, you will receive an email notification. In the Auto-labeling policies list you can review the simulation to see how many items will be affected by your policy and click Turn on policy to let Microsoft Purview work its magic.
Testing a sensitivity label
After creating and publishing the Confidential sensitivity label for the Sales and Marketing team, I created and published a few additional labels, including another Confidential label – this time, for the Finance team. Then, I waited for the labels to be provisioned. Now, it’s time to see if they work as expected.
Emails
When Lynne (a user belonging to the Finance team) launches Outlook on the web and creates a new test message, she can see the sensitivity button with the list of created labels, including the Confidential – Finance label, but she can’t see the Confidential – Sales and Marketing label that I added first.
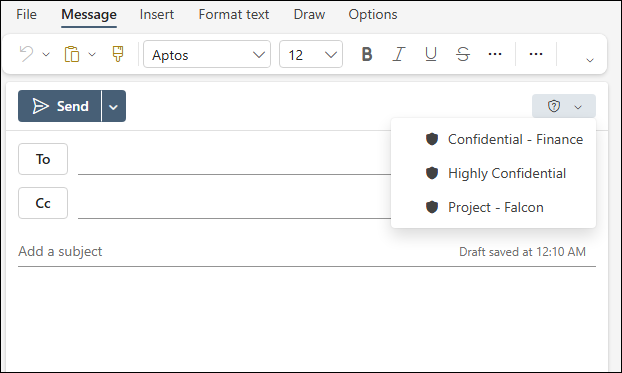
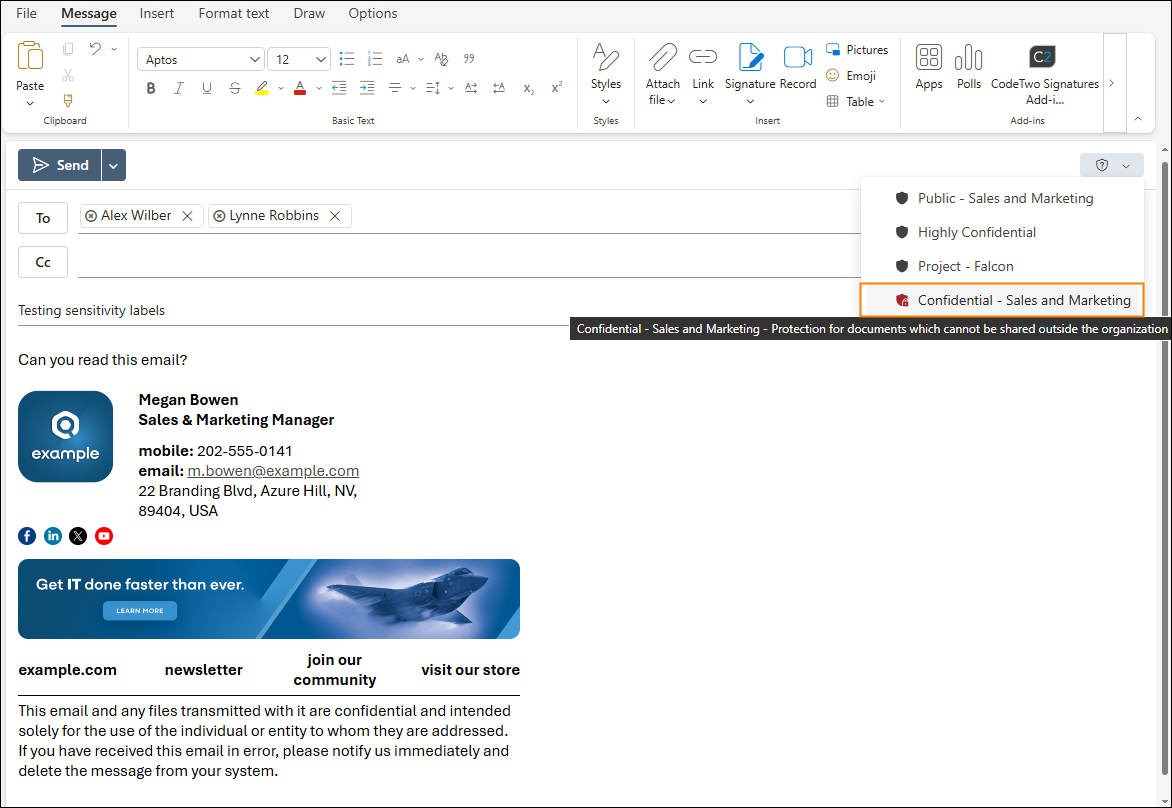
On the other hand, Megan (a member of Sales and Marketing) can see the Confidential – Sales and Marketing label, but not the Confidential – Finance label available to Lynne and other members of the Finance team.
Now, let’s see what happens when we apply the Confidential – Sales and Marketing label to encrypt an email from Megan and send it to Lynne (the user without permissions for this label) and to Alex, who has permissions for pretty much anything.
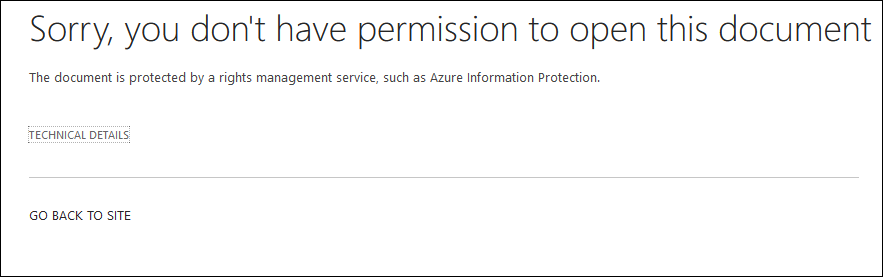
All that Lynne can see is a notification stating that she doesn’t have the required permissions. That’s the expected behavior. Also, if you look right above the email, Outlook shows that the label has been applied, exactly as intended.
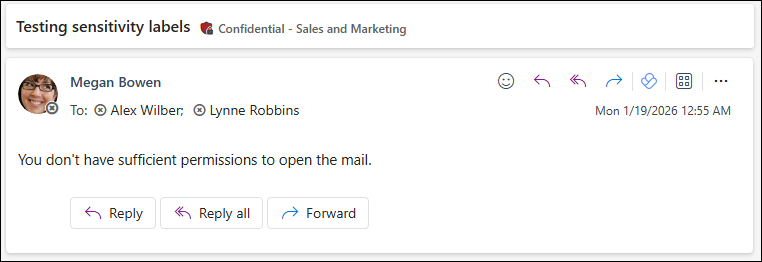
Sending the labeled email to any other mailbox without the required permissions results in the same behavior: a notification is displayed and access to the original message’s body is blocked. Thanks to this, even if an email is sent to the wrong recipient, it doesn’t lead to a security incident, since only authorized users are able to open it.
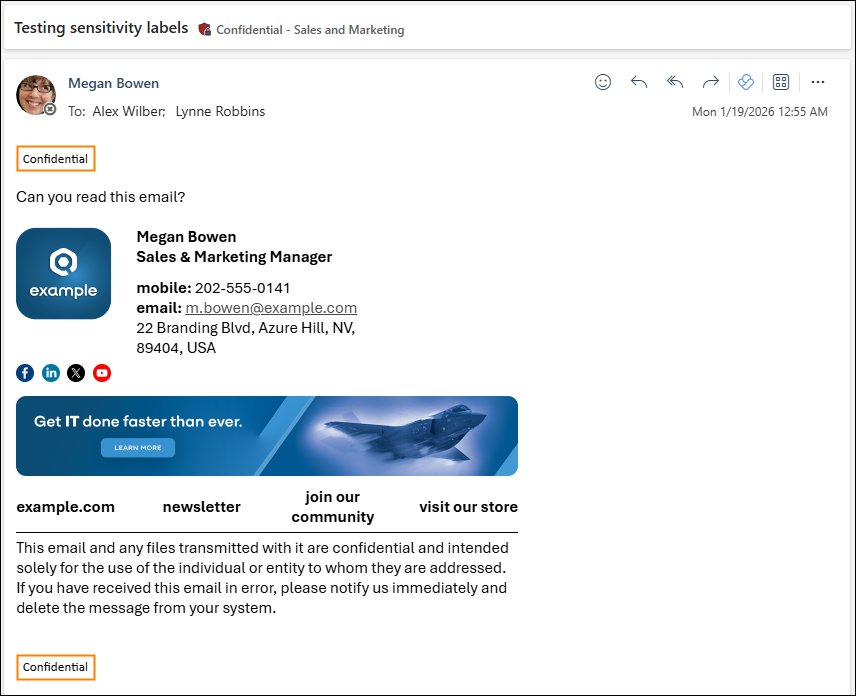
The other recipient of Megan’s labeled email is Alex. He has no problems opening the message, just like any standard, unlabeled email. The only visible difference for such an email is the Confidential header and footer set up in the Content marking step. While the user can’t delete the label, he can reply to the message without any problems.
Documents
All the tests in this part of the article have been conducted using Word for the web, with files saved to OneDrive for Business. It will work the same in SharePoint Online or when trying to open a file locally (when it’s sent as an attachment, for example). To enable using sensitivity labels with Office for the web apps, follow the instructions from this Microsoft article.
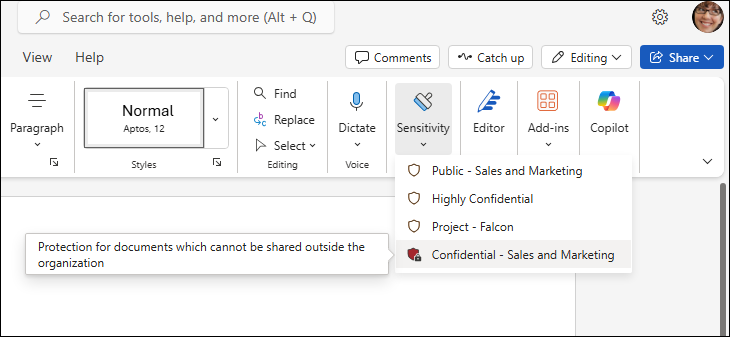
When Megan, the user with permissions for the Confidential – Sales and Marketing label, opens a document in Word for the web, she can use the Sensitivity button on the ribbon and pick the label to protect her document.
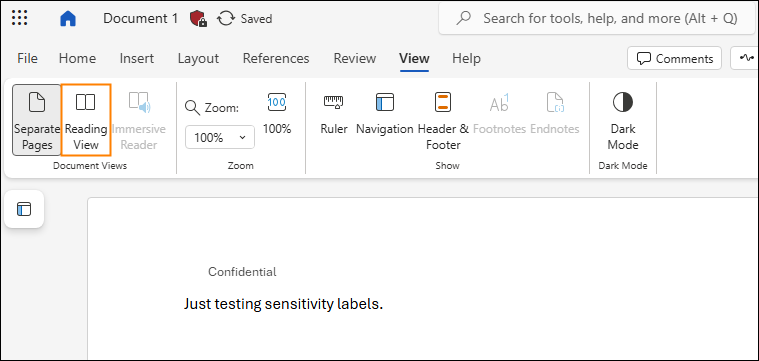
If a watermark, header, and footer have been set up for the label in the Content marking step, they are displayed in the document after the label is applied. If you don’t see the header or footer, turn on Reading View to display those elements.
Now, when Megan sends the document to Lynne, who doesn’t have permissions for this label (or when Lynne tries to open this file in SharePoint Online), the following notification is displayed:
Removing an applied sensitivity label
Since I’ve set the label policy settings to Users must provide a justification to remove a label or lower its classification, each time someone wants to change or remove a label, they need to specify why they’re doing it.
To remove a label, open a document, go to Sensitivity and click the name of the currently applied label. The Justification Required popup will show up. Pick an appropriate option and click Change. The label should be removed at this point.
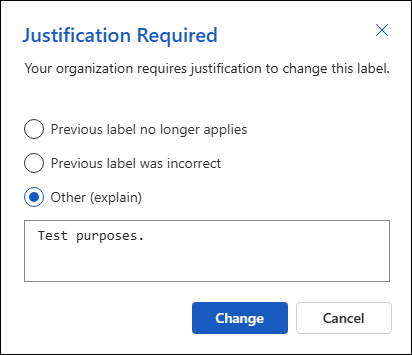
The label change and justification are logged and stored in activity explorer.
Monitoring label changes in activity explorer
You can access activity explorer using this link or by navigating to Microsoft Purview > Records Management > Explorers > Activity explorer. It’s important to note that activity explorer will not record any action until you turn on auditing by clicking Turn on auditing.
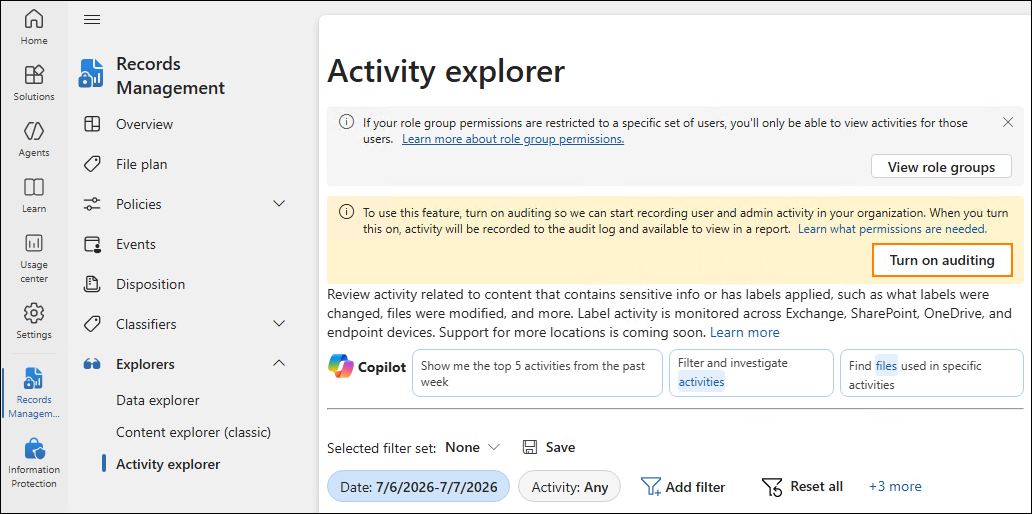
If auditing is turned on, you can get insights into how security labels are used in your company:
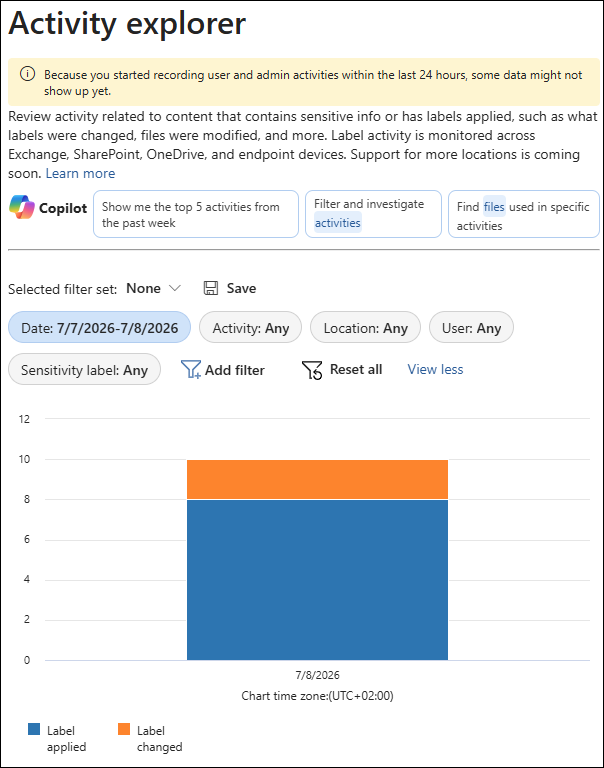
Activity explorer registers all operations on labels, that is:
- Applying a label (either via a policy or manually).
- Changing a label (two possible event types: LabelUpgraded and LabelDowngraded).
- Removing a label.
Depending on the size of your organization and number of label policies, activity explorer can return a few or a few thousand new entries daily. So, if you want to verify only the changed labels, use filters:
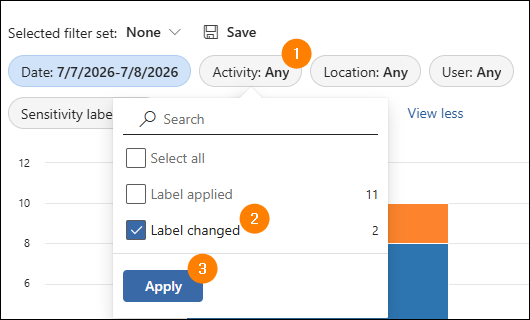
After applying filters, simply click one of the activities. The justification is available in the right pane.
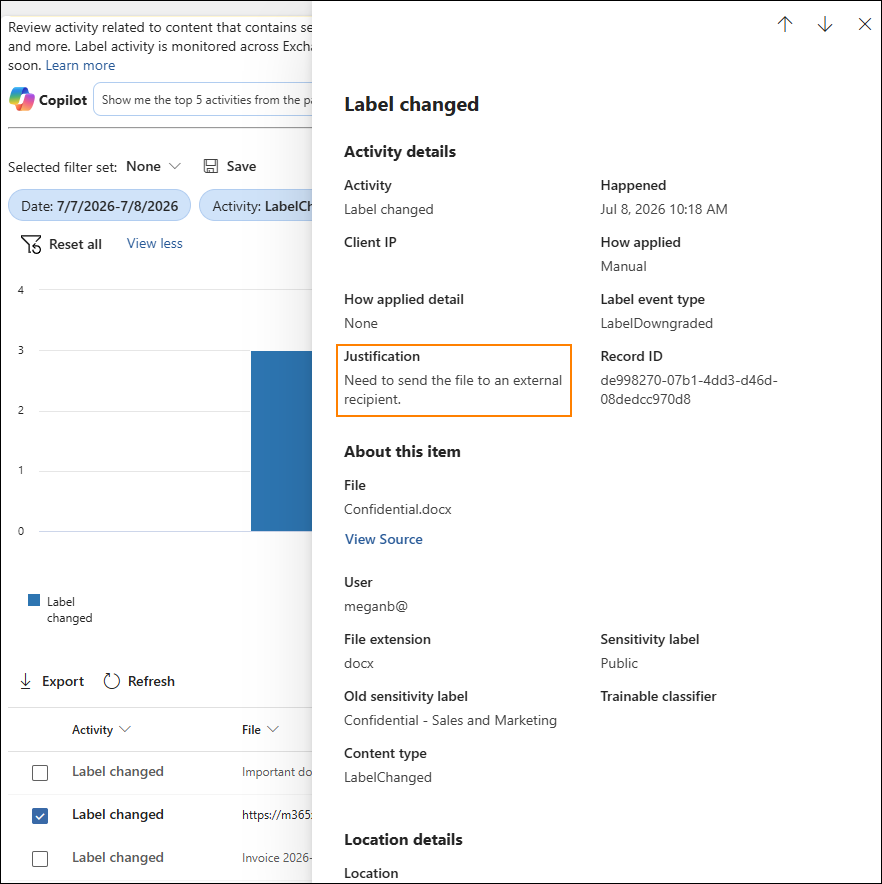
Why can’t I see a justification for a label change?
If you can’t find a justification for a label change, there are a few possibilities:
- Auditing is turned off or has been turned on recently – according to Microsoft’s documentation, it can take up to 24 hours for auditing to start working.
- The option Users must provide a justification to remove a label or lower its classification has not been selected in the Sensitivity Label Policy settings or the policy has been published or updated recently.
- Label event type is LabelUpgraded, which means that a user changed the label to a more restrictive one.
Conclusion
That concludes my overview of sensitivity labels for emails and documents in Microsoft 365. Still, the topic of sensitivity labels is a broad one. To learn more about advanced configuration options and see additional use cases, check out Microsoft’s documentation.
Stay safe!
See also
How to use Microsoft Purview Message Encryption to protect emails sent externally
Recommended articles
Thanks for the steps. Wondering where and how to find the Justification Text in Activity Explorer or Audit Log? Text is not shown in Activity Explorer when lowering a sensitivity label.
Hello,
As an admin, you should be able to read the justification in activity explorer. Make sure you have an appropriate justification prompt set up in the label settings.
Hi,
How can we search for SensitiveLabels in emails when using the content search in the Purview Portal?
What is the name of property when using the query builder / KQL editor?
Thank you.
In short, you can look for keywords and add the following query:
InformationProtectionLabelId:YourSensitivityLabelIDFor more info on how to get your labels’ ID, check out this article by Tony Redmond.
Hi, when we use sensivity labels with access control, no signature will be attached. I guess the signature tool dont have access to modify the mail and add a signature.
Can you add a part what to look out for with CodeTwo e-mail signatures?
Hello Thomas,
Messages with applied sensitivity labels are of course supported by CodeTwo Email Signatures 365. Please consult our manual for details.