


Information security should be the cornerstone of every organization – especially when dealing with external parties. In email communication, organizations can protect their data by implementing email encryption mechanisms. This way, they can make sure that only intended recipients can read their messages.
If you are looking for a user-friendly email encryption solution for your Microsoft 365 organization, there is a native tool for that – Microsoft Purview Message Encryption, still commonly referred to by its former name, Office 365 Message Encryption (OME).
What is Microsoft Purview Message Encryption
Microsoft Purview Message Encryption (PME or OME) is a cryptographic mechanism which protects the contents of emails (email body and attachments), so that only the intended recipient can view them. Like most encryption mechanisms, it uses a pair of public and private keys for encryption and decryption. The difference from traditional peer-to-peer encryption like S/MIME is that the keys are managed through Azure Rights Management. As the keys don’t have to be handled manually, the whole process becomes easier.
From the user’s perspective, Purview Message Encryption is one of the easiest encryption methods to use: it can even be automated, requiring no user action to encrypt outgoing emails. On the recipient’s end, it works seamlessly with Microsoft 365 accounts and offers an intuitive experience for users of other email services.
Read on to learn how Microsoft Purview Message Encryption works and how to use it to encrypt your emails and files.
How email encryption works in Microsoft 365
Let’s say you want to automatically encrypt emails sent outside your organization. With Microsoft Purview Message Encryption, this can work as follows:
- The user sends a message as usual.
- Microsoft 365 automatically encrypts the message before it leaves your Microsoft 365 organization. This can be done using an Exchange transport rule that applies a relevant sensitivity label configured in the Microsoft Purview portal to encrypt emails sent to external recipients.
- The recipient needs to authenticate to open the message contents. The recipient’s experience depends on their email service and app:
- If the recipient is signed into their Microsoft 365 account and is using a supported version of Outlook (desktop, mobile, or Outlook on the web), they can typically open the message as usual, together with its attachments, if any.
- In non-Microsoft 365 email services and apps, the recipient receives a wrapper email (aka an “envelope”) directing them to the encrypted message portal, where they are asked to authenticate. The authentication method may require signing in with a supported account or using a one-time code sent in a separate message (the best practice is to send using a different channel).
In the sections below, I’ll show you how to set up email encryption in your Microsoft 365 organization to achieve the same effect. Before that, however, let’s look at the Microsoft 365 and Office 365 plans that support Purview Message Encryption, as well as some preconditions you need to meet to use this feature.
Supported plans and preconditions
Microsoft Purview Message Encryption is included out of the box with the following Microsoft 365 and Office 365 plans:
- Office 365 A1
- Microsoft 365 F3
- Microsoft 365 E3 / Office 365 E3
- Microsoft 365 A3 / Office 365 A3
- Microsoft 365 G3 / Office 365 G3
- Microsoft 365 E5 / Office 365 E5
- Microsoft 365 A5 / Office 365 A5
- Microsoft 365 G5 / Office 365 G5
- Microsoft 365 Business Premium
You can also use Purview Message Encryption if you have Azure Information Protection (AIP) Plan 1 added to the following plans (AIP Plan 1 is no longer available to new customers, though):
- Exchange Online Kiosk
- Exchange Online Plan 1
- Exchange Online Plan 2
- Office 365 F3
- Microsoft 365 Business Basic
- Microsoft 365 Business Standard
- Office 365 Enterprise E1
For up-to-date information about Microsoft plans that support Purview Message Encryption, see this article.
Other preconditions:
- Since Microsoft Purview Message Encryption is based on the Azure Rights Management service (Azure RMS), verify that the service is active in your organization, as discussed in this Microsoft article.
- To add sensitivity labels and view encrypted files in non-Microsoft 365 apps and services (such as File Explorer), as well as to support more file types, you need to deploy the Microsoft Purview Information Protection client. See this Microsoft article to learn more.
How to set up email encryption in Microsoft 365
Setting up Microsoft Purview Message Encryption to encrypt emails sent externally is relatively easy. You will do this in two steps. First, configure a sensitivity label in the Microsoft Purview portal to apply the encryption. Then, create a transport rule in the Exchange admin center that will apply this label to outgoing messages sent by all or selected users.
See our complete guide to sensitivity labels in Microsoft 365
Configure a sensitivity label
For the purpose of this article, I will create a new sensitivity label that will apply encryption to emails and attachments. You can skip this section if you already have the relevant sensitivity labels in place in your organization or if you want to use a default label created by Microsoft.
To create a new label to encrypt external emails:
- Use this direct link to open the Sensitivity labels page in the Microsoft Purview portal. Alternatively, go to the Microsoft Purview portal, select Information Protection from the list of solutions, and click Sensitivity labels.
- Click Create > Label. This will open the New sensitivity label wizard.
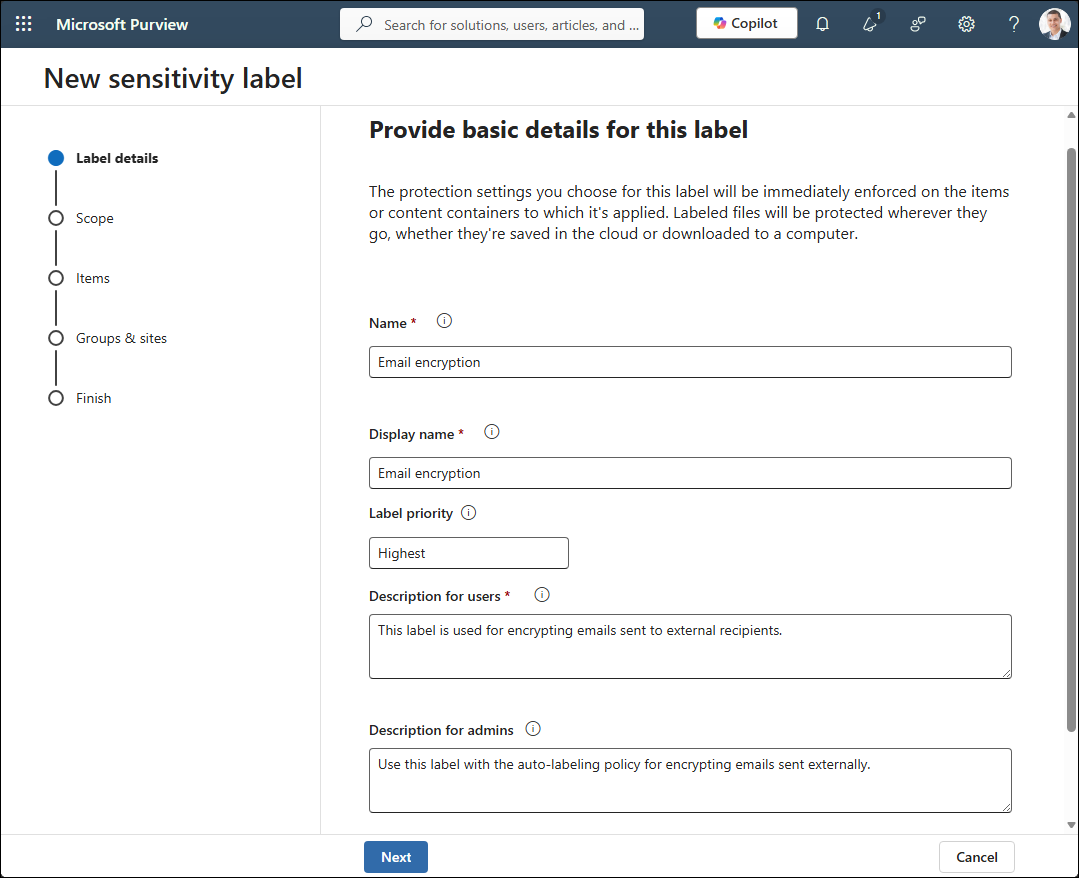
- Use the fields provided in the Label details step to enter the name of the label and additional information. The information in the Display name and Description for users fields will be visible to email senders, so make it clear and concise. Click Next to move to the next step.
- In the Scope step of the wizard, select Emails. Optionally, if you also want to use this label for files and meetings, select Files & other data assets (see this section to check which file types are supported) and Meetings. Confirm by clicking Next.
- In the Items step, select Control access.
- In the Access control step, leave the default options selected, as shown in the screenshot below. In specific situations, you can grant time-limited access to content by using User access to content expires and block offline access by changing the Allow offline access settings. Use these features carefully: on the one hand, they can greatly increase security of your data; on the other, they can make work much harder for end-users.
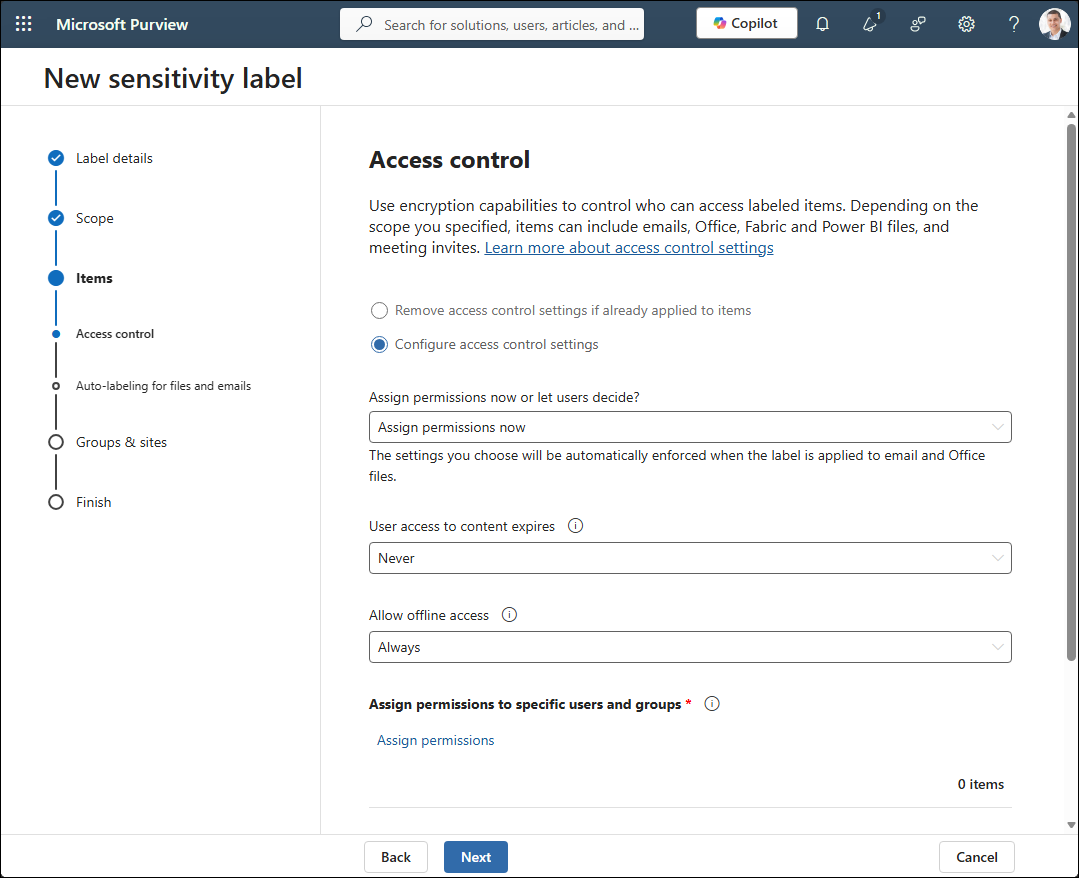
- Click the Assign permissions link (the blue link visible above). The Assign permissions pane will open.
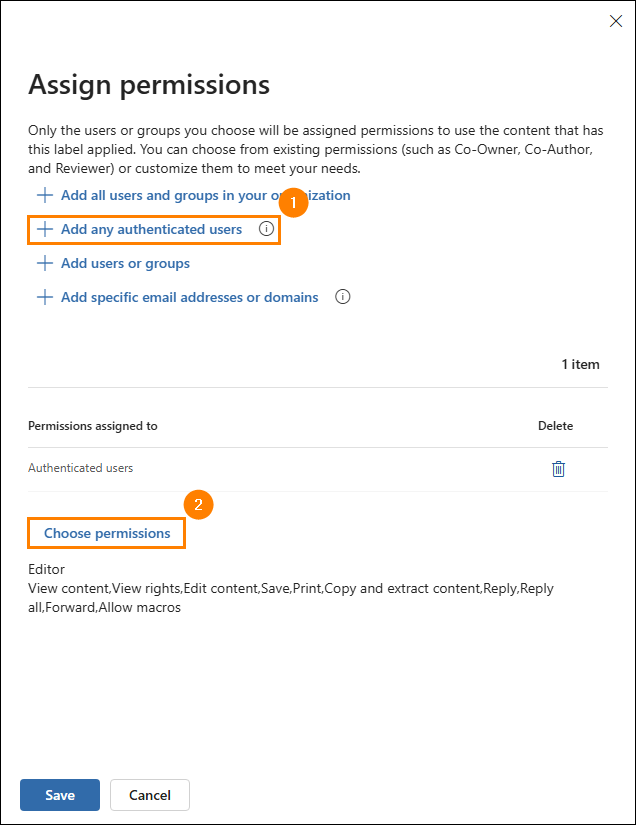
- Click Add any authenticated users (see the screenshot below). This will allow authenticated users from outside of your organization to access and open messages and attachments.
- While in the same pane, click Choose permissions (see the screenshot below) and select a permission level to control what recipients can do with emails and attachments. In this example, I set the Editor permission level that does not impose many restrictions. Click Save to confirm and close the pane.
- In the next step, Auto-labeling for files and emails, you can configure Microsoft 365 to apply your label if it detects that an email or file contains specific types of information, such as an account number, passport number, or other personal data. In this example, I’ll skip this option, because I want to apply the label to all external emails, regardless of their contents.
- Since I have selected to use this label with emails, files, and meetings, I will not be able to modify information in the Groups & sites step.
- In the Finish step, you can review your label’s configuration and make changes as needed. When you are ready, click the Create label button.
Creating a label can take a moment. You will receive a confirmation once the label is ready.
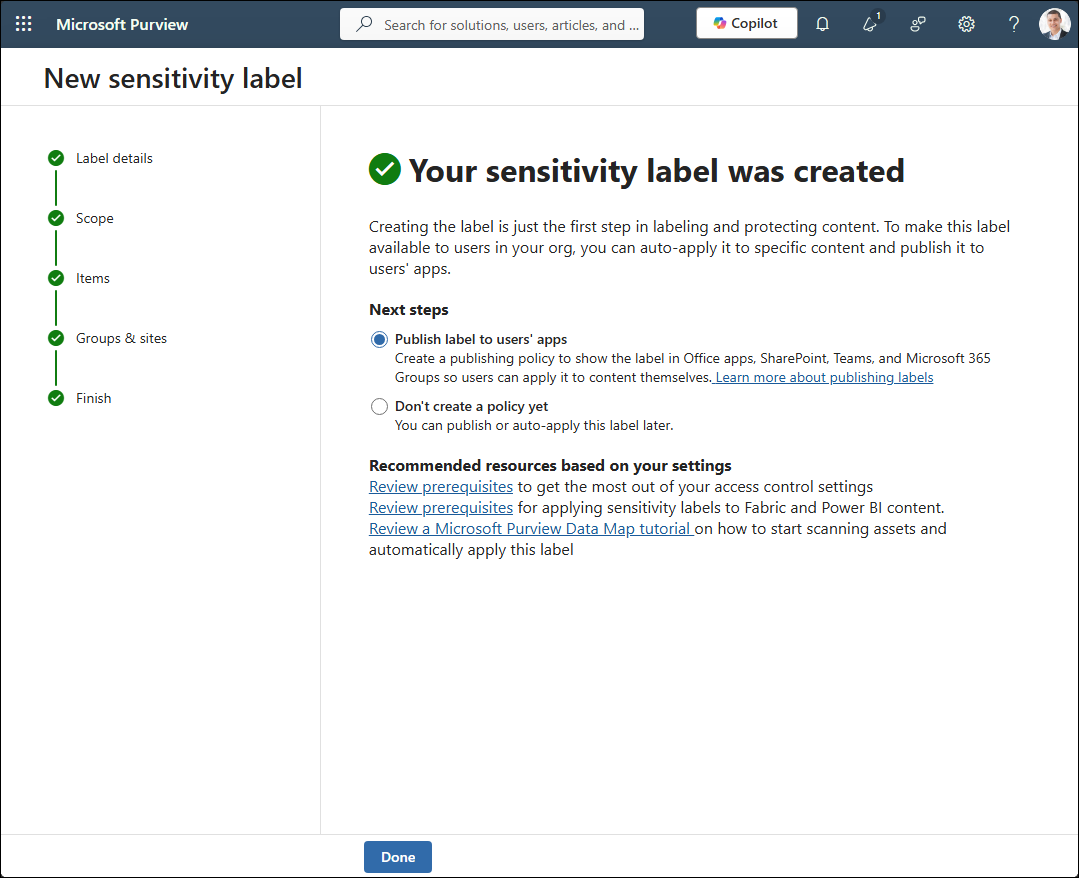
From here, you can publish your label via a new or existing label publishing policy, or skip this step and create a new policy later. In this scenario, I will publish the label by creating a new label policy at once. Here’s how to do that:
- Select Publish label to users’ apps and click Done.
- In the pane that opens, click Create new label policy. This will trigger the policy creation wizard. Alternatively, you can add your label to an existing policy by selecting it from the list.
- In the Labels to publish step, click Choose sensitivity labels to publish and select your new label from the list.
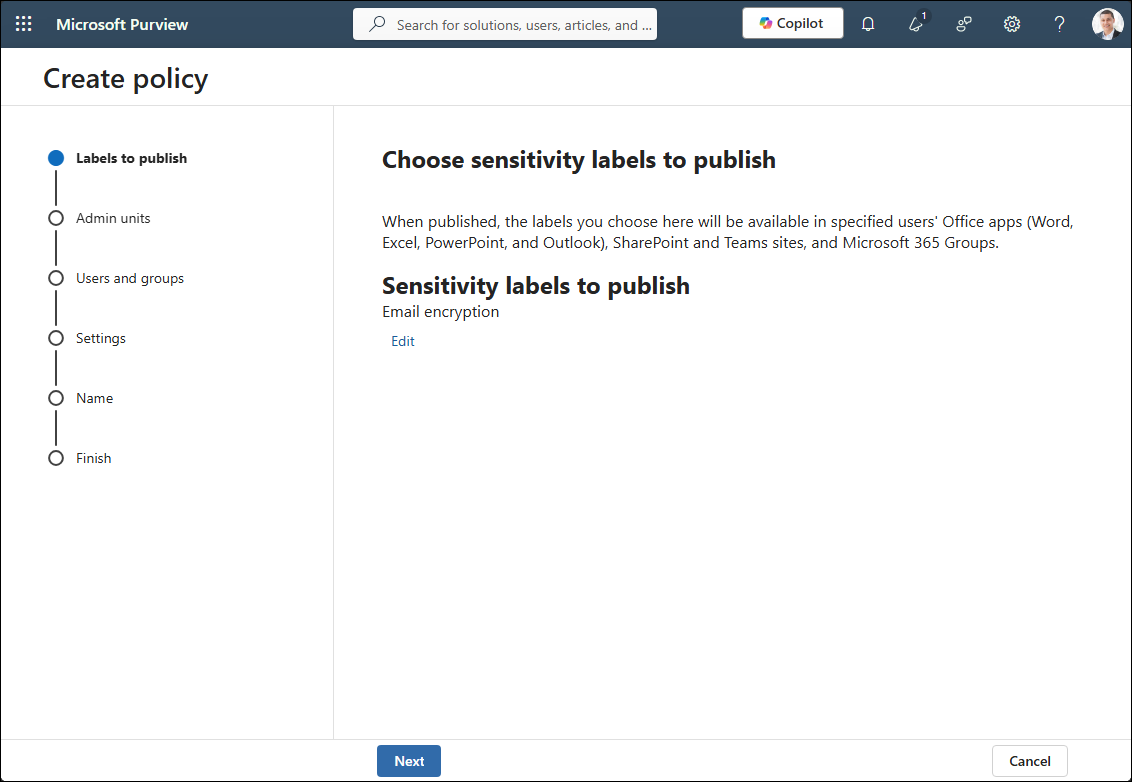
- The next step, Admin units, allows you to choose admin units created in Microsoft Entra ID to which you want to restrict your label policy. To assign the policy to all users, simply click Next.
- The Users and groups step also allows you to restrict your policy assignment – this time, to individual users, distribution groups, mail-enabled security groups, and Microsoft 365 Groups. You can skip this step if you want your label to be available to all users.
- In the Settings step (and its substeps), you can modify general policy settings (for example, you can require users to provide a justification before removing the label or lowering its classification) and set a default label for documents, emails, meetings, and Fabric and Power BI content. Once done, proceed to the penultimate step.
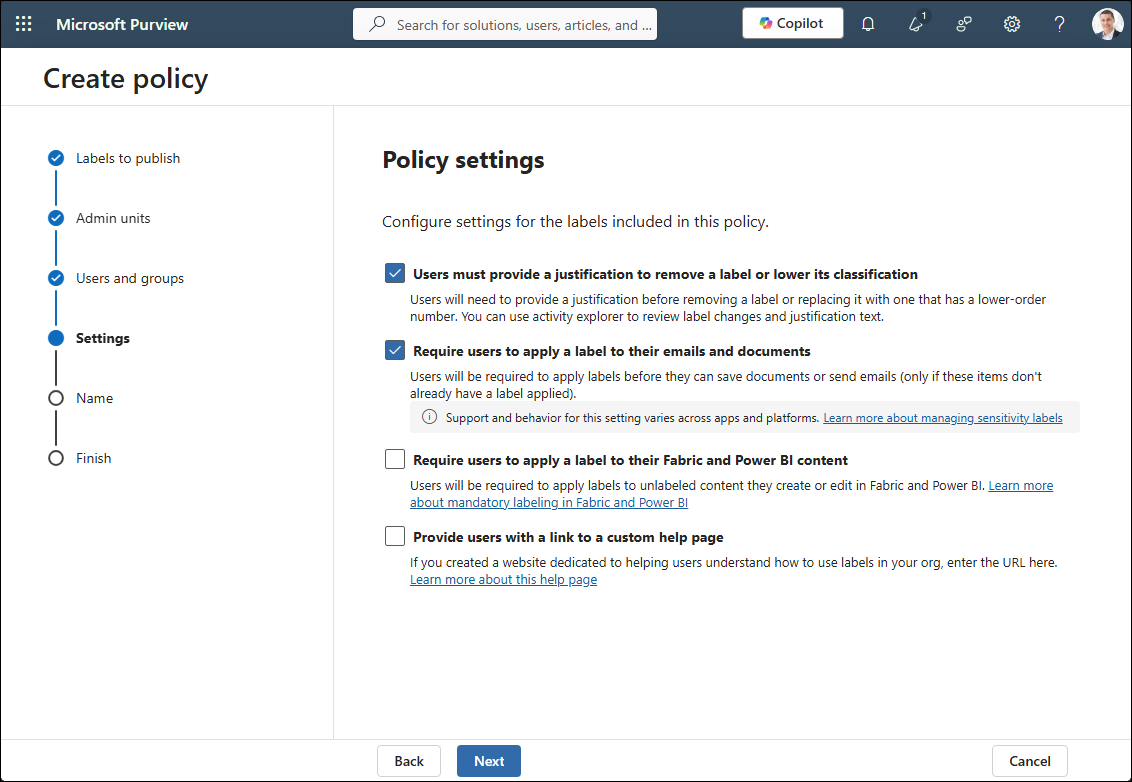
- Name your label policy (you can also provide a description with more information) and click Next.
- Finally, review the provided details and click the Submit button to publish the policy and close the wizard.
Note that it may take up to 24 hours for the new label to propagate, so you might need to wait before you can perform the steps described further in this article.
Configure a transport rule to apply encryption to emails sent externally
When the label is published, you need to use it in a transport rule (mail flow rule) that automatically applies the label to all external emails, encrypting them. If needed, you can also define the scope of senders whose emails should be encrypted. The key point is to define all conditions and exceptions in the transport rule, as it controls whether and how the label is applied. Follow the steps below to set up the rule:
- Open the Exchange admin center and go to Mail flow > Rules.
- Click the Add a rule button and select Apply Office 365 Message Encryption and rights protection to messages.
- Name the new rule, for example, External email encryption.
- In the Apply this rule if section, choose The recipient > Is external/internal and select Outside the organization. Confirm by clicking Save.
- In the Do the following section, make sure that Modify the message security > Apply Office 365 Message Encryption and rights protection is selected. Then, click the Select one link below and select the sensitivity label you have created in the previous steps (or another existing label of your choice). In this case, I choose my Email encryption label.
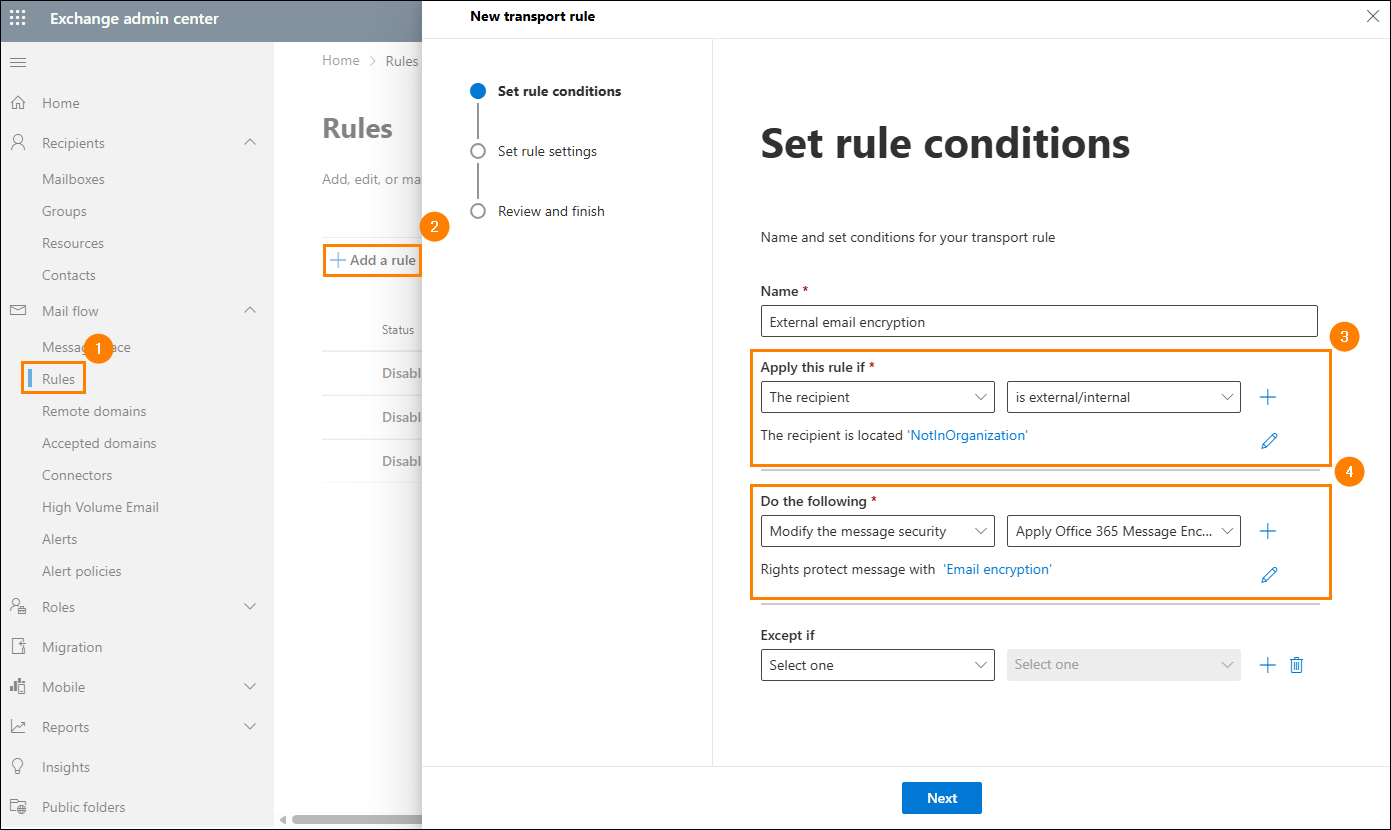
- Complete the remaining steps of the rule creation wizard. Review your rule settings and click Finish to create the new transport rule.
- Once created, the mail flow rule is disabled by default. Select it from the rules list and use the toggle to enable the rule.
That’s it! As soon as the new rule is enabled, every email that is sent to a recipient outside the organization will be automatically encrypted using Microsoft Purview Message Encryption.
File types supported by sensitivity labels
If you want to use sensitivity labels created in the Microsoft Purview portal with files, note that there are three “levels” of support for different file types. Let’s finish off by taking a look at each of them.
Full support
Some file types, like .docx, allow you to manage sensitivity labels directly in a Microsoft 365 app.
- Text files: DOCX, DOCM
- Workbooks: XLSX, XLSM, XLSB
- Presentations: PPTX, PPSX
Partial support
Other types (like plain old 97’ .doc) don’t let you manage labels within Microsoft 365 apps directly, but can have labels applied, so their contents can be protected.
- Text files: DOC, DOT, DOTX, DOTM
- Workbooks: XLS, XLT, XLC, XLW, XLTX, XLTM, XLAM
- Presentations: PPT, POT, PPS, PPA, PPSXM, POTX, PPAM, PPTM, POTM, PPSM
- PDF – now, PDFs are something else. Labels can typically be applied to PDFs created with Word, Excel, or PowerPoint – not in all cases, though. If you use options such as Save, Export or Send as copy, your labels will work and continue to limit access to files. However, printing to PDF or using some add-ins can remove labeling.
No support
Any file types not listed above aren’t supported by sensitivity labels, which means you will not be able to protect them with your labels. Some of the obvious examples are TXTs and all kinds of image files. Still, to benefit from label protection, you can always copy contents of such files into a .docx file and slap your label then.
While those files are not directly supported, a TXT (feel free to replace TXT with any other “unsupported” format) file attachment is a part of the email protected by Microsoft Purview Message Encryption. It means that if your recipient fails to authenticate themselves, they will not be able to see or download the attachment. However, after downloading it, recipients will be able to edit and forward it however they see fit.
Recommended articles


The interface in Purview for the creation of sensitivity labels has changed a bit in the meantime. I appreciate the good work here but would be nice if this post could be updated again :)
Hi André,
Thanks for the information. I will have a look and update the article accordingly.
“I’ve followed the steps and all looks right but when choosing RMS template in he mail transport rules, all I see are the default RMS templates. I’ve waited 24 hours and my custom label doesnt’ show in the drop down.”
========================================
me the same
I’d try publishing the label and see if you are included in the users’ scope.
Hi there,
I’ve followed the steps and all looks right but when choosing RMS template in he mail transport rules, all I see are the default RMS templates. I’ve waited 24 hours and my custom label doesnt’ show in the drop down.
Thanks