



To protect mailbox databases from uncontrolled growth due to massive use of mail attachments, Microsoft Exchange 2019/2016/2013/2010/2007 incorporates a special set of message size limits in its configuration.
The video below provides a step-by-step guidance on how to check and change email size limit. Below the video walkthrough, you can find a detailed description of the same procedures.
Message size limits
There are basically three places where you can configure default message size limits on Exchange:
- Organization transport settings
- Send/receive connector settings
- User mailbox settings.
To check your server’s current limit you can open and access them via Exchange Management Console (EMC), however PowerShell offers a faster method that is available also on Office 365. Run the following code in the Exchange Management Shell, or after connecting with Office 365 via remote PowerShell session:
get-transportconfig | ft maxsendsize, maxreceivesize get-receiveconnector | ft name, maxmessagesize get-sendconnector | ft name, maxmessagesize get-mailbox Administrator |ft Name, Maxsendsize, maxreceivesize
The result should be similar to the example visible on the screenshot below, which presents following limits:
- Transport service accepts messages no larger than 25 MB
- All send/receive connectors have message size limit set to 10 MB
- There is no size limit set on the Administrator mailbox.
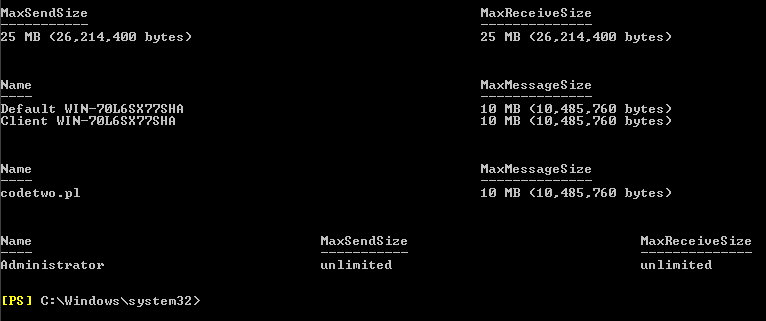
Bear in mind that the last line of the script (Get-Mailbox) returns information only about the Administrator’s user mailbox. Replace it with the user name you want to check. Alternatively, you can remove the Administrator phrase entirely, however this will result in a list of all mailboxes present on the Exchange.
To change the above size limits you can use a PS script too. The example below shows how to reduce the size of messages accepted by the transport service from the 25 MB to 15 MB.
Set-TransportConfig -MaxSendSize 15MB -MaxReceiveSize 15MB
Syntax of the command for send/receive connectors is similar, however you need to execute it for each connector’s identity. The same rule applies to mailboxes – you need to specify which mailboxes to affect by the command. Therefore, it is easier to pass over the result of the Get- command directly to the Set- command. To do so – use the piping feature of PowerShell. E.g. setting a 10MB message size limit in all mailboxes requires the following command:
Get-Mailbox | Set-Mailbox -MaxSendSize 10MB -MaxReceiveSize 10MB
The Get-mailbox command result is passed with the “|” pipe symbol to the Set-Mailbox command. This method works also for the send/receive connectors. The final script that sets the transport message size limit to 15 MB, send/receive connectors limits to 10 MB each, and the message size limit in all mailboxes to 10 MB presents as follows:
get-transportconfig | Set-TransportConfig -maxsendsize 15MB -maxreceivesize 15MB; get-receiveconnector | set-receiveconnector -maxmessagesize 10MB; get-sendconnector | set-sendconnector -maxmessagesize 10MB; get-mailbox | Set-Mailbox -Maxsendsize 10MB -maxreceivesize 10MB
There is a drawback however. Limits presented above are set for the message as a whole, no matter if they contain attachments or not. If the message is extremely large and contains no attachment, it will be stopped.
Attachment size limit
The only way to set size limits exclusively for attachments is to use a hub transport rule, which will detect and block messages if their attachments are over a specified size threshold.
To set up the rule you can use the below PowerShell script, as the method is quite simple:
New-TransportRule -Name LargeAttach -AttachmentSizeOver 10MB -RejectMessageReasonText "Message attachment size over 10MB - email rejected."
The command creates a rule named LargeAttach that is triggered by any email with attachments larger than 10MB. The rule then stops the message from delivery, and sends back a notification about that fact to the original sender.
Setting up message and attachment size limits to stop bloating your mailbox database seems quite reasonable. However, this still does not resolve the problem fully, as over time the database will grow anyway due to increased email traffic. Even small attachments can affect your server when they are sent in large quantities. Sure, you can even lower limits, but this is a dead end situation. In today’s world a 5MB PDF attachment is nothing uncommon, and it is safe to assume that these numbers will only grow.
Fortunately, there is a solution that keeps your database safe and allows even large attachments to reach your organization – CodeTwo Exchange Rules Pro. It features the attachment strip/compress function. It gives you ability to remove attachments on the fly from messages traveling through your server and place them in a different, separate repository. It also leaves a link to that repository in the message itself so the recipient can still access the file with no problem – check out all available email attachment stripping and compressing capabilities of CodeTwo Exchange Rules Pro.
Useful links:

Recommended articles



Thank You!!!! This article still has relevance all these years. I am working in an Exchange Hybrid Environment and we could not find why or where are emails were getting blocked for max size. After running your perscribed three PS scripts, we found that the Exchange On Prem Edge servers had the Set-ReceiveConnector was set to 35 MB. It was set to unlimited everywhere else. Huge Thanks!
Thanks. Worked perfect on Exchange 2010!
I am running exchange 2016. The get commands above do not work and are not listed when I enter Get-ExCommand. Do I have to load these commands?
Here’s a .bat file to set this to 40MB (Rename file from .txt to .bat, run as admin.):
@echo off
rem set-exchange-2013-message-size-limits.bat
setlocal
set MAXSIZE=40
if not “x%1” == “x” set MAXSIZE=%1
set MAXMB=%MAXSIZE%MB
echo %0: MAXMB is: %MAXMB%
echo . ‘C:\Program Files\Microsoft \Exchange Server\V15\bin\RemoteExchange.ps1’ >set-limits.ps1
echo Connect-ExchangeServer -auto >>set-limits.ps1
echo Set-TransportConfig -MaxReceiveSize %MAXMB% -MaxSendSize %MAXMB% >>set-limits.ps1
echo Set-ReceiveConnector ‘Default %COMPUTERNAME%’ -MaxMessageSize %MAXMB% >>set-limits.ps1
echo Get-SendConnector ^| Set-SendConnector -MaxMessageSize %MAXMB% >>set-limits.ps1
powershell .\set-limits.ps1
Thank you, it really help me to solve my problem.
Great article!
You can also use Exchange PowerShell cmd-let (Get-MessageTrackingLog) to track messages that could not be delivered because message size
Extremely Helpfull.
Thanks!
Using Exchange ECP, follow these steps;
1. Log on to the Exchange Ecp console
2. Click on Mail flow on the left pane
3. On the tabs above select Receive connector and click on the connector
4. Change the “Maximum message size to the desired”
5. Do step 3 an 4 above for the send connector.
Hi Scott,
There are several things that could be causing this, but the first one to try is changing the maxrequestlenght value in the web.config file on your OWA server to a (much) higher one.
It has also been reported that OWA doesn’t interpret ‘unlimited’ value settings correctly, which may cause errors like yours. In these cases setting a high numerical value should resolve the problem.
For more see: http://www.slipstick.com/exchange/cmdlets/changing-the-message-size-in-exchange-server/
Best regards,
Adam
Having an issue, Exchange reports unlimited attachment size, however users are getting errors stating that the attachment size maximum is 5mb. The users are using the OWA app.
Looking for some help. Once the size is changed and the rule implemented, how do you add the senders address to the mail that is sent to a recipient saying the mail is blocked?
We have a rule implemented on Office365 that generates an email to any recipient of mail over 10MB. However it doesn’t show the senders address in this email.
Hi Dawid,
This is not achievable within Office 365 at this point. Follow CodeTwo on social media – if we will have a solution for the issue, we will announce it there.
https://plus.google.com/114028260526830186292?prsrc=3
http://www.facebook.com/CodeTwo
http://www.linkedin.com/company/codetwo
https://twitter.com/CodeTwoSoftware
Best redards,
Adam
Thanks extremely helpful, detailed and clear documentation worked (in Bostonian) “like a chaam”!
Thanks for this great resource :)