
Trying to find the right meeting time that suits all required attendees is not a piece of cake. Especially when every user has many different duties during a workday. So, if you feel like you’re sacrificing too much time for scheduling a meeting, you might benefit from the Microsoft Outlook feature called Scheduling Poll. It is intended to help you efficiently find the optimal time to meet with all invitees. Let’s see how this timesaver works.
What is Scheduling Poll?
Scheduling Poll is a feature in Microsoft Outlook that you can use to create scheduling polls. A poll helps you find the best time for a meeting, so that all required people can attend it. This saves a lot of time and unnecessary emailing.
Scheduling Poll has replaced FindTime: an Outlook add-in that served the same purpose and offered the same functionality, it’s available in both classic and New Outlook. To the end users’ relief, all their data has been smoothly migrated by Microsoft with no additional action required. Now, with the feature built into Outlook, you do not need to install anything extra.
How to find time that suits them all
The thing is that setting up a meeting can be frustrating if you need to coordinate it for many people that have different schedules. And when you invite people beyond your organization’s boundaries, it can get even more complex. If you had a chance to be a meeting organizer at least once, then you know what I‘m talking about. So, let’s see how Scheduling Poll can help you minimize the stress and reduce the time necessary to successfully schedule the meeting.
To start a meeting poll, you need to:
- Start creating a new email.
- Add some recipients.
- Open the Scheduling Poll pane. You can do it from the Outlook ribbon and the specific path depends on your Outlook version and settings:
- In the New Outlook and Outlook on the web (simplified ribbon): Message > More (…) > Scheduling Poll
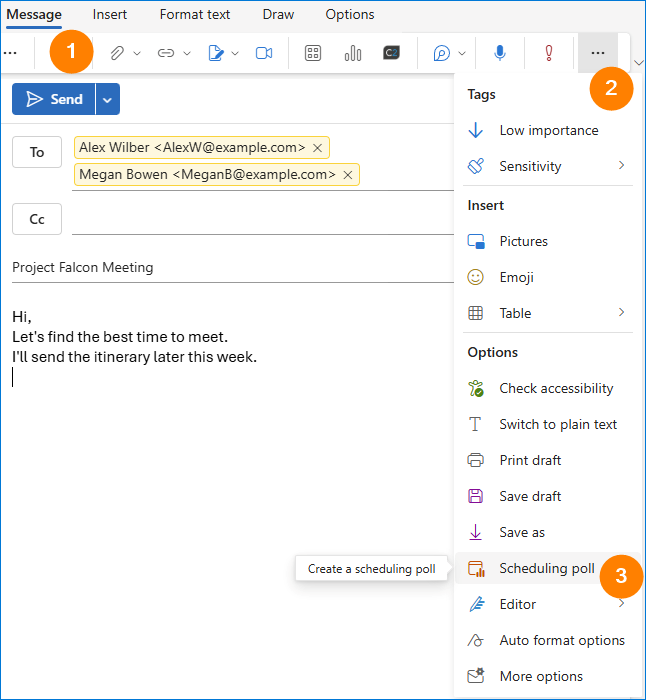
- In the classic Outlook: Message > New Scheduling Poll
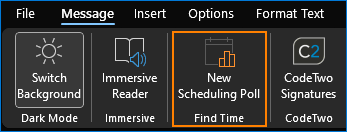
- In the new Outlook (classic ribbon): Message > Scheduling Poll

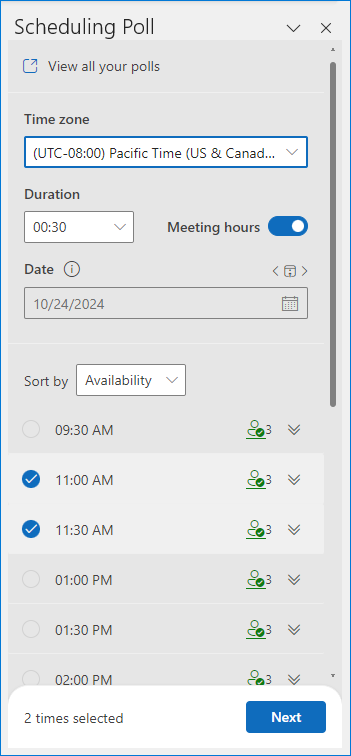
- Now, a new scheduling poll wizard opens. Set up your poll by selecting time zone, meeting duration, date and hours. You can enable Meeting hours to limit proposed meeting hours to workdays and working hours. Click Next when the poll is ready.
Note: The colors show who is available when. Here’s how to read each status designation:
- Green: Available.
- Red: Busy.
- Purple: Out of Office.
- Gray: Unknown – this status will be always shown for external attendees, unless you add their calendar(s) to your Outlook.
- Underlined: Indicates the organizer’s status.
This way, you can easily select times where all attendees are available for a meeting. What’s more, Scheduling Poll will include availability across different time zones, as long as the attendees are within the same organization.
For example, in the screenshot below, all required attendees are available for the 9:30 AM meeting slot (all are green). At 9:00 AM, only one attendee is available, while the others, including the organizer (underline), are not (red). And at 10:00, one of the attendees is out of office (purple). So, as an organizer, I know that only 9:30, 11:00 and 11:30 meeting slots make sense.
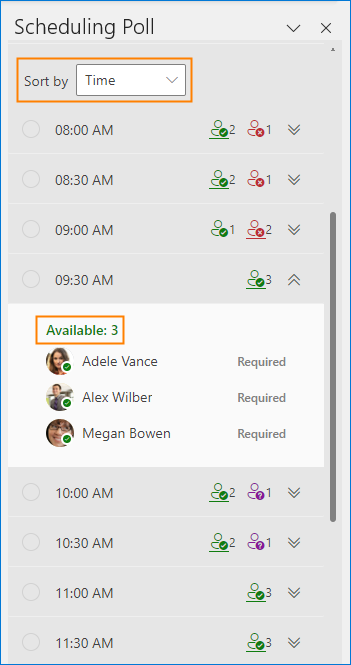
You can sort the view by Availability (all hours when everyone is available go to the top of the list) and Time (it displays all hours chronologically). Hover your mouse cursor over the user icons or click the downfacing arrows icons on the right to see more details.
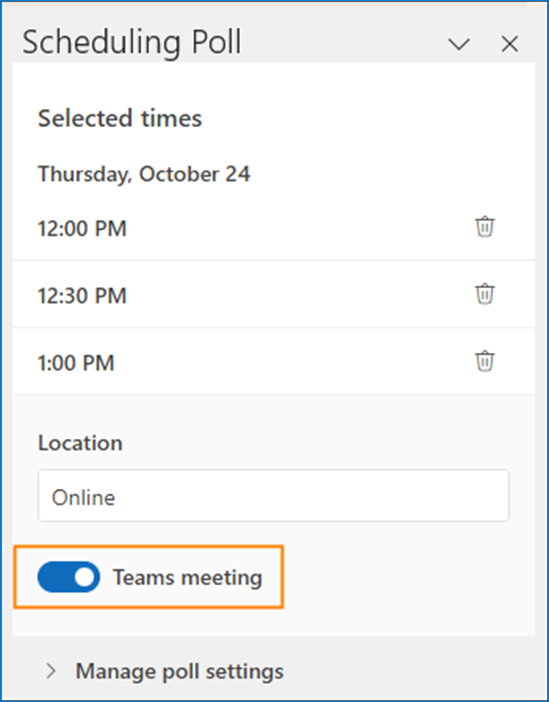
- In the next step, provide the meeting location. If you want it to be an online meeting and your organization uses Microsoft Teams, you can enable Teams meeting. Take a final look at the poll and if it’s ready, click Create poll. It will add the poll in the new email.
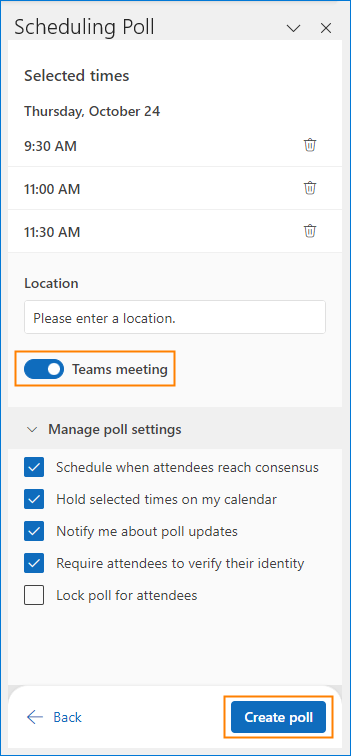
Note: In this step, you can also enable/disable additional poll settings:
- Schedule when attendees reach consensus – an event will be automatically scheduled if all required attendees have voted in favor of a specific time option. If there is a tie between two or more options, the earliest option will be scheduled. If you turn this option off, you will be able to schedule the meeting manually from the Scheduling poll dashboard / relevant voting page. That’s also where you can edit the meeting invite details (e.g., change the meeting title, duration add attendees, etc.).
- Hold selected times on my calendar – a tentative event will be placed on your calendar for each time option you propose. All holds will be removed once a poll is scheduled or cancelled.
- Notify me about poll updates – when turned on, you will receive an email each time an attendee votes. The message will include the current vote status and an option to schedule the meeting manually (e.g., when not all attendees have selected their preferred time slot or the majority agrees to a specific hour).
- Require attendees to verify their identity – enable this option to force authentication preventing anonymous voting.
- Lock poll for attendees – attendees will not be able to suggest new times or edit other attendees.
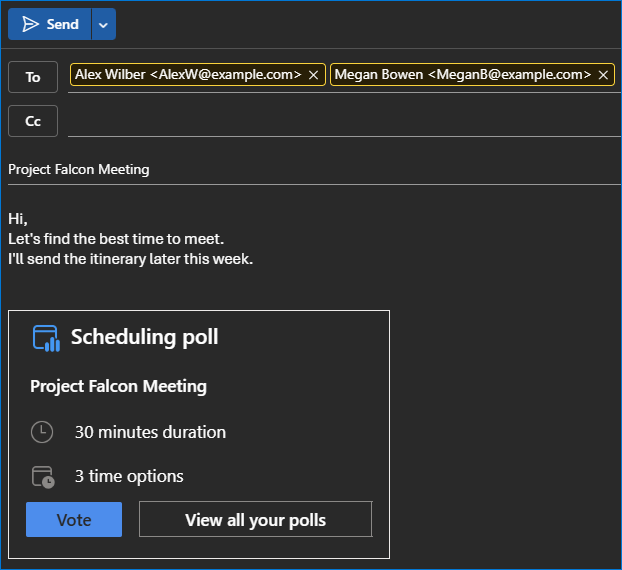
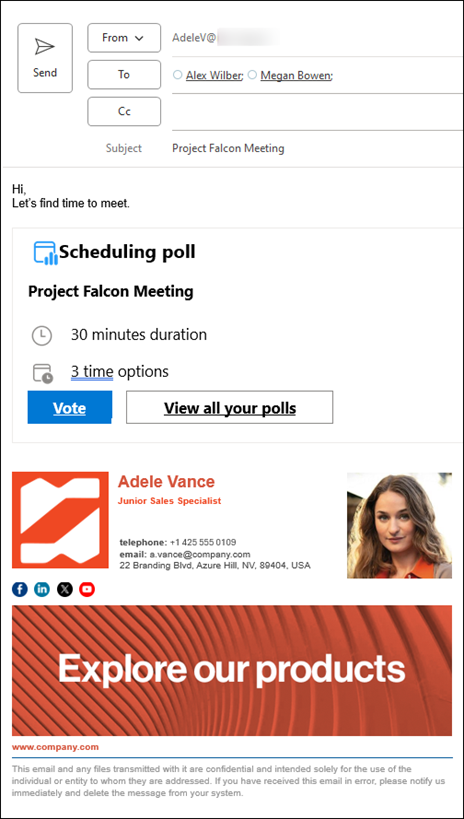
- Send the poll to all attendees, so that they can select the time that suits them best.
Once all invited users select the time as shown in the next section, the Scheduling poll service will send out the meeting invitations on your behalf. That is, unless you deactivate the default option for scheduling meetings when attendees reach consensus. In such a case, go to the Scheduling Poll organizer dashboard / relevant voting page to set up the event manually. The dashboard is currently available at 3 different addresses:
- https://outlook.office365.com/findtime/dashboard
- https://outlook.cloud.microsoft/findtime/dashboard
- https://outlook.office.com/findtime/vote
Why 3 different addresses? Find out in this article.
How to vote when you receive a poll?
Start with clicking the Vote button in the email with a scheduling poll you’ve received. The next steps depend on whether you’re a Microsoft 365 user or not.
In the first case, the website https://outlook.office.com/findtime/vote will open in your browser. If you look closely, you’ll see that FindTime didn’t die completely. If the meeting organizer enabled the Require attendees to verify their identity option, and you’re not signed in to Microsoft 365, you’ll need to sign in.
Then you’ll be able to finally vote for the proposed meeting hours by clicking the right options (Yes, No, Prefer) and then Vote:
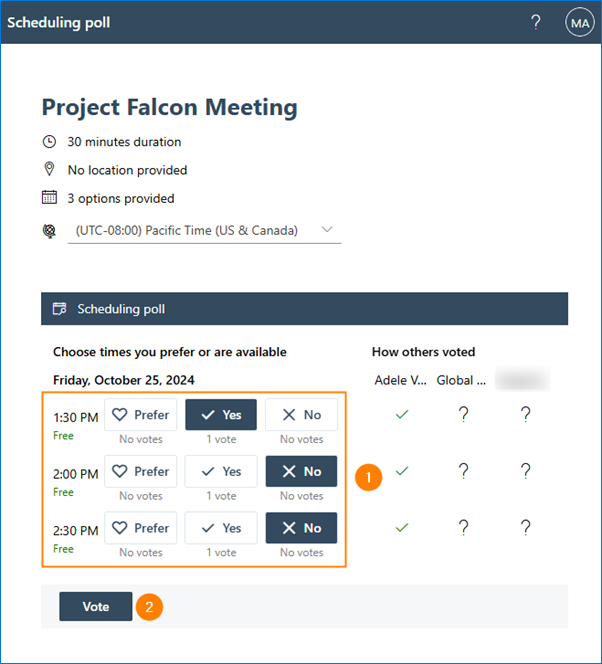
Note that you can see how other users voted too.
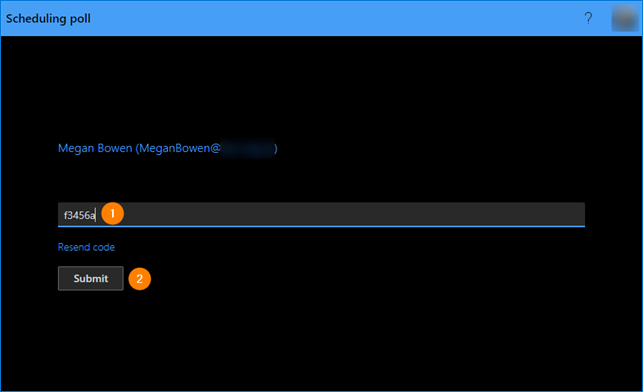
For non-Microsoft 365 users, the same poll website will open. If the organizer used the Require attendees to verify their identity option, you’ll need to first authenticate by providing verification code sent to your email.
Use Scheduling Poll with Microsoft Teams
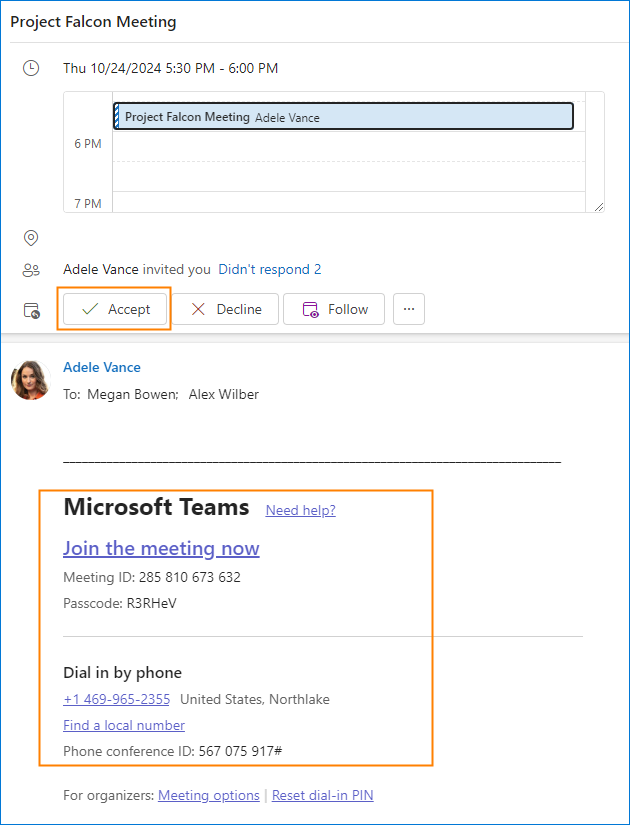
If you are using Microsoft Teams for online meetings in your organization, then you can easily use Scheduling Poll for scheduling purposes. You just need to toggle Teams meeting on when creating a poll.
Then, once you and your invitees find the optimal time, the service will send out the invitation with an option to accept the meeting and a link to join it in Teams.
That’s all. Now with that extra time you saved, you can focus on more productive tasks.
Add signatures to Scheduling Poll emails
Scheduling Poll can be very helpful, especially when organizing meetings with many participants. When you are adding a scheduling poll, it is crucial to include your email signature as well, for quite a few reasons:
- Professional email signatures show your attention to detail. A well-formatted email signature gives you additional marketing opportunities and helps build your brand. This is vital when you send scheduling polls to people outside your organization.
- Because of increased number of phishing attempts, many recipients will be alarmed by links in your messages. A standardized and fully branded email signature adds credibility to your messages.
- If your contact details are up to date, your recipients will be able to use other channels to contact you, should they have additional questions about the meeting.
The only way to make sure your signatures are always up to date and equally professional, regardless of email clients and devices from which your business emails are sent, is to use an email signature management tool.
Check out the leading email signature managers for Microsoft 365 and Exchange Server.
See also:
Recommended articles


what if my meeting lasts more than one day? For example a conference and I want to offer options?
Hi Susan,
Scheduling Poll is designed for polling single-day meeting options, where you choose a meeting date, duration, and possible start times. It doesn’t support multi-day date ranges; the maximum meeting duration is 8 hours, and available time options are limited to those ending no later than 00:00.
For multi-day events, you’ll need to collect preferred date ranges separately: for example, the old-fashioned way (by email), with Microsoft Forms, or by using third-party solutions. However, these alternatives won’t provide Scheduling Poll’s Outlook-native automation.
Should all possible meeting times be showing in Outlook? It used to, but one that I just created is only showing the first time as HOLD the others are not on my calendar.
Indeed, according to this Microsoft article, a tentative event should be placed on your calendar for each time option proposed by you. Check in the FindTime Dashboard (https://outlook.office365.com/findtime/dashboard) under Default Poll Settings whether the option Hold selected times on my calendar is selected.
Is there a way to make the poll blind, so that the invitees do not see who else is polling?
I am conducting confidential interviews of roughly 30 people and need to schedule them into slots. I tried putting their email addresses in a BCC line in Outlook, but FindTime doesn’t seem to support that.
Hi Roy,
What you’re trying to achieve requires sending individual invites. You should try using tools like Microsoft Bookings or Calendly to ensure anonymity among the invitees.
@Kamil thank you, but pointing to the tech doc page does not help, when trying to figure out how to force a meeting time (ie not all people have voted). when it is this situation, there is no schedule option, it just says “New Meeting”, which is not what you want to do. You have to remove the person from the meeting to gain consensus, and then book, which is not helpful..
How does the poll let me know the best date. It doesn’t really give that answer in the poll other than me looking at each individual attendee’s response.
With the default options, it will send out invitations automatically, once the best time slot is chosen. And if, for example, not everyone answers, you can use the voting page to see which times suit the most. Learn more
If two persons can not attend, and others can, how to force select one meeting from all the offered options?
You can use the voting page for that. Learn more
How can I send a poll from someone else’s calendar while using my email? Is there a delegate access function?
Unfortunately, as far as I know, there’s no delegate access function.
Hi,
How can I as admin of the poll vote on behalf of someone (e.g. if I received their availability by mail)?
Txs
According to this page, the organizer has an option to vote for another person on the voting page.
Is there a way to include an agenda in the “FindTime” meeting poll? When I try to type an agenda in prior to sending the poll request, the agenda is not including in the initial poll distribution nor it is included in the final meeting once consensus is reached. It would be beneficial to know how to include the agenda so it does not have to be included later. This can also apply to attachments you want the team to see prior to joining the meeting. Thank you.
If you type the agenda before sending the meeting poll, it should be there, just below the Invitation created with FindTime button.
When it comes to the agenda in the final meeting invitation, you could upvote the feature request on this UserVoice page:
How do you handle meetings across timezones when you want to find a availible meeting time that fits inside the working hours of respective timezone?
If it’s within the same organization, both the Outlook’s scheduling assitant and FindTime should include availability. If not – you can use another kind of tool – a meeting scheduler.
Can I change the title before FindTime will automatically plan the meeting? Because now the meeting has the title ‘You are invited to a meeting’ but of course this has to be a more specific title about the subject we are going to discuss in this meeting. I have to change the title manually now and send another updated invite with the correct title.
As long as you add the meeting title before clicking the Add to email button, the final meeting should have the title you’ve specified. I’ve just verified it in Outlook on the Web. And the meeting description is attached to the FindTime invite.
I’m not sure what might be the reason if doesn’t work this way in your case.
How do I confirm a meeting time if not all recipients have selected their preferred time slot?
The best option would be to ping the recipients who haven’t selected their preferred time slot. If that doesn’t work, instead of autoscheduling, you can click Schedule on the voting page to schedule the meeting for any suitable time.
what is 2 people did not answer the vote ?
You might see this notification if some of recipients haven’t chosen any option suggested by FindTime.