If your organization still hasn’t migrated its public folders from an on-premises Exchange Server to Exchange Online (Microsoft 365), now’s the time to act. Why the rush? Because the Exchange Web Services (EWS) protocol used for public folder migrations is scheduled for retirement in Exchange Online starting in October 2026 – and there’s no successor apparent in sight. In other words, migrating your public folders to the cloud may soon become impossible (see this article to learn more about EWS retirement and its impact on public folder migrations).
Best tools for migrating public folders to Exchange Online (Microsoft 365)
To migrate Exchange public folders to Microsoft 365 ahead of EWS retirement, you have two options to choose from: use a native solution or a third-party application like CodeTwo Office 365 Migration.
The native migration solution available in Exchange Server and Microsoft 365 is free of charge, but it comes with at least several significant limitations. Here are a few of them:
- Downtime is required for some migration steps, leaving your users with no access to public folders.
- The migration process is based on a set of PowerShell scripts you need to run in a correct sequence.
- You need to create CSV mapping files.
- There’s no user-friendly dashboard that would allow for real-time reporting.
- Manual work is required, especially when an error occurs.
You can compensate for all these limitations by migrating your public folders with CodeTwo Office 365 Migration. Here are a few examples of the program’s benefits:
- It’s easy to install, configure, and use, and can be managed by a single administrator from one place.
- It doesn’t require any downtime during the migration process. Migration can also be completed in batches according to a specified time filter.
- The migration process starts and stops automatically, saving the admin a lot of time and effort. There is also no need to play with PowerShell scripting.
- The program has a light graphical user interface, which allows managing all migration tasks, such as server connections, delta migrations, auto-matching of mailboxes or folder filtering.
- CodeTwo Office 365 Migration can also create reports that help monitor the whole migration process – simply generate overall, job, or mailbox reports directly from the panel or set up the program to generate them automatically and send them to you via email.
In this article, I will show you how to migrate Exchange public folders to Microsoft 365 (Office 365) with CodeTwo Office 365 Migration.
Tip: If you’re considering migrating Exchange public folders to a Microsoft 365 shared mailbox, CodeTwo Office 365 Migration can help with that as well. See this step-by-step guide for details.
Before migration
You need to install CodeTwo Office 365 Migration in your environment to perform this task. To download the program, visit this website, run the installer, and follow the wizard to install the program on your machine. To check system requirements for the program, click here.
Configure source and target server connections
Before you can start the migration of public folders using CodeTwo Office 365 Migration, you have to connect the application to the source and the target servers. To do it, follow the steps below:
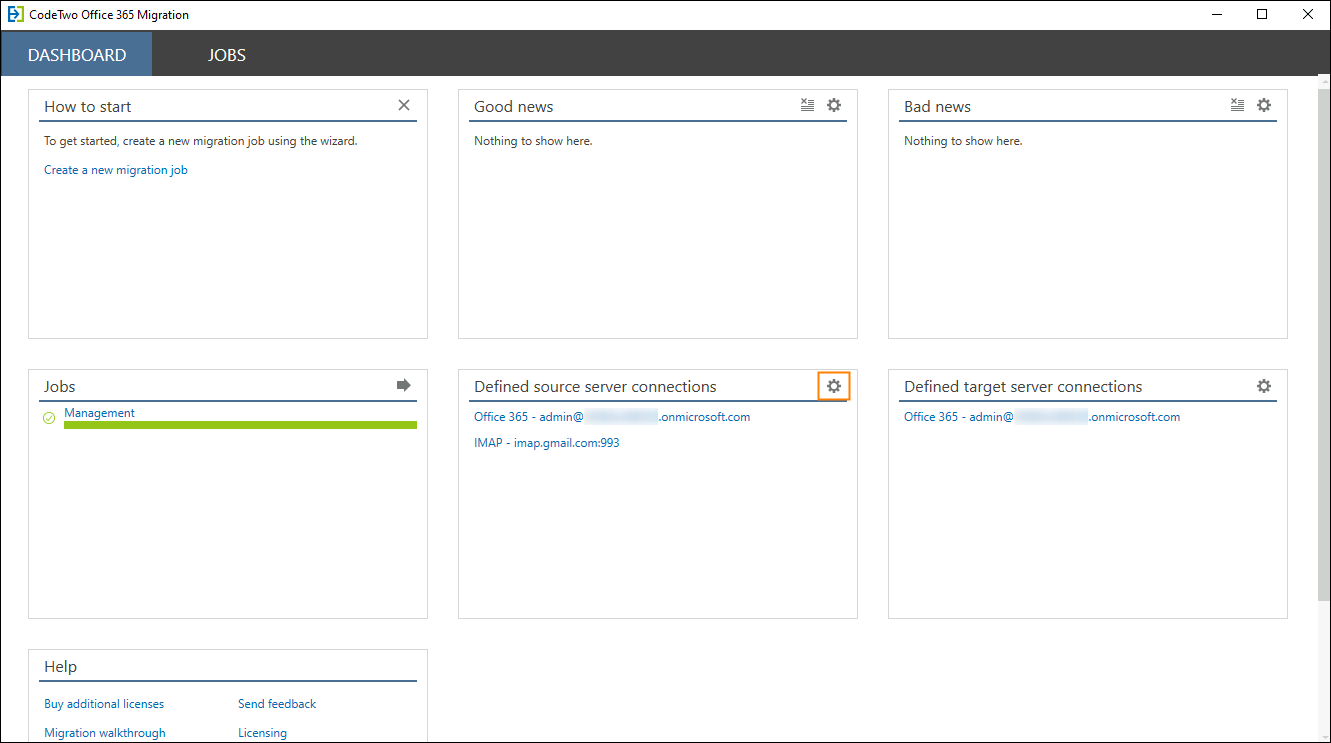
- Open the program’s Administration Panel from the Start menu.
- Click the gear (settings) icon on the Defined source server connections card of the Dashboard tab.

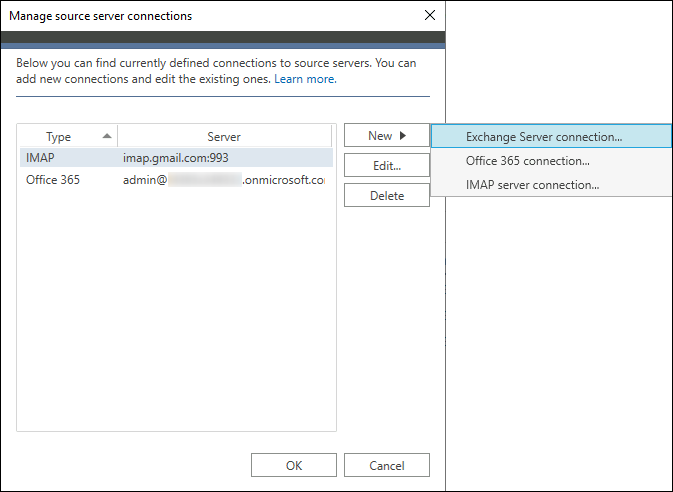
- In the Manage source server connections window, click the New button and select the Exchange Server connection option.

- Then, follow the steps in the Exchange source server connection wizard to configure the connection.
- Next, go back to the Dashboard tab and click the gear icon on the Defined target server connections card. Follow the wizard to configure the target server connection.
- Once you have finished, you are ready to create a migration job that will move Exchange public folders to Office 365.
Migrate public folders to Microsoft 365 (Office 365)
Important: To perform migration of public folders, you need to have 100 licenses for CodeTwo Office 365 Migration. The program always uses 100 licenses, no matter how many public folders you want to migrate. Additionally, be sure to create public folders on the target server prior to migration – see this Knowledge Base article for instructions.
To migrate the contents of public folders from on-premises Exchange to Exchange Online (Microsoft 365), you need to create a migration job. Follow the steps below to set it up:
Create a migration job
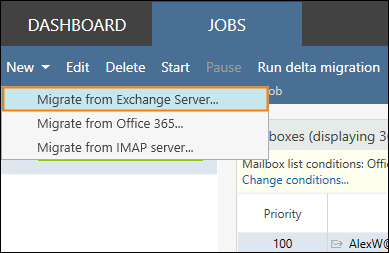
- Go to the Jobs tab, click New and select Migrate from Exchange Server. This way you open a new job wizard.

- In the General step, provide your job name, leaving other options unchanged. Click Next.
- Leave the default option selected in the Mailbox types step and proceed further.
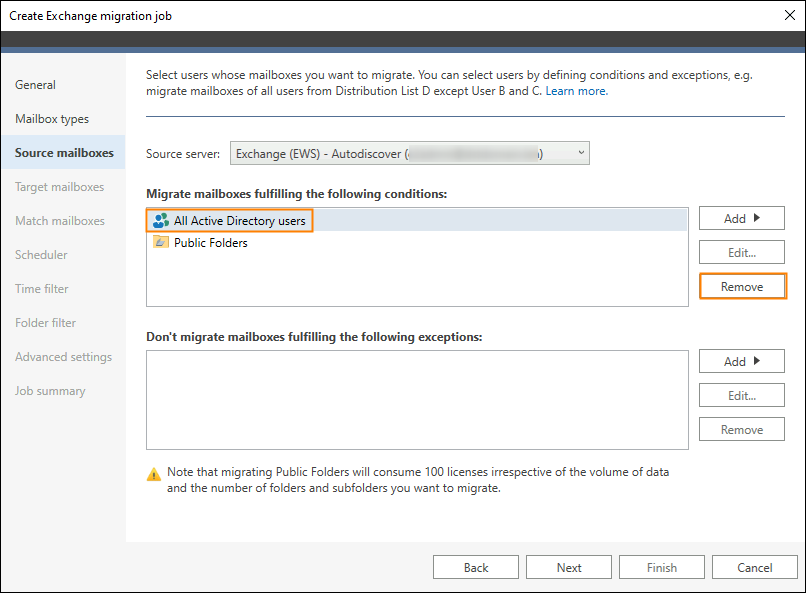
- Then, you need to select public folders in the Migrate mailboxes fulfilling the following conditions section.
Note: By default, the All Active Directory users and Public Folders conditions are added in this section. As we want to set up this job exclusively for public folders, the All Active Directory users condition needs to be removed. To remove it, select it and click Remove. Then, click Next.
- In the Target mailboxes step, the connection should be already configured (we covered this in the Configure source and target server connections section above). Click Next.
Match source public folders with the target ones
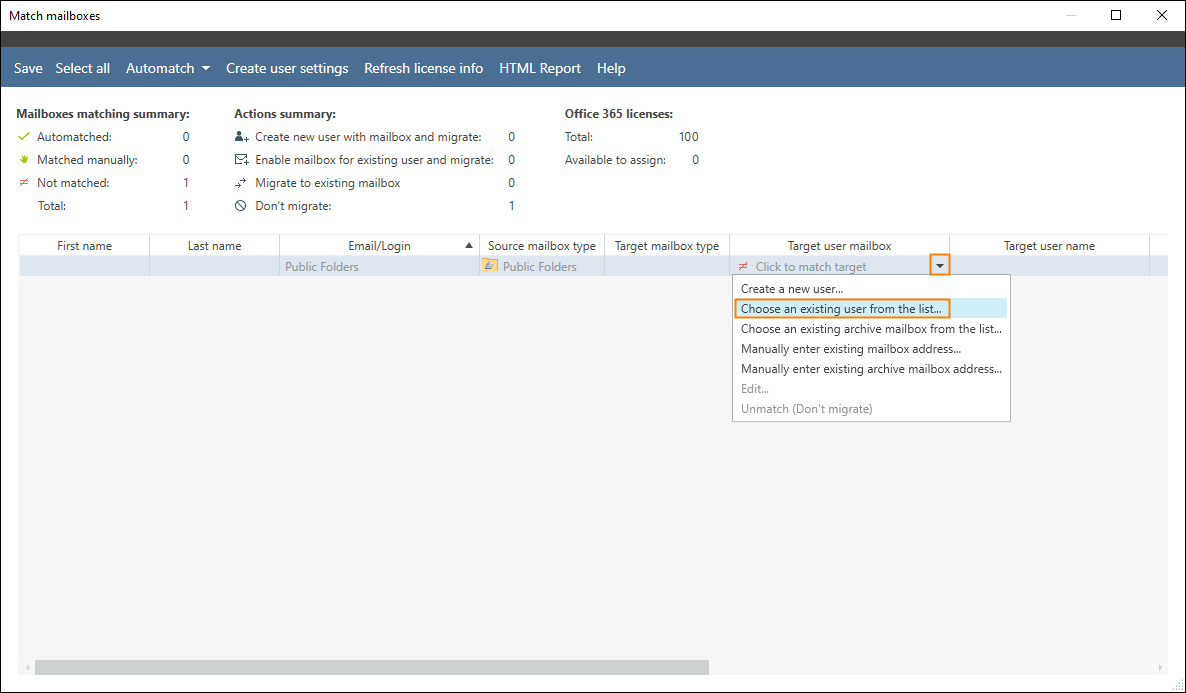
- The next step is to match source public folders with the target ones. In the Match mailboxes step, click the Match mailboxes button.
- In the window that opens, select Click to match target > Choose an existing user from the list.

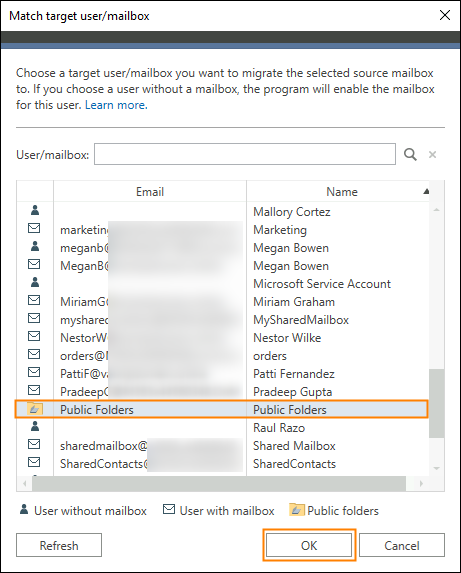
- In the Match target user/mailbox window, find your public folders mailbox, select it, and click OK.

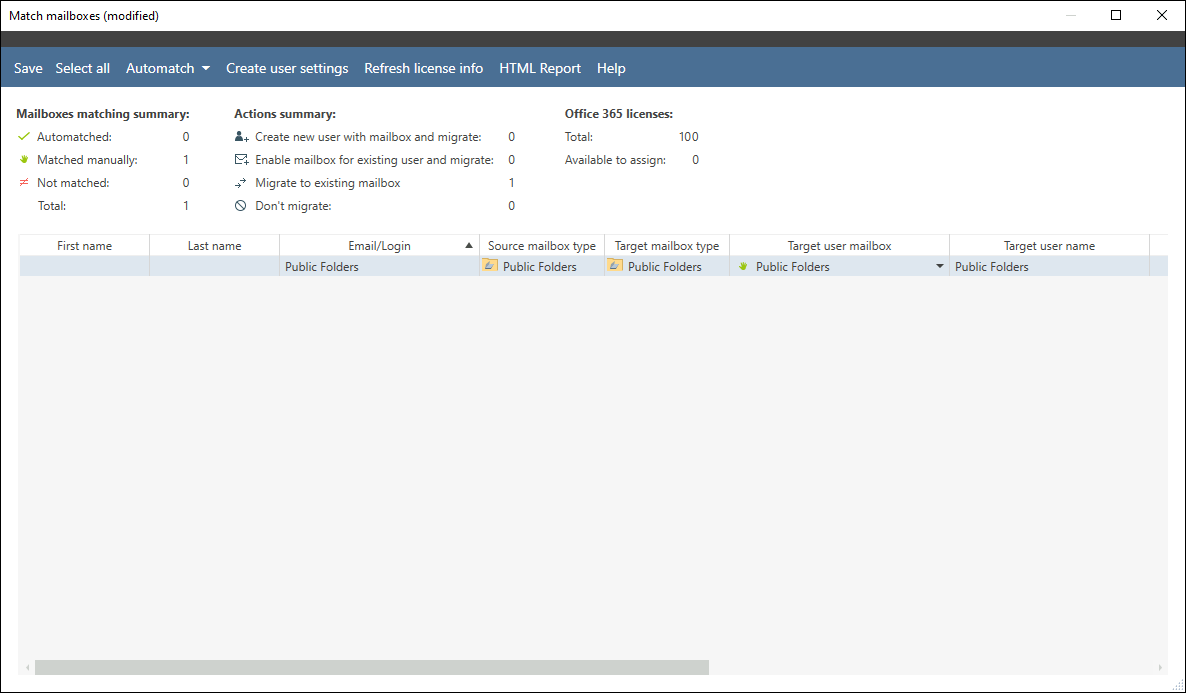
- In the Match mailboxes window, you should now see public folders matched.
- Click Save in the top left corner of the window to save changes. Close the window. Then, go back to the migration job wizard window. Click Next.
- In the Scheduler section, you can set up activity time for the migration job. In my example, I leave it untouched as I will run the job manually.
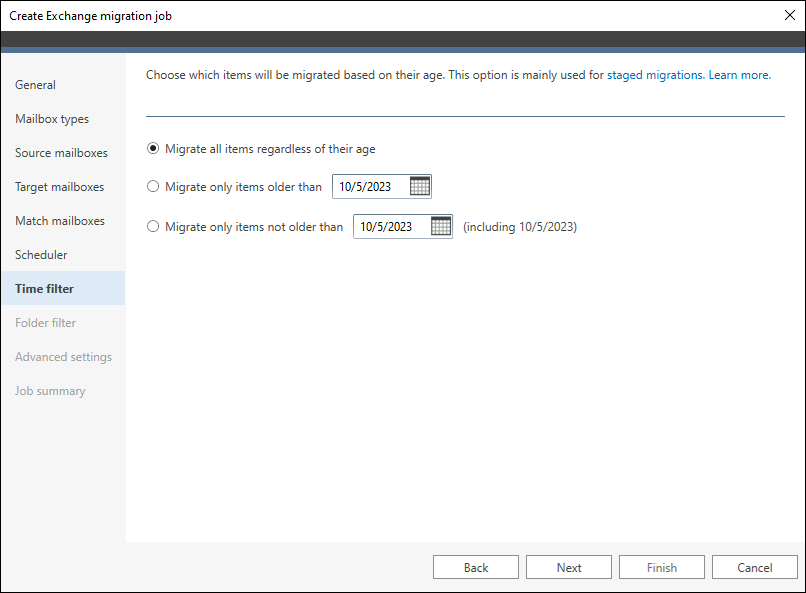
- The next step is Time filter. By default, the Migrate all items regardless of their age option is checked. If you do not want to change anything here, click Next.
- In the Folder filter step, specify folder types you want to migrate. Click Next.
- In the Advanced settings step, you do not need to change anything. Click Next.
- The final step is Job summary, where you can overview your settings. Once everything is set up correctly, click Finish.
Start migration of public folders
- Now, go to the Jobs tab in the Administration Panel – you should find your migration job there. Click Start to run it.

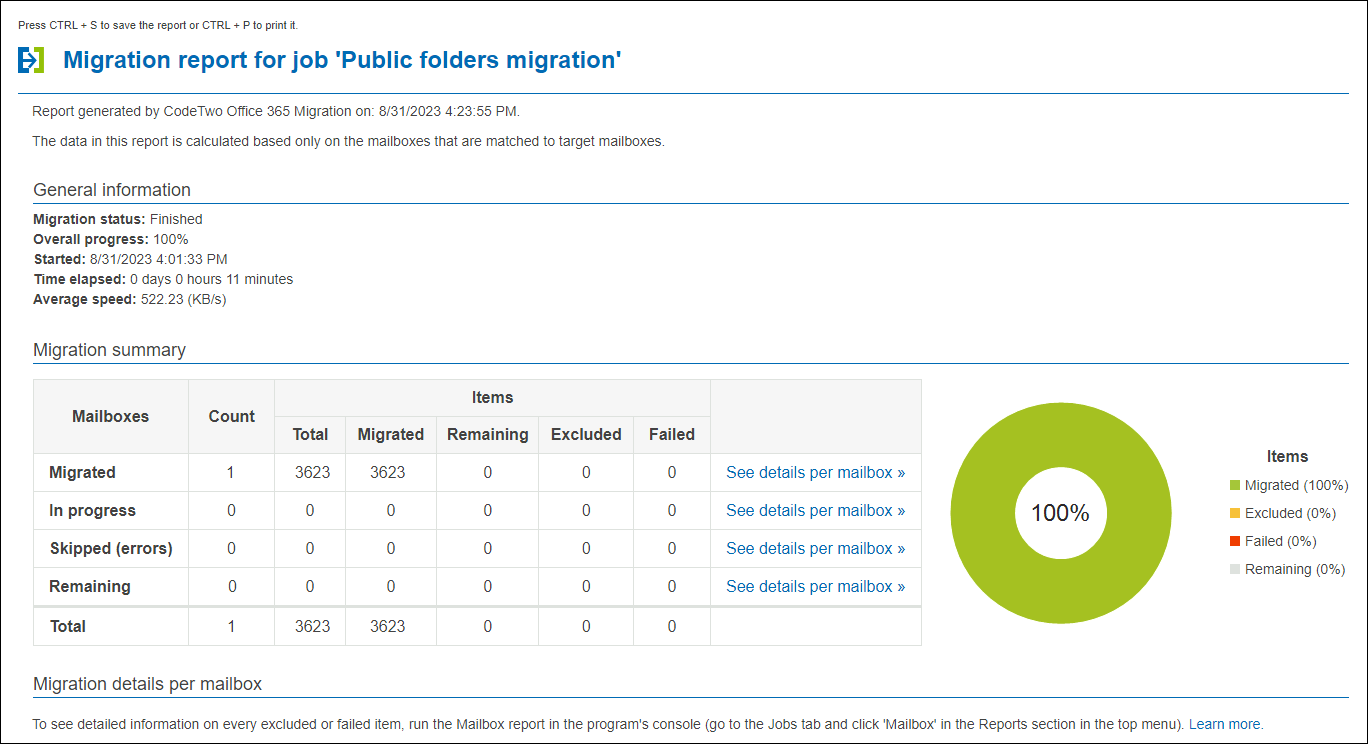
- Once the migration job is running, you can monitor the process directly in the program’s panel. In the Job migration progress, Job good news, and Job bad news sections, you will see migration statistics and alerts. After the migration is finished, you can also generate overall, job, or mailbox reports that illustrate the migration results.


And that’s it. With CodeTwo Office 365 Migration, public folders can be migrated to Exchange Online without PowerShell scripting, extensive manual work, or unnecessary use of company resources, making the entire migration process fast and easy.
But migrating public folders is only part of what the tool can do. Here are some of the other features of CodeTwo Office 365 Migration:
- Migration of mailboxes from Exchange SE, 2019, 2016, or 2013 to Microsoft 365 (Office 365),
- Migration between Microsoft 365 tenants,
- Migration from hosted Exchange (like Intermedia, Rackspace, or GoDaddy) or IMAP servers (like Google Workspace, Zimbra, or Kerio Connect) to Microsoft 365,
- Migration of public folders to a Microsoft 365 shared mailbox,
- Migration according to schedule – at once or in stages,
- Automatic delta migrations,
- And many more.
If you have any questions about the program’s functionalities, you can always contact our Customer Success Team, available 24 hours a day, 7 days a week.
Give the program a try
If you want to test CodeTwo Office 365 Migration in your environment, download a trial version from this website and test the program for 30 days at no cost. The only limitation is that you can migrate 10 items per folder.
Download CodeTwo Office 365 Migration
See also:
Recommended articles
Can mail enabled public folders be migrated to a 365 shared mailbox instead or does it have to be a 365 Public folder?
Hi Andrew,
Sure, you can use CodeTwo’s migration tools to migrate public folders to a shared mailbox. See this article to learn how to do this.
What about the cutover? Do need to have downtime for the cutover and what are the steps for doing a cutover when performing public folder migration using Code Two?
Here’s a step-by-step cutover migration guide. There is no downtime during the migration. The difference between cutover and other migration types is that it takes more time to switch to the new environment. That’s why many companies migrate a subset of data first, switch to the new environment and then migrate the rest.
Our Customer Success team offers guidance every step of the way – feel free to reach out to choose the best migration option for you.
Can it migrate non-mail enabled public folders?
I don’t see any technical reasons that argue against such a migration.
if we migrate, do onprem Exchange users in a hybrid Environment that are not migrated yet lose connection to the public folders?
Users that are not yet migrated will have the connection to the on-prem instance of public folders. It’s best to plan public folders migration as the last step of the journey – this way you won’t need to run delta migration to keep on-prem and cloud public folders synchronized.
If I want to migrate Public folder only no mailboxes, should I order 25 mailbox licenses?
That’s right. You can reach out to our Customer Success Team (available 24/7) if you have any additional pricing- or product-related questions.
How is this licenced?
If I just want to use the tool for PF migration how many licences do I need?
Thanks
Tom
Hi Tom,
Public Folder migration requires 25 licenses, regardless of how many subfolders you have and their size. You can see the licensing and pricing details on this page.
Can Email Activated Public Folders also be migrated?
Will the public folder permissions be taken over?
You can retain folder permissions after migration. Take a look at this knowledge base article to learn how to.
Hi,
how to migrate multiple public folder mailboxes? In the tool you can not select granularly which folders to migrate. Similar on the O365 side. There are storage limits of the publicfolder mailboxes (100GB at O365). How exactly does the distribution of the storage work?
Hi Niko,
You can exclude a specific public folder from migration using this method.
When it comes to storage distribution, it is managed by Microsoft 365. You can read more in this article.
If you have any additional questions, it’s best to contact our Customer Service.
Hello,
have users access to the public folders during the migration?
Hello Dirk,
That’s right, there is no downtime during the migration – public folders can be accessed and actively used during the migration. The rescan feature makes it possible to update all the items added or modified since the primary migration process.