



eDiscovery (Premium) requirements & permissions
eDiscovery (Premium) is not a part of every tenant. To experience its goodness, you need either an E5 subscription with the E5 Compliance add-on or E3 with the E5 eDiscovery and Audit add-on. You need to assign the required licenses to all users who would benefit from the feature (to the users performing the search, that is).
Another important requirement to keep in mind is permissions. Back in the day, eDiscovery mechanism was based on the permissions from the Exchange admin center. Currently, the Microsoft Purview compliance portal has its own, independent Permissions settings page. To manage eDiscovery cases, a user needs to be assigned an eDiscovery role group – eDiscovery Manager. This role group is a particular one, as it has two very distinct subgroups:
eDiscovery Manager – this role group allows its members to create and manage eDiscovery cases, as long as they have created the case or have been added as members to the case.
eDiscovery Administrator – is a role group which allows full access to each and every eDiscovery case, without necessarily being a member of said case.
Managers will not be able to see the cases they have not created or been assigned to. Administrators have full access to all cases – better assign those permissions with care. There is also one role which plays an important role while dealing with eDiscovery:
Reviewer – reviewers can be assigned as members of a case. They cannot create eDiscovery cases, run content search or even preview results of the search – they can only access and analyze the case data in eDiscovery (Premium). This is the most restrictive eDiscovery-related role, but without it, users cannot access any part of eDiscovery at all.
Like with the Exchange admin center, this Microsoft 365 module offers a fully-customizable RBAC experience. As a result, apart from those default role groups, you can define custom role groups with the permissions you choose.
What does eDiscovery mechanism do?
eDiscovery includes many options devoted to searching, collecting, preserving and exporting data. Here are its key parts:
eDiscovery case. A case is the most basic eDiscovery tool. eDiscovery cases allow you to control who can see and access a certain investigation.
Litigation hold. Whenever a mailbox or another resource (for example, a SharePoint site) is subject to a litigation hold, it means that its content is protected. Owner of a mailbox on a litigation will be able to delete items, but unable to purge them. It means that as long as a mailbox is on a litigation hold, it is not possible to permanently delete an email or any other item. As long as the litigation hold is active, deleted items will go to a specific subfolder in Recoverable Items folder: DiscoveryHold. Its contents can be searched with eDiscovery content search or using Search-Mailbox cmdlet.
Content search. Content search can use various filters and criteria to search for specific content in mailboxes, SharePoint sites, or in Public Folders. It can also be used as a means to a manual local backup. Data which meets the specified requirements can be exported to PST files, which can be imported back into mailboxes later on for revision or restoring purposes.
eDiscovery, Premium or not, allows administrators to search, analyze and export specific data form an Office 365 organization. While the purpose and general idea of both mechanisms is the same, there are some important differences in how they achieve the same goal.
How is eDiscovery (Premium) different from eDiscovery?
The easiest way to see the differences between an eDiscovery case and an premium case is to take a look at both in the Microsoft Purview compliance portal. After noticing a slightly different layout, it is time to get into details.
Standard eDiscovery case has 5 tabs: Home, Searches, Hold, Exports and Settings.
The first conclusion is that a standard eDiscovery case gives a chance to:
- put mailboxes, SharePoint locations and Public Folders on hold,
- search for items related to a case
- export the results
eDiscovery (Premium) adds the following tabs:
- Data sources allows you to specify the users who might have relevant information about the case matter (these are called custodians). In standard eDiscovery case, they would be simply added to the Legal hold. Additionally, you can define non-custodial data sources from SharePoint and Exchange Online.
- Collections tool lets you built queries to search for content that is relevant to your case in the previously added sources (custodians, non-custodial sources). To configure the queries, you can use keywords, properties, and conditions.
- Review Sets results of a content search (or multiple searches) can be added to a review set for further analysis.
- Communications provides an easy tool to send notifications to custodians. The case manager can ask the custodians to preserve any information that might be useful for discovery.
- Processing lets you follow the status of processing for indexing case’s content.
- Jobs basically lists all jobs performed in the eDiscovery case together with their current status, creation and completion dates.
- Settings has three sections. While first two can be modified in a standard eDiscovery case, the third (Search & analytics) gives some extra options. Case information tab allows manager to modify basic case information, like name, number, description and status. Access & permissions gives an option to add or remove users in charge of the case. Search & analytics is where the best part is.
Search & analytics in eDiscovery (Premium)
The Search & analytics section gives you options which can potentially speed up the discovery process. For example:
Near duplicates / email threading significantly decreases the amount of documents and threads exported for revision. So when someone replies to an email which is a “hit” eDiscovery will not return 20 consequent emails, but only one conversation. Optical Character Recognition allows Microsoft 365 to find text in graphical files to add it to a Review Set later on. OCR supports GIF, JPG,PNG and TIFF.
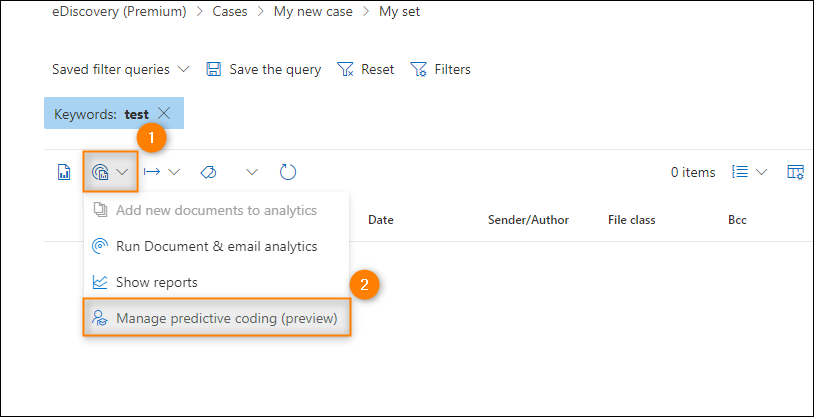
eDiscovery (Premium) also makes use of machine learning mechanisms to limit search results to items which are most probably relevant to the case. The system can be trained by accessing a certain review set, clicking the Analytics icon and choosing Manage predictive coding from drop-down menu.
How to run an eDiscovery (Premium) case
In the next article, How to create an eDiscovery (Premium) case, I present how to run an eDiscovery (Premium) case and make use of all the premium features mentioned in the article above. Be sure to read it if you want to see the premium features in action.
Suggested reading:
Recommended articles
“The quoted passage refers to the users performing the search. ”
Thanks for the this. What is your source for this please? We’re struggling to find any official written Microsoft source confirming whether the license is required only by those performing the search, or if the subjects of the searches also need the E5 license.
We even asked M365 Copilot, and it referred to your article right here lol.
I’m afraid I’m unable to quote anything relevant from Microsoft’s documentation. The licensing info has always been tricky to come by. It’s all based on manual testing – you can add any active mailbox and even unlicensed shared mailbox as the source for eDiscovery searches. Adding custodians and litigation holds on mailboxes is another story, there’s a bit more information on that in my other article: https://www.codetwo.com/admins-blog/office-365-litigation-hold-vs-retention-policy/
“you need to assign the required licenses to all users who would benefit from the feature.”
Does that mean the people performing the search (HR / legal) or the rest of the business that could be searched or have requested a search. e.g. Please tell me everything that has been said about me as part of GDPR?
The quoted passage refers to the users performing the search. I’ve added additional info in the article to make this clear.
Gabriel, did you ever find your your answer? I have the same issue
You say “To experience its goodness, you need either an E5 subscription with the E5 Compliance add-on or E3 with the E5 eDiscovery and Audit add-on.”
Is it that only the staff in the “eDiscovery Manager” group needs the add-on or is an add-on license required for all users in the tenant?
Thanks for pointing that out. I’ve added additional info in the article that also answers your question: you need to assign the required licenses to all users who would benefit from the feature.
In O365, sometimes I have to look for all emails between two users.
However, the search results includes other participants in thousands of emails.
Is there anyway to set a condition like “Participants includes ONLY these two users”?
While creating a data collection in your eDiscovery case, in the Conditions step, you can use Sender and Participant fields to exclude irrelevant users.