How to block sending out-of-office messages on Exchange Server for external recipients?

How to block sending out-of-office messages on Exchange Server for external recipients?

This article explains how to set up a mail flow rules to stop auto-replies from being sent outside Exchange 2019, 2016 and 2013, 2010 and 2007 organizations.

Block sending auto-replies on Exchange 2019/2016/2013

To block Exchange 2019, 2016 or 2013 from sending automatic out-of-office messages, follow the steps below:

  1. Log in to the Exchange Admin Center (EAC) at https://localhost/ecp/.
  2. In the EAC, go to mail flow>rules. Click on the Plus icon and select Create a new rule.
  3. In the resulting window, add the first condition:
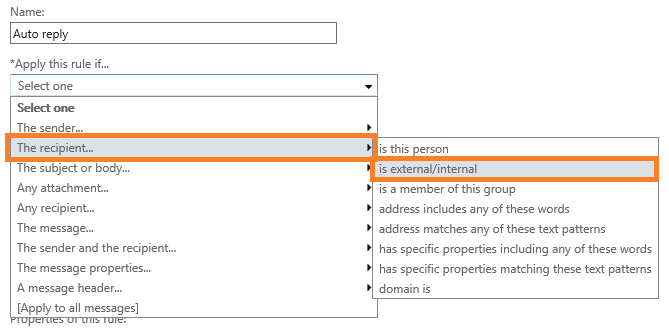
    a. Apply this rule if…> The recipient… > is external/internal.

    Block auto replies on Exchange Server for external recipient.

    b. Then, in the next dialog box, select Outside the organization and click OK.
  4. Now, add the second condition:
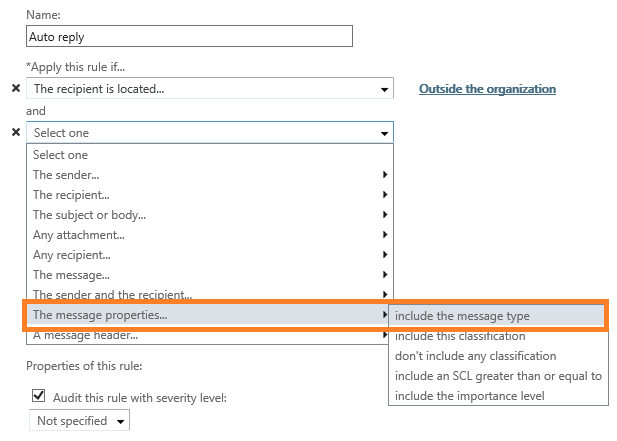
    a. The message properties…> include the message type.

    Set up a rule on Exchange Server to apply to out-of-office messages.

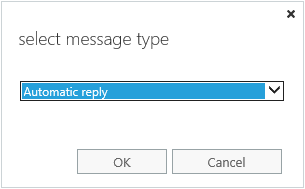
    b. In the resulting dialog box, set the message type to Automatic reply and click OK.

    Automatic reply.
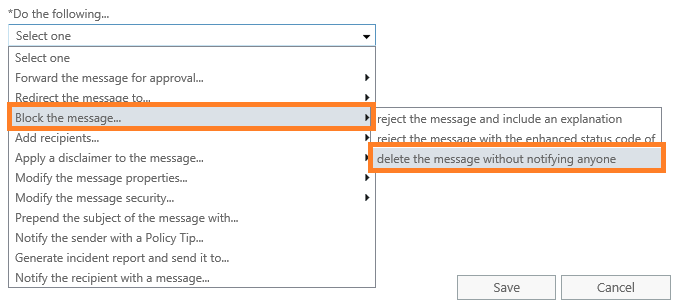
  5. In the Do the following… section, select: Block the message…> delete the message without notifying anyone.

    Block the message.
  6. Click Save to implement changes.

Now, all automatic replies sent outside your organization should be blocked and deleted automatically.

Block sending auto-replies on Exchange 2010 and 2007

If you are running either Exchange 2007 or 2010, you will not find a block-message-related action. However, automatic replies should be already disabled (by default) on your Exchange. To make sure that external out-of-office messages are not allowed, follow the steps below:

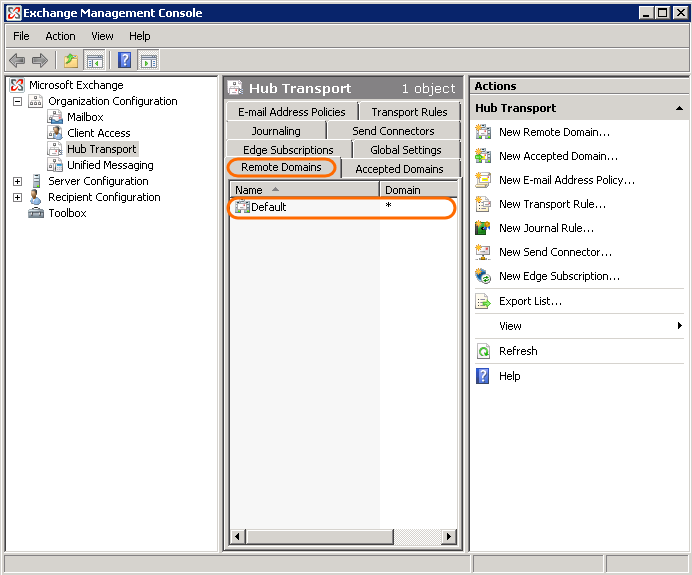
  1. Open Exchange Management Console.
  2. Expand Organization Configuration, and click on Hub Transport.
  3. In the central part of the window, select the Remote Domain tab. Then, right click on Default and select Properties.

    Set up a new Exchange Server 2007-2010 Hub Transport rule to block auto replies.
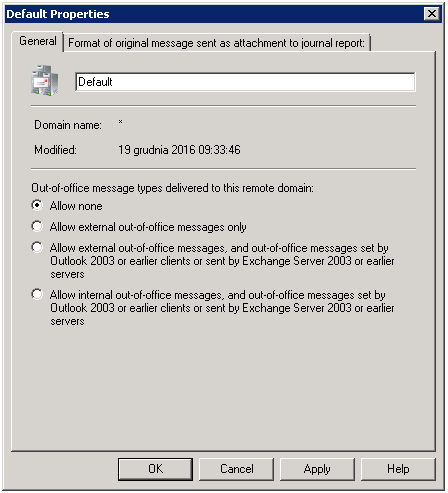
  4. In the resulting dialog box, under the General tab, select the Allow none option to block all auto-replies both to external and internal recipients. Or select the Allow internal out-of-office messages, and out-of-office messages set by Outlook 2003 or earlier or sent by Exchange Server or earlier server option to allow only auto-replies configured as internal.

    Default properties when setting up remote domain on Exchange 2007.
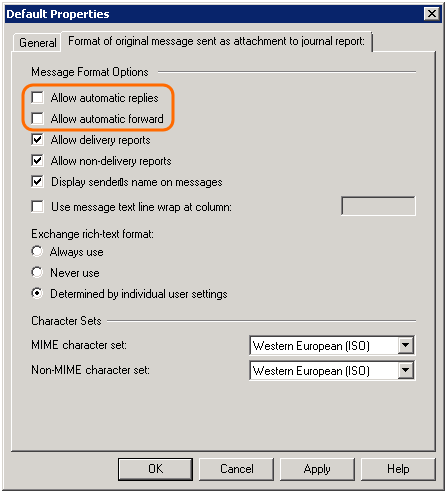
  5. In the Format of original message sent as attachment to journal report tab (or the Message Format tab in Exchange 2010), leave Allow automatic replies and Allow automatic forwards options unchecked to block all automatic replies and automatic forwards (not only OOF).

    Exchange Server 2007-2010 message format settings.
  6. Click OK to save changes.

Use PowerShell to block external out-of-office messages only for selected users

If you want to prevent only selected users/mailboxes from sending auto-replies externally, use the following PowerShell cmdlet:

Set-Mailbox "John Doe" -ExternalOofOptions InternalOnly

The command sets up John Doe’s mailbox to do not send out-of-office messages to external users.

To revert these settings, execute the below cmdlet to allow the selected mailbox to send external OOFs again:

Set-Mailbox "John Doe" -ExternalOofOptions External

Block Exchange auto-replies with a 3rd party application like CodeTwo Exchange Rules Pro

If you are a user of CodeTwo Exchange Rules Pro, a powerful server-based application for email signatures and email flow management purposes, you can use it to block external out-of-office messages with just a few clicks.

Follow the steps below to set up the rule that blocks outgoing auto-replies:

  1. Open the Administration Panel of the program.
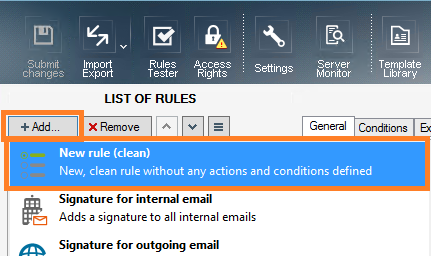
  2. Add a new rule – click the Add button and then select the New rule (clean) option.

    CodeTwo Exchange Rules Pro - New rule.
  3. In the General tab, name the rule and, in the Enable/disable rule section, check the Enable rule box to activate it (this will not immediately push the rule to the production – you need to hit the Submit changes button first to run the newly enabled rule).
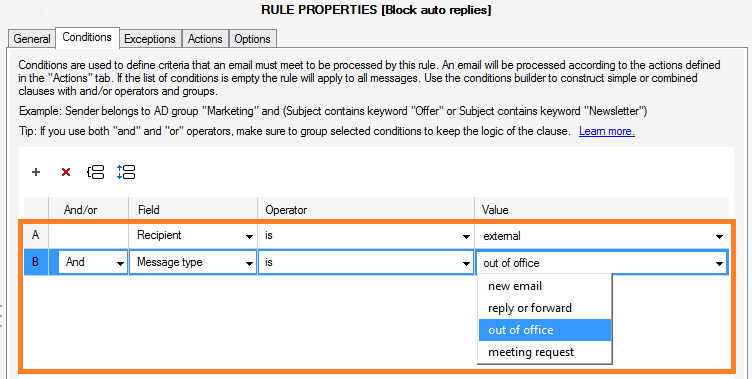
  4. In the Conditions tab, set up the following conditions: Recipient > is > external
    And Message type > is > out of office

    CodeTwo Exchange Rules Pro - conditions tab.
  5. Do not make changes in the Exception tab.
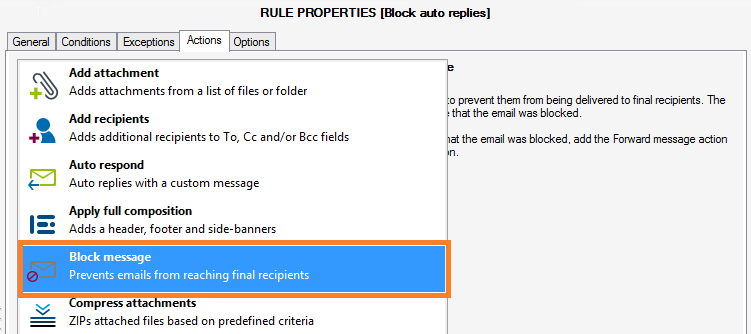
  6. In the Actions tab, click on the Add button and select the Block message option.

    CodeTwo Exchange Rules Pro - block message action.
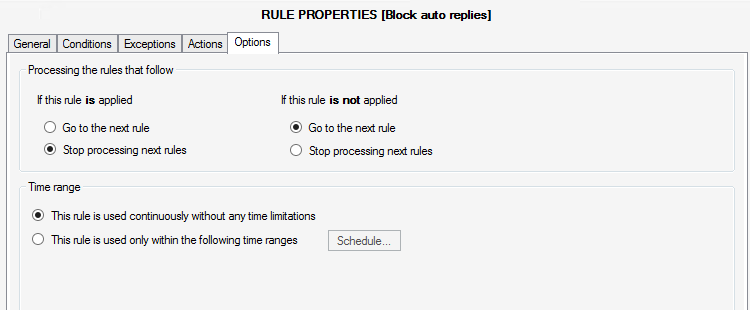
  7. In the Options tab, you can make some final changes according to your needs.

    CodeTwo Exchange Rules Pro - options tab.
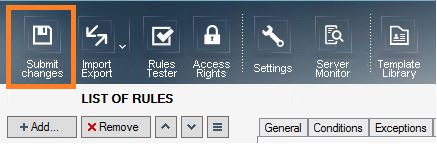
  8. Save the settings by clicking Submit changes.

    CodeTwo Exchange Rules Pro - submit changes.

That’s it! Now the program will block every auto-reply message before it hits external recipients. As CodeTwo Exchange Rules Pro is a server-based application, the rule is applied to all messages that meet the conditions, no matter what email client or device (including mobiles) a message is sent from.

See also:

Tools for Microsoft 365

Recommended articles

How to migrate from Exchange Server 2016/2019 to Microsoft 365

How to migrate from Exchange Server 2016/2019 to Microsoft 365

Migrating Exchange data to the cloud is not rocket science – explore your options and launch the migration stress-free. As you may already know, Exchange Server 2016 and 2019 have reached end of life and are no longer officially supported by Microsoft. If your organization still uses either of these platforms to manage email, contacts, calendars, and tasks, keep in mind that: Your environment may become vulnerable to newly discovered security threats – Microsoft will no longer provide security updates for Exchange 2016 and 2019 (unless you’ve enrolled in the Extended Security Update program, which ends in October 2026). Your emails may get blocked – Microsoft has started to throttle and block emails sent from unsupported Exchange Server versions to Exchange Online (as I covered in this article). That said, migrating to a supported platform is now the only viable long-term option for keeping your organization’s email environment secure, supported, and fully operational. If your organization wants or needs to keep things on‑premises (and continue using Microsoft’s solutions for that), upgrading to Exchange Server Subscription Edition (SE) is the only path forward. But given Microsoft’s clear preference for its cloud services – evident in the faster rollout of new features and the many security capabilities available exclusively in Microsoft 365 (Office 365) – now is a great time to leave your on‑prem environment behind and migrate to Exchange Online as part of Microsoft 365. While switching over to a new platform might seem like a rough ride, I’ll show you some easy ways to follow when migrating mailboxes from Exchange Server 2016/2019 to Microsoft 365. How to prepare for email migration to Microsoft 365 Before you start the migration process, you need to make sure your environment is ready for the move. For this purpose, you can use this guide in the Microsoft 365 admin center – it will help you connect your organization to Microsoft 365 and integrate your existing user accounts with Microsoft Entra ID. Microsoft also recommends completing the steps below: Set up an SPF record to determine valid email sources for your organization’s Microsoft 365 domain. Set up the Exchange Online Protection service as a means of protection against spam and malware. If you’re behind on updates, make sure to install the latest Cumulative Update (CU). And here is my quick, less obvious Microsoft 365 migration checklist: Verify if your software will work in Microsoft 365 (especially when it comes to server software). Microsoft 365 migration might be the time you learn that there is crucial legacy software that half the company uses and which is hard to replace. Encourage the whole company to clean up projects. It’s much easier to do this before the migration and start fresh. Gather as much information about your on‑premises environment as possible. For example, you might need to recreate access roles and permissions from scratch in the cloud or set up mail flow rules. Without prior research, it will be much more difficult. Verify if you need to migrate service accounts. There can be a lot of them on‑premises and in most cases, you won’t need them after the move. Review mailbox size limits in Exchange Online before migration to see which licenses you’ll need and whic
New-ComplianceSearch: how to use the newer version of Search-Mailbox

New-ComplianceSearch: how to use the newer version of Search-Mailbox

Microsoft retired the Search-Mailbox cmdlet – now what? Discover how to use New-ComplianceSearch, its key advantages and how to make the switch seamlessly.
How to start remote PowerShell session to Exchange or Microsoft 365

How to start remote PowerShell session to Exchange or Microsoft 365

One of many features of the PowerShell command line tool is its ability to connect with and manage the Exchange Server remotely. The procedure described below applies to the classic on-prem Exchange server and to the Microsoft 365/Exchange Online version.

Comments

Leave a Reply

Your email address will not be published.

You may use these HTML tags and attributes: <a href="" title=""> <abbr title=""> <acronym title=""> <b> <blockquote cite=""> <cite> <code> <del datetime=""> <em> <i> <q cite=""> <s> <strike> <strong>

*

CodeTwo sp. z o.o. sp. k. is a controller of your personal data.
See our Privacy Policy to learn more.