How to register CodeTwo applications in Entra ID (Azure AD)
Problem:
You want to manually register a CodeTwo application in your Microsoft Entra ID tenant.
Solution:
To enable a CodeTwo program to connect to Microsoft 365 (Office 365) by using the secure OAuth 2.0 authorization protocol, first you need to register a CodeTwo application in Entra ID for all Microsoft 365 tenants that will be used in the program. Next, to allow the CodeTwo application to access your data and perform the necessary tasks, you also need to grant the necessary permissions to that application.
These guidelines apply to the following CodeTwo programs:
- CodeTwo Backup, starting with version 2.3.x
- CodeTwo Office 365 Migration / CodeTwo Exchange Migration, starting with version 3.2.x
Use the links below for guidelines on how to register the CodeTwo application in Entra ID (Azure AD):
- Before you start
- Register a new application in Entra ID
- Configure application permissions
- Assign certificates / secrets to an app in Entra ID
For guidelines for the Sent Items Update (SIU) service in CodeTwo Email Signatures On-prem, refer to this user’s manual (the steps provided there will also work for the discontinued CodeTwo Exchange Rules family of software).
Before you start
Keep in mind that CodeTwo software can perform the registration automatically. You simply need to provide the credentials of a user with the Global Administrator or Privileged Role Administrator role in the server connection wizard. To learn more, see the user's manual:
CodeTwo Backup
CodeTwo Office 365 Migration
If you want to continue with manual registration, proceed to the next section.
Registering a new application in Entra ID
- Sign in to the Microsoft Entra admin center.
- Navigate to Entra ID > App registrations.
- Click New registration (Fig. 1.). This opens the Register an application page.
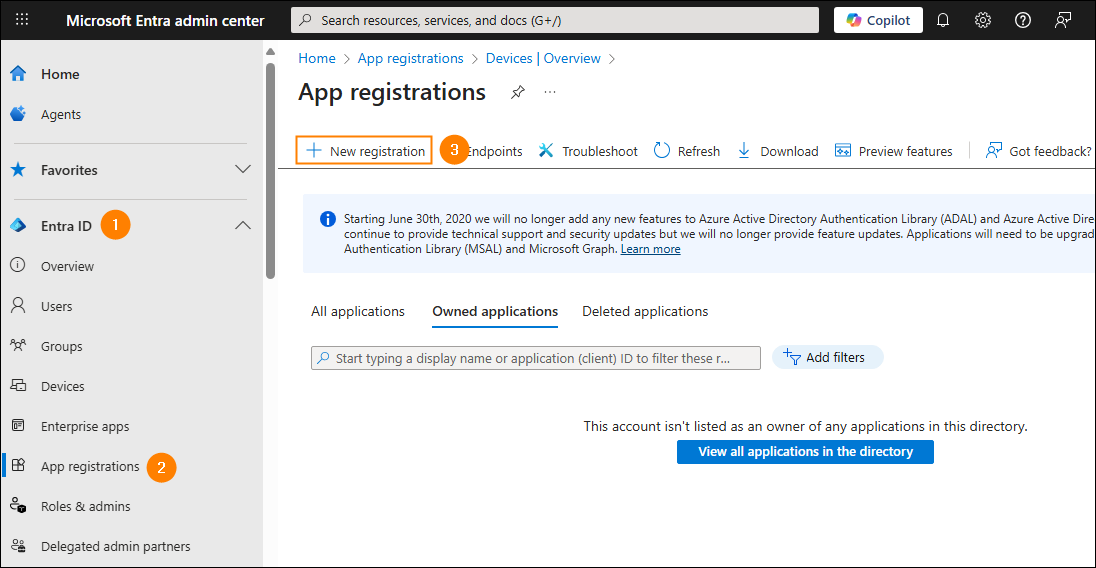
Fig. 1. The App registrations page in the Microsoft Entra admin center.
Enter a name for the application (e.g., CodeTwo Migration app, if you are using one of CodeTwo’s migration tools) and click Register (Fig. 2.). You can leave the other options to their defaults.

Fig. 2. Registering the CodeTwo application with Entra ID.
Configuring application permissions
- On the application Overview page, click View API permissions (Fig. 3.). The API permissions page will open.
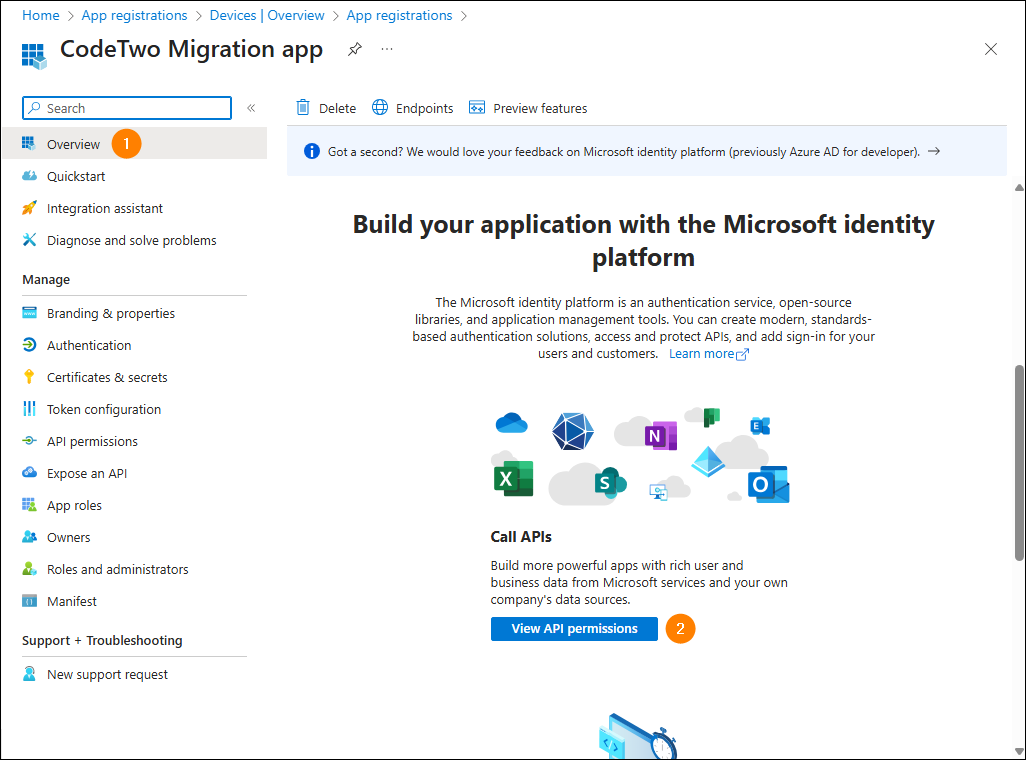
Fig. 3. Accessing the API permissions page.
- Click the Add a permission button and in the pane that opens click APIs my organization uses (Fig. 4.).
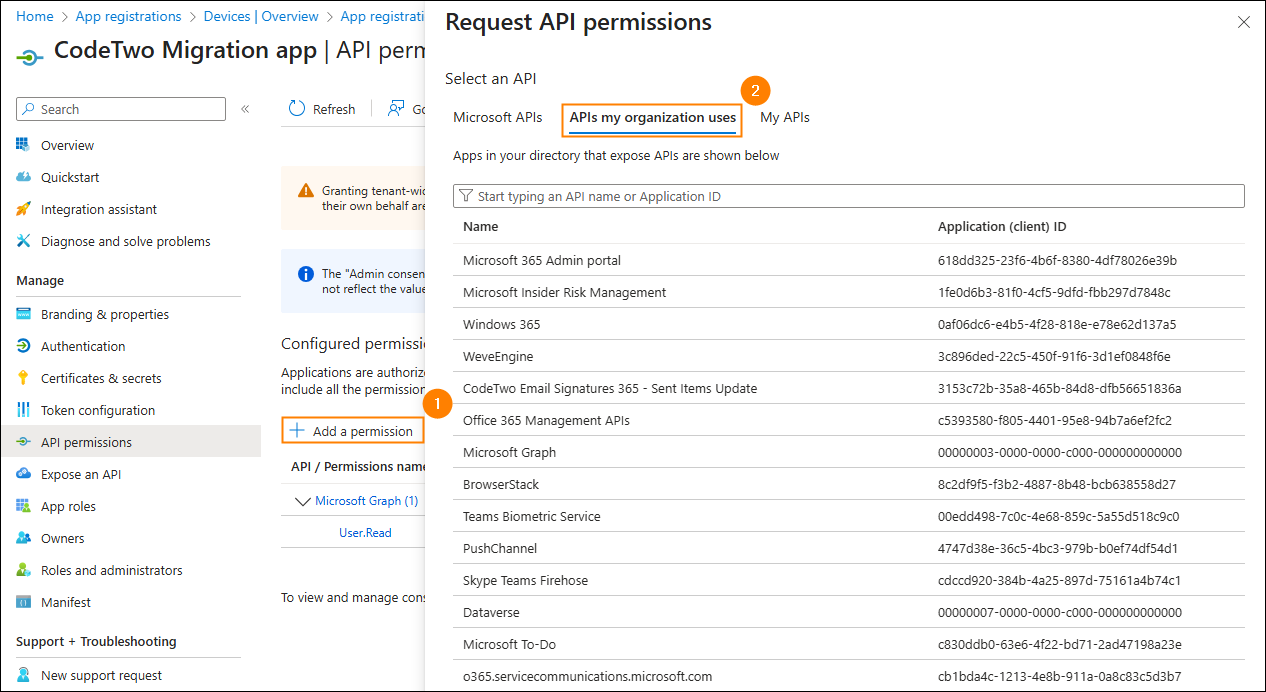
Fig. 4. Listing all APIs available for your organization.
- Enter Office 365 in the search box and select Office 365 Exchange Online (Fig. 5.).
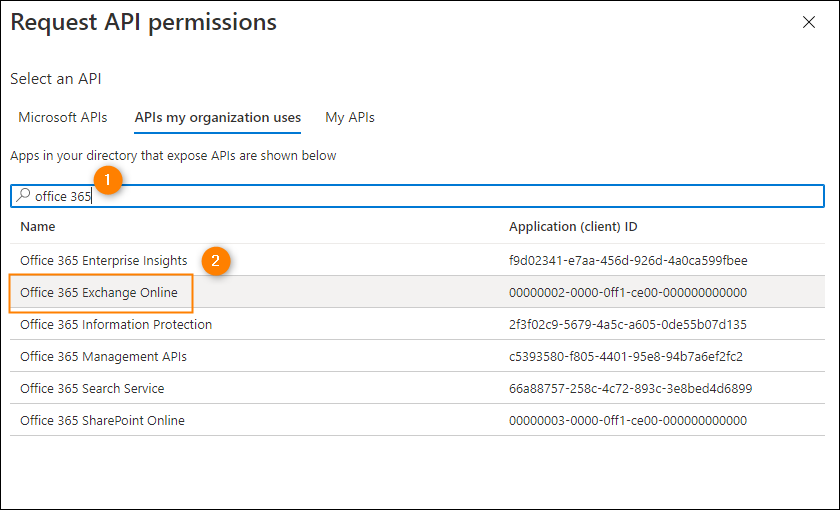
Fig. 5. Finding the Exchange Online API.
- Click Application permissions, expand Other permissions, select full_access_as_app and then click Add permissions (Fig. 6.).
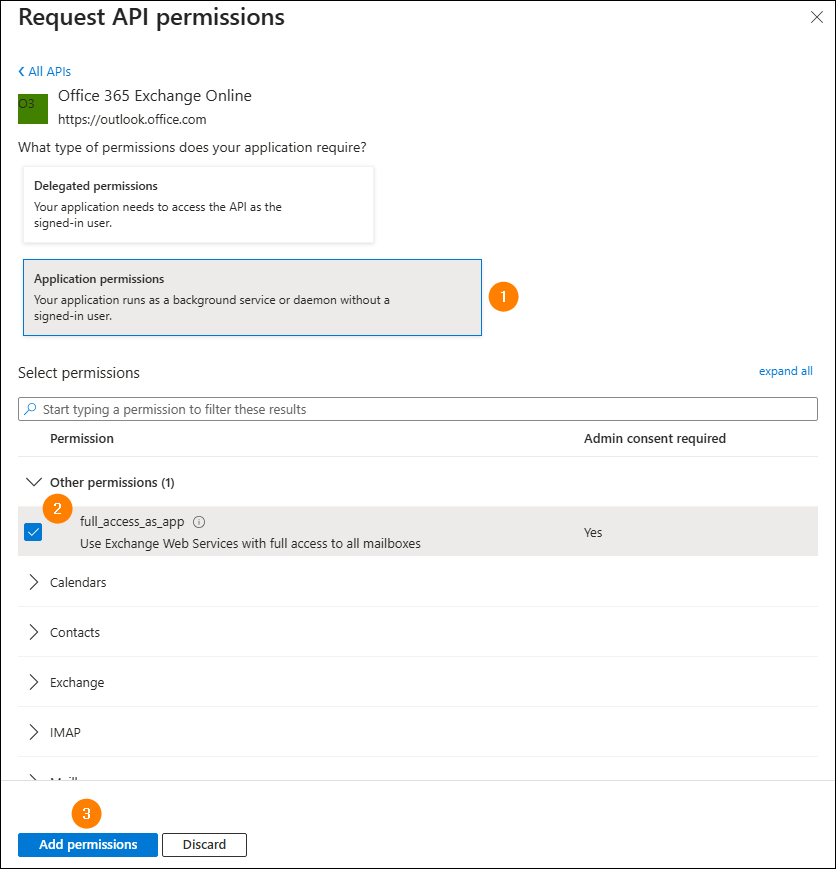
Fig. 6. Adding a new permission to an application in Entra ID.
- Click Add a permission again and this time select Microsoft Graph under Microsoft APIs.
- Click Application permissions and select the permissions required by a specific CodeTwo application and server connection type:
CodeTwo Backup
If you are configuring a connection to Exchange Online, select:
- Directory > Directory.Read.All
- Group > Group.Read.All
- MailboxSettings > MailboxSettings.ReadWrite
- User > User.Read.All
and skip to this step.
If you are configuring a connection to SharePoint Online, select:
- Directory > Directory.Read.All
- Group > Group.Read.All
- User > User.Read.All
and go to the next step.
CodeTwo migration software
If you are configuring a connection to your source Microsoft 365 (Office 365) tenant, select:
- Directory > Directory.Read.All
- MailboxSettings > MailboxSettings.ReadWrite
- User > User.Read.All
and skip to this step.
If you are configuring a connection to your target Microsoft 365 (Office 365) tenant, select:
- Device > Device.ReadWrite.All*
- Directory > Directory.Read.All
- Directory > Directory.ReadWrite.All*
- MailboxSettings > MailboxSettings.ReadWrite
- User > User.Read.All
- User > User.ReadWrite.All*
and skip to this step.
* These permissions are required only if you want CodeTwo Office 365 Migration to automatically create mailboxes in your target Microsoft 365 tenant. If you already have target mailboxes or wish to create them manually, you don’t need to assign these permissions to the CodeTwo app.
- (SharePoint Online connections only) Click Add a permission once again and click APIs my organization uses (see Fig. 4.). Type Office 365 in the search box, click Office 365 SharePoint Online on the list (see Fig. 5.) and choose Application permissions. Select the following permissions:
- Sites > Sites.FullControl.All
- User > User.Read.All
and click Add permissions.
- Back on the API permissions page, click the Grant admin consent for <your organization name> button (once it becomes available) and then click Yes to confirm (Fig. 7.).
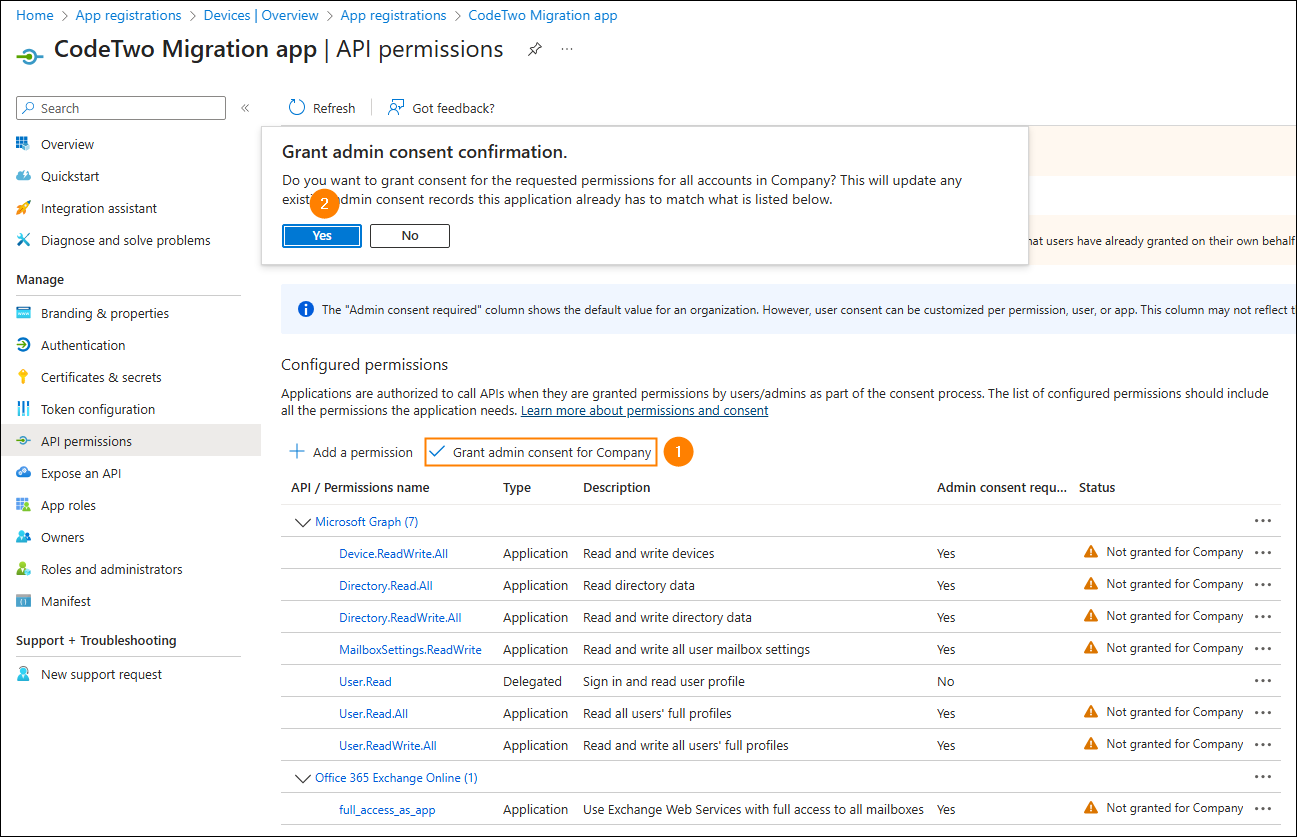
Fig. 7. Granting the necessary consents.
Assigning certificates / secrets in Entra ID
You need to assign a certificate or client secret (app password) to the newly added application. This will allow the OAuth protocol to prove the application’s identity. Follow the steps below to assign a certificate or add a client secret to the CodeTwo application registered in Entra ID (Azure AD).
Important
Note that client secrets (app passwords) cannot be used if you want to connect to SharePoint Online from CodeTwo Backup. For this scenario, you can use a certificate only.
- Navigate to Entra ID > App registrations > All applications and select the newly added application (in this example: CodeTwo Migration app).
- In the navigation menu, click Certificates & secrets (see Fig. 8.). Now, you need to assign either a certificate or client secret to the CodeTwo application.
- 3a To assign a certificate, click Certificates > Upload certificate, select your certificate file and click Add (Fig. 8.). The certificate needs to be signed with a key size of 2048 bits.
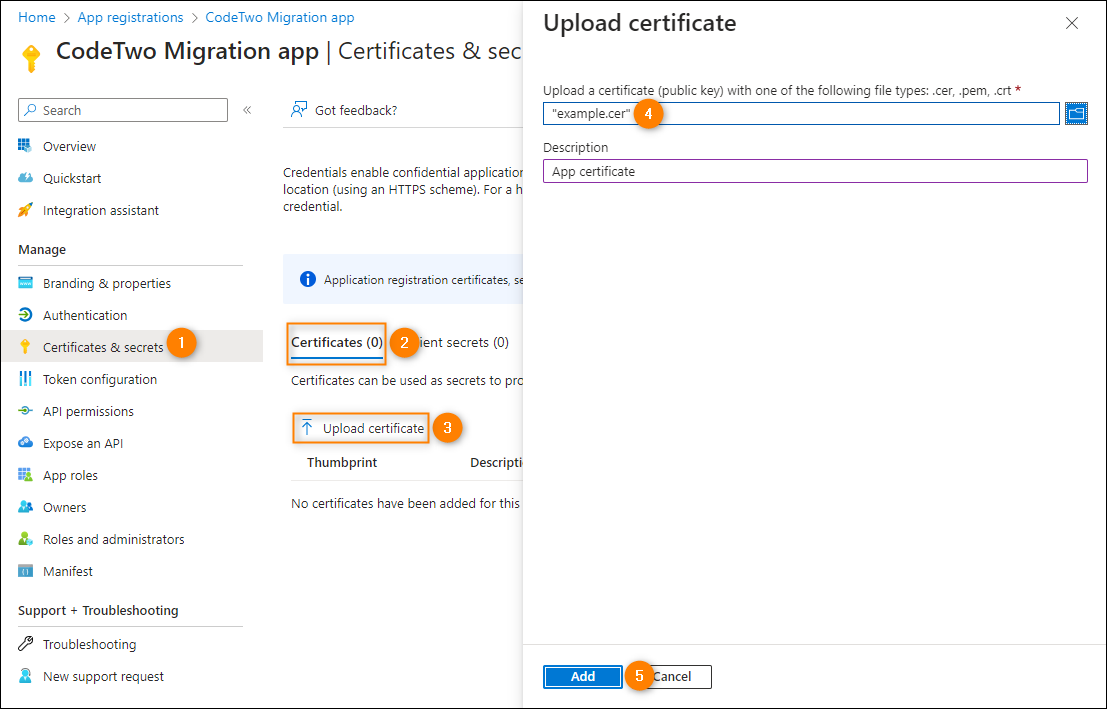
Fig. 8. Assigning a certificate in Entra ID.
- 3b To add a client secret, click Client secrets > New client secret, enter a short description (e.g., CodeTwo Migration app), select the expiration time (whichever suits your needs) from the drop-down menu, and click Add (Fig. 9.).
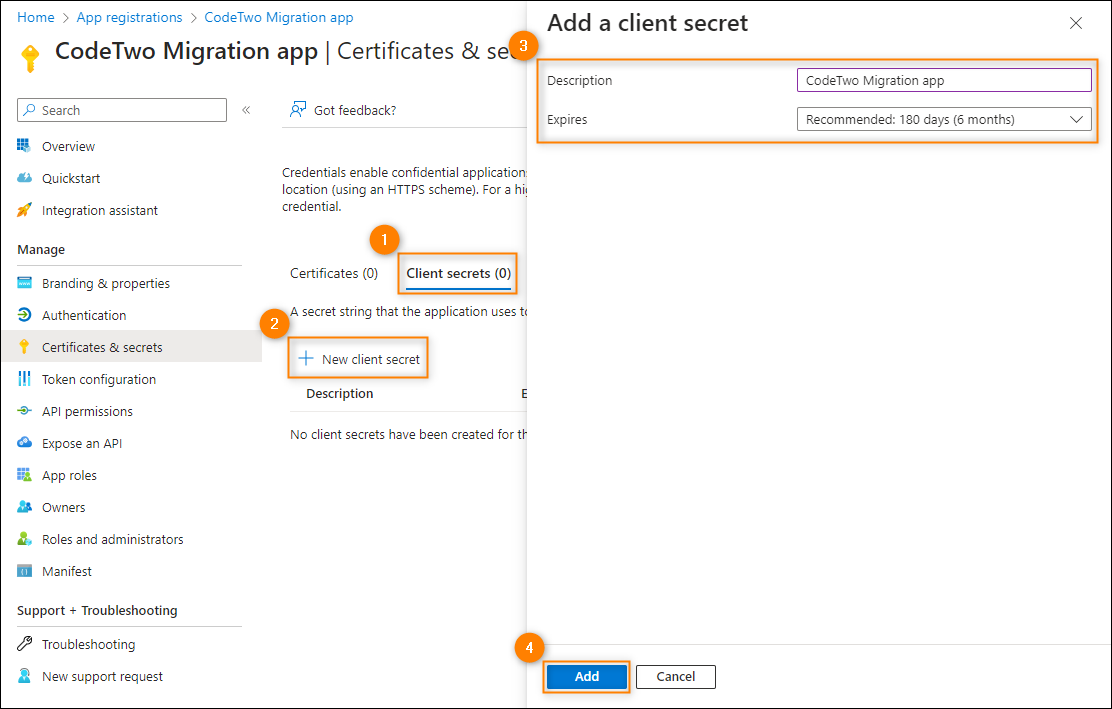
Fig. 9. Creating a new client secret for an application registered in Entra ID.
Important
Make sure to copy the client secret value to clipboard (Fig. 10.) or use it in your CodeTwo application straightaway, because once you refresh the page, you will not be able to view that value again. You will have to create another client secret.
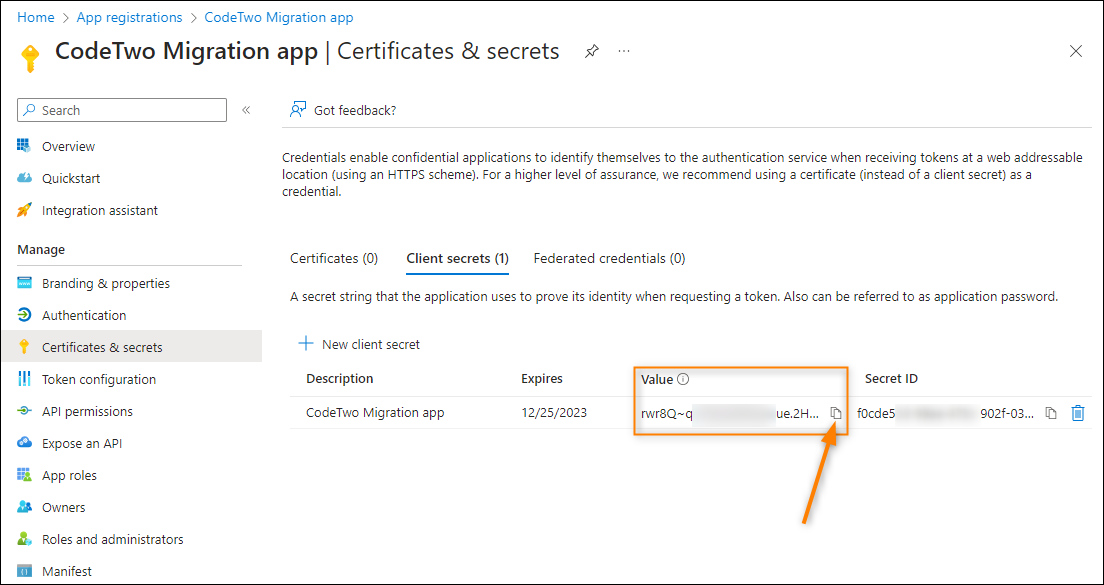
Fig. 10. How to copy the client secret value to the clipboard.
Once done, the application registration process is completed. You can now configure a connection to Microsoft 365 (Office 365) in your CodeTwo software. All the information that you need to provide in the Application details step of the server connection wizard (Fig. 11.) is provided in Entra ID either on the application overview page (Application (client) ID and Directory (tenant) ID) or on the Certificates & secrets page (the Certificates or Client secrets tab).
Important
If you have used a certificate to identify an application, you can enter the Certificate thumbprint only if the certificate associated with the CodeTwo application has been added to the correct certificate store on the machine where the application is installed. If not, use the Import button to add the necessary certificate to that store.
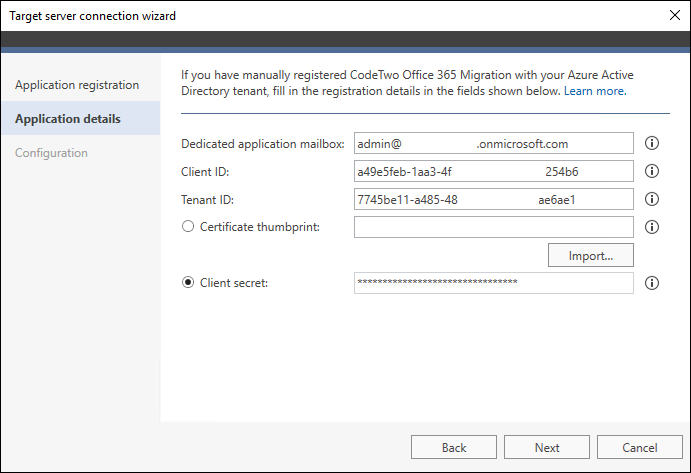
Fig. 11. Providing the registration details in the target server connection wizard in CodeTwo Office 365 Migration.
For more information on how to configure server connections, refer to the user’s manual:
| Related products: | CodeTwo Backup for Exchange, CodeTwo Backup for Office 365, CodeTwo Exchange Migration, CodeTwo Office 365 Migration |
| Categories: | How-To |
| Last modified: | April 7, 2026 |
| Created: | January 27, 2020 |
| ID: | 840 |


