Microsoft has been promoting Viva since 2021 as ‘an employee experience platform that brings together communications, knowledge, learning, resources, and insights in the flow of work.’ Maybe it’s just me, but this description doesn’t really explain what Microsoft Viva is, and what to expect from it. That’s why I’ve dived into this subject to give you a straightforward description of Viva, admin to admin.
So, what is Microsoft Viva?
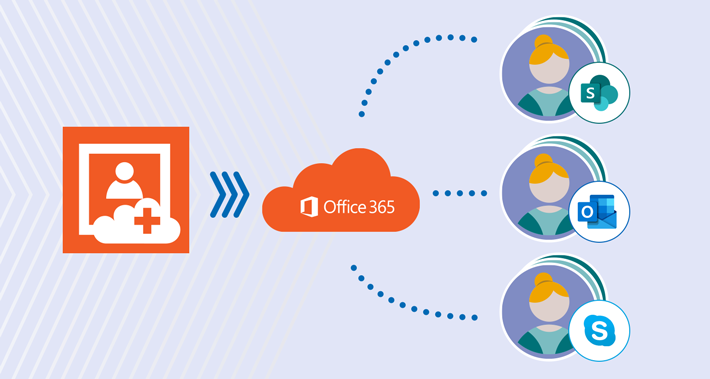
Essentially, Microsoft Viva is a solution suite. It encompasses multiple apps (add-ins, modules) for Microsoft 365, mostly Microsoft Teams, that provide content and services aimed at helping users work more efficiently & develop professionally.
It’s a bird… it’s a plane… it’s Microsoft Viva!
Source: Unknown
Because each Viva module is a separate story, I’ve decided to split this small Viva encyclopedia into two different articles. If you cannot find a certain Viva app below, go to this article instead.
Here’s what the first four Viva modules are and what they do:
- Viva Connections – a SharePoint-style intranet home page with company news & info, simple forms, tasks, etc. you can access directly in Teams.
- Viva Insights – data-driven insights, tips, and features to help you work productively & healthily (e.g. avoid burnout or stress) delivered in Teams as an interactive page and via emails.
- Viva Learning – training courses and learning content from Microsoft and external vendors delivered via Teams.
- Viva Topics – company-wide hub presenting specialized knowledge (projects) in a Wikipedia-like style along with company experts on those projects, plus providing references to the knowledge across Microsoft 365 (in SharePoint, Teams, Outlook, Word, etc.). Sounds amazing, right? Then it might come as a surprise that it’s set to retire on February 22, 2025.
To get the exhaustive information about each app, I recommend reading Microsoft’s documentation for Connections, Insights, Learning, and Topics.
Microsoft Viva licensing and prices
Microsoft Viva licensing varies from app to app. For example, Connections is available to any user who is licensed with a Microsoft 365 enterprise license, while Topics always requires you to buy a separate license. Below you’ll find detailed information on which license is required to use each Viva app and what’s the price per user:
| Viva app | License required | Cost per user* |
|---|---|---|
| Connections | Any Microsoft 365 plan for enterprise. Learn more | $2.00 user/month |
| Insights | Any Microsoft 365 plan for enterprise + separate app license to access all features | $6.00 user/month |
| Learning | Any Microsoft 365 plan for enterprise + separate app license to access all features | $6.00 user/month |
| Topics | Viva Topics is being retired | (Before retirement) $4.00 user/month |
*Costs were taken from Microsoft’s website at the time of the last article update. There is no guarantee the cost or requirements will stay the same later on. It’s a good idea to double-check pricing pages before buying Viva licenses.
The cost covers full access to a specific Viva module, but most of these modules are also partially included in Microsoft 365 Enterprise plans.
The prices above apply to the annual subscription, if you purchase a single Viva app. If you want to use more than one app in your tenant, Microsoft offers various bundles, including Microsoft Viva Suite that lets you use all the goodness of Microsoft Viva for $12.00 user/month.
To learn more about Viva pricing, visit this website.
How to configure Microsoft Viva
As an admin, the most important thing to know is how to deploy the Viva apps in your organization. The configuration differs largely from app to app. In this section, I’ll also show how to disable Microsoft Viva features, which might be handy if you (and your users) conclude that the solution is not designed specifically for you.
At the beginning, sign in to the Microsoft 365 admin center and navigate to Settings >Viva. Or use this direct link: https://admin.cloud.microsoft/#/viva. To start configuring each Viva app as discussed in the subsections below, simply click its name.
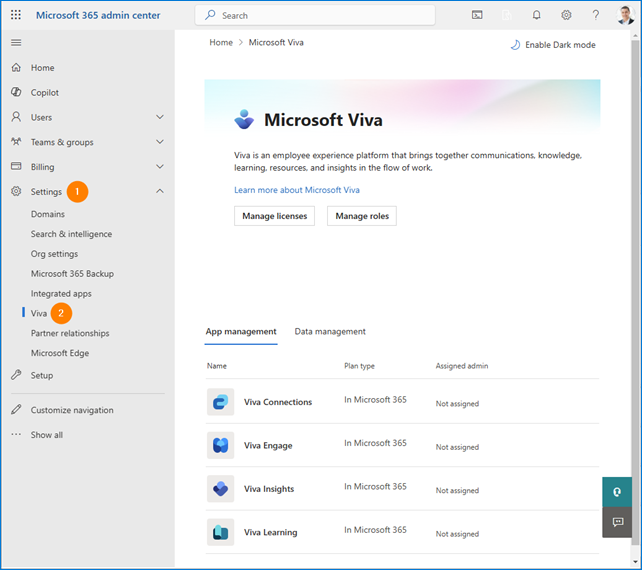
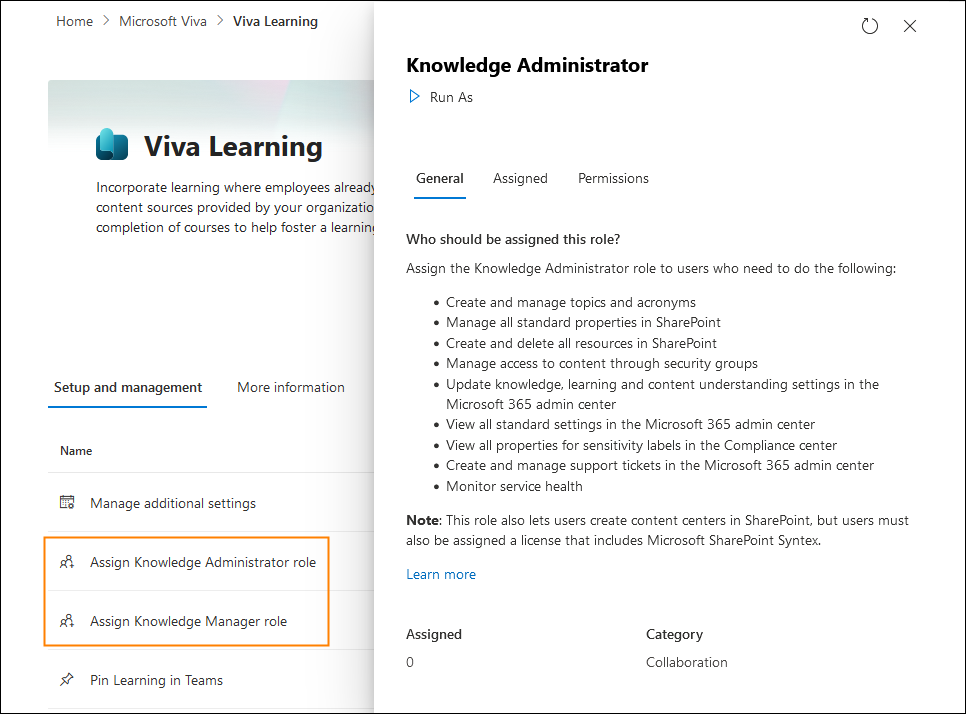
The main settings page includes Manage license and Manage roles buttons. They redirect you to general Microsoft 365 billing and roles tabs which include both Viva-related and other tenant settings. For example in the roles tab, you can set up Knowledge Administrator (Viva Learning) or a Knowledge Manager (Viva Topics) roles, but it is easier to find those in the dedicated Viva admin centers).
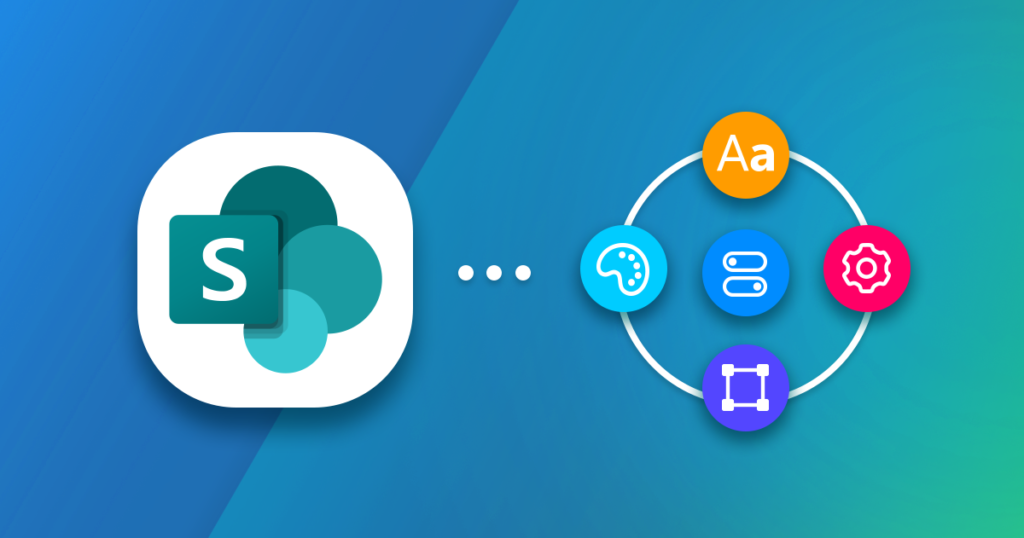
Viva Connections
Start from planning what to include on your Viva Connections home page. Essentially, it should include 3 main sections: Dashboard (interactive cards), Resources (SharePoint navigation), and Feed (internal news).
See this article to learn how to plan your Viva Connections experience
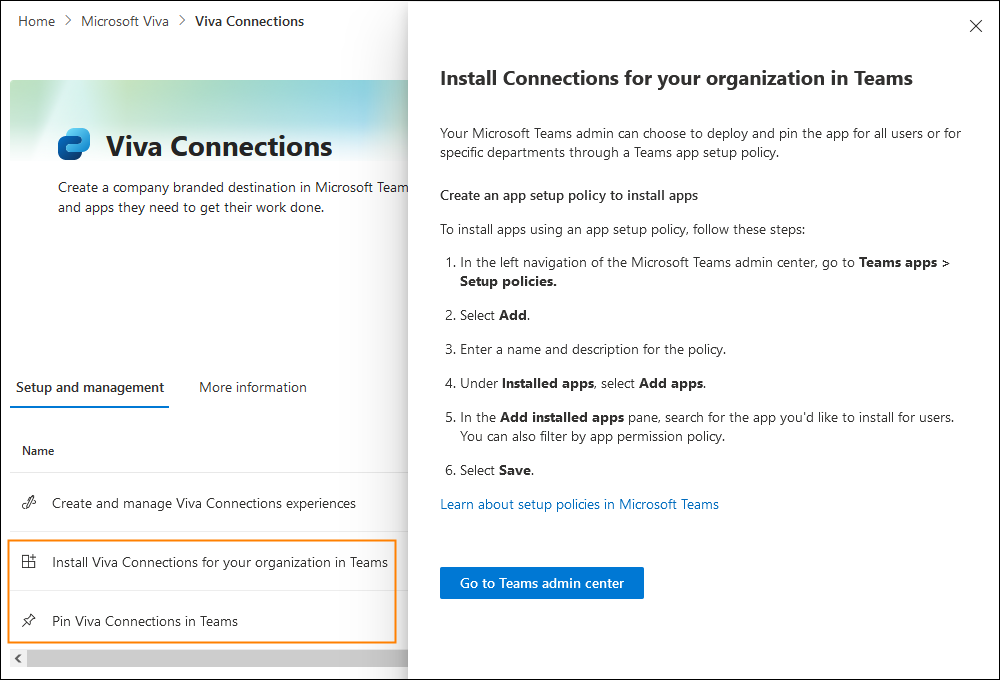
When you’re ready, access the Viva Connections settings as shown above and click the two options: Install Viva Connections for your organization in Teams and Pin Viva Connections in Teams to get easy instructions on how to set up the Connections app in the Teams admin center. Remember that it might take some time for the app to appear in Teams.
Once the Connections app is there in Microsoft Teams, click Viva Connections tile in the leftmost pane to see the default Connections experience.
If you don’t feel like setting off for the customization journey, click the menu icon in the top-right corner, use the Manage access option to assign a user with the Owner role and pass the baton.
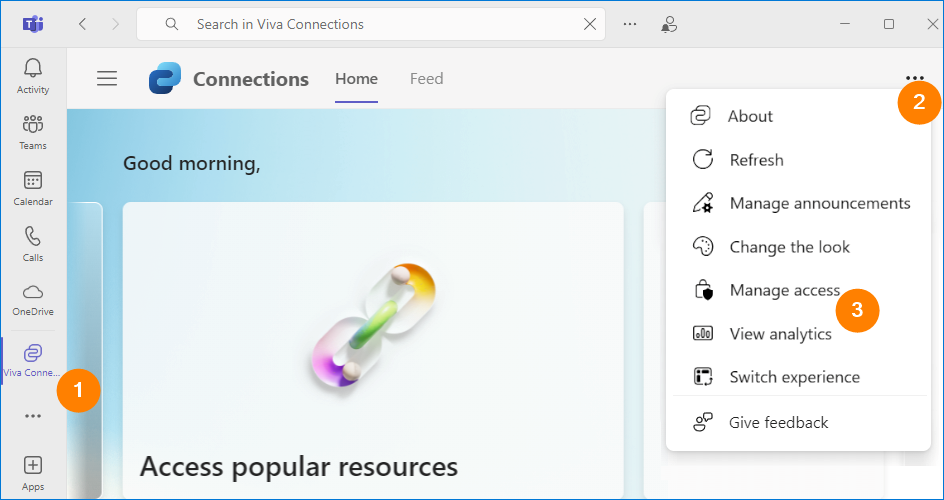
The menu also has a few options that might be interesting to you:
- Manage announcements – use this to take care of announcements (e.g. deadline reminders) pushed to specific users on mobiles. This feature requires additional licenses. Learn more
- Change the look – lets you quickly change the theme for the Connections app.
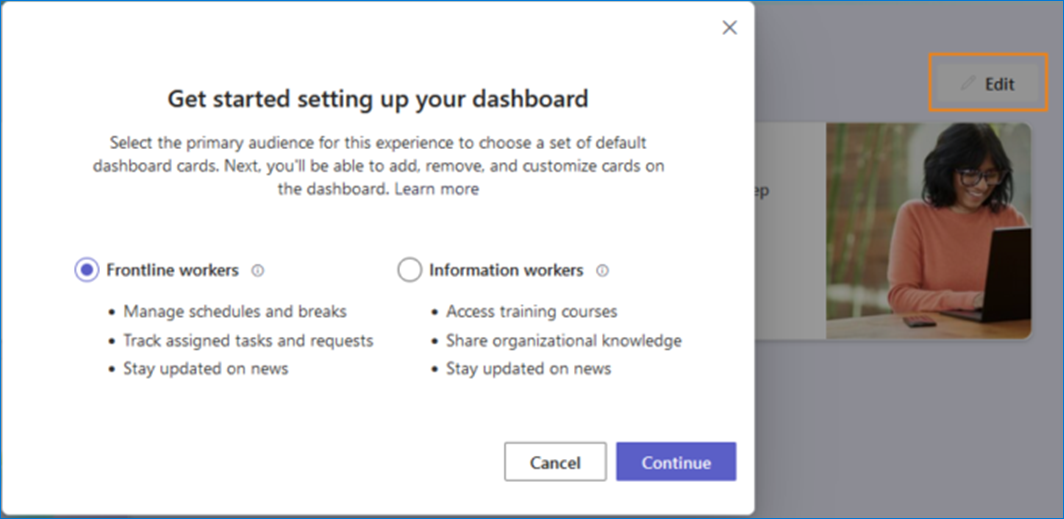
- Switch experience – if you’re on Microsoft Viva Suite license, you can prepare multiple Connections experiences targeted at e.g. frontline workers, information workers. This is where you can switch them (experiences, not workers). Learn more
If you’re a customization lover (or at least your boss thinks so), start with the first section called Dashboard. It is a set of cards that unlock quick actions. For example you can let your users praise their co-worker, check paid time-off balance, view pay slips and so on.
Under the hood, the cards are usually tied to some kind of data source like another Microsoft 365 app (like Bookings or Dynamics 365) or a third-party app (Google Calendar, Jira, Asana, and others).
Click Edit to enter the personalization realm. When editing for the first time, you can choose the default set of the cards.
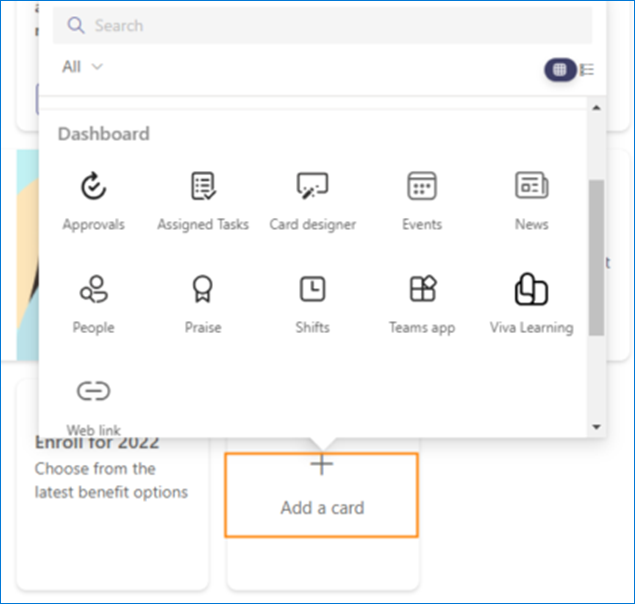
To add a new card, click Add a card and choose one of the existing card types. You might also use the search box to find the one you look for. If you select Card designer, you’ll get more granular options of card’s personalization. For details on how to work with different card types, see this Microsoft article.
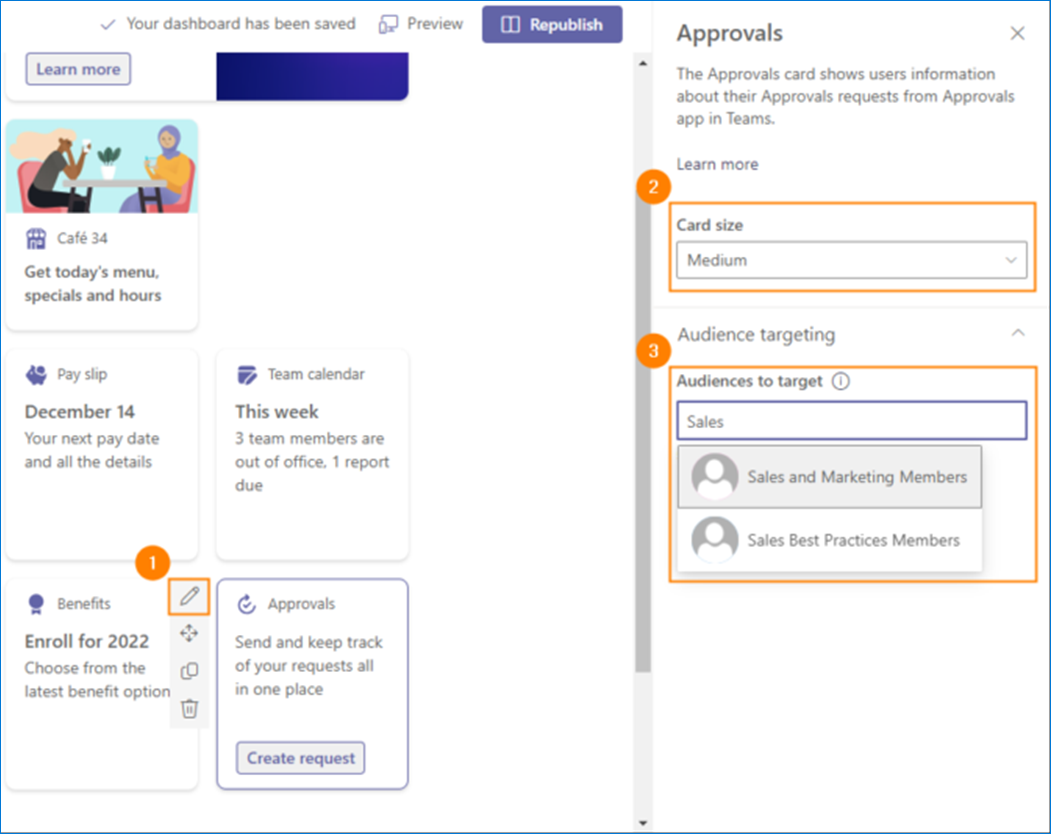
To display the settings pane of the newly created card, select the card and click the pencil icon (by the way, you edit an existing card the same way). In the pane that opens, you can usually select only card size and groups of users (Audiences to target) for whom the card will be displayed and actionable. The core settings, such as shift information or assigned tasks are configured separately in respective apps like Shifts, Tasks, etc.
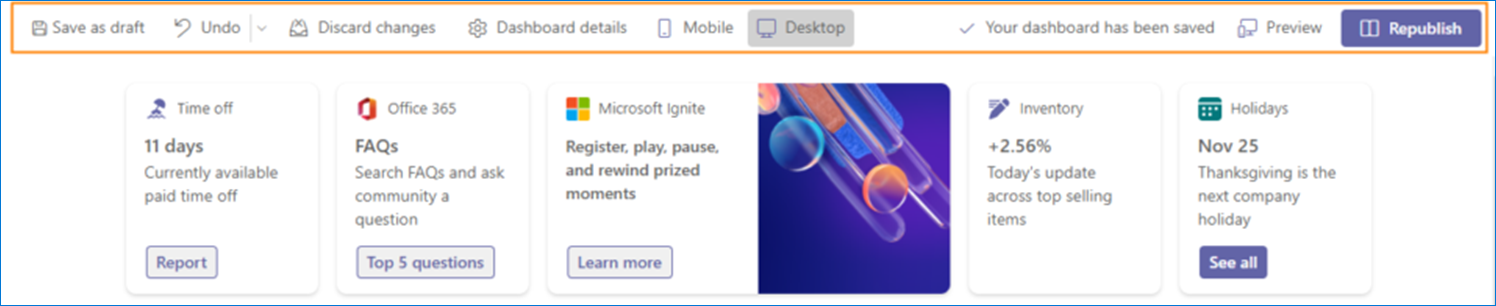
Using the top menu, you can preview your dashboard on desktop/mobile, save it as draft, publish it and so on. To save your changes, click Publish/Republish.
Now that your Viva Connections experience is published, it becomes available for your users in Teams.
While the Dashboard is the main Viva Connections experience, there’re two other sections that you can find in the app.
The Resources is just below the Dashboard, and it’s a place to add links to popular SharePoint resources in your organization. To add the first one, click Get Started, provide all the details for the resource you’re adding, and click Save.
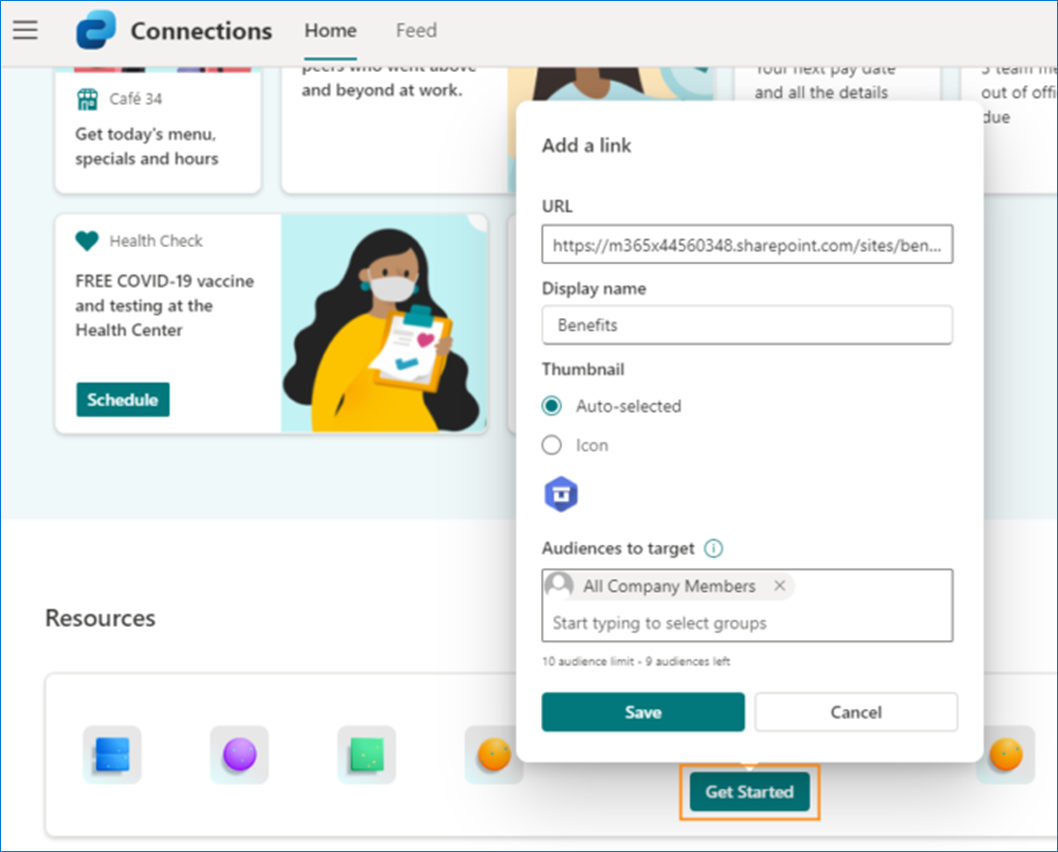
When at least one resource has been added, click Edit > Add link to add subsequent resources in a similar fashion.
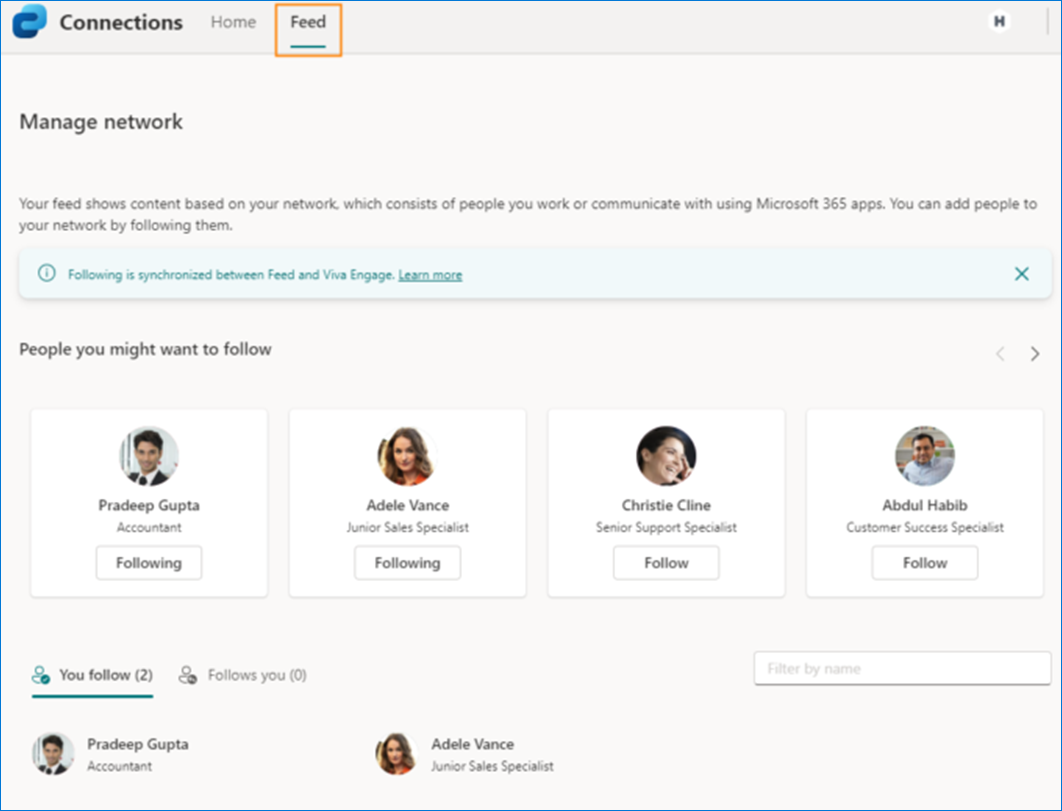
The Feed section is shown on a separate tab (Feed). It is a Facebook-style feed that shows latest conversations in your network and is synced to the Viva Engage app. The Feed settings are managed by end users. To learn more about networks and Viva Engage, see our other Viva-themed article.
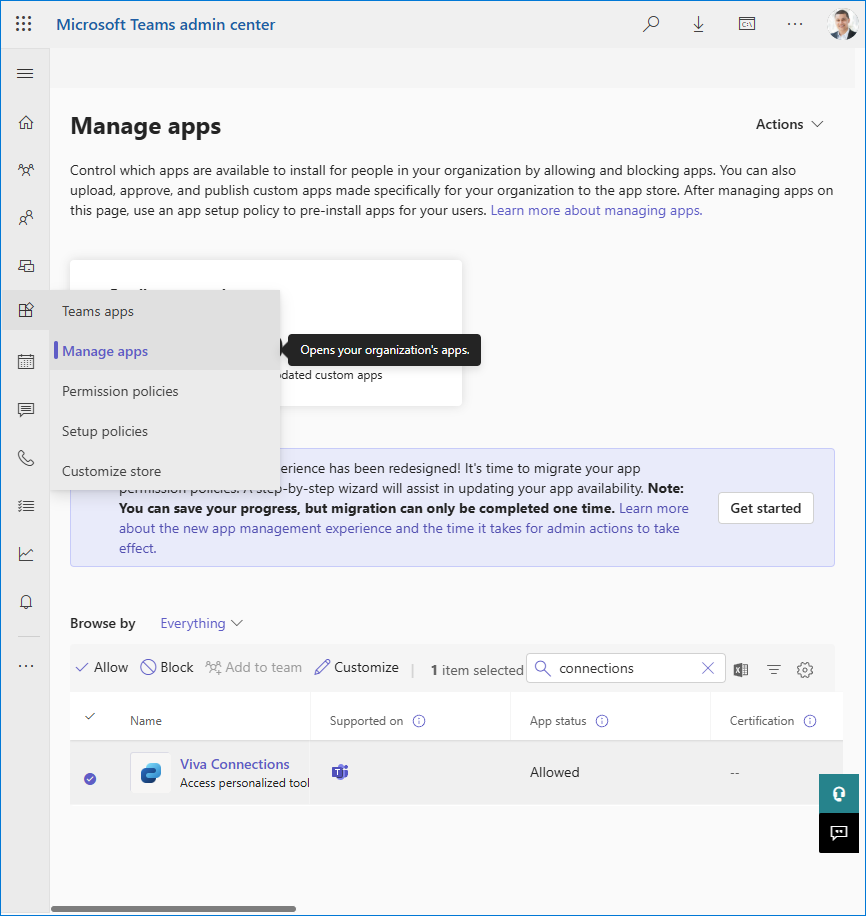
If you ever wish to disable the Connections app in Teams globally, sign in to the Microsoft Teams admin center, go to Teams apps > Manage apps, find the Viva Connections app on the list (or better use the search box), and click it. Allow and Block options appear in the navigation bar.
Viva Insights
Viva Insights includes several solutions your users might (or might not) want to interact with:
- App in Teams – shows cards that let you take care of your professional wellbeing by taking a break, finding time for learning, booking focus time, etc.
- Viva Insights web app (insights.cloud.microsoft) – the duplicate experience of the app in Teams.
- Digest emails – include tips about focus, wellbeing, collaboration, etc. The emails are being phased out with the tips now displayed in the Insights app.
- Insights Outlook add-in and inline suggestions – display useful wellbeing and productivity tips in Outlook.
- Meeting effectiveness surveys – help you collect feedback from colleagues about your Teams meetings, e.g. how you can improve your meetings.
- Schedule send suggestions in Outlook – help you avoid email communications disruptions by letting you know about your co-workers’ absence at work.
- Copilot Dashboard* – this solution lets you analyze your Microsoft 365 Copilot usage and see in which areas your employees can achieve more with Copilot. The dashboard lets you also analyze sentiments towards the Copilot among the users who’re not using it yet.
* This Viva Insights feature reached general availability in Q3 2024. It requires Microsoft 365 Copilot deployment. Interestingly, no Viva licenses are required to use it. Learn more
To start configuring them, access the Viva Insights settings as shown above.
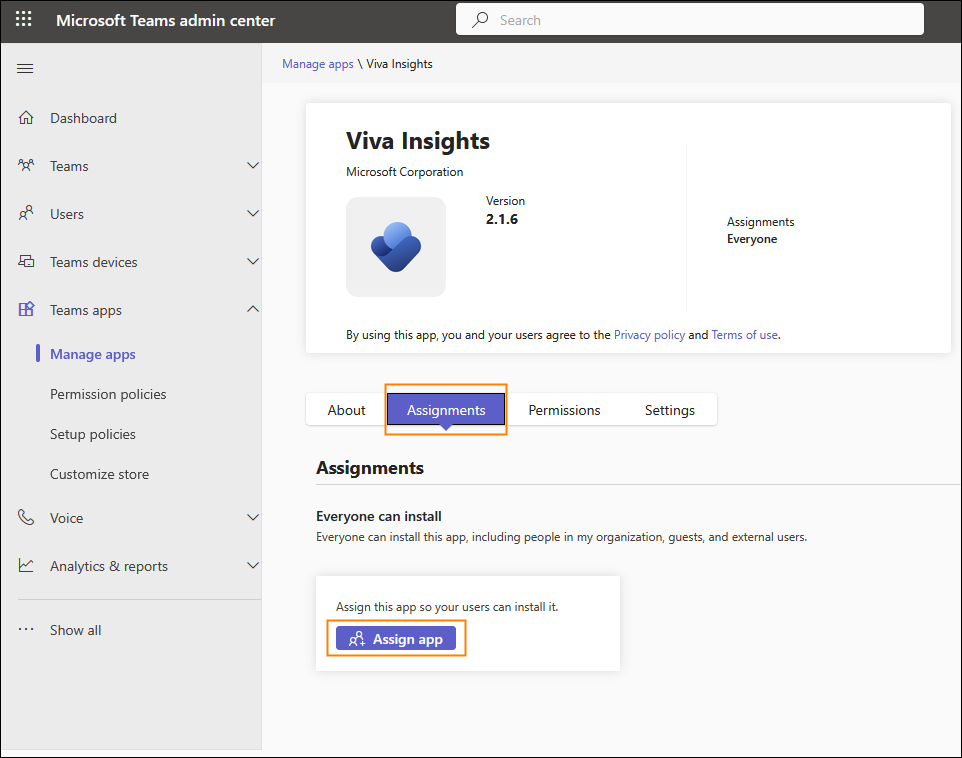
To enable or disable Insights app in Teams, sign in to the Microsoft Teams admin center, go to Teams apps > Manage apps, find Viva Insights and click it. Go to the Assignments tab and make sure the app is assigned to all the users you want. If not, click the Assign app button to customize the assignments. It might take up to 24 hours before the app is shown for the newly assigned users in Teams.
The next items can be globally enabled or disabled in the Microsoft 365 admin center. Start from clicking Manage settings for Viva Insights. In the pane that opens, select these Viva Insights elements that you want to enable for all your users and click Save.
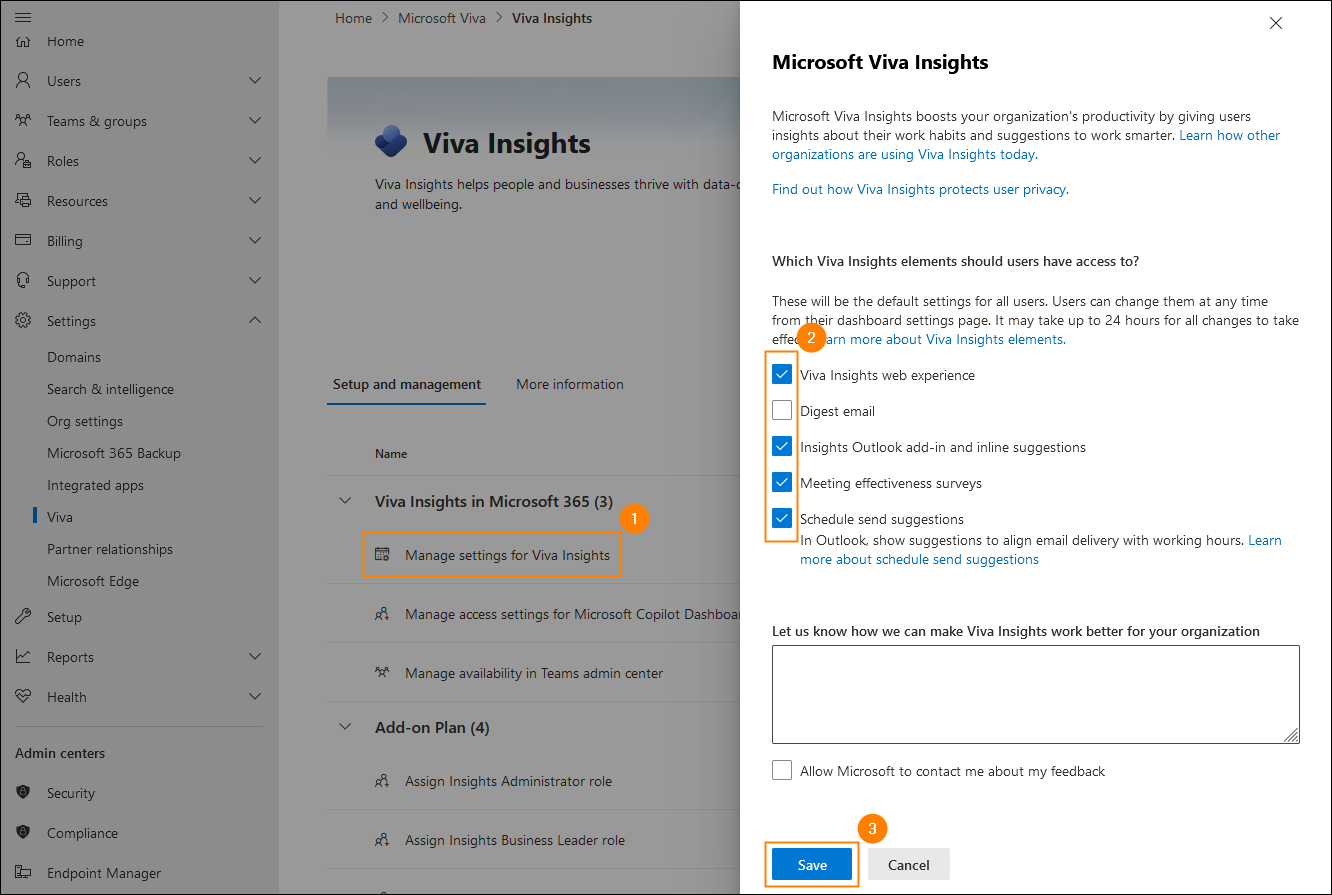
If you want to enable or disable selected Viva Insights features, e.g., turn off Briefing emails, or disable Viva Insights completely for selected users (groups of users), you need to use PowerShell. For detailed instructions, see this Microsoft help article.
Viva Learning
This app is enabled by default, and you can access its settings by completing the steps outlined above and clicking Viva Learning on the list.
By going to Manage additional settings in Viva Learning, you can (dis)allow your end users to add learning content to the Learning app in Teams plus modify privacy-related options.
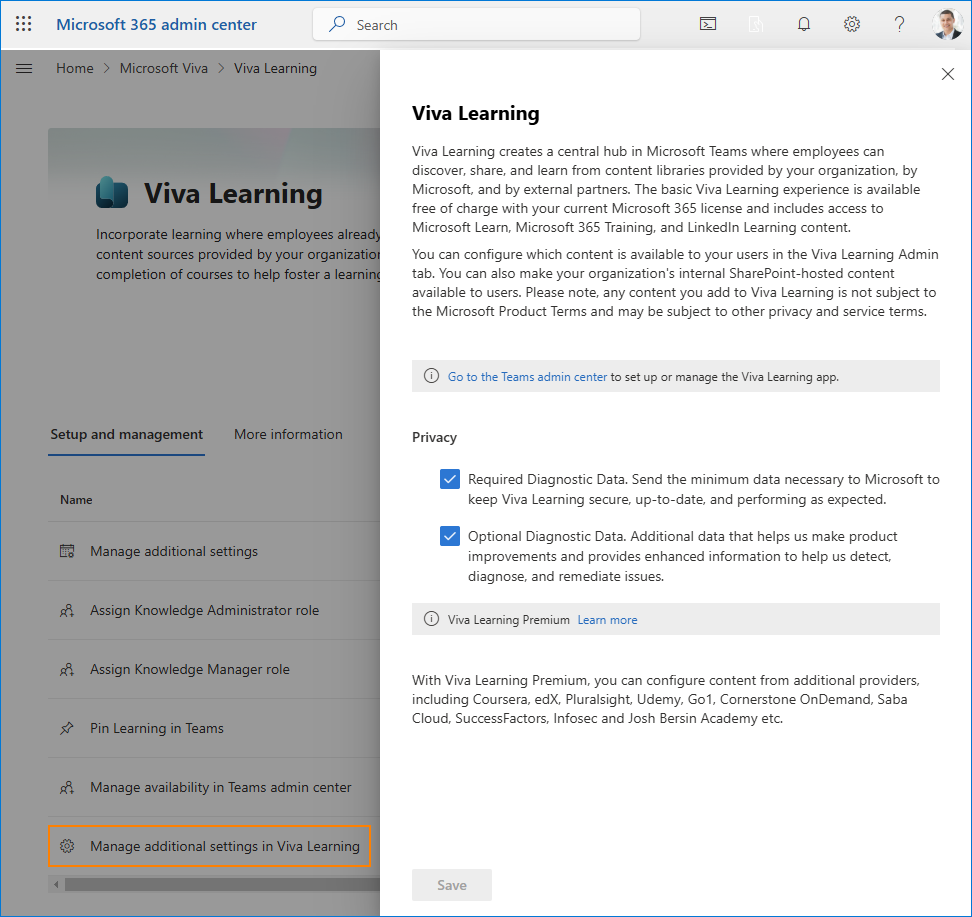
In the Microsoft 365 admin center, you can also assign the Knowledge Administrator or Manager roles to take care of learning and knowledge management related tasks in your organization.
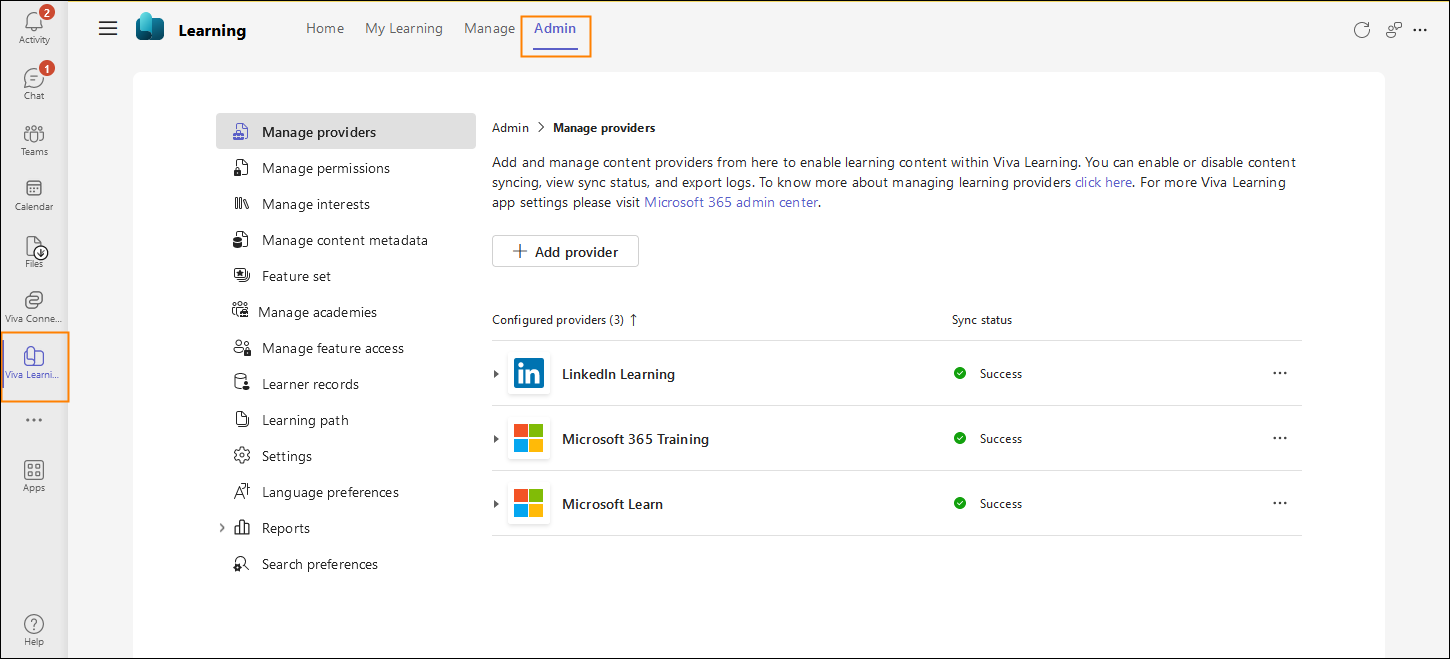
To access more settings, go to Microsoft Teams > Viva Learning > Admin (tab). Here, you can add new sources of learning, including your own learning repository on SharePoint, manage permissions to access specific content/providers, manage interests and so on. All these tasks can be delegated to a Knowledge Administrator/Manager.
If you ever wish to disable the Learning app in Teams globally, sign in to the Microsoft Teams admin center, go to Teams apps > Manage apps, find the Viva Learning app on the list (or better use the search box), and click it. Then, click Block in the navigation bar.
Viva Topics
When working on the first large update to this article, I’ve learned that Microsoft’s going to (surprise, surprise!) retire Viva Topics. At the moment, the date is February 22, 2025 and the reason why Topics will be pushing up the daisies is a shift towards the Copilot based knowledge management experience. This makes investing in Viva Topics (e.g. licenses) pointless.
After the retirement:
- Topic pages published by your users will become standard SharePoint pages and will no longer be enhanced by Viva Topics AI. That’s in theory, since Microsoft Copilot will have access to it, so you might simply treat it as a name change.
- Topic pages generated by AI will no longer be available. If you want to preserve them, you need to turn them into user-generated ones.
- The Topic Center page (that lists all the topics discovered by Viva Topics) will be converted to a standard SharePoint site.
- Other experiences will be affected as well – Topics will not show up automatically in Microsoft 365 apps to display info about topics discovered in a given context.
Learn more about the Viva Topics retirement
So how to approach this change? Microsoft recommends that you continue to publish and organize knowledge in SharePoint, for example by creating wiki pages. Once you’ve adopted Microsoft 365 Copilot, the new Microsoft AI solution will be able to access your wikis to share all the knowledge, organized by topics, with your users.
If you wish to learn how to take care of knowledge management in Microsoft 365 using the latest solutions, visit this Microsoft Adoption website.
The bottom line is: if you’re interested in continuing to organize your organization’s know-how into topics, go for Microsoft 365 Copilot.
Other ways to enhance your Microsoft 365
Looking for other enhancements for Microsoft 365? Try CodeTwo Email Signatures 365 to enjoy:
- centralized email signature and auto-reply management with a rich set of personalization options;
- one-click surveys in emails plus analytics to turn feedback into insights;
- emails compliant with national, international, and industry regulations;
- consistent branding in your email correspondence;
- automated email marketing campaigns;
- and many more.
Click here to test for free.
Recommended articles

CodeTwo sp. z o.o. sp. k. is a controller of your personal data.
See our Privacy Policy to learn more.