
How to track attachments in Exchange 2013/2016/2019

How to track attachments in Exchange 2013/2016/2019

Luckily, Microsoft Exchange does have a tool that helps fulfill the task by tracking emails containing attachments. It is called Hub Transport rules.

In short, Transport Rules are facilities configured on the Exchange Server that check transmitted emails. When an email meets conditions configured in a rule (e.g. contains a specific attachment), an action is executed. This action could be forwarding the message to the recipient’s manager, blocking the message, etc.

Below you can find configuration steps for an example rule. The rule blocks all messages with compressed attachments coming from outside of the organization and informs the administrator about that fact.

To set up such a rule in Exchange 2013, Exchange 2016 or Exchange 2019, first you need to launch Exchange Admin Center by entering the following address in the web browser:

https://localhost/eac

Click the mail flow option in the left pane, then navigate to the rules tab.
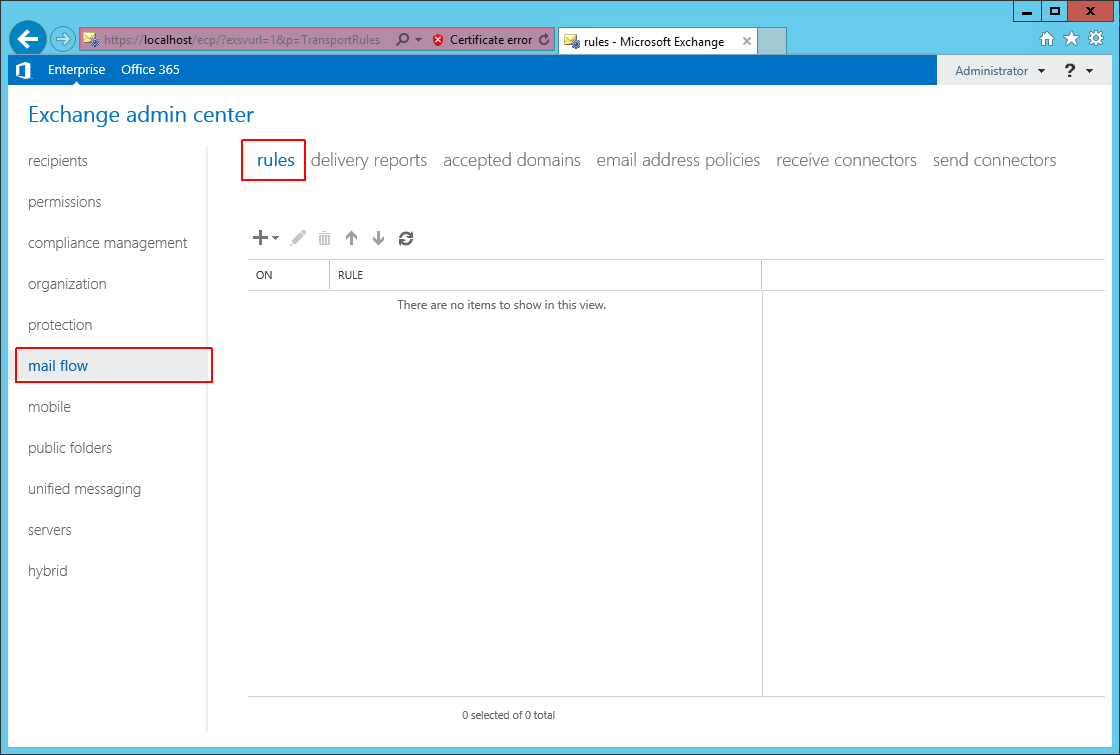
atttrack1

Click the “+” icon on top of the available rules list and select the Create a new rule….
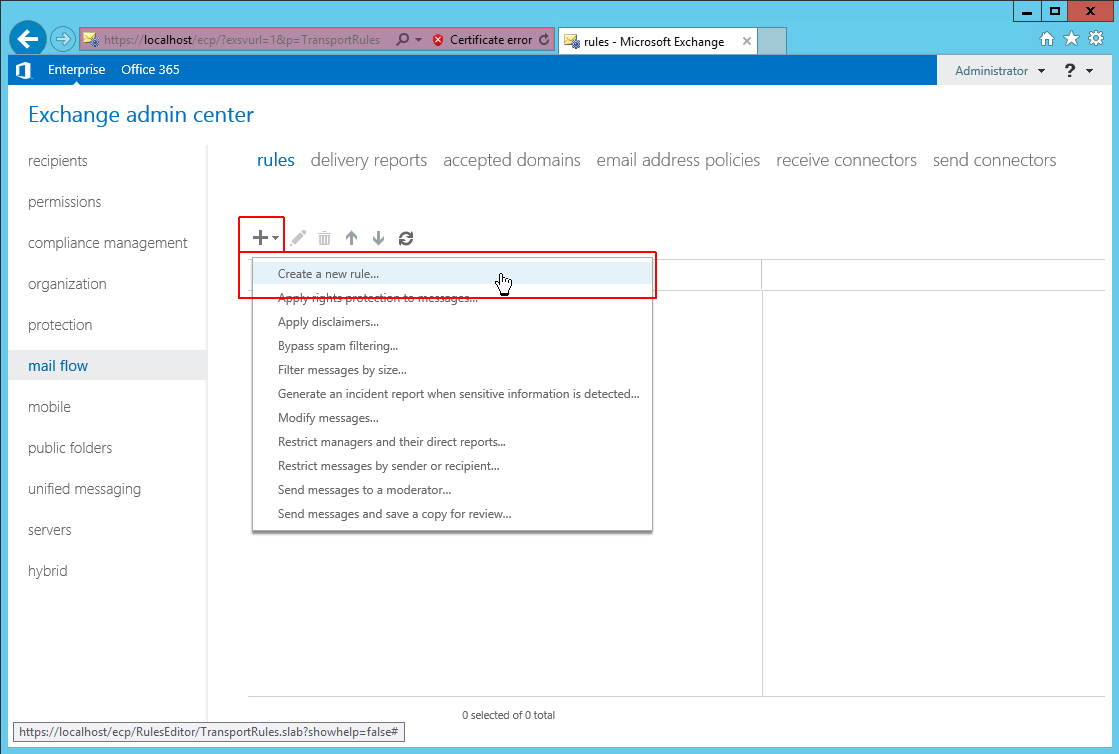
atttrack2

In the Name field enter the name of your rule (e.g. Track compressed attachments). Next, click More options… to expand available configuration options.
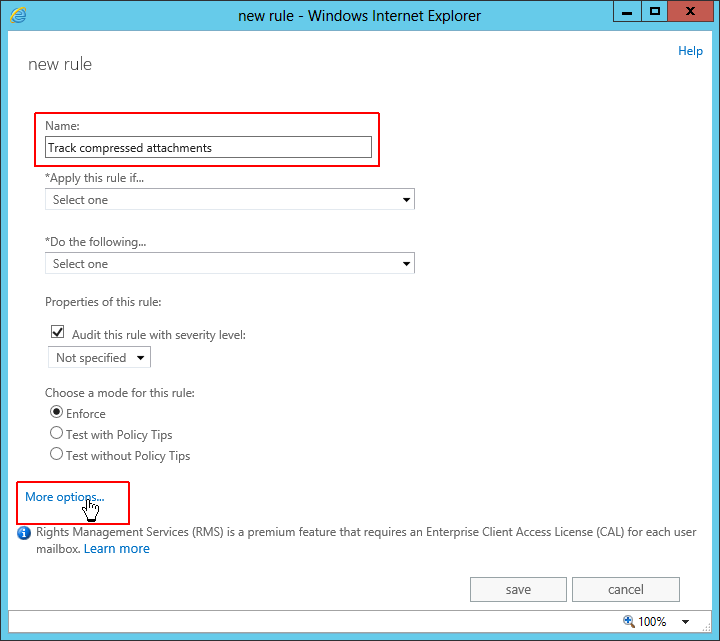
atttrack3

From the Apply this rule if… menu select Any attachment… and then click file extension includes these words.
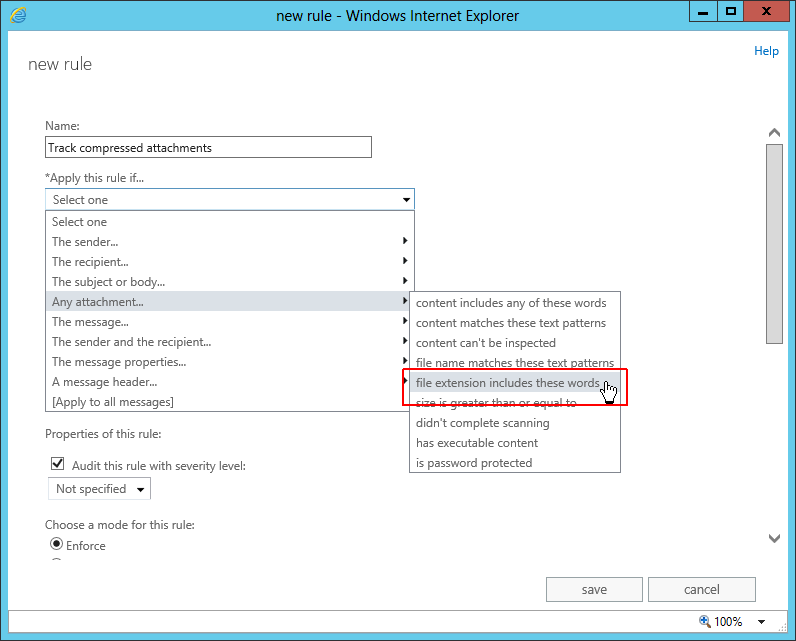
atttrack4

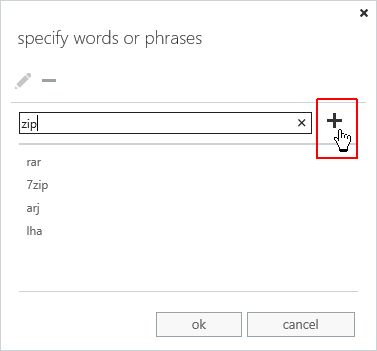
In the window that shows up enter the file extension phrase and confirm it by clicking the “+” button visible on the right. Repeat this process for each file extension.
atttrack5

Follow the link to see the list of available compressed/archived files extensions. Once your list is ready, confirm the selection with the OK button.

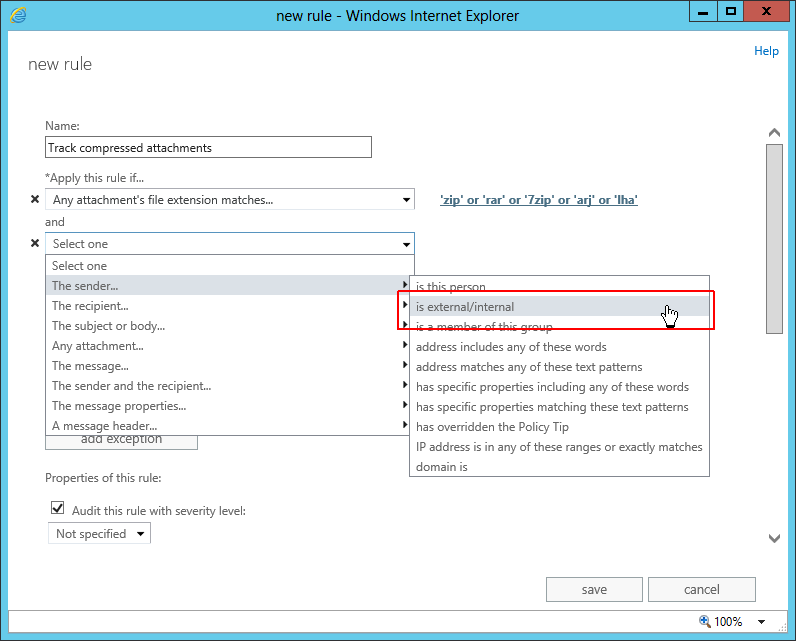
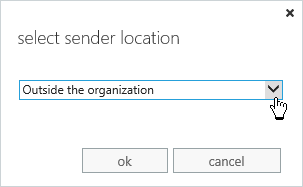
Then, back in the new rule wizard click the add condition button and in the new drop-down menu select The sender…, next click is external/internal. In the new window select Outside the organization and click OK. This way the action will be performed only on messages received from outside of your Exchange organization.
atttrack6

atttrack7

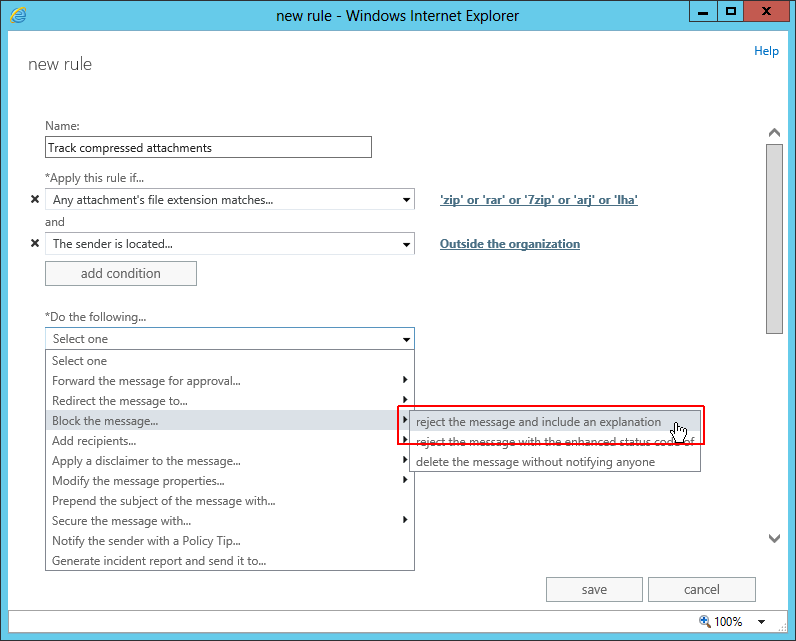
To select the action click the Do the following menu and select an action of your choice. In our example, it’s Block the message… and then the reject the message and include an explanation option.
atttrack8

In the specify rejection reason enter a message that should be returned to the sender of the original message. Click OK to save it.
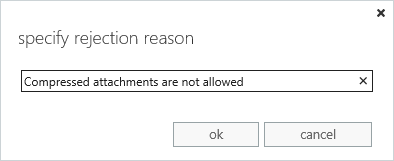
atttrack9

Next, click the add action button and from the new drop-down menu select Generate incident report and send it to action. This way the tracking part of the rule is added.
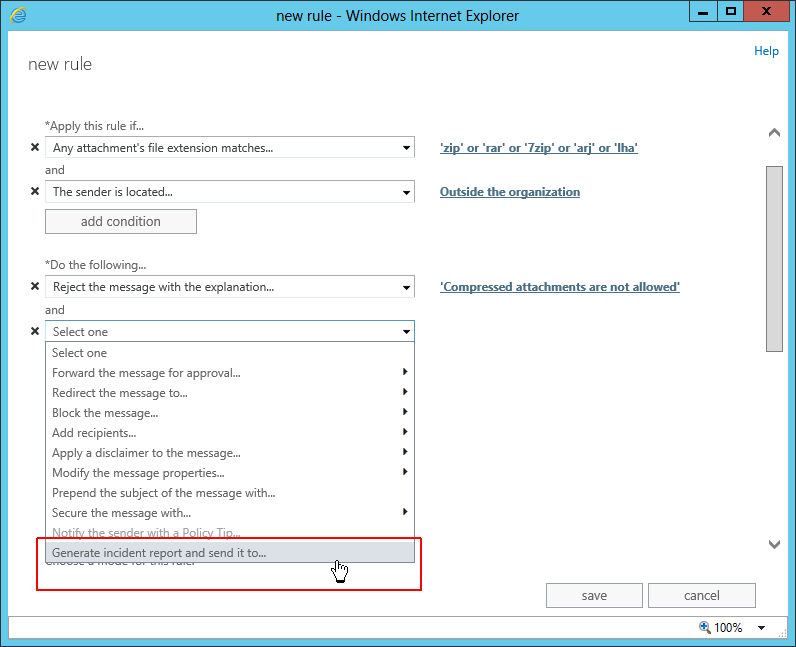
atttrack10

Click the Select one link next to the action and, from the list that shows up, pick a user that should be notified when the message is blocked.
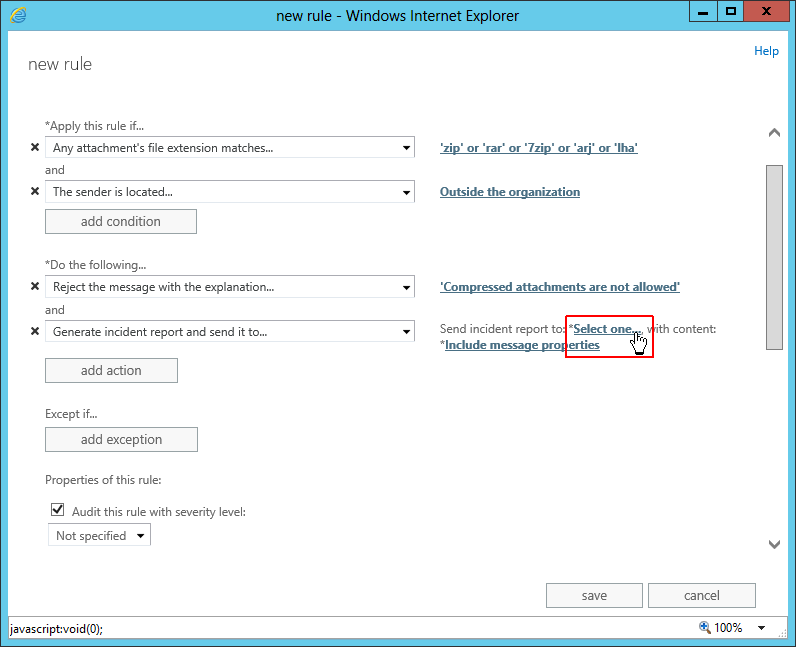
atttrack11

Lastly, in the rule creation window, click the save button visible at the bottom to preserve and activate the rule.

From now on every time any email containing compressed attachments is received from an external address, it’ll be blocked, returned back to the sender with a short explanation, and a person in your company will be notified of that fact. Bear in mind that this blocked message will never reach its original recipient.

The above method provides a quite rudimentary way of keeping track of those risky compressed attachments. However, if more control is required, or when the message should be delivered but without an attachment, a third party solution might become necessary.

CodeTwo Exchange Rules Pro not only allows for blocking messages, it also provides an email stripping feature which saves attachments to a specified location and removes them from the message, allowing it to still be accessible by its intended recipient. Additionally, it can quietly redirect the message containing the file to a different person, or compress attachments on the fly, which lets you keep your database small and save room in your EDB file, etc.

Follow the link to learn more about the attachment management and tracking capability in CodeTwo Exchange Rules Pro.

Suggested reading:

Tools for Exchange Server

Recommended articles

How to migrate from Exchange Server 2016/2019 to Microsoft 365

How to migrate from Exchange Server 2016/2019 to Microsoft 365

Migrating Exchange data to the cloud is not rocket science – explore your options and launch the migration stress-free. As you may already know, Exchange Server 2016 and 2019 have reached end of life and are no longer officially supported by Microsoft. If your organization still uses either of these platforms to manage email, contacts, calendars, and tasks, keep in mind that: Your environment may become vulnerable to newly discovered security threats – Microsoft will no longer provide security updates for Exchange 2016 and 2019 (unless you’ve enrolled in the Extended Security Update program, which ends in October 2026). Your emails may get blocked – Microsoft has started to throttle and block emails sent from unsupported Exchange Server versions to Exchange Online (as I covered in this article). That said, migrating to a supported platform is now the only viable long-term option for keeping your organization’s email environment secure, supported, and fully operational. If your organization wants or needs to keep things on‑premises (and continue using Microsoft’s solutions for that), upgrading to Exchange Server Subscription Edition (SE) is the only path forward. But given Microsoft’s clear preference for its cloud services – evident in the faster rollout of new features and the many security capabilities available exclusively in Microsoft 365 (Office 365) – now is a great time to leave your on‑prem environment behind and migrate to Exchange Online as part of Microsoft 365. While switching over to a new platform might seem like a rough ride, I’ll show you some easy ways to follow when migrating mailboxes from Exchange Server 2016/2019 to Microsoft 365. How to prepare for email migration to Microsoft 365 Before you start the migration process, you need to make sure your environment is ready for the move. For this purpose, you can use this guide in the Microsoft 365 admin center – it will help you connect your organization to Microsoft 365 and integrate your existing user accounts with Microsoft Entra ID. Microsoft also recommends completing the steps below: Set up an SPF record to determine valid email sources for your organization’s Microsoft 365 domain. Set up the Exchange Online Protection service as a means of protection against spam and malware. If you’re behind on updates, make sure to install the latest Cumulative Update (CU). And here is my quick, less obvious Microsoft 365 migration checklist: Verify if your software will work in Microsoft 365 (especially when it comes to server software). Microsoft 365 migration might be the time you learn that there is crucial legacy software that half the company uses and which is hard to replace. Encourage the whole company to clean up projects. It’s much easier to do this before the migration and start fresh. Gather as much information about your on‑premises environment as possible. For example, you might need to recreate access roles and permissions from scratch in the cloud or set up mail flow rules. Without prior research, it will be much more difficult. Verify if you need to migrate service accounts. There can be a lot of them on‑premises and in most cases, you won’t need them after the move. Review mailbox size limits in Exchange Online before migration to see which licenses you’ll need and whic
New-ComplianceSearch: how to use the newer version of Search-Mailbox

New-ComplianceSearch: how to use the newer version of Search-Mailbox

Microsoft retired the Search-Mailbox cmdlet – now what? Discover how to use New-ComplianceSearch, its key advantages and how to make the switch seamlessly.
How to start remote PowerShell session to Exchange or Microsoft 365

How to start remote PowerShell session to Exchange or Microsoft 365

One of many features of the PowerShell command line tool is its ability to connect with and manage the Exchange Server remotely. The procedure described below applies to the classic on-prem Exchange server and to the Microsoft 365/Exchange Online version.

Leave a Reply

Your email address will not be published.

You may use these HTML tags and attributes: <a href="" title=""> <abbr title=""> <acronym title=""> <b> <blockquote cite=""> <cite> <code> <del datetime=""> <em> <i> <q cite=""> <s> <strike> <strong>

*

CodeTwo sp. z o.o. sp. k. is a controller of your personal data.
See our Privacy Policy to learn more.