The Exchange Server 2013 release has brought a handful of innovations into admin’s inventory, among them we can find a new management console called Exchange Admin Center (EAC). It is there to replace its predecessor, Exchange Management Console (EMC), which supported admins in managing Exchange 2010 organizations. Both consoles are pretty distinctive, since EMC is a Microsoft Management Console (MMC) type application, and EAC is a web-based management console which is installed on Client Access Server (CAS) as a virtual directory on IIS. EAC is equipped with Exchange Control Panel (ECP), it is a non-restricted web application, accessible practically from every location in network (LAN, Internet). Anyone who has a valid username and password, may unprecedentedly log on to it. It may pose a great threat when CAS is installed in a perimeter network like DMZ and some hackers using intercepted passwords could be able to log on to ECP from the Internet.
Fortunately, Microsoft gives us a possibility to restrict access to ECP without turning off access to OWA. We can do this by just simply following the documentation from Microsoft and trying the command below:

Set-EcpVirtualDirectory -identity "ecp (Default Web Site)" -AdminEnabled $false
As it can be seen in the screenshot above, if we want the changes to take immediate effect we may execute the “iisreset /noforce” command.
iisreset /noforce
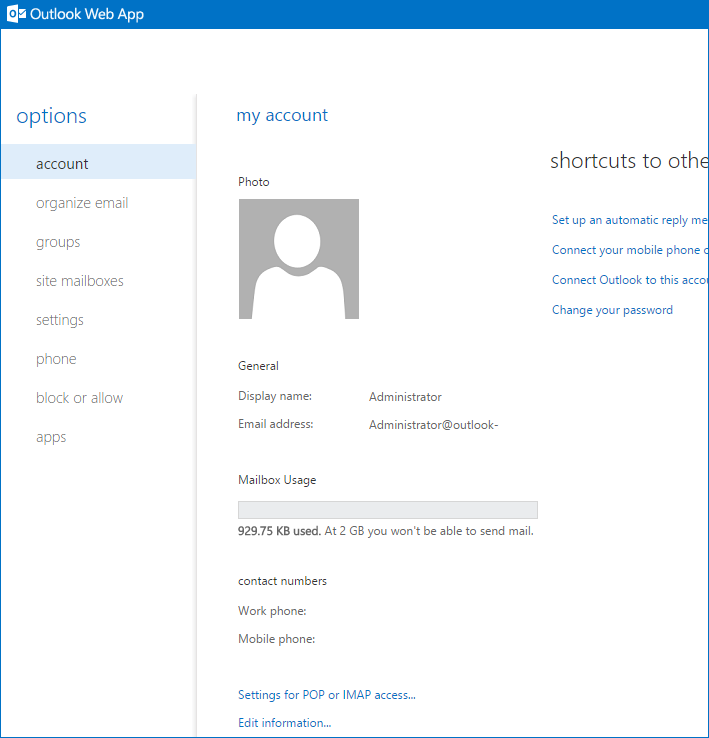
After the implementation of the solution, each attempt to reach ECP page will end with the “404 – page not found” error, or alternatively the request will be redirected to OWA options of administrator account details (see the screen below).
However, this solution has one drawback. Although by the implementation of this feature we successfully restrict access to ECP from the Internet zone, we lose access to ECP from the internal network. In this case Microsoft recommends us to install one more CAS server for internal ECP access only. But in my own and professional IT colleagues’ opinion, much better would be to install a second website with ECP and OWA virtual directories on the internet-faced CAS. This is a less expensive and time-consuming solution.
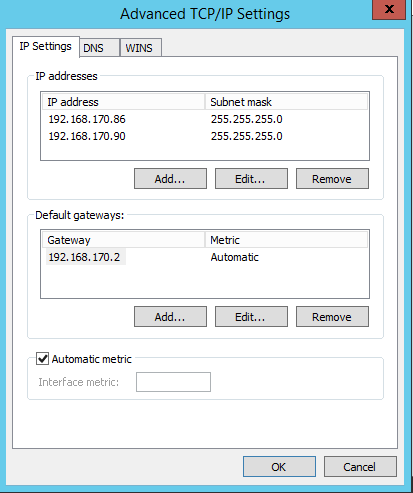
To apply the solution, we need to assign a second IP address to our server where CAS is installed on (most often the only one we have). It can be easily done by configuring a new IP address on the second network adapter installed in a CAS server, or by assigning a second IP address on the existing network interface. The first way is mainly deployed by administrators in case of the security policy compliance reasons, however, the second way is easier in terms of implementation and cheaper. The screen below illustrates the latter solution:
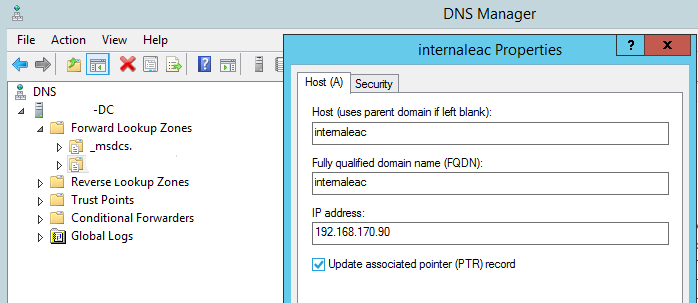
After the IP address arrangement to CAS, we need to create an appropriate record in the DNS zone on the DNS server. The name in this record will be used to reach out to the custom ECP virtual directory. What’s more, this record also needs to point to the IP address configured one step earlier:
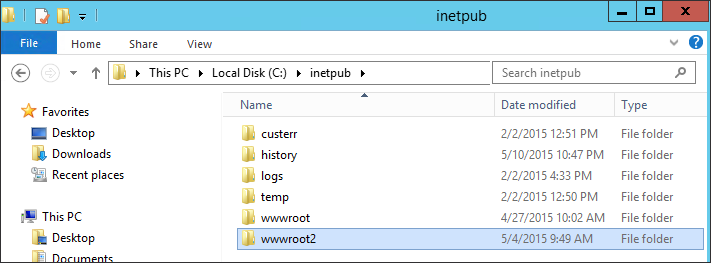
In the next step, we create a folder for the second website, e.g. wwwroot2, under C:\Inetpub folder.
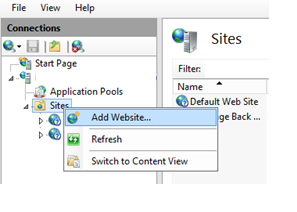
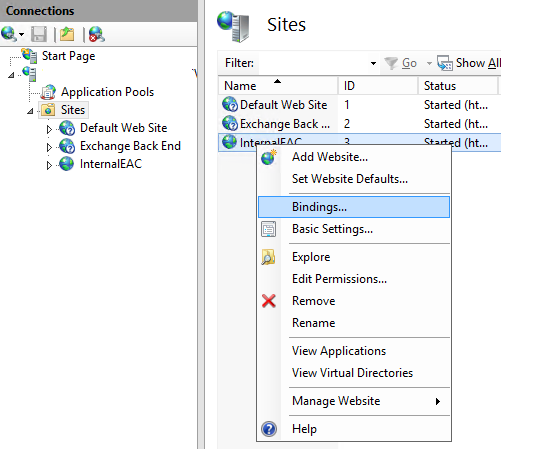
When the folder is created, we have to open the Internet Information Services (IIS) Manager and establish the second website, e.g. “InternalEAC”, pointing to the created folder C:\inetpub\wwwroot2 and bound to TCP/80 (HTTP) and TCP/443 (HTTPS) ports. Screens below present the walkthrough process.
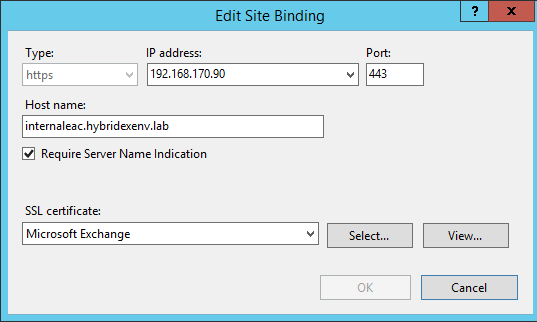
First of all, we have to remember to bind the new website with the new IP address:

In the following step, we need to set up virtual directories for ECP and OWA under the newly created second website. We will approach this by executing the commands below:

New-EcpVirtualDirectory -Server "<ServerIdParameter>"-WebSiteName "InternalEAC" -InternalUrl "<internal url>"
New-OwaVirtualDirectory -Server "<ServerIdParameter>"-WebSiteName "InternalEAC" -InternalUrl "<internal url>"
After this point, we disable access to EAC using the Microsoft solution mentioned earlier. To do this, we simply run the following commands:

Set-EcpVirtualDirectory -identity "ecp <Default Web Site>" -AdminEnabled $false
iisreset /noforce
Finally, there are only two last steps to go. It is restricting access to the IP address bound to our custom website, e.g. for internal users or admin management stations. This will prevent access to our new website from undesired areas like perimeter networks or the Internet area.
The last step is to assign to the custom ECP website a proper certificate for SSL purposes. It can be a third-party certificate (e.g. an existing wildcard certificate assigned already to Default Web Site), a certificate from the internal CA or a self-signed certificate. In case of creating a new certificate, we have to remember about matching the name in a certificate with the name used in the ECP URL.
Suggested reading:

Recommended articles


Thx, but does not work on Exchange Server 2016 CU12. On the new site goes to the mailbox control panel. And “ecp (Default web Site)” – as it should be, error 400.
Are you certain you have configured the new site correctly? Sometimes, patching the server undoes the changes you made on new sites.
In Exchange 2019, there are Client Access Rules which make restricting access to Exchange Admin Center (and Exchange Management Shell) a whole lot easier.
I have the new site setup, but i was looking for the admin ECP for the new site. Those do not seem to be present. Its just the user level ECP. Is it a permissions issue?
That is right, it seems like your account does not have the right permissions to access ECP. You can use the built-in administrator’s account instead or assign admin’s permissions to your account using Active Directory Users and Computers.
I followed these directions, and it is working, however, when users are in OWA now, and click on the gear tab at the top right of the web browser, and then click “Set automatic replies”, they’re presented with another login screen that never lets them login.
Any ideas?
Hi Mark,
I am afraid that setting automatic replies is a part of the ECP and you will not be able to restrict access to a chosen set of ECP functionalities – this is an all-or-nothing kind of solution.
One of the solutions to the problem would be to manage automatic replies centrally, using our free CodeTwo Out of Office Manager.
When I run the command, “Set-EcpVirtualDirectory -identity “ecp ” -AdminEnabled $false”, it’s giving me an error that the object couldn’t be found…. on my domain controller?? I am running the command from my exchange server in the exchange management shell.
The exact error is:
The operation couldn’t be performed because object ‘exchange01.domain.local\ecp ‘ couldn’t be found on
‘dc01.domain.local’.
+ CategoryInfo : NotSpecified: (:) [Set-EcpVirtualDirectory], ManagementObjectNotFoundException
+ FullyQualifiedErrorId : [Server=exchange01,RequestId=b854a48d-f9c5-4b9b-b071-fd61d3781915,TimeStamp=3/26/2018 4:39:17
PM] [FailureCategory=Cmdlet-ManagementObjectNotFoundException] 74A1BB0E,Microsoft.Exchange.Management.SystemConfig
urationTasks.SetEcpVirtualDirectory
+ PSComputerName : exchange01.hopes.local
The first instruction, the syntax is wrong.
WRONG:
Set-EcpVirtualDirectory -identity “ecp ” -AdminEnabled $false
CORRECT:
Set-EcpVirtualDirectory -identity “ecp (Default Web Site)” -AdminEnabled $false
Hi Jeff,
Thank you for noticing the mistake! I have used a wrong bracket type, but I have fixed it, now. I am not sure how the error got there in the first place – I have used the round brackets in my environment.
Dear, the topic is old, but I do not find anything new, I have CU15 and do the procedure, it redicciona to the site of webmail.domain.com
This configuration (second ECP and OWA virtual directories) needs to be done every time after CU installation, so I recommend install new server with AdminEnabled $True
See “Turn off access to the Exchange admin center” here https://technet.microsoft.com/en-us/library/jj218639(v=exchg.160).aspx
I was wondering the same thing as Ashish Sharma. It seems like cumulative updates and service packs undo work like this. I saw at least one of the Exchange 2013 cumulative updates undo our default domain for OWA. This just seems like your asking for headaches and additional complexity when attempting upgrades in the future.
This seems more elegant, has anyone tried this?
http://www.peters.com/exchange-2014-how-to-prevent-exchange-admin-center-access-from-internet-while-still-allowing-outlook-web-access/
Hi Guys,
Since my solution is not an official one, it’s possible that update installs could overwrite it. Of course, it depends on what the updates contain.
I haven’t tested the solution linked by Joe, so I can’t comment on it.
Best regards,
Adam
Thanks for sharing this. I tried and it works with Exchange 2016 also. However, I don’t know What will happen when there is a new service pack or update to Exchange server? Does the new website and it’s directories will be updated automatically?
After following all the instructions, the fact was that, when applying the parameter -AdminEnabled $false, it affected to the InternalECP web site too. I suspect that the second EcpVirtualDirectory inherits this property from the Defaul Web Site, and maybe cannot be configured independently.
Hello Alfredo,
could you please hint what kind of environment with which Cumulative Update to Exchange 2013 are you using?
Best regards,
Adam