


The purpose of Client Access Rules
Managing Client Access Rules is possible only from the Exchange Management Shell level. There is no GUI you can use to manage them. The Client Access Rules feature allows you to block:
- Individual IP addresses, e.g. 192.168.0.1
- Ranges of IP addresses, e.g. 192.168.0.1 – 192.168.0.10
- Subnet IP, e.g. 168.0.0/24
With the use of more advanced rules, you can also block elements like authentication protocols, selected users in Active Directory or users having specified attributes in AD like e.g. Department, Company, etc. (the last option seems to be reserved for Exchange Online, for the moment). To get more information about Client Access Rules, visit this Microsoft document.
The elements of Client Access Rules
A single Client Access Rule consist of the following elements:
- Condition – identifies the client connection to which the rule applies.
- Exception – identifies the client connection to which the rule should not apply.
- Action – defines what actions need to be taken when the client connection meets the condition.
- Priority – defines the order in which rules are executed. Every rule has a priority number assigned. The lower the number, the higher the priority. By default, the oldest rules have the highest priority, so they are processed first.
The cmdlets for Client Access Rules
There are different cmdlets available to manage Client Access Rules. See the list below:
- Get-ClientAccessRule – this cmdlet will return the results showing a list of currently configured rules.
- New-ClientAccessRule –this cmdlet lets you create new rules.
- Set-ClientAccessRule – use this cmdlet to modify existing rules.
- Test-ClientAccessRule – a useful cmdlet that lets you test a rule configuration.
- Remove-ClientAccessRule – use it to remove rules.
How to block access to EAC (ECP)
You can use Client Access Rules to block access to Exchange admin center. In my example below, I want to block access for all users except for one internal network, VLAN 192.168.171.0/24, which is Management. Thanks to that, other subnets within the organization as well as users from outside of the organization will have no access to Exchange admin center. The main purpose of it is to keep organization secure and protected from unauthorized access.
To start, it is a good practice to run the following cmdlet:
New-ClientAccessRule -Name "Always Allow Remote PowerShell" -Action AllowAccess -AnyOfProtocols RemotePowerShell -Priority 1
This command will prevent Exchange Management Shell (EMS) to be cut off in case the administrator makes a mistake during the configuration.
Block access for all users except for one network
In order to block the access to EAC for all user except for the particular network e.g. in my case it is VLAN Management 192.168.171.0/24, run the cmdlet like this:
New-ClientAccessRule -Name "Allow ECP only for VLAN MGMT" -Action DenyAccess -AnyOfProtocols ExchangeAdminCenter -ExceptAnyOfClientIPAddressesOrRanges 192.168.171.0/24 -Priority 2

As a result, only VLAN Management can access EAC. Users from other VLANs\subnets will not be allowed to access EAC.
Check a list of Client Access Rules
To check a list of configured rules, run the following cmdlet:
Get-ClientAccessRule
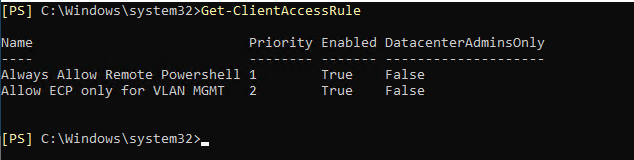
It will return results where you can see details about each rules like name or their priority on the list.
Check if the rule works properly
To test the rule to verify if it works as expected, try to log in to EAC from the network other than, in my case, 192.168.171.0. If the rule works correctly, you should see something similar to:
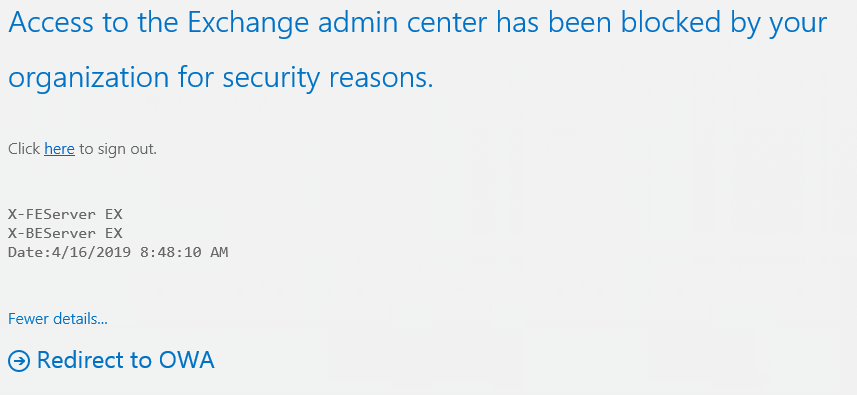
To test the rule, you can also run abovementioned cmdlet Test-ClientAccessRule. This will simulate the connection e.g. from IP address 192.168.169.2 to EAC for the Administrator user:

Of course, this is only an example of how you can use cmdlets to manage a wide range of functionalities offered by Client Access Rules. Let’s now see how to block access to EAC by using different Active Directory attributes.
Block access to EAC depending on user Active Directory attributes
[Important] At the time of writing this article, this method worked flawlessly. However, when recently testing it, it turned out that -UserRecipientFilter is no longer available in Exchange 2019. This Microsoft article seems to confirm this information. The New-ClientAccessRule cmdlet with this filter runs successfully and doesn’t return errors. However, access isn’t blocked afterwards. Running this cmdlet in Exchange Online works without any issues.
Let’s assume that your company security policy requires that only employees of the IT Department can have access to Exchange admin center. To make this case more complex, let’s also assume that the IT Department is located in different parts of the world as well as there are different networks to take into account (LAN, VLAN etc. which is really problematic to write rules based on IP addresses).
To meet the abovementioned requirements, you can create the Client Access Rules based on, for example, the Department attribute in Active Directory. I created two new employees in AD who are members of the IT Department and assigned them with Organizational Management rights.
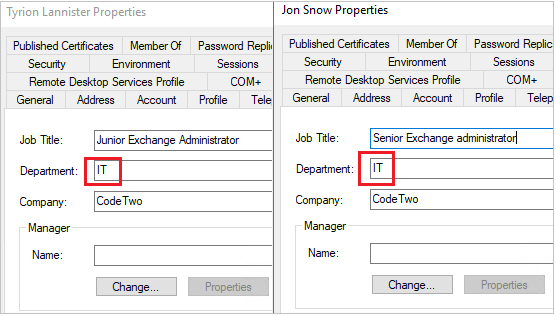
Before I start a new rule configuration, I remove the rule based on the IP subnet by using the following cmdlet:
Remove-ClientAccessRule

Now, I can create a new rule, which will check the value of the Department AD attribute. If the value is different than “IT”, the access will be denied. This is the command:
New-ClientAccessRule -Name "Allow access to ECP only for IT" -Action DenyAccess -AnyOfProtocols ExchangeAdminCenter -UserRecipientFilter {Department -ne "IT"} -Priority 2

Now it is time to test the new rule. I will use a newly created account of Jon Snow to access EAC (Jon is a member of the IT team). For this purpose, I run this cmdlet:

If there are no results returned, it means that no Client Access Rules apply to the user. And this is correct as I configured a blocking rule. Let’s now test what happens when I change the value of the Department attribute to “HR”.
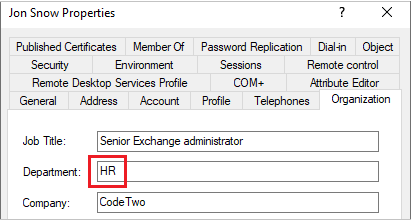
To check the results of the rule, I use the same cmdlet as for the example above:
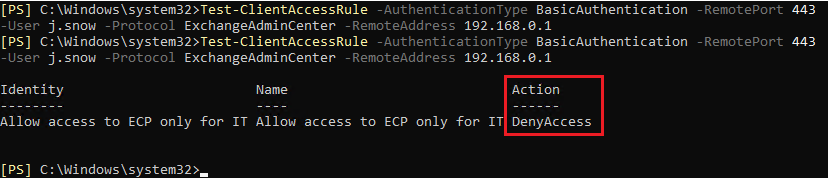
You can see that once I changed the value of the Active Directory attribute, the Client Access Rule works correctly by blocking access to ECP.
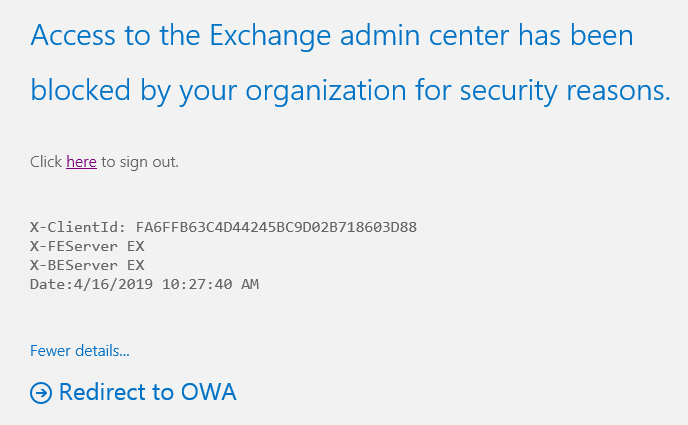
This is what it looks like from the browser (for Jon Snow if he is in the “HR” Department):
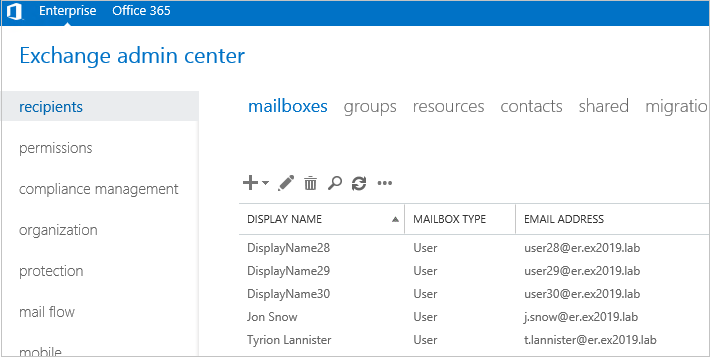
And here is an example for another user, Tyrion Lannister who is from the “IT” Department. As you can see, the user has access to ECP:
Bottom line
Those examples are just a small part of what you can really get from the Client Access Rules functionality in Exchange 2019. The list of scenarios that you can cover by using this feature is almost endless and will definitely help you meet strict security requirements in your Exchange 2019 environment.
See also:

Recommended articles



Hello,
On Exchange 2019, is it possible to block my users’ access from outside via their mobiles (I suppose it is enough to deactivate ActiveSync on each user) but also access to OWA via a web browser at home? The goal being that they only use Exchange 2019 messaging internally
Regards,
Hi,
The approach with deactivating ActiveSync on each user to block their access from outside via mobiles, should do the trick. This can be achieved either via EAC or PowerShell. Regarding OWA: this article explains how to disable Outlook on the web access to mailboxes in Exchange Server.
Nice article but you were using the wrong syntax for “Block access to EAC depending on user Active Directory attributes”
The syntax works this way;
New-ClientAccessRule -Name “Allow access to ECP only for IT” -Action DenyAccess -AnyOfProtocols ExchangeAdminCenter -UserRecipientFilter “Department -ne ‘IT'” -Priority 2
Franklin Guerrero – Exchange Admin
Thanks! I’ve noticed that the wrong type of quotation marks was used in the command, but other than that the syntax should be ok. You can use braces { } as long as the filter doesn’t contain variables. In this case, it doesn’t.
Thanks so much for this post. Super helpful.
I really wish blocking Outlook Anywhere externally would work, but it does not.
-AnyOfProtocols
The AnyOfProtocols parameter specifies a condition for the client access rule that’s based on the client’s protocol.
Valid values for this parameter are:
Note: In Exchange 2019, the only supported values are ExchangeAdminCenter and RemotePowerShell.
https://docs.microsoft.com/en-us/powershell/module/exchange/new-clientaccessrule?view=exchange-ps
Any solution to this would be great as we are looking to block this as well.
You’re right, the rest of the protocols are restricted to Client Access Rules in Exchange Online. Until the feature is upgraded in Exchange 2019, there is no easy way to block this protocol.
Thank you for the information. I would like to know can we check the list of the blocked IP address when it comes to access Exchange.
The cmdlet:
Get-ClientAccessRule | FL Name,Action,AnyOfClientIPAddressesOrRanges,ExceptAnyOfAuthenticationTypesShould return all relevant information.
Hi, Does the parameter UserRecipientFilter work in Exchange 2019:)
Hi,
After testing, it seems that Exchange 2019 does accept the -UserRecipientFilter but such a rule doesn’t really work. I’m sorry for the mixup, I’ll edit the article as soon as I’m able.
Hi, can this the parameter “UserRecipientFilter ” be used in Exchange 2019? From here(https://docs.microsoft.com/en-us/powershell/module/exchange/client-access/New-ClientAccessRule?redirectedfrom=MSDN&view=exchange-ps), i find that this parameter only be used in Exchange Online.
I’m positive I’ve tested it before and it worked in Exchange 2019, as well. I’ve just checked it in a test Exchange 2019 environment and PowerShell does accept the UserRecipientFilter attribute with a proper value. I’ll let you know if it actually works as expected after the Client Access rule kicks in (the first Client Access rule takes up to 24 hours to start working).
Hi, does this also work for Outlook Anywhere? We have Exchange 2013 now but if this can also control Outlook Anywhere, this would be a compelling upgrade.
We deploy active sync to mobile devices using MDM. What we don’t want is an end user with their personal device configuring outlook to download corporate data to an unmanaged system. It’s easy to do and even if activesync and owa are disabled for the account, Outlook anywhere and autodiscover makes it all too easy to setup any outlook to any company email account, provided you know the username and password.
Hi Kjstech,
Yes, Client Access Rules support Outlook Anywhere. The complete list of protocols it can handle is as follows:
• ExchangeActiveSync
• ExchangeAdminCenter
• ExchangeWebServices
• IMAP4
• OfflineAddressBook
• OutlookAnywhere (includes MAPI over HTTP)
• OutlookWebApp (Outlook on the web)
• POP3
• PowerShellWebServices
• RemotePowerShell
• REST
So for the rule to apply to Outlook Anywhere, you would simply need to add
-AnyOfProtocols OutlookAnywherenot specifying the AnyofProtocols attribute would also make the rule apply to Outlook Anywhere (and all the other protocols listed). The problem is that currently, it only works for Exchange Online. Rules on Exchange 2019 allow only Exchange Admin Center and RemotePowerShell protocols.thanks for the excellent story,
I have a question, is it possible to use more than one access rule to have more specific control?
For example, I want access to be restricted to my organization’s IP only but I need IT staff to have external access. I created this two rules but apparently didn´t work
New-ClientAccessRule -Name “Acesso Departamento” -Action AllowAccess -AnyOfProtocols ExchangeAdminCenter -UserRecipientFilter {Department -eq “IT”} -Priority 2
New-ClientAccessRule -Name “Acesso IP” -Action DenyAccess -AnyOfProtocols ExchangeAdminCenter -ExceptAnyOfClientIPAddressesOrRanges -Priority 3
Hi Diego,
It is one of the most basic setups and it should work without problems. One of the first pieces of information shared on the subject of Client Access Rules by Microsoft is that you should start with setting up a safety rule not to lock your admins out. How does this setup work? Anyone can access PowerShell regardless of IP, IT can only connect from a set of IPs?
Another thing to keep in mind is that Client Access Rules need some time to propagate through your tenant.
does this steps also work for Exchange 2013 servers?
Unfortunately, Client Access Rules have been introduced in Exchange 2019, so the steps from this article will not work for the previous Exchange Server releases.