
What does ‘catch all mailbox’ mean?
Catch all (or catch-all) mailbox is a shared mailbox that you can use to receive (or catch) all the incorrectly addressed messages sent to your organization (tenant), which would otherwise be bounced back, producing a Non-Delivery Report (NDR) for a sender.
A catch all mailbox cannot exist on its own. To work properly, it requires you to complete some additional configuration steps such as:
- Create a dynamic distribution group with all the valid mailboxes in your tenant which should be ignored by the catch all mailbox.
- Set your company’s email domain to Internal Relay to make the rule below take precedence over the default Directory-Based Edge Blocking mechanism that rejects messages for invalid recipients.
- Create a transport rule that will redirect all the messages with an invalid addressee to your catch all mailbox.
All these steps will be discussed in detail in the How to set up a catch all email and rule section.
Use cases
As highlighted at the beginning, a catch all mailbox allows you to save the communication with an external sender (possibly a customer), even when they fail to use a correct email address in a message they send to your domain.
A catch all email address can be also of help to the organizations that are legally required to receive absolutely all emails no matter if an actual mailbox exists or not.
Limitations
You cannot use a catch all mailbox in the following environments:
- Hybrid environments
- Environments where Exchange Online coexists with a third-party email system
- Environments with the old Small Business plans (no support for transport rules)
Warning
A catch-all mailbox can be useful. But it doesn’t necessarily mean that all companies should drop everything and start setting them up if they haven’t done that already. Think about it for a second.
Some of your shared mailboxes receive more spam than the others or than user mailboxes, right? That’s usually because they use a common name, like ‘contact@<yourdomain>.com,’ or ‘help@<yourdomain>.com.’ Those mailboxes are much more likely to suffer from an ongoing onslaught of spam, phishing attempts and so on. A catch-all mailbox is like a utopia for threat actors. And a bit of a dystopia for yourself. The mailbox opens up your organization for attacks even when mailing is sent to ‘yougottabekiddingme@<yourdomain>.com’ or ‘asiufhasdpifuhsadf@<yourdomain>.com.’ In other words:
- Your catch-all mailbox will probably be full of spam (some of it being potentially dangerous).
- Those who manage the mailbox need to have high security awareness.
- In most cases, sieving through the mailbox’s content will be a chore that yields little gains.
In the end, you (or, more likely, the management) need to take a close look at pros and cons. Put it into your company’s context.
How to set up a catch all email and rule?
This section shows how to configure a catch all mailbox, step by step. For a successful configuration, you need to complete the steps in all the subsections below (unless stated otherwise). Keep in mind that all the procedures should be completed in the Exchange admin center only.
Create a shared mailbox
First, create a new shared mailbox and assign permissions to it for chosen user(s). They will be responsible for checking the mailbox and forwarding emails to relevant people in your organization (or responding). It’s also reasonable to start with the shared mailbox configuration, because permissions’ propagation can take even up to 24 hours (usually 2 hours).
Tip: You can use an existing shared mailbox instead of creating a new one. If permissions to that mailbox are already granted to the relevant users, you can skip this section altogether.
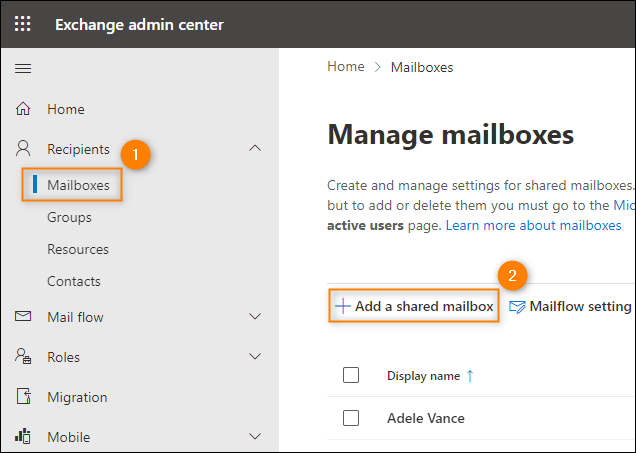
- Log in to the Exchange admin center.
- Go to Recipients > Mailboxes and click Add a shared mailbox.
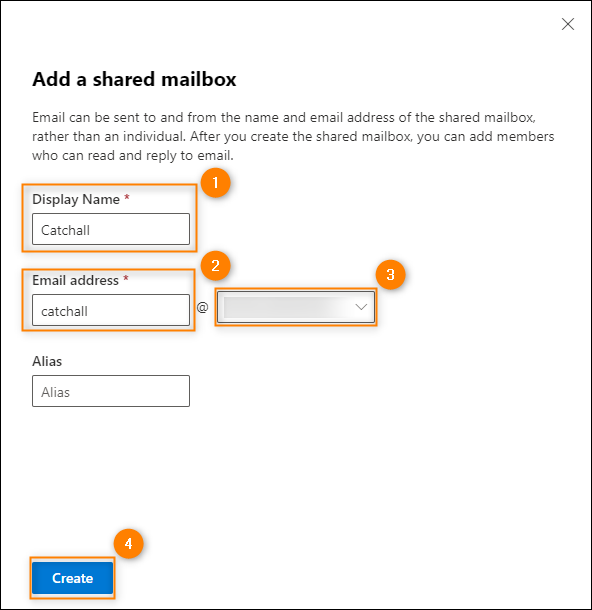
- In the pane that opens, define the mailbox’s Display Name, address, choose your organization’s main domain from the dropdown menu, and click Create. In this example, I’ll call it simply Catchall and use [email protected] as the email address.
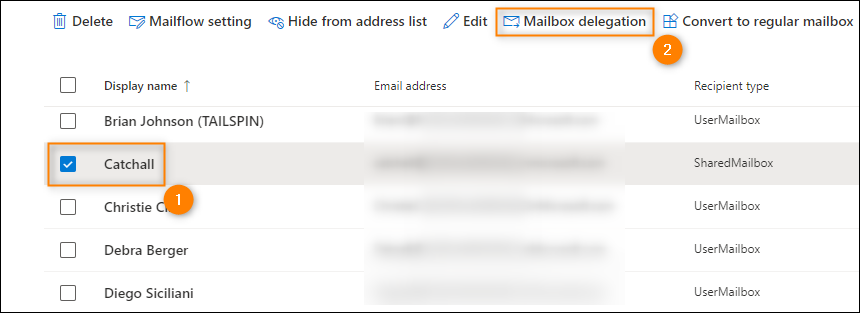
- Close the wizard, locate the newly created mailbox on the list and choose Mailbox delegation.
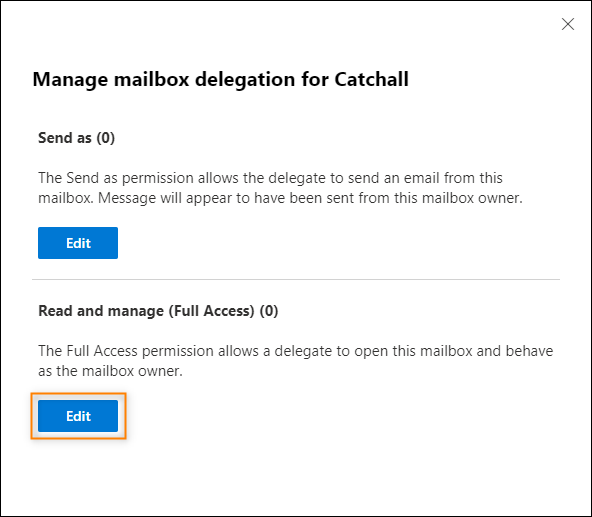
- Click Edit in the Read and manage (Full Access) section and choose user(s) that will manage the catch all mailbox correspondence in your organization.
- Close the pane and proceed to the next section.
Create a dynamic distribution group
Now, let’s create a dynamic distribution group (DDG) covering all the valid mailboxes in your tenant. Since the group is dynamic, it’ll be automatically updated if user(s) join or leave your organization in the future.
The group will be used as an exception in the catch all mailbox’s transport rule (you’ll create later on) to prevent all the correctly addressed emails from being processed by the rule and, consequently, forwarded to your catch all mailbox.
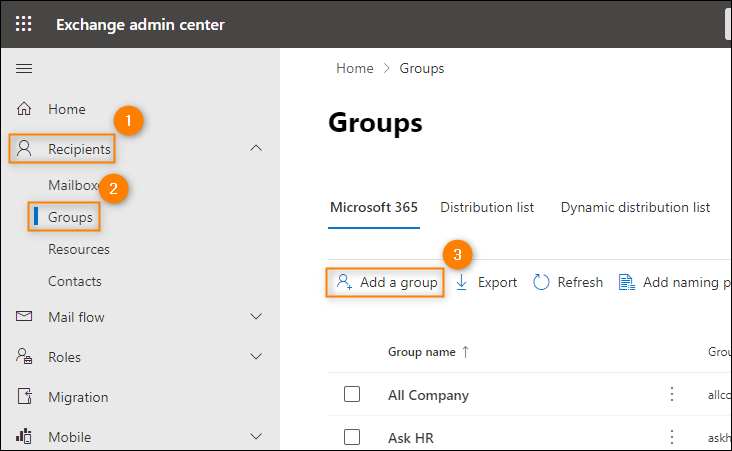
- In the left-hand navigation menu, go to Recipients > Groups and click Add a group on any tab you want.
- Choose Dynamic distribution as the Group type.
- Name your group the way you want – I’ll call it simply All users.
- To add all the valid mailboxes in your organization, leave the default option (All recipient types) selected in the Users step.

- In the Settings step, specify the group’s email address, e.g. [email protected].
- In the final step, click Create group and next Close to finish the setup.
Note that it might take up to 2 hours before your group becomes fully functional.
However, there’s a catch with dynamic distribution groups: according to the information from Microsoft, the membership information for each dynamic distribution group in Exchange Online is updated every 24 hours. It means that when you, for example, add a new user to your organization, emails sent to them might not reach their mailbox but be redirected to a catch all mailbox for up to 24 hours.
That’s why, especially if the provisioning of new users in your organization is quick or you often add/remove mailboxes, it might be a good idea to also create a static distribution group (to be manually and instantly updated with a ‘freshly-added’ user by you) and add it as another exception to the Catch all mailbox transport rule later on.
Once 24 hours have elapsed and the user automatically becomes a member of your dynamic distribution group, you can remove them from the static group or leave them untouched if you want.
Refer to the section below to learn how to create an optional static distribution group or skip directly to the next step: Set your company’s email domain to internal relay.
(Optional) Create a static distribution group
- Launch the group creation wizard in the similar way as for the dynamic distribution group.
- Choose Distribution as the Group type.
- Name your group the way you want – I’ll call it simply New users.
- In the next step, assign yourself (or a person responsible for managing the group) as the owner.
- You can skip the Members step for now – you’ll start adding new members the next time you add a new Microsoft 365 user to your organization.
- Now, configure the settings:
- Define group’s email address.
- Decide how users can join/leave the group – since you’ll manage users on your own, you can choose Closed in both cases to avoid users’ accidentally joining the group.
- Leave other settings as default.
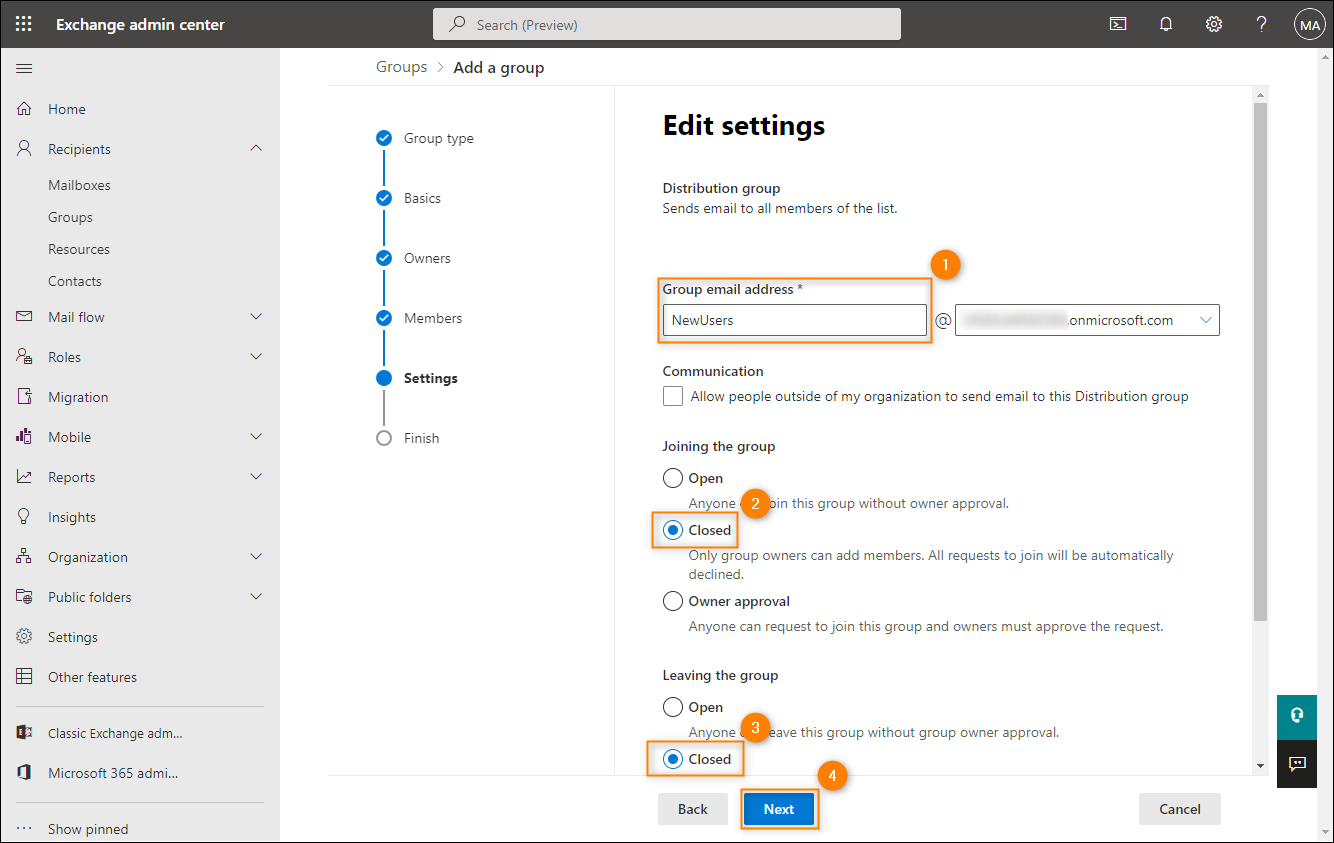
- Finally, click the Create group button and wait for the group to be created.
Note that it might take up to 1 hour before your group becomes fully functional. Now, when you add a new user to your organization in the future, remember to add that user to this static distribution group as well to avoid unnecessary email redirection to the catch all mailbox, until the user automatically becomes a member of the previously created dynamic distribution group (up to 24 hours).
Set your company’s email domain to internal relay
Setting your domain to internal relay (or non-authoritative relay) will allow you to relay misaddressed messages, e.g., with the use of a transport rule, to your catch all mailbox. Otherwise, with the authoritative domain setup, such emails are blocked and generate a Non-Delivery Report (which is the default behavior in Exchange Online).
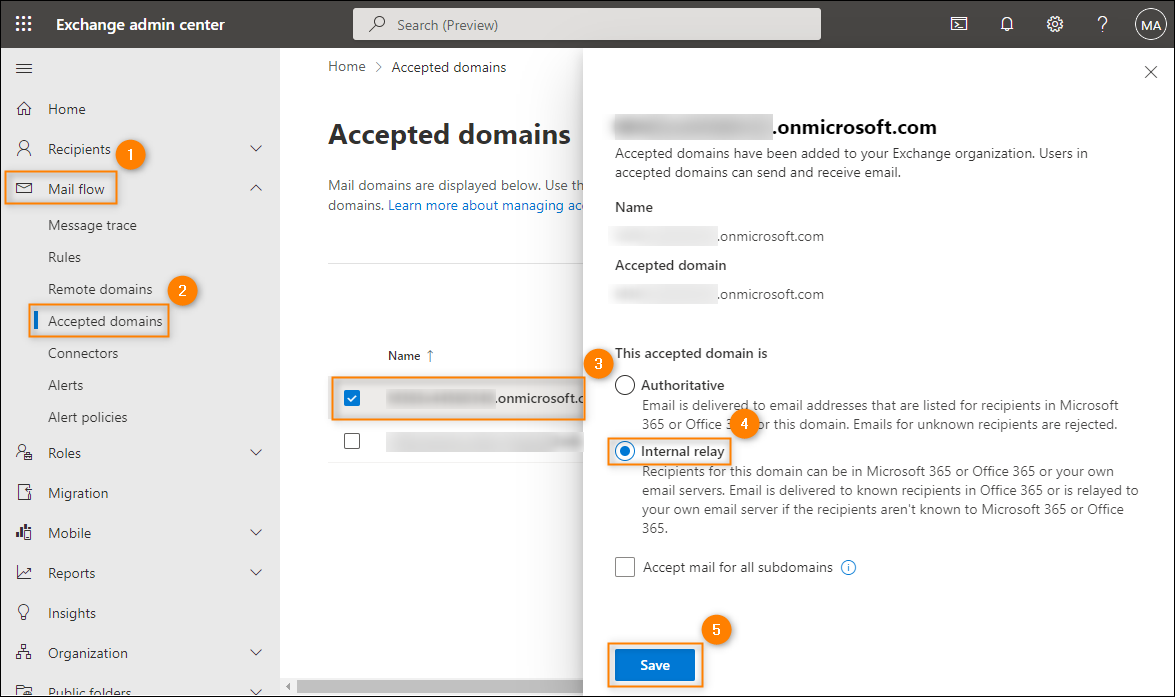
- In the left-hand navigation menu, go to Mail flow > Accepted domains, and choose your organization’s email domain. In most cases, it’ll be you default company domain.
- In the pane that opens, select Internal relay and click Save.
Create a transport rule
Finally, you need to create the transport rule that will use the previously configured items as conditions and, once saved, make the catch all mailbox fully operational.
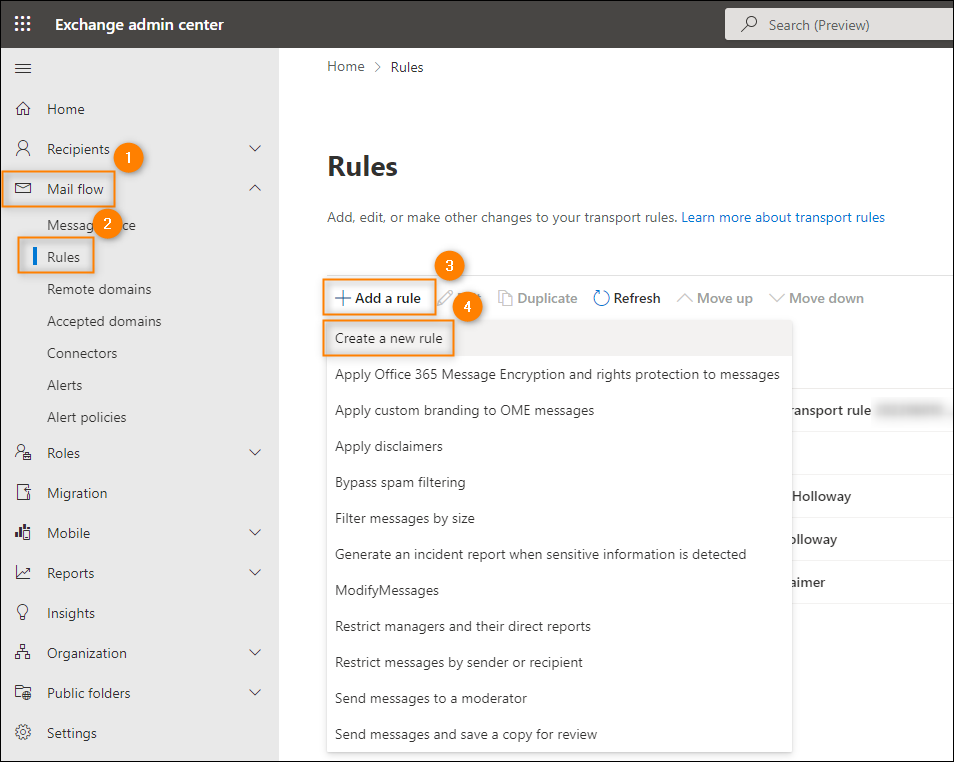
- In the left-hand navigation menu, go to Mail flow > Rules. Click the Add a rule button and choose Create a new rule.
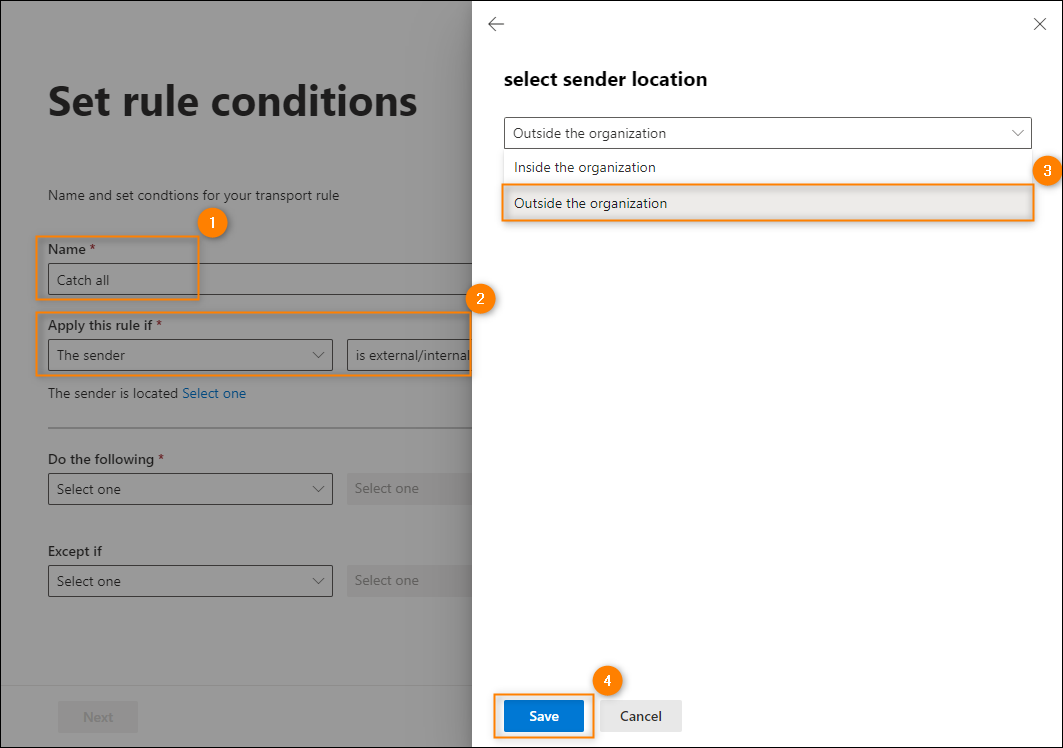
- First, name you rule whatever you want – the ‘Catch all’ phrase allows an easy identification.
- Next, in the Apply this rule if section, choose The sender > is external/internal. In the pane that opens, choose Outside the organization from the drop-down list and confirm by clicking Save.
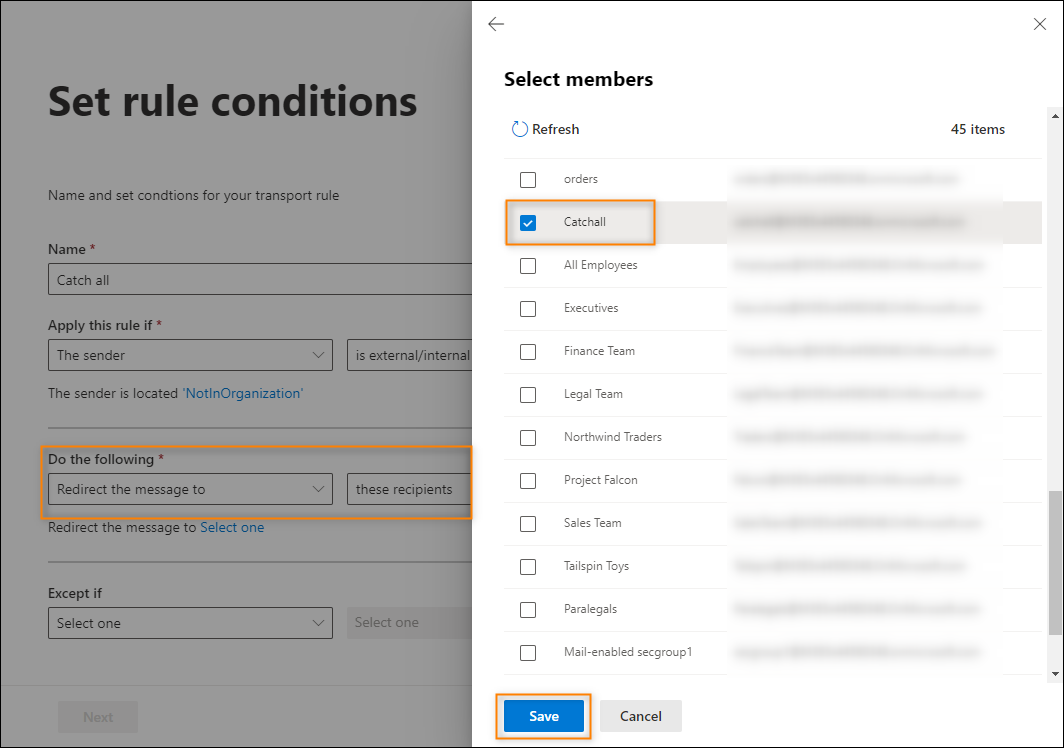
- Next, under the Do the following section, select Redirect the message to > these recipients. In the pane that opens, select the catch all mailbox you created before from the list and click Save.
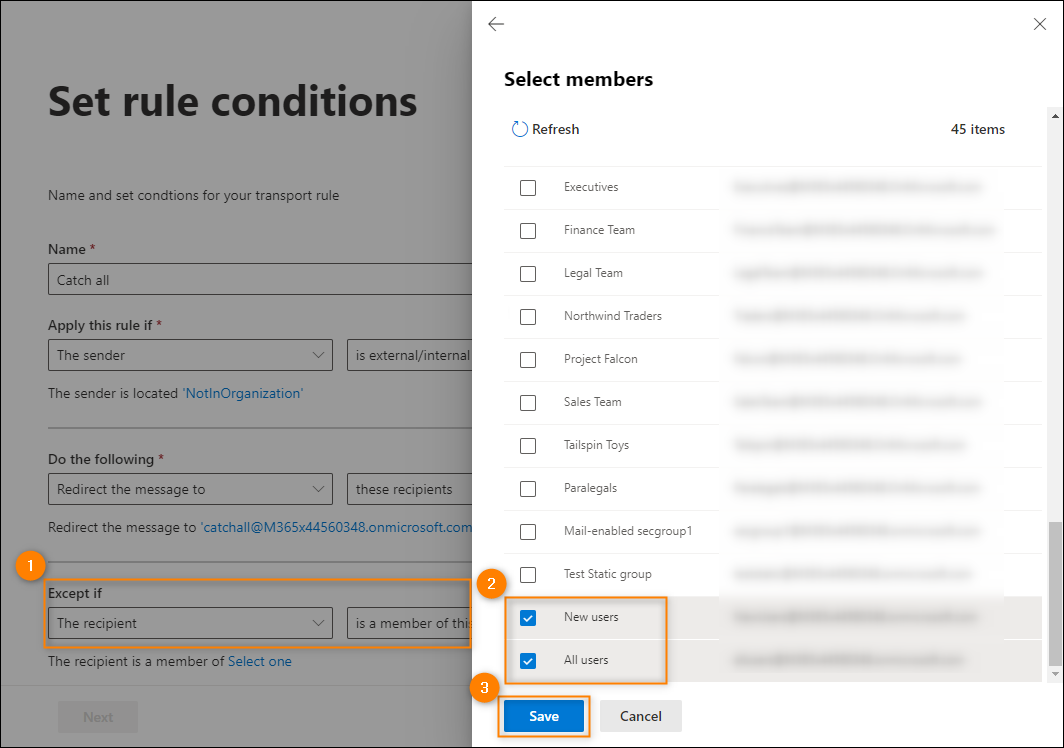
- Now, under the Except if section, select The recipient > is a member of this group. In the pane that opens, select the dynamic distribution group and (if you want to speed up user provisioning) the static distribution group you created before from the list, and click Save.
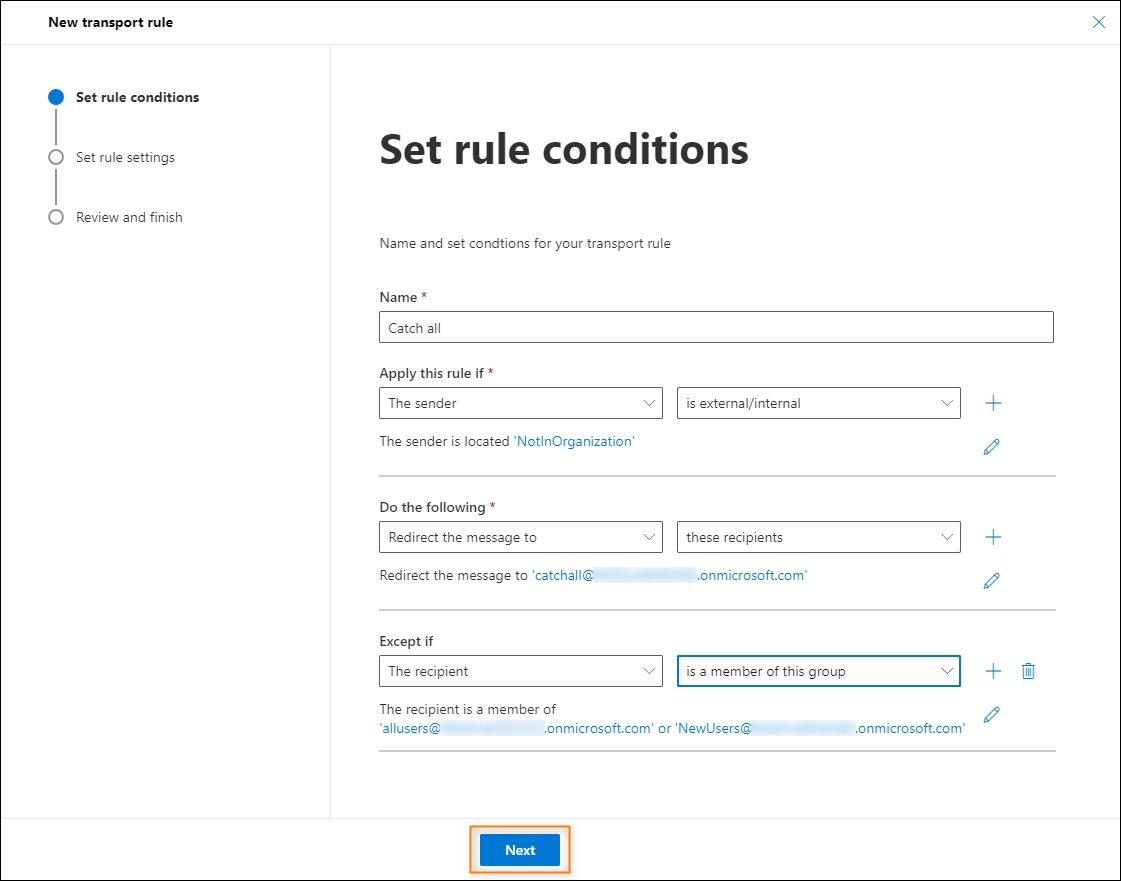
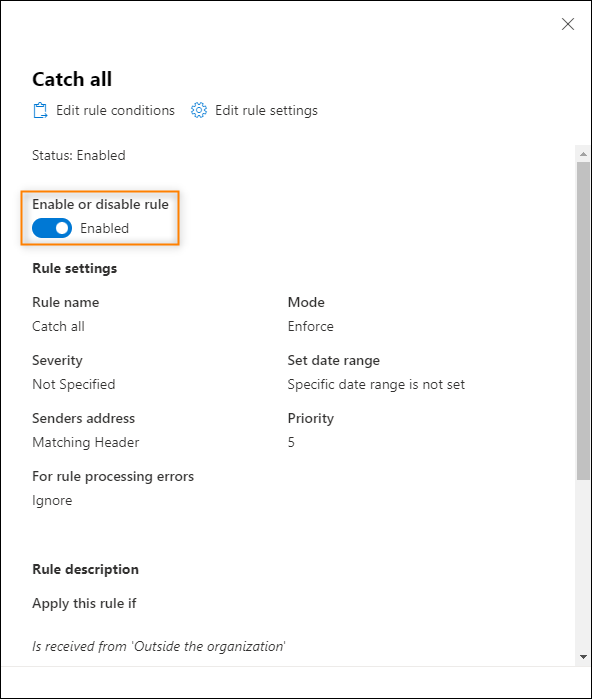
- Review your rule – it should look similar to the one shown below. If the settings look OK, click Next to go to the next step of the rule creation wizard.
- In the Set rule settings step, leave all the default settings as they are and proceed to the final step by clicking Next.
- The final step (Review and finish) lets you check your settings once again. If you’re OK with them, click Finish > Done to create your catch all transport rule and make it appear on the rules’ list.
- Note that each newly created rule is disabled by default. To make use of the catch all mailbox, remember to enable your rule by clicking it on the list and setting the toggle switch to Enabled, as shown below.
Now that everything’s ready, do some testing by sending a few emails from an external mailbox to a non-existing email address in your organization’s domain. All the messages should be relayed to the catch all mailbox, so you should be able to see them when you access it.
You can also test if the created groups work as intended:
- For the dynamic distribution group, create a new mailbox, wait for about 24 hours, and send a few emails from an external email address to see if they reach the newly created mailbox (correct behavior) or are redirected to the catch all mailbox (incorrect behavior). If you experience the incorrect behavior, wait some more time for the changes to propagate.
- For the static distribution group, do the similar testing, remembering to manually add a freshly created user (mailbox) first. This time you won’t have to wait.
Will a catch all email work with third party solutions in Exchange Online?
In most cases, the catch all mailbox should not interfere with any third-party solutions like a smart host or signature adding software that process your emails in transit in Exchange Online.
If, however, you experience any problems (e.g., emails get blocked), you need to modify the configuration by completing these two general steps:
- In the rules list (Mail flow > Rules), move your third-party solution’s rule above the catch all mailbox’s rule. You can use the arrows just above the list (see below) or set the priority in each rule’s configuration window.
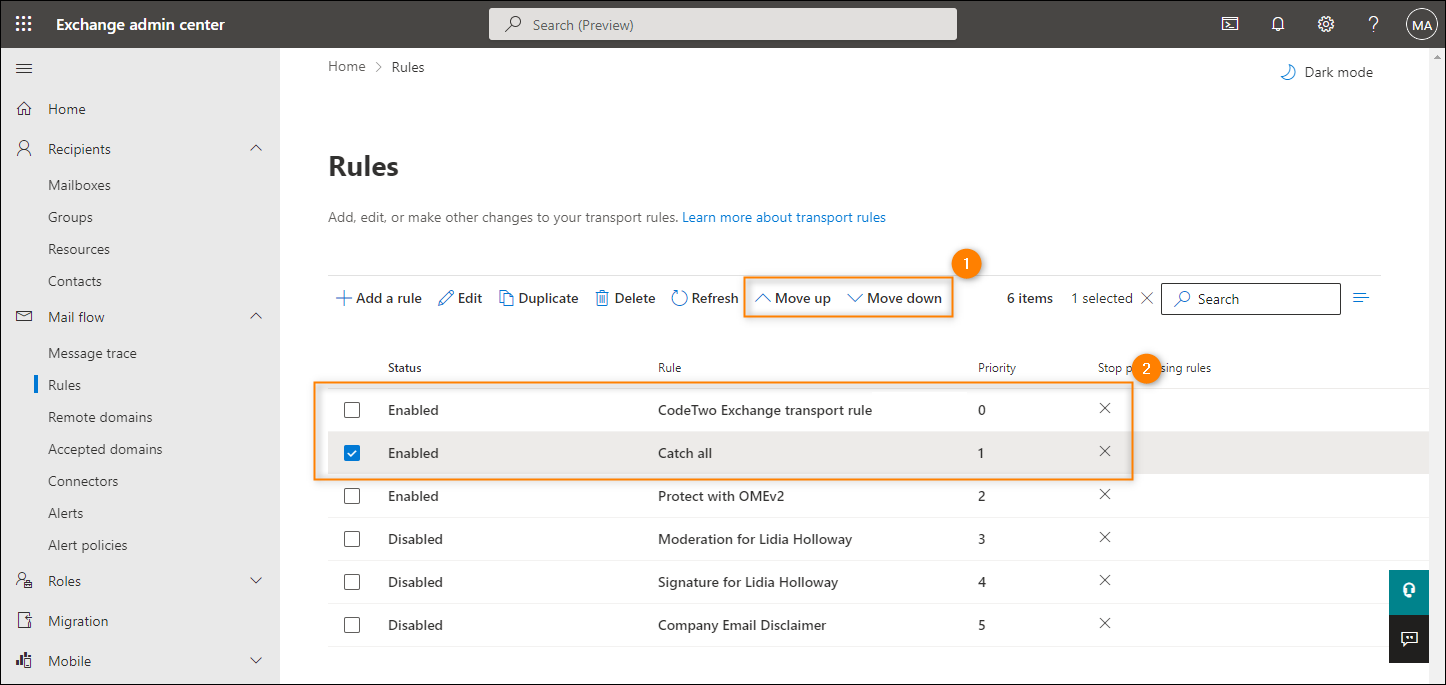
- Next, add the exception for your third-party solution to the catch all mailbox’s rule by using the add exception button and choosing an appropriate condition. You can, for example, ‘whitelist’ your third-party solution based on:
- Fully Qualified Domain Name
- IP address
- Specific header
- Keywords in Subject or Body
- Etc.
For sample instructions on how to add an exception to a transport rule, see this article in our Knowledge Base.
Recommended articles


Thank you so much for that very helpful article!
This is a really great article. I find myself in the odd position of needing to migrate a domain owned by the deceased husband of my girlfriend. One of the challenges is that he previously used mediatemple for email and had a number of oddball IMAP mailboxes.
This solution will help me track them down.
I saw your comments regarding external forwarding and wanted to say that I agree with your thoughts on external forwarding. That said, as you acknowledged there are technical reasons why it might be good in some cases.
I was just going to toss out the ‘best practice’ for managing external forwarding. That is, in the security admin center locate the default outbound spam filter and make sure it is configured to explicitly disable external forwarding. Per MS blogs this is the only reliable way of actually blocking all forms of external forwarding.
Then create a secondary outbound spam filter and explicitly add any senders that you want to allow.
I work in an MSP-like role and use this practice to manage sending 365 alerts from client tenants to my company’s mail/ticketing system.
Hi Shawn,
Thanks for providing your ’best practice’ for managing external forwarding. I’m sure the readers will find it useful.
DLP policies and DLP-related conditions and actions in Mail flow rules are no longer supported and can no longer be created or edited in the Exchange Admin Center (EAC) or using Exchange Online PowerShell. We recommend migrating all DLP-related rules to Microsoft Purview DLP in the compliance center as soon as possible. Once you have migrated these rules please delete them here in the EAC or via PowerShell. Learn more: Migrate DLP policies | No DLP-conditions or actions
That’s right, DLP policies are no longer supported in EAC. Fortunately, setting up catch-all mailboxes isn’t affected by this. If you have any questions about setting up DLP policies, ask away.
Hi Adam,
weird, I never got an email notifying me that you replied.
I don’t understand how it would not work the way I suggested, logically it seems it should work. Or are you saying that it should would, but in practice it does not work despite the logic?
I want to avoid the complexity of using a DDL is at all possible.
Thanks,
Daniel
Hi Daniel,
Logically, it does make sense. However, in practice it just doesn’t seem to work. My bet is that when you switch to Internal Relay, the definition of “internal recipients” changes.
A few questions:
1) How does this rule get applied to messages sent from an internal address as this is not defined in the rule?
2) Why use a Distribution List, static, or dynamic? Couldn’t you just set the exception to external/internal with the sender location as internal? According to Copilot (GPT4), this should work just fine without the 24hr delay adding users to the DDL and without the inconvenience of maintaining a static distribution list. Email will still be delivered to all mailboxes including sharedmailboxes, distribution lists and group email accounts. Or am I and Copilot missing something?
Hi,
When it comes to the conditions – in this scenario, I’m applying the rule only to external emails. Intra-organizational misspellings are less common and usually don’t have that much of an impact. You can cover internal senders by adding a second rule or by changing the condition to “The recipient domain is” followed by your domain.
Regarding “recipient is internal” exception – based on my tests, it doesn’t work with Catchall mailbox and returns an NDR instead. DDL and optional SDL are still your best bet.
Cheers!
Hi – thanks for a v useful technique, but a FYI.
It seems this approach blocks email auto forwarding to external email accounts at both the server/admin and user level. The Catch All rule will intercept the forward and send it to the catch all.
I can’t figure out why Exchange is doing this.
So it seems if you want to allow auto forwarding emails, you can’t setup a catch all.
Hi Syd,
I’m sure there are valid business or technical reasons for auto forwarding emails outside your organization. However, in most scenarios it’s bordering on outright sneaky, if not worse.
You could fine-tune rule conditions and exceptions to allow your auto-forwarding scenario. But remember that the audit log sees everything.
BTW, couldn’t resist the opportunity: to learn more about auto-forwarding in M365, take a look at this piece.
this process is not working anymore
Office 365 Message Encryption will be retired in July 2023 and replaced by Microsoft Purview Message Encryption. Starting May 2023, all existing rules that use Office 365 Message Encryption will automatically start using Microsoft Purview Message Encryption. Learn More
Hi Alexander,
I’ve conducted several tests on my side and my catch all mailboxes are working without any issues. The message you are citing (displayed in the Exchange admin center) pertains to the Message Encryption functionality which doesn’t have an impact on catch all mailboxes.
Super helpful thanks
Does it (support for transport rules) work with a “Microsoft 365 Business Standard” License or not? If not, which License is needed and what would be an alternative to: Microsoft 365 Business Standard? E3 or F3?
Best regards,
AlexPhBit
Hi Alex,
According to Microsoft’s documentation, you should be able to use mail flow / transport rules with any Microsoft 365 Business plan that’s currently on the market. For more details, refer to the table you can find here.
Nice article but there’s unfortunately a new problem:
Due to changes at Microsoft, updates to the dynamic distribution list (DDL) now only happen once a day instead of immediately. You can force updates through a PowerShell command but you can only do this once per hour. So when you add a user or contact, it won’t get email until the DDL is updated.
The fix is to create a static distribution list of new email addresses for contacts or new mailboxes, and change the catchall EXCEPTION rule so that the email address in question is on the DDL -OR- on the static list.
NOW the rule again works immediately on all added addresses to the domain. And you don’t need to “clean-up” the static list after DDL propagation unless the email address is “retired.”
Hi Paul,
Thanks for sharing this knowledge! I’ll look into that and update the article.